
AndroidJUnitRunner 클래스는 Espresso, UI Automator, Compose 테스트 프레임워크를 사용하는 것을 비롯하여 Android 기기에서 계측된 JUnit 4 테스트를 실행할 수 있는 JUnit 테스트 실행기입니다.
테스트 실행기는 테스트 패키지와 테스트 대상 앱을 기기에 로드하여 테스트를 실행하고 테스트 결과를 보고하는 역할을 합니다.
이 테스트 실행기는 다음을 포함하여 몇 가지 일반적인 테스트 작업을 지원합니다.
JUnit 테스트 작성
다음 코드 스니펫은 ChangeTextBehavior 클래스의 changeText 작업이 올바르게 작동하는지 검증하기 위해 계측 JUnit 4 테스트를 작성하는 방법을 보여줍니다.
Kotlin
@RunWith(AndroidJUnit4::class)
@LargeTest // Optional runner annotation
class ChangeTextBehaviorTest {
 val stringToBeTyped = "Espresso"
 // ActivityTestRule accesses context through the runner
 @get:Rule
 val activityRule = ActivityTestRule(MainActivity::class.java)

 @Test fun changeText_sameActivity() {
 // Type text and then press the button.
 onView(withId(R.id.editTextUserInput))
 .perform(typeText(stringToBeTyped), closeSoftKeyboard())
 onView(withId(R.id.changeTextBt)).perform(click())

 // Check that the text was changed.
 onView(withId(R.id.textToBeChanged))
 .check(matches(withText(stringToBeTyped)))
 }
}
자바
@RunWith(AndroidJUnit4.class)
@LargeTest // Optional runner annotation
public class ChangeTextBehaviorTest {

    private static final String stringToBeTyped = "Espresso";

    @Rule
    public ActivityTestRule<MainActivity>; activityRule =
            new ActivityTestRule<>;(MainActivity.class);

    @Test
    public void changeText_sameActivity() {
        // Type text and then press the button.
        onView(withId(R.id.editTextUserInput))
                .perform(typeText(stringToBeTyped), closeSoftKeyboard());
        onView(withId(R.id.changeTextBt)).perform(click());

        // Check that the text was changed.
        onView(withId(R.id.textToBeChanged))
                .check(matches(withText(stringToBeTyped)));
    }
}
애플리케이션 컨텍스트에 액세스
AndroidJUnitRunner를 사용하여 테스트를 실행할 때 정적 ApplicationProvider.getApplicationContext() 메서드를 호출하여 테스트 중인 앱의 컨텍스트에 액세스할 수 있습니다. 앱에서 Application의 맞춤 서브클래스를 만든 경우 이 메서드는 맞춤 서브클래스의 컨텍스트를 반환합니다.
도구 구현자는 InstrumentationRegistry 클래스를 사용하여 하위 수준 테스트 API에 액세스할 수 있습니다. 이 클래스에는 Instrumentation 객체, 타겟 앱 Context 객체, 테스트 앱 Context 객체 및 테스트에 전달되는 명령줄 인수가 포함되어 있습니다.
테스트 필터링
JUnit 4.x 테스트에서는 주석을 사용하여 테스트 실행을 구성할 수 있습니다. 이 기능 덕분에 테스트에서 상용구 코드와 조건 코드를 추가할 필요성이 최소화됩니다. JUnit 4에서 지원되는 표준 주석 외에도, 이 테스트 실행기는 다음을 포함한 Android 고유의 주석도 지원합니다.
@RequiresDevice: 에뮬레이터가 아니라 실제 기기에서만 테스트를 실행해야 한다고 지정합니다.@SdkSuppress: 지정된 수준보다 낮은 Android API 수준에서는 테스트가 실행되지 않도록 억제합니다. 예를 들어 23보다 낮은 모든 API 수준에서 테스트 실행을 억제하려면 주석@SDKSuppress(minSdkVersion=23)을 사용하세요.@SmallTest,@MediumTest,@LargeTest: 테스트를 실행하는 데 걸리는 시간과 테스트를 실행할 수 있는 빈도를 분류합니다. 이 주석을 사용하여android.testInstrumentationRunnerArguments.size속성을 설정하여 실행할 테스트를 필터링할 수 있습니다.
-Pandroid.testInstrumentationRunnerArguments.size=small
테스트 샤딩
테스트 실행을 병렬화하여 여러 서버에 공유하여 더 빠르게 실행해야 하는 경우 테스트를 그룹 또는 샤드로 분할할 수 있습니다. 테스트 실행기는 단일 테스트 모음을 여러 샤드로 분할하는 기능을 지원하므로 같은 샤드에 속하는 테스트를 그룹으로 묶어 손쉽게 실행할 수 있습니다. 각각의 분할 부분은 인덱스 번호로 식별됩니다. 테스트를 실행할 때 만들 개별 샤드의 개수를 지정하려면 -e numShards 옵션을 사용하고 실행할 샤드를 지정하려면 -e shardIndex 옵션을 사용하세요.
예를 들어 테스트 모음을 10개의 샤드로 분할하고 두 번째 샤드에 그룹화된 테스트만 실행하려면 다음 adb 명령어를 사용하세요.
adb shell am instrument -w -e numShards 10 -e shardIndex 2
Android Test Orchestrator 사용
Android Test Orchestrator를 사용하면 앱의 자체 Instrumentation 호출 내에서 각 앱의 테스트를 실행할 수 있습니다. AndroidJUnitRunner 버전 1.0 이상을 사용하는 경우 Android Test Orchestrator에 액세스할 수 있습니다.
Android Test Orchestrator는 테스트 환경에 다음과 같은 이점을 제공합니다.
- 최소 공유 상태: 각 테스트가 자체
Instrumentation인스턴스에서 실행됩니다. 따라서 테스트가 앱 상태를 공유하는 경우 각 테스트 후 이러한 공유 상태 대부분이 기기의 CPU 또는 메모리에서 삭제됩니다. 각 테스트 후 모든 공유 상태를 기기의 CPU와 메모리에서 삭제하려면clearPackageData플래그를 사용하세요. 예는 Gradle에서 사용 설정 섹션을 참고하세요. - 비정상 종료가 격리됨: 테스트 하나가 비정상 종료되더라도 자체
Instrumentation인스턴스만 중단됩니다. 즉, 모음의 다른 테스트는 계속 실행되어 완전한 테스트 결과를 제공합니다.
이러한 격리로 인해 Android 테스트 조정자가 각 테스트 후에 애플리케이션을 다시 시작하기 때문에 테스트 실행 시간이 늘어날 수 있습니다.
Android 스튜디오와 Firebase Test Lab 모두에는 Android Test Orchestrator가 사전 설치되어 있지만 Android 스튜디오에서는 이 기능을 사용 설정해야 합니다.
Gradle에서 사용 설정
Gradle 명령줄 도구를 사용하여 Android Test Orchestrator를 사용 설정하려면 다음 단계를 완료하세요.
- 1단계: gradle 파일을 수정합니다. 프로젝트의
build.gradle파일에 다음 구문을 추가합니다.
android {
 defaultConfig {
  ...
  testInstrumentationRunner "androidx.test.runner.AndroidJUnitRunner"

  // The following argument makes the Android Test Orchestrator run its
  // "pm clear" command after each test invocation. This command ensures
  // that the app's state is completely cleared between tests.
  testInstrumentationRunnerArguments clearPackageData: 'true'
 }

 testOptions {
  execution 'ANDROIDX_TEST_ORCHESTRATOR'
 }
}

dependencies {
 androidTestImplementation 'androidx.test:runner:1.1.0'
 androidTestUtil 'androidx.test:orchestrator:1.1.0'
}
- 2단계: 다음 명령어를 실행하여 Android Test Orchestrator를 실행합니다.
./gradlew connectedCheck
Android 스튜디오에서 사용 설정
Android 스튜디오에서 Android Test Orchestrator를 사용 설정하려면 Gradle에서 사용 설정에 나온 구문을 앱의 build.gradle 파일에 추가합니다.
명령줄에서 사용 설정
명령줄에서 Android Test Orchestrator를 사용하려면 터미널 창에서 다음 명령어를 실행하세요.
DEVICE_API_LEVEL=$(adb shell getprop ro.build.version.sdk)

FORCE_QUERYABLE_OPTION=""
if [[ $DEVICE_API_LEVEL -ge 30 ]]; then
   FORCE_QUERYABLE_OPTION="--force-queryable"
fi

# uninstall old versions
adb uninstall androidx.test.services
adb uninstall androidx.test.orchestrator

# Install the test orchestrator.
adb install $FORCE_QUERYABLE_OPTION -r path/to/m2repository/androidx/test/orchestrator/1.4.2/orchestrator-1.4.2.apk

# Install test services.
adb install $FORCE_QUERYABLE_OPTION -r path/to/m2repository/androidx/test/services/test-services/1.4.2/test-services-1.4.2.apk

# Replace "com.example.test" with the name of the package containing your tests.
# Add "-e clearPackageData true" to clear your app's data in between runs.
adb shell 'CLASSPATH=$(pm path androidx.test.services) app_process / \
 androidx.test.services.shellexecutor.ShellMain am instrument -w -e \
 targetInstrumentation com.example.test/androidx.test.runner.AndroidJUnitRunner \
 androidx.test.orchestrator/.AndroidTestOrchestrator'
명령어 구문에 표시된 대로 Android Test Orchestrator를 설치한 다음 바로 사용합니다.
adb shell pm list instrumentation
다른 도구 모음 사용
다른 도구 모음을 사용하여 앱을 테스트하는 경우 다음 단계를 완료하여 Android Test Orchestrator를 계속 사용할 수 있습니다.
아키텍처
Orchestrator 서비스 APK는 테스트 APK 및 테스트 중인 앱의 APK와 별도의 프로세스에 저장됩니다.
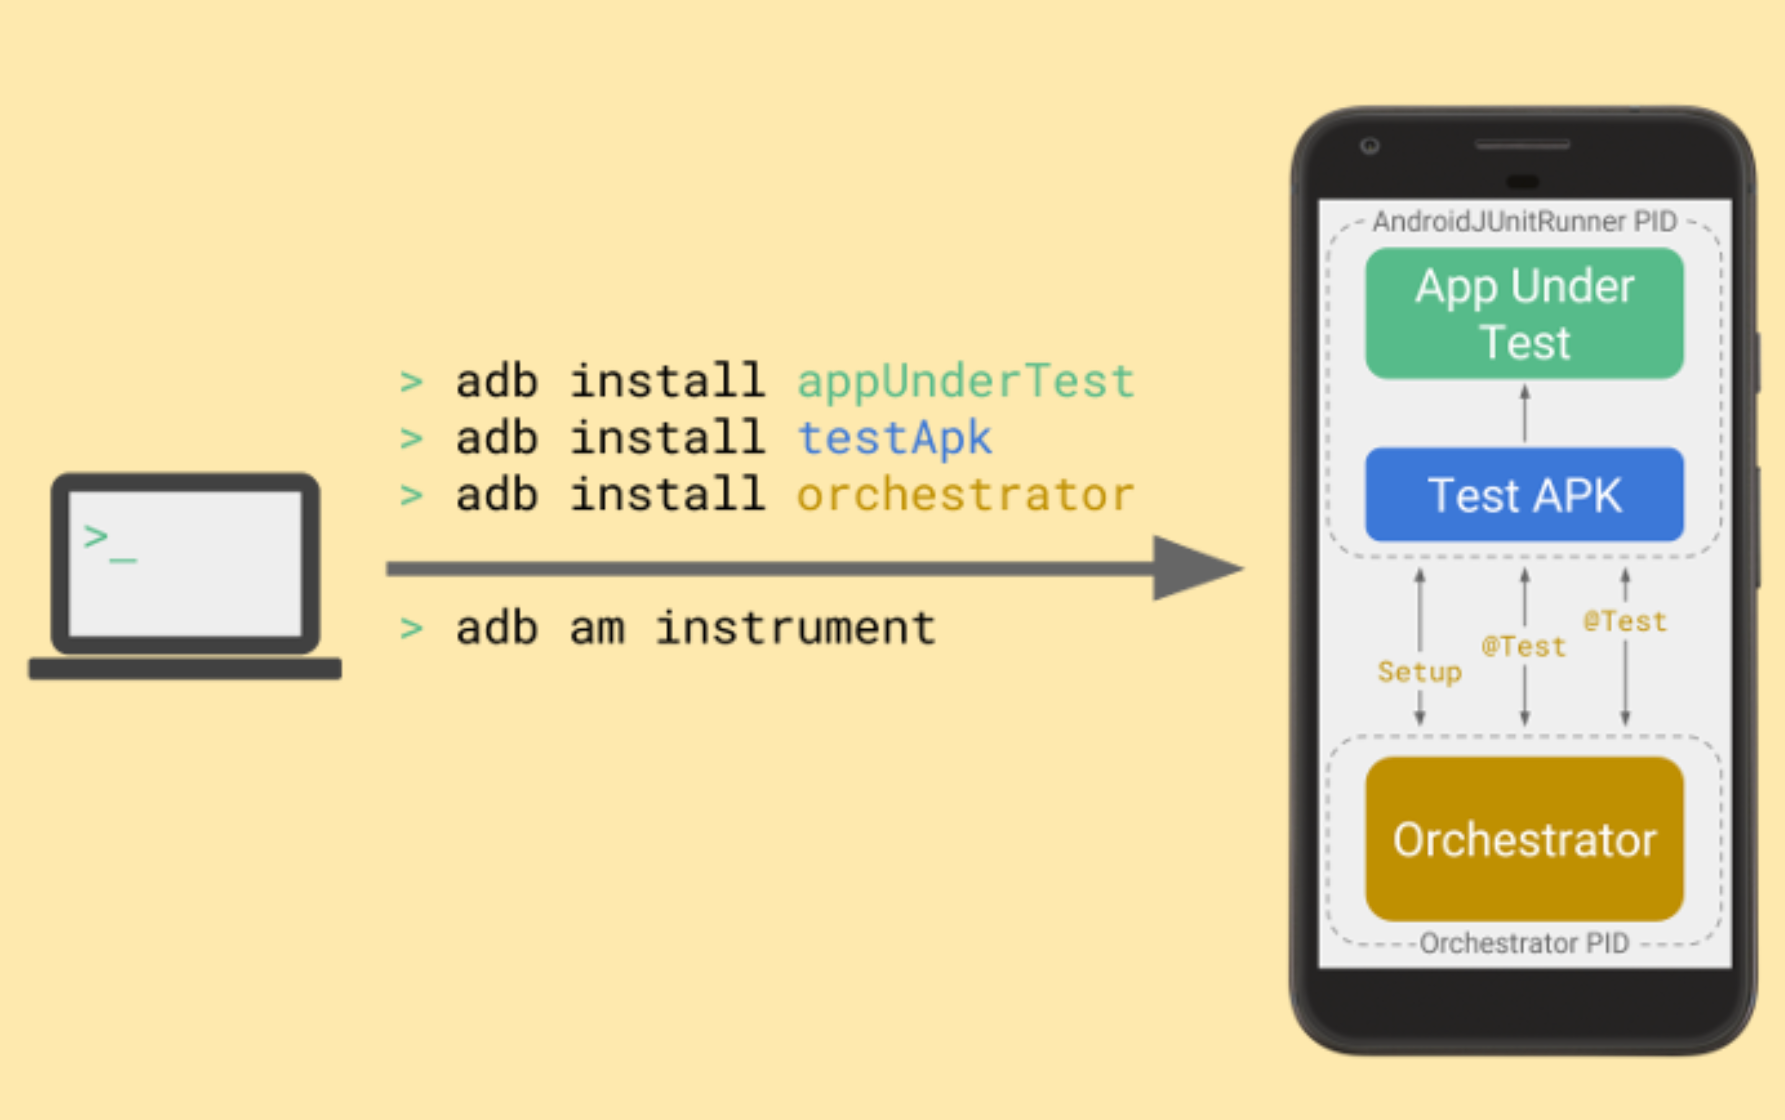
Android Test Orchestrator는 테스트 모음 실행을 시작할 때 JUnit 테스트를 수집한 다음 자체 Instrumentation 인스턴스에서 개별적으로 각 테스트를 실행합니다.
추가 정보
AndroidJUnitRunner 사용에 관한 자세한 내용은 API 참조를 참고하세요.
추가 리소스
AndroidJUnitRunner 사용에 관한 자세한 내용은 다음 리소스를 참고하세요.
샘플
- AndroidJunitRunnerSample: 테스트 주석, 매개변수화된 테스트, 테스트 모음 생성을 보여줍니다.