
이 문서에서는 다양한 일반 Espresso 테스트를 설정하는 방법을 설명합니다.
뷰를 옆의 다른 뷰와 일치
레이아웃에 그 자체로 고유하지 않은 특정 뷰가 포함될 수 있습니다. 대상
예를 들어 연락처 표의 반복 통화 버튼이
R.id, 동일한 텍스트 포함, 다른 호출과 동일한 속성 보유
뷰 계층 구조 내에 버튼이 있습니다.
예를 들어 이 활동에서는 "7" 텍스트가 있는 뷰가 여러 개의 뷰에 걸쳐 반복됩니다.
행:
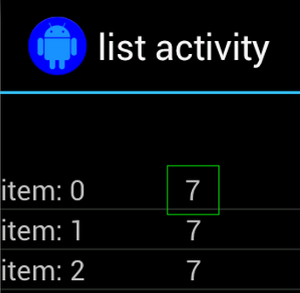
고유하지 않은 뷰는 위치에 있는 고유한 라벨과 쌍을 이루는 경우가 많습니다.
예를 들어 통화 버튼 옆에 있는 연락처 이름을 클릭합니다. 이 경우
hasSibling() 매처를 사용하여 선택 범위를 좁힐 수 있습니다.
Kotlin
onView(allOf(withText("7"), hasSibling(withText("item: 0"))))
    .perform(click())
자바
onView(allOf(withText("7"), hasSibling(withText("item: 0"))))
    .perform(click());
작업 모음 내부에 있는 뷰 일치
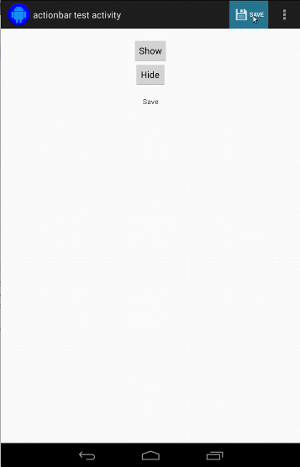
ActionBarTestActivity에는 일반
작업 모음 및 옵션 메뉴에서 만든 상황별 작업 모음 모두
작업 모음에는 항상 표시되는 항목 하나와
더보기 메뉴에 표시됩니다. 항목을 클릭하면 TextView가
확인할 수 있습니다
두 작업 모음 모두에 표시되는 아이콘을 일치시키는 것은 간단합니다. 다음 코드 스니펫에서 찾을 수 있습니다.
Kotlin
fun testClickActionBarItem() {
    // We make sure the contextual action bar is hidden.
    onView(withId(R.id.hide_contextual_action_bar))
        .perform(click())

    // Click on the icon - we can find it by the r.Id.
    onView(withId(R.id.action_save))
        .perform(click())

    // Verify that we have really clicked on the icon
    // by checking the TextView content.
    onView(withId(R.id.text_action_bar_result))
        .check(matches(withText("Save")))
}
자바
public void testClickActionBarItem() {
    // We make sure the contextual action bar is hidden.
    onView(withId(R.id.hide_contextual_action_bar))
        .perform(click());

    // Click on the icon - we can find it by the r.Id.
    onView(withId(R.id.action_save))
        .perform(click());

    // Verify that we have really clicked on the icon
    // by checking the TextView content.
    onView(withId(R.id.text_action_bar_result))
        .check(matches(withText("Save")));
}
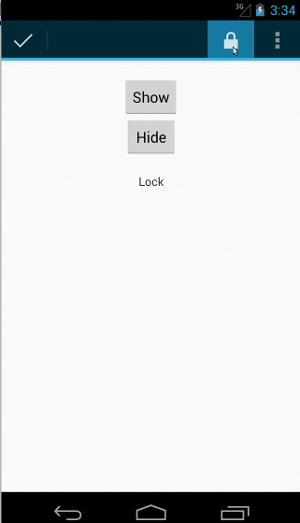
상황별 작업 모음의 코드도 동일해 보입니다.
Kotlin
fun testClickActionModeItem() {
    // Make sure we show the contextual action bar.
    onView(withId(R.id.show_contextual_action_bar))
        .perform(click())

    // Click on the icon.
    onView((withId(R.id.action_lock)))
        .perform(click())

    // Verify that we have really clicked on the icon
    // by checking the TextView content.
    onView(withId(R.id.text_action_bar_result))
        .check(matches(withText("Lock")))
}
자바
public void testClickActionModeItem() {
    // Make sure we show the contextual action bar.
    onView(withId(R.id.show_contextual_action_bar))
        .perform(click());

    // Click on the icon.
    onView((withId(R.id.action_lock)))
        .perform(click());

    // Verify that we have really clicked on the icon
    // by checking the TextView content.
    onView(withId(R.id.text_action_bar_result))
        .check(matches(withText("Lock")));
}
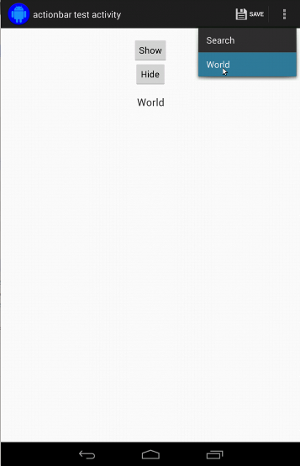
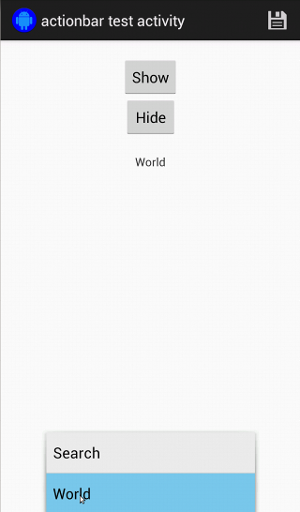
더보기 메뉴의 항목을 클릭하는 것은 일반적인 작업에서는 약간 까다롭습니다. 툴바에 표시됩니다. 일부 기기에는 하드웨어 더보기 메뉴 버튼이 있어서 옵션 메뉴에 항목이 오버플로되고 있으며, 일부 기기에는 소프트웨어 오버플로우 메뉴 버튼: 일반 더보기 메뉴를 엽니다. 다행히 Espresso에서 이 작업을 처리합니다. 저희에게 알려주셨어요.
일반 작업 모음의 경우 다음과 같습니다.
Kotlin
fun testActionBarOverflow() {
    // Make sure we hide the contextual action bar.
    onView(withId(R.id.hide_contextual_action_bar))
        .perform(click())

    // Open the options menu OR open the overflow menu, depending on whether
    // the device has a hardware or software overflow menu button.
    openActionBarOverflowOrOptionsMenu(
            ApplicationProvider.getApplicationContext<Context>())

    // Click the item.
    onView(withText("World"))
        .perform(click())

    // Verify that we have really clicked on the icon by checking
    // the TextView content.
    onView(withId(R.id.text_action_bar_result))
        .check(matches(withText("World")))
}
자바
public void testActionBarOverflow() {
    // Make sure we hide the contextual action bar.
    onView(withId(R.id.hide_contextual_action_bar))
        .perform(click());

    // Open the options menu OR open the overflow menu, depending on whether
    // the device has a hardware or software overflow menu button.
    openActionBarOverflowOrOptionsMenu(
            ApplicationProvider.getApplicationContext());

    // Click the item.
    onView(withText("World"))
        .perform(click());

    // Verify that we have really clicked on the icon by checking
    // the TextView content.
    onView(withId(R.id.text_action_bar_result))
        .check(matches(withText("World")));
}
하드웨어 더보기 메뉴 버튼이 있는 기기에서는 다음과 같이 표시됩니다.
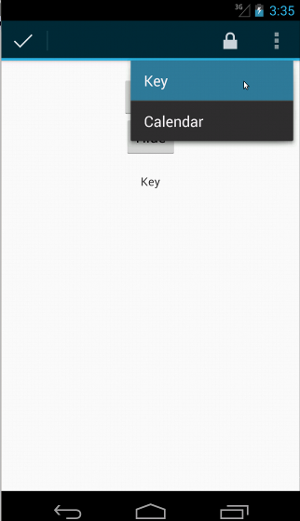
상황별 작업 모음의 경우 이 작업이 매우 쉽습니다.
Kotlin
fun testActionModeOverflow() {
    // Show the contextual action bar.
    onView(withId(R.id.show_contextual_action_bar))
        .perform(click())

    // Open the overflow menu from contextual action mode.
    openContextualActionModeOverflowMenu()

    // Click on the item.
    onView(withText("Key"))
        .perform(click())

    // Verify that we have really clicked on the icon by
    // checking the TextView content.
    onView(withId(R.id.text_action_bar_result))
        .check(matches(withText("Key")))
    }
}
자바
public void testActionModeOverflow() {
    // Show the contextual action bar.
    onView(withId(R.id.show_contextual_action_bar))
        .perform(click());

    // Open the overflow menu from contextual action mode.
    openContextualActionModeOverflowMenu();

    // Click on the item.
    onView(withText("Key"))
        .perform(click());

    // Verify that we have really clicked on the icon by
    // checking the TextView content.
    onView(withId(R.id.text_action_bar_result))
        .check(matches(withText("Key")));
    }
}
이러한 샘플의 전체 코드를 보려면
GitHub의 ActionBarTest.java 샘플
뷰가 표시되지 않는지 어설션
일련의 작업을 수행한 후에는
상태를 나타냅니다. 경우에 따라 부정적 사례일 수도 있습니다(예:
무언가가 진행되고 있지 않습니다. 모든 햄크레스트 보기는
ViewAssertions.matches()을 사용하여 ViewAssertion 매처로 변환합니다.
아래 예에서는 isDisplayed() 매처를 가져와서 다음을 사용하여 반전시킵니다.
표준 not() 매처:
Kotlin
import androidx.test.espresso.Espresso.onView
import androidx.test.espresso.assertion.ViewAssertions.matches
import androidx.test.espresso.matcher.ViewMatchers.isDisplayed
import androidx.test.espresso.matcher.ViewMatchers.withId
import org.hamcrest.Matchers.not

onView(withId(R.id.bottom_left))
    .check(matches(not(isDisplayed())))
자바
import static androidx.test.espresso.Espresso.onView;
import static androidx.test.espresso.assertion.ViewAssertions.matches;
import static androidx.test.espresso.matcher.ViewMatchers.isDisplayed;
import static androidx.test.espresso.matcher.ViewMatchers.withId;
import static org.hamcrest.Matchers.not;

onView(withId(R.id.bottom_left))
    .check(matches(not(isDisplayed())));
위의 접근 방식은 뷰가 여전히 계층 구조의 일부인 경우에 작동합니다. 다음에 해당하는 경우
그러지 않으면 NoMatchingViewException이 발생하며
ViewAssertions.doesNotExist()입니다.
뷰가 없는지 어설션
뷰가 뷰 계층 구조에서 벗어나면(예: 뷰 계층 구조에서 벗어나는 경우)
다른 활동으로 전환된 경우
ViewAssertions.doesNotExist():
Kotlin
import androidx.test.espresso.Espresso.onView
import androidx.test.espresso.assertion.ViewAssertions.doesNotExist
import androidx.test.espresso.matcher.ViewMatchers.withId

onView(withId(R.id.bottom_left))
    .check(doesNotExist())
자바
import static androidx.test.espresso.Espresso.onView;
import static androidx.test.espresso.assertion.ViewAssertions.doesNotExist;
import static androidx.test.espresso.matcher.ViewMatchers.withId;

onView(withId(R.id.bottom_left))
    .check(doesNotExist());
데이터 항목이 어댑터에 없는지 어설션
특정 데이터 항목이 AdapterView 내에 없음을 증명하려면 다음을 실행해야 합니다.
조금 다르게 할 수 있습니다. 관심 있는 AdapterView을(를) 찾아야 합니다.
보유하고 있는 데이터를 조사합니다. onData()를 사용할 필요는 없습니다.
대신 onView()를 사용하여 AdapterView를 찾은 후 다른 메서드를 사용합니다.
매처를 사용하여 뷰 내부의 데이터에 관해 작업할 수 있습니다.
먼저 매처를 찾습니다.
Kotlin
private fun withAdaptedData(dataMatcher: Matcher<Any>): Matcher<View> {
    return object : TypeSafeMatcher<View>() {

        override fun describeTo(description: Description) {
            description.appendText("with class name: ")
            dataMatcher.describeTo(description)
        }

        public override fun matchesSafely(view: View) : Boolean {
            if (view !is AdapterView<*>) {
                return false
            }

            val adapter = view.adapter
            for (i in 0 until adapter.count) {
                if (dataMatcher.matches(adapter.getItem(i))) {
                    return true
                }
            }

            return false
        }
    }
}
자바
private static Matcher<View> withAdaptedData(final Matcher<Object> dataMatcher) {
    return new TypeSafeMatcher<View>() {

        @Override
        public void describeTo(Description description) {
            description.appendText("with class name: ");
            dataMatcher.describeTo(description);
        }

        @Override
        public boolean matchesSafely(View view) {
            if (!(view instanceof AdapterView)) {
                return false;
            }

            @SuppressWarnings("rawtypes")
            Adapter adapter = ((AdapterView) view).getAdapter();
            for (int i = 0; i < adapter.getCount(); i++) {
                if (dataMatcher.matches(adapter.getItem(i))) {
                    return true;
                }
            }

            return false;
        }
    };
}
그런 다음, onView()를 사용하여 AdapterView를 찾기만 하면 됩니다.
Kotlin
fun testDataItemNotInAdapter() {
    onView(withId(R.id.list))
          .check(matches(not(withAdaptedData(withItemContent("item: 168")))))
    }
}
자바
@SuppressWarnings("unchecked")
public void testDataItemNotInAdapter() {
    onView(withId(R.id.list))
          .check(matches(not(withAdaptedData(withItemContent("item: 168")))));
    }
}
그리고 항목이 'item: 168'과 같으면 실패하는 어설션이 있습니다. ID 목록이 있는 어댑터 뷰에 있는지 확인합니다.
전체 샘플은 다음과 같은 testDataItemNotInAdapter() 메서드를 참고하세요.
AdapterViewTest.java
클래스를 참조하세요.
맞춤 실패 핸들러 사용
Espresso의 기본 FailureHandler를 맞춤 FailureHandler로 교체하면 다음 작업이 가능합니다.
추가 또는 다른 오류 처리(예: 스크린샷 촬영,
추가 디버그 정보가 표시됩니다
CustomFailureHandlerTest 예는 맞춤
오류 핸들러:
Kotlin
private class CustomFailureHandler(targetContext: Context) : FailureHandler {
    private val delegate: FailureHandler

    init {
        delegate = DefaultFailureHandler(targetContext)
    }

    override fun handle(error: Throwable, viewMatcher: Matcher<View>) {
        try {
            delegate.handle(error, viewMatcher)
        } catch (e: NoMatchingViewException) {
            throw MySpecialException(e)
        }

    }
}
자바
private static class CustomFailureHandler implements FailureHandler {
    private final FailureHandler delegate;

    public CustomFailureHandler(Context targetContext) {
        delegate = new DefaultFailureHandler(targetContext);
    }

    @Override
    public void handle(Throwable error, Matcher<View> viewMatcher) {
        try {
            delegate.handle(error, viewMatcher);
        } catch (NoMatchingViewException e) {
            throw new MySpecialException(e);
        }
    }
}
이 실패 핸들러는 대신 MySpecialException을 발생시킵니다.
NoMatchingViewException이고 다른 모든 실패는
DefaultFailureHandler입니다. CustomFailureHandler는
Espresso를 setUp() 테스트 메서드에서 실행합니다.
Kotlin
@Throws(Exception::class)
override fun setUp() {
    super.setUp()
    getActivity()
    setFailureHandler(CustomFailureHandler(
            ApplicationProvider.getApplicationContext<Context>()))
}
자바
@Override
public void setUp() throws Exception {
    super.setUp();
    getActivity();
    setFailureHandler(new CustomFailureHandler(
            ApplicationProvider.getApplicationContext()));
}
자세한 내용은
FailureHandler 드림
인터페이스 및
Espresso.setFailureHandler()
기본이 아닌 창 타겟팅
Android는 여러 창을 지원합니다. 일반적으로 이는 사용자에게 투명하게 표시됩니다.
앱 개발자에게 보여야 하지만, 경우에 따라 여러 개의 창이 표시됩니다.
기본 애플리케이션 창 위에 자동 완성 창이 그려질 때처럼
검색 위젯을 사용할 수 있습니다. 작업을 단순화하기 위해 기본적으로 Espresso는 휴리스틱을 사용하여
상호작용하려는 Window를 추측합니다. 이 휴리스틱은
항상 좋습니다. 드문 경우이긴 하지만 특정 기간 동안 사용할 기간을
상호작용의 대상이 되어야 합니다. 자체 루트 창을 제공하여 이 작업을 수행할 수 있습니다.
매처 또는 Root 매처:
Kotlin
onView(withText("South China Sea"))
    .inRoot(withDecorView(not(`is`(getActivity().getWindow().getDecorView()))))
    .perform(click())
자바
onView(withText("South China Sea"))
    .inRoot(withDecorView(not(is(getActivity().getWindow().getDecorView()))))
    .perform(click());
인코더-디코더 아키텍처를
ViewMatchers님,
Google에서 제공하는 사전 제공된
RootMatchers
물론, 언제든지 자체 Matcher 객체를 구현할 수 있습니다.
MultipleWindowTest 살펴보기 샘플 를 참조하세요.
목록 뷰에서 헤더 또는 바닥글 일치
머리글과 바닥글은 ListViews에 addHeaderView() 및
addFooterView() 메서드를 사용하여 지도 가장자리에
패딩을 추가할 수 있습니다. Espresso.onData()에서 어떤 데이터 객체를 알 수 있도록 하기 위해
일치시키려면 미리 설정된 데이터 객체 값을 두 번째 매개변수로 전달해야 합니다.
addHeaderView()님과 addFooterView()님에게 보냅니다. 예를 들면 다음과 같습니다.
Kotlin
const val FOOTER = "FOOTER"
...
val footerView = layoutInflater.inflate(R.layout.list_item, listView, false)
footerView.findViewById<TextView>(R.id.item_content).text = "count:"
footerView.findViewById<TextView>(R.id.item_size).text
        = data.size.toString
listView.addFooterView(footerView, FOOTER, true)
자바
public static final String FOOTER = "FOOTER";
...
View footerView = layoutInflater.inflate(R.layout.list_item, listView, false);
footerView.findViewById<TextView>(R.id.item_content).setText("count:");
footerView.findViewById<TextView>(R.id.item_size).setText(String.valueOf(data.size()));
listView.addFooterView(footerView, FOOTER, true);
그런 다음 바닥글용 매처를 작성할 수 있습니다.
Kotlin
import org.hamcrest.Matchers.allOf
import org.hamcrest.Matchers.instanceOf
import org.hamcrest.Matchers.`is`

fun isFooter(): Matcher<Any> {
    return allOf(`is`(instanceOf(String::class.java)),
            `is`(LongListActivity.FOOTER))
}
자바
import static org.hamcrest.Matchers.allOf;
import static org.hamcrest.Matchers.instanceOf;
import static org.hamcrest.Matchers.is;

@SuppressWarnings("unchecked")
public static Matcher<Object> isFooter() {
    return allOf(is(instanceOf(String.class)), is(LongListActivity.FOOTER));
}
테스트에서 뷰를 로드하는 것은 간단합니다.
Kotlin
import androidx.test.espresso.Espresso.onData
import androidx.test.espresso.action.ViewActions.click
import androidx.test.espresso.sample.LongListMatchers.isFooter

fun testClickFooter() {
    onData(isFooter())
        .perform(click())

    // ...
}
자바
import static androidx.test.espresso.Espresso.onData;
import static androidx.test.espresso.action.ViewActions.click;
import static androidx.test.espresso.sample.LongListMatchers.isFooter;

public void testClickFooter() {
    onData(isFooter())
        .perform(click());

    // ...
}
testClickFooter() 메서드에 있는 전체 코드 샘플을 살펴보세요.
AdapterViewTest.java
를 참조하세요.