
認証情報マネージャーは、Android アプリでの認証情報の交換に推奨される Jetpack API です。Credential Manager API は、認証と認可にまたがるユースケースで、フォーム ファクタ間の認証情報の交換を効率化します。Credential Manager を使用して、デジタル認証情報を処理し、新しい Android デバイスでユーザー認証情報を復元することもできます。
認証情報マネージャーの機能
Credential Manager は、次のような強力な機能を提供することで、ログイン プロセスを合理化し、セキュリティを強化します。
- さまざまな認証メカニズムのサポート: ユーザーが次の方法でアプリに登録またはログインできるようにします。
- パスキー
- Google でログインやその他のフェデレーション ログイン メカニズム
- パスワード
- デジタル認証情報
- クロスデバイスの認証情報の復元: 認証情報の復元との統合を提供し、ユーザーが新しいデバイスでアプリをシームレスに使い始めることができるようにします。
- 認証情報プロバイダとのシームレスな統合: Google パスワード マネージャーなどのパスワード マネージャーを含む、認証情報プロバイダのサポートを提供します。
- 認証情報の管理: ユーザー認証情報のメタデータを更新できるようにします。これにより、アプリと認証情報プロバイダ間で認証情報の一貫性を保つことができます。
- WebView の互換性: WebView を使用するアプリで動作します。
- 自動入力の統合: 自動入力と統合して、自動入力 UI 内に認証情報を表示します。
認証情報マネージャーを使用するメリット
認証情報マネージャーを採用すると、アプリとユーザーの両方に次のようなメリットがあります。
- セキュリティの強化: パスキーはセキュリティを強化し、ユーザーをフィッシング攻撃から保護します。
- さまざまなフォーム ファクタのサポート: API は、モバイル、Android XR、Wear OS デバイスなど、Android のフォーム ファクタ全体で動作します。
- ユースケース全体で認証を簡素化: デジタル運転免許証、社員証、国民 ID カードなどのデジタル認証情報を使用すると、電話番号の確認が必要なユースケースを含め、さまざまなユースケースで認証を行うことができます。
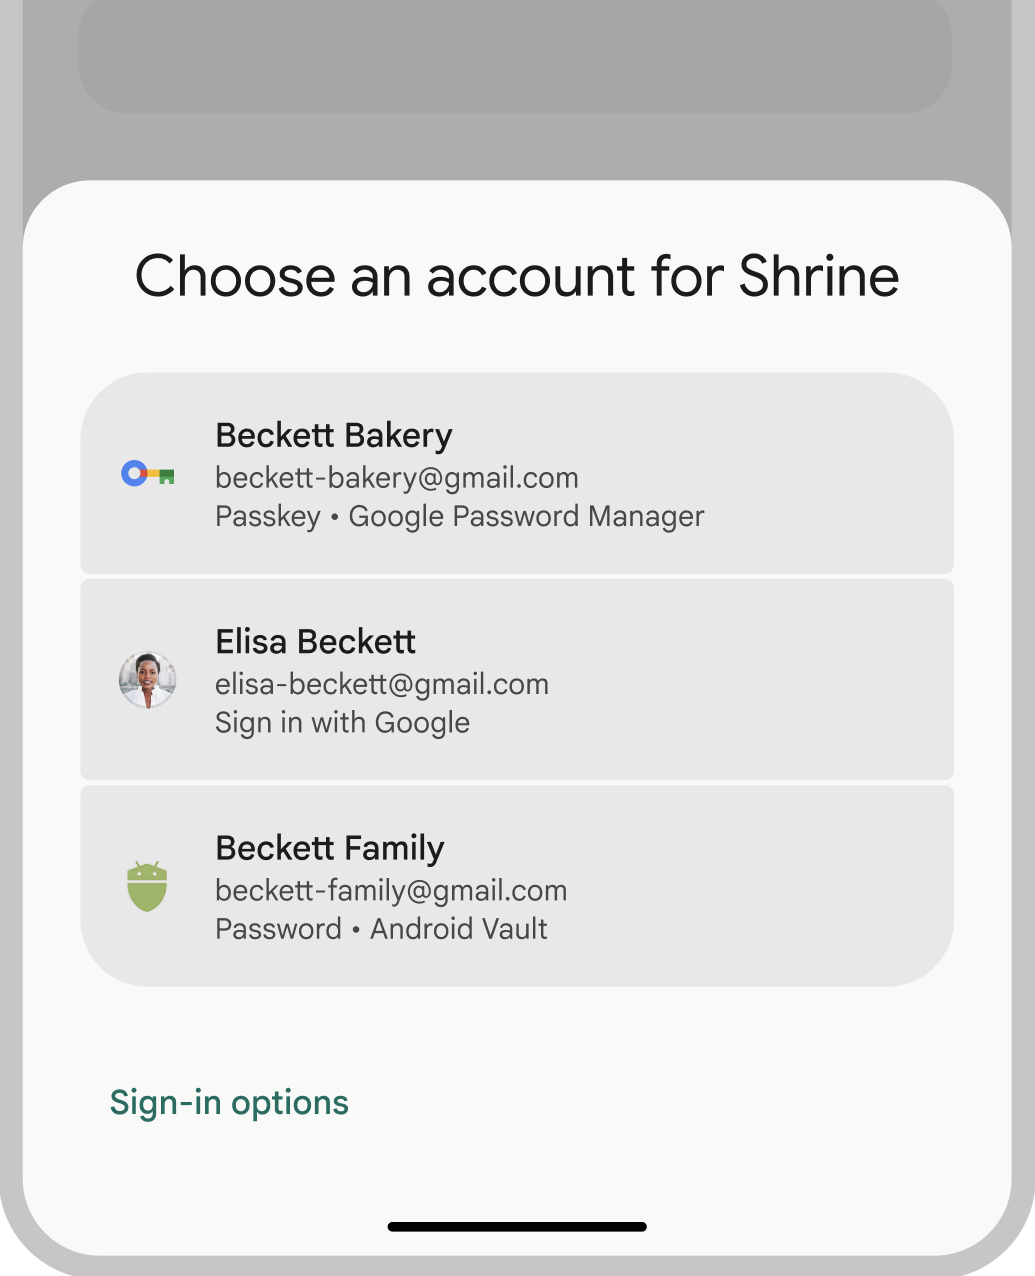
- ユーザー エクスペリエンスの向上: 認証情報マネージャーの統合インターフェースにより、ユーザーは使い慣れた一貫性のあるエクスペリエンスを利用でき、登録とログインの速度が向上します。ボトムシート UI はアプリのコンテンツ内に表示されるため、ユーザーはログイン中もアプリのコンテキスト内に留まります。次の画像は、Credential Manager の組み込み UI を示しています。
認証に関する用語
ユーザーの認証を必要とするエンティティは、証明書利用者と呼ばれます。通常、認証ワークフローには次のコンポーネントが含まれます。
- 証明書利用者クライアント アプリ: パスキーの作成と使用のためのユーザー インターフェースを処理するクライアント(この場合は Android アプリ)。
- 証明書利用者サーバー: パスキーの作成、保存、検証を支援するアプリサーバー。
- 認証情報プロバイダ: Google パスワード マネージャーなど、ユーザー認証情報を保存して提供するコンポーネント。FIDO ドキュメントでは、認証情報プロバイダを認証情報マネージャーと呼んでいます。
認証情報ストレージ
Google パスワード マネージャーなどの認証情報プロバイダは、ユーザーがデバイス間で認証情報を管理できる一元化された安全な場所を提供し、認証プロセスをさらに簡素化します。認証情報プロバイダとして認証情報マネージャーと統合するには、認証を認証情報プロバイダとして実装するをご覧ください。
Google パスワード マネージャーで認証情報を安全に保つ方法について詳しくは、Google パスワード マネージャーのパスキーのセキュリティをご覧ください。
認証情報マネージャーに移行する
Credential Manager は、以前の Android 認証 API とローカル FIDO2 認証情報を置き換えることを目的としています。Credential Manager への移行の詳細については、次のガイドをご覧ください。