
В Android Studio создайте для Gemini персонализированные инструкции, используя один или несколько файлов AGENTS.md . Файлы AGENTS.md размещаются рядом с другими файлами в вашем коде, поэтому их легко добавить в систему контроля версий (VCS) и поделиться инструкциями, специфичными для проекта, правилами стиля кодирования и другими рекомендациями со всей вашей командой.
Для начала выполните следующие шаги:
Создайте файл
AGENTS.mdв любом месте файловой системы вашего проекта. Gemini сканирует текущий каталог и все родительские каталоги на наличие файловAGENTS.mdпри отправке запроса. Для получения более подробной информации см. раздел «Как работают файлыAGENTS.md.Добавьте свои инструкции. Напишите инструкции, используя Markdown. Для удобства чтения можно использовать заголовки и маркированные списки для разных правил. См. пример инструкций .
Сохраните и добавьте файл в свою систему контроля версий, чтобы поделиться им со своей командой.
Управление файлами AGENTS.md как контекстом
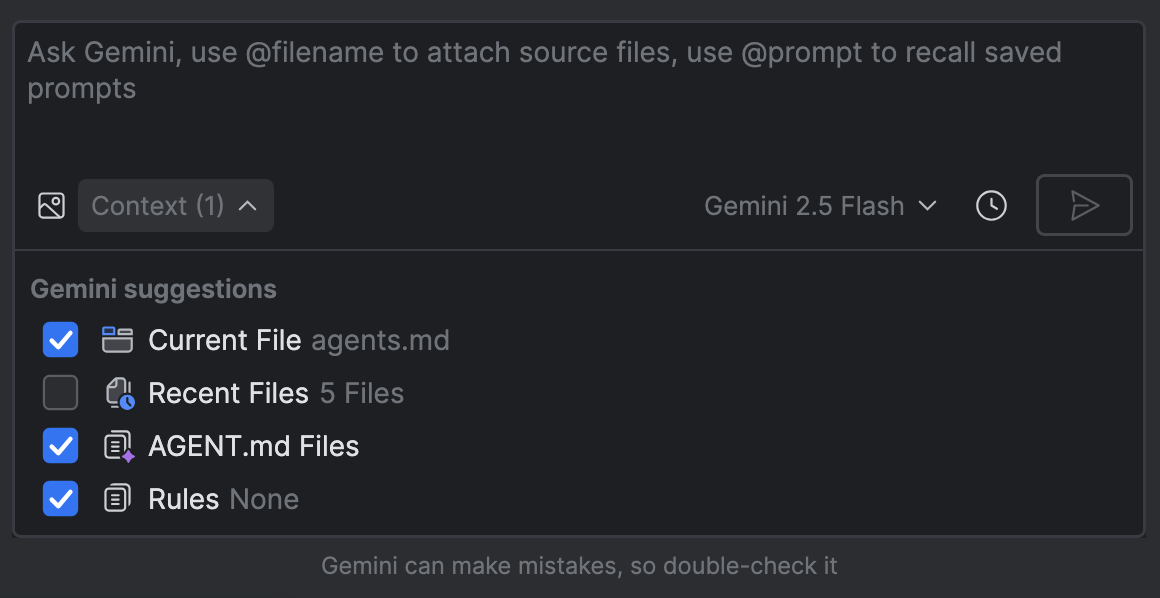
С помощью панели «Контекст » в чате вы можете добавлять или удалять файлы AGENTS.md в качестве контекста для конкретного запроса. Параметр «Файлы AGENTS.md включает все файлы AGENTS.md в текущем каталоге и его родительских каталогах.
AGENTS.md в качестве контекста.Пример инструкций
Для передачи инструкций агенту можно использовать файл AGENTS.md . Ниже приведены несколько примеров, но инструкции, которые вы должны предоставить, должны соответствовать специфике вашего проекта.
- «Основной файл программы находится по адресу
/path/to/MainActivity.kt». - "Код, обеспечивающий навигацию между экранами, находится по
path/to/navigation/UiNavigation.kt" - "Код, обрабатывающий HTTP-запросы, находится по адресу
<path>." - Архитектура проекта
- «Всю бизнес-логику следует размещать в ViewModel».
- «Всегда следуйте официальным рекомендациям по архитектуре, включая использование многоуровневой архитектуры. Используйте однонаправленный поток данных (UDF), ViewModels, сбор состояния пользовательского интерфейса с учетом жизненного цикла и другие рекомендации».
- Рекомендуемые библиотеки: «Для навигации используйте библиотеку <название библиотеки>».
- Определение имен-заполнителей для общих API-сервисов или внутренней терминологии: «Основной бэкэнд-сервис называется 'PhotoSift-API'».
- В соответствии с фирменными правилами, «все новые компоненты пользовательского интерфейса должны создаваться с помощью Jetpack Compose. Не предлагайте макеты на основе XML».
Разделите ваши файлы AGENTS.md на модули.
Большие файлы AGENTS.md можно разбить на более мелкие файлы, которые можно повторно использовать в различных контекстах:
Выделите отдельный набор инструкций и сохраните его в другом файле Markdown, например,
style-guidance.md.Для ссылки на более мелкие файлы Markdown в файле
AGENTS.mdиспользуйте символ@, за которым следует путь к файлу, который вы хотите импортировать. Поддерживаются следующие форматы путей:- Относительные пути:
-
@./file.md- Импорт из той же директории -
@../file.md- Импорт из родительского каталога -
@./subdirectory/file.md- Импорт из подкаталога
-
- Абсолютные пути:
@/absolute/path/to/file.md
- Относительные пути:
Например, следующий файл AGENTS.md ссылается на два других файла инструкций:
# My AGENTS.md

You are an experienced Android app developer.

@./get-started.md

## Coding style {:#coding-style}

@./shared/style-guidance.md
Как работают файлы AGENTS.md
Gemini автоматически сканирует текущий каталог и родительские каталоги на наличие файлов AGENTS.md и добавляет их содержимое в начало каждого запроса в качестве преамбулы. Если при отправке запроса у вас нет открытого файла, то по умолчанию включается файл AGENTS.md , находящийся в корне проекта (если он есть).
В чём разница между файлами AGENTS.md и правилами?
Правила также позволяют определять инструкции и настройки, которые применяются ко всем подсказкам. Однако правила определяются в файле IntelliJ /.idea/project.prompts.xml , тогда как файлы AGENTS.md сохраняются рядом с исходным кодом и не зависят от IDE. Мы рекомендуем использовать файлы AGENTS.md , если одной из основных целей является обмен инструкциями с вашей командой.
В чём разница между файлами AGENTS.md и навыками?
Навыки представляют собой востребованные экспертные знания, которые активируются, когда ваш запрос соответствует описанию навыка, тогда как содержимое файла AGENTS.md добавляется в начало каждого запроса. Мы рекомендуем использовать навыки для конкретных задач, а файлы AGENTS.md — для влияния на общее поведение агента. Более подробную информацию о навыках см. в обзоре навыков Android .