
इस पेज पर, मेनिफ़ेस्ट मर्ज करने के तरीके के बारे में बताया गया है. साथ ही, मर्ज से जुड़ी समस्याओं को हल करने के लिए, मर्ज की प्राथमिकताएं लागू करने का तरीका भी बताया गया है. ऐप्लिकेशन मेनिफ़ेस्ट फ़ाइल के बारे में जानने के लिए, ऐप्लिकेशन मेनिफ़ेस्ट की खास जानकारी लेख पढ़ें.
एक से ज़्यादा मेनिफ़ेस्ट फ़ाइलों को मर्ज करना
आपकी APK या Android ऐप्लिकेशन बंडल फ़ाइल में सिर्फ़ एक AndroidManifest.xml फ़ाइल हो सकती है. हालांकि, आपके Android Studio प्रोजेक्ट में मुख्य सोर्स सेट, बिल्ड वैरिएंट, और इंपोर्ट की गई लाइब्रेरी से मिली कई मेनिफ़ेस्ट फ़ाइलें हो सकती हैं. आपके ऐप्लिकेशन को बिल्ड करते समय, Gradle बिल्ड सभी मेनिफ़ेस्ट फ़ाइलों को एक मेनिफ़ेस्ट फ़ाइल में मर्ज कर देता है. इस फ़ाइल को आपके ऐप्लिकेशन में पैकेज किया जाता है.
मेनिफ़ेस्ट मर्ज करने वाला टूल, हर फ़ाइल के सभी एक्सएमएल एलिमेंट को मर्ज करता है. इसके लिए, वह एक्सएमएल एलिमेंट को मर्ज करने के लिए इस्तेमाल किए जाने वाले तरीकों का पालन करता है. साथ ही, उन प्राथमिकताओं का पालन करता है जिन्हें आपने खास एक्सएमएल एट्रिब्यूट की मदद से तय किया है.
सलाह: मर्ज किए गए मेनिफ़ेस्ट के नतीजों की झलक देखने और विरोध की गड़बड़ियों का पता लगाने के लिए, नीचे दिए गए सेक्शन में बताए गए मर्ज किए गए मेनिफ़ेस्ट व्यू का इस्तेमाल करें.
प्राथमिकताएं मर्ज करना
मर्ज करने वाला टूल, सभी मेनिफ़ेस्ट फ़ाइलों को एक फ़ाइल में क्रम से जोड़ता है. यह फ़ाइल, हर मेनिफ़ेस्ट फ़ाइल की प्राथमिकता के आधार पर बनाई जाती है. उदाहरण के लिए, अगर आपके पास तीन मेनिफ़ेस्ट फ़ाइलें हैं, तो सबसे कम प्राथमिकता वाले मेनिफ़ेस्ट को सबसे ज़्यादा प्राथमिकता वाले मेनिफ़ेस्ट में मर्ज किया जाता है. इसके बाद, सबसे ज़्यादा प्राथमिकता वाले मेनिफ़ेस्ट को सबसे कम प्राथमिकता वाले मेनिफ़ेस्ट में मर्ज किया जाता है, जैसा कि पहले चित्र में दिखाया गया है.
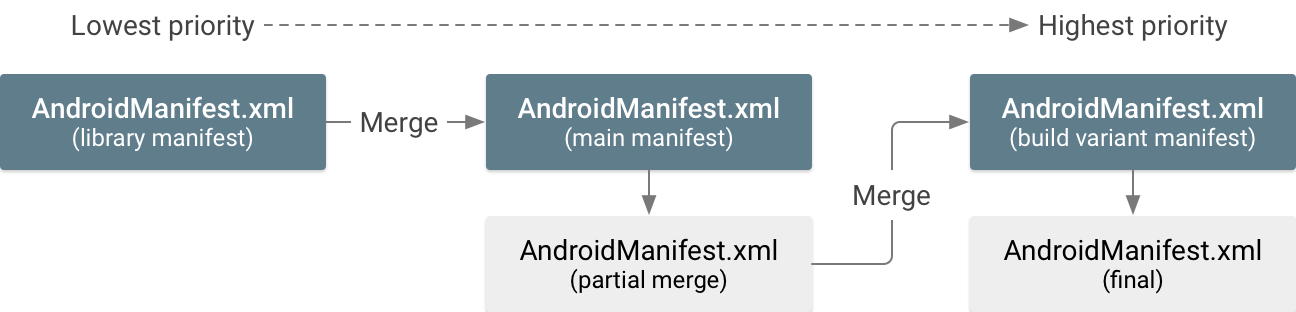
मेनिफ़ेस्ट फ़ाइलें तीन तरह की होती हैं, जिन्हें एक-दूसरे में मर्ज किया जा सकता है. साथ ही, मर्ज करने की प्राथमिकताएं इस तरह से होती हैं (सबसे ज़्यादा प्राथमिकता पहले):
- आपके बिल्ड वैरिएंट के लिए मेनिफ़ेस्ट फ़ाइल
अगर आपके वैरिएंट के लिए एक से ज़्यादा सोर्स सेट हैं, तो उनके मेनिफ़ेस्ट की प्राथमिकताएं इस तरह से तय की जाती हैं:
- बिल्ड का वैरिएंट मेनिफ़ेस्ट (जैसे,
src/demoDebug/) - बिल्ड टाइप मेनिफ़ेस्ट (जैसे,
src/debug/) - प्रॉडक्ट फ़्लेवर मेनिफ़ेस्ट (जैसे,
src/demo/)अगर फ़्लेवर डाइमेंशन का इस्तेमाल किया जा रहा है, तो मेनिफ़ेस्ट की प्राथमिकताएं,
flavorDimensionsप्रॉपर्टी में हर डाइमेंशन के क्रम से मेल खाती हैं. पहला डाइमेंशन सबसे ज़्यादा प्राथमिकता वाला होता है.
- बिल्ड का वैरिएंट मेनिफ़ेस्ट (जैसे,
- ऐप्लिकेशन मॉड्यूल के लिए मुख्य मेनिफ़ेस्ट फ़ाइल
- शामिल की गई लाइब्रेरी की मेनिफ़ेस्ट फ़ाइल
अगर आपके पास एक से ज़्यादा लाइब्रेरी हैं, तो उनके मेनिफ़ेस्ट की प्राथमिकताएं, आपके Gradle
dependenciesब्लॉक में दिखने के क्रम से मेल खाती हैं.
उदाहरण के लिए, लाइब्रेरी मेनिफ़ेस्ट को मुख्य मेनिफ़ेस्ट में मर्ज किया जाता है. इसके बाद, मुख्य मेनिफ़ेस्ट को बिल्ड वैरिएंट मेनिफ़ेस्ट में मर्ज किया जाता है. ध्यान दें कि ये सभी सोर्स सेट के लिए, मर्ज करने की एक जैसी प्राथमिकताएं हैं, जैसा कि सोर्स सेट की मदद से बनाएं में बताया गया है.
अहम जानकारी: build.gradle फ़ाइल से मिले बिल्ड कॉन्फ़िगरेशन, मर्ज की गई मेनिफ़ेस्ट फ़ाइल में मौजूद मिलते-जुलते एट्रिब्यूट को बदल देते हैं. उदाहरण के लिए, build.gradle या
build.gradle.kts फ़ाइल में मौजूद
minSdk, <uses-sdk>
मैनिफ़ेस्ट एलिमेंट में मौजूद मैच करने वाले एट्रिब्यूट को बदल देता है. भ्रम से बचने के लिए, <uses-sdk> एलिमेंट को हटाएं और इन प्रॉपर्टी को सिर्फ़ build.gradle फ़ाइल में तय करें. ज़्यादा जानकारी के लिए, अपना बिल्ड कॉन्फ़िगर करना लेख पढ़ें.
मर्ज करने से जुड़े ह्यूरिस्टिक्स
मर्ज करने वाला टूल, एक मेनिफ़ेस्ट के हर एक्सएमएल एलिमेंट को, दूसरे मेनिफ़ेस्ट के मिलते-जुलते एलिमेंट से लॉजिक के हिसाब से मैच कर सकता है. मैच करने के तरीके के बारे में ज़्यादा जानने के लिए, पिछले सेक्शन में मर्ज की प्राथमिकताएं देखें.
अगर कम प्राथमिकता वाले मेनिफ़ेस्ट का कोई एलिमेंट, ज़्यादा प्राथमिकता वाले मेनिफ़ेस्ट के किसी भी एलिमेंट से मेल नहीं खाता है, तो उसे मर्ज किए गए मेनिफ़ेस्ट में जोड़ दिया जाता है. हालांकि, अगर कोई मैच करने वाला एलिमेंट मौजूद है, तो मर्ज करने वाला टूल, हर एलिमेंट के सभी एट्रिब्यूट को एक ही एलिमेंट में जोड़ने की कोशिश करता है. अगर टूल को पता चलता है कि दोनों मेनिफ़ेस्ट में एक ही एट्रिब्यूट की अलग-अलग वैल्यू मौजूद हैं, तो मर्ज करने में समस्या आती है.
टेबल 1 में, उन संभावित नतीजों को दिखाया गया है जो मर्ज टूल के सभी एट्रिब्यूट को एक ही एलिमेंट में जोड़ने की कोशिश करने पर मिल सकते हैं.
टेबल 1. एट्रिब्यूट वैल्यू के लिए, मर्ज करने का डिफ़ॉल्ट तरीका
| ज़्यादा प्राथमिकता वाला एट्रिब्यूट | कम प्राथमिकता वाला एट्रिब्यूट | एट्रिब्यूट का मर्ज किया गया नतीजा |
|---|---|---|
| काम की नहीं है | काम की नहीं है | कोई वैल्यू नहीं (डिफ़ॉल्ट वैल्यू का इस्तेमाल करें) |
| वैल्यू B | वैल्यू B | |
| वैल्यू A | काम की नहीं है | वैल्यू A |
| वैल्यू A | वैल्यू A | |
| वैल्यू B | कॉन्फ़िगरेशन में गड़बड़ी—आपको एक मर्ज नियम मार्कर जोड़ना होगा. |
हालांकि, कुछ स्थितियों में मर्ज करने से जुड़ी समस्याओं से बचने के लिए, मर्ज टूल अलग तरह से काम करता है:
<manifest>एलिमेंट में मौजूद एट्रिब्यूट को कभी भी एक साथ मर्ज नहीं किया जाता. सिर्फ़ सबसे ज़्यादा प्राथमिकता वाले मेनिफ़ेस्ट के एट्रिब्यूट का इस्तेमाल किया जाता है.-
<uses-feature>और<uses-library>एलिमेंट में मौजूदandroid:requiredएट्रिब्यूट, OR मर्ज का इस्तेमाल करता है. अगर कोई विरोध होता है, तो"true"लागू होता है और किसी एक मेनिफ़ेस्ट में ज़रूरी सुविधा या लाइब्रेरी हमेशा शामिल होती है. <uses-sdk>एलिमेंट में मौजूद एट्रिब्यूट, हमेशा ज़्यादा प्राथमिकता वाले मेनिफ़ेस्ट की वैल्यू का इस्तेमाल करते हैं. हालांकि, इन स्थितियों में ऐसा नहीं होता:- जब कम प्राथमिकता वाले मेनिफ़ेस्ट की
minSdkवैल्यू, ज़्यादा होती है, तो तब तक गड़बड़ी होती है, जब तक कि आपनेoverrideLibraryमर्ज करने का नियम लागू नहीं किया है. - जब कम प्राथमिकता वाले मेनिफ़ेस्ट में
targetSdkVersionवैल्यू कम होती है, तो मर्ज टूल, ज़्यादा प्राथमिकता वाले मेनिफ़ेस्ट की वैल्यू का इस्तेमाल करता है. साथ ही, वह ऐसी सभी सिस्टम अनुमतियां भी जोड़ता है जो यह पक्का करने के लिए ज़रूरी हैं कि इंपोर्ट की गई लाइब्रेरी सही तरीके से काम करती रहे. ऐसा उन मामलों में किया जाता है जिनमें Android के नए वर्शन में, अनुमतियों से जुड़ी पाबंदियां बढ़ाई गई हैं. इस व्यवहार के बारे में ज़्यादा जानकारी के लिए, सिस्टम की अनुमतियों वाला सेक्शन देखें.
- जब कम प्राथमिकता वाले मेनिफ़ेस्ट की
<intent-filter>एलिमेंट, एक मेनिफ़ेस्ट से दूसरे मेनिफ़ेस्ट के साथ कभी मैच नहीं होता. हर एलिमेंट को यूनीक माना जाता है और उसे मर्ज किए गए मेनिफ़ेस्ट में, सामान्य पैरंट एलिमेंट में जोड़ा जाता है.
एट्रिब्यूट के बीच होने वाले अन्य सभी विरोधों के लिए, आपको गड़बड़ी का मैसेज मिलता है. साथ ही, आपको ज़्यादा प्राथमिकता वाली मेनिफ़ेस्ट फ़ाइल में कोई खास एट्रिब्यूट जोड़कर, मर्ज टूल को इसे ठीक करने का तरीका बताना होगा. मर्ज नियम मार्कर के बारे में जानने के लिए, यहां दिया गया सेक्शन देखें.
एट्रिब्यूट की डिफ़ॉल्ट वैल्यू पर निर्भर न रहें. सभी यूनीक एट्रिब्यूट को एक ही एलिमेंट में जोड़ दिया जाता है. इसलिए, अगर ज़्यादा प्राथमिकता वाला मेनिफ़ेस्ट, किसी एट्रिब्यूट की डिफ़ॉल्ट वैल्यू पर निर्भर करता है, तो इससे अनचाहे नतीजे मिल सकते हैं. उदाहरण के लिए, अगर प्राथमिकता में सबसे ऊपर वाले मेनिफ़ेस्ट में android:launchMode एट्रिब्यूट की जानकारी नहीं दी गई है, तो "standard" की डिफ़ॉल्ट वैल्यू का इस्तेमाल किया जाता है. हालांकि, अगर प्राथमिकता में सबसे नीचे वाले मेनिफ़ेस्ट में इस एट्रिब्यूट की जानकारी किसी दूसरी वैल्यू के साथ दी गई है, तो मर्ज किए गए मेनिफ़ेस्ट में उस वैल्यू का इस्तेमाल किया जाता है. इससे डिफ़ॉल्ट वैल्यू बदल जाती है. आपको हर एट्रिब्यूट को साफ़ तौर पर वैसा ही तय करना चाहिए जैसा आपको चाहिए. हर एट्रिब्यूट की डिफ़ॉल्ट वैल्यू, मेनिफ़ेस्ट रेफ़रंस में दी गई होती हैं.
नियम मार्कर मर्ज करना
मर्ज नियम मार्कर एक एक्सएमएल एट्रिब्यूट है. इसका इस्तेमाल, मर्ज से जुड़ी समस्याओं को हल करने या अनचाहे एलिमेंट और एट्रिब्यूट को हटाने के तरीके के बारे में अपनी प्राथमिकता बताने के लिए किया जा सकता है. मार्कर को पूरे एलिमेंट या एलिमेंट के कुछ खास एट्रिब्यूट पर लागू किया जा सकता है.
दो मेनिफ़ेस्ट फ़ाइलों को मर्ज करते समय, मर्ज करने वाला टूल, ज़्यादा प्राथमिकता वाली मेनिफ़ेस्ट फ़ाइल में इन मार्कर को खोजता है.
सभी मार्कर, Android tools नेमस्पेस से जुड़े होते हैं. इसलिए, आपको सबसे पहले <manifest> एलिमेंट में इस नेमस्पेस का एलान करना होगा, जैसा कि यहां दिखाया गया है:
<manifest xmlns:android="http://schemas.android.com/apk/res/android"
    package="com.example.myapp"
    xmlns:tools="http://schemas.android.com/tools">
नोड मार्कर
पूरे एक्सएमएल एलिमेंट (किसी दिए गए मेनिफ़ेस्ट एलिमेंट के सभी एट्रिब्यूट और उसके सभी चाइल्ड टैग पर) पर मर्ज करने का नियम लागू करने के लिए, इन एट्रिब्यूट का इस्तेमाल करें:
tools:node="merge"- विरोध को हल करने के लिए, एलिमेंट को मर्ज करने के तरीके का इस्तेमाल करके, इस टैग और सभी नेस्ट किए गए एलिमेंट के सभी एट्रिब्यूट को मर्ज करें. ऐसा तब करें, जब कोई विरोध न हो. यह एलिमेंट के लिए डिफ़ॉल्ट व्यवहार है.
कम प्राथमिकता वाला मेनिफ़ेस्ट:
<activity android:name="com.example.ActivityOne"
    android:windowSoftInputMode="stateUnchanged">
    <intent-filter>
        <action android:name="android.intent.action.SEND" />
        <category android:name="android.intent.category.DEFAULT" />
    </intent-filter>
</activity>
ज़्यादा प्राथमिकता वाला मेनिफ़ेस्ट:
<activity android:name="com.example.ActivityOne"
    android:screenOrientation="portrait"
    tools:node="merge">
</activity>
मर्ज किए गए मेनिफ़ेस्ट का नतीजा:
<activity android:name="com.example.ActivityOne"
    android:screenOrientation="portrait"
    android:windowSoftInputMode="stateUnchanged">
    <intent-filter>
        <action android:name="android.intent.action.SEND" />
        <category android:name="android.intent.category.DEFAULT" />
    </intent-filter>
</activity>
tools:node="mergeOnlyAttributes"- सिर्फ़ इस टैग में एट्रिब्यूट मर्ज करें. नेस्ट किए गए एलिमेंट को मर्ज न करें.
कम प्राथमिकता वाला मेनिफ़ेस्ट:
<activity android:name="com.example.ActivityOne"
    android:windowSoftInputMode="stateUnchanged">
    <intent-filter>
        <action android:name="android.intent.action.SEND" />
        <data android:type="image/*" />
        <category android:name="android.intent.category.DEFAULT" />
    </intent-filter>
</activity>
ज़्यादा प्राथमिकता वाला मेनिफ़ेस्ट:
<activity android:name="com.example.ActivityOne"
    android:screenOrientation="portrait"
    tools:node="mergeOnlyAttributes">
</activity>
मर्ज किए गए मेनिफ़ेस्ट का नतीजा:
<activity android:name="com.example.ActivityOne"
    android:screenOrientation="portrait"
    android:windowSoftInputMode="stateUnchanged">
</activity>
tools:node="remove"- मर्ज किए गए मेनिफ़ेस्ट से इस एलिमेंट को हटाएं. इसका इस्तेमाल तब किया जाता है, जब आपको मर्ज किए गए मेनिफ़ेस्ट में ऐसा एलिमेंट दिखता है जिसकी आपको ज़रूरत नहीं है. यह एलिमेंट, कम प्राथमिकता वाली मेनिफ़ेस्ट फ़ाइल से मिला होता है, जिसे कंट्रोल नहीं किया जा सकता. जैसे, इंपोर्ट की गई लाइब्रेरी.
कम प्राथमिकता वाला मेनिफ़ेस्ट:
<activity-alias android:name="com.example.alias">
  <meta-data android:name="cow"
      android:value="@string/moo"/>
  <meta-data android:name="duck"
      android:value="@string/quack"/>
</activity-alias>
ज़्यादा प्राथमिकता वाला मेनिफ़ेस्ट:
<activity-alias android:name="com.example.alias">
  <meta-data android:name="cow"
      tools:node="remove"/>
</activity-alias>
मर्ज किए गए मेनिफ़ेस्ट का नतीजा:
<activity-alias android:name="com.example.alias">
  <meta-data android:name="duck"
      android:value="@string/quack"/>
</activity-alias>
tools:node="removeAll"tools:node="remove"की तरह ही, लेकिन यह इस एलिमेंट टाइप से मैच करने वाले सभी एलिमेंट को हटा देता है (एक ही पैरंट एलिमेंट में).कम प्राथमिकता वाला मेनिफ़ेस्ट:
<activity-alias android:name="com.example.alias">
  <meta-data android:name="cow"
      android:value="@string/moo"/>
  <meta-data android:name="duck"
      android:value="@string/quack"/>
</activity-alias>
ज़्यादा प्राथमिकता वाला मेनिफ़ेस्ट:
<activity-alias android:name="com.example.alias">
  <meta-data tools:node="removeAll"/>
</activity-alias>
मर्ज किए गए मेनिफ़ेस्ट का नतीजा:
<activity-alias android:name="com.example.alias"> </activity-alias>tools:node="replace"- कम प्राथमिकता वाले एलिमेंट को पूरी तरह से बदलें. इसका मतलब है कि अगर कम प्राथमिकता वाले मेनिफ़ेस्ट में मैच करने वाला कोई एलिमेंट है, तो उसे अनदेखा करें और इस एलिमेंट का इस्तेमाल ठीक वैसे ही करें जैसे वह इस मेनिफ़ेस्ट में दिखता है.
कम प्राथमिकता वाला मेनिफ़ेस्ट:
<activity-alias android:name="com.example.alias">
  <meta-data android:name="cow"
      android:value="@string/moo"/>
  <meta-data android:name="duck"
      android:value="@string/quack"/>
</activity-alias>
ज़्यादा प्राथमिकता वाला मेनिफ़ेस्ट:
<activity-alias android:name="com.example.alias"
    tools:node="replace">
  <meta-data android:name="fox"
      android:value="@string/dingeringeding"/>
</activity-alias>
मर्ज किए गए मेनिफ़ेस्ट का नतीजा:
<activity-alias android:name="com.example.alias">
  <meta-data android:name="fox"
      android:value="@string/dingeringeding"/>
</activity-alias>
tools:node="strict"- जब भी कम प्राथमिकता वाले मेनिफ़ेस्ट में मौजूद यह एलिमेंट, ज़्यादा प्राथमिकता वाले मेनिफ़ेस्ट में मौजूद एलिमेंट से पूरी तरह मेल न खाता हो, तब बिल्ड फ़ेल होने की जानकारी जनरेट करें. ऐसा तब तक करें, जब तक कि मर्ज करने के अन्य नियम के मार्कर से इसे ठीक नहीं कर दिया जाता. इससे, मर्ज करने से जुड़ी समस्याओं को हल करने के लिए इस्तेमाल होने वाले हेयुरिस्टिक्स की सेटिंग बदल जाती है. उदाहरण के लिए, अगर कम प्राथमिकता वाले मेनिफ़ेस्ट में कोई अतिरिक्त एट्रिब्यूट शामिल है, तो बिल्ड पूरा नहीं होता. हालांकि, डिफ़ॉल्ट व्यवहार के तहत, मर्ज किए गए मेनिफ़ेस्ट में अतिरिक्त एट्रिब्यूट जोड़ दिया जाता है.
कम प्राथमिकता वाला मेनिफ़ेस्ट:
<activity android:name="com.example.ActivityOne"
    android:windowSoftInputMode="stateUnchanged">
    <intent-filter>
        <action android:name="android.intent.action.SEND" />
        <category android:name="android.intent.category.DEFAULT" />
    </intent-filter>
</activity>
ज़्यादा प्राथमिकता वाला मेनिफ़ेस्ट:
<activity android:name="com.example.ActivityOne"
    android:screenOrientation="portrait"
    tools:node="strict">
</activity>
इससे मेनिफ़ेस्ट मर्ज करने में गड़बड़ी होती है. स्ट्रिक्ट मोड में, दोनों मेनिफ़ेस्ट एलिमेंट एक जैसे होने चाहिए. इन अंतरों को हल करने के लिए, आपको मर्ज करने के अन्य नियम के मार्कर लागू करने होंगे. (
tools:node="strict"के बिना, ये दोनों फ़ाइलें बिना किसी गड़बड़ी के मर्ज हो सकती हैं, जैसा किtools:node="merge"के उदाहरण में दिखाया गया है.)
एट्रिब्यूट मार्कर
अगर आपको सिर्फ़ मेनिफ़ेस्ट टैग में मौजूद कुछ खास एट्रिब्यूट पर मर्ज करने का नियम लागू करना है, तो इन एट्रिब्यूट का इस्तेमाल करें. हर एट्रिब्यूट में एक या उससे ज़्यादा एट्रिब्यूट के नाम (एट्रिब्यूट नेमस्पेस के साथ) शामिल किए जा सकते हैं. इन्हें कॉमा लगाकर अलग किया जाता है.
tools:remove="attr, ..."- मर्ज किए गए मेनिफ़ेस्ट से, बताए गए एट्रिब्यूट हटाएं.
इसका इस्तेमाल तब किया जाता है, जब कम प्राथमिकता वाली मेनिफ़ेस्ट फ़ाइल में ये एट्रिब्यूट शामिल हों और आपको यह पक्का करना हो कि ये एट्रिब्यूट, मर्ज किए गए मेनिफ़ेस्ट में शामिल न हों.
कम प्राथमिकता वाला मेनिफ़ेस्ट:
<activity android:name="com.example.ActivityOne"
    android:windowSoftInputMode="stateUnchanged">
ज़्यादा प्राथमिकता वाला मेनिफ़ेस्ट:
<activity android:name="com.example.ActivityOne"
    android:screenOrientation="portrait"
    tools:remove="android:windowSoftInputMode">
मर्ज किए गए मेनिफ़ेस्ट का नतीजा:
<activity android:name="com.example.ActivityOne"
    android:screenOrientation="portrait">
tools:replace="attr, ..."- कम प्राथमिकता वाले मेनिफ़ेस्ट में मौजूद एट्रिब्यूट को, इस मेनिफ़ेस्ट में मौजूद एट्रिब्यूट से बदलें. दूसरे शब्दों में, हमेशा ज़्यादा प्राथमिकता वाले मेनिफ़ेस्ट की वैल्यू रखें.
कम प्राथमिकता वाला मेनिफ़ेस्ट:
<activity android:name="com.example.ActivityOne"
    android:theme="@oldtheme"
    android:exported="false"
    android:windowSoftInputMode="stateUnchanged">
ज़्यादा प्राथमिकता वाला मेनिफ़ेस्ट:
<activity android:name="com.example.ActivityOne"
    android:theme="@newtheme"
    android:exported="true"
    android:screenOrientation="portrait"
    tools:replace="android:theme,android:exported">
मर्ज किए गए मेनिफ़ेस्ट का नतीजा:
<activity android:name="com.example.ActivityOne"
    android:theme="@newtheme"
    android:exported="true"
    android:screenOrientation="portrait"
    android:windowSoftInputMode="stateUnchanged">
tools:strict="attr, ..."- जब भी कम प्राथमिकता वाले मेनिफ़ेस्ट में मौजूद ये एट्रिब्यूट, ज़्यादा प्राथमिकता वाले मेनिफ़ेस्ट में मौजूद एट्रिब्यूट से पूरी तरह मेल न खाते हों, तब बिल्ड में गड़बड़ी का मैसेज जनरेट करें. यह सभी एट्रिब्यूट के लिए डिफ़ॉल्ट तौर पर लागू होता है. हालांकि, मर्ज करने से जुड़ी समस्याओं को हल करने के लिए इस्तेमाल होने वाले हेयुरिस्टिक्स में बताए गए खास एट्रिब्यूट के लिए यह लागू नहीं होता.
कम प्राथमिकता वाला मेनिफ़ेस्ट:
<activity android:name="com.example.ActivityOne"
    android:screenOrientation="landscape">
</activity>
ज़्यादा प्राथमिकता वाला मेनिफ़ेस्ट:
<activity android:name="com.example.ActivityOne"
    android:screenOrientation="portrait"
    tools:strict="android:screenOrientation">
</activity>
इससे मेनिफ़ेस्ट मर्ज करने से जुड़ी गड़बड़ी होती है. समस्या को हल करने के लिए, आपको मर्ज करने के दूसरे नियम के मार्कर लागू करने होंगे. यह डिफ़ॉल्ट रूप से होता है. इसलिए,
tools:strict="screenOrientation"को साफ़ तौर पर जोड़ने पर भी यही नतीजा मिलता है.
एक एलिमेंट पर कई मार्कर भी लागू किए जा सकते हैं, जैसा कि इस उदाहरण में दिखाया गया है:
कम प्राथमिकता वाला मेनिफ़ेस्ट:
<activity android:name="com.example.ActivityOne"
    android:theme="@oldtheme"
    android:exported="false"
    android:allowTaskReparenting="true"
    android:windowSoftInputMode="stateUnchanged">
ज़्यादा प्राथमिकता वाला मेनिफ़ेस्ट:
<activity android:name="com.example.ActivityOne"
    android:theme="@newtheme"
    android:exported="true"
    android:screenOrientation="portrait"
    tools:replace="android:theme,android:exported"
    tools:remove="android:windowSoftInputMode">
मर्ज किए गए मेनिफ़ेस्ट का नतीजा:
<activity android:name="com.example.ActivityOne"
    android:theme="@newtheme"
    android:exported="true"
    android:allowTaskReparenting="true"
    android:screenOrientation="portrait">
मार्कर सिलेक्टर
अगर आपको मर्ज करने के नियम के मार्कर सिर्फ़ किसी एक इंपोर्ट की गई लाइब्रेरी पर लागू करने हैं, तो लाइब्रेरी पैकेज के नाम के साथ tools:selector एट्रिब्यूट जोड़ें.
उदाहरण के लिए, नीचे दिए गए मेनिफ़ेस्ट के साथ, remove
मर्ज करने का नियम सिर्फ़ तब लागू होता है, जब कम प्राथमिकता वाली मेनिफ़ेस्ट फ़ाइल,
com.example.lib1 लाइब्रेरी से हो:
<permission android:name="permissionOne"
    tools:node="remove"
    tools:selector="com.example.lib1">
अगर कम प्राथमिकता वाला मेनिफ़ेस्ट किसी दूसरे सोर्स से है, तो remove मर्ज करने के नियम को अनदेखा कर दिया जाता है.
ध्यान दें: अगर इसका इस्तेमाल किसी एट्रिब्यूट मार्कर के साथ किया जाता है, तो यह मार्कर में बताए गए सभी एट्रिब्यूट पर लागू होता है.
इंपोर्ट की गई लाइब्रेरी के लिए <uses-sdk> को बदलना
डिफ़ॉल्ट रूप से, मुख्य मेनिफ़ेस्ट फ़ाइल से ज़्यादा minSdk वैल्यू वाली लाइब्रेरी इंपोर्ट करने पर, गड़बड़ी होती है और लाइब्रेरी इंपोर्ट नहीं की जा सकती.
मर्ज टूल को इस विरोध को अनदेखा करने और आपके ऐप्लिकेशन की कम minSdk वैल्यू को बनाए रखते हुए लाइब्रेरी इंपोर्ट करने के लिए, <uses-sdk> टैग में overrideLibrary एट्रिब्यूट जोड़ें.
एट्रिब्यूट की वैल्यू, एक या एक से ज़्यादा लाइब्रेरी पैकेज के नाम हो सकते हैं. इन्हें कॉमा लगाकर अलग किया जाता है. इससे उन लाइब्रेरी के बारे में पता चलता है जो मुख्य मेनिफ़ेस्ट के minSdk को बदल सकती हैं.
उदाहरण के लिए, अगर आपके ऐप्लिकेशन का मुख्य मेनिफ़ेस्ट इस तरह overrideLibrary
लागू करता है:
<manifest xmlns:android="http://schemas.android.com/apk/res/android"
          package="com.example.app"
          xmlns:tools="http://schemas.android.com/tools">
  <uses-sdk tools:overrideLibrary="com.example.lib1, com.example.lib2"/>
...
इसके बाद, <uses-sdk> टैग से जुड़ी गड़बड़ी के बिना, नीचे दिए गए मेनिफ़ेस्ट को मर्ज किया जा सकता है. साथ ही, मर्ज किए गए मेनिफ़ेस्ट में ऐप्लिकेशन मेनिफ़ेस्ट से minSdk="2" को हटा दिया जाता है.
<manifest xmlns:android="http://schemas.android.com/apk/res/android"
          package="com.example.lib1">
   <uses-sdk android:minSdk="4" />
...
सिस्टम की अनुमतियां
Android के कुछ एपीआई, पहले ऐप्लिकेशन के लिए आसानी से ऐक्सेस किए जा सकते थे. हालांकि, Android के हाल ही के वर्शन में, सिस्टम की अनुमतियों की वजह से इन पर पाबंदी लगा दी गई है.
जिन ऐप्लिकेशन को इन एपीआई का ऐक्सेस चाहिए उन्हें काम करने में आने वाली समस्याओं से बचाने के लिए, Android के नए वर्शन में ऐप्लिकेशन को अनुमति के बिना भी उन एपीआई को ऐक्सेस करने की अनुमति दी जाती है. हालांकि, ऐसा तब ही होता है, जब targetSdkVersion को उस वर्शन से कम वैल्यू पर सेट किया गया हो जिसमें पाबंदी जोड़ी गई थी. इस तरह के व्यवहार से, ऐप्लिकेशन को एपीआई को ऐक्सेस करने की अनुमति मिल जाती है. जिन मर्ज किए गए मेनिफ़ेस्ट में targetSdkVersion के लिए अलग-अलग वैल्यू हैं उन पर असर पड़ सकता है.
अगर कम प्राथमिकता वाली मेनिफ़ेस्ट फ़ाइल में targetSdkVersion की वैल्यू कम है, जिससे उसे अनुमति मिलती है और ज़्यादा प्राथमिकता वाली मेनिफ़ेस्ट में यह अनुमति नहीं है (क्योंकि इसकी targetSdkVersion वैल्यू, उस वर्शन के बराबर या उससे ज़्यादा है जिसमें पाबंदी जोड़ी गई थी), तो मर्ज करने वाला टूल, मर्ज किए गए मेनिफ़ेस्ट में सिस्टम की अनुमति को साफ़ तौर पर जोड़ता है.
उदाहरण के लिए, अगर आपके ऐप्लिकेशन में targetSdkVersion को 4 या उससे ज़्यादा पर सेट किया गया है और targetSdkVersion को 3 या उससे कम पर सेट करके कोई लाइब्रेरी इंपोर्ट की गई है, तो मर्ज करने वाला टूल, मर्ज किए गए मेनिफ़ेस्ट में WRITE_EXTERNAL_STORAGE अनुमति जोड़ता है.
टेबल 2 में, उन सभी अनुमतियों की सूची दी गई है जिन्हें आपके मर्ज किए गए मेनिफ़ेस्ट में जोड़ा जा सकता है:
टेबल 2. उन अनुमतियों की सूची जिन्हें मर्ज करने वाला टूल, मर्ज किए गए मेनिफ़ेस्ट में जोड़ सकता है
| कम प्राथमिकता वाले मेनिफ़ेस्ट के एलान | मर्ज किए गए मेनिफ़ेस्ट में जोड़ी गई अनुमतियां |
|---|---|
targetSdkVersion 3 या उससे कम है |
WRITE_EXTERNAL_STORAGE, READ_PHONE_STATE |
targetSdkVersion 15 या उससे पहले का वर्शन है और READ_CONTACTS का इस्तेमाल किया जा रहा है |
READ_CALL_LOG |
targetSdkVersion 15 या उससे पहले का वर्शन है और WRITE_CONTACTS का इस्तेमाल किया जा रहा है |
WRITE_CALL_LOG |
मर्ज किए गए मेनिफ़ेस्ट की जांच करना और उसमें मौजूद समस्याओं का पता लगाना
ऐप्लिकेशन बनाने से पहले ही, मर्ज किए गए मेनिफ़ेस्ट की झलक देखी जा सकती है. झलक देखने के लिए, यह तरीका अपनाएं:
- Android Studio में, अपनी
AndroidManifest.xmlफ़ाइल खोलें. - एडिटर में सबसे नीचे मौजूद, मर्ज किया गया मेनिफ़ेस्ट टैब पर क्लिक करें.
मर्ज किए गए मेनिफ़ेस्ट व्यू में, बाईं ओर मर्ज किए गए मेनिफ़ेस्ट के नतीजे दिखते हैं और दाईं ओर, मर्ज की गई हर मेनिफ़ेस्ट फ़ाइल की जानकारी दिखती है, जैसा कि दूसरे चित्र में दिखाया गया है.
कम प्राथमिकता वाली मेनिफ़ेस्ट फ़ाइलों से मर्ज किए गए एलिमेंट, बाईं ओर अलग-अलग रंगों में हाइलाइट किए गए हैं. हर रंग की कुंजी, मेनिफ़ेस्ट सोर्स में बताई गई है.
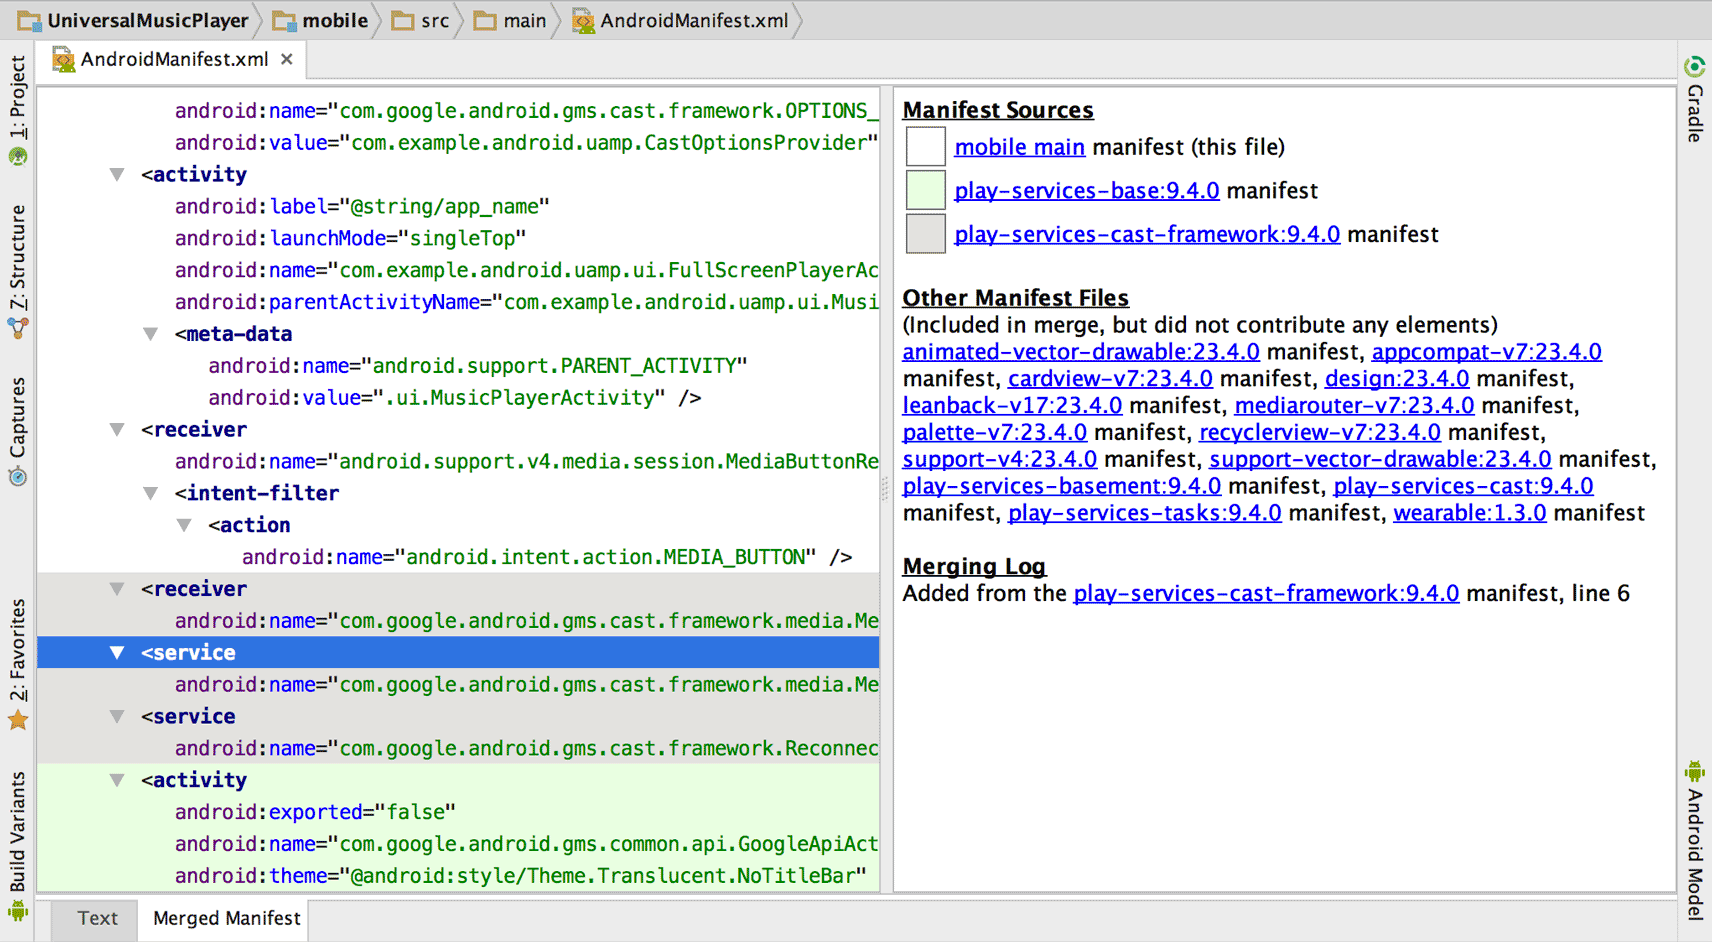
दूसरी इमेज. मर्ज किए गए मेनिफ़ेस्ट का व्यू.
जिन मेनिफ़ेस्ट फ़ाइलों ने बिल्ड में हिस्सा लिया था, लेकिन जिनमें एलिमेंट या एट्रिब्यूट शामिल नहीं थे उन्हें अन्य मेनिफ़ेस्ट फ़ाइलें में शामिल किया गया है.
किसी एलिमेंट के सोर्स के बारे में जानकारी देखने के लिए, बाएं पैनल में उस पर क्लिक करें. इसके बाद, मर्जिंग लॉग में जानकारी दिखेगी.
अगर कोई विरोध होता है, तो वह मर्ज करने से जुड़ी गड़बड़ियां में दिखता है. साथ ही, मर्ज करने के नियम के मार्कर का इस्तेमाल करके, विरोध को हल करने का सुझाव भी दिखता है.
गड़बड़ियां, इवेंट लॉग विंडो में भी प्रिंट होती हैं. इन्हें देखने के लिए, व्यू > टूल विंडो > इवेंट लॉग चुनें.
मर्ज किए जा रहे डिसीज़न ट्री का पूरा लॉग देखने के लिए, लॉग फ़ाइल को अपने मॉड्यूल की build/outputs/logs/ डायरेक्ट्री में manifest-merger-buildVariant-report.txt नाम से ढूंढें.
नीतियां मर्ज करना
मेनिफ़ेस्ट मर्ज करने वाला टूल, एक मेनिफ़ेस्ट फ़ाइल के हर एक्सएमएल एलिमेंट को, दूसरी फ़ाइल के मिलते-जुलते एलिमेंट से मैच कर सकता है. मर्ज करने वाला टूल, मैच की कुंजी का इस्तेमाल करके हर एलिमेंट से मैच करता है. यह कुंजी, एट्रिब्यूट की यूनीक वैल्यू (जैसे, android:name) या टैग की यूनीक वैल्यू हो सकती है. उदाहरण के लिए, सिर्फ़ एक <supports-screen> एलिमेंट हो सकता है.
अगर दो मेनिफ़ेस्ट में एक ही एक्सएमएल एलिमेंट है, तो टूल, मर्ज करने की तीन नीतियों में से किसी एक का इस्तेमाल करके, दोनों एलिमेंट को आपस में मर्ज कर देता है:
- मर्ज करें
- एक-दूसरे से मेल न खाने वाले सभी एट्रिब्यूट को एक ही टैग में जोड़ें और चाइल्ड एलिमेंट को, मर्ज करने की उनकी नीति के मुताबिक मर्ज करें. अगर कोई एट्रिब्यूट एक-दूसरे से मेल नहीं खाता है, तो मर्ज करने के नियम के मार्कर की मदद से, उन्हें एक साथ मर्ज करें.
- सिर्फ़ चाइल्ड एंट्री मर्ज करना
- एट्रिब्यूट को आपस में न जोड़ें या मर्ज न करें. सिर्फ़ सबसे ज़्यादा प्राथमिकता वाली मेनिफ़ेस्ट फ़ाइल से मिले एट्रिब्यूट रखें. साथ ही, एलिमेंट को मर्ज करने की नीति के मुताबिक, चाइल्ड एलिमेंट को मर्ज करें.
- Keep
- एलिमेंट को वैसे ही रहने दें और उसे मर्ज की गई फ़ाइल में मौजूद कॉमन पैरंट एलिमेंट में जोड़ें. इसका इस्तेमाल सिर्फ़ तब किया जाता है, जब एक ही एलिमेंट के कई एलान किए जा सकते हों.
टेबल 3 में हर एलिमेंट टाइप, इस्तेमाल की गई मर्ज नीति का टाइप, और दो मेनिफ़ेस्ट के बीच एलिमेंट मैच का पता लगाने के लिए इस्तेमाल की गई कुंजी की सूची दी गई है:
टेबल 3. मेनिफ़ेस्ट एलिमेंट को मर्ज करने की नीतियां और मैच करने वाली कुंजियां
| कौन-कौन सी चीज़ें शामिल हैं | मर्ज करने की नीति | मैच की |
|---|---|---|
<action>
|
मर्ज करें | android:name एट्रिब्यूट
|
<activity>
|
मर्ज करें | android:name एट्रिब्यूट
|
<application>
|
मर्ज करें | हर <manifest> के लिए सिर्फ़ एक है.
|
<category>
|
मर्ज करें | android:name एट्रिब्यूट
|
<data>
|
मर्ज करें | हर <intent-filter> के लिए सिर्फ़ एक है.
|
<grant-uri-permission>
|
मर्ज करें | हर <provider> के लिए सिर्फ़ एक है.
|
<instrumentation>
|
मर्ज करें | android:name एट्रिब्यूट
|
<intent-filter>
|
Keep | कोई मैच नहीं; पैरंट एलिमेंट में कई एलान किए जा सकते हैं. |
<manifest>
|
सिर्फ़ चाइल्ड एंट्री मर्ज करना | हर फ़ाइल में सिर्फ़ एक होता है. |
<meta-data>
|
मर्ज करें | android:name एट्रिब्यूट
|
<path-permission>
|
मर्ज करें | हर <provider> के लिए सिर्फ़ एक है.
|
<permission-group>
|
मर्ज करें | android:name एट्रिब्यूट
|
<permission>
|
मर्ज करें | android:name एट्रिब्यूट
|
<permission-tree>
|
मर्ज करें | android:name एट्रिब्यूट
|
<provider>
|
मर्ज करें | android:name एट्रिब्यूट
|
<receiver>
|
मर्ज करें | android:name एट्रिब्यूट
|
<screen>
|
मर्ज करें | android:screenSize एट्रिब्यूट
|
<service>
|
मर्ज करें | android:name एट्रिब्यूट
|
<supports-gl-texture>
|
मर्ज करें | android:name एट्रिब्यूट
|
<supports-screen>
|
मर्ज करें | हर <manifest> के लिए सिर्फ़ एक है.
|
<uses-configuration>
|
मर्ज करें | हर <manifest> के लिए सिर्फ़ एक है.
|
<uses-feature>
|
मर्ज करें | android:name एट्रिब्यूट (अगर मौजूद नहीं है, तो
android:glEsVersion एट्रिब्यूट)
|
<uses-library>
|
मर्ज करें | android:name एट्रिब्यूट
|
<uses-permission>
|
मर्ज करें | android:name एट्रिब्यूट
|
<uses-sdk>
|
मर्ज करें | हर <manifest> के लिए सिर्फ़ एक है.
|
| कस्टम एलिमेंट | मर्ज करें | मेल नहीं खाते; ये मर्ज करने वाले टूल के लिए अनजान होते हैं और इन्हें हमेशा मर्ज किए गए मेनिफ़ेस्ट में शामिल किया जाता है. |
मेनिफ़ेस्ट में बिल्ड वैरिएबल इंजेक्ट करना
अगर आपको अपनी AndroidManifest.xml फ़ाइल में ऐसे वैरिएबल डालने हैं जो आपकी build.gradle फ़ाइल में तय किए गए हैं, तो ऐसा manifestPlaceholders प्रॉपर्टी की मदद से किया जा सकता है. यह प्रॉपर्टी, की-वैल्यू पेयर का मैप लेती है, जैसा कि यहां दिखाया गया है:
Groovy
android {
    defaultConfig {
        manifestPlaceholders = [hostName:"www.example.com"]
    }
    ...
}
Kotlin
android {
    defaultConfig {
        manifestPlaceholders["hostName"] = "www.example.com"
    }
    ...
}
इसके बाद, एट्रिब्यूट की वैल्यू के तौर पर, मेनिफ़ेस्ट फ़ाइल में किसी एक प्लेसहोल्डर को डाला जा सकता है:
<intent-filter ... >
    <data android:scheme="https" android:host="${hostName}" ... />
    ...
</intent-filter>
डिफ़ॉल्ट रूप से, बिल्ड टूल ${applicationId} प्लेसहोल्डर में आपके ऐप्लिकेशन का ऐप्लिकेशन आईडी भी उपलब्ध कराते हैं. यह वैल्यू, मौजूदा बिल्ड के लिए हमेशा फ़ाइनल ऐप्लिकेशन आईडी से मैच होती है. इसमें बिल्ड के वैरिएंट के हिसाब से किए गए बदलाव भी शामिल होते हैं.
यह तब काम आता है, जब आपको अपने बिल्ड वैरिएंट के बीच भी, इंटेंट ऐक्शन जैसे आइडेंटिफ़ायर के लिए यूनीक नेमस्पेस का इस्तेमाल करना हो.
उदाहरण के लिए, अगर आपकी build.gradle फ़ाइल कुछ ऐसी दिखती है:
Groovy
android {
    defaultConfig {
        applicationId "com.example.myapp"
    }
    flavorDimensions "type"
    productFlavors {
        free {
            applicationIdSuffix ".free"
            dimension "type"
        }
        pro {
            applicationIdSuffix ".pro"
            dimension "type"
        }
    }
}
Kotlin
android {
    defaultConfig {
        applicationId = "com.example.myapp"
    }
    flavorDimensions += "type"
    productFlavors {
        create("free") {
            applicationIdSuffix = ".free"
            dimension = "type"
        }
        create("pro") {
            applicationIdSuffix = ".pro"
            dimension = "type"
        }
    }
}
इसके बाद, अपने मेनिफ़ेस्ट में ऐप्लिकेशन आईडी को इस तरह डाला जा सकता है:
<intent-filter ... >
    <action android:name="${applicationId}.TRANSMOGRIFY" />
    ...
</intent-filter>
"मुफ़्त" प्रॉडक्ट फ़्लेवर बनाने पर, मेनिफ़ेस्ट का नतीजा यह होता है:
<intent-filter ... >
   <action android:name="com.example.myapp.free.TRANSMOGRIFY" />
    ...
</intent-filter>
ज़्यादा जानकारी के लिए, ऐप्लिकेशन आईडी सेट करना लेख पढ़ें.