این صفحه به شما نشان می دهد که چگونه می توانید انواع ساخت را برای ایجاد نسخه های مختلف برنامه خود از یک پروژه واحد پیکربندی کنید و چگونه وابستگی ها و پیکربندی های امضای خود را به درستی مدیریت کنید.
هر نوع ساخت نشان دهنده نسخه متفاوتی از برنامه شما است که می توانید بسازید. به عنوان مثال، ممکن است بخواهید یک نسخه از برنامه خود را بسازید که رایگان با مجموعه ای محدود از محتوا، و نسخه دیگری پولی که شامل موارد بیشتری باشد. همچنین میتوانید نسخههای مختلفی از برنامه خود را بسازید که دستگاههای مختلف را هدف قرار میدهند، بر اساس سطح API یا سایر تغییرات دستگاه.
انواع ساخت نتیجه استفاده Gradle از مجموعه ای خاص از قوانین برای ترکیب تنظیمات، کد و منابع پیکربندی شده در انواع ساخت و طعم محصول شماست. اگرچه شما انواع ساخت را مستقیماً پیکربندی نمیکنید، اما انواع ساخت و طعمهای محصول را که آنها را تشکیل میدهند پیکربندی میکنید.
به عنوان مثال، طعم محصول "دمو" ممکن است ویژگی ها و الزامات دستگاه خاصی را مشخص کند، مانند کد منبع سفارشی، منابع، و حداقل سطوح API، در حالی که نوع ساخت "اشکال زدایی" تنظیمات مختلف ساخت و بسته بندی، مانند گزینه های اشکال زدایی و کلیدهای امضا را اعمال می کند. نوع ساختی که این دو را ترکیب میکند، نسخه «demoDebug» برنامه شما است و ترکیبی از پیکربندیها و منابع موجود در طعم محصول «دمو»، نوع ساخت «اشکالزدایی» و مجموعه main/
منبع را شامل میشود.
پیکربندی انواع ساخت
می توانید انواع ساخت را در بلوک android
فایل build.gradle.kts
در سطح ماژول ایجاد و پیکربندی کنید. هنگامی که یک ماژول جدید ایجاد می کنید، Android Studio به طور خودکار انواع ساخت دیباگ و انتشار را ایجاد می کند. اگرچه نوع ساخت اشکالزدایی در فایل پیکربندی ساخت ظاهر نمیشود، Android Studio آن را با debuggable true
پیکربندی میکند. این به شما امکان میدهد برنامه را در دستگاههای Android ایمن اشکالزدایی کنید و امضای برنامه را با یک فروشگاه کلید اشکال زدایی عمومی پیکربندی کنید.
اگر میخواهید تنظیمات خاصی را اضافه یا تغییر دهید، میتوانید نوع ساخت اشکالزدایی را به پیکربندی خود اضافه کنید. نمونه زیر یک applicationIdSuffix
برای نوع ساخت اشکالزدایی مشخص میکند و یک نوع ساخت «staging» را پیکربندی میکند که با استفاده از تنظیمات از نوع ساخت اشکالزدایی مقداردهی اولیه میشود:
کاتلین
android { defaultConfig { manifestPlaceholders["hostName"] = "www.example.com" ... } buildTypes { getByName("release") { isMinifyEnabled = true proguardFiles(getDefaultProguardFile("proguard-android.txt"), "proguard-rules.pro") } getByName("debug") { applicationIdSuffix = ".debug" isDebuggable = true } /** * The `initWith` property lets you copy configurations from other build types, * then configure only the settings you want to change. This one copies the debug build * type, and then changes the manifest placeholder and application ID. */ create("staging") { initWith(getByName("debug")) manifestPlaceholders["hostName"] = "internal.example.com" applicationIdSuffix = ".debugStaging" } } }
شیار
android { defaultConfig { manifestPlaceholders = [hostName:"www.example.com"] ... } buildTypes { release { minifyEnabled true proguardFiles getDefaultProguardFile('proguard-android.txt'), 'proguard-rules.pro' } debug { applicationIdSuffix ".debug" debuggable true } /** * The `initWith` property lets you copy configurations from other build types, * then configure only the settings you want to change. This one copies the debug build * type, and then changes the manifest placeholder and application ID. */ staging { initWith debug manifestPlaceholders = [hostName:"internal.example.com"] applicationIdSuffix ".debugStaging" } } }
توجه: هنگامی که در فایل پیکربندی ساخت، تغییراتی ایجاد می کنید، Android Studio از شما می خواهد که پروژه خود را با پیکربندی جدید همگام سازی کنید. برای همگام سازی پروژه خود، روی همگام سازی اکنون در نوار اعلان که هنگام ایجاد تغییر ظاهر می شود کلیک کنید یا روی همگام سازی پروژه کلیک کنید. از نوار ابزار اگر Android Studio متوجه هر گونه خطایی در پیکربندی شما شود، پنجره Messages برای توصیف مشکل ظاهر می شود.
برای کسب اطلاعات بیشتر در مورد تمام ویژگی هایی که می توانید با انواع ساخت پیکربندی کنید، مرجع BuildType
بخوانید.
طعم های محصول را پیکربندی کنید
ایجاد طعم محصول مشابه ایجاد انواع ساخت است. طعم های محصول را به بلوک productFlavors
در پیکربندی ساخت خود اضافه کنید و تنظیماتی را که می خواهید اضافه کنید. طعم های محصول از ویژگی های defaultConfig
پشتیبانی می کنند، زیرا defaultConfig
در واقع به کلاس ProductFlavor
تعلق دارد. این بدان معناست که میتوانید پیکربندی پایه را برای همه طعمها در بلوک defaultConfig
ارائه کنید و هر طعم میتواند هر یک از این مقادیر پیشفرض را تغییر دهد، مانند applicationId
. برای کسب اطلاعات بیشتر در مورد شناسه برنامه، تنظیم شناسه برنامه را بخوانید.
توجه: همچنان باید نام بسته را با استفاده از ویژگی package
در فایل main/
مانیفست مشخص کنید. همچنین باید از آن نام بسته در کد منبع خود برای ارجاع به کلاس R
یا حل هر گونه فعالیت یا ثبت خدمات نسبی استفاده کنید. این به شما امکان می دهد از applicationId
استفاده کنید تا به هر محصول یک شناسه منحصر به فرد برای بسته بندی و توزیع بدون نیاز به تغییر کد منبع خود بدهید.
همه طعم ها باید به یک بعد طعم نامگذاری شده تعلق داشته باشند که گروهی از طعم های محصول است. شما باید همه طعم ها را به یک بعد طعم اختصاص دهید. در غیر این صورت با خطای ساخت زیر مواجه خواهید شد.
Error: All flavors must now belong to a named flavor dimension. The flavor 'flavor_name' is not assigned to a flavor dimension.
اگر یک ماژول معین فقط یک بعد طعم را مشخص کند، افزونه Android Gradle به طور خودکار همه طعمهای ماژول را به آن بعد اختصاص میدهد.
نمونه کد زیر یک بعد طعم به نام "نسخه" ایجاد می کند و طعم های "دمو" و "کامل" محصول را اضافه می کند. این طعم ها applicationIdSuffix
و versionNameSuffix
خود را ارائه می دهند:
کاتلین
android { ... defaultConfig {...} buildTypes { getByName("debug"){...} getByName("release"){...} } // Specifies one flavor dimension. flavorDimensions += "version" productFlavors { create("demo") { // Assigns this product flavor to the "version" flavor dimension. // If you are using only one dimension, this property is optional, // and the plugin automatically assigns all the module's flavors to // that dimension. dimension = "version" applicationIdSuffix = ".demo" versionNameSuffix = "-demo" } create("full") { dimension = "version" applicationIdSuffix = ".full" versionNameSuffix = "-full" } } }
شیار
android { ... defaultConfig {...} buildTypes { debug{...} release{...} } // Specifies one flavor dimension. flavorDimensions "version" productFlavors { demo { // Assigns this product flavor to the "version" flavor dimension. // If you are using only one dimension, this property is optional, // and the plugin automatically assigns all the module's flavors to // that dimension. dimension "version" applicationIdSuffix ".demo" versionNameSuffix "-demo" } full { dimension "version" applicationIdSuffix ".full" versionNameSuffix "-full" } } }
توجه: اگر برنامه قدیمی دارید (که قبل از آگوست 2021 ایجاد شده است) که با استفاده از APK ها در Google Play توزیع می کنید، برای توزیع برنامه خود با استفاده از پشتیبانی از چندین APK در Google Play، یک مقدار applicationId
یکسان را به همه گونه ها اختصاص دهید و به هر گونه versionCode
متفاوتی بدهید. برای توزیع انواع مختلف برنامه خود به عنوان برنامه های جداگانه در Google Play، باید یک applicationId
متفاوت به هر گونه اختصاص دهید.
پس از ایجاد و پیکربندی طعم های محصول خود، روی همگام سازی اکنون در نوار اعلان کلیک کنید. هنگامی که همگام سازی کامل شد، Gradle به طور خودکار انواع ساخت را بر اساس نوع ساخت و طعم محصول شما ایجاد می کند و آنها را بر اساس <product-flavor><Build-Type>
نام گذاری می کند. به عنوان مثال، اگر طعم های محصول "دمو" و "کامل" را ایجاد کرده باشید و انواع ساخت پیش فرض "debug" و "release" را حفظ کرده باشید، Gradle انواع ساخت زیر را ایجاد می کند:
-
demoDebug
-
demoRelease
-
fullDebug
-
fullRelease
برای انتخاب نوع ساخت و اجرا، به Build > Select Build Variant بروید و یک نوع ساخت را از منو انتخاب کنید. برای شروع سفارشیسازی هر نوع ساخت با ویژگیها و منابع خاص خود، باید مجموعههای منبع را ایجاد و مدیریت کنید ، همانطور که در این صفحه توضیح داده شده است.
شناسه برنامه را برای انواع ساخت تغییر دهید
هنگامی که یک APK یا AAB برای برنامه خود می سازید، ابزارهای ساخت برنامه را با شناسه برنامه تعریف شده در بلوک defaultConfig
از فایل build.gradle.kts
تگ می کنند، همانطور که در مثال زیر نشان داده شده است. با این حال، اگر میخواهید نسخههای مختلفی از برنامهتان را ایجاد کنید تا بهصورت فهرستهای جداگانه در فروشگاه Google Play ظاهر شوند، مانند نسخههای «رایگان» و «حرفهای»، باید نسخههای ساخت جداگانهای ایجاد کنید که هر کدام شناسه برنامه متفاوتی داشته باشند.
در این مورد، هر نوع ساخت را به عنوان طعم محصول جداگانه تعریف کنید. برای هر طعم داخل بلوک productFlavors
، میتوانید ویژگی applicationId
دوباره تعریف کنید، یا در عوض میتوانید یک بخش را با استفاده از applicationIdSuffix
به شناسه برنامه پیشفرض اضافه کنید، همانطور که در اینجا نشان داده شده است:
کاتلین
android { defaultConfig { applicationId = "com.example.myapp" } productFlavors { create("free") { applicationIdSuffix = ".free" } create("pro") { applicationIdSuffix = ".pro" } } }
شیار
android { defaultConfig { applicationId "com.example.myapp" } productFlavors { free { applicationIdSuffix ".free" } pro { applicationIdSuffix ".pro" } } }
به این ترتیب، شناسه برنامه برای طعم محصول "رایگان" "com.example.myapp.free" است.
همچنین می توانید از applicationIdSuffix
برای اضافه کردن یک بخش بر اساس نوع ساخت خود استفاده کنید، همانطور که در اینجا نشان داده شده است:
کاتلین
android { ... buildTypes { getByName("debug") { applicationIdSuffix = ".debug" } } }
شیار
android { ... buildTypes { debug { applicationIdSuffix ".debug" } } }
از آنجایی که Gradle پیکربندی نوع ساخت را بعد از طعم محصول اعمال می کند، شناسه برنامه برای نوع ساخت "اشکال زدایی رایگان" "com.example.myapp.free.debug" است. این زمانی مفید است که میخواهید هم اشکال زدایی و هم نسخه انتشار را روی یک دستگاه داشته باشید، زیرا هیچ دو برنامهای نمیتوانند شناسه برنامه یکسانی داشته باشند.
اگر یک برنامه قدیمی (که قبل از آگوست 2021 ایجاد شده است) دارید که با استفاده از APK در Google Play توزیع میکنید، و میخواهید از فهرست برنامههای مشابه برای توزیع چندین APK استفاده کنید که هر کدام پیکربندی دستگاه متفاوتی مانند سطح API را هدف قرار میدهند، باید از همان شناسه برنامه برای هر نوع ساخت استفاده کنید، اما به هر APK یکversionCode
متفاوت بدهید. برای اطلاعات بیشتر، درباره پشتیبانی از APK چندگانه بخوانید. انتشار با استفاده از AAB ها بی تاثیر است، زیرا از یک مصنوع استفاده می کند که به طور پیش فرض از یک کد نسخه و شناسه برنامه استفاده می کند. نکته: اگر نیاز به ارجاع شناسه برنامه در فایل مانیفست خود دارید، میتوانید از مکاننمای ${applicationId}
در هر ویژگی مانیفست استفاده کنید. در طول ساخت، Gradle این تگ را با شناسه واقعی برنامه جایگزین می کند. برای اطلاعات بیشتر، به تزریق متغیرهای ساخت به مانیفست مراجعه کنید.
چندین طعم محصول را با ابعاد طعم ترکیب کنید
در برخی موارد، ممکن است بخواهید پیکربندی هایی را از طعم های مختلف محصول ترکیب کنید. برای مثال، ممکن است بخواهید پیکربندیهای مختلفی را برای طعمهای محصول «کامل» و «دمو» ایجاد کنید که بر اساس سطح API هستند. برای انجام این کار، افزونه Android Gradle به شما امکان می دهد چندین گروه از طعم های محصول را به عنوان ابعاد طعم ایجاد کنید.
هنگام ساخت اپلیکیشن، Gradle یک پیکربندی طعم محصول را از هر بعد طعمی که تعریف میکنید، همراه با پیکربندی نوع ساخت ترکیب میکند تا نوع ساخت نهایی را ایجاد کند. Gradle طعم های محصول را که متعلق به یک بعد طعم هستند ترکیب نمی کند.
نمونه کد زیر از ویژگی flavorDimensions
برای ایجاد یک بعد طعم "mode" برای گروه بندی طعم های محصول "full" و "demo" و یک بعد طعم "api" برای گروه بندی تنظیمات طعم محصول بر اساس سطح API استفاده می کند:
کاتلین
android { ... buildTypes { getByName("debug") {...} getByName("release") {...} } // Specifies the flavor dimensions you want to use. The order in which you // list the dimensions determines their priority, from highest to lowest, // when Gradle merges variant sources and configurations. You must assign // each product flavor you configure to one of the flavor dimensions. flavorDimensions += listOf("api", "mode") productFlavors { create("demo") { // Assigns this product flavor to the "mode" flavor dimension. dimension = "mode" ... } create("full") { dimension = "mode" ... } // Configurations in the "api" product flavors override those in "mode" // flavors and the defaultConfig block. Gradle determines the priority // between flavor dimensions based on the order in which they appear next // to the flavorDimensions property, with the first dimension having a higher // priority than the second, and so on. create("minApi24") { dimension = "api" minSdk = 24 // To ensure the target device receives the version of the app with // the highest compatible API level, assign version codes in increasing // value with API level. versionCode = 30000 + (android.defaultConfig.versionCode ?: 0) versionNameSuffix = "-minApi24" ... } create("minApi23") { dimension = "api" minSdk = 23 versionCode = 20000 + (android.defaultConfig.versionCode ?: 0) versionNameSuffix = "-minApi23" ... } create("minApi21") { dimension = "api" minSdk = 21 versionCode = 10000 + (android.defaultConfig.versionCode ?: 0) versionNameSuffix = "-minApi21" ... } } } ...
شیار
android { ... buildTypes { debug {...} release {...} } // Specifies the flavor dimensions you want to use. The order in which you // list the dimensions determines their priority, from highest to lowest, // when Gradle merges variant sources and configurations. You must assign // each product flavor you configure to one of the flavor dimensions. flavorDimensions "api", "mode" productFlavors { demo { // Assigns this product flavor to the "mode" flavor dimension. dimension "mode" ... } full { dimension "mode" ... } // Configurations in the "api" product flavors override those in "mode" // flavors and the defaultConfig block. Gradle determines the priority // between flavor dimensions based on the order in which they appear next // to the flavorDimensions property, with the first dimension having a higher // priority than the second, and so on. minApi24 { dimension "api" minSdkVersion 24 // To ensure the target device receives the version of the app with // the highest compatible API level, assign version codes in increasing // value with API level. versionCode 30000 + android.defaultConfig.versionCode versionNameSuffix "-minApi24" ... } minApi23 { dimension "api" minSdkVersion 23 versionCode 20000 + android.defaultConfig.versionCode versionNameSuffix "-minApi23" ... } minApi21 { dimension "api" minSdkVersion 21 versionCode 10000 + android.defaultConfig.versionCode versionNameSuffix "-minApi21" ... } } } ...
تعداد انواع ساختی که Gradle ایجاد می کند برابر است با حاصل ضرب تعداد طعم ها در هر بعد طعم و تعداد انواع ساختی که پیکربندی می کنید. وقتی Gradle هر نوع ساخت یا مصنوعات مربوطه را نام میبرد، طعمهای محصول متعلق به بعد طعم با اولویت بالاتر ابتدا ظاهر میشوند، سپس طعمهای مربوط به ابعاد با اولویت پایینتر و سپس نوع ساخت ظاهر میشوند.
با استفاده از پیکربندی ساخت قبلی به عنوان مثال، Gradle در مجموع 12 نوع ساخت با طرح نامگذاری زیر ایجاد می کند:
- نوع ساخت:
[minApi24, minApi23, minApi21][Demo, Full][Debug, Release]
- APK مربوطه:
app-[minApi24, minApi23, minApi21]-[demo, full]-[debug, release].apk
- به عنوان مثال،
- نوع ساخت:
minApi24DemoDebug
- APK مربوطه:
app-minApi24-demo-debug.apk
علاوه بر دایرکتوریهای مجموعه منبعی که میتوانید برای هر طعم محصول و نوع ساخت ایجاد کنید، همچنین میتوانید فهرستهای منبع مجموعه را برای هر ترکیبی از طعمهای محصول ایجاد کنید. به عنوان مثال، میتوانید منابع جاوا را به دایرکتوری src/demoMinApi24/java/
ایجاد و اضافه کنید، و Gradle از این منابع فقط در هنگام ساختن گونهای استفاده میکند که این دو طعم محصول را با هم ترکیب میکند.
مجموعههای منبعی که برای ترکیب طعم محصول ایجاد میکنید، اولویت بیشتری نسبت به مجموعههای منبعی دارند که به هر طعم محصول اختصاص دارند. برای کسب اطلاعات بیشتر درباره مجموعههای منبع و نحوه ادغام منابع Gradle، بخش نحوه ایجاد مجموعههای منبع را بخوانید.
انواع فیلتر
Gradle یک نوع ساخت برای هر ترکیب ممکن از طعم محصول و انواع ساختی که شما پیکربندی می کنید ایجاد می کند. با این حال، ممکن است انواع خاصی از ساخت وجود داشته باشد که شما به آنها نیاز ندارید یا در زمینه پروژه شما منطقی نیستند. برای حذف برخی از پیکربندیهای نوع ساخت، یک فیلتر متغیر در فایل build.gradle.kts
در سطح ماژول خود ایجاد کنید.
با استفاده از پیکربندی ساخت بخش قبلی به عنوان مثال، فرض کنید قصد دارید فقط سطوح API 23 و بالاتر را برای نسخه آزمایشی برنامه پشتیبانی کنید. میتوانید از بلوک variantFilter
برای فیلتر کردن تمام پیکربندیهای نوع ساخت که ترکیبی از طعمهای محصول «minApi21» و «demo» هستند استفاده کنید:
کاتلین
android { ... buildTypes {...} flavorDimensions += listOf("api", "mode") productFlavors { create("demo") {...} create("full") {...} create("minApi24") {...} create("minApi23") {...} create("minApi21") {...} } } androidComponents { beforeVariants { variantBuilder -> // To check for a certain build type, use variantBuilder.buildType == "<buildType>" if (variantBuilder.productFlavors.containsAll(listOf("api" to "minApi21", "mode" to "demo"))) { // Gradle ignores any variants that satisfy the conditions above. variantBuilder.enable = false } } } ...
شیار
android { ... buildTypes {...} flavorDimensions "api", "mode" productFlavors { demo {...} full {...} minApi24 {...} minApi23 {...} minApi21 {...} } variantFilter { variant -> def names = variant.flavors*.name // To check for a certain build type, use variant.buildType.name == "<buildType>" if (names.contains("minApi21") && names.contains("demo")) { // Gradle ignores any variants that satisfy the conditions above. setIgnore(true) } } } ...
هنگامی که یک فیلتر متغیر را به پیکربندی ساخت خود اضافه میکنید و روی همگامسازی اکنون در نوار اعلان کلیک میکنید، Gradle هر نوع ساختی را که شرایطی را که شما مشخص کردهاید برآورده میکند نادیده میگیرد. وقتی روی Build > انتخاب نوع ساخت از نوار منو یا Build Variants کلیک می کنید، دیگر در منو ظاهر نمی شود. در نوار پنجره ابزار
مجموعه های منبع ایجاد کنید
به طور پیشفرض، Android Studio مجموعه main/
منبع و دایرکتوریها را برای هر چیزی که میخواهید بین همه انواع ساخت خود به اشتراک بگذارید، ایجاد میکند. با این حال، میتوانید مجموعههای منبع جدیدی ایجاد کنید تا دقیقاً کنترل کنید که Gradle کدام فایلها را کامپایل و بستهبندی میکند برای انواع ساختهای خاص، طعمهای محصول، ترکیب طعمهای محصول (هنگام استفاده از ابعاد طعم )، و انواع ساخت.
به عنوان مثال، میتوانید عملکرد اصلی را در مجموعه main/
منبع تعریف کنید و از مجموعههای منبع طعم محصول برای تغییر نام تجاری برنامه خود برای مشتریان مختلف استفاده کنید، یا مجوزهای ویژه و عملکرد گزارشگیری را فقط برای انواع ساختهایی که از نوع ساخت اشکالزدایی استفاده میکنند، بگنجانید.
Gradle انتظار دارد که فایلها و دایرکتوریهای مجموعه منبع به روشی خاص، مشابه مجموعه main/
منبع سازماندهی شوند. به عنوان مثال، Gradle انتظار دارد فایلهای کلاس Kotlin یا Java که مخصوص نوع ساخت «debug» شما هستند در فهرستهای src/debug/kotlin/
یا src/debug/java/
قرار گیرند.
افزونه Android Gradle یک کار مفید Gradle را ارائه می دهد که به شما نشان می دهد چگونه فایل های خود را برای هر یک از انواع ساخت، طعم محصول و انواع ساخت خود سازماندهی کنید. به عنوان مثال، نمونه زیر از خروجی وظیفه توضیح می دهد که Gradle انتظار دارد فایل های خاصی را برای نوع ساخت "debug" پیدا کند:
------------------------------------------------------------ Project :app ------------------------------------------------------------ ... debug ---- Compile configuration: debugCompile build.gradle name: android.sourceSets.debug Java sources: [app/src/debug/java] Kotlin sources: [app/src/debug/kotlin, app/src/debug/java] Manifest file: app/src/debug/AndroidManifest.xml Android resources: [app/src/debug/res] Assets: [app/src/debug/assets] AIDL sources: [app/src/debug/aidl] RenderScript sources: [app/src/debug/rs] JNI sources: [app/src/debug/jni] JNI libraries: [app/src/debug/jniLibs] Java-style resources: [app/src/debug/resources]
برای مشاهده این خروجی به صورت زیر عمل کنید:
- روی Gradle در نوار پنجره ابزار کلیک کنید.
به MyApplication > Tasks > android بروید و روی sourceSets دوبار کلیک کنید.
برای دیدن پوشه Tasks ، باید به Gradle اجازه دهید تا لیست وظایف را در حین همگام سازی بسازد. برای انجام این کار، این مراحل را دنبال کنید:
- روی File > Settings > Experimental ( Android Studio > Settings > Experimental on macOS) کلیک کنید.
- در حین همگام سازی Gradle، لیست وظایف Gradle ایجاد نشود را لغو انتخاب کنید.
- بعد از اینکه Gradle وظیفه را اجرا کرد، پنجره Run برای نمایش خروجی باز می شود.
توجه: خروجی وظیفه همچنین به شما نشان میدهد که چگونه مجموعههای منبع را برای فایلهایی که میخواهید برای اجرای آزمایشهای برنامه خود استفاده کنید، مانند مجموعههای منبع test/
و androidTest/
آزمایش سازماندهی کنید.
هنگامی که یک نوع ساخت جدید ایجاد می کنید، Android Studio دایرکتوری های مجموعه منبع را برای شما ایجاد نمی کند، اما چند گزینه برای کمک به شما در اختیار شما قرار می دهد. به عنوان مثال، برای ایجاد فقط دایرکتوری java/
برای نوع ساخت "debug" خود:
- پنجره Project را باز کنید و نمای پروژه را از منوی بالای صفحه انتخاب کنید.
- به
MyProject/app/src/
بروید. - روی دایرکتوری
src
کلیک راست کرده و New > Directory را انتخاب کنید. - از منوی Gradle Source Sets ، full/java را انتخاب کنید.
- Enter را فشار دهید.
اندروید استودیو یک دایرکتوری مجموعه منبع برای نوع ساخت اشکال زدایی شما ایجاد می کند و سپس دایرکتوری java/
را در داخل آن ایجاد می کند. از طرف دیگر، Android Studio می تواند زمانی که یک فایل جدید را برای یک نوع ساخت خاص به پروژه خود اضافه می کنید، دایرکتوری ها را برای شما ایجاد کند.
به عنوان مثال، برای ایجاد یک فایل XML مقادیر برای نوع ساخت "debug" خود:
- در پنجره Project ، روی دایرکتوری
src
کلیک راست کرده و New > XML > Values XML File را انتخاب کنید. - نام فایل XML را وارد کنید یا نام پیش فرض را نگه دارید.
- از منوی کنار Target Source Set ، debug را انتخاب کنید.
- روی Finish کلیک کنید.
از آنجایی که نوع ساخت «اشکالزدایی» بهعنوان مجموعه منبع هدف مشخص شده بود، Android Studio بهطور خودکار فهرستهای لازم را هنگام ایجاد فایل XML ایجاد میکند. ساختار دایرکتوری حاصل مانند شکل 1 است.
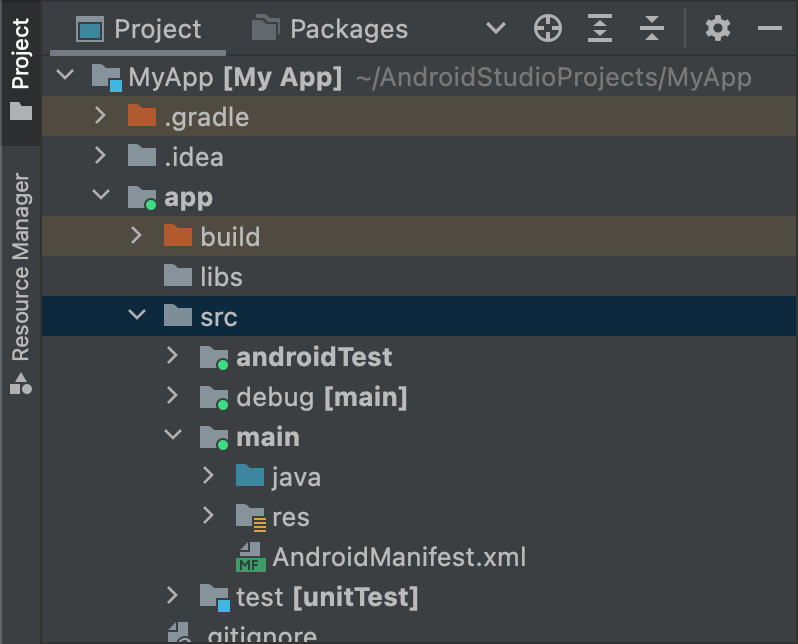
شکل 1. دایرکتوری های مجموعه منبع جدید برای نوع ساخت "debug".
مجموعه های منبع فعال دارای یک نشانگر سبز رنگ در نماد خود هستند تا نشان دهند که فعال هستند. مجموعه منبع debug
با پسوند [main]
اضافه می شود تا نشان دهد که در مجموعه منبع main
ادغام خواهد شد.
با استفاده از همین رویه، همچنین میتوانید فهرستهای منبع مجموعهای را برای طعمهای محصول، مانند src/demo/
، و انواع ساخت، مانند src/demoDebug/
ایجاد کنید. علاوه بر این، میتوانید مجموعههای منبع آزمایشی ایجاد کنید که انواع ساختهای خاص را هدف قرار میدهند، مانند src/androidTestDemoDebug/
. برای کسب اطلاعات بیشتر، درباره تست مجموعه های منبع مطالعه کنید.
تنظیمات پیش فرض مجموعه منبع را تغییر دهید
اگر منابعی دارید که در ساختار فایل مجموعه منبع پیشفرض سازماندهی نشدهاند که Gradle انتظار دارد، همانطور که در بخش قبلی درباره ایجاد مجموعههای منبع توضیح داده شد، میتوانید از بلوک sourceSets
برای تغییر مکان ظاهری Gradle برای جمعآوری فایلها برای هر جزء از مجموعه منبع استفاده کنید.
بلوک sourceSets
باید در بلوک android
باشد. شما نیازی به تغییر مکان فایل های منبع ندارید. شما فقط باید مسیر(های) را نسبت به فایل build.gradle.kts
سطح ماژول در اختیار Gradle قرار دهید، جایی که Gradle میتواند فایلها را برای هر جزء مجموعه منبع پیدا کند. برای اینکه بدانید کدام مؤلفهها را میتوانید پیکربندی کنید و آیا میتوانید آنها را به چندین فایل یا فهرست راهنما نگاشت کنید، به مرجع API افزونه Android Gradle مراجعه کنید.
نمونه کد زیر منابع را از دایرکتوری app/other/
به اجزای خاصی از مجموعه منبع main
نگاشت و دایرکتوری ریشه مجموعه منبع androidTest
را تغییر می دهد:
کاتلین
android { ... // Encapsulates configurations for the main source set. sourceSets.getByName("main") { // Changes the directory for Java sources. The default directory is // 'src/main/java'. java.setSrcDirs(listOf("other/java")) // If you list multiple directories, Gradle uses all of them to collect // sources. Because Gradle gives these directories equal priority, if // you define the same resource in more than one directory, you receive an // error when merging resources. The default directory is 'src/main/res'. res.setSrcDirs(listOf("other/res1", "other/res2")) // Note: Avoid specifying a directory that is a parent to one // or more other directories you specify. For example, avoid the following: // res.srcDirs = ['other/res1', 'other/res1/layouts', 'other/res1/strings'] // Specify either only the root 'other/res1' directory or only the // nested 'other/res1/layouts' and 'other/res1/strings' directories. // For each source set, you can specify only one Android manifest. // By default, Android Studio creates a manifest for your main source // set in the src/main/ directory. manifest.srcFile("other/AndroidManifest.xml") ... } // Create additional blocks to configure other source sets. sourceSets.getByName("androidTest") { // If all the files for a source set are located under a single root // directory, you can specify that directory using the setRoot property. // When gathering sources for the source set, Gradle looks only in locations // relative to the root directory you specify. For example, after applying the // configuration below for the androidTest source set, Gradle looks for Java // sources only in the src/tests/java/ directory. setRoot("src/tests") ... } } ...
شیار
android { ... sourceSets { // Encapsulates configurations for the main source set. main { // Changes the directory for Java sources. The default directory is // 'src/main/java'. java.srcDirs = ['other/java'] // If you list multiple directories, Gradle uses all of them to collect // sources. Because Gradle gives these directories equal priority, if // you define the same resource in more than one directory, you receive an // error when merging resources. The default directory is 'src/main/res'. res.srcDirs = ['other/res1', 'other/res2'] // Note: Avoid specifying a directory that is a parent to one // or more other directories you specify. For example, avoid the following: // res.srcDirs = ['other/res1', 'other/res1/layouts', 'other/res1/strings'] // Specify either only the root 'other/res1' directory or only the // nested 'other/res1/layouts' and 'other/res1/strings' directories. // For each source set, you can specify only one Android manifest. // By default, Android Studio creates a manifest for your main source // set in the src/main/ directory. manifest.srcFile 'other/AndroidManifest.xml' ... } // Create additional blocks to configure other source sets. androidTest { // If all the files for a source set are located under a single root // directory, you can specify that directory using the setRoot property. // When gathering sources for the source set, Gradle looks only in locations // relative to the root directory you specify. For example, after applying the // configuration below for the androidTest source set, Gradle looks for Java // sources only in the src/tests/java/ directory. setRoot 'src/tests' ... } } } ...
توجه داشته باشید که دایرکتوری منبع فقط می تواند به یک مجموعه منبع تعلق داشته باشد. برای مثال، نمیتوانید منابع آزمایشی یکسانی را با مجموعههای منبع test
و androidTest
به اشتراک بگذارید. این به این دلیل است که Android Studio ماژول های IntelliJ جداگانه برای هر مجموعه منبع ایجاد می کند و نمی تواند از ریشه های محتوای تکراری در مجموعه های منبع پشتیبانی کند.
با مجموعه های منبع بسازید
شما می توانید از دایرکتوری های مجموعه منبع استفاده کنید تا حاوی کد و منابعی باشد که می خواهید فقط با تنظیمات خاصی بسته بندی شوند. به عنوان مثال، اگر شما در حال ساخت نوع "demoDebug" هستید که محصول متقاطع طعم محصول "دمو" و نوع ساخت "debug" است، Gradle به این دایرکتوری ها نگاه می کند و اولویت زیر را به آنها می دهد:
-
src/demoDebug/
(مجموعه منبع نوع ساخت) -
src/debug/
(مجموعه منبع نوع ساخت) -
src/demo/
(مجموعه منبع طعم محصول) -
src/main/
(مجموعه منبع اصلی)
مجموعه های منبع ایجاد شده برای ترکیبی از طعم های محصول باید شامل تمام ابعاد طعم باشد. به عنوان مثال، مجموعه منبع نوع ساخت باید ترکیبی از نوع ساخت و تمام ابعاد طعم باشد. ادغام کد و منابعی که شامل پوشههایی میشود که چندین ابعاد را پوشش میدهند اما همه ابعاد طعم را پوشش نمیدهند، پشتیبانی نمیشود.
اگر چندین طعم محصول را ترکیب کنید ، اولویت بین طعم های محصول با توجه به بعد طعمی که به آن تعلق دارند تعیین می شود. هنگام فهرستبندی ابعاد طعم با ویژگی android.flavorDimensions
، طعمهای محصولی که به بعد طعم اولی که فهرست میکنید، اولویت بیشتری نسبت به طعمهای متعلق به بعد طعم دوم دارند و غیره. علاوه بر این، مجموعههای منبعی که برای ترکیبی از طعمهای محصول ایجاد میکنید، اولویت بیشتری نسبت به مجموعههای منبعی دارند که به طعم محصول جداگانه تعلق دارند.
ترتیب اولویت تعیین میکند که وقتی Gradle کد و منابع را ترکیب میکند، کدام مجموعه منبع اولویت بیشتری دارد. از آنجایی که دایرکتوری demoDebug/
source set احتمالا حاوی فایل هایی است که مختص آن نوع ساخت هستند، اگر demoDebug/
شامل فایلی باشد که در debug/
نیز تعریف شده است، Gradle از فایل در مجموعه منبع demoDebug/
استفاده می کند. به طور مشابه، Gradle به فایلها در نوع ساخت و منبع طعم محصول اولویت بیشتری نسبت به فایلهای مشابه در main/
میدهد. Gradle این ترتیب اولویت را هنگام اعمال قوانین ساخت زیر در نظر می گیرد:
- تمام کدهای منبع در دایرکتوری های
kotlin/
یاjava/
با هم کامپایل می شوند تا یک خروجی واحد تولید کنند.توجه: برای یک نوع ساخت معین، Gradle در صورتی که با دو یا چند دایرکتوری مجموعه منبع مواجه شود که یک کلاس Kotlin یا Java را تعریف کرده اند، یک خطای ساخت ایجاد می کند. به عنوان مثال، هنگام ساختن یک برنامه اشکال زدایی، نمی توانید هم
src/debug/Utility.kt
و همsrc/main/Utility.kt
تعریف کنید، زیرا Gradle در طول فرآیند ساخت به هر دو این دایرکتوری ها نگاه می کند و یک خطای "کلاس تکراری" می اندازد. اگر نسخههای مختلفUtility.kt
را برای انواع ساختهای مختلف میخواهید، هر نوع ساخت باید نسخه خود را از فایل تعریف کند و آن را در مجموعهmain/
منبع گنجانده نشود. - مانیفست ها در یک مانیفست واحد با هم ادغام می شوند. اولویت به همان ترتیب لیست در مثال قبلی داده شده است. یعنی تنظیمات مانیفست برای یک نوع ساخت، تنظیمات مانیفست برای طعم محصول و غیره را لغو می کند. برای کسب اطلاعات بیشتر، درباره ادغام مانیفست بخوانید.
- فایل های موجود در
values/
دایرکتوری ها با هم ادغام می شوند. اگر دو فایل نام یکسانی داشته باشند، مانند دو فایلstrings.xml
، اولویت به همان ترتیب لیست در مثال قبلی داده می شود. یعنی مقادیر تعریف شده در یک فایل در مجموعه منبع نوع ساخت، مقادیر تعریف شده در همان فایل در طعم محصول و غیره را لغو می کنند. - منابع موجود در دایرکتوری های
res/
وasset/
با هم بسته بندی می شوند. اگر منابعی با نام یکسان در دو یا چند مجموعه منبع تعریف شده باشد، اولویت به همان ترتیب لیست در مثال قبلی داده می شود. - Gradle به منابع و مانیفست های موجود در وابستگی های ماژول کتابخانه کمترین اولویت را هنگام ساخت برنامه می دهد.
وابستگی ها را اعلام کنید
برای پیکربندی یک وابستگی برای یک نوع ساخت خاص یا مجموعه منبع آزمایشی ، پیشوند نام نوع ساخت یا مجموعه منبع آزمایشی را قبل از کلمه کلیدی Implementation
قرار دهید، همانطور که در مثال زیر نشان داده شده است:
کاتلین
dependencies { // Adds the local "mylibrary" module as a dependency to the "free" flavor. "freeImplementation"(project(":mylibrary")) // Adds a remote binary dependency only for local tests. testImplementation("junit:junit:4.12") // Adds a remote binary dependency only for the instrumented test APK. androidTestImplementation("com.android.support.test.espresso:espresso-core:3.6.1") }
شیار
dependencies { // Adds the local "mylibrary" module as a dependency to the "free" flavor. freeImplementation project(":mylibrary") // Adds a remote binary dependency only for local tests. testImplementation 'junit:junit:4.12' // Adds a remote binary dependency only for the instrumented test APK. androidTestImplementation 'com.android.support.test.espresso:espresso-core:3.6.1' }
برای اطلاعات بیشتر درباره پیکربندی وابستگیها، به افزودن وابستگیهای ساخت مراجعه کنید.
از مدیریت وابستگی آگاهانه استفاده کنید
افزونه Android Gradle نسخه 3.0.0 و بالاتر شامل یک مکانیسم وابستگی جدید است که به طور خودکار انواع را هنگام مصرف یک کتابخانه مطابقت می دهد. این به این معنی است که نوع debug
یک برنامه به طور خودکار نوع debug
یک کتابخانه و غیره را مصرف می کند. همچنین هنگام استفاده از طعمها کار میکند: نوع freeDebug
یک برنامه، نوع freeDebug
یک کتابخانه را مصرف میکند.
برای اینکه این افزونه به طور دقیق با انواع مختلف مطابقت داشته باشد، باید بک گراندهای منطبق را همانطور که در بخش زیر توضیح داده شده است ارائه دهید ، برای نمونه هایی که تطبیق مستقیم امکان پذیر نیست.
به عنوان مثال، فرض کنید برنامه شما یک نوع ساخت به نام "staging" را پیکربندی می کند، اما یکی از وابستگی های کتابخانه آن این کار را نمی کند. وقتی افزونه سعی میکند نسخه «staging» برنامه شما را بسازد، نمیداند از کدام نسخه کتابخانه استفاده کند و یک پیام خطایی شبیه به زیر مشاهده میکنید:
Error:Failed to resolve: Could not resolve project :mylibrary. Required by: project :app
خطاهای ساخت مربوط به تطبیق انواع را حل کنید
این افزونه شامل عناصر DSL است تا به شما کمک کند نحوه حل و فصل موقعیتهایی را که در آنها تطبیق نوع مستقیم بین یک برنامه و یک وابستگی امکانپذیر نیست را کنترل کنید.
در زیر فهرستی از مسائل مربوط به تطبیق وابستگی با نوع آگاه و نحوه حل آنها با استفاده از ویژگی های DSL آمده است:برنامه شما دارای یک نوع ساخت است که وابستگی کتابخانه آن را ندارد.
به عنوان مثال، برنامه شما شامل یک نوع ساخت "staging" است، اما یک وابستگی فقط شامل انواع ساخت "debug" و "release" است.
توجه داشته باشید که وقتی وابستگی کتابخانه شامل یک نوع ساخت است که برنامه شما ندارد، مشکلی وجود ندارد. دلیلش این است که پلاگین هرگز آن نوع ساخت را از وابستگی درخواست نمی کند.
همانطور که در اینجا نشان داده شده است، از
matchingFallbacks
برای تعیین موارد مشابه برای یک نوع ساخت معین استفاده کنید:کاتلین
// In the app's build.gradle.kts file. android { buildTypes { getByName("debug") {} getByName("release") {} create("staging") { // Specifies a sorted list of fallback build types that the // plugin can try to use when a dependency does not include a // "staging" build type. You may specify as many fallbacks as you // like, and the plugin selects the first build type that's // available in the dependency. matchingFallbacks += listOf("debug", "qa", "release") } } }
شیار
// In the app's build.gradle file. android { buildTypes { debug {} release {} staging { // Specifies a sorted list of fallback build types that the // plugin can try to use when a dependency does not include a // "staging" build type. You may specify as many fallbacks as you // like, and the plugin selects the first build type that's // available in the dependency. matchingFallbacks = ['debug', 'qa', 'release'] } } }
برای یک بعد طعم معین که هم در برنامه و هم در وابستگی کتابخانه آن وجود دارد، برنامه شما شامل طعم هایی است که کتابخانه آن را ندارد.
به عنوان مثال، هم برنامه شما و هم وابستگی های کتابخانه آن دارای یک بعد طعم "سطح" هستند. با این حال، بعد "سطح" در برنامه شامل طعم های "رایگان" و "پرداخت" است، اما یک وابستگی فقط شامل طعم های "دمو" و "پرداخت" برای همان بعد است.
توجه داشته باشید که برای یک بعد طعم معین که هم در برنامه و هم در وابستگیهای کتابخانه آن وجود دارد، زمانی که یک کتابخانه دارای طعم محصولی باشد که برنامه شما ندارد، مشکلی وجود ندارد. دلیلش این است که پلاگین هرگز آن طعم را از وابستگی درخواست نمی کند.
همانطور که در اینجا نشان داده شده است، از
matchingFallbacks
برای تعیین موارد مشابه برای طعم محصول "رایگان" برنامه استفاده کنید:کاتلین
// In the app's build.gradle.kts file. android { defaultConfig{ // Don't configure matchingFallbacks in the defaultConfig block. // Instead, specify fallbacks for a given product flavor in the // productFlavors block, as shown below. } flavorDimensions += "tier" productFlavors { create("paid") { dimension = "tier" // Because the dependency already includes a "paid" flavor in its // "tier" dimension, you don't need to provide a list of fallbacks // for the "paid" flavor. } create("free") { dimension = "tier" // Specifies a sorted list of fallback flavors that the plugin // can try to use when a dependency's matching dimension does // not include a "free" flavor. Specify as many // fallbacks as you like; the plugin selects the first flavor // that's available in the dependency's "tier" dimension. matchingFallbacks += listOf("demo", "trial") } } }
شیار
// In the app's build.gradle file. android { defaultConfig{ // Don't configure matchingFallbacks in the defaultConfig block. // Instead, specify fallbacks for a given product flavor in the // productFlavors block, as shown below. } flavorDimensions 'tier' productFlavors { paid { dimension 'tier' // Because the dependency already includes a "paid" flavor in its // "tier" dimension, you don't need to provide a list of fallbacks // for the "paid" flavor. } free { dimension 'tier' // Specifies a sorted list of fallback flavors that the plugin // can try to use when a dependency's matching dimension does // not include a "free" flavor. Specify as many // fallbacks as you like; the plugin selects the first flavor // that's available in the dependency's "tier" dimension. matchingFallbacks = ['demo', 'trial'] } } }
وابستگی کتابخانه شامل یک بعد طعم است که برنامه شما ندارد.
برای مثال، یک وابستگی کتابخانه شامل طعمهایی برای بعد «minApi» است، اما برنامه شما شامل طعمهایی فقط برای بعد «سطح» است. وقتی میخواهید نسخه «freeDebug» برنامه خود را بسازید، افزونه نمیداند که از نسخه «minApi23Debug» یا «minApi18Debug» وابستگی استفاده کند.
توجه داشته باشید که زمانی که برنامه شما دارای یک بعد طعم باشد، مشکلی وجود ندارد که وابستگی کتابخانه آن را ندارد. دلیل آن این است که این افزونه فقط با ابعادی که در وابستگی وجود دارد مطابقت دارد. به عنوان مثال، اگر یک وابستگی شامل یک بعد برای ABI ها نباشد، نسخه "freeX86Debug" برنامه شما از نسخه "freeDebug" وابستگی استفاده می کند.
همانطور که در نمونه زیر نشان داده شده است، از
missingDimensionStrategy
در بلوکdefaultConfig
استفاده کنید تا طعم پیش فرض را برای افزونه برای انتخاب از هر بعد گمشده مشخص کنید. همچنین میتوانید انتخابهای خود را در بلوکproductFlavors
لغو کنید، بنابراین هر طعم میتواند استراتژی تطبیقی متفاوتی را برای بعد گمشده مشخص کند.کاتلین
// In the app's build.gradle.kts file. android { defaultConfig{ // Specifies a sorted list of flavors that the plugin can try to use from // a given dimension. This tells the plugin to select the "minApi18" flavor // when encountering a dependency that includes a "minApi" dimension. // You can include additional flavor names to provide a // sorted list of fallbacks for the dimension. missingDimensionStrategy("minApi", "minApi18", "minApi23") // Specify a missingDimensionStrategy property for each // dimension that exists in a local dependency but not in your app. missingDimensionStrategy("abi", "x86", "arm64") } flavorDimensions += "tier" productFlavors { create("free") { dimension = "tier" // You can override the default selection at the product flavor // level by configuring another missingDimensionStrategy property // for the "minApi" dimension. missingDimensionStrategy("minApi", "minApi23", "minApi18") } create("paid") {} } }
شیار
// In the app's build.gradle file. android { defaultConfig{ // Specifies a sorted list of flavors that the plugin can try to use from // a given dimension. This tells the plugin to select the "minApi18" flavor // when encountering a dependency that includes a "minApi" dimension. // You can include additional flavor names to provide a // sorted list of fallbacks for the dimension. missingDimensionStrategy 'minApi', 'minApi18', 'minApi23' // Specify a missingDimensionStrategy property for each // dimension that exists in a local dependency but not in your app. missingDimensionStrategy 'abi', 'x86', 'arm64' } flavorDimensions 'tier' productFlavors { free { dimension 'tier' // You can override the default selection at the product flavor // level by configuring another missingDimensionStrategy property // for the 'minApi' dimension. missingDimensionStrategy 'minApi', 'minApi23', 'minApi18' } paid {} } }
برای اطلاعات بیشتر، matchingFallbacks
و missingDimensionStrategy
در مرجع DSL پلاگین Android Gradle ببینید.
تنظیمات امضا را پیکربندی کنید
Gradle APK یا AAB ساخت نسخه شما را امضا نمیکند مگر اینکه صریحاً یک پیکربندی امضا برای این ساخت تعریف کنید. اگر هنوز کلید امضا ندارید، یک کلید آپلود و ذخیره کلید با استفاده از Android Studio ایجاد کنید .
برای پیکربندی دستی پیکربندی های امضا برای نوع ساخت نسخه خود با استفاده از تنظیمات ساخت Gradle:
- یک فروشگاه کلید ایجاد کنید. انبار کلید یک فایل باینری است که شامل مجموعه ای از کلیدهای خصوصی است. شما باید فروشگاه کلید خود را در مکانی امن و مطمئن نگه دارید.
- یک کلید خصوصی ایجاد کنید. یک کلید خصوصی برای امضای برنامه شما برای توزیع استفاده میشود و هرگز همراه برنامه نیست و در اختیار اشخاص ثالث غیرمجاز قرار نمیگیرد.
پیکربندی امضا را به فایل
build.gradle.kts
در سطح ماژول اضافه کنید:کاتلین
... android { ... defaultConfig {...} signingConfigs { create("release") { storeFile = file("myreleasekey.keystore") storePassword = "password" keyAlias = "MyReleaseKey" keyPassword = "password" } } buildTypes { getByName("release") { ... signingConfig = signingConfigs.getByName("release") } } }
شیار
... android { ... defaultConfig {...} signingConfigs { release { storeFile file("myreleasekey.keystore") storePassword "password" keyAlias "MyReleaseKey" keyPassword "password" } } buildTypes { release { ... signingConfig signingConfigs.release } } }
توجه: گنجاندن گذرواژههای کلید انتشار و ذخیرهسازی کلید در داخل فایل ساخت، عمل امنیتی خوبی نیست. درعوض، فایل ساخت را طوری پیکربندی کنید که این پسوردها را از متغیرهای محیطی دریافت کند یا فرآیند ساخت را از شما بخواهد که این پسوردها را دریافت کنید.
برای بدست آوردن این رمزهای عبور از متغیرهای محیطی:
کاتلین
storePassword = System.getenv("KSTOREPWD") keyPassword = System.getenv("KEYPWD")
شیار
storePassword System.getenv("KSTOREPWD") keyPassword System.getenv("KEYPWD")
همچنین، میتوانید keystore را از یک فایل ویژگیهای محلی بارگیری کنید. به دلایل امنیتی، این فایل را به کنترل منبع اضافه نکنید. در عوض، آن را به صورت محلی برای هر توسعه دهنده تنظیم کنید. برای کسب اطلاعات بیشتر، حذف اطلاعات امضا از فایلهای ساخت خود را بخوانید.
پس از تکمیل این فرآیند، می توانید برنامه خود را توزیع کرده و آن را در Google Play منتشر کنید.
اخطار: فروشگاه کلید و کلید خصوصی خود را در مکانی امن و مطمئن نگه دارید و مطمئن شوید که پشتیبان امنی از آنها دارید. اگر از Play App Signing استفاده میکنید و کلید آپلود خود را گم میکنید، میتوانید با استفاده از Play Console درخواست بازنشانی کنید . اگر برنامهای را بدون امضای Play App Signing منتشر میکنید (برای برنامههایی که قبل از آگوست ۲۰۲۱ ایجاد شدهاند) و کلید امضای برنامهتان را گم میکنید، نمیتوانید بهروزرسانیهایی را برای برنامه خود منتشر کنید، زیرا همیشه باید همه نسخههای برنامه خود را با یک کلید امضا کنید.
امضای برنامههای Wear OS
هنگام انتشار برنامههای Wear OS، APK ساعت و APK اختیاری تلفن باید با یک کلید امضا شوند. برای اطلاعات بیشتر درباره بستهبندی و امضای برنامههای Wear OS، به بستهبندی و توزیع برنامههای Wear مراجعه کنید.
،این صفحه به شما نشان می دهد که چگونه می توانید انواع ساخت را برای ایجاد نسخه های مختلف برنامه خود از یک پروژه واحد پیکربندی کنید و چگونه وابستگی ها و پیکربندی های امضای خود را به درستی مدیریت کنید.
هر نوع ساخت نشان دهنده نسخه متفاوتی از برنامه شما است که می توانید بسازید. به عنوان مثال، ممکن است بخواهید یک نسخه از برنامه خود را بسازید که رایگان با مجموعه ای محدود از محتوا، و نسخه دیگری پولی که شامل موارد بیشتری باشد. همچنین میتوانید نسخههای مختلفی از برنامه خود را بسازید که دستگاههای مختلف را هدف قرار میدهند، بر اساس سطح API یا سایر تغییرات دستگاه.
انواع ساخت نتیجه استفاده Gradle از مجموعه ای خاص از قوانین برای ترکیب تنظیمات، کد و منابع پیکربندی شده در انواع ساخت و طعم محصول شماست. اگرچه شما انواع ساخت را مستقیماً پیکربندی نمیکنید، اما انواع ساخت و طعمهای محصول را که آنها را تشکیل میدهند پیکربندی میکنید.
به عنوان مثال، طعم محصول "دمو" ممکن است ویژگی ها و الزامات دستگاه خاصی را مشخص کند، مانند کد منبع سفارشی، منابع، و حداقل سطوح API، در حالی که نوع ساخت "اشکال زدایی" تنظیمات مختلف ساخت و بسته بندی، مانند گزینه های اشکال زدایی و کلیدهای امضا را اعمال می کند. نوع ساختی که این دو را ترکیب میکند، نسخه «demoDebug» برنامه شما است و ترکیبی از پیکربندیها و منابع موجود در طعم محصول «دمو»، نوع ساخت «اشکالزدایی» و مجموعه main/
منبع را شامل میشود.
پیکربندی انواع ساخت
می توانید انواع ساخت را در بلوک android
فایل build.gradle.kts
در سطح ماژول ایجاد و پیکربندی کنید. هنگامی که یک ماژول جدید ایجاد می کنید، Android Studio به طور خودکار انواع ساخت دیباگ و انتشار را ایجاد می کند. اگرچه نوع ساخت اشکالزدایی در فایل پیکربندی ساخت ظاهر نمیشود، Android Studio آن را با debuggable true
پیکربندی میکند. این به شما امکان میدهد برنامه را در دستگاههای Android ایمن اشکالزدایی کنید و امضای برنامه را با یک فروشگاه کلید اشکال زدایی عمومی پیکربندی کنید.
اگر میخواهید تنظیمات خاصی را اضافه یا تغییر دهید، میتوانید نوع ساخت اشکالزدایی را به پیکربندی خود اضافه کنید. نمونه زیر یک applicationIdSuffix
برای نوع ساخت اشکالزدایی مشخص میکند و یک نوع ساخت «staging» را پیکربندی میکند که با استفاده از تنظیمات از نوع ساخت اشکالزدایی مقداردهی اولیه میشود:
کاتلین
android { defaultConfig { manifestPlaceholders["hostName"] = "www.example.com" ... } buildTypes { getByName("release") { isMinifyEnabled = true proguardFiles(getDefaultProguardFile("proguard-android.txt"), "proguard-rules.pro") } getByName("debug") { applicationIdSuffix = ".debug" isDebuggable = true } /** * The `initWith` property lets you copy configurations from other build types, * then configure only the settings you want to change. This one copies the debug build * type, and then changes the manifest placeholder and application ID. */ create("staging") { initWith(getByName("debug")) manifestPlaceholders["hostName"] = "internal.example.com" applicationIdSuffix = ".debugStaging" } } }
شیار
android { defaultConfig { manifestPlaceholders = [hostName:"www.example.com"] ... } buildTypes { release { minifyEnabled true proguardFiles getDefaultProguardFile('proguard-android.txt'), 'proguard-rules.pro' } debug { applicationIdSuffix ".debug" debuggable true } /** * The `initWith` property lets you copy configurations from other build types, * then configure only the settings you want to change. This one copies the debug build * type, and then changes the manifest placeholder and application ID. */ staging { initWith debug manifestPlaceholders = [hostName:"internal.example.com"] applicationIdSuffix ".debugStaging" } } }
توجه: هنگامی که در فایل پیکربندی ساخت، تغییراتی ایجاد می کنید، Android Studio از شما می خواهد که پروژه خود را با پیکربندی جدید همگام سازی کنید. برای همگام سازی پروژه خود، روی همگام سازی اکنون در نوار اعلان که هنگام ایجاد تغییر ظاهر می شود کلیک کنید یا روی همگام سازی پروژه کلیک کنید. از نوار ابزار اگر Android Studio متوجه هر گونه خطایی در پیکربندی شما شود، پنجره Messages برای توصیف مشکل ظاهر می شود.
برای کسب اطلاعات بیشتر در مورد تمام ویژگی هایی که می توانید با انواع ساخت پیکربندی کنید، مرجع BuildType
را بخوانید.
طعم های محصول را پیکربندی کنید
ایجاد طعم محصول مشابه ایجاد انواع ساخت است. طعم های محصول را به بلوک productFlavors
در پیکربندی ساخت خود اضافه کنید و تنظیماتی را که می خواهید اضافه کنید. طعم های محصول از ویژگی های defaultConfig
پشتیبانی می کنند، زیرا defaultConfig
در واقع به کلاس ProductFlavor
تعلق دارد. این بدان معناست که میتوانید پیکربندی پایه را برای همه طعمها در بلوک defaultConfig
ارائه کنید و هر طعم میتواند هر یک از این مقادیر پیشفرض را تغییر دهد، مانند applicationId
. برای کسب اطلاعات بیشتر در مورد شناسه برنامه، تنظیم شناسه برنامه را بخوانید.
توجه: همچنان باید نام بسته را با استفاده از ویژگی package
در فایل main/
مانیفست مشخص کنید. همچنین باید از آن نام بسته در کد منبع خود برای ارجاع به کلاس R
یا حل هر گونه فعالیت یا ثبت خدمات نسبی استفاده کنید. این به شما امکان می دهد از applicationId
استفاده کنید تا به هر محصول یک شناسه منحصر به فرد برای بسته بندی و توزیع بدون نیاز به تغییر کد منبع خود بدهید.
همه طعم ها باید به یک بعد طعم نامگذاری شده تعلق داشته باشند که گروهی از طعم های محصول است. شما باید همه طعم ها را به یک بعد طعم اختصاص دهید. در غیر این صورت با خطای ساخت زیر مواجه خواهید شد.
Error: All flavors must now belong to a named flavor dimension. The flavor 'flavor_name' is not assigned to a flavor dimension.
اگر یک ماژول معین فقط یک بعد طعم را مشخص کند، افزونه Android Gradle به طور خودکار همه طعمهای ماژول را به آن بعد اختصاص میدهد.
نمونه کد زیر یک بعد طعم به نام "نسخه" ایجاد می کند و طعم های "دمو" و "کامل" محصول را اضافه می کند. این طعم ها applicationIdSuffix
و versionNameSuffix
خود را ارائه می دهند:
کاتلین
android { ... defaultConfig {...} buildTypes { getByName("debug"){...} getByName("release"){...} } // Specifies one flavor dimension. flavorDimensions += "version" productFlavors { create("demo") { // Assigns this product flavor to the "version" flavor dimension. // If you are using only one dimension, this property is optional, // and the plugin automatically assigns all the module's flavors to // that dimension. dimension = "version" applicationIdSuffix = ".demo" versionNameSuffix = "-demo" } create("full") { dimension = "version" applicationIdSuffix = ".full" versionNameSuffix = "-full" } } }
شیار
android { ... defaultConfig {...} buildTypes { debug{...} release{...} } // Specifies one flavor dimension. flavorDimensions "version" productFlavors { demo { // Assigns this product flavor to the "version" flavor dimension. // If you are using only one dimension, this property is optional, // and the plugin automatically assigns all the module's flavors to // that dimension. dimension "version" applicationIdSuffix ".demo" versionNameSuffix "-demo" } full { dimension "version" applicationIdSuffix ".full" versionNameSuffix "-full" } } }
توجه: اگر برنامه قدیمی دارید (که قبل از آگوست 2021 ایجاد شده است) که با استفاده از APK ها در Google Play توزیع می کنید، برای توزیع برنامه خود با استفاده از پشتیبانی از چندین APK در Google Play، یک مقدار applicationId
یکسان را به همه گونه ها اختصاص دهید و به هر گونه versionCode
متفاوتی بدهید. برای توزیع انواع مختلف برنامه خود به عنوان برنامه های جداگانه در Google Play، باید یک applicationId
متفاوت به هر گونه اختصاص دهید.
پس از ایجاد و پیکربندی طعم های محصول خود، روی همگام سازی اکنون در نوار اعلان کلیک کنید. هنگامی که همگام سازی کامل شد، Gradle به طور خودکار انواع ساخت را بر اساس نوع ساخت و طعم محصول شما ایجاد می کند و آنها را بر اساس <product-flavor><Build-Type>
نام گذاری می کند. به عنوان مثال، اگر طعم های محصول "دمو" و "کامل" را ایجاد کرده باشید و انواع ساخت پیش فرض "debug" و "release" را حفظ کرده باشید، Gradle انواع ساخت زیر را ایجاد می کند:
-
demoDebug
-
demoRelease
-
fullDebug
-
fullRelease
برای انتخاب نوع ساخت و اجرا، به Build > Select Build Variant بروید و یک نوع ساخت را از منو انتخاب کنید. برای شروع سفارشیسازی هر نوع ساخت با ویژگیها و منابع خاص خود، باید مجموعههای منبع را ایجاد و مدیریت کنید ، همانطور که در این صفحه توضیح داده شده است.
شناسه برنامه را برای انواع ساخت تغییر دهید
هنگامی که یک برنامه APK یا AAB را برای برنامه خود می سازید ، Build Tools برنامه را با شناسه برنامه تعریف شده در بلوک defaultConfig
از پرونده build.gradle.kts
، همانطور که در مثال زیر نشان داده شده است ، برچسب گذاری می کنند. با این حال ، اگر می خواهید نسخه های مختلفی از برنامه خود را ایجاد کنید تا به عنوان لیست های جداگانه در فروشگاه Google Play ، مانند نسخه "رایگان" و "Pro" ظاهر شود ، باید انواع ساخت و ساز جداگانه ای ایجاد کنید که هر یک دارای شناسه کاربردی متفاوتی هستند.
در این حالت ، هر نوع ساخت را به عنوان یک طعم محصول جداگانه تعریف کنید. برای هر عطر و طعم موجود در بلوک productFlavors
، می توانید ویژگی applicationId
دوباره تعریف کنید ، یا در عوض می توانید یک بخش را با استفاده از applicationIdSuffix
به شناسه برنامه پیش فرض اضافه کنید ، همانطور که در اینجا نشان داده شده است:
کاتلین
android { defaultConfig { applicationId = "com.example.myapp" } productFlavors { create("free") { applicationIdSuffix = ".free" } create("pro") { applicationIdSuffix = ".pro" } } }
شیار
android { defaultConfig { applicationId "com.example.myapp" } productFlavors { free { applicationIdSuffix ".free" } pro { applicationIdSuffix ".pro" } } }
به این ترتیب ، شناسه برنامه برای طعم محصول "رایگان" "com.example.myapp.free" است.
همچنین می توانید از applicationIdSuffix
برای اضافه کردن یک بخش بر اساس نوع ساخت خود استفاده کنید ، همانطور که در اینجا نشان داده شده است:
کاتلین
android { ... buildTypes { getByName("debug") { applicationIdSuffix = ".debug" } } }
شیار
android { ... buildTypes { debug { applicationIdSuffix ".debug" } } }
از آنجا که Gradle پیکربندی نوع ساخت را پس از طعم محصول اعمال می کند ، شناسه برنامه برای نوع ساخت "اشکال زدایی رایگان" "com.example.myapp.free.debug" است. این زمانی مفید است که شما می خواهید هر دو اشکال زدایی و انتشار را در همان دستگاه ایجاد کنید ، زیرا هیچ دو برنامه نمی توانند شناسه برنامه یکسان داشته باشند.
اگر یک برنامه Legacy دارید (قبل از آگوست 2021 ایجاد شده است) که با استفاده از APK ها در Google Play توزیع می کنید ، و می خواهید از همان لیست برنامه برای توزیع چندین APK استفاده کنید که هر یک از آنها پیکربندی دستگاه متفاوتی مانند سطح API را هدف قرار می دهد ، پس باید از یک شناسه برنامه مشابه برای هر نوع ساخت استفاده کنید اما به هر APKversionCode
دیگری بدهید. برای اطلاعات بیشتر ، در مورد پشتیبانی از APK متعدد بخوانید. انتشار با استفاده از AABS بی تأثیر است ، زیرا از یک مصنوع واحد استفاده می کند که به طور پیش فرض از یک کد نسخه و شناسه برنامه استفاده می کند. نکته: در صورت نیاز به مراجعه به شناسه برنامه در پرونده مانیفست خود ، می توانید در هر ویژگی مانیفست از محل نگهدارنده ${applicationId}
استفاده کنید. در حین ساخت ، Gradle این برچسب را با شناسه برنامه واقعی جایگزین می کند. برای اطلاعات بیشتر ، به متغیرهای تزریق در مانیفست مراجعه کنید.
چندین طعم محصول را با ابعاد عطر و طعم ترکیب کنید
در بعضی موارد ، شما ممکن است بخواهید تنظیمات را از چندین طعم محصول ترکیب کنید. به عنوان مثال ، شما ممکن است بخواهید تنظیمات مختلفی را برای طعم های محصول "کامل" و "نسخه ی نمایشی" ایجاد کنید که مبتنی بر سطح API هستند. برای انجام این کار ، افزونه Android Gradle به شما امکان می دهد چندین گروه از طعم های محصول را به عنوان ابعاد طعم ایجاد کنید.
هنگام ساختن برنامه خود ، Gradle از هر ابعاد طعم دهنده ای که تعریف می کنید ، همراه با پیکربندی نوع ساخت ، یک پیکربندی عطر و طعم محصول را ترکیب می کند تا نوع ساخت نهایی را ایجاد کند. Gradle طعم دهنده های محصول را که متعلق به همان بعد طعم دهنده هستند ، ترکیب نمی کند.
نمونه کد زیر از ویژگی flavorDimensions
برای ایجاد ابعاد عطر و طعم "حالت" برای گروه بندی طعم های محصول "کامل" و "نسخه ی نمایشی" و ابعاد عطر و طعم "API" برای گروه بندی تنظیمات عطر و طعم محصول بر اساس سطح API استفاده می کند:
کاتلین
android { ... buildTypes { getByName("debug") {...} getByName("release") {...} } // Specifies the flavor dimensions you want to use. The order in which you // list the dimensions determines their priority, from highest to lowest, // when Gradle merges variant sources and configurations. You must assign // each product flavor you configure to one of the flavor dimensions. flavorDimensions += listOf("api", "mode") productFlavors { create("demo") { // Assigns this product flavor to the "mode" flavor dimension. dimension = "mode" ... } create("full") { dimension = "mode" ... } // Configurations in the "api" product flavors override those in "mode" // flavors and the defaultConfig block. Gradle determines the priority // between flavor dimensions based on the order in which they appear next // to the flavorDimensions property, with the first dimension having a higher // priority than the second, and so on. create("minApi24") { dimension = "api" minSdk = 24 // To ensure the target device receives the version of the app with // the highest compatible API level, assign version codes in increasing // value with API level. versionCode = 30000 + (android.defaultConfig.versionCode ?: 0) versionNameSuffix = "-minApi24" ... } create("minApi23") { dimension = "api" minSdk = 23 versionCode = 20000 + (android.defaultConfig.versionCode ?: 0) versionNameSuffix = "-minApi23" ... } create("minApi21") { dimension = "api" minSdk = 21 versionCode = 10000 + (android.defaultConfig.versionCode ?: 0) versionNameSuffix = "-minApi21" ... } } } ...
شیار
android { ... buildTypes { debug {...} release {...} } // Specifies the flavor dimensions you want to use. The order in which you // list the dimensions determines their priority, from highest to lowest, // when Gradle merges variant sources and configurations. You must assign // each product flavor you configure to one of the flavor dimensions. flavorDimensions "api", "mode" productFlavors { demo { // Assigns this product flavor to the "mode" flavor dimension. dimension "mode" ... } full { dimension "mode" ... } // Configurations in the "api" product flavors override those in "mode" // flavors and the defaultConfig block. Gradle determines the priority // between flavor dimensions based on the order in which they appear next // to the flavorDimensions property, with the first dimension having a higher // priority than the second, and so on. minApi24 { dimension "api" minSdkVersion 24 // To ensure the target device receives the version of the app with // the highest compatible API level, assign version codes in increasing // value with API level. versionCode 30000 + android.defaultConfig.versionCode versionNameSuffix "-minApi24" ... } minApi23 { dimension "api" minSdkVersion 23 versionCode 20000 + android.defaultConfig.versionCode versionNameSuffix "-minApi23" ... } minApi21 { dimension "api" minSdkVersion 21 versionCode 10000 + android.defaultConfig.versionCode versionNameSuffix "-minApi21" ... } } } ...
تعداد انواع ساخت و ساز درجه یک برابر با محصول تعداد طعم دهنده ها در هر بعد طعم و تعداد انواع ساختگی که پیکربندی می کنید برابر است. هنگامی که Gradle هر نوع ساخت و ساز یا مصنوعات مربوطه را نامگذاری می کند ، طعم دهنده های محصول متعلق به بعد طعم بالاتر با اولویت بالاتر ظاهر می شوند ، و به دنبال آن از ابعاد اولویت پایین تر و به دنبال آن نوع ساخت.
با استفاده از پیکربندی ساخت قبلی به عنوان نمونه ، Gradle در مجموع 12 نوع ساخت با طرح نامگذاری زیر ایجاد می کند:
- ساخت نوع:
[minApi24, minApi23, minApi21][Demo, Full][Debug, Release]
- APK مربوطه:
app-[minApi24, minApi23, minApi21]-[demo, full]-[debug, release].apk
- به عنوان مثال،
- ساخت نوع:
minApi24DemoDebug
- APK مربوطه:
app-minApi24-demo-debug.apk
علاوه بر دایرکتوری های مجموعه منبع که می توانید برای هر محصول خاص و عطر و طعم ایجاد کنید ، می توانید برای هر ترکیبی از طعم دهنده های محصول ، دایرکتوری های مجموعه منبع ایجاد کنید. به عنوان مثال ، می توانید منابع جاوا را به src/demoMinApi24/java/
Directory ایجاد و اضافه کنید ، و Gradle فقط در هنگام ساختن یک نوع که ترکیب آن دو طعم محصول است ، از آن منابع استفاده می کند.
مجموعه منبع شما برای ترکیب عطر و طعم محصول از اولویت بالاتری نسبت به مجموعه های منبع که متعلق به هر عطر و طعم محصول جداگانه است ، دارند. برای کسب اطلاعات بیشتر در مورد مجموعه های منبع و چگونگی ادغام Gradle منابع ، بخش مربوط به نحوه ایجاد مجموعه های منبع را بخوانید.
انواع فیلتر
Gradle برای هر ترکیب ممکن از طعم دهنده های محصول یک نوع ساخت ایجاد می کند و انواع مختلفی را که پیکربندی می کنید ایجاد می کند. با این وجود ، ممکن است انواع خاصی از ساخت و ساز وجود داشته باشد که شما به آن احتیاج ندارید یا در زمینه پروژه خود معنی ندارد. برای حذف برخی از تنظیمات مختلف ساخت ، یک فیلتر متنوع را در پرونده سطح build.gradle.kts
خود ایجاد کنید.
با استفاده از پیکربندی ساخت از بخش قبلی به عنوان نمونه ، فرض کنید قصد دارید فقط از سطح API 23 و بالاتر برای نسخه نسخه ی نمایشی برنامه پشتیبانی کنید. شما می توانید از بلوک variantFilter
استفاده کنید تا تمام تنظیمات مختلف ساخت و ساز را که ترکیب "Minapi21" و "Demo" طعم دهنده محصول است ، فیلتر کنید:
کاتلین
android { ... buildTypes {...} flavorDimensions += listOf("api", "mode") productFlavors { create("demo") {...} create("full") {...} create("minApi24") {...} create("minApi23") {...} create("minApi21") {...} } } androidComponents { beforeVariants { variantBuilder -> // To check for a certain build type, use variantBuilder.buildType == "<buildType>" if (variantBuilder.productFlavors.containsAll(listOf("api" to "minApi21", "mode" to "demo"))) { // Gradle ignores any variants that satisfy the conditions above. variantBuilder.enable = false } } } ...
شیار
android { ... buildTypes {...} flavorDimensions "api", "mode" productFlavors { demo {...} full {...} minApi24 {...} minApi23 {...} minApi21 {...} } variantFilter { variant -> def names = variant.flavors*.name // To check for a certain build type, use variant.buildType.name == "<buildType>" if (names.contains("minApi21") && names.contains("demo")) { // Gradle ignores any variants that satisfy the conditions above. setIgnore(true) } } } ...
هنگامی که یک فیلتر متنوع را به پیکربندی ساخت خود اضافه می کنید و هم اکنون در نوار اعلان همگام سازی می کنید ، Gradle انواع مختلفی از ساخت و ساز را که شرایط تعیین شده را برآورده می کند ، نادیده می گیرد. انواع ساخت و ساز دیگر در منو وقتی کلیک می کنید BUILD> SELECT Build Variant را از نوار منو یا ساخت انواع ایجاد کنید در نوار پنجره ابزار.
مجموعه های منبع را ایجاد کنید
به طور پیش فرض ، Android Studio مجموعه main/
منبع و دایرکتوری ها را برای همه چیزهایی که می خواهید بین همه انواع ساخت خود به اشتراک بگذارید ، ایجاد می کند. با این حال ، شما می توانید مجموعه های منبع جدیدی ایجاد کنید تا دقیقاً کدام یک از ترکیبات و بسته های Gradle را برای انواع خاص ساخت ، طعم دهنده های محصول ، ترکیبی از طعم دهنده های محصول (هنگام استفاده از ابعاد طعم دهنده ) و ساخت انواع مختلف کنترل کنید.
به عنوان مثال ، شما می توانید عملکردهای اساسی را در مجموعه main/
منبع تعریف کنید و از مجموعه منبع عطر و طعم محصول استفاده کنید تا مارک تجاری برنامه خود را برای مشتری های مختلف تغییر دهید ، یا مجوزهای ویژه و عملکرد ورود به سیستم را فقط برای ساخت انواع مختلفی که از نوع ساخت اشکال استفاده می کنند ، درج کنید.
Gradle انتظار دارد پرونده ها و دایرکتوری ها را به روشی خاص ، مشابه مجموعه main/
منبع سازماندهی کنند. به عنوان مثال ، Gradle انتظار دارد پرونده های کلاس Kotlin یا Java که مخصوص نوع ساخت "اشکال زدایی" شما هستند که در src/debug/kotlin/
یا src/debug/java/
DIRETRIES قرار دارد.
افزونه Android Gradle یک کار Gradle مفید را ارائه می دهد که به شما نشان می دهد که چگونه می توانید پرونده های خود را برای هر یک از انواع ساخت ، طعم دهنده های محصول و ساخت انواع خود سازماندهی کنید. به عنوان مثال ، نمونه زیر از خروجی کار توصیف می کند که در آن گرادل انتظار دارد پرونده های خاصی را برای نوع ساخت "اشکال زدایی" پیدا کند:
------------------------------------------------------------ Project :app ------------------------------------------------------------ ... debug ---- Compile configuration: debugCompile build.gradle name: android.sourceSets.debug Java sources: [app/src/debug/java] Kotlin sources: [app/src/debug/kotlin, app/src/debug/java] Manifest file: app/src/debug/AndroidManifest.xml Android resources: [app/src/debug/res] Assets: [app/src/debug/assets] AIDL sources: [app/src/debug/aidl] RenderScript sources: [app/src/debug/rs] JNI sources: [app/src/debug/jni] JNI libraries: [app/src/debug/jniLibs] Java-style resources: [app/src/debug/resources]
برای مشاهده این خروجی ، به شرح زیر ادامه دهید:
- روی Gradle در نوار پنجره ابزار کلیک کنید.
به MyApplication> Tasks> Android و منابع دو کلیک بروید.
برای دیدن پوشه وظایف ، باید به Gradle اجازه دهید لیست کار را در حین همگام سازی بسازد. برای انجام این کار، این مراحل را دنبال کنید:
- روی پرونده> تنظیمات> آزمایش ( استودیوی اندرویدی> تنظیمات> آزمایش در MACOS) کلیک کنید.
- DEELECT لیست کار Gradle را در طول همگام سازی Gradle ایجاد نکنید .
- پس از انجام Gradle کار ، پنجره Run برای نمایش خروجی باز می شود.
توجه: خروجی کار همچنین به شما نشان می دهد که چگونه می توانید مجموعه های منبع را برای پرونده هایی که می خواهید از آنها استفاده کنید برای اجرای تست های برنامه خود ، مانند مجموعه های test/
و androidTest/
تست ، سازماندهی کنید.
هنگامی که یک نوع ساخت جدید ایجاد می کنید ، Android Studio منبع مجموعه منبع را برای شما ایجاد نمی کند ، اما این گزینه برای کمک به شما چند گزینه به شما می دهد. به عنوان مثال ، برای ایجاد java/
Directory برای نوع ساخت "اشکال زدایی" خود:
- صفحه پروژه را باز کنید و نمای پروژه را از منو در بالای صفحه انتخاب کنید.
- حرکت به
MyProject/app/src/
. - روی فهرست
src
راست کلیک کرده و Directory New > را انتخاب کنید. - از منوی زیر مجموعه های منبع Gradle ، Full/Java را انتخاب کنید.
- Enter را فشار دهید.
Android Studio یک دایرکتوری مجموعه منبع را برای نوع ساخت اشکال ایجاد می کند و سپس java/
دایرکتوری را در داخل آن ایجاد می کند. از طرف دیگر ، Android Studio می تواند هنگام اضافه کردن یک پرونده جدید به پروژه خود برای یک نوع ساخت خاص ، دایرکتوری ها را برای شما ایجاد کند.
به عنوان مثال ، برای ایجاد یک فایل XML مقادیر برای نوع ساخت "اشکال زدایی" خود:
- در صفحه پروژه ، روی دایرکتوری
src
راست کلیک کرده و پرونده XML New > XML > مقادیر را انتخاب کنید. - نام پرونده XML را وارد کنید یا نام پیش فرض را نگه دارید.
- از منوی کنار مجموعه منبع هدف ، Debug را انتخاب کنید.
- روی Finish کلیک کنید.
از آنجا که نوع ساخت "اشکال زدایی" به عنوان مجموعه منبع هدف مشخص شده است ، Android Studio هنگام ایجاد پرونده XML به طور خودکار دایرکتوری های لازم را ایجاد می کند. ساختار دایرکتوری حاصل مانند شکل 1 به نظر می رسد.

شکل 1. دایرکتوری های جدید منبع برای نوع ساخت "اشکال زدایی".
مجموعه های منبع فعال دارای یک نشانگر سبز در نماد خود هستند تا نشان دهند که آنها فعال هستند. مجموعه منبع debug
با [main]
پسوند می شود تا نشان دهد که در مجموعه منبع main
ادغام خواهد شد.
با استفاده از همان روش ، می توانید دایرکتوری های مجموعه منبع را برای طعم دهنده های محصول مانند src/demo/
و ساخت انواع مختلفی مانند src/demoDebug/
ایجاد کنید. علاوه بر این ، شما می توانید مجموعه های منبع آزمایش را ایجاد کنید که انواع ساخت و سازهای خاص مانند src/androidTestDemoDebug/
را هدف قرار دهید. برای کسب اطلاعات بیشتر ، در مورد مجموعه های منبع آزمایش بخوانید.
تنظیمات تنظیم منبع پیش فرض را تغییر دهید
اگر منابعی دارید که در ساختار پیش فرض مجموعه فایل تنظیم شده که Gradle انتظار دارد ، سازماندهی نشده است ، همانطور که در بخش قبلی در مورد ایجاد مجموعه های منبع توضیح داده شده است ، می توانید از بلوک sourceSets
استفاده کنید تا جایی که Gradle به دنبال جمع آوری پرونده ها برای هر یک از مؤلفه های یک منبع است ، تغییر دهید.
بلوک sourceSets
باید در بلوک android
باشد. نیازی به جابجایی پرونده های منبع نیست. شما فقط باید مسیر (ها) را نسبت به پرونده module-level.gradle.kts در سطح build.gradle.kts
فراهم کنید ، جایی که Gradle می تواند برای هر یک از مؤلفه های تنظیم شده منبع پرونده هایی پیدا کند. برای یادگیری کدام مؤلفه ها می توانید پیکربندی کنید و آیا می توانید آنها را در چندین پرونده یا دایرکتوری نقشه برداری کنید ، به مرجع API افزونه Android Gradle مراجعه کنید.
نمونه کد زیر منابع نقشه را از app/other/
دایرکتوری به برخی از مؤلفه های مجموعه منبع main
نقشه می کند و فهرست اصلی مجموعه منبع androidTest
را تغییر می دهد:
کاتلین
android { ... // Encapsulates configurations for the main source set. sourceSets.getByName("main") { // Changes the directory for Java sources. The default directory is // 'src/main/java'. java.setSrcDirs(listOf("other/java")) // If you list multiple directories, Gradle uses all of them to collect // sources. Because Gradle gives these directories equal priority, if // you define the same resource in more than one directory, you receive an // error when merging resources. The default directory is 'src/main/res'. res.setSrcDirs(listOf("other/res1", "other/res2")) // Note: Avoid specifying a directory that is a parent to one // or more other directories you specify. For example, avoid the following: // res.srcDirs = ['other/res1', 'other/res1/layouts', 'other/res1/strings'] // Specify either only the root 'other/res1' directory or only the // nested 'other/res1/layouts' and 'other/res1/strings' directories. // For each source set, you can specify only one Android manifest. // By default, Android Studio creates a manifest for your main source // set in the src/main/ directory. manifest.srcFile("other/AndroidManifest.xml") ... } // Create additional blocks to configure other source sets. sourceSets.getByName("androidTest") { // If all the files for a source set are located under a single root // directory, you can specify that directory using the setRoot property. // When gathering sources for the source set, Gradle looks only in locations // relative to the root directory you specify. For example, after applying the // configuration below for the androidTest source set, Gradle looks for Java // sources only in the src/tests/java/ directory. setRoot("src/tests") ... } } ...
شیار
android { ... sourceSets { // Encapsulates configurations for the main source set. main { // Changes the directory for Java sources. The default directory is // 'src/main/java'. java.srcDirs = ['other/java'] // If you list multiple directories, Gradle uses all of them to collect // sources. Because Gradle gives these directories equal priority, if // you define the same resource in more than one directory, you receive an // error when merging resources. The default directory is 'src/main/res'. res.srcDirs = ['other/res1', 'other/res2'] // Note: Avoid specifying a directory that is a parent to one // or more other directories you specify. For example, avoid the following: // res.srcDirs = ['other/res1', 'other/res1/layouts', 'other/res1/strings'] // Specify either only the root 'other/res1' directory or only the // nested 'other/res1/layouts' and 'other/res1/strings' directories. // For each source set, you can specify only one Android manifest. // By default, Android Studio creates a manifest for your main source // set in the src/main/ directory. manifest.srcFile 'other/AndroidManifest.xml' ... } // Create additional blocks to configure other source sets. androidTest { // If all the files for a source set are located under a single root // directory, you can specify that directory using the setRoot property. // When gathering sources for the source set, Gradle looks only in locations // relative to the root directory you specify. For example, after applying the // configuration below for the androidTest source set, Gradle looks for Java // sources only in the src/tests/java/ directory. setRoot 'src/tests' ... } } } ...
توجه داشته باشید که یک فهرست منبع فقط می تواند متعلق به یک مجموعه منبع باشد. به عنوان مثال ، شما نمی توانید منابع تست مشابه را با مجموعه های منبع test
و androidTest
به اشتراک بگذارید. این امر به این دلیل است که Android Studio ماژول های جداگانه IntelliJ را برای هر مجموعه منبع ایجاد می کند و نمی تواند ریشه های محتوای تکراری را در مجموعه های منبع پشتیبانی کند.
با مجموعه های منبع بسازید
شما می توانید از دایرکتوری های منبع تنظیم شده برای حاوی کد و منابعی که می خواهید فقط با تنظیمات خاص بسته بندی شده استفاده کنید. به عنوان مثال ، اگر شما در حال ساخت نوع ساخت "DemodeBug" هستید ، که محصول متقاطع یک محصول "نسخه ی نمایشی" و نوع ساخت "اشکال زدایی" است ، Gradle به این دایرکتوری ها نگاه می کند و اولویت زیر را به آنها می دهد:
-
src/demoDebug/
(ساخت مجموعه منبع مختلف) -
src/debug/
(مجموعه منبع نوع ساخت) -
src/demo/
(مجموعه منبع طعم محصول) -
src/main/
(مجموعه منبع اصلی)
مجموعه های منبع ایجاد شده برای ترکیب طعم دهنده های محصول باید شامل تمام ابعاد طعم دهنده باشند. به عنوان مثال ، مجموعه منبع Variant Build باید ترکیبی از نوع ساخت و تمام ابعاد طعم دهنده باشد. ادغام کد و منابع مربوط به پوشه هایی که چندین ابعاد عطر و طعم را پوشش نمی دهند ، پشتیبانی نمی شوند.
اگر چندین طعم محصول را با هم ترکیب کنید ، اولویت بین طعم های محصول با ابعاد عطر و طعم متعلق به آنها تعیین می شود. هنگام لیست ابعاد طعم دهنده با ویژگی android.flavorDimensions
، طعم دهنده های محصول که متعلق به اولین ابعاد طعم دهنده شما است ، اولویت بالاتری نسبت به موارد متعلق به بعد طعم دوم و غیره دارند. علاوه بر این ، مجموعه ای از منبعی که شما برای ترکیبی از طعم دهنده های محصول ایجاد می کنید ، از اولویت بالاتری نسبت به مجموعه های منبع که متعلق به یک عطر و طعم محصول جداگانه است ، دارند.
ترتیب اولویت تعیین می کند که مجموعه منبع اولویت بالاتری دارد که Gradle کد و منابع را ترکیب کند. از آنجا که دایرکتوری Set demoDebug/
Source به احتمال زیاد شامل پرونده هایی است که مخصوص آن نوع ساخت هستند ، اگر demoDebug/
شامل پرونده ای باشد که در debug/
، Gradle از پرونده در مجموعه demoDebug/
Source استفاده می کند. به طور مشابه ، Gradle به پرونده های موجود در نوع ساخت می دهد و منبع عطر و طعم محصول اولویت بالاتری را نسبت به همان پرونده ها در main/
قرار می دهد. Gradle هنگام استفاده از قوانین ساخت زیر ، این دستور اولویت را در نظر می گیرد:
- تمام کد منبع موجود در
kotlin/
یاjava/
Direcieties برای تولید یک خروجی واحد با هم گردآوری می شوند.توجه: برای یک نوع ساخت خاص ، Gradle در صورت مواجهه با دو یا چند دایرکتوری مجموعه منبع که کلاس Kotlin یا Java را تعریف کرده اند ، خطای ساخت را به وجود می آورد. به عنوان مثال ، هنگام ساختن یک برنامه اشکال زدایی ، شما نمی توانید
src/debug/Utility.kt
وsrc/main/Utility.kt
، زیرا Gradle به هر دو دایرکتوری در طول فرآیند ساخت نگاه می کند و خطای "کلاس تکراری" را پرتاب می کند. اگر می خواهید نسخه های مختلفی ازUtility.kt
برای انواع مختلف ساخت ، هر نوع ساخت باید نسخه خاص خود را از پرونده تعریف کند و آن را در مجموعهmain/
منبع قرار ندهد. - مانیفست ها با هم در یک مانیفست ادغام می شوند. اولویت به همان ترتیب لیست در مثال قبلی آورده شده است. یعنی تنظیمات مانیفست برای یک نوع ساخت ، تنظیمات مانیفست را برای طعم محصول و غیره نادیده می گیرد. برای کسب اطلاعات بیشتر ، در مورد ادغام مانیفست بخوانید.
- پرونده های موجود در
values/
دایرکتوری ها با هم ادغام می شوند. اگر دو پرونده دارای یک نام یکسان باشند ، مانند دو پروندهstrings.xml
، اولویت به همان ترتیب لیست در مثال قبلی آورده شده است. یعنی مقادیر تعریف شده در یک فایل در مجموعه منبع ساخت و ساز مقادیر تعریف شده در همان پرونده را در یک عطر و طعم محصول و غیره غلبه کنید. - منابع موجود در
res/
وasset/
دایرکتوری ها با هم بسته بندی می شوند. اگر منابعی با همین نام در دو یا چند منبع منبع تعریف شده باشد ، اولویت به همان ترتیب لیست در مثال قبلی ارائه می شود. - Gradle منابع و مانیفست هایی را که با وابستگی ماژول کتابخانه در هنگام ساخت برنامه کمترین اولویت را ارائه می دهد ، می دهد.
وابستگی ها را اعلام کنید
برای پیکربندی وابستگی به یک نوع ساخت خاص یا مجموعه منبع آزمایش ، پیشوند نام نوع ساخت یا منبع آزمایش را که قبل از کلمه کلیدی Implementation
تنظیم شده است ، همانطور که در مثال زیر نشان داده شده است ، پیشوند کنید:
کاتلین
dependencies { // Adds the local "mylibrary" module as a dependency to the "free" flavor. "freeImplementation"(project(":mylibrary")) // Adds a remote binary dependency only for local tests. testImplementation("junit:junit:4.12") // Adds a remote binary dependency only for the instrumented test APK. androidTestImplementation("com.android.support.test.espresso:espresso-core:3.6.1") }
شیار
dependencies { // Adds the local "mylibrary" module as a dependency to the "free" flavor. freeImplementation project(":mylibrary") // Adds a remote binary dependency only for local tests. testImplementation 'junit:junit:4.12' // Adds a remote binary dependency only for the instrumented test APK. androidTestImplementation 'com.android.support.test.espresso:espresso-core:3.6.1' }
برای کسب اطلاعات بیشتر در مورد پیکربندی وابستگی ها ، به افزودن وابستگی های افزودنی مراجعه کنید.
از مدیریت وابستگی آگاهانه متفاوت استفاده کنید
افزونه Android Gradle 3.0.0 و بالاتر شامل یک مکانیسم وابستگی جدید است که به طور خودکار با انواع مختلف در هنگام مصرف یک کتابخانه مطابقت دارد. این بدان معنی است که نوع debug
یک برنامه به طور خودکار از نوع debug
کتابخانه و غیره استفاده می کند. همچنین در هنگام استفاده از طعم دهنده ها کار می کند: یک نوع برنامه freeDebug
یک برنامه ، یک نوع freeDebug
کتابخانه را مصرف می کند.
برای اینکه این افزونه به طور دقیق با انواع مختلف مطابقت داشته باشد ، باید برای مواردی که در آن یک مسابقه مستقیم امکان پذیر نیست ، تطبیق دهنده های تطبیق را ارائه دهید .
به عنوان مثال ، فرض کنید برنامه شما نوع ساخت و ساز به نام "مرحله بندی" را پیکربندی می کند ، اما یکی از وابستگی های کتابخانه ای آن نیست. هنگامی که این افزونه سعی می کند نسخه "مرحله بندی" برنامه خود را بسازد ، نمی داند از کدام نسخه از کتابخانه استفاده کند ، و یک پیام خطایی شبیه به موارد زیر مشاهده خواهید کرد:
Error:Failed to resolve: Could not resolve project :mylibrary. Required by: project :app
خطاهای ساخت و سازم مربوط به تطبیق نوع را حل کنید
این افزونه شامل عناصر DSL برای کمک به شما در کنترل چگونگی حل و فصل Gradle موقعیت هایی است که در آن یک نوع مستقیم بین یک برنامه و وابستگی امکان پذیر نیست.
در زیر لیستی از موضوعات مربوط به تطبیق وابستگی به آگاه و نحوه حل آنها با استفاده از خواص DSL وجود دارد:برنامه شما شامل یک نوع ساخت و ساز است که وابستگی به کتابخانه ندارد.
به عنوان مثال ، برنامه شما شامل نوع ساخت "مرحله بندی" است ، اما وابستگی فقط شامل انواع ساخت "اشکال زدایی" و "انتشار" است.
توجه داشته باشید که هیچ مشکلی وجود ندارد که وابستگی کتابخانه شامل یک نوع ساخت باشد که برنامه شما انجام نمی دهد. دلیل این امر این است که این افزونه هرگز درخواست نمی کند که نوع از وابستگی باشد.
همانطور که در اینجا نشان داده شده است ، برای مشخص کردن مسابقات جایگزین برای یک نوع ساخت خاص ،
matchingFallbacks
استفاده کنید:کاتلین
// In the app's build.gradle.kts file. android { buildTypes { getByName("debug") {} getByName("release") {} create("staging") { // Specifies a sorted list of fallback build types that the // plugin can try to use when a dependency does not include a // "staging" build type. You may specify as many fallbacks as you // like, and the plugin selects the first build type that's // available in the dependency. matchingFallbacks += listOf("debug", "qa", "release") } } }
شیار
// In the app's build.gradle file. android { buildTypes { debug {} release {} staging { // Specifies a sorted list of fallback build types that the // plugin can try to use when a dependency does not include a // "staging" build type. You may specify as many fallbacks as you // like, and the plugin selects the first build type that's // available in the dependency. matchingFallbacks = ['debug', 'qa', 'release'] } } }
برای یک بعد طعم دار که در برنامه و وابستگی کتابخانه آن وجود دارد ، برنامه شما شامل طعم دهنده هایی است که کتابخانه ندارد.
به عنوان مثال ، هم برنامه شما و هم وابستگی های کتابخانه ای آن شامل ابعاد عطر و طعم "لایه" هستند. با این حال ، بعد "لایه" در برنامه شامل طعم های "رایگان" و "پرداخت شده" است ، اما یک وابستگی فقط شامل طعم های "نسخه ی نمایشی" و "پرداخت شده" برای همان بعد است.
توجه داشته باشید که برای یک بعد طعم داده شده که هم در برنامه و هم در وابستگی به کتابخانه آن وجود دارد ، مشکلی وجود ندارد که یک کتابخانه شامل عطر و طعم محصول باشد که برنامه شما ندارد. دلیل این امر این است که این افزونه هرگز از این عطر و طعم از وابستگی درخواست نمی کند.
برای مشخص کردن مسابقات جایگزین برای طعم محصول "رایگان" برنامه ، همانطور که در اینجا نشان داده شده است ، از
matchingFallbacks
استفاده کنید:کاتلین
// In the app's build.gradle.kts file. android { defaultConfig{ // Don't configure matchingFallbacks in the defaultConfig block. // Instead, specify fallbacks for a given product flavor in the // productFlavors block, as shown below. } flavorDimensions += "tier" productFlavors { create("paid") { dimension = "tier" // Because the dependency already includes a "paid" flavor in its // "tier" dimension, you don't need to provide a list of fallbacks // for the "paid" flavor. } create("free") { dimension = "tier" // Specifies a sorted list of fallback flavors that the plugin // can try to use when a dependency's matching dimension does // not include a "free" flavor. Specify as many // fallbacks as you like; the plugin selects the first flavor // that's available in the dependency's "tier" dimension. matchingFallbacks += listOf("demo", "trial") } } }
شیار
// In the app's build.gradle file. android { defaultConfig{ // Don't configure matchingFallbacks in the defaultConfig block. // Instead, specify fallbacks for a given product flavor in the // productFlavors block, as shown below. } flavorDimensions 'tier' productFlavors { paid { dimension 'tier' // Because the dependency already includes a "paid" flavor in its // "tier" dimension, you don't need to provide a list of fallbacks // for the "paid" flavor. } free { dimension 'tier' // Specifies a sorted list of fallback flavors that the plugin // can try to use when a dependency's matching dimension does // not include a "free" flavor. Specify as many // fallbacks as you like; the plugin selects the first flavor // that's available in the dependency's "tier" dimension. matchingFallbacks = ['demo', 'trial'] } } }
وابستگی کتابخانه شامل ابعاد طعم دهنده ای است که برنامه شما ندارد.
به عنوان مثال ، وابستگی کتابخانه شامل طعم دهنده هایی برای بعد "minapi" است ، اما برنامه شما شامل طعم دهنده هایی برای بعد "لایه" است. هنگامی که می خواهید نسخه "FreedeBug" برنامه خود را بسازید ، این افزونه نمی داند که از نسخه "MinApi23Debug" یا "minapi18debug" از وابستگی استفاده کند.
توجه داشته باشید که هیچ مشکلی وجود ندارد که برنامه شما شامل ابعاد عطر و طعم باشد که وابستگی کتابخانه ای انجام نمی دهد. دلیل این امر این است که این افزونه با طعم های تنها ابعادی که در وابستگی وجود دارد مطابقت دارد. به عنوان مثال ، اگر وابستگی ابعادی را برای ABIS شامل نشود ، نسخه "Freex86Debug" برنامه شما از نسخه "FreedeBug" وابستگی استفاده می کند.
از
missingDimensionStrategy
در بلوکdefaultConfig
استفاده کنید تا طعم پیش فرض برای افزونه را از هر بعد گمشده انتخاب کنید ، همانطور که در نمونه زیر نشان داده شده است. همچنین می توانید انتخاب های خود را در بلوکproductFlavors
نادیده بگیرید ، بنابراین هر عطر و طعم می تواند یک استراتژی تطبیق متفاوت را برای ابعاد گمشده مشخص کند.کاتلین
// In the app's build.gradle.kts file. android { defaultConfig{ // Specifies a sorted list of flavors that the plugin can try to use from // a given dimension. This tells the plugin to select the "minApi18" flavor // when encountering a dependency that includes a "minApi" dimension. // You can include additional flavor names to provide a // sorted list of fallbacks for the dimension. missingDimensionStrategy("minApi", "minApi18", "minApi23") // Specify a missingDimensionStrategy property for each // dimension that exists in a local dependency but not in your app. missingDimensionStrategy("abi", "x86", "arm64") } flavorDimensions += "tier" productFlavors { create("free") { dimension = "tier" // You can override the default selection at the product flavor // level by configuring another missingDimensionStrategy property // for the "minApi" dimension. missingDimensionStrategy("minApi", "minApi23", "minApi18") } create("paid") {} } }
شیار
// In the app's build.gradle file. android { defaultConfig{ // Specifies a sorted list of flavors that the plugin can try to use from // a given dimension. This tells the plugin to select the "minApi18" flavor // when encountering a dependency that includes a "minApi" dimension. // You can include additional flavor names to provide a // sorted list of fallbacks for the dimension. missingDimensionStrategy 'minApi', 'minApi18', 'minApi23' // Specify a missingDimensionStrategy property for each // dimension that exists in a local dependency but not in your app. missingDimensionStrategy 'abi', 'x86', 'arm64' } flavorDimensions 'tier' productFlavors { free { dimension 'tier' // You can override the default selection at the product flavor // level by configuring another missingDimensionStrategy property // for the 'minApi' dimension. missingDimensionStrategy 'minApi', 'minApi23', 'minApi18' } paid {} } }
برای اطلاعات بیشتر ، به matchingFallbacks
و missingDimensionStrategy
در افزونه Android Gradle DSL مراجعه کنید.
تنظیمات امضا را پیکربندی کنید
Gradle APK یا AAB ساخت شما را امضا نمی کند ، مگر اینکه صریحاً پیکربندی امضای این ساخت را تعریف کنید. اگر هنوز کلید امضاء ندارید ، با استفاده از Android Studio یک کلید بارگذاری و کلید اصلی ایجاد کنید .
برای پیکربندی دستی تنظیمات امضا برای نوع ساخت نسخه خود با استفاده از تنظیمات ساخت Gradle:
- ایجاد یک کلیدی. کلیدی کلیدی یک فایل باینری است که شامل مجموعه ای از کلیدهای خصوصی است. شما باید کلید اصلی خود را در مکانی امن و ایمن نگه دارید.
- یک کلید خصوصی ایجاد کنید. از یک کلید خصوصی برای امضای برنامه شما برای توزیع استفاده می شود و هرگز با برنامه درج نمی شود یا به اشخاص ثالث غیرمجاز فاش نمی شود.
پیکربندی امضای را به پرونده module-
build.gradle.kts
اضافه کنید:کاتلین
... android { ... defaultConfig {...} signingConfigs { create("release") { storeFile = file("myreleasekey.keystore") storePassword = "password" keyAlias = "MyReleaseKey" keyPassword = "password" } } buildTypes { getByName("release") { ... signingConfig = signingConfigs.getByName("release") } } }
شیار
... android { ... defaultConfig {...} signingConfigs { release { storeFile file("myreleasekey.keystore") storePassword "password" keyAlias "MyReleaseKey" keyPassword "password" } } buildTypes { release { ... signingConfig signingConfigs.release } } }
توجه: از جمله رمزهای عبور برای کلید انتشار و کلید اصلی در داخل پرونده ساخت ، یک روش امنیتی خوب نیست. در عوض ، فایل ساخت را پیکربندی کنید تا این رمزهای عبور را از متغیرهای محیط به دست آورید یا فرآیند ساخت را برای این گذرواژهها بخواهید.
برای به دست آوردن این رمزهای عبور از متغیرهای محیط:
کاتلین
storePassword = System.getenv("KSTOREPWD") keyPassword = System.getenv("KEYPWD")
شیار
storePassword System.getenv("KSTOREPWD") keyPassword System.getenv("KEYPWD")
از طرف دیگر ، می توانید کلید اصلی را از یک فایل خاصیت محلی بارگیری کنید. به دلایل امنیتی ، این پرونده را به کنترل منبع اضافه نکنید. در عوض ، آن را به صورت محلی برای هر توسعه دهنده تنظیم کنید. برای کسب اطلاعات بیشتر ، حذف اطلاعات امضاء از پرونده های ساخت خود را بخوانید.
پس از اتمام این فرآیند ، می توانید برنامه خود را توزیع کرده و آن را در Google Play منتشر کنید.
هشدار: کلید اصلی و کلید خصوصی خود را در مکانی امن و ایمن نگه دارید و اطمینان حاصل کنید که از آنها پشتیبان تهیه می کنید. اگر از امضای برنامه Play استفاده می کنید و کلید بارگذاری خود را از دست می دهید ، می توانید با استفاده از کنسول Play مجدداً تنظیم مجدد کنید . اگر در حال انتشار یک برنامه بدون امضای برنامه Play (برای برنامه های ایجاد شده قبل از آگوست 2021) هستید و کلید امضای برنامه خود را از دست می دهید ، قادر نخواهید بود به روزرسانی در برنامه خود منتشر کنید ، زیرا همیشه باید تمام نسخه های برنامه خود را با همان کلید امضا کنید.
امضای برنامه های سیستم عامل
هنگام انتشار برنامه های OS Wear ، هر دو APK Watch و APK اختیاری باید با همان کلید امضا شوند. برای کسب اطلاعات بیشتر در مورد بسته بندی و امضای برنامه های سیستم عامل Wear ، به بسته بندی و توزیع برنامه های Wear مراجعه کنید.
،این صفحه به شما نشان می دهد که چگونه می توانید انواع ساخت را برای ایجاد نسخه های مختلف برنامه خود از یک پروژه واحد و نحوه مدیریت صحیح وابستگی ها و تنظیمات امضاء خود پیکربندی کنید.
هر نوع ساخت ، نسخه متفاوتی از برنامه شما را نشان می دهد که می توانید بسازید. به عنوان مثال ، شما ممکن است بخواهید یک نسخه از برنامه خود را که با مجموعه محدودی از محتوا رایگان است ، بسازید و یک نسخه دیگر پرداخت شده که شامل موارد بیشتری نیز می شود. همچنین می توانید نسخه های مختلفی از برنامه خود را ایجاد کنید که دستگاه های مختلف را بر اساس سطح API یا سایر تغییرات دستگاه هدف قرار دهند.
ساخت انواع نتیجه Gradle با استفاده از مجموعه خاصی از قوانین برای ترکیب تنظیمات ، کد و منابع پیکربندی شده در انواع ساخت و سازهای شما و طعم دهنده های محصول است. اگرچه شما به طور مستقیم انواع ساخت را پیکربندی نمی کنید ، اما انواع ساخت و طعم های محصول را که آنها را تشکیل می دهند پیکربندی می کنید.
به عنوان مثال ، یک عطر و طعم محصول "نسخه ی نمایشی" ممکن است ویژگی ها و الزامات خاص دستگاه ، مانند کد منبع سفارشی ، منابع و حداقل سطح API را مشخص کند ، در حالی که نوع ساخت "اشکال زدایی" از تنظیمات ساخت و بسته بندی های مختلف مانند گزینه های اشکال زدایی و کلیدهای امضا استفاده می کند. نوع ساخت و ساز که این دو را ترکیب می کند ، نسخه "DemodeBug" برنامه شما است و شامل ترکیبی از تنظیمات و منابع موجود در "Demo" طعم محصول ، نوع ساخت اشکال زدایی "اشکال زدایی" و مجموعه main/
منبع است.
پیکربندی انواع ساخت
می توانید انواع ساخت و ساز را در داخل بلوک android
پرونده ماژول build.gradle.kts
ایجاد و پیکربندی کنید. هنگامی که یک ماژول جدید ایجاد می کنید ، Android Studio به طور خودکار انواع اشکال زدایی و انتشار را ایجاد می کند. اگرچه نوع ساخت اشکال در فایل پیکربندی ساخت ظاهر نمی شود ، Android Studio آن را با debuggable true
پیکربندی می کند. این به شما امکان می دهد تا برنامه را در دستگاه های Secure Android اشکال زدایی کنید و امضای برنامه را با یک کلیدی کلیدی اشکال زدایی عمومی پیکربندی می کند.
اگر می خواهید تنظیمات خاص را اضافه یا تغییر دهید ، می توانید نوع ساخت اشکال را به پیکربندی خود اضافه کنید. نمونه زیر یک applicationIdSuffix
برای نوع ساخت اشکال را مشخص می کند و یک نوع ساخت "مرحله بندی" را پیکربندی می کند که با استفاده از تنظیمات از نوع ساخت اشکال آغاز می شود:
کاتلین
android { defaultConfig { manifestPlaceholders["hostName"] = "www.example.com" ... } buildTypes { getByName("release") { isMinifyEnabled = true proguardFiles(getDefaultProguardFile("proguard-android.txt"), "proguard-rules.pro") } getByName("debug") { applicationIdSuffix = ".debug" isDebuggable = true } /** * The `initWith` property lets you copy configurations from other build types, * then configure only the settings you want to change. This one copies the debug build * type, and then changes the manifest placeholder and application ID. */ create("staging") { initWith(getByName("debug")) manifestPlaceholders["hostName"] = "internal.example.com" applicationIdSuffix = ".debugStaging" } } }
شیار
android { defaultConfig { manifestPlaceholders = [hostName:"www.example.com"] ... } buildTypes { release { minifyEnabled true proguardFiles getDefaultProguardFile('proguard-android.txt'), 'proguard-rules.pro' } debug { applicationIdSuffix ".debug" debuggable true } /** * The `initWith` property lets you copy configurations from other build types, * then configure only the settings you want to change. This one copies the debug build * type, and then changes the manifest placeholder and application ID. */ staging { initWith debug manifestPlaceholders = [hostName:"internal.example.com"] applicationIdSuffix ".debugStaging" } } }
توجه: هنگامی که در یک فایل پیکربندی ساخت تغییراتی ایجاد می کنید ، Android Studio نیاز دارد که پروژه خود را با پیکربندی جدید همگام سازی کنید. برای همگام سازی پروژه خود ، اکنون روی همگام سازی روی نوار اعلان که هنگام ایجاد تغییر یا روی پروژه Sync کلیک می کنید ، روی همگام سازی کلیک کنید. از نوار ابزار اگر Android Studio با پیکربندی شما خطایی را مشاهده کند ، به نظر می رسد پنجره پیام ها مسئله را توصیف می کند.
برای کسب اطلاعات بیشتر در مورد تمام خصوصیاتی که می توانید با انواع ساخت پیکربندی کنید ، مرجع BuildType
بخوانید.
طعم دهنده های محصول را پیکربندی کنید
ایجاد طعم های محصول شبیه به ایجاد انواع ساخت است. طعم دهنده های محصول را در پیکربندی ساخت خود به بلوک productFlavors
اضافه کنید و تنظیمات مورد نظر خود را درج کنید. طعم دهنده های محصول از همان خواص defaultConfig
پشتیبانی می کنند ، زیرا defaultConfig
در واقع متعلق به کلاس ProductFlavor
است. این بدان معنی است که شما می توانید پیکربندی پایه را برای همه طعم دهنده ها در بلوک defaultConfig
فراهم کنید ، و هر عطر و طعم می تواند هر یک از این مقادیر پیش فرض مانند applicationId
تغییر دهد. برای کسب اطلاعات بیشتر در مورد شناسه برنامه ، SET APPLICE را بخوانید.
توجه: شما هنوز هم باید نام بسته را با استفاده از ویژگی package
در پرونده main/
مانیفست مشخص کنید. همچنین باید از آن نام بسته در کد منبع خود استفاده کنید تا به کلاس R
مراجعه کنید یا برای حل هرگونه فعالیت نسبی یا ثبت نام خدمات. این به شما امکان می دهد بدون نیاز به تغییر کد منبع خود ، applicationId
استفاده کنید تا به هر محصول عطر و طعم منحصر به فرد برای بسته بندی و توزیع بدهید.
تمام طعم دهنده ها باید متعلق به یک بعد طعم دار باشند ، که گروهی از طعم دهنده های محصول است. شما باید تمام طعم دهنده ها را به ابعاد عطر و طعم اختصاص دهید. در غیر این صورت ، خطای ساخت زیر را دریافت خواهید کرد.
Error: All flavors must now belong to a named flavor dimension. The flavor 'flavor_name' is not assigned to a flavor dimension.
اگر یک ماژول داده شده تنها یک بعد طعم را مشخص کند ، افزونه Android Gradle به طور خودکار تمام طعم های ماژول را به آن بعد اختصاص می دهد.
نمونه کد زیر ابعاد عطر و طعم به نام "نسخه" ایجاد می کند و طعم های محصول "نسخه ی نمایشی" و "کامل" را اضافه می کند. این طعم دهنده ها applicationIdSuffix
و versionNameSuffix
خود را ارائه می دهند:
کاتلین
android { ... defaultConfig {...} buildTypes { getByName("debug"){...} getByName("release"){...} } // Specifies one flavor dimension. flavorDimensions += "version" productFlavors { create("demo") { // Assigns this product flavor to the "version" flavor dimension. // If you are using only one dimension, this property is optional, // and the plugin automatically assigns all the module's flavors to // that dimension. dimension = "version" applicationIdSuffix = ".demo" versionNameSuffix = "-demo" } create("full") { dimension = "version" applicationIdSuffix = ".full" versionNameSuffix = "-full" } } }
شیار
android { ... defaultConfig {...} buildTypes { debug{...} release{...} } // Specifies one flavor dimension. flavorDimensions "version" productFlavors { demo { // Assigns this product flavor to the "version" flavor dimension. // If you are using only one dimension, this property is optional, // and the plugin automatically assigns all the module's flavors to // that dimension. dimension "version" applicationIdSuffix ".demo" versionNameSuffix "-demo" } full { dimension "version" applicationIdSuffix ".full" versionNameSuffix "-full" } } }
توجه: اگر یک برنامه میراث دارید (قبل از آگوست 2021) که با استفاده از APK ها در Google Play توزیع می کنید ، برای توزیع برنامه خود با استفاده از چندین پشتیبانی APK در Google Play توزیع کنید ، همان مقدار applicationId
را به همه انواع اختصاص دهید و به هر نوع نسخه متفاوت versionCode
ارائه دهید. برای توزیع انواع مختلف برنامه خود به عنوان برنامه های جداگانه در Google Play ، باید یک applicationId
متفاوت را به هر نوع اختصاص دهید.
بعد از ایجاد و پیکربندی طعم های محصول خود ، اکنون روی همگام سازی در نوار اعلان کلیک کنید. پس از اتمام همگام سازی ، Gradle به طور خودکار انواع ساخت و ساز را بر اساس انواع ساخت و سازهای شما ایجاد می کند و آنها را با توجه به <product-flavor><Build-Type>
نامگذاری می کند. به عنوان مثال ، اگر شما طعم های محصول "نسخه ی نمایشی" و "کامل" را ایجاد کرده اید ، و انواع ساخت "اشکال زدایی" و "انتشار" را نگه دارید ، Gradle انواع ساخت زیر را ایجاد می کند:
-
demoDebug
-
demoRelease
-
fullDebug
-
fullRelease
برای انتخاب نوع ساخت و ساز برای ساخت و اجرای ، به ساخت > ساخت نوع ساخت و ساز را انتخاب کنید و یک نوع ساخت را از منو انتخاب کنید. برای شروع سفارشی کردن هر نوع ساخت با ویژگی ها و منابع خاص خود ، همانطور که در این صفحه توضیح داده شده است ، باید مجموعه های منبع را ایجاد و مدیریت کنید .
شناسه برنامه را برای ساخت انواع تغییر دهید
هنگامی که یک برنامه APK یا AAB را برای برنامه خود می سازید ، Build Tools برنامه را با شناسه برنامه تعریف شده در بلوک defaultConfig
از پرونده build.gradle.kts
، همانطور که در مثال زیر نشان داده شده است ، برچسب گذاری می کنند. با این حال ، اگر می خواهید نسخه های مختلفی از برنامه خود را ایجاد کنید تا به عنوان لیست های جداگانه در فروشگاه Google Play ، مانند نسخه "رایگان" و "Pro" ظاهر شود ، باید انواع ساخت و ساز جداگانه ای ایجاد کنید که هر یک دارای شناسه کاربردی متفاوتی هستند.
در این حالت ، هر نوع ساخت را به عنوان یک طعم محصول جداگانه تعریف کنید. برای هر عطر و طعم موجود در بلوک productFlavors
، می توانید ویژگی applicationId
دوباره تعریف کنید ، یا در عوض می توانید یک بخش را با استفاده از applicationIdSuffix
به شناسه برنامه پیش فرض اضافه کنید ، همانطور که در اینجا نشان داده شده است:
کاتلین
android { defaultConfig { applicationId = "com.example.myapp" } productFlavors { create("free") { applicationIdSuffix = ".free" } create("pro") { applicationIdSuffix = ".pro" } } }
شیار
android { defaultConfig { applicationId "com.example.myapp" } productFlavors { free { applicationIdSuffix ".free" } pro { applicationIdSuffix ".pro" } } }
به این ترتیب ، شناسه برنامه برای طعم محصول "رایگان" "com.example.myapp.free" است.
همچنین می توانید از applicationIdSuffix
برای اضافه کردن یک بخش بر اساس نوع ساخت خود استفاده کنید ، همانطور که در اینجا نشان داده شده است:
کاتلین
android { ... buildTypes { getByName("debug") { applicationIdSuffix = ".debug" } } }
شیار
android { ... buildTypes { debug { applicationIdSuffix ".debug" } } }
از آنجا که Gradle پیکربندی نوع ساخت را پس از طعم محصول اعمال می کند ، شناسه برنامه برای نوع ساخت "اشکال زدایی رایگان" "com.example.myapp.free.debug" است. این زمانی مفید است که شما می خواهید هر دو اشکال زدایی و انتشار را در همان دستگاه ایجاد کنید ، زیرا هیچ دو برنامه نمی توانند شناسه برنامه یکسان داشته باشند.
اگر یک برنامه Legacy دارید (قبل از آگوست 2021 ایجاد شده است) که با استفاده از APK ها در Google Play توزیع می کنید ، و می خواهید از همان لیست برنامه برای توزیع چندین APK استفاده کنید که هر یک از آنها پیکربندی دستگاه متفاوتی مانند سطح API را هدف قرار می دهد ، پس باید از یک شناسه برنامه مشابه برای هر نوع ساخت استفاده کنید اما به هر APKversionCode
دیگری بدهید. برای اطلاعات بیشتر ، در مورد پشتیبانی از APK متعدد بخوانید. انتشار با استفاده از AABS بی تأثیر است ، زیرا از یک مصنوع واحد استفاده می کند که به طور پیش فرض از یک کد نسخه و شناسه برنامه استفاده می کند. نکته: در صورت نیاز به مراجعه به شناسه برنامه در پرونده مانیفست خود ، می توانید در هر ویژگی مانیفست از محل نگهدارنده ${applicationId}
استفاده کنید. در حین ساخت ، Gradle این برچسب را با شناسه برنامه واقعی جایگزین می کند. برای اطلاعات بیشتر ، به متغیرهای تزریق در مانیفست مراجعه کنید.
چندین طعم محصول را با ابعاد عطر و طعم ترکیب کنید
در بعضی موارد ، شما ممکن است بخواهید تنظیمات را از چندین طعم محصول ترکیب کنید. به عنوان مثال ، شما ممکن است بخواهید تنظیمات مختلفی را برای طعم های محصول "کامل" و "نسخه ی نمایشی" ایجاد کنید که مبتنی بر سطح API هستند. برای انجام این کار ، افزونه Android Gradle به شما امکان می دهد چندین گروه از طعم های محصول را به عنوان ابعاد طعم ایجاد کنید.
هنگام ساختن برنامه خود ، Gradle از هر ابعاد طعم دهنده ای که تعریف می کنید ، همراه با پیکربندی نوع ساخت ، یک پیکربندی عطر و طعم محصول را ترکیب می کند تا نوع ساخت نهایی را ایجاد کند. Gradle طعم دهنده های محصول را که متعلق به همان بعد طعم دهنده هستند ، ترکیب نمی کند.
نمونه کد زیر از ویژگی flavorDimensions
برای ایجاد ابعاد عطر و طعم "حالت" برای گروه بندی طعم های محصول "کامل" و "نسخه ی نمایشی" و ابعاد عطر و طعم "API" برای گروه بندی تنظیمات عطر و طعم محصول بر اساس سطح API استفاده می کند:
کاتلین
android { ... buildTypes { getByName("debug") {...} getByName("release") {...} } // Specifies the flavor dimensions you want to use. The order in which you // list the dimensions determines their priority, from highest to lowest, // when Gradle merges variant sources and configurations. You must assign // each product flavor you configure to one of the flavor dimensions. flavorDimensions += listOf("api", "mode") productFlavors { create("demo") { // Assigns this product flavor to the "mode" flavor dimension. dimension = "mode" ... } create("full") { dimension = "mode" ... } // Configurations in the "api" product flavors override those in "mode" // flavors and the defaultConfig block. Gradle determines the priority // between flavor dimensions based on the order in which they appear next // to the flavorDimensions property, with the first dimension having a higher // priority than the second, and so on. create("minApi24") { dimension = "api" minSdk = 24 // To ensure the target device receives the version of the app with // the highest compatible API level, assign version codes in increasing // value with API level. versionCode = 30000 + (android.defaultConfig.versionCode ?: 0) versionNameSuffix = "-minApi24" ... } create("minApi23") { dimension = "api" minSdk = 23 versionCode = 20000 + (android.defaultConfig.versionCode ?: 0) versionNameSuffix = "-minApi23" ... } create("minApi21") { dimension = "api" minSdk = 21 versionCode = 10000 + (android.defaultConfig.versionCode ?: 0) versionNameSuffix = "-minApi21" ... } } } ...
شیار
android { ... buildTypes { debug {...} release {...} } // Specifies the flavor dimensions you want to use. The order in which you // list the dimensions determines their priority, from highest to lowest, // when Gradle merges variant sources and configurations. You must assign // each product flavor you configure to one of the flavor dimensions. flavorDimensions "api", "mode" productFlavors { demo { // Assigns this product flavor to the "mode" flavor dimension. dimension "mode" ... } full { dimension "mode" ... } // Configurations in the "api" product flavors override those in "mode" // flavors and the defaultConfig block. Gradle determines the priority // between flavor dimensions based on the order in which they appear next // to the flavorDimensions property, with the first dimension having a higher // priority than the second, and so on. minApi24 { dimension "api" minSdkVersion 24 // To ensure the target device receives the version of the app with // the highest compatible API level, assign version codes in increasing // value with API level. versionCode 30000 + android.defaultConfig.versionCode versionNameSuffix "-minApi24" ... } minApi23 { dimension "api" minSdkVersion 23 versionCode 20000 + android.defaultConfig.versionCode versionNameSuffix "-minApi23" ... } minApi21 { dimension "api" minSdkVersion 21 versionCode 10000 + android.defaultConfig.versionCode versionNameSuffix "-minApi21" ... } } } ...
تعداد انواع ساخت و ساز درجه یک برابر با محصول تعداد طعم دهنده ها در هر بعد طعم و تعداد انواع ساختگی که پیکربندی می کنید برابر است. هنگامی که Gradle هر نوع ساخت و ساز یا مصنوعات مربوطه را نامگذاری می کند ، طعم دهنده های محصول متعلق به بعد طعم بالاتر با اولویت بالاتر ظاهر می شوند ، و به دنبال آن از ابعاد اولویت پایین تر و به دنبال آن نوع ساخت.
با استفاده از پیکربندی ساخت قبلی به عنوان نمونه ، Gradle در مجموع 12 نوع ساخت با طرح نامگذاری زیر ایجاد می کند:
- ساخت نوع:
[minApi24, minApi23, minApi21][Demo, Full][Debug, Release]
- APK مربوطه:
app-[minApi24, minApi23, minApi21]-[demo, full]-[debug, release].apk
- به عنوان مثال،
- ساخت نوع:
minApi24DemoDebug
- APK مربوطه:
app-minApi24-demo-debug.apk
علاوه بر دایرکتوری های مجموعه منبع که می توانید برای هر محصول خاص و عطر و طعم ایجاد کنید ، می توانید برای هر ترکیبی از طعم دهنده های محصول ، دایرکتوری های مجموعه منبع ایجاد کنید. به عنوان مثال ، می توانید منابع جاوا را به src/demoMinApi24/java/
Directory ایجاد و اضافه کنید ، و Gradle فقط در هنگام ساختن یک نوع که ترکیب آن دو طعم محصول است ، از آن منابع استفاده می کند.
مجموعه منبع شما برای ترکیب عطر و طعم محصول از اولویت بالاتری نسبت به مجموعه های منبع که متعلق به هر عطر و طعم محصول جداگانه است ، دارند. برای کسب اطلاعات بیشتر در مورد مجموعه های منبع و چگونگی ادغام Gradle منابع ، بخش مربوط به نحوه ایجاد مجموعه های منبع را بخوانید.
انواع فیلتر
Gradle برای هر ترکیب ممکن از طعم دهنده های محصول یک نوع ساخت ایجاد می کند و انواع مختلفی را که پیکربندی می کنید ایجاد می کند. با این وجود ، ممکن است انواع خاصی از ساخت و ساز وجود داشته باشد که شما به آن احتیاج ندارید یا در زمینه پروژه خود معنی ندارد. برای حذف برخی از تنظیمات مختلف ساخت ، یک فیلتر متنوع را در پرونده سطح build.gradle.kts
خود ایجاد کنید.
با استفاده از پیکربندی ساخت از بخش قبلی به عنوان نمونه ، فرض کنید قصد دارید فقط از سطح API 23 و بالاتر برای نسخه نسخه ی نمایشی برنامه پشتیبانی کنید. شما می توانید از بلوک variantFilter
استفاده کنید تا تمام تنظیمات مختلف ساخت و ساز را که ترکیب "Minapi21" و "Demo" طعم دهنده محصول است ، فیلتر کنید:
کاتلین
android { ... buildTypes {...} flavorDimensions += listOf("api", "mode") productFlavors { create("demo") {...} create("full") {...} create("minApi24") {...} create("minApi23") {...} create("minApi21") {...} } } androidComponents { beforeVariants { variantBuilder -> // To check for a certain build type, use variantBuilder.buildType == "<buildType>" if (variantBuilder.productFlavors.containsAll(listOf("api" to "minApi21", "mode" to "demo"))) { // Gradle ignores any variants that satisfy the conditions above. variantBuilder.enable = false } } } ...
شیار
android { ... buildTypes {...} flavorDimensions "api", "mode" productFlavors { demo {...} full {...} minApi24 {...} minApi23 {...} minApi21 {...} } variantFilter { variant -> def names = variant.flavors*.name // To check for a certain build type, use variant.buildType.name == "<buildType>" if (names.contains("minApi21") && names.contains("demo")) { // Gradle ignores any variants that satisfy the conditions above. setIgnore(true) } } } ...
هنگامی که یک فیلتر متنوع را به پیکربندی ساخت خود اضافه می کنید و هم اکنون در نوار اعلان همگام سازی می کنید ، Gradle انواع مختلفی از ساخت و ساز را که شرایط تعیین شده را برآورده می کند ، نادیده می گیرد. انواع ساخت و ساز دیگر در منو وقتی کلیک می کنید BUILD> SELECT Build Variant را از نوار منو یا ساخت انواع ایجاد کنید در نوار پنجره ابزار.
مجموعه های منبع را ایجاد کنید
به طور پیش فرض ، Android Studio مجموعه main/
منبع و دایرکتوری ها را برای همه چیزهایی که می خواهید بین همه انواع ساخت خود به اشتراک بگذارید ، ایجاد می کند. با این حال ، شما می توانید مجموعه های منبع جدیدی ایجاد کنید تا دقیقاً کدام یک از ترکیبات و بسته های Gradle را برای انواع خاص ساخت ، طعم دهنده های محصول ، ترکیبی از طعم دهنده های محصول (هنگام استفاده از ابعاد طعم دهنده ) و ساخت انواع مختلف کنترل کنید.
For example, you can define basic functionality in the main/
source set and use product flavor source sets to change the branding of your app for different clients, or include special permissions and logging functionality only for build variants that use the debug build type.
Gradle expects source set files and directories to be organized in a certain way, similar to the main/
source set. For example, Gradle expects Kotlin or Java class files that are specific to your "debug" build type to be located in the src/debug/kotlin/
or src/debug/java/
directories.
The Android Gradle plugin provides a useful Gradle task that shows you how to organize your files for each of your build types, product flavors, and build variants. For example, the following sample from the task output describes where Gradle expects to find certain files for the "debug" build type:
------------------------------------------------------------ Project :app ------------------------------------------------------------ ... debug ---- Compile configuration: debugCompile build.gradle name: android.sourceSets.debug Java sources: [app/src/debug/java] Kotlin sources: [app/src/debug/kotlin, app/src/debug/java] Manifest file: app/src/debug/AndroidManifest.xml Android resources: [app/src/debug/res] Assets: [app/src/debug/assets] AIDL sources: [app/src/debug/aidl] RenderScript sources: [app/src/debug/rs] JNI sources: [app/src/debug/jni] JNI libraries: [app/src/debug/jniLibs] Java-style resources: [app/src/debug/resources]
To view this output, proceed as follows:
- Click Gradle in the tool window bar.
Navigate to MyApplication > Tasks > android and double-click sourceSets .
To see the Tasks folder, you must let Gradle build the task list during sync. برای انجام این کار، این مراحل را دنبال کنید:
- Click File > Settings > Experimental ( Android Studio > Settings > Experimental on macOS).
- Deselect Do not build Gradle task list during Gradle sync .
- After Gradle executes the task, the Run window opens to display the output.
Note: The task output also shows you how to organize source sets for files you want to use to run tests for your app, such as the test/
and androidTest/
testing source sets .
When you create a new build variant, Android Studio doesn't create the source set directories for you, but it does give you a few options to help you. For example, to create just the java/
directory for your "debug" build type:
- Open the Project pane and select the Project view from the menu at the top of the pane.
- Navigate to
MyProject/app/src/
. - Right-click the
src
directory and select New > Directory . - From the menu under Gradle Source Sets , select full/java .
- Enter را فشار دهید.
Android Studio creates a source set directory for your debug build type and then creates the java/
directory inside it. Alternatively, Android Studio can create the directories for you when you add a new file to your project for a specific build variant.
For example, to create a values XML file for your "debug" build type:
- In the Project pane, right-click the
src
directory and select New > XML > Values XML File . - Enter the name for the XML file or keep the default name.
- From the menu next to Target Source Set , select debug .
- روی Finish کلیک کنید.
Because the "debug" build type was specified as the target source set, Android Studio automatically creates the necessary directories when it creates the XML file. The resulting directory structure looks like figure 1.

Figure 1. New source set directories for the "debug" build type.
Active source sets have a green indicator in their icon to show that they are active. The debug
source set is suffixed with [main]
to show that it will be merged in to the main
source set.
Using the same procedure, you can also create source set directories for product flavors, such as src/demo/
, and build variants, such as src/demoDebug/
. Additionally, you can create testing source sets that target specific build variants, such as src/androidTestDemoDebug/
. To learn more, read about testing source sets .
Change default source set configurations
If you have sources that are not organized into the default source set file structure that Gradle expects, as described in the previous section about creating source sets , you can use the sourceSets
block to change where Gradle looks to gather files for each component of a source set.
The sourceSets
block must be in the android
block. You don't need to relocate the source files; you only need to provide Gradle with the path(s), relative to the module-level build.gradle.kts
file, where Gradle can find files for each source set component. To learn which components you can configure and whether you can map them to multiple files or directories, see the Android Gradle plugin API reference .
The following code sample maps sources from the app/other/
directory to certain components of the main
source set and changes the root directory of the androidTest
source set:
کاتلین
android { ... // Encapsulates configurations for the main source set. sourceSets.getByName("main") { // Changes the directory for Java sources. The default directory is // 'src/main/java'. java.setSrcDirs(listOf("other/java")) // If you list multiple directories, Gradle uses all of them to collect // sources. Because Gradle gives these directories equal priority, if // you define the same resource in more than one directory, you receive an // error when merging resources. The default directory is 'src/main/res'. res.setSrcDirs(listOf("other/res1", "other/res2")) // Note: Avoid specifying a directory that is a parent to one // or more other directories you specify. For example, avoid the following: // res.srcDirs = ['other/res1', 'other/res1/layouts', 'other/res1/strings'] // Specify either only the root 'other/res1' directory or only the // nested 'other/res1/layouts' and 'other/res1/strings' directories. // For each source set, you can specify only one Android manifest. // By default, Android Studio creates a manifest for your main source // set in the src/main/ directory. manifest.srcFile("other/AndroidManifest.xml") ... } // Create additional blocks to configure other source sets. sourceSets.getByName("androidTest") { // If all the files for a source set are located under a single root // directory, you can specify that directory using the setRoot property. // When gathering sources for the source set, Gradle looks only in locations // relative to the root directory you specify. For example, after applying the // configuration below for the androidTest source set, Gradle looks for Java // sources only in the src/tests/java/ directory. setRoot("src/tests") ... } } ...
شیار
android { ... sourceSets { // Encapsulates configurations for the main source set. main { // Changes the directory for Java sources. The default directory is // 'src/main/java'. java.srcDirs = ['other/java'] // If you list multiple directories, Gradle uses all of them to collect // sources. Because Gradle gives these directories equal priority, if // you define the same resource in more than one directory, you receive an // error when merging resources. The default directory is 'src/main/res'. res.srcDirs = ['other/res1', 'other/res2'] // Note: Avoid specifying a directory that is a parent to one // or more other directories you specify. For example, avoid the following: // res.srcDirs = ['other/res1', 'other/res1/layouts', 'other/res1/strings'] // Specify either only the root 'other/res1' directory or only the // nested 'other/res1/layouts' and 'other/res1/strings' directories. // For each source set, you can specify only one Android manifest. // By default, Android Studio creates a manifest for your main source // set in the src/main/ directory. manifest.srcFile 'other/AndroidManifest.xml' ... } // Create additional blocks to configure other source sets. androidTest { // If all the files for a source set are located under a single root // directory, you can specify that directory using the setRoot property. // When gathering sources for the source set, Gradle looks only in locations // relative to the root directory you specify. For example, after applying the // configuration below for the androidTest source set, Gradle looks for Java // sources only in the src/tests/java/ directory. setRoot 'src/tests' ... } } } ...
Note that a source directory can only belong to one source set. For example, you can't share the same test sources with both the test
and androidTest
source sets. This is because Android Studio creates separate IntelliJ modules for each source set and can't support duplicate content roots across source sets.
Build with source sets
You can use source set directories to contain the code and resources you want packaged only with certain configurations. For example, if you are building the "demoDebug" build variant, which is the crossproduct of a "demo" product flavor and "debug" build type, Gradle looks at these directories and gives them the following priority:
-
src/demoDebug/
(build variant source set) -
src/debug/
(build type source set) -
src/demo/
(product flavor source set) -
src/main/
(main source set)
Source sets created for combinations of product flavors must include all flavor dimensions. For example, the build variant source set must be the combination of the build type and all flavor dimensions. Merging code and resources involving folders that cover multiple but not all flavor dimensions is not supported.
If you combine multiple product flavors , priority between the product flavors is determined by the flavor dimension they belong to. When listing flavor dimensions with the android.flavorDimensions
property, product flavors that belong to the first flavor dimension you list have a higher priority than those belonging to the second flavor dimension, and so on. Additionally, source sets you create for combinations of product flavors have a higher priority than source sets that belong to an individual product flavor.
The priority order determines which source set has a higher priority when Gradle combines code and resources. Because the demoDebug/
source set directory likely contains files that are specific to that build variant, if demoDebug/
includes a file that is also defined in debug/
, Gradle uses the file in the demoDebug/
source set. Similarly, Gradle gives files in the build type and product flavor source sets a higher priority than the same files in main/
. Gradle considers this priority order when applying the following build rules:
- All source code in the
kotlin/
orjava/
directories are compiled together to generate a single output.Note: For a given build variant, Gradle throws a build error if it encounters two or more source set directories that have defined the same Kotlin or Java class. For example, when building a debug app, you can't define both
src/debug/Utility.kt
andsrc/main/Utility.kt
, because Gradle looks at both these directories during the build process and throws a "duplicate class" error. If you want different versions ofUtility.kt
for different build types, each build type must define its own version of the file and not include it in themain/
source set. - Manifests are merged together into a single manifest. Priority is given in the same order as the list in the previous example. That is, manifest settings for a build type override the manifest settings for a product flavor, and so on. To learn more, read about manifest merging .
- Files in the
values/
directories are merged together. If two files have the same name, such as twostrings.xml
files, priority is given in the same order as the list in the previous example. That is, values defined in a file in the build type source set override the values defined in the same file in a product flavor, and so on. - Resources in the
res/
andasset/
directories are packaged together. If there are resources with the same name defined in two or more source sets, priority is given in the same order as the list in the previous example. - Gradle gives resources and manifests included with library module dependencies the lowest priority when building the app.
وابستگی ها را اعلام کنید
To configure a dependency for a specific build variant or testing source set , prefix the name of the build variant or testing source set before the Implementation
keyword, as shown in the following example:
کاتلین
dependencies { // Adds the local "mylibrary" module as a dependency to the "free" flavor. "freeImplementation"(project(":mylibrary")) // Adds a remote binary dependency only for local tests. testImplementation("junit:junit:4.12") // Adds a remote binary dependency only for the instrumented test APK. androidTestImplementation("com.android.support.test.espresso:espresso-core:3.6.1") }
شیار
dependencies { // Adds the local "mylibrary" module as a dependency to the "free" flavor. freeImplementation project(":mylibrary") // Adds a remote binary dependency only for local tests. testImplementation 'junit:junit:4.12' // Adds a remote binary dependency only for the instrumented test APK. androidTestImplementation 'com.android.support.test.espresso:espresso-core:3.6.1' }
For more information about configuring dependencies, see Add build dependencies .
Use variant-aware dependency management
The Android Gradle plugin 3.0.0 and higher includes a new dependency mechanism that automatically matches variants when consuming a library. This means an app's debug
variant automatically consumes a library's debug
variant, and so on. It also works when using flavors: an app's freeDebug
variant will consume a library's freeDebug
variant.
For the plugin to accurately match variants, you need to provide matching fallbacks as described in the following section, for instances where a direct match is not possible.
For example, suppose your app configures a build type called "staging", but one of its library dependencies doesn't. When the plugin tries to build the "staging" version of your app, it won't know which version of the library to use, and you'll see an error message similar to the following:
Error:Failed to resolve: Could not resolve project :mylibrary. Required by: project :app
Resolve build errors related to variant matching
The plugin includes DSL elements to help you control how Gradle resolves situations in which a direct variant match between an app and a dependency is not possible.
The following is a list of issues related to variant-aware dependency matching and how to solve them using DSL properties:Your app includes a build type that a library dependency does not.
For example, your app includes a "staging" build type, but a dependency includes only "debug" and "release" build types.
Note that there is no issue when a library dependency includes a build type that your app doesn't. That's because the plugin never requests that build type from the dependency.
Use
matchingFallbacks
to specify alternative matches for a given build type, as shown here:کاتلین
// In the app's build.gradle.kts file. android { buildTypes { getByName("debug") {} getByName("release") {} create("staging") { // Specifies a sorted list of fallback build types that the // plugin can try to use when a dependency does not include a // "staging" build type. You may specify as many fallbacks as you // like, and the plugin selects the first build type that's // available in the dependency. matchingFallbacks += listOf("debug", "qa", "release") } } }
شیار
// In the app's build.gradle file. android { buildTypes { debug {} release {} staging { // Specifies a sorted list of fallback build types that the // plugin can try to use when a dependency does not include a // "staging" build type. You may specify as many fallbacks as you // like, and the plugin selects the first build type that's // available in the dependency. matchingFallbacks = ['debug', 'qa', 'release'] } } }
For a given flavor dimension that exists in both the app and its library dependency, your app includes flavors that the library does not.
For example, both your app and its library dependencies include a "tier" flavor dimension. However, the "tier" dimension in the app includes "free" and "paid" flavors, but a dependency includes only "demo" and "paid" flavors for the same dimension.
Note that for a given flavor dimension that exists in both the app and its library dependencies, there is no issue when a library includes a product flavor that your app does not. That's because the plugin never requests that flavor from the dependency.
Use
matchingFallbacks
to specify alternative matches for the app's "free" product flavor, as shown here:کاتلین
// In the app's build.gradle.kts file. android { defaultConfig{ // Don't configure matchingFallbacks in the defaultConfig block. // Instead, specify fallbacks for a given product flavor in the // productFlavors block, as shown below. } flavorDimensions += "tier" productFlavors { create("paid") { dimension = "tier" // Because the dependency already includes a "paid" flavor in its // "tier" dimension, you don't need to provide a list of fallbacks // for the "paid" flavor. } create("free") { dimension = "tier" // Specifies a sorted list of fallback flavors that the plugin // can try to use when a dependency's matching dimension does // not include a "free" flavor. Specify as many // fallbacks as you like; the plugin selects the first flavor // that's available in the dependency's "tier" dimension. matchingFallbacks += listOf("demo", "trial") } } }
شیار
// In the app's build.gradle file. android { defaultConfig{ // Don't configure matchingFallbacks in the defaultConfig block. // Instead, specify fallbacks for a given product flavor in the // productFlavors block, as shown below. } flavorDimensions 'tier' productFlavors { paid { dimension 'tier' // Because the dependency already includes a "paid" flavor in its // "tier" dimension, you don't need to provide a list of fallbacks // for the "paid" flavor. } free { dimension 'tier' // Specifies a sorted list of fallback flavors that the plugin // can try to use when a dependency's matching dimension does // not include a "free" flavor. Specify as many // fallbacks as you like; the plugin selects the first flavor // that's available in the dependency's "tier" dimension. matchingFallbacks = ['demo', 'trial'] } } }
A library dependency includes a flavor dimension that your app does not.
For example, a library dependency includes flavors for a "minApi" dimension, but your app includes flavors for only the "tier" dimension. When you want to build the "freeDebug" version of your app, the plugin doesn't know whether to use the "minApi23Debug" or "minApi18Debug" version of the dependency.
Note that there is no issue when your app includes a flavor dimension that a library dependency doesn't. That's because the plugin matches flavors of only the dimensions that exist in the dependency. For example, if a dependency does not include a dimension for ABIs, the "freeX86Debug" version of your app would use the "freeDebug" version of the dependency.
Use
missingDimensionStrategy
in thedefaultConfig
block to specify the default flavor for the plugin to select from each missing dimension, as shown in the following sample. You can also override your selections in theproductFlavors
block, so each flavor can specify a different matching strategy for a missing dimension.کاتلین
// In the app's build.gradle.kts file. android { defaultConfig{ // Specifies a sorted list of flavors that the plugin can try to use from // a given dimension. This tells the plugin to select the "minApi18" flavor // when encountering a dependency that includes a "minApi" dimension. // You can include additional flavor names to provide a // sorted list of fallbacks for the dimension. missingDimensionStrategy("minApi", "minApi18", "minApi23") // Specify a missingDimensionStrategy property for each // dimension that exists in a local dependency but not in your app. missingDimensionStrategy("abi", "x86", "arm64") } flavorDimensions += "tier" productFlavors { create("free") { dimension = "tier" // You can override the default selection at the product flavor // level by configuring another missingDimensionStrategy property // for the "minApi" dimension. missingDimensionStrategy("minApi", "minApi23", "minApi18") } create("paid") {} } }
شیار
// In the app's build.gradle file. android { defaultConfig{ // Specifies a sorted list of flavors that the plugin can try to use from // a given dimension. This tells the plugin to select the "minApi18" flavor // when encountering a dependency that includes a "minApi" dimension. // You can include additional flavor names to provide a // sorted list of fallbacks for the dimension. missingDimensionStrategy 'minApi', 'minApi18', 'minApi23' // Specify a missingDimensionStrategy property for each // dimension that exists in a local dependency but not in your app. missingDimensionStrategy 'abi', 'x86', 'arm64' } flavorDimensions 'tier' productFlavors { free { dimension 'tier' // You can override the default selection at the product flavor // level by configuring another missingDimensionStrategy property // for the 'minApi' dimension. missingDimensionStrategy 'minApi', 'minApi23', 'minApi18' } paid {} } }
For more information, see matchingFallbacks
and missingDimensionStrategy
in the Android Gradle plugin DSL reference.
Configure signing settings
Gradle doesn't sign your release build's APK or AAB unless you explicitly define a signing configuration for this build. If you don't have a signing key yet, generate an upload key and keystore using Android Studio.
To manually configure the signing configurations for your release build type using Gradle build configurations:
- Create a keystore. A keystore is a binary file that contains a set of private keys. You must keep your keystore in a safe and secure place.
- Create a private key. A private key is used to sign your app for distribution and is never included with the app or disclosed to unauthorized third parties.
Add the signing configuration to the module-level
build.gradle.kts
file:کاتلین
... android { ... defaultConfig {...} signingConfigs { create("release") { storeFile = file("myreleasekey.keystore") storePassword = "password" keyAlias = "MyReleaseKey" keyPassword = "password" } } buildTypes { getByName("release") { ... signingConfig = signingConfigs.getByName("release") } } }
شیار
... android { ... defaultConfig {...} signingConfigs { release { storeFile file("myreleasekey.keystore") storePassword "password" keyAlias "MyReleaseKey" keyPassword "password" } } buildTypes { release { ... signingConfig signingConfigs.release } } }
Note: Including the passwords for your release key and keystore inside the build file is not a good security practice. Instead, configure the build file to obtain these passwords from environment variables or have the build process prompt you for these passwords.
To obtain these passwords from environment variables:
کاتلین
storePassword = System.getenv("KSTOREPWD") keyPassword = System.getenv("KEYPWD")
شیار
storePassword System.getenv("KSTOREPWD") keyPassword System.getenv("KEYPWD")
Alternatively, you can load the keystore from a local properties file. For security reasons, don't add this file to source control. Instead, set it up locally for each developer. To learn more, read Remove signing information from your build files .
After you complete this process, you can distribute your app and publish it on Google Play.
Warning: Keep your keystore and private key in a safe and secure place, and ensure that you have secure backups of them. If you use Play App Signing and you lose your upload key, you can request a reset using the Play Console. If you are publishing an app without Play App Signing (for apps created before August 2021) and you lose your app signing key, you will not be able to publish any updates to your app, since you must always sign all versions of your app with the same key.
Signing Wear OS apps
When publishing Wear OS apps, both the watch APK and optional phone APK must be signed with the same key. For more information on packaging and signing Wear OS apps, see Package and distribute Wear apps .
،This page shows you how you can configure build variants to create different versions of your app from a single project and how to properly manage your dependencies and signing configurations.
Each build variant represents a different version of your app that you can build. For example, you might want to build one version of your app that's free with a limited set of content, and another paid version that includes more. You can also build different versions of your app that target different devices, based on API level or other device variations.
Build variants are the result of Gradle using a specific set of rules to combine settings, code, and resources configured in your build types and product flavors. Although you don't configure build variants directly, you do configure the build types and product flavors that form them.
For example, a "demo" product flavor might specify certain features and device requirements, such as custom source code, resources, and minimum API levels, while the "debug" build type applies different build and packaging settings, such as debug options and signing keys. The build variant that combines these two is the "demoDebug" version of your app, and it includes a combination of the configurations and resources included in the "demo" product flavor, "debug" build type, and main/
source set.
Configure build types
You can create and configure build types inside the android
block of the module-level build.gradle.kts
file. When you create a new module, Android Studio automatically creates the debug and release build types. Although the debug build type doesn't appear in the build configuration file, Android Studio configures it with debuggable true
. This lets you debug the app on secure Android devices and configures app signing with a generic debug keystore.
You can add the debug build type to your configuration if you want to add or change certain settings. The following sample specifies an applicationIdSuffix
for the debug build type and configures a "staging" build type that is initialized using settings from the debug build type:
کاتلین
android { defaultConfig { manifestPlaceholders["hostName"] = "www.example.com" ... } buildTypes { getByName("release") { isMinifyEnabled = true proguardFiles(getDefaultProguardFile("proguard-android.txt"), "proguard-rules.pro") } getByName("debug") { applicationIdSuffix = ".debug" isDebuggable = true } /** * The `initWith` property lets you copy configurations from other build types, * then configure only the settings you want to change. This one copies the debug build * type, and then changes the manifest placeholder and application ID. */ create("staging") { initWith(getByName("debug")) manifestPlaceholders["hostName"] = "internal.example.com" applicationIdSuffix = ".debugStaging" } } }
شیار
android { defaultConfig { manifestPlaceholders = [hostName:"www.example.com"] ... } buildTypes { release { minifyEnabled true proguardFiles getDefaultProguardFile('proguard-android.txt'), 'proguard-rules.pro' } debug { applicationIdSuffix ".debug" debuggable true } /** * The `initWith` property lets you copy configurations from other build types, * then configure only the settings you want to change. This one copies the debug build * type, and then changes the manifest placeholder and application ID. */ staging { initWith debug manifestPlaceholders = [hostName:"internal.example.com"] applicationIdSuffix ".debugStaging" } } }
Note: When you make changes to a build configuration file, Android Studio requires that you sync your project with the new configuration. To sync your project, click Sync Now in the notification bar that appears when you make a change or click Sync Project از نوار ابزار If Android Studio notices any errors with your configuration, the Messages window appears to describe the issue.
To learn more about all the properties you can configure with build types, read the BuildType
reference.
Configure product flavors
Creating product flavors is similar to creating build types. Add product flavors to the productFlavors
block in your build configuration and include the settings you want. The product flavors support the same properties as defaultConfig
, because defaultConfig
actually belongs to the ProductFlavor
class. This means you can provide the base configuration for all flavors in the defaultConfig
block, and each flavor can change any of these default values, such as the applicationId
. To learn more about the application ID, read Set the application ID .
Note: You still need to specify a package name using the package
attribute in the main/
manifest file. You must also use that package name in your source code to refer to the R
class or to resolve any relative activity or service registration. This lets you use applicationId
to give each product flavor a unique ID for packaging and distribution without having to change your source code.
All flavors must belong to a named flavor dimension, which is a group of product flavors. You must assign all flavors to a flavor dimension; otherwise, you will get the following build error.
Error: All flavors must now belong to a named flavor dimension. The flavor 'flavor_name' is not assigned to a flavor dimension.
If a given module specifies only one flavor dimension, the Android Gradle plugin automatically assigns all of the module's flavors to that dimension.
The following code sample creates a flavor dimension named "version" and adds "demo" and "full" product flavors. These flavors provide their own applicationIdSuffix
and versionNameSuffix
:
کاتلین
android { ... defaultConfig {...} buildTypes { getByName("debug"){...} getByName("release"){...} } // Specifies one flavor dimension. flavorDimensions += "version" productFlavors { create("demo") { // Assigns this product flavor to the "version" flavor dimension. // If you are using only one dimension, this property is optional, // and the plugin automatically assigns all the module's flavors to // that dimension. dimension = "version" applicationIdSuffix = ".demo" versionNameSuffix = "-demo" } create("full") { dimension = "version" applicationIdSuffix = ".full" versionNameSuffix = "-full" } } }
شیار
android { ... defaultConfig {...} buildTypes { debug{...} release{...} } // Specifies one flavor dimension. flavorDimensions "version" productFlavors { demo { // Assigns this product flavor to the "version" flavor dimension. // If you are using only one dimension, this property is optional, // and the plugin automatically assigns all the module's flavors to // that dimension. dimension "version" applicationIdSuffix ".demo" versionNameSuffix "-demo" } full { dimension "version" applicationIdSuffix ".full" versionNameSuffix "-full" } } }
Note: If you have a legacy app (created before August 2021) that you distribute using APKs on Google Play, to distribute your app using multiple APK support in Google Play, assign the same applicationId
value to all variants and give each variant a different versionCode
. To distribute different variants of your app as separate apps in Google Play, you need to assign a different applicationId
to each variant.
After you create and configure your product flavors, click Sync Now in the notification bar. Once the sync completes, Gradle automatically creates build variants based on your build types and product flavors and names them according to <product-flavor><Build-Type>
. For example, if you created "demo" and "full" product flavors, and kept the default "debug" and "release" build types, Gradle creates the following build variants:
-
demoDebug
-
demoRelease
-
fullDebug
-
fullRelease
To select which build variant to build and run, go to Build > Select Build Variant and select a build variant from the menu. To start customizing each build variant with its own features and resources, you'll need to create and manage source sets , as described on this page.
Change the application ID for build variants
When you build an APK or AAB for your app, the build tools tag the app with the application ID defined in the defaultConfig
block from the build.gradle.kts
file, as shown in the following example. However, if you want to create different versions of your app to appear as separate listings on Google Play Store, such as a "free" and "pro" version, you need to create separate build variants that each have a different application ID.
In this case, define each build variant as a separate product flavor . For each flavor inside the productFlavors
block, you can redefine the applicationId
property, or you can instead append a segment to the default application ID using applicationIdSuffix
, as shown here:
کاتلین
android { defaultConfig { applicationId = "com.example.myapp" } productFlavors { create("free") { applicationIdSuffix = ".free" } create("pro") { applicationIdSuffix = ".pro" } } }
شیار
android { defaultConfig { applicationId "com.example.myapp" } productFlavors { free { applicationIdSuffix ".free" } pro { applicationIdSuffix ".pro" } } }
This way, the application ID for the "free" product flavor is "com.example.myapp.free".
You can also use applicationIdSuffix
to append a segment based on your build type , as shown here:
کاتلین
android { ... buildTypes { getByName("debug") { applicationIdSuffix = ".debug" } } }
شیار
android { ... buildTypes { debug { applicationIdSuffix ".debug" } } }
Because Gradle applies the build type configuration after the product flavor, the application ID for the "free debug" build variant is "com.example.myapp.free.debug". This is useful when you want to have both the debug and the release build on the same device, because no two apps can have the same application ID.
If you have a legacy app (created before August 2021) that you distribute using APKs on Google Play, and you want to use the same app listing to distribute multiple APKs that each target a different device configuration, such as the API level, then you must use the same application ID for each build variant but give each APK a differentversionCode
. For more information, read about Multiple APK support . Publishing using AABs is unaffected, as it uses a single artifact that uses a single version code and application ID by default. Tip: If you need to reference the application ID in your manifest file, you can use the ${applicationId}
placeholder in any manifest attribute. During a build, Gradle replaces this tag with the actual application ID. For more information, see Inject build variables into the manifest .
Combine multiple product flavors with flavor dimensions
In some cases, you may want to combine configurations from multiple product flavors. For example, you may want to create different configurations for the "full" and "demo" product flavors that are based on API level. To do this, the Android Gradle plugin lets you create multiple groups of product flavors as flavor dimensions.
When building your app, Gradle combines a product flavor configuration from each flavor dimension you define, along with a build type configuration, to create the final build variant. Gradle doesn't combine product flavors that belong to the same flavor dimension.
The following code sample uses the flavorDimensions
property to create a "mode" flavor dimension to group the "full" and "demo" product flavors and an "api" flavor dimension to group product flavor configurations based on API level:
کاتلین
android { ... buildTypes { getByName("debug") {...} getByName("release") {...} } // Specifies the flavor dimensions you want to use. The order in which you // list the dimensions determines their priority, from highest to lowest, // when Gradle merges variant sources and configurations. You must assign // each product flavor you configure to one of the flavor dimensions. flavorDimensions += listOf("api", "mode") productFlavors { create("demo") { // Assigns this product flavor to the "mode" flavor dimension. dimension = "mode" ... } create("full") { dimension = "mode" ... } // Configurations in the "api" product flavors override those in "mode" // flavors and the defaultConfig block. Gradle determines the priority // between flavor dimensions based on the order in which they appear next // to the flavorDimensions property, with the first dimension having a higher // priority than the second, and so on. create("minApi24") { dimension = "api" minSdk = 24 // To ensure the target device receives the version of the app with // the highest compatible API level, assign version codes in increasing // value with API level. versionCode = 30000 + (android.defaultConfig.versionCode ?: 0) versionNameSuffix = "-minApi24" ... } create("minApi23") { dimension = "api" minSdk = 23 versionCode = 20000 + (android.defaultConfig.versionCode ?: 0) versionNameSuffix = "-minApi23" ... } create("minApi21") { dimension = "api" minSdk = 21 versionCode = 10000 + (android.defaultConfig.versionCode ?: 0) versionNameSuffix = "-minApi21" ... } } } ...
شیار
android { ... buildTypes { debug {...} release {...} } // Specifies the flavor dimensions you want to use. The order in which you // list the dimensions determines their priority, from highest to lowest, // when Gradle merges variant sources and configurations. You must assign // each product flavor you configure to one of the flavor dimensions. flavorDimensions "api", "mode" productFlavors { demo { // Assigns this product flavor to the "mode" flavor dimension. dimension "mode" ... } full { dimension "mode" ... } // Configurations in the "api" product flavors override those in "mode" // flavors and the defaultConfig block. Gradle determines the priority // between flavor dimensions based on the order in which they appear next // to the flavorDimensions property, with the first dimension having a higher // priority than the second, and so on. minApi24 { dimension "api" minSdkVersion 24 // To ensure the target device receives the version of the app with // the highest compatible API level, assign version codes in increasing // value with API level. versionCode 30000 + android.defaultConfig.versionCode versionNameSuffix "-minApi24" ... } minApi23 { dimension "api" minSdkVersion 23 versionCode 20000 + android.defaultConfig.versionCode versionNameSuffix "-minApi23" ... } minApi21 { dimension "api" minSdkVersion 21 versionCode 10000 + android.defaultConfig.versionCode versionNameSuffix "-minApi21" ... } } } ...
The number of build variants Gradle creates is equal to the product of the number of flavors in each flavor dimension and the number of build types you configure. When Gradle names each build variant or corresponding artifacts, product flavors belonging to higher-priority flavor dimension appear first, followed by those from lower-priority dimensions, followed by the build type.
Using the previous build configuration as an example, Gradle creates a total of 12 build variants with the following naming scheme:
- Build variant:
[minApi24, minApi23, minApi21][Demo, Full][Debug, Release]
- Corresponding APK:
app-[minApi24, minApi23, minApi21]-[demo, full]-[debug, release].apk
- به عنوان مثال،
- Build variant:
minApi24DemoDebug
- Corresponding APK:
app-minApi24-demo-debug.apk
In addition to the source set directories you can create for each individual product flavor and build variant, you can also create source set directories for each combination of product flavors. For example, you can create and add Java sources to the src/demoMinApi24/java/
directory, and Gradle uses those sources only when building a variant that combines those two product flavors.
Source sets you create for product flavor combinations have a higher priority than source sets that belong to each individual product flavor. To learn more about source sets and how Gradle merges resources, read the section about how to create source sets .
Filter variants
Gradle creates a build variant for every possible combination of the product flavors and build types that you configure. However, there may be certain build variants that you don't need or that don't make sense in the context of your project. To remove certain build variant configurations, create a variant filter in your module-level build.gradle.kts
file.
Using the build configuration from the previous section as an example, suppose you plan to support only API levels 23 and higher for the demo version of the app. You can use the variantFilter
block to filter out all build variant configurations that combine the "minApi21" and "demo" product flavors:
کاتلین
android { ... buildTypes {...} flavorDimensions += listOf("api", "mode") productFlavors { create("demo") {...} create("full") {...} create("minApi24") {...} create("minApi23") {...} create("minApi21") {...} } } androidComponents { beforeVariants { variantBuilder -> // To check for a certain build type, use variantBuilder.buildType == "<buildType>" if (variantBuilder.productFlavors.containsAll(listOf("api" to "minApi21", "mode" to "demo"))) { // Gradle ignores any variants that satisfy the conditions above. variantBuilder.enable = false } } } ...
شیار
android { ... buildTypes {...} flavorDimensions "api", "mode" productFlavors { demo {...} full {...} minApi24 {...} minApi23 {...} minApi21 {...} } variantFilter { variant -> def names = variant.flavors*.name // To check for a certain build type, use variant.buildType.name == "<buildType>" if (names.contains("minApi21") && names.contains("demo")) { // Gradle ignores any variants that satisfy the conditions above. setIgnore(true) } } } ...
Once you add a variant filter to your build configuration and click Sync Now in the notification bar, Gradle ignores any build variants that meet the conditions you specify. The build variants no longer appear in the menu when you click Build > Select Build Variant from the menu bar or Build Variants in the tool window bar.
Create source sets
By default, Android Studio creates the main/
source set and directories for everything you want to share between all your build variants. However, you can create new source sets to control exactly which files Gradle compiles and packages for specific build types, product flavors, combinations of product flavors (when using flavor dimensions ), and build variants.
For example, you can define basic functionality in the main/
source set and use product flavor source sets to change the branding of your app for different clients, or include special permissions and logging functionality only for build variants that use the debug build type.
Gradle expects source set files and directories to be organized in a certain way, similar to the main/
source set. For example, Gradle expects Kotlin or Java class files that are specific to your "debug" build type to be located in the src/debug/kotlin/
or src/debug/java/
directories.
The Android Gradle plugin provides a useful Gradle task that shows you how to organize your files for each of your build types, product flavors, and build variants. For example, the following sample from the task output describes where Gradle expects to find certain files for the "debug" build type:
------------------------------------------------------------ Project :app ------------------------------------------------------------ ... debug ---- Compile configuration: debugCompile build.gradle name: android.sourceSets.debug Java sources: [app/src/debug/java] Kotlin sources: [app/src/debug/kotlin, app/src/debug/java] Manifest file: app/src/debug/AndroidManifest.xml Android resources: [app/src/debug/res] Assets: [app/src/debug/assets] AIDL sources: [app/src/debug/aidl] RenderScript sources: [app/src/debug/rs] JNI sources: [app/src/debug/jni] JNI libraries: [app/src/debug/jniLibs] Java-style resources: [app/src/debug/resources]
To view this output, proceed as follows:
- Click Gradle in the tool window bar.
Navigate to MyApplication > Tasks > android and double-click sourceSets .
To see the Tasks folder, you must let Gradle build the task list during sync. برای انجام این کار، این مراحل را دنبال کنید:
- Click File > Settings > Experimental ( Android Studio > Settings > Experimental on macOS).
- Deselect Do not build Gradle task list during Gradle sync .
- After Gradle executes the task, the Run window opens to display the output.
Note: The task output also shows you how to organize source sets for files you want to use to run tests for your app, such as the test/
and androidTest/
testing source sets .
When you create a new build variant, Android Studio doesn't create the source set directories for you, but it does give you a few options to help you. For example, to create just the java/
directory for your "debug" build type:
- Open the Project pane and select the Project view from the menu at the top of the pane.
- Navigate to
MyProject/app/src/
. - Right-click the
src
directory and select New > Directory . - From the menu under Gradle Source Sets , select full/java .
- Enter را فشار دهید.
Android Studio creates a source set directory for your debug build type and then creates the java/
directory inside it. Alternatively, Android Studio can create the directories for you when you add a new file to your project for a specific build variant.
For example, to create a values XML file for your "debug" build type:
- In the Project pane, right-click the
src
directory and select New > XML > Values XML File . - Enter the name for the XML file or keep the default name.
- From the menu next to Target Source Set , select debug .
- روی Finish کلیک کنید.
Because the "debug" build type was specified as the target source set, Android Studio automatically creates the necessary directories when it creates the XML file. The resulting directory structure looks like figure 1.

Figure 1. New source set directories for the "debug" build type.
Active source sets have a green indicator in their icon to show that they are active. The debug
source set is suffixed with [main]
to show that it will be merged in to the main
source set.
Using the same procedure, you can also create source set directories for product flavors, such as src/demo/
, and build variants, such as src/demoDebug/
. Additionally, you can create testing source sets that target specific build variants, such as src/androidTestDemoDebug/
. To learn more, read about testing source sets .
Change default source set configurations
If you have sources that are not organized into the default source set file structure that Gradle expects, as described in the previous section about creating source sets , you can use the sourceSets
block to change where Gradle looks to gather files for each component of a source set.
The sourceSets
block must be in the android
block. You don't need to relocate the source files; you only need to provide Gradle with the path(s), relative to the module-level build.gradle.kts
file, where Gradle can find files for each source set component. To learn which components you can configure and whether you can map them to multiple files or directories, see the Android Gradle plugin API reference .
The following code sample maps sources from the app/other/
directory to certain components of the main
source set and changes the root directory of the androidTest
source set:
کاتلین
android { ... // Encapsulates configurations for the main source set. sourceSets.getByName("main") { // Changes the directory for Java sources. The default directory is // 'src/main/java'. java.setSrcDirs(listOf("other/java")) // If you list multiple directories, Gradle uses all of them to collect // sources. Because Gradle gives these directories equal priority, if // you define the same resource in more than one directory, you receive an // error when merging resources. The default directory is 'src/main/res'. res.setSrcDirs(listOf("other/res1", "other/res2")) // Note: Avoid specifying a directory that is a parent to one // or more other directories you specify. For example, avoid the following: // res.srcDirs = ['other/res1', 'other/res1/layouts', 'other/res1/strings'] // Specify either only the root 'other/res1' directory or only the // nested 'other/res1/layouts' and 'other/res1/strings' directories. // For each source set, you can specify only one Android manifest. // By default, Android Studio creates a manifest for your main source // set in the src/main/ directory. manifest.srcFile("other/AndroidManifest.xml") ... } // Create additional blocks to configure other source sets. sourceSets.getByName("androidTest") { // If all the files for a source set are located under a single root // directory, you can specify that directory using the setRoot property. // When gathering sources for the source set, Gradle looks only in locations // relative to the root directory you specify. For example, after applying the // configuration below for the androidTest source set, Gradle looks for Java // sources only in the src/tests/java/ directory. setRoot("src/tests") ... } } ...
شیار
android { ... sourceSets { // Encapsulates configurations for the main source set. main { // Changes the directory for Java sources. The default directory is // 'src/main/java'. java.srcDirs = ['other/java'] // If you list multiple directories, Gradle uses all of them to collect // sources. Because Gradle gives these directories equal priority, if // you define the same resource in more than one directory, you receive an // error when merging resources. The default directory is 'src/main/res'. res.srcDirs = ['other/res1', 'other/res2'] // Note: Avoid specifying a directory that is a parent to one // or more other directories you specify. For example, avoid the following: // res.srcDirs = ['other/res1', 'other/res1/layouts', 'other/res1/strings'] // Specify either only the root 'other/res1' directory or only the // nested 'other/res1/layouts' and 'other/res1/strings' directories. // For each source set, you can specify only one Android manifest. // By default, Android Studio creates a manifest for your main source // set in the src/main/ directory. manifest.srcFile 'other/AndroidManifest.xml' ... } // Create additional blocks to configure other source sets. androidTest { // If all the files for a source set are located under a single root // directory, you can specify that directory using the setRoot property. // When gathering sources for the source set, Gradle looks only in locations // relative to the root directory you specify. For example, after applying the // configuration below for the androidTest source set, Gradle looks for Java // sources only in the src/tests/java/ directory. setRoot 'src/tests' ... } } } ...
Note that a source directory can only belong to one source set. For example, you can't share the same test sources with both the test
and androidTest
source sets. This is because Android Studio creates separate IntelliJ modules for each source set and can't support duplicate content roots across source sets.
Build with source sets
You can use source set directories to contain the code and resources you want packaged only with certain configurations. For example, if you are building the "demoDebug" build variant, which is the crossproduct of a "demo" product flavor and "debug" build type, Gradle looks at these directories and gives them the following priority:
-
src/demoDebug/
(build variant source set) -
src/debug/
(build type source set) -
src/demo/
(product flavor source set) -
src/main/
(main source set)
Source sets created for combinations of product flavors must include all flavor dimensions. For example, the build variant source set must be the combination of the build type and all flavor dimensions. Merging code and resources involving folders that cover multiple but not all flavor dimensions is not supported.
If you combine multiple product flavors , priority between the product flavors is determined by the flavor dimension they belong to. When listing flavor dimensions with the android.flavorDimensions
property, product flavors that belong to the first flavor dimension you list have a higher priority than those belonging to the second flavor dimension, and so on. Additionally, source sets you create for combinations of product flavors have a higher priority than source sets that belong to an individual product flavor.
The priority order determines which source set has a higher priority when Gradle combines code and resources. Because the demoDebug/
source set directory likely contains files that are specific to that build variant, if demoDebug/
includes a file that is also defined in debug/
, Gradle uses the file in the demoDebug/
source set. Similarly, Gradle gives files in the build type and product flavor source sets a higher priority than the same files in main/
. Gradle considers this priority order when applying the following build rules:
- All source code in the
kotlin/
orjava/
directories are compiled together to generate a single output.Note: For a given build variant, Gradle throws a build error if it encounters two or more source set directories that have defined the same Kotlin or Java class. For example, when building a debug app, you can't define both
src/debug/Utility.kt
andsrc/main/Utility.kt
, because Gradle looks at both these directories during the build process and throws a "duplicate class" error. If you want different versions ofUtility.kt
for different build types, each build type must define its own version of the file and not include it in themain/
source set. - Manifests are merged together into a single manifest. Priority is given in the same order as the list in the previous example. That is, manifest settings for a build type override the manifest settings for a product flavor, and so on. To learn more, read about manifest merging .
- Files in the
values/
directories are merged together. If two files have the same name, such as twostrings.xml
files, priority is given in the same order as the list in the previous example. That is, values defined in a file in the build type source set override the values defined in the same file in a product flavor, and so on. - Resources in the
res/
andasset/
directories are packaged together. If there are resources with the same name defined in two or more source sets, priority is given in the same order as the list in the previous example. - Gradle gives resources and manifests included with library module dependencies the lowest priority when building the app.
وابستگی ها را اعلام کنید
To configure a dependency for a specific build variant or testing source set , prefix the name of the build variant or testing source set before the Implementation
keyword, as shown in the following example:
کاتلین
dependencies { // Adds the local "mylibrary" module as a dependency to the "free" flavor. "freeImplementation"(project(":mylibrary")) // Adds a remote binary dependency only for local tests. testImplementation("junit:junit:4.12") // Adds a remote binary dependency only for the instrumented test APK. androidTestImplementation("com.android.support.test.espresso:espresso-core:3.6.1") }
شیار
dependencies { // Adds the local "mylibrary" module as a dependency to the "free" flavor. freeImplementation project(":mylibrary") // Adds a remote binary dependency only for local tests. testImplementation 'junit:junit:4.12' // Adds a remote binary dependency only for the instrumented test APK. androidTestImplementation 'com.android.support.test.espresso:espresso-core:3.6.1' }
For more information about configuring dependencies, see Add build dependencies .
Use variant-aware dependency management
The Android Gradle plugin 3.0.0 and higher includes a new dependency mechanism that automatically matches variants when consuming a library. This means an app's debug
variant automatically consumes a library's debug
variant, and so on. It also works when using flavors: an app's freeDebug
variant will consume a library's freeDebug
variant.
For the plugin to accurately match variants, you need to provide matching fallbacks as described in the following section, for instances where a direct match is not possible.
For example, suppose your app configures a build type called "staging", but one of its library dependencies doesn't. When the plugin tries to build the "staging" version of your app, it won't know which version of the library to use, and you'll see an error message similar to the following:
Error:Failed to resolve: Could not resolve project :mylibrary. Required by: project :app
Resolve build errors related to variant matching
The plugin includes DSL elements to help you control how Gradle resolves situations in which a direct variant match between an app and a dependency is not possible.
The following is a list of issues related to variant-aware dependency matching and how to solve them using DSL properties:Your app includes a build type that a library dependency does not.
For example, your app includes a "staging" build type, but a dependency includes only "debug" and "release" build types.
Note that there is no issue when a library dependency includes a build type that your app doesn't. That's because the plugin never requests that build type from the dependency.
Use
matchingFallbacks
to specify alternative matches for a given build type, as shown here:کاتلین
// In the app's build.gradle.kts file. android { buildTypes { getByName("debug") {} getByName("release") {} create("staging") { // Specifies a sorted list of fallback build types that the // plugin can try to use when a dependency does not include a // "staging" build type. You may specify as many fallbacks as you // like, and the plugin selects the first build type that's // available in the dependency. matchingFallbacks += listOf("debug", "qa", "release") } } }
شیار
// In the app's build.gradle file. android { buildTypes { debug {} release {} staging { // Specifies a sorted list of fallback build types that the // plugin can try to use when a dependency does not include a // "staging" build type. You may specify as many fallbacks as you // like, and the plugin selects the first build type that's // available in the dependency. matchingFallbacks = ['debug', 'qa', 'release'] } } }
For a given flavor dimension that exists in both the app and its library dependency, your app includes flavors that the library does not.
For example, both your app and its library dependencies include a "tier" flavor dimension. However, the "tier" dimension in the app includes "free" and "paid" flavors, but a dependency includes only "demo" and "paid" flavors for the same dimension.
Note that for a given flavor dimension that exists in both the app and its library dependencies, there is no issue when a library includes a product flavor that your app does not. That's because the plugin never requests that flavor from the dependency.
Use
matchingFallbacks
to specify alternative matches for the app's "free" product flavor, as shown here:کاتلین
// In the app's build.gradle.kts file. android { defaultConfig{ // Don't configure matchingFallbacks in the defaultConfig block. // Instead, specify fallbacks for a given product flavor in the // productFlavors block, as shown below. } flavorDimensions += "tier" productFlavors { create("paid") { dimension = "tier" // Because the dependency already includes a "paid" flavor in its // "tier" dimension, you don't need to provide a list of fallbacks // for the "paid" flavor. } create("free") { dimension = "tier" // Specifies a sorted list of fallback flavors that the plugin // can try to use when a dependency's matching dimension does // not include a "free" flavor. Specify as many // fallbacks as you like; the plugin selects the first flavor // that's available in the dependency's "tier" dimension. matchingFallbacks += listOf("demo", "trial") } } }
شیار
// In the app's build.gradle file. android { defaultConfig{ // Don't configure matchingFallbacks in the defaultConfig block. // Instead, specify fallbacks for a given product flavor in the // productFlavors block, as shown below. } flavorDimensions 'tier' productFlavors { paid { dimension 'tier' // Because the dependency already includes a "paid" flavor in its // "tier" dimension, you don't need to provide a list of fallbacks // for the "paid" flavor. } free { dimension 'tier' // Specifies a sorted list of fallback flavors that the plugin // can try to use when a dependency's matching dimension does // not include a "free" flavor. Specify as many // fallbacks as you like; the plugin selects the first flavor // that's available in the dependency's "tier" dimension. matchingFallbacks = ['demo', 'trial'] } } }
A library dependency includes a flavor dimension that your app does not.
For example, a library dependency includes flavors for a "minApi" dimension, but your app includes flavors for only the "tier" dimension. When you want to build the "freeDebug" version of your app, the plugin doesn't know whether to use the "minApi23Debug" or "minApi18Debug" version of the dependency.
Note that there is no issue when your app includes a flavor dimension that a library dependency doesn't. That's because the plugin matches flavors of only the dimensions that exist in the dependency. For example, if a dependency does not include a dimension for ABIs, the "freeX86Debug" version of your app would use the "freeDebug" version of the dependency.
Use
missingDimensionStrategy
in thedefaultConfig
block to specify the default flavor for the plugin to select from each missing dimension, as shown in the following sample. You can also override your selections in theproductFlavors
block, so each flavor can specify a different matching strategy for a missing dimension.کاتلین
// In the app's build.gradle.kts file. android { defaultConfig{ // Specifies a sorted list of flavors that the plugin can try to use from // a given dimension. This tells the plugin to select the "minApi18" flavor // when encountering a dependency that includes a "minApi" dimension. // You can include additional flavor names to provide a // sorted list of fallbacks for the dimension. missingDimensionStrategy("minApi", "minApi18", "minApi23") // Specify a missingDimensionStrategy property for each // dimension that exists in a local dependency but not in your app. missingDimensionStrategy("abi", "x86", "arm64") } flavorDimensions += "tier" productFlavors { create("free") { dimension = "tier" // You can override the default selection at the product flavor // level by configuring another missingDimensionStrategy property // for the "minApi" dimension. missingDimensionStrategy("minApi", "minApi23", "minApi18") } create("paid") {} } }
شیار
// In the app's build.gradle file. android { defaultConfig{ // Specifies a sorted list of flavors that the plugin can try to use from // a given dimension. This tells the plugin to select the "minApi18" flavor // when encountering a dependency that includes a "minApi" dimension. // You can include additional flavor names to provide a // sorted list of fallbacks for the dimension. missingDimensionStrategy 'minApi', 'minApi18', 'minApi23' // Specify a missingDimensionStrategy property for each // dimension that exists in a local dependency but not in your app. missingDimensionStrategy 'abi', 'x86', 'arm64' } flavorDimensions 'tier' productFlavors { free { dimension 'tier' // You can override the default selection at the product flavor // level by configuring another missingDimensionStrategy property // for the 'minApi' dimension. missingDimensionStrategy 'minApi', 'minApi23', 'minApi18' } paid {} } }
For more information, see matchingFallbacks
and missingDimensionStrategy
in the Android Gradle plugin DSL reference.
Configure signing settings
Gradle doesn't sign your release build's APK or AAB unless you explicitly define a signing configuration for this build. If you don't have a signing key yet, generate an upload key and keystore using Android Studio.
To manually configure the signing configurations for your release build type using Gradle build configurations:
- Create a keystore. A keystore is a binary file that contains a set of private keys. You must keep your keystore in a safe and secure place.
- Create a private key. A private key is used to sign your app for distribution and is never included with the app or disclosed to unauthorized third parties.
Add the signing configuration to the module-level
build.gradle.kts
file:کاتلین
... android { ... defaultConfig {...} signingConfigs { create("release") { storeFile = file("myreleasekey.keystore") storePassword = "password" keyAlias = "MyReleaseKey" keyPassword = "password" } } buildTypes { getByName("release") { ... signingConfig = signingConfigs.getByName("release") } } }
شیار
... android { ... defaultConfig {...} signingConfigs { release { storeFile file("myreleasekey.keystore") storePassword "password" keyAlias "MyReleaseKey" keyPassword "password" } } buildTypes { release { ... signingConfig signingConfigs.release } } }
Note: Including the passwords for your release key and keystore inside the build file is not a good security practice. Instead, configure the build file to obtain these passwords from environment variables or have the build process prompt you for these passwords.
To obtain these passwords from environment variables:
کاتلین
storePassword = System.getenv("KSTOREPWD") keyPassword = System.getenv("KEYPWD")
شیار
storePassword System.getenv("KSTOREPWD") keyPassword System.getenv("KEYPWD")
Alternatively, you can load the keystore from a local properties file. For security reasons, don't add this file to source control. Instead, set it up locally for each developer. To learn more, read Remove signing information from your build files .
After you complete this process, you can distribute your app and publish it on Google Play.
Warning: Keep your keystore and private key in a safe and secure place, and ensure that you have secure backups of them. If you use Play App Signing and you lose your upload key, you can request a reset using the Play Console. If you are publishing an app without Play App Signing (for apps created before August 2021) and you lose your app signing key, you will not be able to publish any updates to your app, since you must always sign all versions of your app with the same key.
Signing Wear OS apps
When publishing Wear OS apps, both the watch APK and optional phone APK must be signed with the same key. For more information on packaging and signing Wear OS apps, see Package and distribute Wear apps .