
Android Studio では Kotlin が完全にサポートされるため、既存のプロジェクトに Kotlin ファイルを追加して Java 言語コードを Kotlin に変換することが可能です。 オートコンプリート、lint チェック、リファクタリング、デバッグなど、Android Studio の既存のすべてのツールを Kotlin コードに対して使用できます。
これから新しいプロジェクトを開始し、Kotlin を使用する必要がある場合は、プロジェクトの作成をご覧ください。
サンプルについては、Kotlin コードのサンプルをご覧ください。
Kotlin を既存のプロジェクトに追加する
Kotlin をプロジェクトに追加するには、次の手順を実行します。
図 1 に示すように、[File] > [New] の順にクリックし、各種 Android テンプレートのいずれか(新しい空白の [Fragment] など)を選択します。このメニューにテンプレートのリストが表示されない場合は、最初に [Project] ウィンドウを開き、アプリ モジュールを選択します。
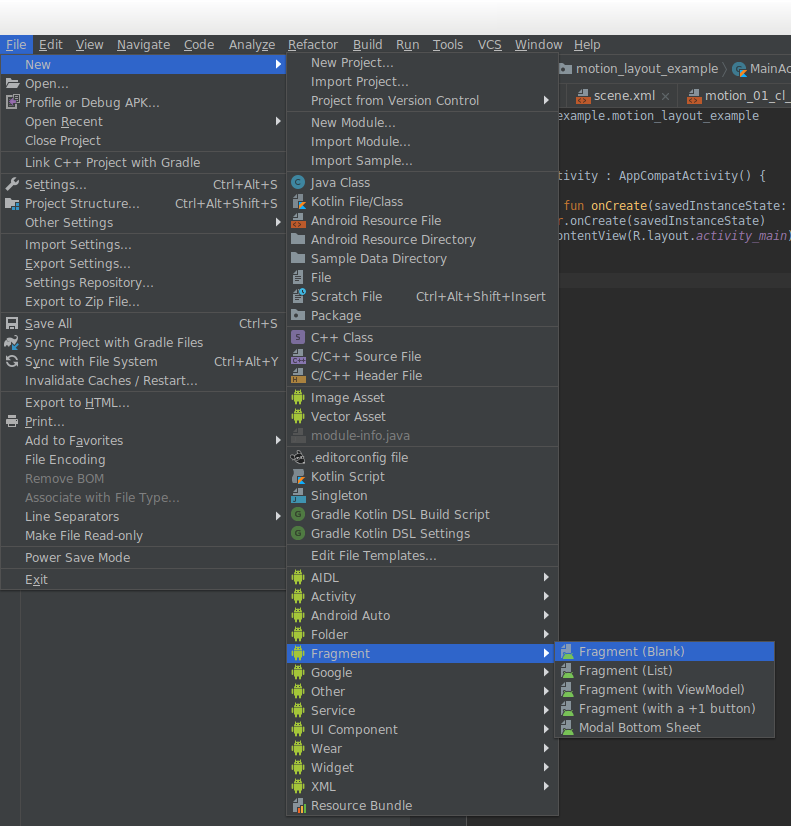
図 1. 使用可能なテンプレート(フラグメントやアクティビティなど)から選択します。 表示されたウィザードで、[Source Language] に [Kotlin] を選択します。図 2 は、新規アクティビティを作成する場合の [New Android Activity] ダイアログを示しています。
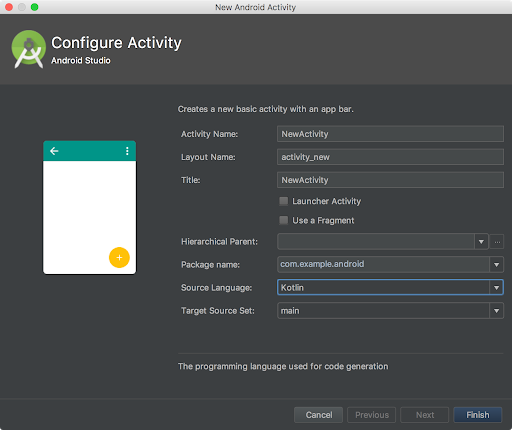
図 2. [Source Language] として [Kotlin] を選択できる [New Android Activity] ダイアログ。 ウィザードに従って作業を続けます。
または、[File] > [New] > [Kotlin File/Class] の順にクリックして基本的な Kotlin ファイルを作成することもできます。このオプションが表示されない場合は、[Project] ウィンドウを開き、[java] ディレクトリを選択します。[New Kotlin File/Class] ウィンドウで、ファイル名を定義します。また、このウィンドウには、ファイル形式の選択肢が表示されます([File]、[Class]、[Interface]、[Enum Class]、[Object])。ここでの選択に基づいて、新しい Kotlin ファイルに作成される基本的な土台が決まります。[Class] を選択した場合、Android Studio は、指定された名前、および一致するクラス定義を使って、新しい Kotlin ソースファイルを作成します。あるいは、[Interface] を選択した場合は、ファイルでインターフェースが宣言されるなどとなります。
新しい Kotlin クラスまたはファイルを(Android テンプレートを使わずに)プロジェクトに初めて直接追加する場合は、図 3 に示すように、プロジェクトで Kotlin が設定されていないことを知らせる警告が Android Studio に表示されます。 エディタ右上隅の [Configure] または右下にポップアップ表示されるイベントログ アラートをクリックして Kotlin を設定します。
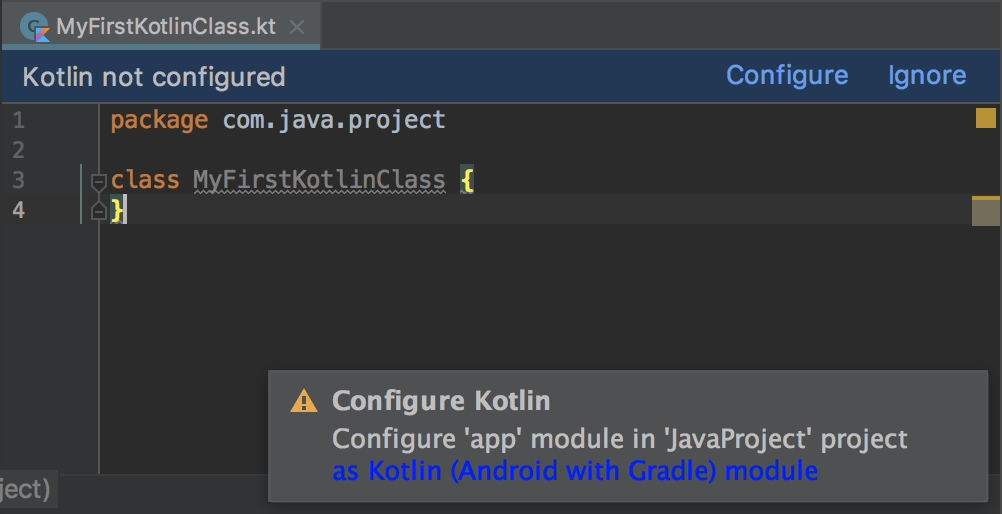
図 4 に示すように、プロンプトが表示されたら Kotlin ファイルを含むすべてのモジュールに Kotlin を設定するオプションを選択します。
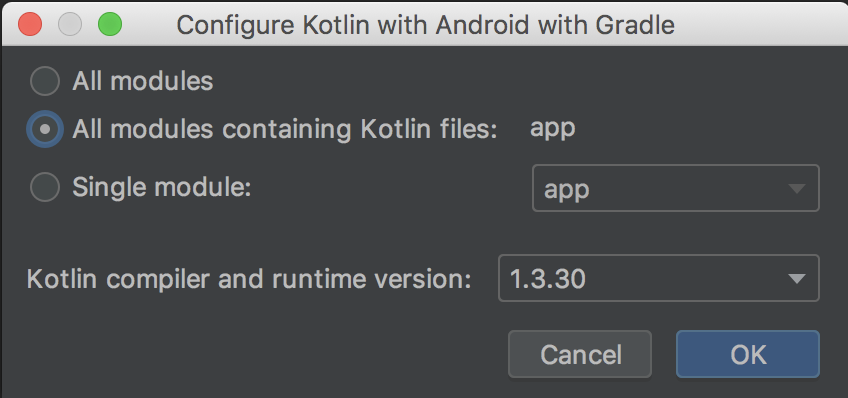
[OK] をクリックすると、Android Studio は、プロジェクトのクラスパスに Kotlin を追加し、Kotlin ファイルを含む各モジュールに Kotlin Android プラグインを適用します。
build.gradle ファイルは次の例のようになります。
Groovy
// Project build.gradle file.
buildscript {
    ext.kotlin_version = '1.4.10'
    ...
    dependencies {
        classpath "org.jetbrains.kotlin:kotlin-gradle-plugin:$kotlin_version"
    }
}
Kotlin
// Project build.gradle.kts file.
buildscript {
    extra["kotlin_version"] = "1.4.10"
    ...
    dependencies {
        classpath("org.jetbrains.kotlin:kotlin-gradle-plugin:$kotlin_version")
    }
}
Groovy
// Inside each module using kotlin
plugins {
    ...
    id 'kotlin-android'
}

...

dependencies {
    implementation 'androidx.core:core-ktx:1.3.2'
    implementation "org.jetbrains.kotlin:kotlin-stdlib:$kotlin_version"
}
Kotlin
// Inside each module using kotlin
plugins {
    ...
    kotlin("android")
}

...

val kotlin_version: String by rootProject.extra

dependencies {
    implementation("androidx.core:core-ktx:1.3.2")
    implementation("org.jetbrains.kotlin:kotlin-stdlib:$kotlin_version")
}
ソース組織
デフォルトでは、新しい Kotlin ファイルは src/main/java/ に保存され、Kotlin と Java の両方のファイルを 1 か所で簡単に表示できるようになります。Kotlin ファイルと Java ファイルを別々の場所に保存する場合は、Kotlin ファイルを src/main/kotlin/ に配置できます。その場合、次のように、このディレクトリを sourceSets 構成に含める必要もあります。
Groovy
android {
    sourceSets {
        main.java.srcDirs += 'src/main/kotlin'
    }
}
Kotlin
android {
    sourceSets {
        getByName("main") {
            java.srcDir("src/main/kotlin")
        }
    }
}
既存の Java コードを Kotlin コードに変換する
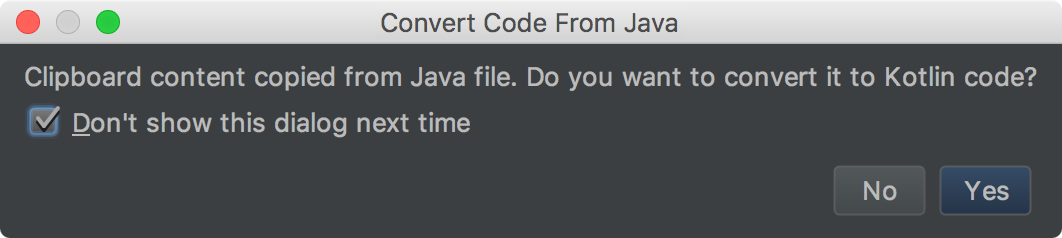
Java コードを Kotlin に変換するには、Android Studio で Java ファイルを開き、[Code] > [Convert Java File to Kotlin File] の順に選択します。または、新しい Kotlin ファイルを作成([File] > [New] > [Kotlin File/Class])してから、Java コードをそのファイルに貼り付けます。すると、図 5 に示すように、コードを Kotlin に変換するよう求めるプロンプトが Android Studio に表示されます。変換するには [Yes] をクリックします。オプションで [Don't show this dialog next time] をオンにすると、それ以降、変換が自動的に行われるようになります。
コード変換と null 値許容
Android Studio の変換処理では、コンパイルおよび実行される、機能的に同等の Kotlin コードが生成されます。ただし多くの場合、変換後のコードはさらに最適化する必要があります。たとえば、変換後のコードによる null 許容型の処理方法を絞り込むことができます。
Android では、View オブジェクトおよびその他のコンポーネントの初期化を、関連フラグメントまたはアクティビティが適切なライフサイクル状態に達するまで遅らせるのが一般的です。たとえば、下記のスニペットに示すように、フラグメントのいずれかにボタンへの参照があるとします。
public class JavaFragment extends Fragment {

    // Null until onCreateView.
    private Button button;

    @Override
    public View onCreateView(@NonNull LayoutInflater inflater, ViewGroup container,
            Bundle savedInstanceState) {
        View root = inflater.inflate(R.layout.fragment_content, container,false);

        // Get a reference to the button in the view, only after the root view is inflated.
        button = root.findViewById(R.id.button);

        return root;
    }

    @Override
    public void onViewCreated(@NonNull View view, @Nullable Bundle savedInstanceState) {
        super.onViewCreated(view, savedInstanceState);

        // Not null at this point of time when onViewCreated runs
        button.setOnClickListener(new View.OnClickListener() {
            @Override
            public void onClick(View v) {
                ...
            }
        });
    }
}
ボタン変数を null にすることは可能ですが、実際の用途として考えると、この例で使用するときには null にすべきではありません。ただし、その値は構築時に割り当てられていないため、以下に示すように、生成された Kotlin コードは、クリック リスナー追加時に、Button を null 許容型として扱い、非 null アサーション演算子を使用してボタンをラッピング解除します。
class JavaFragment : Fragment() {

    // Null until onCreateView.
    private var button: Button? = null

    override fun onCreateView(inflater: LayoutInflater, container: ViewGroup?,
            savedInstanceState: Bundle?): View? {
        ...
        // Get a reference to the button in the view, only after the root view is inflated.
        button = root.findViewById(R.id.button)
        ...
    }

    override fun onViewCreated(view: View, savedInstanceState: Bundle?) {
        super.onViewCreated(view, savedInstanceState)

        // Not null at the point of time when onViewCreated fires
        // but force unwrapped nonetheless
        button!!.setOnClickListener { }
    }
}
この変換では、アクセスされるすべての場所でボタン参照を非 null アサーションまたは safe-call 演算子でラッピング解除せざるを得ないため、このケースに関しては lateinit を使用するほうが適切です。
他のケースでは、null がアプリケーションのユースケースに基づく有効な変数割り当てである場合、null 許容オブジェクトを安全にラッピング解除あるいは null 以外の合理的なデフォルト値に自動変換する方法としては、safe-call(?.)演算子を終了 elvis 演算子(?:)とともに使用するほうが適切である可能性があります。Android Studio には、変換処理中にこの判断を行えるほどの十分な情報はありません。デフォルトでは非 null アサーションが使用されますが、必要に応じて変換後のコードをフォローアップして調整するようおすすめします。
詳細
プロジェクトで Kotlin と Java の両方のコードを使用する方法については、Kotlin から Java コードを呼び出すで詳細をご確認ください。
企業でのシナリオで Kotlin を使用する方法については、大規模なチームに Kotlin を導入するで詳細をご確認ください。
既存の Android API 用の慣用的な Kotlin ラッパーについては、Android KTX をご覧ください。