
কন্টাক্টস প্রোভাইডার হলো একটি শক্তিশালী এবং নমনীয় অ্যান্ড্রয়েড কম্পোনেন্ট যা ডিভাইসের মধ্যে থাকা ব্যক্তিদের সম্পর্কিত ডেটার কেন্দ্রীয় ভান্ডার পরিচালনা করে। ডিভাইসের কন্টাক্টস অ্যাপ্লিকেশনে আপনি যে ডেটা দেখতে পান, তার উৎস হলো কন্টাক্টস প্রোভাইডার। এছাড়াও আপনি আপনার নিজের অ্যাপ্লিকেশনে এর ডেটা অ্যাক্সেস করতে পারেন এবং ডিভাইস ও অনলাইন পরিষেবাগুলোর মধ্যে ডেটা স্থানান্তর করতে পারেন। এই প্রোভাইডারটি বিভিন্ন ধরনের ডেটা উৎস সমর্থন করে এবং প্রত্যেক ব্যক্তির জন্য যথাসম্ভব বেশি ডেটা পরিচালনা করার চেষ্টা করে, যার ফলে এর বিন্যাস বেশ জটিল হয়। এই কারণে, প্রোভাইডারের এপিআই-তে কন্ট্রাক্ট ক্লাস এবং ইন্টারফেসের একটি বিস্তৃত সেট অন্তর্ভুক্ত রয়েছে, যা ডেটা পুনরুদ্ধার এবং পরিবর্তন উভয়কেই সহজ করে তোলে।
এই নির্দেশিকায় নিম্নলিখিত বিষয়গুলো বর্ণনা করা হয়েছে:
- মৌলিক সরবরাহকারী কাঠামো।
- প্রোভাইডারের কাছ থেকে কীভাবে ডেটা পুনরুদ্ধার করবেন।
- প্রোভাইডারে ডেটা কীভাবে পরিবর্তন করবেন।
- আপনার সার্ভার থেকে কন্ট্যাক্টস প্রোভাইডারে ডেটা সিঙ্ক্রোনাইজ করার জন্য কীভাবে একটি সিঙ্ক অ্যাডাপ্টার লিখতে হয়।
এই নির্দেশিকাটি ধরে নেয় যে আপনি অ্যান্ড্রয়েড কন্টেন্ট প্রোভাইডারের প্রাথমিক বিষয়গুলো জানেন। অ্যান্ড্রয়েড কন্টেন্ট প্রোভাইডার সম্পর্কে আরও জানতে, কন্টেন্ট প্রোভাইডার বেসিকস গাইডটি পড়ুন।
যোগাযোগ প্রদানকারী সংস্থা
কন্টাক্টস প্রোভাইডার হলো একটি অ্যান্ড্রয়েড কন্টেন্ট প্রোভাইডার কম্পোনেন্ট। এটি একজন ব্যক্তি সম্পর্কে তিন ধরনের ডেটা সংরক্ষণ করে, যার প্রতিটি প্রোভাইডার কর্তৃক প্রদত্ত একটি টেবিলের সাথে সঙ্গতিপূর্ণ, যেমনটি চিত্র ১-এ দেখানো হয়েছে:
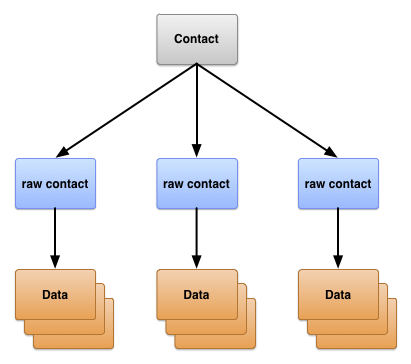
চিত্র ১. যোগাযোগ প্রদানকারী টেবিলের কাঠামো।
এই তিনটি টেবিলকে সাধারণত তাদের কন্ট্রাক্ট ক্লাসের নামে উল্লেখ করা হয়। এই ক্লাসগুলো টেবিলগুলোতে ব্যবহৃত কন্টেন্ট ইউআরআই, কলামের নাম এবং কলামের মানের জন্য কনস্ট্যান্ট নির্ধারণ করে:
-
ContactsContract.Contactsটেবিল - কাঁচা যোগাযোগের সারিগুলোর সমষ্টির উপর ভিত্তি করে বিভিন্ন ব্যক্তির প্রতিনিধিত্বকারী সারি।
-
ContactsContract.RawContactsটেবিল - যেসব সারিতে কোনো ব্যবহারকারীর অ্যাকাউন্ট ও ধরন অনুযায়ী তার তথ্যের সারসংক্ষেপ থাকে।
-
ContactsContract.Dataটেবিল - যেসব সারিতে সরাসরি যোগাযোগের বিবরণ, যেমন ইমেল ঠিকানা বা ফোন নম্বর থাকে।
ContactsContract এ কন্ট্রাক্ট ক্লাস দ্বারা উপস্থাপিত অন্যান্য টেবিলগুলো হলো সহায়ক টেবিল, যা Contacts Provider তার কার্যক্রম পরিচালনা করতে অথবা ডিভাইসের কন্টাক্ট বা টেলিফোনি অ্যাপ্লিকেশনের নির্দিষ্ট ফাংশন সমর্থন করার জন্য ব্যবহার করে।
কাঁচা যোগাযোগ
একটি র কন্ট্যাক্ট কোনো ব্যক্তির ডেটাকে বোঝায়, যা একটিমাত্র অ্যাকাউন্ট টাইপ এবং অ্যাকাউন্ট নেম থেকে আসে। যেহেতু কন্ট্যাক্টস প্রোভাইডার কোনো ব্যক্তির ডেটার উৎস হিসেবে একাধিক অনলাইন পরিষেবা ব্যবহারের অনুমতি দেয়, তাই এটি একই ব্যক্তির জন্য একাধিক র কন্ট্যাক্ট রাখার সুযোগ দেয়। একাধিক র কন্ট্যাক্ট একজন ব্যবহারকারীকে একই অ্যাকাউন্ট টাইপের একাধিক অ্যাকাউন্ট থেকে কোনো ব্যক্তির ডেটা একত্রিত করার সুযোগও দেয়।
একটি র কন্ট্যাক্টের বেশিরভাগ ডেটা ContactsContract.RawContacts টেবিলে সংরক্ষিত থাকে না। এর পরিবর্তে, এটি ContactsContract.Data টেবিলের এক বা একাধিক সারিতে সংরক্ষিত থাকে। প্রতিটি ডেটা সারিতে Data.RAW_CONTACT_ID নামে একটি কলাম থাকে, যেখানে এর প্যারেন্ট ContactsContract.RawContacts সারির RawContacts._ID ভ্যালুটি থাকে।
গুরুত্বপূর্ণ কাঁচা যোগাযোগ কলাম
ContactsContract.RawContacts টেবিলের গুরুত্বপূর্ণ কলামগুলো সারণি ১-এ তালিকাভুক্ত করা হয়েছে। অনুগ্রহ করে সারণিটির পরে দেওয়া টীকাগুলো পড়ুন:
সারণি ১. গুরুত্বপূর্ণ প্রাথমিক যোগাযোগের কলামসমূহ।
| কলামের নাম | ব্যবহার | নোট |
|---|---|---|
ACCOUNT_NAME | যে অ্যাকাউন্ট টাইপটি এই র কন্ট্যাক্টটির উৎস, এটি সেই অ্যাকাউন্ট নেম। উদাহরণস্বরূপ, একটি গুগল অ্যাকাউন্টের অ্যাকাউন্ট নেম হলো ডিভাইসটির মালিকের জিমেইল অ্যাড্রেসগুলোর মধ্যে একটি। আরও তথ্যের জন্য ACCOUNT_TYPE এর পরবর্তী এন্ট্রিটি দেখুন। | এই নামের গঠনটি এর অ্যাকাউন্টের ধরনের ওপর নির্ভরশীল। এটি অগত্যা একটি ইমেল ঠিকানা নয়। |
ACCOUNT_TYPE | যে অ্যাকাউন্ট টাইপটি এই র কন্টাক্টের উৎস। উদাহরণস্বরূপ, একটি গুগল অ্যাকাউন্টের অ্যাকাউন্ট টাইপ হলো com.google । আপনার মালিকানাধীন বা নিয়ন্ত্রিত কোনো ডোমেইনের জন্য সর্বদা একটি ডোমেইন আইডেন্টিফায়ার দিয়ে আপনার অ্যাকাউন্ট টাইপকে নির্দিষ্ট করুন। এটি নিশ্চিত করবে যে আপনার অ্যাকাউন্ট টাইপটি অনন্য। | যেসব অ্যাকাউন্ট টাইপ কন্ট্যাক্ট ডেটা অফার করে, সেগুলোর সাথে সাধারণত একটি সিঙ্ক অ্যাডাপ্টার যুক্ত থাকে যা কন্ট্যাক্টস প্রোভাইডারের সাথে সিঙ্ক্রোনাইজ করে। |
DELETED | একটি অসংযুক্ত কন্ট্যাক্টের জন্য 'ডিলিটেড' ফ্ল্যাগ। | এই ফ্ল্যাগটি কন্ট্যাক্টস প্রোভাইডারকে সারিটি অভ্যন্তরীণভাবে বজায় রাখার অনুমতি দেয়, যতক্ষণ না সিঙ্ক অ্যাডাপ্টারগুলি তাদের সার্ভার থেকে সারিটি মুছে ফেলতে সক্ষম হয় এবং অবশেষে রিপোজিটরি থেকে সারিটি মুছে ফেলে। |
নোট
ContactsContract.RawContacts টেবিলটি সম্পর্কে নিম্নলিখিতগুলি গুরুত্বপূর্ণ তথ্য:
- একটি র কন্ট্যাক্টের নাম
ContactsContract.RawContactsএর নিজস্ব রো-তে সংরক্ষিত হয় না। এর পরিবর্তে, এটিContactsContract.DataটেবিলেরContactsContract.CommonDataKinds.StructuredNameরো-তে সংরক্ষিত হয়। একটি র কন্ট্যাক্টের জন্যContactsContract.Dataটেবিলে এই ধরনের কেবল একটিই রো থাকে। - সতর্কতা: একটি খালি কন্ট্যাক্ট রো-তে আপনার নিজের অ্যাকাউন্টের ডেটা ব্যবহার করতে হলে, সেটিকে প্রথমে
AccountManagerসাথে রেজিস্টার করতে হবে। এটি করার জন্য, ব্যবহারকারীদেরকে অ্যাকাউন্টের তালিকায় অ্যাকাউন্টের ধরন এবং তাদের অ্যাকাউন্টের নাম যোগ করতে বলুন। আপনি যদি এটি না করেন, তাহলে কন্ট্যাক্টস প্রোভাইডার (Contacts Provider) স্বয়ংক্রিয়ভাবে আপনার খালি কন্ট্যাক্ট রো-টি মুছে ফেলবে।উদাহরণস্বরূপ, যদি আপনি চান যে আপনার অ্যাপটি
com.example.dataserviceডোমেনের ওয়েব-ভিত্তিক পরিষেবার জন্য কন্ট্যাক্ট ডেটা সংরক্ষণ করুক, এবং আপনার পরিষেবার জন্য ব্যবহারকারীর অ্যাকাউন্টটিbecky.sharp@dataservice.example.comহয়, তাহলে আপনার অ্যাপ সরাসরি কন্ট্যাক্ট সারি যোগ করার আগে ব্যবহারকারীকে অবশ্যই প্রথমে অ্যাকাউন্টের 'টাইপ' (com.example.dataservice) এবং অ্যাকাউন্টের 'নাম' (becky.smart@dataservice.example.com) যোগ করতে হবে। আপনি ডকুমেন্টেশনে ব্যবহারকারীকে এই প্রয়োজনীয়তাটি ব্যাখ্যা করতে পারেন, অথবা আপনি ব্যবহারকারীকে টাইপ এবং নাম, বা উভয়ই যোগ করার জন্য অনুরোধ করতে পারেন। অ্যাকাউন্টের টাইপ এবং অ্যাকাউন্টের নাম পরবর্তী বিভাগে আরও বিস্তারিতভাবে বর্ণনা করা হয়েছে।
কাঁচা যোগাযোগের তথ্যের উৎস
র কন্টাক্ট কীভাবে কাজ করে তা বোঝার জন্য, 'এমিলি ডিকিনসন' নামের ব্যবহারকারীর কথা বিবেচনা করুন, যার ডিভাইসে নিম্নলিখিত তিনটি ব্যবহারকারী অ্যাকাউন্ট সংজ্ঞায়িত করা আছে:
-
emily.dickinson@gmail.com -
emilyd@gmail.com - টুইটার অ্যাকাউন্ট "belle_of_amherst"
এই ব্যবহারকারী অ্যাকাউন্ট সেটিংসে এই তিনটি অ্যাকাউন্টের জন্যই ‘সিঙ্ক কন্টাক্টস’ চালু করেছেন।
ধরা যাক, এমিলি ডিকিনসন একটি ব্রাউজার উইন্ডো খুলে emily.dickinson@gmail.com হিসেবে Gmail-এ লগ ইন করলেন, Contacts খুললেন এবং 'Thomas Higginson'-কে যুক্ত করলেন। পরে, তিনি emilyd@gmail.com হিসেবে Gmail-এ লগ ইন করে 'Thomas Higginson'-কে একটি ইমেল পাঠান, যা স্বয়ংক্রিয়ভাবে তাকে কন্ট্যাক্ট হিসেবে যুক্ত করে নেয়। তিনি টুইটারে 'colonel_tom' (টমাস হিগিনসনের টুইটার আইডি)-কেও ফলো করেন।
এই কাজের ফলে কন্টাক্টস প্রোভাইডার তিনটি র কন্টাক্ট তৈরি করে:
-
emily.dickinson@gmail.comএর সাথে যুক্ত 'টমাস হিগিনসন'-এর একটি অপ্রাতিষ্ঠানিক যোগাযোগ। ব্যবহারকারী অ্যাকাউন্টের ধরন হলো গুগল। -
emilyd@gmail.comএর সাথে যুক্ত 'টমাস হিগিনসন'-এর একটি দ্বিতীয় সরাসরি যোগাযোগ রয়েছে। ব্যবহারকারী অ্যাকাউন্টের ধরনটিও গুগল। নামটি পূর্বের একটি নামের সাথে হুবহু মিলে যাওয়া সত্ত্বেও একটি দ্বিতীয় সরাসরি যোগাযোগ রয়েছে, কারণ ব্যক্তিটিকে একটি ভিন্ন ব্যবহারকারী অ্যাকাউন্টের জন্য যুক্ত করা হয়েছিল। - 'belle_of_amherst'-এর সাথে যুক্ত 'Thomas Higginson'-এর জন্য এটি তৃতীয় একটি অপ্রাত্যক্ষ যোগাযোগ। ব্যবহারকারী অ্যাকাউন্টের ধরন হলো টুইটার।
ডেটা
পূর্বে যেমন উল্লেখ করা হয়েছে, একটি র কন্ট্যাক্টের ডেটা ContactsContract.Data রো-তে সংরক্ষিত থাকে, যা র কন্ট্যাক্টটির _ID ভ্যালুর সাথে লিঙ্ক করা থাকে। এর ফলে একটিমাত্র র কন্ট্যাক্টের একই ধরনের ডেটার, যেমন ইমেল অ্যাড্রেস বা ফোন নম্বরের, একাধিক ইনস্ট্যান্স থাকতে পারে। উদাহরণস্বরূপ, যদি emilyd@gmail.com এর জন্য "Thomas Higginson"-এর (Google অ্যাকাউন্ট emilyd@gmail.com এর সাথে যুক্ত Thomas Higginson-এর র কন্ট্যাক্ট রো) একটি বাড়ির ইমেল অ্যাড্রেস thigg@gmail.com এবং একটি অফিসের ইমেল অ্যাড্রেস thomas.higginson@gmail.com থাকে, তাহলে কন্ট্যাক্টস প্রোভাইডার দুটি ইমেল অ্যাড্রেস রো-ই সংরক্ষণ করে এবং উভয়কেই র কন্ট্যাক্টটির সাথে লিঙ্ক করে দেয়।
লক্ষ্য করুন যে, বিভিন্ন ধরণের ডেটা এই একটি টেবিলেই সংরক্ষিত থাকে। প্রদর্শিত নাম, ফোন নম্বর, ইমেল, ডাক ঠিকানা, ছবি এবং ওয়েবসাইটের বিস্তারিত বিবরণের সারিগুলো সবই ContactsContract.Data টেবিলে পাওয়া যায়। এই বিষয়টি পরিচালনায় সাহায্য করার জন্য, ContactsContract.Data টেবিলের কিছু কলামের বর্ণনামূলক নাম এবং অন্যগুলোর সাধারণ নাম রয়েছে। বর্ণনামূলক নামের কলামের বিষয়বস্তুর অর্থ সারিতে থাকা ডেটার ধরণ নির্বিশেষে একই থাকে, অন্যদিকে সাধারণ নামের কলামের বিষয়বস্তুর অর্থ ডেটার ধরণের উপর নির্ভর করে ভিন্ন ভিন্ন হয়।
বর্ণনামূলক কলামের নাম
বর্ণনামূলক কলাম নামের কিছু উদাহরণ হলো:
-
RAW_CONTACT_ID - এই ডেটার জন্য মূল কন্ট্যাক্টের
_IDকলামের মান। -
MIMETYPE - এই সারিতে সংরক্ষিত ডেটার ধরণ, যা একটি কাস্টম MIME টাইপ হিসাবে প্রকাশ করা হয়। কন্টাক্টস প্রোভাইডার,
ContactsContract.CommonDataKindsএর সাবক্লাসগুলিতে সংজ্ঞায়িত MIME টাইপগুলি ব্যবহার করে। এই MIME টাইপগুলি ওপেন সোর্স, এবং কন্টাক্টস প্রোভাইডারের সাথে কাজ করে এমন যেকোনো অ্যাপ্লিকেশন বা সিঙ্ক অ্যাডাপ্টার এগুলি ব্যবহার করতে পারে। -
IS_PRIMARY - যদি কোনো র কন্ট্যাক্টের জন্য এই ধরনের ডেটা রো একাধিকবার থাকতে পারে, তাহলে
IS_PRIMARYকলামটি সেই ডেটা রো-কে চিহ্নিত করে যেটিতে ওই ধরনের প্রাথমিক ডেটা থাকে। উদাহরণস্বরূপ, যদি ব্যবহারকারী কোনো কন্ট্যাক্টের ফোন নম্বরে লং-প্রেস করে 'সেট ডিফল্ট' নির্বাচন করেন, তাহলে সেই নম্বরটি ধারণকারীContactsContract.Dataরো-এরIS_PRIMARYকলামটির মান একটি অশূন্যতে সেট করা হয়।
সাধারণ কলামের নাম
DATA1 থেকে DATA15 নামের ১৫টি জেনেরিক কলাম রয়েছে যা সাধারণত উপলব্ধ এবং SYNC4 থেকে SYNC1 নামের অতিরিক্ত চারটি জেনেরিক কলাম রয়েছে যা শুধুমাত্র সিঙ্ক অ্যাডাপ্টার দ্বারা ব্যবহার করা উচিত। সারিতে কী ধরনের ডেটা রয়েছে তা নির্বিশেষে, জেনেরিক কলামের নামের কনস্ট্যান্টগুলো সর্বদা কাজ করে।
DATA1 কলামটি ইনডেক্স করা আছে। কন্ট্যাক্টস প্রোভাইডার সবসময় এই কলামটি সেই ডেটার জন্য ব্যবহার করে, যা প্রোভাইডারের প্রত্যাশা অনুযায়ী কোনো কোয়েরির সবচেয়ে ঘন ঘন লক্ষ্যবস্তু হবে। উদাহরণস্বরূপ, একটি ইমেল সারিতে, এই কলামটিতে প্রকৃত ইমেল ঠিকানাটি থাকে।
প্রচলিত রীতি অনুযায়ী, DATA15 কলামটি ছবির থাম্বনেইলের মতো বাইনারি লার্জ অবজেক্ট (BLOB) ডেটা সংরক্ষণের জন্য সংরক্ষিত।
প্রকার-নির্দিষ্ট কলামের নাম
একটি নির্দিষ্ট ধরণের সারির কলামগুলির সাথে কাজ করা সহজ করার জন্য, কন্টাক্টস প্রোভাইডারটি টাইপ-নির্দিষ্ট কলাম নামের কনস্ট্যান্টও প্রদান করে, যা ContactsContract.CommonDataKinds এর সাবক্লাসগুলিতে সংজ্ঞায়িত থাকে। এই কনস্ট্যান্টগুলি একই কলাম নামকে কেবল একটি ভিন্ন নাম দেয়, যা আপনাকে একটি নির্দিষ্ট ধরণের সারির ডেটা অ্যাক্সেস করতে সহায়তা করে।
উদাহরণস্বরূপ, ContactsContract.CommonDataKinds.Email ক্লাসটি Email.CONTENT_ITEM_TYPE MIME টাইপের একটি ContactsContract.Data সারির জন্য টাইপ-নির্দিষ্ট কলাম নামের কনস্ট্যান্ট সংজ্ঞায়িত করে। ক্লাসটিতে ইমেল অ্যাড্রেস কলামের জন্য ADDRESS কনস্ট্যান্টটি রয়েছে। ADDRESS এর প্রকৃত মান হলো 'data1', যা কলামটির জেনেরিক নামের সমান।
সতর্কতা: প্রোভাইডারের পূর্ব-নির্ধারিত MIME টাইপগুলোর কোনো একটি থাকা সারি ব্যবহার করে ContactsContract.Data টেবিলে আপনার নিজস্ব কাস্টম ডেটা যোগ করবেন না। যদি আপনি তা করেন, তাহলে আপনি ডেটা হারাতে পারেন অথবা প্রোভাইডারটি অকার্যকর হয়ে যেতে পারে। উদাহরণস্বরূপ, Email.CONTENT_ITEM_TYPE MIME টাইপের এমন কোনো সারি যোগ করা উচিত নয়, যার DATA1 কলামে ইমেল ঠিকানার পরিবর্তে ব্যবহারকারীর নাম রয়েছে। যদি আপনি সারির জন্য আপনার নিজস্ব কাস্টম MIME টাইপ ব্যবহার করেন, তাহলে আপনি আপনার নিজস্ব টাইপ-নির্দিষ্ট কলামের নাম নির্ধারণ করতে এবং আপনার ইচ্ছামতো কলামগুলো ব্যবহার করতে স্বাধীন।
চিত্র ২-এ দেখানো হয়েছে, একটি ContactsContract.Data সারিতে বর্ণনামূলক কলাম এবং ডেটা কলামগুলো কীভাবে প্রদর্শিত হয়, এবং কীভাবে প্রকার-নির্দিষ্ট কলামের নামগুলো সাধারণ কলামের নামগুলোকে "ওভারলে" করে।
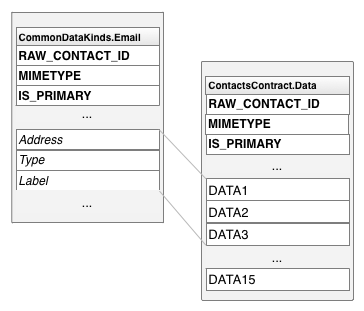
চিত্র ২. প্রকার-নির্দিষ্ট কলামের নাম এবং সাধারণ কলামের নাম।
প্রকার-নির্দিষ্ট কলাম নামের ক্লাস
সারণি ২-এ সর্বাধিক ব্যবহৃত টাইপ-নির্দিষ্ট কলাম নামের ক্লাসগুলো তালিকাভুক্ত করা হয়েছে:
সারণি ২. প্রকার-নির্দিষ্ট কলাম নামের শ্রেণিবিভাগ
| ম্যাপিং ক্লাস | ডেটার প্রকার | নোট |
|---|---|---|
ContactsContract.CommonDataKinds.StructuredName | এই ডেটা সারির সাথে যুক্ত মূল কন্ট্যাক্টের নামের ডেটা। | একটি র কন্ট্যাক্টে এই সারিগুলোর মধ্যে কেবল একটিই থাকে। |
ContactsContract.CommonDataKinds.Photo | এই ডেটা সারির সাথে যুক্ত মূল যোগাযোগের ছবিটি। | একটি র কন্ট্যাক্টে এই সারিগুলোর মধ্যে কেবল একটিই থাকে। |
ContactsContract.CommonDataKinds.Email | এই ডেটা সারির সাথে যুক্ত মূল কন্ট্যাক্টের একটি ইমেল ঠিকানা। | একটি র কন্ট্যাক্টের একাধিক ইমেল ঠিকানা থাকতে পারে। |
ContactsContract.CommonDataKinds.StructuredPostal | এই ডেটা সারির সাথে যুক্ত মূল যোগাযোগের জন্য একটি ডাক ঠিকানা। | একটি অসংযুক্ত কন্ট্যাক্টের একাধিক ডাক ঠিকানা থাকতে পারে। |
ContactsContract.CommonDataKinds.GroupMembership | একটি শনাক্তকারী যা মূল যোগাযোগটিকে কন্টাক্টস প্রোভাইডারের গ্রুপগুলোর কোনো একটির সাথে সংযুক্ত করে। | গ্রুপ হলো অ্যাকাউন্ট টাইপ এবং অ্যাকাউন্ট নামের একটি ঐচ্ছিক বৈশিষ্ট্য। ‘যোগাযোগ গ্রুপ’ বিভাগে এগুলি সম্পর্কে আরও বিস্তারিতভাবে বর্ণনা করা হয়েছে। |
যোগাযোগ
কন্ট্যাক্টস প্রোভাইডার সমস্ত অ্যাকাউন্ট টাইপ এবং অ্যাকাউন্ট নামের কাঁচা কন্ট্যাক্ট সারিগুলিকে একত্রিত করে একটি কন্ট্যাক্ট তৈরি করে। এটি একজন ব্যবহারকারীর কোনো ব্যক্তির জন্য সংগ্রহ করা সমস্ত ডেটা প্রদর্শন এবং পরিবর্তন করা সহজ করে তোলে। কন্ট্যাক্টস প্রোভাইডার নতুন কন্ট্যাক্ট সারি তৈরি করা এবং একটি বিদ্যমান কন্ট্যাক্ট সারির সাথে কাঁচা কন্ট্যাক্টগুলির একত্রীকরণ পরিচালনা করে। অ্যাপ্লিকেশন বা সিঙ্ক অ্যাডাপ্টার কোনোটিকেই কন্ট্যাক্ট যোগ করার অনুমতি দেওয়া হয় না এবং একটি কন্ট্যাক্ট সারির কিছু কলাম শুধুমাত্র পঠনযোগ্য (read-only) হয়।
দ্রষ্টব্য: আপনি যদি insert() ব্যবহার করে Contacts Provider-এ কোনো কন্ট্যাক্ট যোগ করার চেষ্টা করেন, তাহলে আপনি একটি UnsupportedOperationException এক্সেপশন পাবেন। আপনি যদি "read-only" হিসেবে তালিকাভুক্ত কোনো কলাম আপডেট করার চেষ্টা করেন, তাহলে সেই আপডেটটি উপেক্ষা করা হবে।
যখন কোনো নতুন র কন্ট্যাক্ট যুক্ত করা হয় যা বিদ্যমান কোনো কন্ট্যাক্টের সাথে মেলে না, তখন কন্ট্যাক্টস প্রোভাইডার একটি নতুন কন্ট্যাক্ট তৈরি করে। প্রোভাইডারটি তখনো এটি করে, যখন কোনো বিদ্যমান র কন্ট্যাক্টের ডেটা এমনভাবে পরিবর্তিত হয় যে এটি পূর্বে সংযুক্ত থাকা কন্ট্যাক্টটির সাথে আর মেলে না। যদি কোনো অ্যাপ্লিকেশন বা সিঙ্ক অ্যাডাপ্টার এমন একটি নতুন র কন্ট্যাক্ট তৈরি করে যা কোনো বিদ্যমান কন্ট্যাক্টের সাথে মিলে যায় , তবে নতুন র কন্ট্যাক্টটিকে বিদ্যমান কন্ট্যাক্টটির সাথে একত্রিত করা হয়।
কন্টাক্টস প্রোভাইডার, Contacts টেবিলের কন্টাক্ট রো-এর _ID কলাম ব্যবহার করে একটি কন্টাক্ট রো-কে তার র কন্টাক্ট রো-গুলোর সাথে লিঙ্ক করে। র কন্টাক্টস টেবিল ContactsContract.RawContacts এর CONTACT_ID কলামটিতে প্রতিটি র কন্টাক্টস রো-এর সাথে সংশ্লিষ্ট কন্টাক্টস রো-এর _ID ভ্যালুগুলো থাকে।
ContactsContract.Contacts টেবিলে LOOKUP_KEY নামে একটি কলামও রয়েছে, যা কন্ট্যাক্ট রো-এর একটি "স্থায়ী" লিঙ্ক। যেহেতু কন্ট্যাক্টস প্রোভাইডার স্বয়ংক্রিয়ভাবে কন্ট্যাক্টগুলো রক্ষণাবেক্ষণ করে, তাই এটি কোনো অ্যাগ্রিগেশন বা সিঙ্কের প্রতিক্রিয়ায় একটি কন্ট্যাক্ট রো-এর _ID ভ্যালু পরিবর্তন করতে পারে। এমনটা ঘটলেও, কন্ট্যাক্টের LOOKUP_KEY এর সাথে যুক্ত কন্টেন্ট ইউআরআই CONTENT_LOOKUP_URI তখনও কন্ট্যাক্ট রো-কেই নির্দেশ করবে, তাই আপনি "প্রিয়" কন্ট্যাক্ট ইত্যাদির লিঙ্ক বজায় রাখতে LOOKUP_KEY ব্যবহার করতে পারেন। এই কলামটির নিজস্ব একটি ফরম্যাট রয়েছে যা _ID কলামের ফরম্যাটের সাথে সম্পর্কহীন।
চিত্র ৩-এ দেখানো হয়েছে তিনটি প্রধান সারণি একে অপরের সাথে কীভাবে সম্পর্কিত।
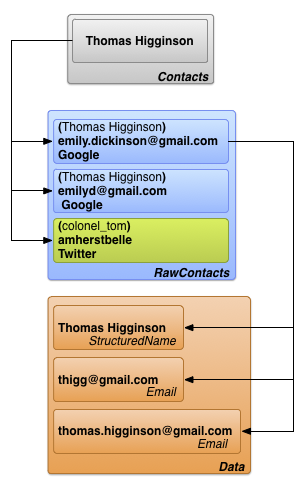
চিত্র ৩. কন্টাক্টস, র কন্টাক্টস এবং ডিটেইলস টেবিলের সম্পর্ক।
সতর্কতা: আপনি যদি আপনার অ্যাপটি গুগল প্লে স্টোরে প্রকাশ করেন, অথবা আপনার অ্যাপটি যদি অ্যান্ড্রয়েড ১০ (এপিআই লেভেল ২৯) বা তার চেয়ে উন্নত সংস্করণের কোনো ডিভাইসে থাকে, তাহলে মনে রাখবেন যে সীমিত সংখ্যক কন্ট্যাক্ট ডেটা ফিল্ড এবং মেথড এখন আর কার্যকর নয়।
উল্লেখিত শর্তানুসারে, সিস্টেমটি পর্যায়ক্রমে এই ডেটা ফিল্ডগুলিতে লেখা যেকোনো মান মুছে ফেলে:
-
ContactsContract.ContactOptionsColumns.LAST_TIME_CONTACTED -
ContactsContract.ContactOptionsColumns.TIMES_CONTACTED -
ContactsContract.DataUsageStatColumns.LAST_TIME_USED -
ContactsContract.DataUsageStatColumns.TIMES_USED
উপরোক্ত ডেটা ফিল্ডগুলি সেট করতে ব্যবহৃত এপিআইগুলিও অপ্রচলিত:
এছাড়াও, নিম্নলিখিত ফিল্ডগুলি এখন আর ঘন ঘন যোগাযোগের তথ্য দেখাবে না। উল্লেখ্য যে, এই ফিল্ডগুলির মধ্যে কয়েকটি শুধুমাত্র তখনই যোগাযোগের র্যাঙ্কিংকে প্রভাবিত করে, যখন যোগাযোগগুলি একটি নির্দিষ্ট ডেটা কাইন্ডের অংশ হয়।
-
ContactsContract.Contacts.CONTENT_FREQUENT_URI -
ContactsContract.Contacts.CONTENT_STREQUENT_URI -
ContactsContract.Contacts.CONTENT_STREQUENT_FILTER_URI -
CONTENT_FILTER_URI(শুধুমাত্র Email , Phone , Callable , এবং Contactables ডেটা কাইন্ডগুলোকে প্রভাবিত করে) -
ENTERPRISE_CONTENT_FILTER_URI(শুধুমাত্র ইমেল , ফোন এবং কলযোগ্য ডেটা প্রকারকে প্রভাবিত করে)
আপনার অ্যাপগুলো যদি এই ফিল্ড বা এপিআইগুলো অ্যাক্সেস বা আপডেট করে, তাহলে বিকল্প পদ্ধতি ব্যবহার করুন। উদাহরণস্বরূপ, আপনি প্রাইভেট কন্টেন্ট প্রোভাইডার অথবা আপনার অ্যাপ বা ব্যাকএন্ড সিস্টেমে সংরক্ষিত অন্যান্য ডেটা ব্যবহার করে নির্দিষ্ট কিছু ইউজ কেস পূরণ করতে পারেন।
এই পরিবর্তনের ফলে আপনার অ্যাপের কার্যকারিতা প্রভাবিত হচ্ছে না, তা যাচাই করতে আপনি ম্যানুয়ালি এই ডেটা ফিল্ডগুলো মুছে ফেলতে পারেন। এটি করার জন্য, Android 4.1 (API লেভেল 16) বা তার উচ্চতর সংস্করণে চালিত কোনো ডিভাইসে নিম্নলিখিত ADB কমান্ডটি চালান:
adb shell content delete \
--uri content://com.android.contacts/contacts/delete_usage
সিঙ্ক অ্যাডাপ্টার থেকে ডেটা
ব্যবহারকারীরা সরাসরি ডিভাইসে কন্ট্যাক্ট ডেটা প্রবেশ করান, কিন্তু সিঙ্ক অ্যাডাপ্টারের মাধ্যমে ওয়েব সার্ভিস থেকেও ডেটা কন্ট্যাক্টস প্রোভাইডারে প্রবাহিত হয়, যা ডিভাইস এবং সার্ভিসের মধ্যে ডেটা স্থানান্তরকে স্বয়ংক্রিয় করে। সিঙ্ক অ্যাডাপ্টারগুলো সিস্টেমের নিয়ন্ত্রণে ব্যাকগ্রাউন্ডে চলে এবং ডেটা পরিচালনার জন্য ContentResolver মেথডগুলোকে কল করে।
অ্যান্ড্রয়েডে, একটি সিঙ্ক অ্যাডাপ্টার যে ওয়েব সার্ভিসের সাথে কাজ করে, তা একটি অ্যাকাউন্ট টাইপ দ্বারা চিহ্নিত করা হয়। প্রতিটি সিঙ্ক অ্যাডাপ্টার একটি অ্যাকাউন্ট টাইপের সাথে কাজ করে, কিন্তু এটি সেই টাইপের জন্য একাধিক অ্যাকাউন্টের নাম সমর্থন করতে পারে। ‘কাঁচা কন্ট্যাক্ট ডেটার উৎস’ (Sources of raw contacts data ) বিভাগে অ্যাকাউন্ট টাইপ এবং অ্যাকাউন্টের নাম সম্পর্কে সংক্ষেপে বর্ণনা করা হয়েছে। নিম্নলিখিত সংজ্ঞাগুলো আরও বিশদ বিবরণ প্রদান করে এবং বর্ণনা করে যে কীভাবে অ্যাকাউন্ট টাইপ ও নাম সিঙ্ক অ্যাডাপ্টার এবং পরিষেবাগুলোর সাথে সম্পর্কিত।
- অ্যাকাউন্টের ধরন
- এমন একটি পরিষেবা শনাক্ত করে যেখানে ব্যবহারকারী ডেটা সংরক্ষণ করেছেন। বেশিরভাগ সময়, ব্যবহারকারীকে পরিষেবাটির সাথে প্রমাণীকরণ করতে হয়। উদাহরণস্বরূপ, গুগল কন্টাক্টস হলো একটি অ্যাকাউন্টের ধরন, যা
google.comকোড দ্বারা শনাক্ত করা হয়। এই মানটিAccountManagerদ্বারা ব্যবহৃত অ্যাকাউন্টের ধরনের সাথে সঙ্গতিপূর্ণ। - অ্যাকাউন্টের নাম
- এটি কোনো নির্দিষ্ট অ্যাকাউন্ট বা অ্যাকাউন্টের ধরনের জন্য লগইন শনাক্ত করে। গুগল কন্ট্যাক্টস অ্যাকাউন্টগুলো গুগল অ্যাকাউন্টের মতোই, যেগুলোর অ্যাকাউন্টের নাম হিসেবে একটি ইমেল অ্যাড্রেস থাকে। অন্যান্য পরিষেবাগুলো এক-শব্দের ইউজারনেম বা সংখ্যাসূচক আইডি ব্যবহার করতে পারে।
অ্যাকাউন্টের ধরনগুলো অনন্য হতে হবে এমন কোনো বাধ্যবাধকতা নেই। একজন ব্যবহারকারী একাধিক গুগল কন্ট্যাক্টস অ্যাকাউন্ট কনফিগার করতে পারেন এবং তাদের ডেটা কন্ট্যাক্টস প্রোভাইডারে ডাউনলোড করতে পারেন; এমনটা হতে পারে যদি ব্যবহারকারীর ব্যক্তিগত অ্যাকাউন্টের জন্য এক সেট ব্যক্তিগত কন্ট্যাক্ট এবং কাজের জন্য অন্য সেট থাকে। অ্যাকাউন্টের নামগুলো সাধারণত অনন্য হয়। এগুলো একত্রে কন্ট্যাক্টস প্রোভাইডার এবং একটি বাহ্যিক পরিষেবার মধ্যে একটি নির্দিষ্ট ডেটা প্রবাহকে শনাক্ত করে।
আপনি যদি আপনার সার্ভিসের ডেটা কন্ট্যাক্টস প্রোভাইডারে স্থানান্তর করতে চান, তাহলে আপনাকে নিজস্ব সিঙ্ক অ্যাডাপ্টার লিখতে হবে। এই বিষয়টি ‘কন্ট্যাক্টস প্রোভাইডার সিঙ্ক অ্যাডাপ্টার’ বিভাগে আরও বিস্তারিতভাবে বর্ণনা করা হয়েছে।
চিত্র ৪-এ দেখানো হয়েছে, ব্যক্তিদের সম্পর্কিত ডেটার প্রবাহে কন্টাক্টস প্রোভাইডার কীভাবে কাজ করে। ‘সিঙ্ক অ্যাডাপ্টার’ চিহ্নিত বক্সে, প্রতিটি অ্যাডাপ্টারকে তার অ্যাকাউন্টের ধরন অনুযায়ী লেবেল করা হয়েছে।
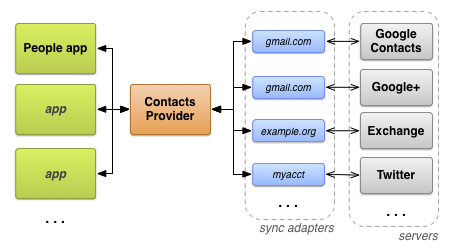
চিত্র ৪. কন্টাক্টস প্রোভাইডারের ডেটা প্রবাহ।
প্রয়োজনীয় অনুমতি
যে অ্যাপ্লিকেশনগুলো কন্টাক্টস প্রোভাইডার অ্যাক্সেস করতে চায়, তাদের অবশ্যই নিম্নলিখিত অনুমতিগুলোর জন্য অনুরোধ করতে হবে:
- এক বা একাধিক টেবিলে পড়ার অ্যাক্সেস
-
READ_CONTACTS, যাAndroidManifest.xmlএ<uses-permission>এলিমেন্টের মাধ্যমে<uses-permission android:name="android.permission.READ_CONTACTS">হিসেবে নির্দিষ্ট করা হয়েছে। - এক বা একাধিক টেবিলে লেখার অ্যাক্সেস
-
WRITE_CONTACTS, যাAndroidManifest.xmlএ<uses-permission>এলিমেন্টের মাধ্যমে<uses-permission android:name="android.permission.WRITE_CONTACTS">হিসেবে নির্দিষ্ট করা হয়েছে।
এই অনুমতিগুলো ব্যবহারকারীর প্রোফাইল ডেটা পর্যন্ত বিস্তৃত নয়। ব্যবহারকারীর প্রোফাইল এবং এর প্রয়োজনীয় অনুমতিগুলো পরবর্তী অনুচ্ছেদ, ‘ব্যবহারকারীর প্রোফাইল’- এ আলোচনা করা হয়েছে।
মনে রাখবেন যে ব্যবহারকারীর কন্ট্যাক্ট ডেটা ব্যক্তিগত এবং সংবেদনশীল। ব্যবহারকারীরা তাদের গোপনীয়তা নিয়ে সচেতন, তাই তারা চান না যে কোনো অ্যাপ্লিকেশন তাদের বা তাদের কন্ট্যাক্টদের সম্পর্কে ডেটা সংগ্রহ করুক। তাদের কন্ট্যাক্ট ডেটা অ্যাক্সেস করার জন্য আপনার কেন অনুমতি প্রয়োজন, তা যদি স্পষ্ট না হয়, তাহলে তারা আপনার অ্যাপ্লিকেশনটিকে কম রেটিং দিতে পারে অথবা এটি ইনস্টল করতে সরাসরি অস্বীকার করতে পারে।
ব্যবহারকারীর প্রোফাইল
ContactsContract.Contacts টেবিলে ডিভাইসের ব্যবহারকারীর প্রোফাইল ডেটা সম্বলিত একটিমাত্র সারি থাকে। এই ডেটা ব্যবহারকারীর কোনো কন্ট্যাক্টের পরিবর্তে ডিভাইসের user বর্ণনা করে। প্রোফাইল ব্যবহারকারী প্রতিটি সিস্টেমের জন্য প্রোফাইল কন্ট্যাক্ট সারিটি একটি র কন্ট্যাক্ট সারির সাথে লিঙ্ক করা থাকে। প্রতিটি প্রোফাইল র কন্ট্যাক্ট সারিতে একাধিক ডেটা সারি থাকতে পারে। ব্যবহারকারীর প্রোফাইল অ্যাক্সেস করার জন্য কনস্ট্যান্টগুলো ContactsContract.Profile ক্লাসে পাওয়া যায়।
ব্যবহারকারীর প্রোফাইল অ্যাক্সেস করার জন্য বিশেষ অনুমতির প্রয়োজন হয়। পড়া এবং লেখার জন্য প্রয়োজনীয় READ_CONTACTS এবং WRITE_CONTACTS অনুমতির পাশাপাশি, ব্যবহারকারীর প্রোফাইল অ্যাক্সেস করার জন্য যথাক্রমে android.Manifest.permission#READ_PROFILE এবং android.Manifest.permission#WRITE_PROFILE অনুমতিরও প্রয়োজন হয়।
মনে রাখবেন যে, ব্যবহারকারীর প্রোফাইলকে সংবেদনশীল হিসেবে বিবেচনা করা উচিত। android.Manifest.permission#READ_PROFILE পারমিশনটি আপনাকে ডিভাইস ব্যবহারকারীর ব্যক্তিগত শনাক্তকারী ডেটা অ্যাক্সেস করার সুযোগ দেয়। আপনার অ্যাপ্লিকেশনের বিবরণে ব্যবহারকারীকে অবশ্যই জানিয়ে দিন যে কেন আপনার ইউজার প্রোফাইল অ্যাক্সেস পারমিশন প্রয়োজন।
ব্যবহারকারীর প্রোফাইল ধারণকারী কন্ট্যাক্ট সারিটি পুনরুদ্ধার করতে, ContentResolver.query() কল করুন। কন্টেন্ট URI-কে CONTENT_URI তে সেট করুন এবং কোনো সিলেকশন ক্রাইটেরিয়া প্রদান করবেন না। আপনি এই কন্টেন্ট URI-কে র কন্ট্যাক্ট বা প্রোফাইলের ডেটা পুনরুদ্ধারের জন্য বেস URI হিসেবেও ব্যবহার করতে পারেন। উদাহরণস্বরূপ, এই কোড স্নিপেটটি প্রোফাইলের ডেটা পুনরুদ্ধার করে:
কোটলিন
// Sets the columns to retrieve for the user profile
projection = arrayOf(
        ContactsContract.Profile._ID,
        ContactsContract.Profile.DISPLAY_NAME_PRIMARY,
        ContactsContract.Profile.LOOKUP_KEY,
        ContactsContract.Profile.PHOTO_THUMBNAIL_URI
)

// Retrieves the profile from the Contacts Provider
profileCursor = contentResolver.query(
        ContactsContract.Profile.CONTENT_URI,
        projection,
        null,
        null,
        null
)
জাভা
// Sets the columns to retrieve for the user profile
projection = new String[]
    {
        Profile._ID,
        Profile.DISPLAY_NAME_PRIMARY,
        Profile.LOOKUP_KEY,
        Profile.PHOTO_THUMBNAIL_URI
    };

// Retrieves the profile from the Contacts Provider
profileCursor =
        getContentResolver().query(
                Profile.CONTENT_URI,
                projection ,
                null,
                null,
                null);
দ্রষ্টব্য: আপনি যদি একাধিক কন্টাক্ট সারি পান এবং সেগুলোর মধ্যে কোনোটি ব্যবহারকারীর প্রোফাইল কিনা তা নির্ধারণ করতে চান, তাহলে সারিটির IS_USER_PROFILE কলামটি পরীক্ষা করুন। কন্টাক্টটি ব্যবহারকারীর প্রোফাইল হলে এই কলামটির মান "1" সেট করা থাকে।
যোগাযোগ প্রদানকারীর মেটাডেটা
কন্টাক্টস প্রোভাইডার রিপোজিটরিতে থাকা কন্টাক্টস ডেটার অবস্থা ট্র্যাক করে এমন ডেটা পরিচালনা করে। রিপোজিটরি সম্পর্কিত এই মেটাডেটা বিভিন্ন স্থানে সংরক্ষিত থাকে, যার মধ্যে রয়েছে Raw Contacts, Data, এবং Contacts টেবিলের সারি, ContactsContract.Settings টেবিল, এবং ContactsContract.SyncState টেবিল। নিম্নলিখিত সারণিতে এই প্রতিটি মেটাডেটার প্রভাব দেখানো হয়েছে:
সারণি ৩. যোগাযোগ প্রদানকারীর মেটাডেটা
| টেবিল | কলাম | মূল্যবোধ | অর্থ |
|---|---|---|---|
ContactsContract.RawContacts | DIRTY | "0" - শেষ সিঙ্কের পর থেকে পরিবর্তিত হয়নি। | ডিভাইসে পরিবর্তিত হওয়া এবং সার্ভারে পুনরায় সিঙ্ক করতে হবে এমন অপরিবর্তিত কন্ট্যাক্টগুলোকে চিহ্নিত করে। অ্যান্ড্রয়েড অ্যাপ্লিকেশনগুলো কোনো সারি আপডেট করলে কন্ট্যাক্টস প্রোভাইডার দ্বারা এই মানটি স্বয়ংক্রিয়ভাবে সেট হয়ে যায়। যেসব সিঙ্ক অ্যাডাপ্টার মূল কন্টাক্ট বা ডেটা টেবিল পরিবর্তন করে, তাদের ব্যবহৃত কন্টেন্ট URI-এর সাথে সর্বদা |
| "১" - শেষ সিঙ্কের পর পরিবর্তিত হয়েছে, সার্ভারে পুনরায় সিঙ্ক করা প্রয়োজন। | |||
ContactsContract.RawContacts | VERSION | এই সারির সংস্করণ নম্বর। | যখনই সারি বা এর সম্পর্কিত ডেটা পরিবর্তিত হয়, কন্টাক্টস প্রোভাইডার স্বয়ংক্রিয়ভাবে এই মানটি বাড়িয়ে দেয়। |
ContactsContract.Data | DATA_VERSION | এই সারির সংস্করণ নম্বর। | ডেটা সারি পরিবর্তিত হলেই কন্টাক্টস প্রোভাইডার স্বয়ংক্রিয়ভাবে এই মানটি বাড়িয়ে দেয়। |
ContactsContract.RawContacts | SOURCE_ID | একটি স্ট্রিং ভ্যালু যা এই র কন্টাক্টটিকে, যে অ্যাকাউন্টে এটি তৈরি করা হয়েছিল, সেই অ্যাকাউন্টের সাথে অনন্যভাবে শনাক্ত করে। | যখন একটি সিঙ্ক অ্যাডাপ্টার একটি নতুন র কন্ট্যাক্ট তৈরি করে, তখন এই কলামটি র কন্ট্যাক্টটির জন্য সার্ভারের ইউনিক আইডি-তে সেট করা উচিত। যখন একটি অ্যান্ড্রয়েড অ্যাপ্লিকেশন একটি নতুন র কন্ট্যাক্ট তৈরি করে, তখন অ্যাপ্লিকেশনটির এই কলামটি খালি রাখা উচিত। এটি সিঙ্ক অ্যাডাপ্টারকে সংকেত দেয় যে, তাকে সার্ভারে একটি নতুন র কন্ট্যাক্ট তৈরি করতে হবে এবং SOURCE_ID এর জন্য একটি ভ্যালু নিতে হবে।বিশেষ করে, প্রতিটি অ্যাকাউন্ট টাইপের জন্য সোর্স আইডি অবশ্যই অনন্য হতে হবে এবং সিঙ্ক জুড়ে স্থিতিশীল থাকা উচিত:
|
ContactsContract.Groups | GROUP_VISIBLE | "0" - এই গ্রুপের পরিচিতিগুলি অ্যান্ড্রয়েড অ্যাপ্লিকেশন UI-তে দৃশ্যমান হবে না। | এই কলামটি এমন সার্ভারগুলির সাথে সামঞ্জস্যের জন্য, যেগুলি ব্যবহারকারীকে নির্দিষ্ট গ্রুপের পরিচিতিগুলি গোপন করার অনুমতি দেয়। |
| "১" - এই গ্রুপের পরিচিতিগুলি অ্যাপ্লিকেশন UI-তে দৃশ্যমান হওয়ার অনুমতি রয়েছে। | |||
ContactsContract.Settings | UNGROUPED_VISIBLE | "0" - এই অ্যাকাউন্ট এবং অ্যাকাউন্টের ধরনের জন্য, যে পরিচিতিগুলি কোনো গ্রুপের অন্তর্ভুক্ত নয়, সেগুলি অ্যান্ড্রয়েড অ্যাপ্লিকেশন UI-এর কাছে অদৃশ্য থাকে। | ডিফল্টরূপে, কোনো কন্ট্যাক্টের র কন্ট্যাক্ট যদি কোনো গ্রুপের অন্তর্ভুক্ত না থাকে, তবে সেই কন্ট্যাক্টগুলো অদৃশ্য থাকে (একটি র কন্ট্যাক্টের গ্রুপ সদস্যপদ ContactsContract.CommonDataKinds.GroupMembership টেবিলের এক বা একাধিক ContactsContract.Data রো দ্বারা নির্দেশিত হয়)। একটি অ্যাকাউন্ট টাইপ এবং অ্যাকাউন্টের জন্য ContactsContract.Settings টেবিলের রো-তে এই ফ্ল্যাগটি সেট করার মাধ্যমে, আপনি গ্রুপবিহীন কন্ট্যাক্টগুলোকে দৃশ্যমান করতে বাধ্য করতে পারেন। এই ফ্ল্যাগটির একটি ব্যবহার হলো সেইসব সার্ভারের কন্ট্যাক্ট দেখানো, যেগুলো গ্রুপ ব্যবহার করে না। |
| "১" - এই অ্যাকাউন্ট এবং অ্যাকাউন্টের ধরনের জন্য, যেসব কন্ট্যাক্ট কোনো গ্রুপের অন্তর্ভুক্ত নয়, সেগুলো অ্যাপ্লিকেশন UI-তে দেখা যায়। | |||
ContactsContract.SyncState | (সকলে) | আপনার সিঙ্ক অ্যাডাপ্টারের মেটাডেটা সংরক্ষণ করতে এই টেবিলটি ব্যবহার করুন। | এই টেবিলের সাহায্যে আপনি সিঙ্ক অবস্থা এবং সিঙ্ক-সম্পর্কিত অন্যান্য ডেটা ডিভাইসে স্থায়ীভাবে সংরক্ষণ করতে পারেন। |
যোগাযোগ প্রদানকারীর অ্যাক্সেস
এই বিভাগে কন্টাক্টস প্রোভাইডার থেকে ডেটা অ্যাক্সেস করার নির্দেশিকা বর্ণনা করা হয়েছে, যেখানে নিম্নলিখিত বিষয়গুলির উপর আলোকপাত করা হয়েছে:
- সত্তা কোয়েরি।
- ব্যাচ পরিবর্তন।
- ইনটেন্টের মাধ্যমে তথ্য পুনরুদ্ধার এবং পরিবর্তন।
- ডেটার অখণ্ডতা।
সিঙ্ক অ্যাডাপ্টার থেকে পরিবর্তন করার বিষয়টি ‘কন্টাক্টস প্রোভাইডার সিঙ্ক অ্যাডাপ্টার’ বিভাগে আরও বিস্তারিতভাবে আলোচনা করা হয়েছে।
সত্তাগুলির কোয়েরি
যেহেতু কন্টাক্টস প্রোভাইডার টেবিলগুলো একটি হায়ারার্কিতে সাজানো থাকে, তাই প্রায়শই একটি রো এবং এর সাথে লিঙ্ক করা সমস্ত "চাইল্ড" রো পুনরুদ্ধার করা দরকারি হয়ে পড়ে। উদাহরণস্বরূপ, কোনো ব্যক্তির সমস্ত তথ্য প্রদর্শন করার জন্য, আপনি একটিমাত্র ContactsContract.Contacts রো-এর জন্য সমস্ত ContactsContract.RawContacts রো, অথবা একটিমাত্র ContactsContract.CommonDataKinds.Email রো-এর জন্য সমস্ত ContactsContract.RawContacts রো পুনরুদ্ধার করতে চাইতে পারেন। এই কাজটি সহজ করার জন্য, কন্টাক্টস প্রোভাইডার এনটিটি কনস্ট্রাক্ট প্রদান করে, যা টেবিলগুলোর মধ্যে ডাটাবেস জয়েনের মতো কাজ করে।
একটি এনটিটি হলো একটি টেবিলের মতো, যা তার প্যারেন্ট টেবিল এবং চাইল্ড টেবিল থেকে নির্বাচিত কলামগুলো দিয়ে গঠিত। যখন আপনি একটি এনটিটি কোয়েরি করেন, তখন আপনি এনটিটিটিতে উপলব্ধ কলামগুলোর উপর ভিত্তি করে একটি প্রজেকশন এবং সার্চ ক্রাইটেরিয়া সরবরাহ করেন। এর ফলাফল হলো একটি Cursor , যাতে পুনরুদ্ধার করা প্রতিটি চাইল্ড টেবিল রো-এর জন্য একটি করে রো থাকে। উদাহরণস্বরূপ, যদি আপনি একটি কন্ট্যাক্টের নাম এবং সেই নামের সমস্ত র কন্ট্যাক্টের জন্য ContactsContract.Contacts.Entity এবং সমস্ত ContactsContract.CommonDataKinds.Email রো কোয়েরি করেন, তাহলে আপনি প্রতিটি ContactsContract.CommonDataKinds.Email রো-এর জন্য একটি করে রো সম্বলিত একটি Cursor ফেরত পাবেন।
এনটিটি কোয়েরি সহজ করে। একটি এনটিটি ব্যবহার করে, আপনি প্রথমে প্যারেন্ট টেবিল থেকে একটি আইডি নিয়ে, এবং তারপর সেই আইডি দিয়ে চাইল্ড টেবিল কোয়েরি করার পরিবর্তে, কোনো একটি কন্ট্যাক্ট বা র কন্ট্যাক্টের সমস্ত ডেটা একবারে পুনরুদ্ধার করতে পারেন। এছাড়াও, কন্ট্যাক্টস প্রোভাইডার একটি এনটিটির বিরুদ্ধে কোয়েরি একটিমাত্র ট্রানজ্যাকশনে প্রসেস করে, যা নিশ্চিত করে যে পুনরুদ্ধার করা ডেটা অভ্যন্তরীণভাবে সামঞ্জস্যপূর্ণ।
দ্রষ্টব্য: একটি এনটিটিতে সাধারণত প্যারেন্ট এবং চাইল্ড টেবিলের সমস্ত কলাম থাকে না। আপনি যদি এনটিটির কলাম নামের কনস্ট্যান্ট তালিকায় নেই এমন কোনো কলামের নাম নিয়ে কাজ করার চেষ্টা করেন, তাহলে আপনি একটি Exception পাবেন।
নিম্নলিখিত কোড স্নিপেটটি দেখায় কিভাবে একটি কন্ট্যাক্টের সমস্ত র কন্ট্যাক্ট রো পুনরুদ্ধার করতে হয়। এই স্নিপেটটি একটি বৃহত্তর অ্যাপ্লিকেশনের অংশ, যেটিতে "main" এবং "detail" নামে দুটি অ্যাক্টিভিটি রয়েছে। মেইন অ্যাক্টিভিটি কন্ট্যাক্ট রো-গুলির একটি তালিকা দেখায়; যখন ব্যবহারকারী একটি নির্বাচন করেন, তখন অ্যাক্টিভিটিটি তার আইডি ডিটেইল অ্যাক্টিভিটিতে পাঠিয়ে দেয়। ডিটেইল অ্যাক্টিভিটি নির্বাচিত কন্ট্যাক্টের সাথে যুক্ত সমস্ত র কন্ট্যাক্ট থেকে সমস্ত ডেটা রো প্রদর্শন করার জন্য ContactsContract.Contacts.Entity ব্যবহার করে।
এই কোড অংশটি 'detail' অ্যাক্টিভিটি থেকে নেওয়া হয়েছে:
কোটলিন
...
    /*
     * Appends the entity path to the URI. In the case of the Contacts Provider, the
     * expected URI is content://com.google.contacts/#/entity (# is the ID value).
     */
    contactUri = Uri.withAppendedPath(
            contactUri,
            ContactsContract.Contacts.Entity.CONTENT_DIRECTORY
    )

    // Initializes the loader identified by LOADER_ID.
    loaderManager.initLoader(
            LOADER_ID,  // The identifier of the loader to initialize
            null,       // Arguments for the loader (in this case, none)
            this        // The context of the activity
    )

    // Creates a new cursor adapter to attach to the list view
    cursorAdapter = SimpleCursorAdapter(
            this,                       // the context of the activity
            R.layout.detail_list_item,  // the view item containing the detail widgets
            mCursor,                    // the backing cursor
            fromColumns,               // the columns in the cursor that provide the data
            toViews,                   // the views in the view item that display the data
            0)                          // flags

    // Sets the ListView's backing adapter.
    rawContactList.adapter = cursorAdapter
...
override fun onCreateLoader(id: Int, args: Bundle?): Loader<Cursor> {
    /*
     * Sets the columns to retrieve.
     * RAW_CONTACT_ID is included to identify the raw contact associated with the data row.
     * DATA1 contains the first column in the data row (usually the most important one).
     * MIMETYPE indicates the type of data in the data row.
     */
    val projection: Array<String> = arrayOf(
            ContactsContract.Contacts.Entity.RAW_CONTACT_ID,
            ContactsContract.Contacts.Entity.DATA1,
            ContactsContract.Contacts.Entity.MIMETYPE
    )

    /*
     * Sorts the retrieved cursor by raw contact id, to keep all data rows for a single raw
     * contact collated together.
     */
    val sortOrder = "${ContactsContract.Contacts.Entity.RAW_CONTACT_ID} ASC"

    /*
     * Returns a new CursorLoader. The arguments are similar to
     * ContentResolver.query(), except for the Context argument, which supplies the location of
     * the ContentResolver to use.
     */
    return CursorLoader(
            applicationContext, // The activity's context
            contactUri,        // The entity content URI for a single contact
            projection,         // The columns to retrieve
            null,               // Retrieve all the raw contacts and their data rows.
            null,               //
            sortOrder           // Sort by the raw contact ID.
    )
}
জাভা
...
    /*
     * Appends the entity path to the URI. In the case of the Contacts Provider, the
     * expected URI is content://com.google.contacts/#/entity (# is the ID value).
     */
    contactUri = Uri.withAppendedPath(
            contactUri,
            ContactsContract.Contacts.Entity.CONTENT_DIRECTORY);

    // Initializes the loader identified by LOADER_ID.
    getLoaderManager().initLoader(
            LOADER_ID,  // The identifier of the loader to initialize
            null,       // Arguments for the loader (in this case, none)
            this);      // The context of the activity

    // Creates a new cursor adapter to attach to the list view
    cursorAdapter = new SimpleCursorAdapter(
            this,                        // the context of the activity
            R.layout.detail_list_item,   // the view item containing the detail widgets
            mCursor,                     // the backing cursor
            fromColumns,                // the columns in the cursor that provide the data
            toViews,                    // the views in the view item that display the data
            0);                          // flags

    // Sets the ListView's backing adapter.
    rawContactList.setAdapter(cursorAdapter);
...
@Override
public Loader<Cursor> onCreateLoader(int id, Bundle args) {

    /*
     * Sets the columns to retrieve.
     * RAW_CONTACT_ID is included to identify the raw contact associated with the data row.
     * DATA1 contains the first column in the data row (usually the most important one).
     * MIMETYPE indicates the type of data in the data row.
     */
    String[] projection =
        {
            ContactsContract.Contacts.Entity.RAW_CONTACT_ID,
            ContactsContract.Contacts.Entity.DATA1,
            ContactsContract.Contacts.Entity.MIMETYPE
        };

    /*
     * Sorts the retrieved cursor by raw contact id, to keep all data rows for a single raw
     * contact collated together.
     */
    String sortOrder =
            ContactsContract.Contacts.Entity.RAW_CONTACT_ID +
            " ASC";

    /*
     * Returns a new CursorLoader. The arguments are similar to
     * ContentResolver.query(), except for the Context argument, which supplies the location of
     * the ContentResolver to use.
     */
    return new CursorLoader(
            getApplicationContext(),  // The activity's context
            contactUri,              // The entity content URI for a single contact
            projection,               // The columns to retrieve
            null,                     // Retrieve all the raw contacts and their data rows.
            null,                     //
            sortOrder);               // Sort by the raw contact ID.
}
লোড শেষ হলে, LoaderManager onLoadFinished() মেথডে একটি কলব্যাক পাঠায়। এই মেথডের আগত আর্গুমেন্টগুলোর মধ্যে একটি হলো কোয়েরির ফলাফলসহ একটি Cursor । আপনার নিজের অ্যাপে, আপনি এই Cursor থেকে ডেটা নিয়ে তা প্রদর্শন করতে বা পরবর্তীতে ব্যবহার করতে পারেন।
ব্যাচ পরিবর্তন
যখনই সম্ভব, Contacts Provider-এ ডেটা ইনসার্ট, আপডেট এবং ডিলিট করার জন্য "ব্যাচ মোড" ব্যবহার করা উচিত। এর জন্য ContentProviderOperation অবজেক্টের একটি ArrayList তৈরি করে applyBatch() কল করতে হবে। যেহেতু Contacts Provider একটি applyBatch() ফাংশনের সমস্ত অপারেশন একটিমাত্র ট্রানজ্যাকশনে সম্পন্ন করে, তাই আপনার করা পরিবর্তনগুলো কন্ট্যাক্টস রিপোজিটরিকে কখনোই একটি অসামঞ্জস্যপূর্ণ অবস্থায় ফেলবে না। ব্যাচ মডিফিকেশন একই সাথে একটি র কন্ট্যাক্ট এবং তার বিস্তারিত ডেটা ইনসার্ট করার সুবিধাও দেয়।
দ্রষ্টব্য: একটিমাত্র র কন্ট্যাক্ট পরিবর্তন করতে, আপনার অ্যাপে পরিবর্তনটি পরিচালনা করার পরিবর্তে ডিভাইসের কন্ট্যাক্টস অ্যাপ্লিকেশনে একটি ইন্টেন্ট পাঠানোর কথা বিবেচনা করুন। এটি কীভাবে করতে হয় তা "ইন্টেন্টের মাধ্যমে পুনরুদ্ধার এবং পরিবর্তন" বিভাগে আরও বিস্তারিতভাবে বর্ণনা করা হয়েছে।
ফলন পয়েন্ট
অনেকগুলো অপারেশন সম্বলিত একটি ব্যাচ মডিফিকেশন অন্যান্য প্রসেসকে ব্লক করতে পারে, যার ফলে ব্যবহারকারীর সামগ্রিক অভিজ্ঞতা খারাপ হয়। আপনি যে সমস্ত মডিফিকেশন করতে চান সেগুলোকে যথাসম্ভব কম সংখ্যক পৃথক লিস্টে সংগঠিত করতে এবং একই সাথে সেগুলোকে সিস্টেম ব্লক করা থেকে বিরত রাখতে, আপনার এক বা একাধিক অপারেশনের জন্য ইয়েল্ড পয়েন্ট সেট করা উচিত। একটি ইয়েল্ড পয়েন্ট হলো একটি ContentProviderOperation অবজেক্ট যার isYieldAllowed() ভ্যালুটি true সেট করা থাকে। যখন Contacts Provider একটি ইয়েল্ড পয়েন্টের সম্মুখীন হয়, তখন এটি অন্যান্য প্রসেসকে চলার সুযোগ দেওয়ার জন্য তার কাজ থামিয়ে দেয় এবং বর্তমান ট্রানজ্যাকশনটি বন্ধ করে দেয়। যখন প্রোভাইডারটি আবার চালু হয়, তখন এটি ArrayList এর পরবর্তী অপারেশনটি নিয়ে কাজ চালিয়ে যায় এবং একটি নতুন ট্রানজ্যাকশন শুরু করে।
ইল্ড পয়েন্টের কারণে applyBatch() ফাংশনের প্রতিটি কলে একাধিক ট্রানজ্যাকশন সম্পন্ন হয়। এই কারণে, সম্পর্কিত সারিগুলোর একটি সেটের জন্য শেষ অপারেশনটিতে একটি ইল্ড পয়েন্ট সেট করা উচিত। উদাহরণস্বরূপ, একটি সেটের শেষ অপারেশনের জন্য আপনার একটি ইল্ড পয়েন্ট সেট করা উচিত, যা একটি র কন্ট্যাক্ট সারি এবং এর সাথে সম্পর্কিত ডেটা সারিগুলো যোগ করে; অথবা একটিমাত্র কন্ট্যাক্টের সাথে সম্পর্কিত সারিগুলোর সেটের শেষ অপারেশনের জন্য।
ইল্ড পয়েন্টও অ্যাটমিক অপারেশনের একটি একক। দুটি ইল্ড পয়েন্টের মধ্যেকার সমস্ত অ্যাক্সেস একটি একক হিসেবে সফল বা ব্যর্থ হবে। আপনি যদি কোনো ইল্ড পয়েন্ট সেট না করেন, তবে ক্ষুদ্রতম অ্যাটমিক অপারেশনটি হলো অপারেশনগুলোর সম্পূর্ণ ব্যাচ। আপনি যদি ইল্ড পয়েন্ট ব্যবহার করেন, তবে আপনি অপারেশনগুলোকে সিস্টেমের পারফরম্যান্সের অবনতি ঘটানো থেকে বিরত রাখতে পারেন এবং একই সাথে এটিও নিশ্চিত করতে পারেন যে অপারেশনগুলোর একটি উপসেট অ্যাটমিক হবে।
পরিবর্তনের পূর্ববর্তী রেফারেন্স
যখন আপনি ContentProviderOperation অবজেক্টের একটি সেট হিসাবে একটি নতুন র কন্ট্যাক্ট রো এবং এর সাথে যুক্ত ডেটা রো সন্নিবেশ করেন, তখন আপনাকে RAW_CONTACT_ID ভ্যালু হিসাবে র কন্ট্যাক্টের _ID ভ্যালুটি প্রবেশ করিয়ে ডেটা রো-গুলোকে র কন্ট্যাক্ট রো-এর সাথে লিঙ্ক করতে হয়। কিন্তু, ডেটা রো-এর জন্য ContentProviderOperation তৈরি করার সময় এই ভ্যালুটি উপলব্ধ থাকে না, কারণ আপনি তখনও র কন্ট্যাক্ট রো-এর জন্য ContentProviderOperation প্রয়োগ করেননি। এর একটি সমাধান হিসাবে, ContentProviderOperation.Builder ক্লাসে withValueBackReference() মেথডটি রয়েছে। এই মেথডটি আপনাকে পূর্ববর্তী কোনো অপারেশনের ফলাফল দিয়ে একটি কলাম সন্নিবেশ বা পরিবর্তন করার সুযোগ দেয়।
withValueBackReference() ` মেথডটির দুটি আর্গুমেন্ট রয়েছে:
-
key - একটি কী-ভ্যালু পেয়ারের কী। এই আর্গুমেন্টের ভ্যালু হবে সেই টেবিলের একটি কলামের নাম, যা আপনি পরিবর্তন করছেন।
-
previousResult -
applyBatch()থেকে প্রাপ্তContentProviderResultঅবজেক্টের অ্যারেতে থাকা কোনো ভ্যালুর ০-ভিত্তিক ইন্ডেক্স। ব্যাচ অপারেশনগুলো প্রয়োগ করার সময়, প্রতিটি অপারেশনের ফলাফল একটি মধ্যবর্তী রেজাল্ট অ্যারেতে সংরক্ষিত হয়।previousResultভ্যালুটি হলো এই ফলাফলগুলোর মধ্যে একটির ইন্ডেক্স, যা ভ্যালুkeyসাথে পুনরুদ্ধার ও সংরক্ষণ করা হয়। এটি আপনাকে একটি নতুন র কন্ট্যাক্ট রেকর্ড ইনসার্ট করে তার_IDভ্যালুটি ফেরত পেতে এবং পরবর্তীতে একটিContactsContract.Dataরো যোগ করার সময় সেই ভ্যালুটির একটি "ব্যাক রেফারেন্স" তৈরি করতে সাহায্য করে।আপনি যখন প্রথমবার
applyBatch()কল করেন, তখন সম্পূর্ণ রেজাল্ট অ্যারেটি তৈরি হয়, যার সাইজ আপনার দেওয়াContentProviderOperationঅবজেক্টেরArrayListএর সাইজের সমান হয়। তবে, রেজাল্ট অ্যারের সমস্ত এলিমেন্টnullসেট করা থাকে, এবং যদি আপনি এমন কোনো অপারেশনের রেজাল্টে ব্যাক রেফারেন্স করার চেষ্টা করেন যা এখনও প্রয়োগ করা হয়নি,withValueBackReference()একটিExceptionথ্রো করে।
নিম্নলিখিত কোড স্নিপেটগুলিতে দেখানো হয়েছে কীভাবে ব্যাচ আকারে একটি নতুন র কন্ট্যাক্ট এবং ডেটা ইনসার্ট করতে হয়। এগুলিতে এমন কোড অন্তর্ভুক্ত রয়েছে যা একটি ইয়েল্ড পয়েন্ট স্থাপন করে এবং একটি ব্যাক রেফারেন্স ব্যবহার করে।
প্রথম কোড স্নিপেটটি UI থেকে কন্ট্যাক্ট ডেটা সংগ্রহ করে। এই পর্যায়ে, ব্যবহারকারী ইতিমধ্যেই সেই অ্যাকাউন্টটি নির্বাচন করে ফেলেছেন যার জন্য নতুন র কন্ট্যাক্টটি যোগ করা হবে।
কোটলিন
// Creates a contact entry from the current UI values, using the currently-selected account.
private fun createContactEntry() {
    /*
     * Gets values from the UI
     */
    val name = contactNameEditText.text.toString()
    val phone = contactPhoneEditText.text.toString()
    val email = contactEmailEditText.text.toString()

    val phoneType: String = contactPhoneTypes[mContactPhoneTypeSpinner.selectedItemPosition]

    val emailType: String = contactEmailTypes[mContactEmailTypeSpinner.selectedItemPosition]
জাভা
// Creates a contact entry from the current UI values, using the currently-selected account.
protected void createContactEntry() {
    /*
     * Gets values from the UI
     */
    String name = contactNameEditText.getText().toString();
    String phone = contactPhoneEditText.getText().toString();
    String email = contactEmailEditText.getText().toString();

    int phoneType = contactPhoneTypes.get(
            contactPhoneTypeSpinner.getSelectedItemPosition());

    int emailType = contactEmailTypes.get(
            contactEmailTypeSpinner.getSelectedItemPosition());
পরবর্তী কোড স্নিপেটটি ContactsContract.RawContacts টেবিলে কাঁচা কন্টাক্ট সারিটি সন্নিবেশ করার জন্য একটি অপারেশন তৈরি করে:
কোটলিন
    /*
     * Prepares the batch operation for inserting a new raw contact and its data. Even if
     * the Contacts Provider does not have any data for this person, you can't add a Contact,
     * only a raw contact. The Contacts Provider will then add a Contact automatically.
     */

    // Creates a new array of ContentProviderOperation objects.
    val ops = arrayListOf<ContentProviderOperation>()

    /*
     * Creates a new raw contact with its account type (server type) and account name
     * (user's account). Remember that the display name is not stored in this row, but in a
     * StructuredName data row. No other data is required.
     */
    var op: ContentProviderOperation.Builder =
            ContentProviderOperation.newInsert(ContactsContract.RawContacts.CONTENT_URI)
                    .withValue(ContactsContract.RawContacts.ACCOUNT_TYPE, selectedAccount.name)
                    .withValue(ContactsContract.RawContacts.ACCOUNT_NAME, selectedAccount.type)

    // Builds the operation and adds it to the array of operations
    ops.add(op.build())
জাভা
    /*
     * Prepares the batch operation for inserting a new raw contact and its data. Even if
     * the Contacts Provider does not have any data for this person, you can't add a Contact,
     * only a raw contact. The Contacts Provider will then add a Contact automatically.
     */

     // Creates a new array of ContentProviderOperation objects.
    ArrayList<ContentProviderOperation> ops =
            new ArrayList<ContentProviderOperation>();

    /*
     * Creates a new raw contact with its account type (server type) and account name
     * (user's account). Remember that the display name is not stored in this row, but in a
     * StructuredName data row. No other data is required.
     */
    ContentProviderOperation.Builder op =
            ContentProviderOperation.newInsert(ContactsContract.RawContacts.CONTENT_URI)
            .withValue(ContactsContract.RawContacts.ACCOUNT_TYPE, selectedAccount.getType())
            .withValue(ContactsContract.RawContacts.ACCOUNT_NAME, selectedAccount.getName());

    // Builds the operation and adds it to the array of operations
    ops.add(op.build());
এরপরে, কোডটি ডিসপ্লে নেম, ফোন এবং ইমেইলের জন্য ডেটা সারি তৈরি করে।
প্রতিটি অপারেশন বিল্ডার অবজেক্ট RAW_CONTACT_ID পেতে withValueBackReference() ব্যবহার করে। এই রেফারেন্সটি প্রথম অপারেশনের ContentProviderResult অবজেক্টকে নির্দেশ করে, যা র কন্টাক্ট রো যোগ করে এবং এর নতুন _ID ভ্যালুটি রিটার্ন করে। ফলে, প্রতিটি ডেটা রো তার RAW_CONTACT_ID দ্বারা স্বয়ংক্রিয়ভাবে নতুন ContactsContract.RawContacts রো-এর সাথে লিঙ্কযুক্ত হয়ে যায়, যার অন্তর্ভুক্ত এটি।
The ContentProviderOperation.Builder object that adds the email row is flagged with withYieldAllowed() , which sets a yield point:
কোটলিন
    // Creates the display name for the new raw contact, as a StructuredName data row.
    op = ContentProviderOperation.newInsert(ContactsContract.Data.CONTENT_URI)
            /*
             * withValueBackReference sets the value of the first argument to the value of
             * the ContentProviderResult indexed by the second argument. In this particular
             * call, the raw contact ID column of the StructuredName data row is set to the
             * value of the result returned by the first operation, which is the one that
             * actually adds the raw contact row.
             */
            .withValueBackReference(ContactsContract.Data.RAW_CONTACT_ID, 0)

            // Sets the data row's MIME type to StructuredName
            .withValue(ContactsContract.Data.MIMETYPE,
                    ContactsContract.CommonDataKinds.StructuredName.CONTENT_ITEM_TYPE)

            // Sets the data row's display name to the name in the UI.
            .withValue(ContactsContract.CommonDataKinds.StructuredName.DISPLAY_NAME, name)

    // Builds the operation and adds it to the array of operations
    ops.add(op.build())

    // Inserts the specified phone number and type as a Phone data row
    op = ContentProviderOperation.newInsert(ContactsContract.Data.CONTENT_URI)
            /*
             * Sets the value of the raw contact id column to the new raw contact ID returned
             * by the first operation in the batch.
             */
            .withValueBackReference(ContactsContract.Data.RAW_CONTACT_ID, 0)

            // Sets the data row's MIME type to Phone
            .withValue(ContactsContract.Data.MIMETYPE,
                    ContactsContract.CommonDataKinds.Phone.CONTENT_ITEM_TYPE)

            // Sets the phone number and type
            .withValue(ContactsContract.CommonDataKinds.Phone.NUMBER, phone)
            .withValue(ContactsContract.CommonDataKinds.Phone.TYPE, phoneType)

    // Builds the operation and adds it to the array of operations
    ops.add(op.build())

    // Inserts the specified email and type as a Phone data row
    op = ContentProviderOperation.newInsert(ContactsContract.Data.CONTENT_URI)
            /*
             * Sets the value of the raw contact id column to the new raw contact ID returned
             * by the first operation in the batch.
             */
            .withValueBackReference(ContactsContract.Data.RAW_CONTACT_ID, 0)

            // Sets the data row's MIME type to Email
            .withValue(ContactsContract.Data.MIMETYPE,
                    ContactsContract.CommonDataKinds.Email.CONTENT_ITEM_TYPE)

            // Sets the email address and type
            .withValue(ContactsContract.CommonDataKinds.Email.ADDRESS, email)
            .withValue(ContactsContract.CommonDataKinds.Email.TYPE, emailType)

    /*
     * Demonstrates a yield point. At the end of this insert, the batch operation's thread
     * will yield priority to other threads. Use after every set of operations that affect a
     * single contact, to avoid degrading performance.
     */
    op.withYieldAllowed(true)

    // Builds the operation and adds it to the array of operations
    ops.add(op.build())
জাভা
    // Creates the display name for the new raw contact, as a StructuredName data row.
    op =
            ContentProviderOperation.newInsert(ContactsContract.Data.CONTENT_URI)
            /*
             * withValueBackReference sets the value of the first argument to the value of
             * the ContentProviderResult indexed by the second argument. In this particular
             * call, the raw contact ID column of the StructuredName data row is set to the
             * value of the result returned by the first operation, which is the one that
             * actually adds the raw contact row.
             */
            .withValueBackReference(ContactsContract.Data.RAW_CONTACT_ID, 0)

            // Sets the data row's MIME type to StructuredName
            .withValue(ContactsContract.Data.MIMETYPE,
                    ContactsContract.CommonDataKinds.StructuredName.CONTENT_ITEM_TYPE)

            // Sets the data row's display name to the name in the UI.
            .withValue(ContactsContract.CommonDataKinds.StructuredName.DISPLAY_NAME, name);

    // Builds the operation and adds it to the array of operations
    ops.add(op.build());

    // Inserts the specified phone number and type as a Phone data row
    op =
            ContentProviderOperation.newInsert(ContactsContract.Data.CONTENT_URI)
            /*
             * Sets the value of the raw contact id column to the new raw contact ID returned
             * by the first operation in the batch.
             */
            .withValueBackReference(ContactsContract.Data.RAW_CONTACT_ID, 0)

            // Sets the data row's MIME type to Phone
            .withValue(ContactsContract.Data.MIMETYPE,
                    ContactsContract.CommonDataKinds.Phone.CONTENT_ITEM_TYPE)

            // Sets the phone number and type
            .withValue(ContactsContract.CommonDataKinds.Phone.NUMBER, phone)
            .withValue(ContactsContract.CommonDataKinds.Phone.TYPE, phoneType);

    // Builds the operation and adds it to the array of operations
    ops.add(op.build());

    // Inserts the specified email and type as a Phone data row
    op =
            ContentProviderOperation.newInsert(ContactsContract.Data.CONTENT_URI)
            /*
             * Sets the value of the raw contact id column to the new raw contact ID returned
             * by the first operation in the batch.
             */
            .withValueBackReference(ContactsContract.Data.RAW_CONTACT_ID, 0)

            // Sets the data row's MIME type to Email
            .withValue(ContactsContract.Data.MIMETYPE,
                    ContactsContract.CommonDataKinds.Email.CONTENT_ITEM_TYPE)

            // Sets the email address and type
            .withValue(ContactsContract.CommonDataKinds.Email.ADDRESS, email)
            .withValue(ContactsContract.CommonDataKinds.Email.TYPE, emailType);

    /*
     * Demonstrates a yield point. At the end of this insert, the batch operation's thread
     * will yield priority to other threads. Use after every set of operations that affect a
     * single contact, to avoid degrading performance.
     */
    op.withYieldAllowed(true);

    // Builds the operation and adds it to the array of operations
    ops.add(op.build());
The last snippet shows the call to applyBatch() that inserts the new raw contact and data rows.
কোটলিন
    // Ask the Contacts Provider to create a new contact
    Log.d(TAG, "Selected account: ${mSelectedAccount.name} (${mSelectedAccount.type})")
    Log.d(TAG, "Creating contact: $name")

    /*
     * Applies the array of ContentProviderOperation objects in batch. The results are
     * discarded.
     */
    try {
        contentResolver.applyBatch(ContactsContract.AUTHORITY, ops)
    } catch (e: Exception) {
        // Display a warning
        val txt: String = getString(R.string.contactCreationFailure)
        Toast.makeText(applicationContext, txt, Toast.LENGTH_SHORT).show()

        // Log exception
        Log.e(TAG, "Exception encountered while inserting contact: $e")
    }
}
জাভা
    // Ask the Contacts Provider to create a new contact
    Log.d(TAG,"Selected account: " + selectedAccount.getName() + " (" +
            selectedAccount.getType() + ")");
    Log.d(TAG,"Creating contact: " + name);

    /*
     * Applies the array of ContentProviderOperation objects in batch. The results are
     * discarded.
     */
    try {

            getContentResolver().applyBatch(ContactsContract.AUTHORITY, ops);
    } catch (Exception e) {

            // Display a warning
            Context ctx = getApplicationContext();

            CharSequence txt = getString(R.string.contactCreationFailure);
            int duration = Toast.LENGTH_SHORT;
            Toast toast = Toast.makeText(ctx, txt, duration);
            toast.show();

            // Log exception
            Log.e(TAG, "Exception encountered while inserting contact: " + e);
    }
}
Batch operations also allow you to implement optimistic concurrency control , a method of applying modification transactions without having to lock the underlying repository. To use this method, you apply the transaction and then check for other modifications that may have been made at the same time. If you find an inconsistent modification has occurred, you roll back your transaction and retry it.
Optimistic concurrency control is useful for a mobile device, where there's only one user at a time, and simultaneous accesses to a data repository are rare. Because locking isn't used, no time is wasted on setting locks or waiting for other transactions to release their locks.
To use optimistic concurrency control while updating a single ContactsContract.RawContacts row, follow these steps:
- Retrieve the raw contact's
VERSIONcolumn along with the other data you retrieve. - Create a
ContentProviderOperation.Builderobject suitable for enforcing a constraint, using the methodnewAssertQuery(Uri). For the content URI, useRawContacts.CONTENT_URIwith the raw contact's_IDappended to it. - For the
ContentProviderOperation.Builderobject, callwithValue()to compare theVERSIONcolumn to the version number you just retrieved. - For the same
ContentProviderOperation.Builder, callwithExpectedCount()to ensure that only one row is tested by this assertion. - Call
build()to create theContentProviderOperationobject, then add this object as the first object in theArrayListthat you pass toapplyBatch(). - Apply the batch transaction.
If the raw contact row is updated by another operation between the time you read the row and the time you attempt to modify it, the "assert" ContentProviderOperation will fail, and the entire batch of operations will be backed out. You can then choose to retry the batch or take some other action.
The following snippet demonstrates how to create an "assert" ContentProviderOperation after querying for a single raw contact using a CursorLoader :
কোটলিন
/*
 * The application uses CursorLoader to query the raw contacts table. The system calls this method
 * when the load is finished.
 */
override fun onLoadFinished(loader: Loader<Cursor>, cursor: Cursor) {
    // Gets the raw contact's _ID and VERSION values
    rawContactID = cursor.getLong(cursor.getColumnIndex(BaseColumns._ID))
    mVersion = cursor.getInt(cursor.getColumnIndex(SyncColumns.VERSION))
}

...

// Sets up a Uri for the assert operation
val rawContactUri: Uri = ContentUris.withAppendedId(
        ContactsContract.RawContacts.CONTENT_URI,
        rawContactID
)

// Creates a builder for the assert operation
val assertOp: ContentProviderOperation.Builder =
        ContentProviderOperation.newAssertQuery(rawContactUri).apply {
            // Adds the assertions to the assert operation: checks the version
            withValue(SyncColumns.VERSION, mVersion)

            // and count of rows tested
            withExpectedCount(1)
        }

// Creates an ArrayList to hold the ContentProviderOperation objects
val ops = arrayListOf<ContentProviderOperation>()

ops.add(assertOp.build())

// You would add the rest of your batch operations to "ops" here

...

// Applies the batch. If the assert fails, an Exception is thrown
try {
    val results: Array<ContentProviderResult> = contentResolver.applyBatch(AUTHORITY, ops)
} catch (e: OperationApplicationException) {
    // Actions you want to take if the assert operation fails go here
}
জাভা
/*
 * The application uses CursorLoader to query the raw contacts table. The system calls this method
 * when the load is finished.
 */
public void onLoadFinished(Loader<Cursor> loader, Cursor cursor) {

    // Gets the raw contact's _ID and VERSION values
    rawContactID = cursor.getLong(cursor.getColumnIndex(BaseColumns._ID));
    mVersion = cursor.getInt(cursor.getColumnIndex(SyncColumns.VERSION));
}

...

// Sets up a Uri for the assert operation
Uri rawContactUri = ContentUris.withAppendedId(RawContacts.CONTENT_URI, rawContactID);

// Creates a builder for the assert operation
ContentProviderOperation.Builder assertOp = ContentProviderOperation.newAssertQuery(rawContactUri);

// Adds the assertions to the assert operation: checks the version and count of rows tested
assertOp.withValue(SyncColumns.VERSION, mVersion);
assertOp.withExpectedCount(1);

// Creates an ArrayList to hold the ContentProviderOperation objects
ArrayList ops = new ArrayList<ContentProviderOperation>;

ops.add(assertOp.build());

// You would add the rest of your batch operations to "ops" here

...

// Applies the batch. If the assert fails, an Exception is thrown
try
    {
        ContentProviderResult[] results =
                getContentResolver().applyBatch(AUTHORITY, ops);

    } catch (OperationApplicationException e) {

        // Actions you want to take if the assert operation fails go here
    }
Retrieval and modification with intents
Sending an intent to the device's contacts application allows you to access the Contacts Provider indirectly. The intent starts the device's contacts application UI, in which users can do contacts-related work. With this type of access, users can:
- Pick a contact from a list and have it returned to your app for further work.
- Edit an existing contact's data.
- Insert a new raw contact for any of their accounts.
- Delete a contact or contacts data.
If the user is inserting or updating data, you can collect the data first and send it as part of the intent.
When you use intents to access the Contacts Provider via the device's contacts application, you don't have to write your own UI or code for accessing the provider. You also don't have to request permission to read or write to the provider. The device's contacts application can delegate read permission for a contact to you, and because you're making modifications to the provider through another application, you don't have to have write permissions.
The general process of sending an intent to access a provider is described in detail in the Content Provider basics guide in the section "Data access via intents." The action, MIME type, and data values you use for the available tasks are summarized in Table 4, while the extras values you can use with putExtra() are listed in the reference documentation for ContactsContract.Intents.Insert :
Table 4. Contacts Provider Intents.
| কাজ | পদক্ষেপ | ডেটা | MIME type | নোট |
|---|---|---|---|---|
| Pick a contact from a list | ACTION_PICK | One of:
| ব্যবহৃত নয় | Displays a list of raw contacts or a list of data from a raw contact, depending on the content URI type you supply. Call |
| Insert a new raw contact | Insert.ACTION | প্রযোজ্য নয় | RawContacts.CONTENT_TYPE , MIME type for a set of raw contacts. | Displays the device's contacts application's Add Contact screen. The extras values you add to the intent are displayed. If sent with startActivityForResult() , the content URI of the newly-added raw contact is passed back to your activity's onActivityResult() callback method in the Intent argument, in the "data" field. To get the value, call getData() . |
| Edit a contact | ACTION_EDIT | CONTENT_LOOKUP_URI for the contact. The editor activity will allow the user to edit any of the data associated with this contact. | Contacts.CONTENT_ITEM_TYPE , a single contact. | Displays the Edit Contact screen in the contacts application. The extras values you add to the intent are displayed. When the user clicks Done to save the edits, your activity returns to the foreground. |
| Display a picker that can also add data. | ACTION_INSERT_OR_EDIT | প্রযোজ্য নয় | CONTENT_ITEM_TYPE | This intent always displays the contacts app's picker screen. The user can either pick a contact to edit, or add a new contact. Either the edit or the add screen appears, depending on the user's choice, and the extras data you pass in the intent is displayed. If your app displays contact data such as an email or phone number, use this intent to allow the user to add the data to an existing contact. contact, Note: There's no need to send a name value in this intent's extras, because the user always picks an existing name or adds a new one. Moreover, if you send a name, and the user chooses to do an edit, the contacts app will display the name you send, overwriting the previous value. If the user doesn't notice this and saves the edit, the old value is lost. |
The device's contacts app doesn't allow you to delete a raw contact or any of its data with an intent. Instead, to delete a raw contact, use ContentResolver.delete() or ContentProviderOperation.newDelete() .
The following snippet shows how to construct and send an intent that inserts a new raw contact and data:
কোটলিন
// Gets values from the UI
val name = contactNameEditText.text.toString()
val phone = contactPhoneEditText.text.toString()
val email = contactEmailEditText.text.toString()

val company = companyName.text.toString()
val jobtitle = jobTitle.text.toString()

/*
 * Demonstrates adding data rows as an array list associated with the DATA key
 */

// Defines an array list to contain the ContentValues objects for each row
val contactData = arrayListOf<ContentValues>()

/*
 * Defines the raw contact row
 */

// Sets up the row as a ContentValues object
val rawContactRow = ContentValues().apply {
    // Adds the account type and name to the row
    put(ContactsContract.RawContacts.ACCOUNT_TYPE, selectedAccount.type)
    put(ContactsContract.RawContacts.ACCOUNT_NAME, selectedAccount.name)
}

// Adds the row to the array
contactData.add(rawContactRow)

/*
 * Sets up the phone number data row
 */

// Sets up the row as a ContentValues object
val phoneRow = ContentValues().apply {
    // Specifies the MIME type for this data row (all data rows must be marked by their type)
    put(ContactsContract.Data.MIMETYPE,ContactsContract.CommonDataKinds.Phone.CONTENT_ITEM_TYPE)

    // Adds the phone number and its type to the row
    put(ContactsContract.CommonDataKinds.Phone.NUMBER, phone)
}

// Adds the row to the array
contactData.add(phoneRow)

/*
 * Sets up the email data row
 */

// Sets up the row as a ContentValues object
val emailRow = ContentValues().apply {
    // Specifies the MIME type for this data row (all data rows must be marked by their type)
    put(ContactsContract.Data.MIMETYPE, ContactsContract.CommonDataKinds.Email.CONTENT_ITEM_TYPE)

    // Adds the email address and its type to the row
    put(ContactsContract.CommonDataKinds.Email.ADDRESS, email)
}

// Adds the row to the array
contactData.add(emailRow)

// Creates a new intent for sending to the device's contacts application
val insertIntent = Intent(ContactsContract.Intents.Insert.ACTION).apply {
    // Sets the MIME type to the one expected by the insertion activity
    type = ContactsContract.RawContacts.CONTENT_TYPE

    // Sets the new contact name
    putExtra(ContactsContract.Intents.Insert.NAME, name)

    // Sets the new company and job title
    putExtra(ContactsContract.Intents.Insert.COMPANY, company)
    putExtra(ContactsContract.Intents.Insert.JOB_TITLE, jobtitle)

    /*
    * Adds the array to the intent's extras. It must be a parcelable object in order to
    * travel between processes. The device's contacts app expects its key to be
    * Intents.Insert.DATA
    */
    putParcelableArrayListExtra(ContactsContract.Intents.Insert.DATA, contactData)
}

// Send out the intent to start the device's contacts app in its add contact activity.
startActivity(insertIntent)
জাভা
// Gets values from the UI
String name = contactNameEditText.getText().toString();
String phone = contactPhoneEditText.getText().toString();
String email = contactEmailEditText.getText().toString();

String company = companyName.getText().toString();
String jobtitle = jobTitle.getText().toString();

// Creates a new intent for sending to the device's contacts application
Intent insertIntent = new Intent(ContactsContract.Intents.Insert.ACTION);

// Sets the MIME type to the one expected by the insertion activity
insertIntent.setType(ContactsContract.RawContacts.CONTENT_TYPE);

// Sets the new contact name
insertIntent.putExtra(ContactsContract.Intents.Insert.NAME, name);

// Sets the new company and job title
insertIntent.putExtra(ContactsContract.Intents.Insert.COMPANY, company);
insertIntent.putExtra(ContactsContract.Intents.Insert.JOB_TITLE, jobtitle);

/*
 * Demonstrates adding data rows as an array list associated with the DATA key
 */

// Defines an array list to contain the ContentValues objects for each row
ArrayList<ContentValues> contactData = new ArrayList<ContentValues>();


/*
 * Defines the raw contact row
 */

// Sets up the row as a ContentValues object
ContentValues rawContactRow = new ContentValues();

// Adds the account type and name to the row
rawContactRow.put(ContactsContract.RawContacts.ACCOUNT_TYPE, selectedAccount.getType());
rawContactRow.put(ContactsContract.RawContacts.ACCOUNT_NAME, selectedAccount.getName());

// Adds the row to the array
contactData.add(rawContactRow);

/*
 * Sets up the phone number data row
 */

// Sets up the row as a ContentValues object
ContentValues phoneRow = new ContentValues();

// Specifies the MIME type for this data row (all data rows must be marked by their type)
phoneRow.put(
        ContactsContract.Data.MIMETYPE,
        ContactsContract.CommonDataKinds.Phone.CONTENT_ITEM_TYPE
);

// Adds the phone number and its type to the row
phoneRow.put(ContactsContract.CommonDataKinds.Phone.NUMBER, phone);

// Adds the row to the array
contactData.add(phoneRow);

/*
 * Sets up the email data row
 */

// Sets up the row as a ContentValues object
ContentValues emailRow = new ContentValues();

// Specifies the MIME type for this data row (all data rows must be marked by their type)
emailRow.put(
        ContactsContract.Data.MIMETYPE,
        ContactsContract.CommonDataKinds.Email.CONTENT_ITEM_TYPE
);

// Adds the email address and its type to the row
emailRow.put(ContactsContract.CommonDataKinds.Email.ADDRESS, email);

// Adds the row to the array
contactData.add(emailRow);

/*
 * Adds the array to the intent's extras. It must be a parcelable object in order to
 * travel between processes. The device's contacts app expects its key to be
 * Intents.Insert.DATA
 */
insertIntent.putParcelableArrayListExtra(ContactsContract.Intents.Insert.DATA, contactData);

// Send out the intent to start the device's contacts app in its add contact activity.
startActivity(insertIntent);
Data integrity
Because the contacts repository contains important and sensitive data that users expect to be correct and up-to-date, the Contacts Provider has well-defined rules for data integrity. It's your responsibility to conform to these rules when you modify contacts data. The important rules are listed here:
- Always add a
ContactsContract.CommonDataKinds.StructuredNamerow for everyContactsContract.RawContactsrow you add. - A
ContactsContract.RawContactsrow without aContactsContract.CommonDataKinds.StructuredNamerow in theContactsContract.Datatable may cause problems during aggregation. - Always link new
ContactsContract.Datarows to their parentContactsContract.RawContactsrow. - A
ContactsContract.Datarow that isn't linked to aContactsContract.RawContactswon't be visible in the device's contacts application, and it might cause problems with sync adapters. - Change data only for those raw contacts that you own.
- Remember that the Contacts Provider is usually managing data from several different account types/online services. You need to ensure that your application only modifies or deletes data for rows that belong to you, and that it only inserts data with an account type and name that you control.
- Always use the constants defined in
ContactsContractand its subclasses for authorities, content URIs, URI paths, column names, MIME types, andTYPEvalues. - Using these constants helps you to avoid errors. You'll also be notified with compiler warnings if any of the constants is deprecated.
Custom data rows
By creating and using your own custom MIME types, you can insert, edit, delete, and retrieve your own data rows in the ContactsContract.Data table. Your rows are limited to using the column defined in ContactsContract.DataColumns , although you can map your own type-specific column names to the default column names. In the device's contacts application, the data for your rows is displayed but can't be edited or deleted, and users can't add additional data. To allow users to modify your custom data rows, you must provide an editor activity in your own application.
To display your custom data, provide a contacts.xml file containing a <ContactsAccountType> element and one or more of its <ContactsDataKind> child elements. This is described in more detail in the section <ContactsDataKind> element .
To learn more about custom MIME types, read the Create a Content Provider guide.
Contacts Provider sync adapters
The Contacts Provider is specifically designed for handling synchronization of contacts data between a device and an online service. This allows users to download existing data to a new device and upload existing data to a new account. Synchronization also ensures that users have the latest data at hand, regardless of the source of additions and changes. Another advantage of synchronization is that it makes contacts data available even when the device is not connected to the network.
Although you can implement synchronization in a variety of ways, the Android system provides a plug-in synchronization framework that automates the following tasks:
- Checking network availability.
- Scheduling and executing synchronization, based on user preferences.
- Restarting synchronizations that have stopped.
To use this framework, you supply a sync adapter plug-in. Each sync adapter is unique to a service and content provider, but can handle multiple account names for the same service. The framework also allows multiple sync adapters for the same service and provider.
Sync adapter classes and files
You implement a sync adapter as a subclass of AbstractThreadedSyncAdapter and install it as part of an Android application. The system learns about the sync adapter from elements in your application manifest, and from a special XML file pointed to by the manifest. The XML file defines the account type for the online service and the authority for the content provider, which together uniquely identify the adapter. The sync adapter does not become active until the user adds an account for the sync adapter's account type and enables synchronization for the content provider the sync adapter syncs with. At that point, the system starts managing the adapter, calling it as necessary to synchronize between the content provider and the server.
Note: Using an account type as part of the sync adapter's identification allows the system to detect and group together sync adapters that access different services from the same organization. For example, sync adapters for Google online services all have the same account type com.google . When users add a Google Account to their devices, all of the installed sync adapters for Google services are listed together; each sync adapter listed syncs with a different content provider on the device.
Because most services require users to verify their identity before accessing data, the Android system offers an authentication framework that is similar to, and often used in conjunction with, the sync adapter framework. The authentication framework uses plug-in authenticators that are subclasses of AbstractAccountAuthenticator . An authenticator verifies the user's identity in the following steps:
- Collects the user's name, password or similar information (the user's credentials ).
- Sends the credentials to the service
- Examines the service's reply.
If the service accepts the credentials, the authenticator can store the credentials for later use. Because of the plug-in authenticator framework, the AccountManager can provide access to any authtokens an authenticator supports and chooses to expose, such as OAuth2 authtokens.
Although authentication is not required, most contacts services use it. However, you're not required to use the Android authentication framework to do authentication.
Sync adapter implementation
To implement a sync adapter for the Contacts Provider, you start by creating an Android application that contains the following:
- A
Servicecomponent that responds to requests from the system to bind to the sync adapter. - When the system wants to run a synchronization, it calls the service's
onBind()method to get anIBinderfor the sync adapter. This allows the system to do cross-process calls to the adapter's methods. - The actual sync adapter, implemented as a concrete subclass of
AbstractThreadedSyncAdapter. - This class does the work of downloading data from the server, uploading data from the device, and resolving conflicts. The main work of the adapter is done in the method
onPerformSync(). This class must be instantiated as a singleton. - A subclass of
Application. - This class acts as a factory for the sync adapter singleton. Use the
onCreate()method to instantiate the sync adapter, and provide a static "getter" method to return the singleton to theonBind()method of the sync adapter's service. - Optional: A
Servicecomponent that responds to requests from the system for user authentication. -
AccountManagerstarts this service to begin the authentication process. The service'sonCreate()method instantiates an authenticator object. When the system wants to authenticate a user account for the application's sync adapter, it calls the service'sonBind()method to get anIBinderfor the authenticator. This allows the system to do cross-process calls to the authenticator's methods.. - Optional: A concrete subclass of
AbstractAccountAuthenticatorthat handles requests for authentication. - This class provides methods that the
AccountManagerinvokes to authenticate the user's credentials with the server. The details of the authentication process vary widely, based on the server technology in use. You should refer to the documentation for your server software to learn more about authentication. - XML files that define the sync adapter and authenticator to the system.
- The sync adapter and authenticator service components described previously are defined in
< service >elements in the application manifest. These elements contain< meta-data >child elements that provide specific data to the system:- The
< meta-data >element for the sync adapter service points to the XML fileres/xml/syncadapter.xml. In turn, this file specifies a URI for the web service that will be synchronized with the Contacts Provider, and an account type for the web service. - Optional: The
< meta-data >element for the authenticator points to the XML fileres/xml/authenticator.xml. In turn, this file specifies the account type that this authenticator supports, as well as UI resources that appear during the authentication process. The account type specified in this element must be the same as the account type specified for the sync adapter.
- The
Social stream data
The android.provider.ContactsContract.StreamItems and android.provider.ContactsContract.StreamItemPhotos tables manage incoming data from social networks. You can write a sync adapter that adds stream data from your own network to these tables, or you can read stream data from these tables and display it in your own application, or both. With these features, your social networking services and applications can be integrated into Android's social networking experience.
Social stream text
Stream items are always associated with a raw contact. The android.provider.ContactsContract.StreamItemsColumns#RAW_CONTACT_ID links to the _ID value for the raw contact. The account type and account name of the raw contact are also stored in the stream item row.
Store the data from your stream in the following columns:
- android.provider.ContactsContract.StreamItemsColumns#ACCOUNT_TYPE
- Required. The user's account type for the raw contact associated with this stream item. Remember to set this value when you insert a stream item.
- android.provider.ContactsContract.StreamItemsColumns#ACCOUNT_NAME
- Required. The user's account name for the raw contact associated with this stream item. Remember to set this value when you insert a stream item.
- Identifier columns
- Required. You must insert the following identifier columns when you insert a stream item:
- android.provider.ContactsContract.StreamItemsColumns#CONTACT_ID: The android.provider.BaseColumns#_ID value of the contact that this stream item is associated with.
- android.provider.ContactsContract.StreamItemsColumns#CONTACT_LOOKUP_KEY: The android.provider.ContactsContract.ContactsColumns#LOOKUP_KEY value of the contact this stream item is associated with.
- android.provider.ContactsContract.StreamItemsColumns#RAW_CONTACT_ID: The android.provider.BaseColumns#_ID value of the raw contact that this stream item is associated with.
- android.provider.ContactsContract.StreamItemsColumns#COMMENTS
- Optional. Stores summary information that you can display at the beginning of a stream item.
- android.provider.ContactsContract.StreamItemsColumns#TEXT
- The text of the stream item, either the content that was posted by the source of the item, or a description of some action that generated the stream item. This column can contain any formatting and embedded resource images that can be rendered by
fromHtml(). The provider may truncate or ellipsize long content, but it will try to avoid breaking tags. - android.provider.ContactsContract.StreamItemsColumns#TIMESTAMP
- A text string containing the time the stream item was inserted or updated, in the form of milliseconds since epoch. Applications that insert or update stream items are responsible for maintaining this column; it is not automatically maintained by the Contacts Provider.
To display identifying information for your stream items, use the android.provider.ContactsContract.StreamItemsColumns#RES_ICON, android.provider.ContactsContract.StreamItemsColumns#RES_LABEL, and android.provider.ContactsContract.StreamItemsColumns#RES_PACKAGE to link to resources in your application.
The android.provider.ContactsContract.StreamItems table also contains the columns android.provider.ContactsContract.StreamItemsColumns#SYNC1 through android.provider.ContactsContract.StreamItemsColumns#SYNC4 for the exclusive use of sync adapters.
Social stream photos
The android.provider.ContactsContract.StreamItemPhotos table stores photos associated with a stream item. The table's android.provider.ContactsContract.StreamItemPhotosColumns#STREAM_ITEM_ID column links to values in the _ID column of android.provider.ContactsContract.StreamItems table. Photo references are stored in the table in these columns:
- android.provider.ContactsContract.StreamItemPhotos#PHOTO column (a BLOB).
- A binary representation of the photo, resized by the provider for storage and display. This column is available for backwards compatibility with previous versions of the Contacts Provider that used it for storing photos. However, in the current version you should not use this column to store photos. Instead, use either android.provider.ContactsContract.StreamItemPhotosColumns#PHOTO_FILE_ID or android.provider.ContactsContract.StreamItemPhotosColumns#PHOTO_URI (both of which are described in the following points) to store photos in a file. This column now contains a thumbnail of the photo, which is available for reading.
- android.provider.ContactsContract.StreamItemPhotosColumns#PHOTO_FILE_ID
- A numeric identifier of a photo for a raw contact. Append this value to the constant
DisplayPhoto.CONTENT_URIto get a content URI pointing to a single photo file, and then callopenAssetFileDescriptor()to get a handle to the photo file. - android.provider.ContactsContract.StreamItemPhotosColumns#PHOTO_URI
- A content URI pointing directly to the photo file for the photo represented by this row. Call
openAssetFileDescriptor()with this URI to get a handle to the photo file.
Using the social stream tables
These tables work the same as the other main tables in the Contacts Provider, except that:
- These tables require additional access permissions. To read from them, your application must have the permission android.Manifest.permission#READ_SOCIAL_STREAM. To modify them, your application must have the permission android.Manifest.permission#WRITE_SOCIAL_STREAM.
- For the android.provider.ContactsContract.StreamItems table, the number of rows stored for each raw contact is limited. Once this limit is reached, the Contacts Provider makes space for new stream item rows by automatically deleting the rows having the oldest android.provider.ContactsContract.StreamItemsColumns#TIMESTAMP. To get the limit, issue a query to the content URI android.provider.ContactsContract.StreamItems#CONTENT_LIMIT_URI. You can leave all the arguments other than the content URI set to
null. The query returns a Cursor containing a single row, with the single column android.provider.ContactsContract.StreamItems#MAX_ITEMS.
The class android.provider.ContactsContract.StreamItems.StreamItemPhotos defines a sub-table of android.provider.ContactsContract.StreamItemPhotos containing the photo rows for a single stream item.
Social stream interactions
The social stream data managed by the Contacts Provider, in conjunction with the device's contacts application, offers a powerful way to connect your social networking system with existing contacts. The following features are available:
- By syncing your social networking service to the Contacts Provider with a sync adapter, you can retrieve recent activity for a user's contacts and store it in the android.provider.ContactsContract.StreamItems and android.provider.ContactsContract.StreamItemPhotos tables for later use.
- Besides regular synchronization, you can trigger your sync adapter to retrieve additional data when the user selects a contact to view. This allows your sync adapter to retrieve high-resolution photos and the most recent stream items for the contact.
- By registering a notification with the device's contacts application and the Contacts Provider, you can receive an intent when a contact is viewed, and at that point update the contact's status from your service. This approach may be faster and use less bandwidth than doing a full sync with a sync adapter.
- Users can add a contact to your social networking service while looking at the contact in the device's contacts application. You enable this with the "invite contact" feature, which you enable with a combination of an activity that adds an existing contact to your network, and an XML file that provides the device's contacts application and the Contacts Provider with the details of your application.
Regular synchronization of stream items with the Contacts Provider is the same as other synchronizations. To learn more about synchronization, see the section Contacts Provider sync adapters . Registering notifications and inviting contacts are covered in the next two sections.
Registering to handle social networking views
To register your sync adapter to receive notifications when the user views a contact that's managed by your sync adapter:
- Create a file named
contacts.xmlin your project'sres/xml/directory. If you already have this file, you can skip this step. - In this file, add the element
<ContactsAccountType xmlns:android="http://schemas.android.com/apk/res/android">. If this element already exists, you can skip this step. - To register a service that is notified when the user opens a contact's detail page in the device's contacts application, add the attribute
viewContactNotifyService=" serviceclass "to the element, whereserviceclassis the fully-qualified classname of the service that should receive the intent from the device's contacts application. For the notifier service, use a class that extendsIntentService, to allow the service to receive intents. The data in the incoming intent contains the content URI of the raw contact the user clicked. From the notifier service, you can bind to and then call your sync adapter to update the data for the raw contact.
To register an activity to be called when the user clicks on a stream item or photo or both:
- Create a file named
contacts.xmlin your project'sres/xml/directory. If you already have this file, you can skip this step. - In this file, add the element
<ContactsAccountType xmlns:android="http://schemas.android.com/apk/res/android">. If this element already exists, you can skip this step. - To register one of your activities to handle the user clicking on a stream item in the device's contacts application, add the attribute
viewStreamItemActivity=" activityclass "to the element, whereactivityclassis the fully-qualified classname of the activity that should receive the intent from the device's contacts application. - To register one of your activities to handle the user clicking on a stream photo in the device's contacts application, add the attribute
viewStreamItemPhotoActivity=" activityclass "to the element, whereactivityclassis the fully-qualified classname of the activity that should receive the intent from the device's contacts application.
The <ContactsAccountType> element is described in more detail in the section <ContactsAccountType> element .
The incoming intent contains the content URI of the item or photo that the user clicked. To have separate activities for text items and for photos, use both attributes in the same file.
Interacting with your social networking service
Users don't have to leave the device's contacts application to invite a contact to your social networking site. Instead, you can have the device's contacts app send an intent for inviting the contact to one of your activities. To set this up:
- Create a file named
contacts.xmlin your project'sres/xml/directory. If you already have this file, you can skip this step. - In this file, add the element
<ContactsAccountType xmlns:android="http://schemas.android.com/apk/res/android">. If this element already exists, you can skip this step. - Add the following attributes:
-
inviteContactActivity=" activityclass " -
inviteContactActionLabel="@string/ invite_action_label "
activityclassvalue is the fully-qualified classname of the activity that should receive the intent. Theinvite_action_labelvalue is a text string that's displayed in the Add Connection menu in the device's contacts application. -
Note: ContactsSource is a deprecated tag name for ContactsAccountType .
contacts.xml reference
The file contacts.xml contains XML elements that control the interaction of your sync adapter and application with the contacts application and the Contacts Provider. These elements are described in the following sections.
<ContactsAccountType> element
The <ContactsAccountType> element controls the interaction of your application with the contacts application. It has the following syntax:
<ContactsAccountType
        xmlns:android="http://schemas.android.com/apk/res/android"
        inviteContactActivity="activity_name"
        inviteContactActionLabel="invite_command_text"
        viewContactNotifyService="view_notify_service"
        viewGroupActivity="group_view_activity"
        viewGroupActionLabel="group_action_text"
        viewStreamItemActivity="viewstream_activity_name"
        viewStreamItemPhotoActivity="viewphotostream_activity_name">
contained in:
res/xml/contacts.xml
can contain:
<ContactsDataKind>
বর্ণনা:
Declares Android components and UI labels that allow users to invite one of their contacts to a social network, notify users when one of their social networking streams is updated, and so forth.
Notice that the attribute prefix android: is not necessary for the attributes of <ContactsAccountType> .
Attributes:
-
inviteContactActivity - The fully-qualified class name of the activity in your application that you want to activate when the user selects Add connection from the device's contacts application.
-
inviteContactActionLabel - A text string that is displayed for the activity specified in
inviteContactActivity, in the Add connection menu. For example, you can use the string "Follow in my network". You can use a string resource identifier for this label. -
viewContactNotifyService - The fully-qualified class name of a service in your application that should receive notifications when the user views a contact. This notification is sent by the device's contacts application; it allows your application to postpone data-intensive operations until they're needed. For example, your application can respond to this notification by reading in and displaying the contact's high-resolution photo and most recent social stream items. This feature is described in more detail in the section Social stream interactions .
-
viewGroupActivity - The fully-qualified class name of an activity in your application that can display group information. When the user clicks the group label in the device's contacts application, the UI for this activity is displayed.
-
viewGroupActionLabel - The label that the contacts application displays for a UI control that allows the user to look at groups in your application.
A string resource identifier is allowed for this attribute.
-
viewStreamItemActivity - The fully-qualified class name of an activity in your application that the device's contacts application launches when the user clicks a stream item for a raw contact.
-
viewStreamItemPhotoActivity - The fully-qualified class name of an activity in your application that the device's contacts application launches when the user clicks a photo in the stream item for a raw contact.
<ContactsDataKind> element
The <ContactsDataKind> element controls the display of your application's custom data rows in the contacts application's UI. It has the following syntax:
<ContactsDataKind
        android:mimeType="MIMEtype"
        android:icon="icon_resources"
        android:summaryColumn="column_name"
        android:detailColumn="column_name">
contained in:
<ContactsAccountType>বর্ণনা:
Use this element to have the contacts application display the contents of a custom data row as part of the details of a raw contact. Each <ContactsDataKind> child element of <ContactsAccountType> represents a type of custom data row that your sync adapter adds to the ContactsContract.Data table. Add one <ContactsDataKind> element for each custom MIME type you use. You don't have to add the element if you have a custom data row for which you don't want to display data.
Attributes:
-
android:mimeType - The custom MIME type you've defined for one of your custom data row types in the
ContactsContract.Datatable. For example, the valuevnd.android.cursor.item/vnd.example.locationstatuscould be a custom MIME type for a data row that records a contact's last known location. -
android:icon - An Android drawable resource that the contacts application displays next to your data. Use this to indicate to the user that the data comes from your service.
-
android:summaryColumn - The column name for the first of two values retrieved from the data row. The value is displayed as the first line of the entry for this data row. The first line is intended to be used as a summary of the data, but that is optional. See also android:detailColumn .
-
android:detailColumn - The column name for the second of two values retrieved from the data row. The value is displayed as the second line of the entry for this data row. See also
android:summaryColumn.
Additional Contacts Provider features
Besides the main features described in previous sections, the Contacts Provider offers these useful features for working with contacts data:
- Contact groups
- Photo features
Contact groups
The Contacts Provider can optionally label collections of related contacts with group data. If the server associated with a user account wants to maintain groups, the sync adapter for the account's account type should transfer groups data between the Contacts Provider and the server. When users add a new contact to the server and then put this contact in a new group, the sync adapter must add the new group to the ContactsContract.Groups table. The group or groups a raw contact belongs to are stored in the ContactsContract.Data table, using the ContactsContract.CommonDataKinds.GroupMembership MIME type.
If you're designing a sync adapter that will add raw contact data from server to the Contacts Provider, and you aren't using groups, then you need to tell the Provider to make your data visible. In the code that is executed when a user adds an account to the device, update the ContactsContract.Settings row that the Contacts Provider adds for the account. In this row, set the value of the Settings.UNGROUPED_VISIBLE column to 1. When you do this, the Contacts Provider will always make your contacts data visible, even if you don't use groups.
Contact photos
The ContactsContract.Data table stores photos as rows with MIME type Photo.CONTENT_ITEM_TYPE . The row's CONTACT_ID column is linked to the _ID column of the raw contact to which it belongs. The class ContactsContract.Contacts.Photo defines a sub-table of ContactsContract.Contacts containing photo information for a contact's primary photo, which is the primary photo of the contact's primary raw contact. Similarly, the class ContactsContract.RawContacts.DisplayPhoto defines a sub-table of ContactsContract.RawContacts containing photo information for a raw contact's primary photo.
The reference documentation for ContactsContract.Contacts.Photo and ContactsContract.RawContacts.DisplayPhoto contain examples of retrieving photo information. There is no convenience class for retrieving the primary thumbnail for a raw contact, but you can send a query to the ContactsContract.Data table, selecting on the raw contact's _ID , the Photo.CONTENT_ITEM_TYPE , and the IS_PRIMARY column to find the raw contact's primary photo row.
Social stream data for a person may also include photos. These are stored in the android.provider.ContactsContract.StreamItemPhotos table, which is described in more detail in the section Social stream photos .