Tabla
Organiza tus páginas con colecciones
Guarda y categoriza el contenido según tus preferencias.
TableLayout
es un objeto ViewGroup
que muestra elementos View
secundarios en filas y columnas.
Nota: Para un mejor rendimiento y asistencia con las herramientas, debes crear tu diseño con ConstraintLayout.
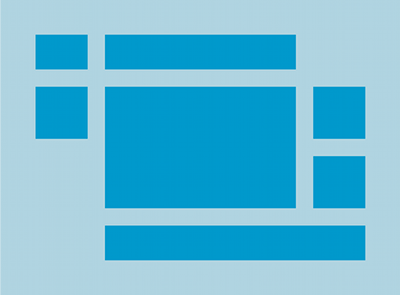
TableLayout
posiciona sus elementos secundarios en filas y columnas. Los contenedores de TableLayout no muestran líneas de bordes para las filas, columnas o celdas. La tabla tendrá la misma cantidad de columnas que la fila con la mayor cantidad de celdas. Una tabla puede dejar celdas vacías. Las celdas pueden abarcar varias columnas, igual que en HTML. Puedes abarcar columnas si usas el campo span
de la clase TableRow.LayoutParams
.
Nota: Las celdas no pueden abarcar varias filas.
Los objetos TableRow
son las vistas secundarias de TableLayout (cada objeto TableRow define una sola fila de la tabla). Cada fila tiene cero o más celdas, y cada una se define por cualquier tipo de objeto View. Por lo tanto, las celdas de una fila pueden estar compuestas por una variedad de objetos View, como ImageView o TextView. Una celda también puede ser un objeto ViewGroup (por ejemplo, puedes anidar otro contenedor de TableLayout como celda).
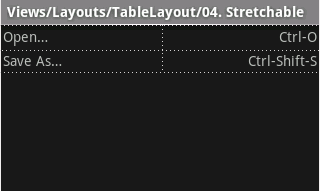
El siguiente ejemplo de diseño tiene dos filas y dos celdas en cada uno. La captura de pantalla complementaria muestra el resultado, y se muestran los bordes de las celdas como líneas de puntos (agregadas para lograr un efecto visual).
<?xml version="1.0" encoding="utf-8"?>
<TableLayout xmlns:android="http://schemas.android.com/apk/res/android"
android:layout_width="match_parent"
android:layout_height="match_parent"
android:stretchColumns="1">
<TableRow>
<TextView
android:text="@string/table_layout_4_open"
android:padding="3dip" />
<TextView
android:text="@string/table_layout_4_open_shortcut"
android:gravity="right"
android:padding="3dip" />
</TableRow>
<TableRow>
<TextView
android:text="@string/table_layout_4_save"
android:padding="3dip" />
<TextView
android:text="@string/table_layout_4_save_shortcut"
android:gravity="right"
android:padding="3dip" />
</TableRow>
</TableLayout>
Las columnas pueden ocultarse, marcarse para extenderse y rellenar el espacio disponible de la pantalla, o marcarse como retráctiles para forzar la reducción de la columna hasta que la tabla se ajuste a la pantalla. Consulta la documentación de TableLayout reference
para obtener más detalles.
Ejemplo
- Comienza un nuevo proyecto con el nombre HelloTableLayout.
- Abre el archivo
res/layout/main.xml
e inserta el siguiente código:
<?xml version="1.0" encoding="utf-8"?>
<TableLayout xmlns:android="http://schemas.android.com/apk/res/android"
android:layout_width="match_parent"
android:layout_height="match_parent"
android:stretchColumns="1">
<TableRow>
<TextView
android:layout_column="1"
android:text="Open..."
android:padding="3dip" />
<TextView
android:text="Ctrl-O"
android:gravity="right"
android:padding="3dip" />
</TableRow>
<TableRow>
<TextView
android:layout_column="1"
android:text="Save..."
android:padding="3dip" />
<TextView
android:text="Ctrl-S"
android:gravity="right"
android:padding="3dip" />
</TableRow>
<TableRow>
<TextView
android:layout_column="1"
android:text="Save As..."
android:padding="3dip" />
<TextView
android:text="Ctrl-Shift-S"
android:gravity="right"
android:padding="3dip" />
</TableRow>
<View
android:layout_height="2dip"
android:background="#FF909090" />
<TableRow>
<TextView
android:text="X"
android:padding="3dip" />
<TextView
android:text="Import..."
android:padding="3dip" />
</TableRow>
<TableRow>
<TextView
android:text="X"
android:padding="3dip" />
<TextView
android:text="Export..."
android:padding="3dip" />
<TextView
android:text="Ctrl-E"
android:gravity="right"
android:padding="3dip" />
</TableRow>
<View
android:layout_height="2dip"
android:background="#FF909090" />
<TableRow>
<TextView
android:layout_column="1"
android:text="Quit"
android:padding="3dip" />
</TableRow>
</TableLayout>
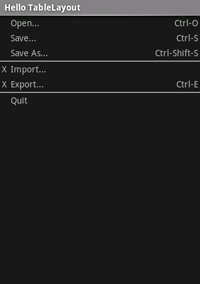
Observa cómo esto se asemeja a la estructura de una tabla HTML. El elemento TableLayout
es similar al elemento <table>
de HTML; TableRow
es similar a un elemento ><tr>>
, pero para las celdas puedes usar cualquier tipo de elemento View
. En este ejemplo, se usa un objeto TextView
para cada celda. En medio de algunas de las filas, también hay un objeto View
básico, que se usa para dibujar una línea horizontal.
- Asegúrate de que el objeto Activity de tu contenedor HelloTableLayout cargue este diseño en el método
onCreate()
:
Kotlin
override fun onCreate(savedInstanceState: Bundle?) {
super.onCreate(savedInstanceState)
setContentView(R.layout.main)
}
Java
public void onCreate(Bundle savedInstanceState) {
super.onCreate(savedInstanceState);
setContentView(R.layout.main);
}
El método setContentView(int)
carga el archivo de diseño para el objeto Activity
, especificado por el ID de recurso. R.layout.main
hace referencia al archivo de diseño res/layout/main.xml
.
- Ejecuta la aplicación.
Deberías ver lo siguiente:
El contenido y las muestras de código que aparecen en esta página están sujetas a las licencias que se describen en la Licencia de Contenido. Java y OpenJDK son marcas registradas de Oracle o sus afiliados.
Última actualización: 2025-07-27 (UTC)
[[["Fácil de comprender","easyToUnderstand","thumb-up"],["Resolvió mi problema","solvedMyProblem","thumb-up"],["Otro","otherUp","thumb-up"]],[["Falta la información que necesito","missingTheInformationINeed","thumb-down"],["Muy complicado o demasiados pasos","tooComplicatedTooManySteps","thumb-down"],["Desactualizado","outOfDate","thumb-down"],["Problema de traducción","translationIssue","thumb-down"],["Problema con las muestras o los códigos","samplesCodeIssue","thumb-down"],["Otro","otherDown","thumb-down"]],["Última actualización: 2025-07-27 (UTC)"],[],[],null,["# Table\n\n[TableLayout](/reference/android/widget/TableLayout) is a [ViewGroup](/reference/android/view/ViewGroup) that\ndisplays child [View](/reference/android/view/View) elements in rows and columns.\n\n**Note:**\nFor better performance and tooling support, you should instead [build your layout with ConstraintLayout](/training/constraint-layout).\n\n\n[TableLayout](/reference/android/widget/TableLayout) positions its children into rows and\ncolumns. TableLayout containers do not display border lines for their rows,\ncolumns, or cells. The table will have as many columns as the row with the\nmost cells. A table can leave cells empty. Cells can span multiple columns,\nas they can in HTML. You can span columns by using the `span`\nfield in the [TableRow.LayoutParams](/reference/android/widget/TableRow.LayoutParams) class.\n\n\n**Note:** Cells cannot span multiple rows.\n\n\n[TableRow](/reference/android/widget/TableRow) objects are the child views of a TableLayout\n(each TableRow defines a single row in the table). Each row has zero or more\ncells, each of which is defined by any kind of other View. So, the cells of\na row may be composed of a variety of View objects, like ImageView or\nTextView objects. A cell may also be a ViewGroup object (for example, you\ncan nest another TableLayout as a cell).\n\n\nThe following sample layout has two rows and two cells in each. The\naccompanying screenshot shows the result, with cell borders displayed as\ndotted lines (added for visual effect). \n\n```xml\n\u003c?xml version=\"1.0\" encoding=\"utf-8\"?\u003e\n\u003cTableLayout xmlns:android=\"http://schemas.android.com/apk/res/android\"\n android:layout_width=\"match_parent\"\n android:layout_height=\"match_parent\"\n android:stretchColumns=\"1\"\u003e\n \u003cTableRow\u003e\n \u003cTextView\n android:text=\"@string/table_layout_4_open\"\n android:padding=\"3dip\" /\u003e\n \u003cTextView\n android:text=\"@string/table_layout_4_open_shortcut\"\n android:gravity=\"right\"\n android:padding=\"3dip\" /\u003e\n \u003c/TableRow\u003e\n\n \u003cTableRow\u003e\n \u003cTextView\n android:text=\"@string/table_layout_4_save\"\n android:padding=\"3dip\" /\u003e\n \u003cTextView\n android:text=\"@string/table_layout_4_save_shortcut\"\n android:gravity=\"right\"\n android:padding=\"3dip\" /\u003e\n \u003c/TableRow\u003e\n\u003c/TableLayout\u003e\n```\n\nColumns can be hidden, marked to stretch and fill the available screen space,\nor can be marked as shrinkable to force the column to shrink until the table\nfits the screen. See the [TableLayout reference](/reference/android/widget/TableLayout)\ndocumentation for more details.\n\nExample\n-------\n\n1. Start a new project named *HelloTableLayout*.\n2. Open the `res/layout/main.xml` file and insert the following: \n\n ```xml\n \u003c?xml version=\"1.0\" encoding=\"utf-8\"?\u003e\n \u003cTableLayout xmlns:android=\"http://schemas.android.com/apk/res/android\"\n android:layout_width=\"match_parent\"\n android:layout_height=\"match_parent\"\n android:stretchColumns=\"1\"\u003e\n\n \u003cTableRow\u003e\n \u003cTextView\n android:layout_column=\"1\"\n android:text=\"Open...\"\n android:padding=\"3dip\" /\u003e\n \u003cTextView\n android:text=\"Ctrl-O\"\n android:gravity=\"right\"\n android:padding=\"3dip\" /\u003e\n \u003c/TableRow\u003e\n\n \u003cTableRow\u003e\n \u003cTextView\n android:layout_column=\"1\"\n android:text=\"Save...\"\n android:padding=\"3dip\" /\u003e\n \u003cTextView\n android:text=\"Ctrl-S\"\n android:gravity=\"right\"\n android:padding=\"3dip\" /\u003e\n \u003c/TableRow\u003e\n\n \u003cTableRow\u003e\n \u003cTextView\n android:layout_column=\"1\"\n android:text=\"Save As...\"\n android:padding=\"3dip\" /\u003e\n \u003cTextView\n android:text=\"Ctrl-Shift-S\"\n android:gravity=\"right\"\n android:padding=\"3dip\" /\u003e\n \u003c/TableRow\u003e\n\n \u003cView\n android:layout_height=\"2dip\"\n android:background=\"#FF909090\" /\u003e\n\n \u003cTableRow\u003e\n \u003cTextView\n android:text=\"X\"\n android:padding=\"3dip\" /\u003e\n \u003cTextView\n android:text=\"Import...\"\n android:padding=\"3dip\" /\u003e\n \u003c/TableRow\u003e\n\n \u003cTableRow\u003e\n \u003cTextView\n android:text=\"X\"\n android:padding=\"3dip\" /\u003e\n \u003cTextView\n android:text=\"Export...\"\n android:padding=\"3dip\" /\u003e\n \u003cTextView\n android:text=\"Ctrl-E\"\n android:gravity=\"right\"\n android:padding=\"3dip\" /\u003e\n \u003c/TableRow\u003e\n\n \u003cView\n android:layout_height=\"2dip\"\n android:background=\"#FF909090\" /\u003e\n\n \u003cTableRow\u003e\n \u003cTextView\n android:layout_column=\"1\"\n android:text=\"Quit\"\n android:padding=\"3dip\" /\u003e\n \u003c/TableRow\u003e\n \u003c/TableLayout\u003e\n ```\n\n Notice how this resembles the structure of an HTML table. The [TableLayout](/reference/android/widget/TableLayout)\n element is like the HTML `\u003ctable\u003e` element; [TableRow](/reference/android/widget/TableRow) is like\n a `\u003e\u003ctr\u003e\u003e` element;\n but for the cells, you can use any kind of [View](/reference/android/view/View) element. In this example, a\n [TextView](/reference/android/widget/TextView) is used for each cell. In between some of the rows, there is also a\n basic [View](/reference/android/view/View), which is used to draw a horizontal line.\n3. Make sure your *HelloTableLayout* Activity loads this layout in the [onCreate()](/reference/android/app/Activity#onCreate(android.os.Bundle)) method: \n\n ### Kotlin\n\n ```kotlin\n override fun onCreate(savedInstanceState: Bundle?) {\n super.onCreate(savedInstanceState)\n setContentView(R.layout.main)\n }\n ```\n\n ### Java\n\n ```java\n public void onCreate(Bundle savedInstanceState) {\n super.onCreate(savedInstanceState);\n setContentView(R.layout.main);\n }\n ```\n\n The [setContentView(int)](/reference/android/app/Activity#setContentView(int)) method loads the\n layout file for the [Activity](/reference/android/app/Activity), specified by the resource\n ID --- `R.layout.main` refers to the `res/layout/main.xml` layout\n file.\n4. Run the application.\n\nYou should see the following:"]]