
The Android platform provides several sensors that let you monitor the motion of a device.
The sensors' possible architectures vary by sensor type:
- The gravity, linear acceleration, rotation vector, significant motion, step counter, and step detector sensors are either hardware-based or software-based.
- The accelerometer and gyroscope sensors are always hardware-based.
Most Android-powered devices have an accelerometer, and many now include a gyroscope. The availability of the software-based sensors is more variable because they often rely on one or more hardware sensors to derive their data. Depending on the device, these software-based sensors can derive their data either from the accelerometer and magnetometer or from the gyroscope.
Motion sensors are useful for monitoring device movement, such as tilt, shake, rotation, or swing. The movement is usually a reflection of direct user input (for example, a user steering a car in a game or a user controlling a ball in a game), but it can also be a reflection of the physical environment in which the device is sitting (for example, moving with you while you drive your car). In the first case, you are monitoring motion relative to the device's frame of reference or your application's frame of reference; in the second case you are monitoring motion relative to the world's frame of reference. Motion sensors by themselves are not typically used to monitor device position, but they can be used with other sensors, such as the geomagnetic field sensor, to determine a device's position relative to the world's frame of reference (see Position Sensors for more information).
All of the motion sensors return multi-dimensional arrays of sensor values for each SensorEvent. For example, during a single sensor event the accelerometer returns
acceleration force data for the three coordinate axes, and the gyroscope returns rate of rotation
data for the three coordinate axes. These data values are returned in a float array
(values) along with other SensorEvent
parameters. Table 1 summarizes the motion sensors that are available on the Android platform.
Table 1. Motion sensors that are supported on the Android platform.
| Sensor | Sensor event data | Description | Units of measure |
|---|---|---|---|
TYPE_ACCELEROMETER |
SensorEvent.values[0] |
Acceleration force along the x axis (including gravity). | m/s2 |
SensorEvent.values[1] |
Acceleration force along the y axis (including gravity). | ||
SensorEvent.values[2] |
Acceleration force along the z axis (including gravity). | ||
TYPE_ACCELEROMETER_UNCALIBRATED |
SensorEvent.values[0] |
Measured acceleration along the X axis without any bias compensation. | m/s2 |
SensorEvent.values[1] |
Measured acceleration along the Y axis without any bias compensation. | ||
SensorEvent.values[2] |
Measured acceleration along the Z axis without any bias compensation. | ||
SensorEvent.values[3] |
Measured acceleration along the X axis with estimated bias compensation. | ||
SensorEvent.values[4] |
Measured acceleration along the Y axis with estimated bias compensation. | ||
SensorEvent.values[5] |
Measured acceleration along the Z axis with estimated bias compensation. | ||
TYPE_GRAVITY |
SensorEvent.values[0] |
Force of gravity along the x axis. | m/s2 |
SensorEvent.values[1] |
Force of gravity along the y axis. | ||
SensorEvent.values[2] |
Force of gravity along the z axis. | ||
TYPE_GYROSCOPE |
SensorEvent.values[0] |
Rate of rotation around the x axis. | rad/s |
SensorEvent.values[1] |
Rate of rotation around the y axis. | ||
SensorEvent.values[2] |
Rate of rotation around the z axis. | ||
TYPE_GYROSCOPE_UNCALIBRATED |
SensorEvent.values[0] |
Rate of rotation (without drift compensation) around the x axis. | rad/s |
SensorEvent.values[1] |
Rate of rotation (without drift compensation) around the y axis. | ||
SensorEvent.values[2] |
Rate of rotation (without drift compensation) around the z axis. | ||
SensorEvent.values[3] |
Estimated drift around the x axis. | ||
SensorEvent.values[4] |
Estimated drift around the y axis. | ||
SensorEvent.values[5] |
Estimated drift around the z axis. | ||
TYPE_LINEAR_ACCELERATION |
SensorEvent.values[0] |
Acceleration force along the x axis (excluding gravity). | m/s2 |
SensorEvent.values[1] |
Acceleration force along the y axis (excluding gravity). | ||
SensorEvent.values[2] |
Acceleration force along the z axis (excluding gravity). | ||
TYPE_ROTATION_VECTOR |
SensorEvent.values[0] |
Rotation vector component along the x axis (x * sin(θ/2)). | Unitless |
SensorEvent.values[1] |
Rotation vector component along the y axis (y * sin(θ/2)). | ||
SensorEvent.values[2] |
Rotation vector component along the z axis (z * sin(θ/2)). | ||
SensorEvent.values[3] |
Scalar component of the rotation vector ((cos(θ/2)).1 | ||
TYPE_SIGNIFICANT_MOTION |
N/A | N/A | N/A |
TYPE_STEP_COUNTER |
SensorEvent.values[0] |
Number of steps taken by the user since the last reboot while the sensor was activated. | Steps |
TYPE_STEP_DETECTOR |
N/A | N/A | N/A |
1 The scalar component is an optional value.
The rotation vector sensor and the gravity sensor are the most frequently used sensors for motion detection and monitoring. The rotational vector sensor is particularly versatile and can be used for a wide range of motion-related tasks, such as detecting gestures, monitoring angular change, and monitoring relative orientation changes. For example, the rotational vector sensor is ideal if you are developing a game, an augmented reality application, a 2-dimensional or 3-dimensional compass, or a camera stabilization app. In most cases, using these sensors is a better choice than using the accelerometer and geomagnetic field sensor or the orientation sensor.
Android Open Source Project sensors
The Android Open Source Project (AOSP) provides three software-based motion sensors: a gravity
sensor, a linear acceleration sensor, and a rotation vector sensor. These sensors were updated in
Android 4.0 and now use a device's gyroscope (in addition to other sensors) to improve stability and
performance. If you want to try these sensors, you can identify them by using the getVendor() method and the getVersion() method
(the vendor is Google LLC; the version number is 3). Identifying these sensors by vendor and
version number is necessary because the Android system considers these three sensors to be secondary
sensors. For example, if a device manufacturer provides their own gravity sensor, then the AOSP
gravity sensor shows up as a secondary gravity sensor. All three of these sensors rely on a
gyroscope: if a device does not have a gyroscope, these sensors do not show up and are not
available for use.
Use the gravity sensor
The gravity sensor provides a three dimensional vector indicating the direction and magnitude of gravity. Typically, this sensor is used to determine the device's relative orientation in space. The following code shows you how to get an instance of the default gravity sensor:
Kotlin
val sensorManager = getSystemService(Context.SENSOR_SERVICE) as SensorManager
val sensor: Sensor? = sensorManager.getDefaultSensor(Sensor.TYPE_GRAVITY)
Java
private SensorManager sensorManager;
private Sensor sensor;
...
sensorManager = (SensorManager) getSystemService(Context.SENSOR_SERVICE);
sensor = sensorManager.getDefaultSensor(Sensor.TYPE_GRAVITY);
The units are the same as those used by the acceleration sensor (m/s2), and the coordinate system is the same as the one used by the acceleration sensor.
Note: When a device is at rest, the output of the gravity sensor should be identical to that of the accelerometer.
Use the linear accelerometer
The linear acceleration sensor provides you with a three-dimensional vector representing acceleration along each device axis, excluding gravity. You can use this value to perform gesture detection. The value can also serve as input to an inertial navigation system, which uses dead reckoning. The following code shows you how to get an instance of the default linear acceleration sensor:
Kotlin
val sensorManager = getSystemService(Context.SENSOR_SERVICE) as SensorManager
val sensor: Sensor? = sensorManager.getDefaultSensor(Sensor.TYPE_LINEAR_ACCELERATION)
Java
private SensorManager sensorManager;
private Sensor sensor;
...
sensorManager = (SensorManager) getSystemService(Context.SENSOR_SERVICE);
sensor = sensorManager.getDefaultSensor(Sensor.TYPE_LINEAR_ACCELERATION);
Conceptually, this sensor provides you with acceleration data according to the following relationship:
linear acceleration = acceleration - acceleration due to gravity
You typically use this sensor when you want to obtain acceleration data without the influence of gravity. For example, you could use this sensor to see how fast your car is going. The linear acceleration sensor always has an offset, which you need to remove. The simplest way to do this is to build a calibration step into your application. During calibration you can ask the user to set the device on a table, and then read the offsets for all three axes. You can then subtract that offset from the acceleration sensor's direct readings to get the actual linear acceleration.
The sensor coordinate system is the same as the one used by the acceleration sensor, as are the units of measure (m/s2).
Use the rotation vector sensor
The rotation vector represents the orientation of the device as a combination of an angle and an axis, in which the device has rotated through an angle θ around an axis (x, y, or z). The following code shows you how to get an instance of the default rotation vector sensor:
Kotlin
val sensorManager = getSystemService(Context.SENSOR_SERVICE) as SensorManager
val sensor: Sensor? = sensorManager.getDefaultSensor(Sensor.TYPE_ROTATION_VECTOR)
Java
private SensorManager sensorManager;
private Sensor sensor;
...
sensorManager = (SensorManager) getSystemService(Context.SENSOR_SERVICE);
sensor = sensorManager.getDefaultSensor(Sensor.TYPE_ROTATION_VECTOR);
The three elements of the rotation vector are expressed as follows:
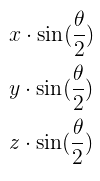
Where the magnitude of the rotation vector is equal to sin(θ/2), and the direction of the rotation vector is equal to the direction of the axis of rotation.
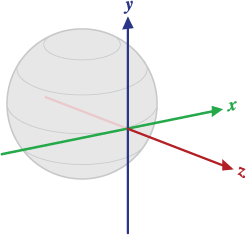
Figure 1. Coordinate system used by the rotation vector sensor.
The three elements of the rotation vector are equal to the last three components of a unit quaternion (cos(θ/2), x*sin(θ/2), y*sin(θ/2), z*sin(θ/2)). Elements of the rotation vector are unitless. The x, y, and z axes are defined in the same way as the acceleration sensor. The reference coordinate system is defined as a direct orthonormal basis (see figure 1). This coordinate system has the following characteristics:
- X is defined as the vector product Y x Z. It is tangential to the ground at the device's current location and points approximately East.
- Y is tangential to the ground at the device's current location and points toward the geomagnetic North Pole.
- Z points toward the sky and is perpendicular to the ground plane.
For a sample application that shows how to use the rotation vector sensor, see RotationVectorDemo.java.
Use the significant motion sensor
The significant motion sensor triggers an event each time significant motion is detected and then it disables itself. A significant motion is a motion that might lead to a change in the user's location; for example walking, biking, or sitting in a moving car. The following code shows you how to get an instance of the default significant motion sensor and how to register an event listener:
Kotlin
val sensorManager = getSystemService(Context.SENSOR_SERVICE) as SensorManager
val mSensor: Sensor? = sensorManager.getDefaultSensor(Sensor.TYPE_SIGNIFICANT_MOTION)
val triggerEventListener = object : TriggerEventListener() {
    override fun onTrigger(event: TriggerEvent?) {
        // Do work
    }
}
mSensor?.also { sensor ->
    sensorManager.requestTriggerSensor(triggerEventListener, sensor)
}
Java
private SensorManager sensorManager;
private Sensor sensor;
private TriggerEventListener triggerEventListener;
...
sensorManager = (SensorManager) getSystemService(Context.SENSOR_SERVICE);
sensor = sensorManager.getDefaultSensor(Sensor.TYPE_SIGNIFICANT_MOTION);

triggerEventListener = new TriggerEventListener() {
    @Override
    public void onTrigger(TriggerEvent event) {
        // Do work
    }
};

sensorManager.requestTriggerSensor(triggerEventListener, mSensor);
For more information, see TriggerEventListener.
Use the step counter sensor
The step counter sensor provides the number of steps taken by the user since the last reboot while the sensor was activated. The step counter has more latency (up to 10 seconds) but more accuracy than the step detector sensor.
Note: You must declare the
ACTIVITY_RECOGNITION
permission in order for your app to use this sensor on devices running
Android 10 (API level 29) or higher.
The following code shows you how to get an instance of the default step counter sensor:
Kotlin
val sensorManager = getSystemService(Context.SENSOR_SERVICE) as SensorManager
val sensor: Sensor? = sensorManager.getDefaultSensor(Sensor.TYPE_STEP_COUNTER)
Java
private SensorManager sensorManager;
private Sensor sensor;
...
sensorManager = (SensorManager) getSystemService(Context.SENSOR_SERVICE);
sensor = sensorManager.getDefaultSensor(Sensor.TYPE_STEP_COUNTER);
To preserve the battery on devices running your app, you should use the
JobScheduler class to retrieve the current value from
the step counter sensor at a specific interval. Although different types of apps
require different sensor-reading intervals, you should make this interval as
long as possible unless your app requires real-time data from the sensor.
Use the step detector sensor
The step detector sensor triggers an event each time the user takes a step. The latency is expected to be below 2 seconds.
Note: You must declare the
ACTIVITY_RECOGNITION
permission in order for your app to use this sensor on devices running
Android 10 (API level 29) or higher.
The following code shows you how to get an instance of the default step detector sensor:
Kotlin
val sensorManager = getSystemService(Context.SENSOR_SERVICE) as SensorManager
val sensor: Sensor? = sensorManager.getDefaultSensor(Sensor.TYPE_STEP_DETECTOR)
Java
private SensorManager sensorManager;
private Sensor sensor;
...
sensorManager = (SensorManager) getSystemService(Context.SENSOR_SERVICE);
sensor = sensorManager.getDefaultSensor(Sensor.TYPE_STEP_DETECTOR);
Work with raw data
The following sensors provide your app with raw data about the linear and rotational forces being applied to the device. In order to use the values from these sensors effectively, you need to filter out factors from the environment, such as gravity. You might also need to apply a smoothing algorithm to the trend of values to reduce noise.
Use the accelerometer
An acceleration sensor measures the acceleration applied to the device, including the force of gravity. The following code shows you how to get an instance of the default acceleration sensor:
Kotlin
val sensorManager = getSystemService(Context.SENSOR_SERVICE) as SensorManager
val sensor: Sensor? = sensorManager.getDefaultSensor(Sensor.TYPE_ACCELEROMETER)
Java
private SensorManager sensorManager;
private Sensor sensor;
  ...
sensorManager = (SensorManager) getSystemService(Context.SENSOR_SERVICE);
sensor = sensorManager.getDefaultSensor(Sensor.TYPE_ACCELEROMETER);
Note: If your app targets Android 12 (API level 31) or higher, this sensor is rate-limited.
Conceptually, an acceleration sensor determines the acceleration that is applied to a device (Ad) by measuring the forces that are applied to the sensor itself (Fs) using the following relationship:
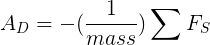
However, the force of gravity is always influencing the measured acceleration according to the following relationship:

For this reason, when the device is sitting on a table (and not accelerating), the accelerometer reads a magnitude of g = 9.81 m/s2. Similarly, when the device is in free fall and therefore rapidly accelerating toward the ground at 9.81 m/s2, its accelerometer reads a magnitude of g = 0 m/s2. Therefore, to measure the real acceleration of the device, the contribution of the force of gravity must be removed from the accelerometer data. This can be achieved by applying a high-pass filter. Conversely, a low-pass filter can be used to isolate the force of gravity. The following example shows how you can do this:
Kotlin
override fun onSensorChanged(event: SensorEvent) {
    // In this example, alpha is calculated as t / (t + dT),
    // where t is the low-pass filter's time-constant and
    // dT is the event delivery rate.

    val alpha: Float = 0.8f

    // Isolate the force of gravity with the low-pass filter.
    gravity[0] = alpha * gravity[0] + (1 - alpha) * event.values[0]
    gravity[1] = alpha * gravity[1] + (1 - alpha) * event.values[1]
    gravity[2] = alpha * gravity[2] + (1 - alpha) * event.values[2]

    // Remove the gravity contribution with the high-pass filter.
    linear_acceleration[0] = event.values[0] - gravity[0]
    linear_acceleration[1] = event.values[1] - gravity[1]
    linear_acceleration[2] = event.values[2] - gravity[2]
}
Java
public void onSensorChanged(SensorEvent event){
    // In this example, alpha is calculated as t / (t + dT),
    // where t is the low-pass filter's time-constant and
    // dT is the event delivery rate.

    final float alpha = 0.8;

    // Isolate the force of gravity with the low-pass filter.
    gravity[0] = alpha * gravity[0] + (1 - alpha) * event.values[0];
    gravity[1] = alpha * gravity[1] + (1 - alpha) * event.values[1];
    gravity[2] = alpha * gravity[2] + (1 - alpha) * event.values[2];

    // Remove the gravity contribution with the high-pass filter.
    linear_acceleration[0] = event.values[0] - gravity[0];
    linear_acceleration[1] = event.values[1] - gravity[1];
    linear_acceleration[2] = event.values[2] - gravity[2];
}
Note: You can use many different techniques to filter sensor data. The code sample above uses a simple filter constant (alpha) to create a low-pass filter. This filter constant is derived from a time constant (t), which is a rough representation of the latency that the filter adds to the sensor events, and the sensor's event delivery rate (dt). The code sample uses an alpha value of 0.8 for demonstration purposes. If you use this filtering method you may need to choose a different alpha value.
Accelerometers use the standard sensor coordinate system. In practice, this means that the following conditions apply when a device is laying flat on a table in its natural orientation:
- If you push the device on the left side (so it moves to the right), the x acceleration value is positive.
- If you push the device on the bottom (so it moves away from you), the y acceleration value is positive.
- If you push the device toward the sky with an acceleration of A m/s2, the z acceleration value is equal to A + 9.81, which corresponds to the acceleration of the device (+A m/s2) minus the force of gravity (-9.81 m/s2).
- The stationary device will have an acceleration value of +9.81, which corresponds to the acceleration of the device (0 m/s2 minus the force of gravity, which is -9.81 m/s2).
In general, the accelerometer is a good sensor to use if you are monitoring device motion. Almost every Android-powered handset and tablet has an accelerometer, and it uses about 10 times less power than the other motion sensors. One drawback is that you might have to implement low-pass and high-pass filters to eliminate gravitational forces and reduce noise.
Use the gyroscope
The gyroscope measures the rate of rotation in rad/s around a device's x, y, and z axis. The following code shows you how to get an instance of the default gyroscope:
Kotlin
val sensorManager = getSystemService(Context.SENSOR_SERVICE) as SensorManager
val sensor: Sensor? = sensorManager.getDefaultSensor(Sensor.TYPE_GYROSCOPE)
Java
private SensorManager sensorManager;
private Sensor sensor;
...
sensorManager = (SensorManager) getSystemService(Context.SENSOR_SERVICE);
sensor = sensorManager.getDefaultSensor(Sensor.TYPE_GYROSCOPE);
Note: If your app targets Android 12 (API level 31) or higher, this sensor is rate-limited.
The sensor's coordinate system is the same as the one used for the acceleration sensor. Rotation is positive in the counter-clockwise direction; that is, an observer looking from some positive location on the x, y or z axis at a device positioned on the origin would report positive rotation if the device appeared to be rotating counter clockwise. This is the standard mathematical definition of positive rotation and is not the same as the definition for roll that is used by the orientation sensor.
Usually, the output of the gyroscope is integrated over time to calculate a rotation describing the change of angles over the timestep. For example:
Kotlin
// Create a constant to convert nanoseconds to seconds.
private val NS2S = 1.0f / 1000000000.0f
private val deltaRotationVector = FloatArray(4) { 0f }
private var timestamp: Float = 0f

override fun onSensorChanged(event: SensorEvent?) {
    // This timestep's delta rotation to be multiplied by the current rotation
    // after computing it from the gyro sample data.
    if (timestamp != 0f && event != null) {
        val dT = (event.timestamp - timestamp) * NS2S
        // Axis of the rotation sample, not normalized yet.
        var axisX: Float = event.values[0]
        var axisY: Float = event.values[1]
        var axisZ: Float = event.values[2]

        // Calculate the angular speed of the sample
        val omegaMagnitude: Float = sqrt(axisX * axisX + axisY * axisY + axisZ * axisZ)

        // Normalize the rotation vector if it's big enough to get the axis
        // (that is, EPSILON should represent your maximum allowable margin of error)
        if (omegaMagnitude > EPSILON) {
            axisX /= omegaMagnitude
            axisY /= omegaMagnitude
            axisZ /= omegaMagnitude
        }

        // Integrate around this axis with the angular speed by the timestep
        // in order to get a delta rotation from this sample over the timestep
        // We will convert this axis-angle representation of the delta rotation
        // into a quaternion before turning it into the rotation matrix.
        val thetaOverTwo: Float = omegaMagnitude * dT / 2.0f
        val sinThetaOverTwo: Float = sin(thetaOverTwo)
        val cosThetaOverTwo: Float = cos(thetaOverTwo)
        deltaRotationVector[0] = sinThetaOverTwo * axisX
        deltaRotationVector[1] = sinThetaOverTwo * axisY
        deltaRotationVector[2] = sinThetaOverTwo * axisZ
        deltaRotationVector[3] = cosThetaOverTwo
    }
    timestamp = event?.timestamp?.toFloat() ?: 0f
    val deltaRotationMatrix = FloatArray(9) { 0f }
    SensorManager.getRotationMatrixFromVector(deltaRotationMatrix, deltaRotationVector);
    // User code should concatenate the delta rotation we computed with the current rotation
    // in order to get the updated rotation.
    // rotationCurrent = rotationCurrent * deltaRotationMatrix;
}
Java
// Create a constant to convert nanoseconds to seconds.
private static final float NS2S = 1.0f / 1000000000.0f;
private final float[] deltaRotationVector = new float[4]();
private float timestamp;

public void onSensorChanged(SensorEvent event) {
    // This timestep's delta rotation to be multiplied by the current rotation
    // after computing it from the gyro sample data.
    if (timestamp != 0) {
      final float dT = (event.timestamp - timestamp) * NS2S;
      // Axis of the rotation sample, not normalized yet.
      float axisX = event.values[0];
      float axisY = event.values[1];
      float axisZ = event.values[2];

      // Calculate the angular speed of the sample
      float omegaMagnitude = sqrt(axisX*axisX + axisY*axisY + axisZ*axisZ);

      // Normalize the rotation vector if it's big enough to get the axis
      // (that is, EPSILON should represent your maximum allowable margin of error)
      if (omegaMagnitude > EPSILON) {
        axisX /= omegaMagnitude;
        axisY /= omegaMagnitude;
        axisZ /= omegaMagnitude;
      }

      // Integrate around this axis with the angular speed by the timestep
      // in order to get a delta rotation from this sample over the timestep
      // We will convert this axis-angle representation of the delta rotation
      // into a quaternion before turning it into the rotation matrix.
      float thetaOverTwo = omegaMagnitude * dT / 2.0f;
      float sinThetaOverTwo = sin(thetaOverTwo);
      float cosThetaOverTwo = cos(thetaOverTwo);
      deltaRotationVector[0] = sinThetaOverTwo * axisX;
      deltaRotationVector[1] = sinThetaOverTwo * axisY;
      deltaRotationVector[2] = sinThetaOverTwo * axisZ;
      deltaRotationVector[3] = cosThetaOverTwo;
    }
    timestamp = event.timestamp;
    float[] deltaRotationMatrix = new float[9];
    SensorManager.getRotationMatrixFromVector(deltaRotationMatrix, deltaRotationVector);
    // User code should concatenate the delta rotation we computed with the current rotation
    // in order to get the updated rotation.
    // rotationCurrent = rotationCurrent * deltaRotationMatrix;
}
Standard gyroscopes provide raw rotational data without any filtering or correction for noise and drift (bias). In practice, gyroscope noise and drift will introduce errors that need to be compensated for. You usually determine the drift (bias) and noise by monitoring other sensors, such as the gravity sensor or accelerometer.
Use the uncalibrated gyroscope
The uncalibrated gyroscope is similar to the gyroscope,
except that no gyro-drift compensation is applied to the rate of rotation. Factory calibration
and temperature compensation are still applied to the rate of rotation. The uncalibrated
gyroscope is useful for post-processing and melding orientation data. In general,
gyroscope_event.values[0] will be close to
uncalibrated_gyroscope_event.values[0] - uncalibrated_gyroscope_event.values[3].
That is,
calibrated_x ~= uncalibrated_x - bias_estimate_x
Note: Uncalibrated sensors provide more raw results and may include some bias, but their measurements contain fewer jumps from corrections applied through calibration. Some applications may prefer these uncalibrated results as smoother and more reliable. For instance, if an application is attempting to conduct its own sensor fusion, introducing calibrations can actually distort results.
In addition to the rates of rotation, the uncalibrated gyroscope also provides the estimated drift around each axis. The following code shows you how to get an instance of the default uncalibrated gyroscope:
Kotlin
val sensorManager = getSystemService(Context.SENSOR_SERVICE) as SensorManager
val sensor: Sensor? = sensorManager.getDefaultSensor(Sensor.TYPE_GYROSCOPE_UNCALIBRATED)
Java
private SensorManager sensorManager;
private Sensor sensor;
...
sensorManager = (SensorManager) getSystemService(Context.SENSOR_SERVICE);
sensor = sensorManager.getDefaultSensor(Sensor.TYPE_GYROSCOPE_UNCALIBRATED);
Additional code samples
The BatchStepSensor sample further demonstrates the use of the APIs covered on this page.