
На этой странице описывается, как сторонние SDK могут интегрировать встроенную установку — новую тестовую функцию Google Play, которая представляет информацию о приложении Google Play в виде интерфейса, состоящего из половины листа. Встроенная установка позволяет пользователям опробовать плавный процесс установки приложения, не выходя из контекста приложения.
Разработчики сторонних SDK могут интегрировать функцию встроенной установки в свои SDK, чтобы разработчики приложений, использующие эти SDK, могли получать доступ к встроенным установкам для своих приложений.
Требования
Чтобы встроенный интерфейс установки половинного листа появился в приложении:
- Минимальная версия Google Play должна быть 40.4 .
- Уровень API Android должен быть 23 или выше .
Архитектура процесса
Архитектура процесса встроенной установки показана на следующем рисунке:
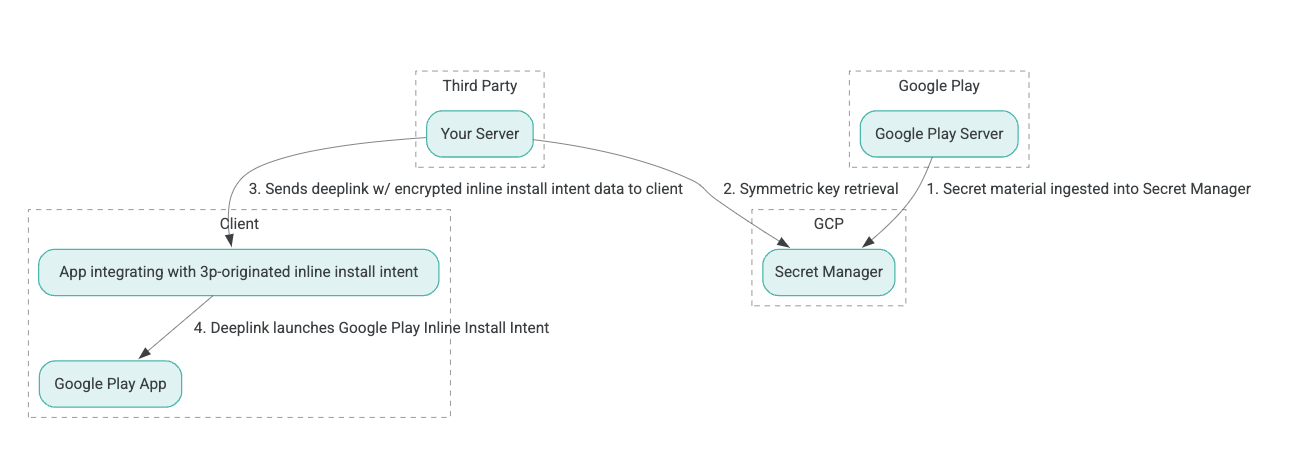
- Серверы Google Play генерируют ключи шифрования с аутентифицированным шифрованием и связанными данными (AEAD) и загружают ключи в экземпляр Secret Manager Google Cloud Platform (GCP).
- Сторонний интегратор извлекает ключ AEAD из GCP Secret Manager.
- Сторонний интегратор шифрует данные
Intentвстроенной установки, генерирует зашифрованный текст, передаваемый в глубинной ссылке, используемой для вызова намерения встроенной установки, и отправляет глубинные ссылки клиенту в ответах. - При переходе по глубинной ссылке приложение Google Play обрабатывает намерение.
Чтобы настроить сторонний SDK для использования процесса встроенной установки, выполните следующие действия.
Создание учетных записей служб в Google Cloud Project
На этом этапе вы настраиваете учетную запись службы с помощью Google Cloud Console .
- Настройте проект Google Cloud:
- Создайте организацию Google Cloud. При создании учётной записи Google Workspace или Cloud Identity и её связывании с вашим доменным именем ресурс организации создаётся автоматически. Подробнее см. в статье Создание и управление ресурсами организации .
- Войдите в консоль GCP, используя учётную запись Google Cloud, созданную на предыдущем шаге, и создайте проект Google Cloud. Подробнее см. в статье Создание проекта Google Cloud .
- Создайте учетную запись службы в созданном проекте Google Cloud. Учетная запись службы будет использоваться в качестве идентификатора Google Cloud для доступа к симметричному ключу от имени ваших серверов. Подробнее см. в разделе Создание учетной записи службы .
- Используйте тот же идентификатор клиента Google Workspace (GWCID) / идентификатор Dasher, который был введен в форму заинтересованности .
- Создайте и загрузите закрытый ключ этой учетной записи службы.
- Создайте ключ для этой учётной записи службы. Подробнее см. в разделе Создание ключа учётной записи службы .
- Скачайте ключ учётной записи сервиса и сохраните его на своём сервере, так как он используется для аутентификации при доступе к ресурсам Google Cloud для симметричных ключей. Подробнее см. в разделе «Получение ключа учётной записи сервиса» .
Получить учетные данные
На этом этапе вы извлекаете симметричный ключ из Secret Manager и безопасно сохраняете его (например, в JSON-файле) на вашем сервере. Этот ключ используется для генерации шифротекста данных для встроенной установки.
Значения secret_id/secretId относятся к имени секрета в менеджере секретов; это имя генерируется путём добавления hsdp-3p-key- к значению sdk_id , предоставленному Play. Например, если sdk_id — abc , имя секрета — hsdp-3p-key-abc .
Секретные версии обновляются еженедельно по вторникам в 14:00 по UTC. Вторые по дате обновления ключи продолжают действовать до следующей ротации, а ключевой материал следует обновлять и сохранять еженедельно.
Пример на Python
В следующем примере кода токен доступа, сохраненный в JSON-файле, используется для доступа к ключевому материалу в GCP Secret Manager и вывода его на консоль.
#!/usr/bin/env python3
# Import the Secret Manager client library.
from google.cloud import secretmanager
from google.oauth2 import service_account
import google_crc32c

# Create a service account key file.
service_account_key_file = "<json key file of the service account>"
credentials = service_account.Credentials.from_service_account_file(service_account_key_file)

# Create the Secret Manager client.
client = secretmanager.SecretManagerServiceClient(
  credentials=credentials
)

# Build the resource name of the secret version.
name = f"projects/prod-play-hsdp-3p-caller-auth/secrets/<secret_id>/versions/latest"

# Access the secret version.
response = client.access_secret_version(request={"name": name})

# Verify payload checksum.
crc32c = google_crc32c.Checksum()
crc32c.update(response.payload.data)
if response.payload.data_crc32c != int(crc32c.hexdigest(), 16):
    print("Data corruption detected.")

# A keyset created with "tinkey create-keyset --key-template=AES256_GCM". Note
# that this keyset has the secret key information in cleartext.
keyset = response.payload.data.decode("UTF-8")

# WARNING: Do not print the secret in a production environment. Please store it
# in a secure storage.
with open('<key file name>', 'w') as f:
    f.write(keyset)
Пример Java
В следующем примере кода токен доступа, сохраненный в JSON-файле, используется для доступа к ключевым данным в GCP Secret Manager и записи их в JSON-файл.
import static java.nio.charset.StandardCharsets.UTF_8;
import com.google.api.gax.core.CredentialsProvider;
import com.google.api.gax.core.FixedCredentialsProvider;
import com.google.auth.oauth2.ServiceAccountCredentials;
import com.google.cloud.secretmanager.v1.AccessSecretVersionResponse;
import com.google.cloud.secretmanager.v1.SecretManagerServiceClient;
import com.google.cloud.secretmanager.v1.SecretManagerServiceSettings;
import com.google.cloud.secretmanager.v1.SecretVersionName;
import java.io.FileInputStream;
import java.io.IOException;
import java.io.PrintWriter;
import java.nio.file.Files;
import java.nio.file.Paths;
import java.util.zip.CRC32C;
import java.util.zip.Checksum;

/** */
final class ThirdPartySecretAccessGuide {

  private ThirdPartySecretAccessGuide() {}

  public static void main(String[] args) throws IOException {
    accessSecretVersion();
  }

  public static void accessSecretVersion() throws IOException {
    // TODO(developer): Replace these variables before running the sample.
    String projectId = "projectId";
    String secretId = "secretId";
    String versionId = "versionId";
    String accessTokenPrivateKeyPath = "path/to/credentials.json";
    String secretMaterialOutputPath = "path/to/secret.json";
    accessSecretVersion(
        projectId, secretId, versionId, accessTokenPrivateKeyPath, secretMaterialOutputPath);
  }

  // Access the payload for the given secret version if one exists. The version
  // can be a version number as a string (e.g. "5") or an alias (e.g. "latest").
  public static void accessSecretVersion(
      String projectId,
      String secretId,
      String versionId,
      String accessTokenPrivateKeyPath,
      String secretMaterialOutputPath)
      throws IOException {

    // We can explicitly instantiate the SecretManagerServiceClient (below) from a json file if we:
    // 1. Create a CredentialsProvider from a FileInputStream of the JSON file,
    CredentialsProvider credentialsProvider =
        FixedCredentialsProvider.create(
            ServiceAccountCredentials.fromStream(new FileInputStream(accessTokenPrivateKeyPath)));

    // 2. Build a SecretManagerService Settings object from that credentials provider, and
    SecretManagerServiceSettings secretManagerServiceSettings =
        SecretManagerServiceSettings.newBuilder()
            .setCredentialsProvider(credentialsProvider)
            .build();

    // 3. Initialize client that will be used to send requests by passing the settings object to
    // create(). This client only needs to be created once, and can be reused for multiple requests.
    // After completing all of your requests, call the "close" method on the client to safely clean
    // up any remaining background resources.
    try (SecretManagerServiceClient client =
        SecretManagerServiceClient.create(secretManagerServiceSettings)) {
      SecretVersionName secretVersionName = SecretVersionName.of(projectId, secretId, versionId);

      // Access the secret version.
      AccessSecretVersionResponse response = client.accessSecretVersion(secretVersionName);

      // Verify checksum. The used library is available in Java 9+.
      // If using Java 8, you may use the following:
      // https://github.com/google/guava/blob/e62d6a0456420d295089a9c319b7593a3eae4a83/guava/src/com/google/common/hash/Hashing.java#L395
      byte[] data = response.getPayload().getData().toByteArray();
      Checksum checksum = new CRC32C();
      checksum.update(data, 0, data.length);
      if (response.getPayload().getDataCrc32C() != checksum.getValue()) {
        System.out.printf("Data corruption detected.");
        return;
      }

      String payload = response.getPayload().getData().toStringUtf8();
      // Print the secret payload.
      //
      // WARNING: Do not print the secret in a production environment - this
      // snippet is showing how to access the secret material.
      System.out.printf("Plaintext: %s\n", payload);

      // Write the JSON secret material payload to a json file
      try (PrintWriter out =
          new PrintWriter(Files.newBufferedWriter(Paths.get(secretMaterialOutputPath), UTF_8))) {
        out.write(payload);
      } catch (Exception e) {
        e.printStackTrace();
      }
    }
  }
}
Установить учетные данные приложения по умолчанию
Если вы не хотите использовать CredentialsProvider для передачи закрытого ключа в JSON-файл в реализации Java, вы можете изменить реализацию, установив Application Default Credentials (ADC):
- Сообщите клиентским библиотекам, где найти ключ учетной записи службы.
- Добавьте зависимости Maven в проект Java.
- Вызовите
SecretManagerServiceClient.create(), который автоматически выполнит аутентификацию (из-за шага 1).
Эти шаги изменяют реализацию Java следующим образом:
- Устранение необходимости создания объектов
CredentialsProviderиSecretManagerServiceSettings. - Измените вызов
SecretManagerServiceClient.create()так, чтобы он не включал аргументы.
Создать зашифрованный текст и сгенерировать глубокую ссылку
На этом этапе вы используете криптографическую библиотеку Tink для создания enifd (шифротекста InlineInstallData ) из объекта Protobuf InlineInstallData . Protobuf InlineInstallData определяется следующим образом:
syntax = "proto2";
package hsdpexperiments;
option java_package = "com.google.hsdpexperiments";
option java_multiple_files = true;

// InlineInstallData is used by 3p auth callers to generate "encrypted inline
// flow data" (enifd) which is decrypted in PGS to verify authenticity and
// freshness.
message InlineInstallData {
  // The timestamp which indicates the time encrypted data is generated.
  // Used to validate freshness (i.e. generation time in past 4 hours).
  // Required.
  optional int64 timestamp_ms = 1;

  // The docid of the app that we want to open inline install page for.
  // This is the package name.
  // Required.
  optional string target_package_name = 2;

  // This is the name of the app requesting the ad from Google Ad Serving
  // system.
  // Required.
  optional string caller_package_name = 3;

  // This is the advertising id that will be collected by 3P Ad SDKs.
  // Optional.
  optional string advertising_id = 4;

  // This is used to indicate the network from where the inline install was
  // requested.
  // Required.
  optional string ad_network_id = 5;
}
На этом этапе вы также создаете URL-адрес глубокой ссылки, используя следующие параметры:
| Поля | Описание | Необходимый |
|---|---|---|
| идентификатор | Имя пакета устанавливаемого приложения. | Да |
| в соответствии | Установите значение true , если запрашивается встроенная установка половины листа; если false , намерение ссылается на Google Play. | Да |
| Энифд | Зашифрованный идентификатор для 3P SDK. | Да |
| левый фт | Внутренний идентификатор. | Да |
| 3pAuthCallerId | Идентификатор SDK. | Да |
| листинг | Необязательный параметр, указывающий цель для пользовательского листинга магазина . | Нет |
| реферер | Необязательная строка отслеживания реферера . | Нет |
Пример на Python
Следующая команда генерирует код Python из InlineInstallData.proto :
protoc InlineInstallData.proto --python_out=.
Следующий пример кода Python создает InlineInstallData и шифрует его с помощью симметричного ключа для создания зашифрованного текста:
#!/usr/bin/env python3

# Import the Secret Manager client library.
import base64
import time
import inline_install_data_pb2 as InlineInstallData
import tink
from tink import aead
from tink import cleartext_keyset_handle

# Read the stored symmetric key.
with open("example3psecret.json", "r") as f:
  keyset = f.read()

"""Encrypt and decrypt using AEAD."""
# Register the AEAD key managers. This is needed to create an Aead primitive later.
aead.register()

# Create a keyset handle from the cleartext keyset in the previous
# step. The keyset handle provides abstract access to the underlying keyset to
# limit access of the raw key material. WARNING: In practice, it is unlikely
# you will want to use a cleartext_keyset_handle, as it implies that your key
# material is passed in cleartext, which is a security risk.
keyset_handle = cleartext_keyset_handle.read(tink.JsonKeysetReader(keyset))

# Retrieve the Aead primitive we want to use from the keyset handle.
primitive = keyset_handle.primitive(aead.Aead)

inlineInstallData = InlineInstallData.InlineInstallData()
inlineInstallData.timestamp_ms = int(time.time() * 1000)
inlineInstallData.target_package_name = "x.y.z"
inlineInstallData.caller_package_name = "a.b.c"
inlineInstallData.ad_network_id = "<sdk_id>"

# Use the primitive to encrypt a message. In this case the primary key of the
# keyset will be used (which is also the only key in this example).
ciphertext = primitive.encrypt(inlineInstallData.SerializeToString(), b'<sdk_id>')
print(f"InlineInstallData Ciphertext: {ciphertext}")

# Base64 Encoded InlineInstallData Ciphertext
enifd = base64.urlsafe_b64encode(ciphertext).decode('utf-8')
print(enifd)

# Deeplink
print(f"https://play.google.com/d?id={inlineInstallData.target_package_name}\&inline=true\&enifd={enifd}\&lft=1\&3pAuthCallerId={inlineInstallData.ad_network_id}")
Выполните скрипт Python, выполнив следующую команду:
python <file_name>.py
Пример Java
Следующая команда генерирует код Java из InlineInstallData.proto :
protoc InlineInstallData.proto --java_out=.
Следующий пример кода Java создает InlineInstallData и шифрует его с помощью симметричного ключа для создания зашифрованного текста:
package com.google.hsdpexperiments;

import static com.google.common.io.BaseEncoding.base64Url;
import static java.nio.charset.StandardCharsets.UTF_8;

import com.google.common.flags.Flag;
import com.google.common.flags.FlagSpec;
import com.google.common.flags.Flags;
import com.google.crypto.tink.Aead;
import com.google.crypto.tink.InsecureSecretKeyAccess;
import com.google.crypto.tink.KeysetHandle;
import com.google.crypto.tink.TinkJsonProtoKeysetFormat;
import com.google.crypto.tink.aead.AeadConfig;
import java.nio.file.Files;
import java.nio.file.Path;
import java.nio.file.Paths;
import java.security.Security;
import java.time.Duration;
import org.conscrypt.Conscrypt;

/** info on encryption in https://github.com/google/tink#learn-more */
final class ThirdPartyEnifdGuide {

  @FlagSpec(
      name = "third_party_id",
      help = "the identifier associated with the 3p for which to generate the enifd")
  private static final Flag<String> thirdPartyAuthCallerId = Flag.value("");

  @FlagSpec(name = "package_name", help = "the package name of the target app")
  private static final Flag<String> packageName = Flag.value("");


  @FlagSpec(name = "caller_package_name", help = "the package name of the caller app")
  private static final Flag<String> callerPackageName = Flag.value("");

  @FlagSpec(name = "secret_filename", help = "the path to the json file with the secret material")
  private static final Flag<String> secretFilename = Flag.value("");

  private ThirdPartyEnifdGuide() {}

  public static void main(String[] args) throws Exception {
    // parse flags
    Flags.parse(args);

    // File keyFile = new File(args[0]);
    Path keyFile = Paths.get(secretFilename.get());

    // Create structured inline flow data
    InlineInstallData idrp =
        InlineInstallData.newBuilder()
            .setTargetPackageName(packageName.get())
            .setCallerPackageName(callerPackageName.get())
            .setTimestampMs(System.currentTimeMillis())
            .setAdNetworkId(thirdPartyAuthCallerId.get())
            .build();

    // we can print this out here to make sure it's well formatted, this will help debug
    System.out.println(idrp.toString());

    // Register all AEAD key types with the Tink runtime.
    Conscrypt.checkAvailability();
    Security.addProvider(Conscrypt.newProvider());
    AeadConfig.register();

    // Read AEAD key downloaded from secretmanager into keysethandle
    KeysetHandle handle =
        TinkJsonProtoKeysetFormat.parseKeyset(
            new String(Files.readAllBytes(keyFile), UTF_8), InsecureSecretKeyAccess.get());

    // Generate enifd using tink library
    Aead aead = handle.getPrimitive(Aead.class);
    byte[] plaintext = idrp.toByteArray();
    byte[] ciphertext = aead.encrypt(plaintext, thirdPartyAuthCallerId.get().getBytes(UTF_8));
    String enifd = base64Url().omitPadding().encode(ciphertext);

    // Build deeplink, escaping ampersands (TODO: verify this is necessary while testing e2e)
    String deeplink =
        "https://play.google.com/d?id="
            + packageName.get()
            + "\\&inline=true\\&enifd="
            + enifd
            + "\\&lft=1\\&3pAuthCallerId="
            + thirdPartyAuthCallerId.get();

    System.out.println(deeplink);
  }
}
Наконец, скомпилируйте программу Java в двоичный файл и вызовите ее с помощью следующего кода:
path/to/binary/ThirdPartyEnifdGuide --secret_filename=path/to/jsonfile/example3psecret.json --package_name=<package_name_of_target_app> --third_party_id=<3p_caller_auth_id>
- Флаг
secret_filenameуказывает путь к JSON-файлу, содержащему секретный материал. - Флаг
package_name— это идентификатор документа целевого приложения. - Флаг
third_party_idиспользуется для указания идентификатора аутентификации стороннего вызывающего абонента (то есть<sdk_id>).
Запустить намерение Inline Install
Чтобы протестировать глубокую ссылку, созданную на предыдущем шаге, подключите устройство Android (убедитесь, что отладка по USB включена) к рабочей станции, на которой установлен ADB, и выполните следующую команду:
adb shell am start "<output_from_the_previous_python_or_java_code>"
В клиентском коде отправьте намерение, используя один из следующих методов (Kotlin или Java).
Котлин
val intent = Intent(Intent.ACTION_VIEW)
val deepLinkUrl = "<output_from_the_previous_python_or_java_code>"
intent.setPackage("com.android.vending")
intent.data = Uri.parse(deepLinkUrl)
val packageManager = context.getPackageManager()
if (intent.resolveActivity(packageManager) != null) {
  startActivityForResult(intent, 0)
} else {
  // Fallback to deep linking to full Play Store.
}
Ява
Intent intent = new Intent(Intent.ACTION_VIEW);
String id = "exampleAppToBeInstalledId";
String deepLinkUrl = "<output_from_the_previous_python_or_java_code>";
intent.setPackage("com.android.vending");
intent.setData(Uri.parse(deepLinkUrl));
PackageManager packageManager = context.getPackageManager();
if (intent.resolveActivity(packageManager) != null) {
  startActivityForResult(intent, 0);
} else {
  // Fallback to deep linking to full Play Store.
}
Приложение
В следующих разделах приведены дополнительные рекомендации по некоторым вариантам использования.
Подготовьте среду Python
Чтобы запустить пример кода Python, настройте среду Python на своей рабочей станции и установите необходимые зависимости.
Настройте среду Python:
Установите python3.11 (если он уже установлен, пропустите этот шаг):
sudo apt install python3.11Установить pip:
sudo apt-get install pipУстановить
virtualenv:sudo apt install python3-virtualenvСоздайте виртуальную среду (требуется для зависимости Tink):
virtualenv inlineinstall --python=/usr/bin/python3.11
Войдите в виртуальную среду:
source inlineinstall/bin/activateОбновление пипа:
python -m pip install --upgrade pipУстановите необходимые зависимости:
Установить Tink:
pip install tinkУстановить Google crc32c:
pip install google-crc32cУстановить Secret Manager:
pip install google-cloud-secret-managerУстановите компилятор protobuf:
sudo apt install protobuf-compiler
Генерация enifd C++
Ниже приведен пример C++, который мы написали и проверили внутренне для генерации enifd .
Генерацию enifd можно осуществить с использованием кода C++ следующим образом:
// A command-line example for using Tink AEAD w/ key template aes128gcmsiv to
// encrypt an InlineInstallData proto.
#include <chrono>
#include <iostream>
#include <memory>
#include <string>

#include "<path_to_protoc_output>/inline_install_data.proto.h"
#include "absl/flags/flag.h"
#include "absl/flags/parse.h"
#include "absl/strings/escaping.h"
#include "absl/strings/string_view.h"
#include "tink/cc/aead.h"
#include "tink/cc/aead_config.h"
#include "tink/cc/aead_key_templates.h"
#include "tink/cc/config/global_registry.h"
#include "tink/cc/examples/util/util.h"
#include "tink/cc/keyset_handle.h"
#include "tink/cc/util/status.h"
#include "tink/cc/util/statusor.h"

ABSL_FLAG(std::string, keyset_filename, "",
          "Keyset file (downloaded from secretmanager) in JSON format");
ABSL_FLAG(std::string, associated_data, "",
          "Associated data for AEAD (default: empty");

namespace {

using ::crypto::tink::Aead;
using ::crypto::tink::AeadConfig;
using ::crypto::tink::KeysetHandle;
using ::crypto::tink::util::Status;
using ::crypto::tink::util::StatusOr;

}  // namespace

namespace tink_cc_examples {

// AEAD example CLI implementation.
void AeadCli(const std::string& keyset_filename,
             absl::string_view associated_data) {
  Status result = AeadConfig::Register();
  if (!result.ok()) {
    std::clog << "Failed to register AeadConfig";
    return;
  }

  // Read the keyset from file.
  StatusOr<std::unique_ptr<KeysetHandle>> keyset_handle =
      ReadJsonCleartextKeyset(keyset_filename);
  if (!keyset_handle.ok()) {
    std::clog << "Failed to read json keyset";
    return;
  }

  // Get the primitive.
  StatusOr<std::unique_ptr<Aead>> aead =
      (*keyset_handle)
          ->GetPrimitive<crypto::tink::Aead>(
              crypto::tink::ConfigGlobalRegistry());
  if (!aead.ok()) {
    std::clog << "Failed to get primitive";
    return;
  }

  // Instantiate the enifd.
  hsdpexperiments::InlineInstallData iid;

  iid.set_timestamp_ms(std::chrono::duration_cast<std::chrono::milliseconds>(
                           std::chrono::system_clock::now().time_since_epoch())
                           .count());
  iid.set_target_package_name("<TARGET_PACKAGE_NAME>");
  iid.set_caller_package_name("<CALLER_PACKAGE_NAME>");
  iid.set_ad_network_id("<SDK_ID>");

  // Compute the output.
  StatusOr<std::string> encrypt_result =
      (*aead)->Encrypt(iid.SerializeAsString(), associated_data);
  if (!encrypt_result.ok()) {
    std::clog << "Failed to encrypt Inline Install Data";
    return;
  }
  const std::string& output = encrypt_result.value();

  std::string enifd;
  absl::WebSafeBase64Escape(output, &enifd);

  std::clog << "enifd: " << enifd << '\n';
}

}  // namespace tink_cc_examples

int main(int argc, char** argv) {
  absl::ParseCommandLine(argc, argv);

  std::string keyset_filename = absl::GetFlag(FLAGS_keyset_filename);
  std::string associated_data = absl::GetFlag(FLAGS_associated_data);

  std::clog << "Using keyset from file " << keyset_filename
            << " to AEAD-encrypt inline install data with associated data '"
            << associated_data << "'." << '\n';

  tink_cc_examples::AeadCli(keyset_filename, associated_data);
  return 0;
}
Этот код был адаптирован из примера , который можно найти в документации Tink.