
Questa pagina descrive come gli SDK di terze parti possono integrare l'installazione integrata, una nuova funzionalità di test per Google Play che presenta i dettagli del prodotto dell'app Google Play in un'interfaccia a metà pagina. L'installazione integrata consente agli utenti di usufruire di un flusso di installazione dell'app senza interruzioni senza uscire dal contesto dell'app.
Gli sviluppatori di SDK di terze parti possono integrare la funzionalità di installazione integrata nei propri SDK per consentire agli sviluppatori di app che utilizzano questi SDK di accedere alle installazioni integrate per le loro app.
Requisiti
Affinché l'interfaccia a metà pagina dell'installazione integrata venga visualizzata in un'app:
- La versione minima di Google Play deve essere la 40.4.
- Il livello API Android deve essere 23 o superiore.
Architettura di processo
L'architettura del processo di installazione integrata è mostrata nella figura seguente:
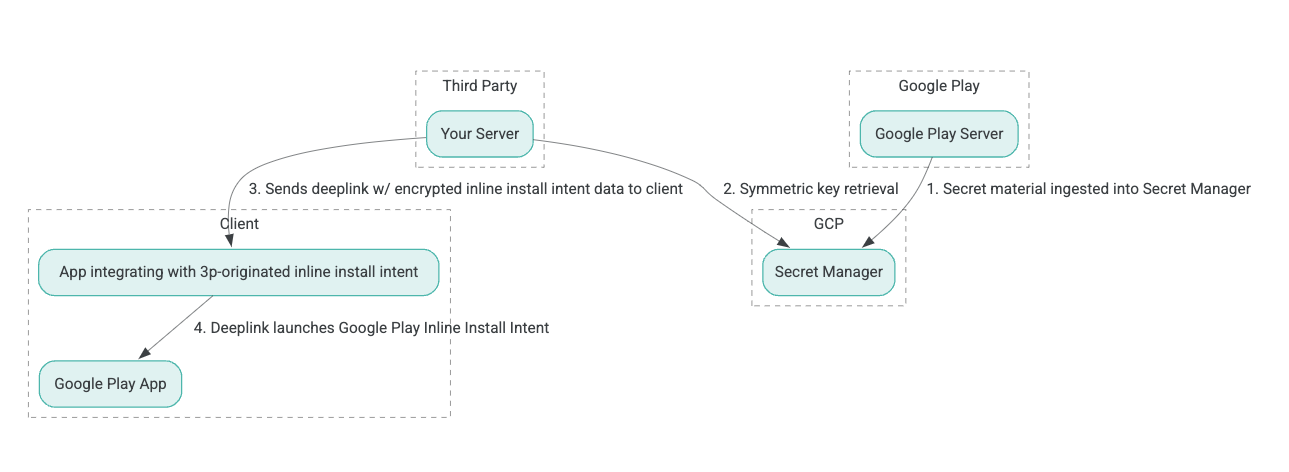
- I server di Google Play generano chiavi di crittografia AEAD (Authenticated Encryption with Associated Data) e le inseriscono in un'istanza di Secret Manager di Google Cloud Platform (GCP).
- L'integratore di terze parti recupera la chiave AEAD da Secret Manager di Google Cloud.
- L'integratore di terze parti cripta i dati
Intentdell'installazione integrata, genera il testo criptato passato nel link diretto utilizzato per richiamare l'intent di installazione integrata e invia i link diretti al client nelle risposte. - Quando viene seguito il link diretto, l'app Google Play gestisce l'intent.
Per configurare un SDK di terze parti in modo che utilizzi il processo di installazione integrata, completa i seguenti passaggi.
Crea account di servizio nel progetto Google Cloud
In questo passaggio, configurerai un account di servizio utilizzando la console Google Cloud.
- Configura un progetto Google Cloud:
- Crea un'organizzazione Google Cloud. Quando crei un account Google Workspace o Cloud Identity e lo associ al tuo nome di dominio, la risorsa organizzazione viene creata automaticamente. Per maggiori dettagli, consulta Creazione e gestione delle risorse organizzazione.
- Accedi alla console Google Cloud utilizzando l'account Google Cloud creato nel passaggio precedente, quindi crea un progetto Google Cloud. Per maggiori dettagli, consulta Creare un progetto Google Cloud.
- Crea un account di servizio nel progetto Google Cloud creato. Il service account viene utilizzato come identità Google Cloud per accedere alla chiave simmetrica per conto dei tuoi server. Per maggiori dettagli, consulta Creare un account di servizio.
- Utilizza lo stesso ID cliente Google Workspace (GWCID) / ID Dasher che è stato inserito nel modulo di interesse.
- Crea e scarica la chiave privata di questo account di servizio.
- Crea una chiave per questo account di servizio. Per maggiori dettagli, consulta Creare una chiave dell'account di servizio.
- Scarica la chiave dell'account di servizio e mantienila accessibile sul server, poiché viene utilizzata per l'autenticazione per accedere alle risorse Google Cloud per le chiavi simmetriche. Per maggiori dettagli, consulta Ottenere una chiave dell'account di servizio.
Recupera le credenziali
In questo passaggio, recupererai la chiave simmetrica da Secret Manager e la memorizzerai in modo sicuro (ad esempio, in un file JSON) nello spazio di archiviazione del server. Questa chiave viene utilizzata per generare il testo criptato dei dati di installazione integrata.
I valori secret_id/secretId si riferiscono al nome del secret all'interno di Secret Manager; questo nome viene generato anteponendo hsdp-3p-key- al valore sdk_id fornito da Play. Ad esempio, se sdk_id è abc, il
nome del secret è hsdp-3p-key-abc.
Le versioni dei secret vengono aggiornate ogni martedì alle 14:00 UTC. Le chiavi più recenti continuano a funzionare fino alla rotazione successiva e il materiale della chiave deve essere recuperato e archiviato ogni settimana.
Esempio Python
Il seguente esempio di codice utilizza un token di accesso archiviato in un file JSON per accedere al materiale della chiave in Secret Manager di Google Cloud e stamparlo nella console.
#!/usr/bin/env python3
# Import the Secret Manager client library.
from google.cloud import secretmanager
from google.oauth2 import service_account
import google_crc32c

# Create a service account key file.
service_account_key_file = "<json key file of the service account>"
credentials = service_account.Credentials.from_service_account_file(service_account_key_file)

# Create the Secret Manager client.
client = secretmanager.SecretManagerServiceClient(
  credentials=credentials
)

# Build the resource name of the secret version.
name = f"projects/prod-play-hsdp-3p-caller-auth/secrets/<secret_id>/versions/latest"

# Access the secret version.
response = client.access_secret_version(request={"name": name})

# Verify payload checksum.
crc32c = google_crc32c.Checksum()
crc32c.update(response.payload.data)
if response.payload.data_crc32c != int(crc32c.hexdigest(), 16):
    print("Data corruption detected.")

# A keyset created with "tinkey create-keyset --key-template=AES256_GCM". Note
# that this keyset has the secret key information in cleartext.
keyset = response.payload.data.decode("UTF-8")

# WARNING: Do not print the secret in a production environment. Please store it
# in a secure storage.
with open('<key file name>', 'w') as f:
    f.write(keyset)
Esempio Java
Il seguente esempio di codice utilizza un token di accesso archiviato in un file JSON per accedere al materiale della chiave in Secret Manager di Google Cloud e scriverlo in un file JSON.
import static java.nio.charset.StandardCharsets.UTF_8;
import com.google.api.gax.core.CredentialsProvider;
import com.google.api.gax.core.FixedCredentialsProvider;
import com.google.auth.oauth2.ServiceAccountCredentials;
import com.google.cloud.secretmanager.v1.AccessSecretVersionResponse;
import com.google.cloud.secretmanager.v1.SecretManagerServiceClient;
import com.google.cloud.secretmanager.v1.SecretManagerServiceSettings;
import com.google.cloud.secretmanager.v1.SecretVersionName;
import java.io.FileInputStream;
import java.io.IOException;
import java.io.PrintWriter;
import java.nio.file.Files;
import java.nio.file.Paths;
import java.util.zip.CRC32C;
import java.util.zip.Checksum;

/** */
final class ThirdPartySecretAccessGuide {

  private ThirdPartySecretAccessGuide() {}

  public static void main(String[] args) throws IOException {
    accessSecretVersion();
  }

  public static void accessSecretVersion() throws IOException {
    // TODO(developer): Replace these variables before running the sample.
    String projectId = "projectId";
    String secretId = "secretId";
    String versionId = "versionId";
    String accessTokenPrivateKeyPath = "path/to/credentials.json";
    String secretMaterialOutputPath = "path/to/secret.json";
    accessSecretVersion(
        projectId, secretId, versionId, accessTokenPrivateKeyPath, secretMaterialOutputPath);
  }

  // Access the payload for the given secret version if one exists. The version
  // can be a version number as a string (e.g. "5") or an alias (e.g. "latest").
  public static void accessSecretVersion(
      String projectId,
      String secretId,
      String versionId,
      String accessTokenPrivateKeyPath,
      String secretMaterialOutputPath)
      throws IOException {

    // We can explicitly instantiate the SecretManagerServiceClient (below) from a json file if we:
    // 1. Create a CredentialsProvider from a FileInputStream of the JSON file,
    CredentialsProvider credentialsProvider =
        FixedCredentialsProvider.create(
            ServiceAccountCredentials.fromStream(new FileInputStream(accessTokenPrivateKeyPath)));

    // 2. Build a SecretManagerService Settings object from that credentials provider, and
    SecretManagerServiceSettings secretManagerServiceSettings =
        SecretManagerServiceSettings.newBuilder()
            .setCredentialsProvider(credentialsProvider)
            .build();

    // 3. Initialize client that will be used to send requests by passing the settings object to
    // create(). This client only needs to be created once, and can be reused for multiple requests.
    // After completing all of your requests, call the "close" method on the client to safely clean
    // up any remaining background resources.
    try (SecretManagerServiceClient client =
        SecretManagerServiceClient.create(secretManagerServiceSettings)) {
      SecretVersionName secretVersionName = SecretVersionName.of(projectId, secretId, versionId);

      // Access the secret version.
      AccessSecretVersionResponse response = client.accessSecretVersion(secretVersionName);

      // Verify checksum. The used library is available in Java 9+.
      // If using Java 8, you may use the following:
      // https://github.com/google/guava/blob/e62d6a0456420d295089a9c319b7593a3eae4a83/guava/src/com/google/common/hash/Hashing.java#L395
      byte[] data = response.getPayload().getData().toByteArray();
      Checksum checksum = new CRC32C();
      checksum.update(data, 0, data.length);
      if (response.getPayload().getDataCrc32C() != checksum.getValue()) {
        System.out.printf("Data corruption detected.");
        return;
      }

      String payload = response.getPayload().getData().toStringUtf8();
      // Print the secret payload.
      //
      // WARNING: Do not print the secret in a production environment - this
      // snippet is showing how to access the secret material.
      System.out.printf("Plaintext: %s\n", payload);

      // Write the JSON secret material payload to a json file
      try (PrintWriter out =
          new PrintWriter(Files.newBufferedWriter(Paths.get(secretMaterialOutputPath), UTF_8))) {
        out.write(payload);
      } catch (Exception e) {
        e.printStackTrace();
      }
    }
  }
}
Imposta le credenziali predefinite dell'applicazione
Se non vuoi utilizzare CredentialsProvider per passare la chiave privata a un file JSON nell'implementazione Java, puoi modificare l'implementazione impostando le credenziali predefinite dell'applicazione (ADC):
- Indica alle librerie client dove trovare la chiave dell'account di servizio.
- Aggiungi le dipendenze Maven al progetto Java.
- Chiama
SecretManagerServiceClient.create(), che rileva automaticamente l' autenticazione (grazie al passaggio 1).
Questi passaggi modificano l'implementazione Java:
- Eliminando la necessità di creare gli oggetti
CredentialsProvidereSecretManagerServiceSettings. - Modificando la chiamata a
SecretManagerServiceClient.create()in modo che non includa argomenti.
Crea il testo criptato e genera il link diretto
In questo passaggio, utilizzerai la libreria di crittografia Tink per creare enifd (testo criptato di InlineInstallData) dall'oggetto protobuf InlineInstallData.
Il proto InlineInstallData è definito come segue:
syntax = "proto2";
package hsdpexperiments;
option java_package = "com.google.hsdpexperiments";
option java_multiple_files = true;

// InlineInstallData is used by 3p auth callers to generate "encrypted inline
// flow data" (enifd) which is decrypted in PGS to verify authenticity and
// freshness.
message InlineInstallData {
  // The timestamp which indicates the time encrypted data is generated.
  // Used to validate freshness (i.e. generation time in past 4 hours).
  // Required.
  optional int64 timestamp_ms = 1;

  // The docid of the app that we want to open inline install page for.
  // This is the package name.
  // Required.
  optional string target_package_name = 2;

  // This is the name of the app requesting the ad from Google Ad Serving
  // system.
  // Required.
  optional string caller_package_name = 3;

  // This is the advertising id that will be collected by 3P Ad SDKs.
  // Optional.
  optional string advertising_id = 4;

  // This is used to indicate the network from where the inline install was
  // requested.
  // Required.
  optional string ad_network_id = 5;
}
In questo passaggio, costruirai anche l'URL del link diretto utilizzando questi parametri:
| Campi | Descrizione | Obbligatorio |
|---|---|---|
| id | Il nome del pacchetto dell'app da installare. | Sì |
| inline | Imposta su true se viene richiesta la metà pagina di installazione integrata; se
false, l'intent rimanda direttamente a Google Play. |
Sì |
| enifd | L'identificatore criptato per gli SDK di terze parti. | Sì |
| lft | Un identificatore interno. | Sì |
| 3pAuthCallerId | L'identificatore dell'SDK. | Sì |
| scheda | Un parametro facoltativo per specificare il target di una scheda dello Store personalizzata. | No |
| referrer | Una stringa di monitoraggio dei referrer facoltativa. | No |
Esempio Python
Il seguente comando genera codice Python da InlineInstallData.proto:
protoc InlineInstallData.proto --python_out=.
Il seguente codice campione Python costruisce InlineInstallData e lo cripta con la chiave simmetrica per creare il testo crittografato:
#!/usr/bin/env python3

# Import the Secret Manager client library.
import base64
import time
import inline_install_data_pb2 as InlineInstallData
import tink
from tink import aead
from tink import cleartext_keyset_handle

# Read the stored symmetric key.
with open("example3psecret.json", "r") as f:
  keyset = f.read()

"""Encrypt and decrypt using AEAD."""
# Register the AEAD key managers. This is needed to create an Aead primitive later.
aead.register()

# Create a keyset handle from the cleartext keyset in the previous
# step. The keyset handle provides abstract access to the underlying keyset to
# limit access of the raw key material. WARNING: In practice, it is unlikely
# you will want to use a cleartext_keyset_handle, as it implies that your key
# material is passed in cleartext, which is a security risk.
keyset_handle = cleartext_keyset_handle.read(tink.JsonKeysetReader(keyset))

# Retrieve the Aead primitive we want to use from the keyset handle.
primitive = keyset_handle.primitive(aead.Aead)

inlineInstallData = InlineInstallData.InlineInstallData()
inlineInstallData.timestamp_ms = int(time.time() * 1000)
inlineInstallData.target_package_name = "x.y.z"
inlineInstallData.caller_package_name = "a.b.c"
inlineInstallData.ad_network_id = "<sdk_id>"

# Use the primitive to encrypt a message. In this case the primary key of the
# keyset will be used (which is also the only key in this example).
ciphertext = primitive.encrypt(inlineInstallData.SerializeToString(), b'<sdk_id>')
print(f"InlineInstallData Ciphertext: {ciphertext}")

# Base64 Encoded InlineInstallData Ciphertext
enifd = base64.urlsafe_b64encode(ciphertext).decode('utf-8')
print(enifd)

# Deeplink
print(f"https://play.google.com/d?id={inlineInstallData.target_package_name}\&inline=true\&enifd={enifd}\&lft=1\&3pAuthCallerId={inlineInstallData.ad_network_id}")
Esegui lo script Python eseguendo il seguente comando:
python <file_name>.py
Esempio Java
Il seguente comando genera codice Java da InlineInstallData.proto:
protoc InlineInstallData.proto --java_out=.
Il seguente codice campione Java costruisce InlineInstallData e lo cripta con la chiave simmetrica per creare il testo crittografato:
package com.google.hsdpexperiments;

import static com.google.common.io.BaseEncoding.base64Url;
import static java.nio.charset.StandardCharsets.UTF_8;

import com.google.common.flags.Flag;
import com.google.common.flags.FlagSpec;
import com.google.common.flags.Flags;
import com.google.crypto.tink.Aead;
import com.google.crypto.tink.InsecureSecretKeyAccess;
import com.google.crypto.tink.KeysetHandle;
import com.google.crypto.tink.TinkJsonProtoKeysetFormat;
import com.google.crypto.tink.aead.AeadConfig;
import java.nio.file.Files;
import java.nio.file.Path;
import java.nio.file.Paths;
import java.security.Security;
import java.time.Duration;
import org.conscrypt.Conscrypt;

/** info on encryption in https://github.com/google/tink#learn-more */
final class ThirdPartyEnifdGuide {

  @FlagSpec(
      name = "third_party_id",
      help = "the identifier associated with the 3p for which to generate the enifd")
  private static final Flag<String> thirdPartyAuthCallerId = Flag.value("");

  @FlagSpec(name = "package_name", help = "the package name of the target app")
  private static final Flag<String> packageName = Flag.value("");


  @FlagSpec(name = "caller_package_name", help = "the package name of the caller app")
  private static final Flag<String> callerPackageName = Flag.value("");

  @FlagSpec(name = "secret_filename", help = "the path to the json file with the secret material")
  private static final Flag<String> secretFilename = Flag.value("");

  private ThirdPartyEnifdGuide() {}

  public static void main(String[] args) throws Exception {
    // parse flags
    Flags.parse(args);

    // File keyFile = new File(args[0]);
    Path keyFile = Paths.get(secretFilename.get());

    // Create structured inline flow data
    InlineInstallData idrp =
        InlineInstallData.newBuilder()
            .setTargetPackageName(packageName.get())
            .setCallerPackageName(callerPackageName.get())
            .setTimestampMs(System.currentTimeMillis())
            .setAdNetworkId(thirdPartyAuthCallerId.get())
            .build();

    // we can print this out here to make sure it's well formatted, this will help debug
    System.out.println(idrp.toString());

    // Register all AEAD key types with the Tink runtime.
    Conscrypt.checkAvailability();
    Security.addProvider(Conscrypt.newProvider());
    AeadConfig.register();

    // Read AEAD key downloaded from secretmanager into keysethandle
    KeysetHandle handle =
        TinkJsonProtoKeysetFormat.parseKeyset(
            new String(Files.readAllBytes(keyFile), UTF_8), InsecureSecretKeyAccess.get());

    // Generate enifd using tink library
    Aead aead = handle.getPrimitive(Aead.class);
    byte[] plaintext = idrp.toByteArray();
    byte[] ciphertext = aead.encrypt(plaintext, thirdPartyAuthCallerId.get().getBytes(UTF_8));
    String enifd = base64Url().omitPadding().encode(ciphertext);

    // Build deeplink, escaping ampersands (TODO: verify this is necessary while testing e2e)
    String deeplink =
        "https://play.google.com/d?id="
            + packageName.get()
            + "\\&inline=true\\&enifd="
            + enifd
            + "\\&lft=1\\&3pAuthCallerId="
            + thirdPartyAuthCallerId.get();

    System.out.println(deeplink);
  }
}
Infine, crea il programma Java in un file binario e richiamalo utilizzando il seguente codice:
path/to/binary/ThirdPartyEnifdGuide --secret_filename=path/to/jsonfile/example3psecret.json --package_name=<package_name_of_target_app> --third_party_id=<3p_caller_auth_id>
- Il flag
secret_filenamespecifica il percorso del file JSON contenente il materiale del secret. - Il flag
package_nameè l'ID documento dell'app di destinazione. - Il flag
third_party_idviene utilizzato per specificare l'ID di autenticazione del chiamante di terze parti (ovvero<sdk_id>).
Avvia l'intent di installazione integrata
Per testare il link diretto generato nel passaggio precedente, collega un dispositivo Android (assicurati che il debug USB sia abilitato) a una workstation su cui è installato ADB ed esegui il seguente comando:
adb shell am start "<output_from_the_previous_python_or_java_code>"
Nel codice client, invia l'intent utilizzando uno dei seguenti metodi (Kotlin o Java).
Kotlin
val intent = Intent(Intent.ACTION_VIEW)
val deepLinkUrl = "<output_from_the_previous_python_or_java_code>"
intent.setPackage("com.android.vending")
intent.data = Uri.parse(deepLinkUrl)
val packageManager = context.getPackageManager()
if (intent.resolveActivity(packageManager) != null) {
  startActivityForResult(intent, 0)
} else {
  // Fallback to deep linking to full Play Store.
}
Java
Intent intent = new Intent(Intent.ACTION_VIEW);
String id = "exampleAppToBeInstalledId";
String deepLinkUrl = "<output_from_the_previous_python_or_java_code>";
intent.setPackage("com.android.vending");
intent.setData(Uri.parse(deepLinkUrl));
PackageManager packageManager = context.getPackageManager();
if (intent.resolveActivity(packageManager) != null) {
  startActivityForResult(intent, 0);
} else {
  // Fallback to deep linking to full Play Store.
}
Appendice
Le sezioni seguenti forniscono ulteriori indicazioni su alcuni casi d'uso.
Prepara l'ambiente Python
Per eseguire il codice di esempio Python, configura l'ambiente Python sulla workstation e installa le dipendenze richieste.
Configura l'ambiente Python:
Installa python3.11 (se è già installato, salta questo passaggio):
sudo apt install python3.11Installa pip:
sudo apt-get install pipInstalla
virtualenv:sudo apt install python3-virtualenvCrea un ambiente virtuale (obbligatorio per la dipendenza Tink):
virtualenv inlineinstall --python=/usr/bin/python3.11
Accedi all'ambiente virtuale:
source inlineinstall/bin/activateAggiorna pip:
python -m pip install --upgrade pipInstalla le dipendenze richieste:
Installa Tink:
pip install tinkInstalla Google crc32c:
pip install google-crc32cInstalla Secret Manager:
pip install google-cloud-secret-managerInstalla il compilatore protobuf:
sudo apt install protobuf-compiler
Generazione di enifd in C++
Di seguito è riportato un esempio in C++ che abbiamo scritto e convalidato internamente per generare enifd.
La generazione di enifd può essere eseguita utilizzando il codice C++ come segue:
// A command-line example for using Tink AEAD w/ key template aes128gcmsiv to
// encrypt an InlineInstallData proto.
#include <chrono>
#include <iostream>
#include <memory>
#include <string>

#include "<path_to_protoc_output>/inline_install_data.proto.h"
#include "absl/flags/flag.h"
#include "absl/flags/parse.h"
#include "absl/strings/escaping.h"
#include "absl/strings/string_view.h"
#include "tink/cc/aead.h"
#include "tink/cc/aead_config.h"
#include "tink/cc/aead_key_templates.h"
#include "tink/cc/config/global_registry.h"
#include "tink/cc/examples/util/util.h"
#include "tink/cc/keyset_handle.h"
#include "tink/cc/util/status.h"
#include "tink/cc/util/statusor.h"

ABSL_FLAG(std::string, keyset_filename, "",
          "Keyset file (downloaded from secretmanager) in JSON format");
ABSL_FLAG(std::string, associated_data, "",
          "Associated data for AEAD (default: empty");

namespace {

using ::crypto::tink::Aead;
using ::crypto::tink::AeadConfig;
using ::crypto::tink::KeysetHandle;
using ::crypto::tink::util::Status;
using ::crypto::tink::util::StatusOr;

}  // namespace

namespace tink_cc_examples {

// AEAD example CLI implementation.
void AeadCli(const std::string& keyset_filename,
             absl::string_view associated_data) {
  Status result = AeadConfig::Register();
  if (!result.ok()) {
    std::clog << "Failed to register AeadConfig";
    return;
  }

  // Read the keyset from file.
  StatusOr<std::unique_ptr<KeysetHandle>> keyset_handle =
      ReadJsonCleartextKeyset(keyset_filename);
  if (!keyset_handle.ok()) {
    std::clog << "Failed to read json keyset";
    return;
  }

  // Get the primitive.
  StatusOr<std::unique_ptr<Aead>> aead =
      (*keyset_handle)
          ->GetPrimitive<crypto::tink::Aead>(
              crypto::tink::ConfigGlobalRegistry());
  if (!aead.ok()) {
    std::clog << "Failed to get primitive";
    return;
  }

  // Instantiate the enifd.
  hsdpexperiments::InlineInstallData iid;

  iid.set_timestamp_ms(std::chrono::duration_cast<std::chrono::milliseconds>(
                           std::chrono::system_clock::now().time_since_epoch())
                           .count());
  iid.set_target_package_name("<TARGET_PACKAGE_NAME>");
  iid.set_caller_package_name("<CALLER_PACKAGE_NAME>");
  iid.set_ad_network_id("<SDK_ID>");

  // Compute the output.
  StatusOr<std::string> encrypt_result =
      (*aead)->Encrypt(iid.SerializeAsString(), associated_data);
  if (!encrypt_result.ok()) {
    std::clog << "Failed to encrypt Inline Install Data";
    return;
  }
  const std::string& output = encrypt_result.value();

  std::string enifd;
  absl::WebSafeBase64Escape(output, &enifd);

  std::clog << "enifd: " << enifd << '\n';
}

}  // namespace tink_cc_examples

int main(int argc, char** argv) {
  absl::ParseCommandLine(argc, argv);

  std::string keyset_filename = absl::GetFlag(FLAGS_keyset_filename);
  std::string associated_data = absl::GetFlag(FLAGS_associated_data);

  std::clog << "Using keyset from file " << keyset_filename
            << " to AEAD-encrypt inline install data with associated data '"
            << associated_data << "'." << '\n';

  tink_cc_examples::AeadCli(keyset_filename, associated_data);
  return 0;
}
Questo codice è stato adattato da un esempio disponibile nella documentazione di Tink.