歡迎回到「建構智慧型 Android 應用程式」網誌系列文章。在本系列中,您將學習如何將基本的 Android 應用程式,轉換為個人化、智慧型且具備代理功能的體驗。在上一篇文章中,您已瞭解如何使用 AppFunctions 連線至智慧系統。
本文將說明如何建構在雲端執行的自主Agentic Workflows。
有時,單一裝置工作階段無法處理過於複雜的工作。舉例來說,預訂完整的假期行程需要協調航班時間、選擇飯店房間、預訂博物館門票,以及規劃餐廳預訂。如果直接在行動裝置上執行這個多步驟程序,應用程式可能會關閉,導致進度遺失。在手機上管理所有這些步驟和 API 憑證,也很快就會變得複雜。
這類長時間執行的多步驟工作流程,可以使用自訂的自行託管後端。後端會在背景執行預訂代理,Android 應用程式則會連線至工作階段、以視覺化方式呈現進度,並在必要時要求使用者輸入。
使用雲端託管的代理後端有幾項優點:
- 背景執行:預訂代理會在雲端自主執行,因此即使行動應用程式進入背景或失去網路連線,進度也不會遺失。
- 複雜的多代理自動化調度管理:協調代理可將預訂作業委派給專用子代理,並處理子代理之間的依附關係。
- 與用戶端無關的 UI 轉譯:後端會動態描述介面結構,因此您不必發布新的用戶端版本,就能更新 UI 版面配置。
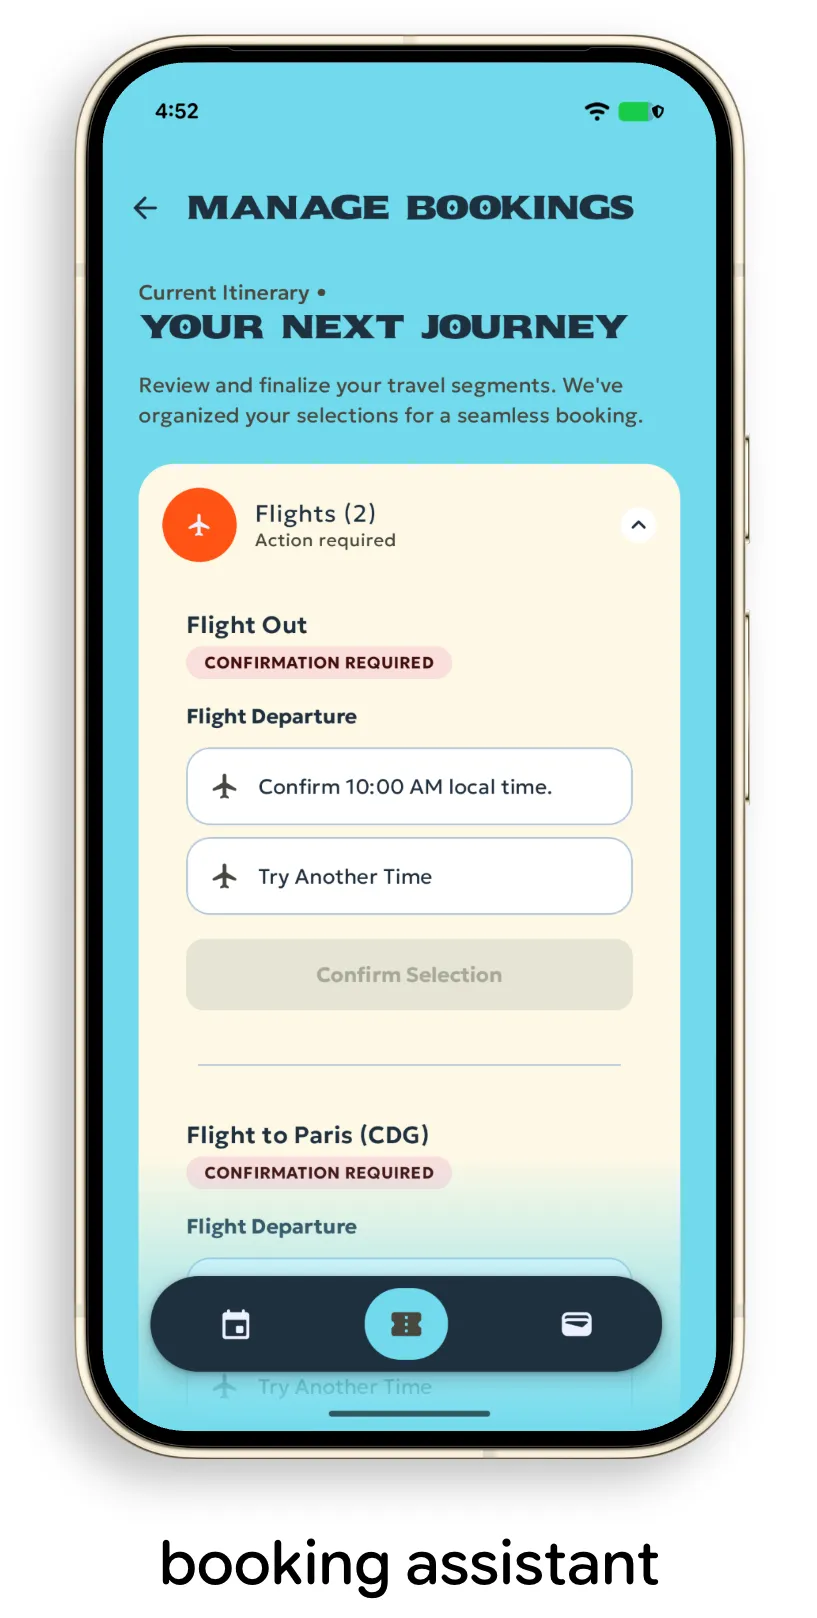
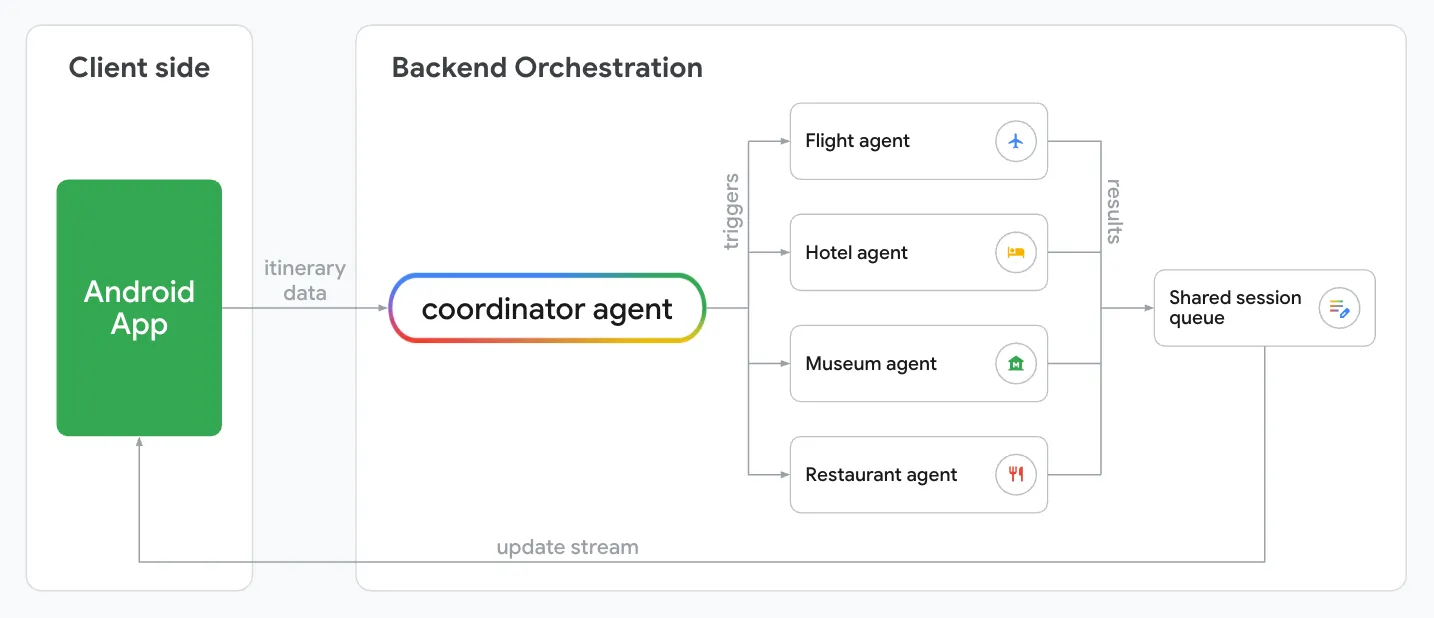
考量到這些優點,我們在 Jetpacker 中新增了預訂助理,可協調航班、飯店、博物館和餐廳預訂。接著,我們來看看如何使用 Agent Development Kit (ADK) 建立多代理系統,並透過 Agent-User Interaction (AG-UI) 和 Agent-to-User Interface (A2UI) 通訊協定,在 Jetpack Compose 中以原生方式傳送及顯示互動式資訊卡。
使用 ADK 代理執行複雜的工作流程
您可以使用 Agent Development Kit (ADK),不必透過自訂 REST 端點或複雜的 WebSocket 手動協調流程。您可以使用 ADK 定義代理,並為代理配備 Python 函式工具,以便查詢資料庫及執行預訂。
以下說明如何定義簡單的代理,並使用 ADK 執行:
# server/main.py

# Note: ADK supports many different coding languages. For now, we use the Python version as it includes support for A2UI which we'll use later in this blog post.

from google.adk import Agent
from google.adk.runners import InMemoryRunner
from google.adk.tools import FunctionTool

# Define custom tools to interact with database
def search_flights(destination: str, date: str) -> list[str]:
    # In production, here you would query our flight database and return dynamic results
    return ["10:00 AM", "2:00 PM"]

def reserve_flight(flight_time: str) -> str:
    # In production, here you would save the reservation transaction
    return "Reserved flight at " + flight_time

# Instantiate the booking agent with specialized tools
flight_agent = Agent(
    name="Flight Booker",
    model="gemini-3.1-flash-lite",
    instruction="Help the user search for flights and book a reservation.",
    tools=[
        FunctionTool(search_flights),
        FunctionTool(reserve_flight, require_confirmation=True)
    ]
)

# Run the agent in memory using a session ID
runner = InMemoryRunner(flight_agent)
async for event in runner.run_async(user_id=user_id, session_id=session_id):
    if event.content:
        print("Agent said:", event.content)
使用這項設定執行代理時,ADK 會為您管理執行步驟。它會自動追蹤對話內容、在使用者和模型之間轉送訊息,並在模型要求時執行已註冊的工具。這樣一來,您就能專注於編寫簡潔的程序邏輯,而架構會在背景處理自動化調度管理作業。
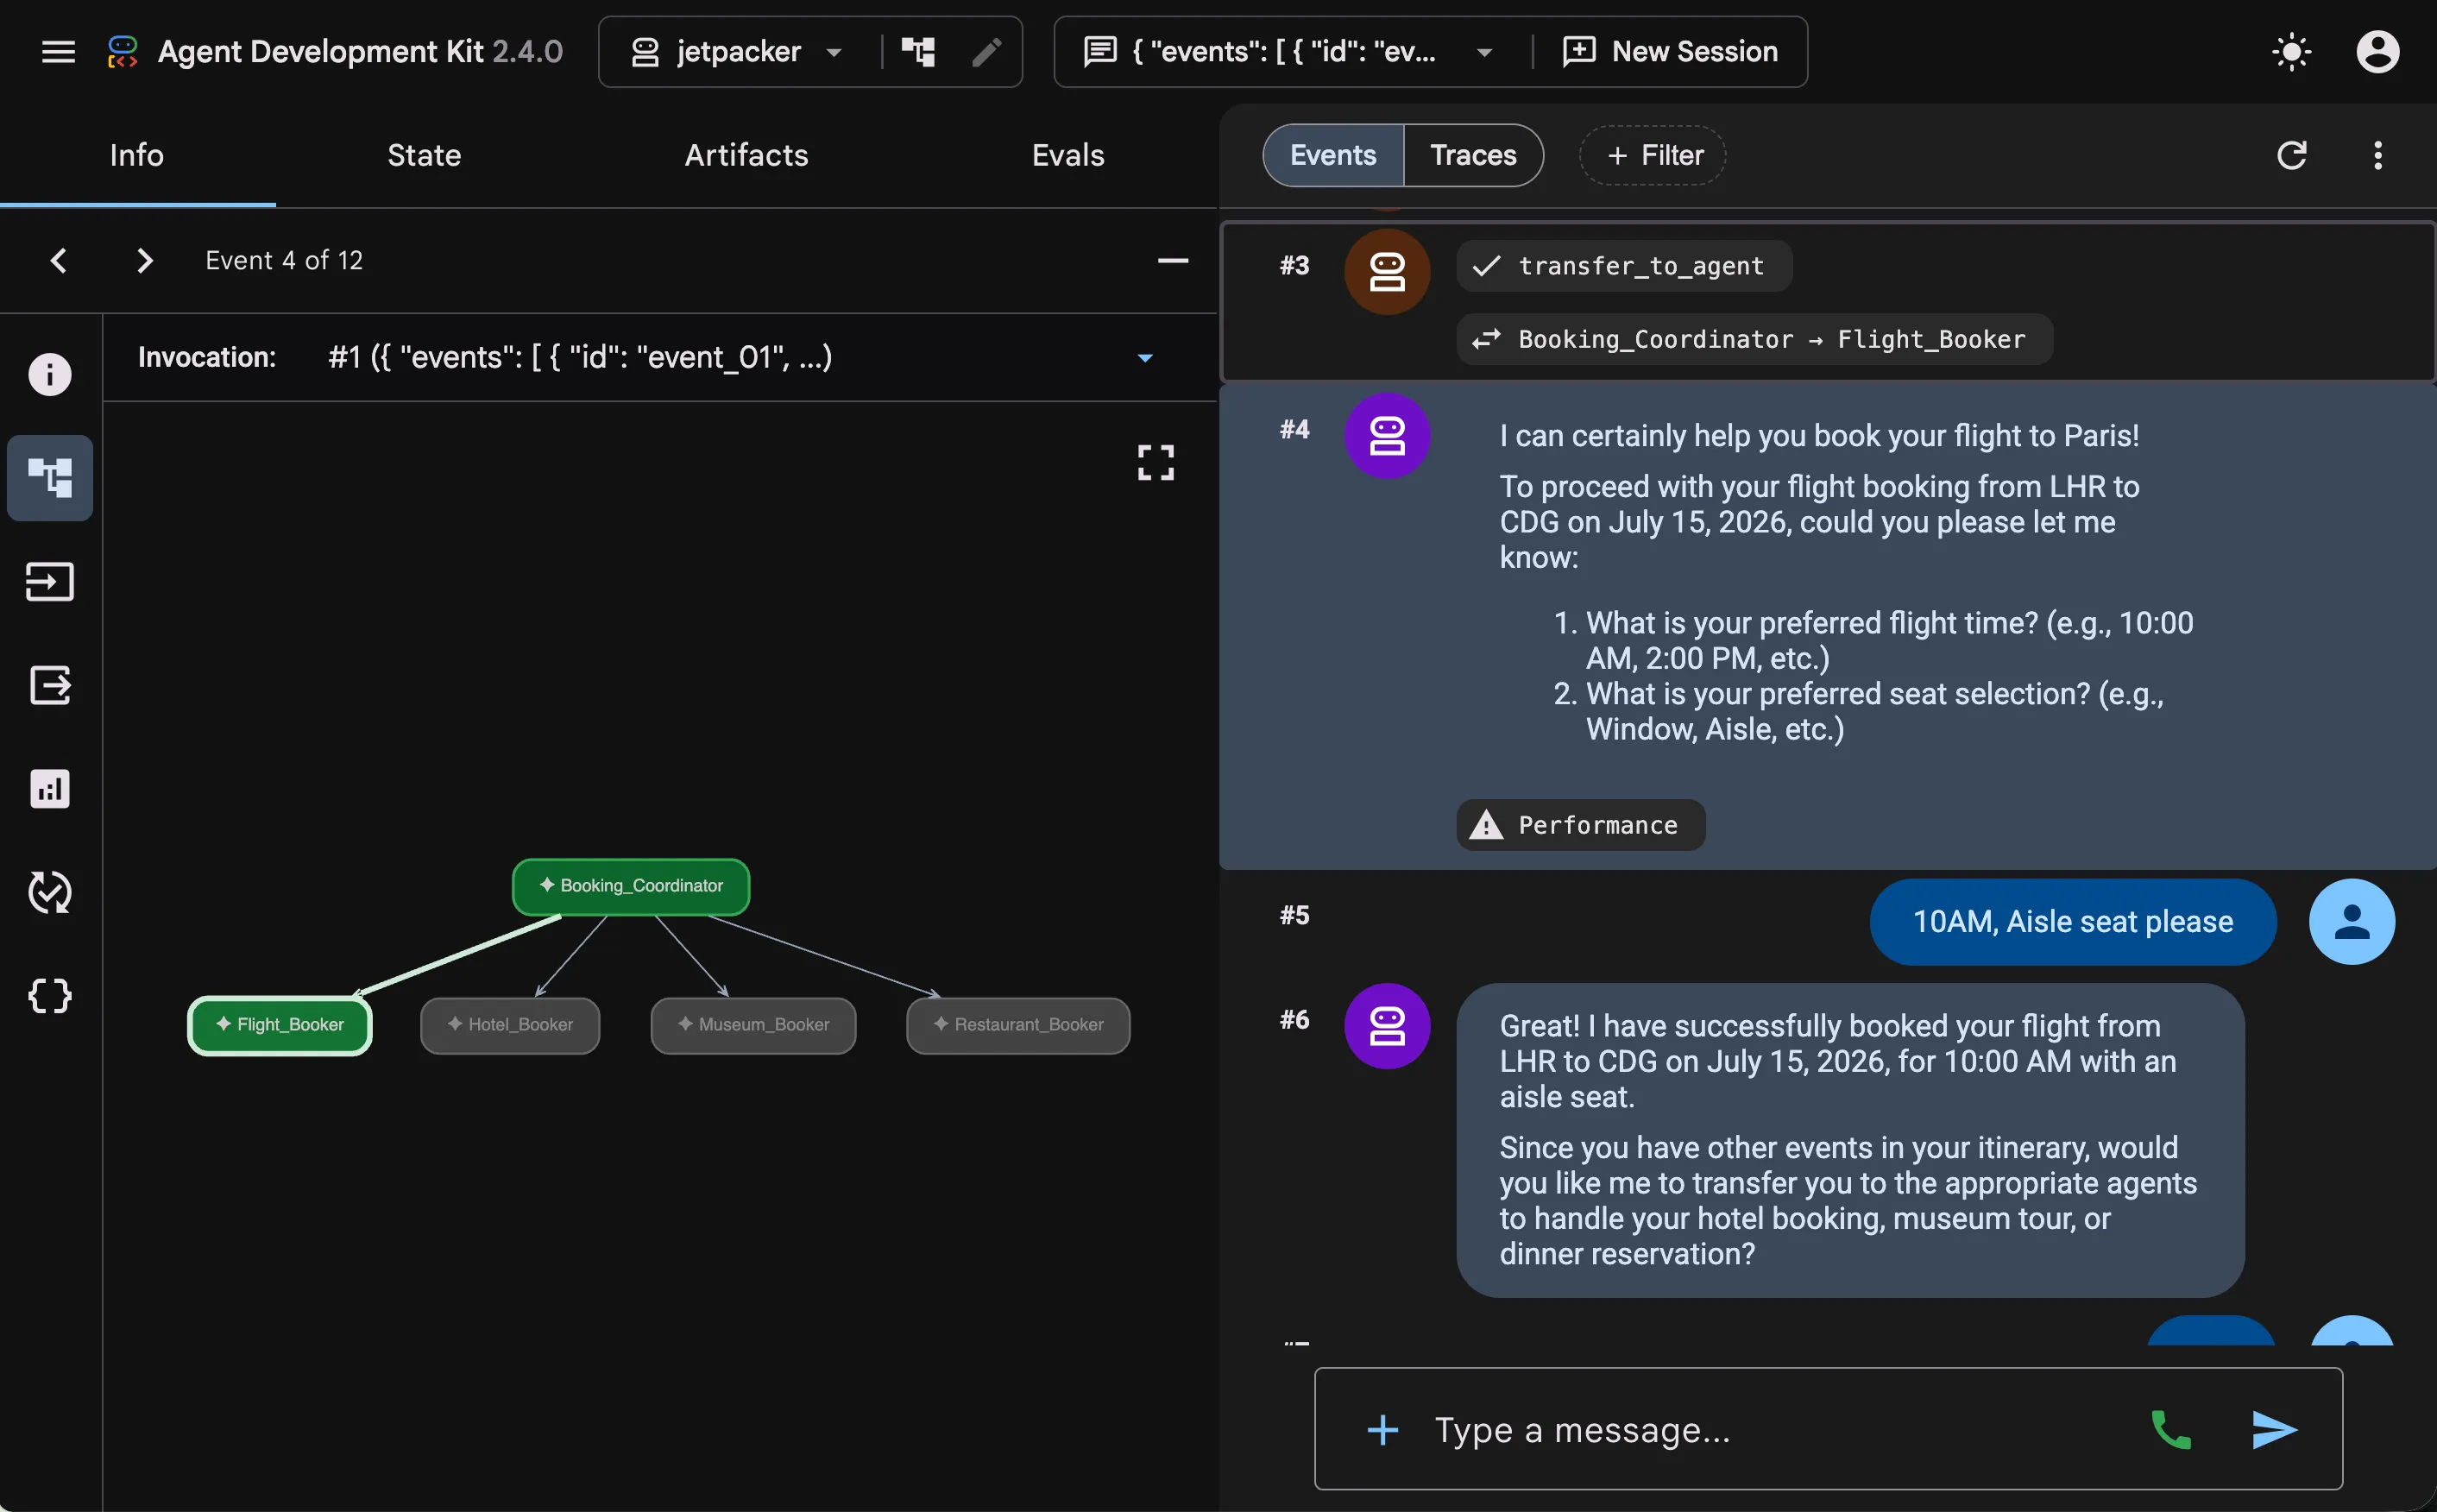
如要將這個後端代理連結至 Jetpacker 應用程式,伺服器必須能即時將更新串流至裝置,這項作業會使用 AG-UI 通訊協定處理。代理也需要以結構化方式,在手機上動態描述及更新互動式元件 (例如選項選取器和座位網格),這時 A2UI 通訊協定就派上用場。
使用 AG-UI 標準化代理與用戶端之間的通訊
在雲端執行代理並在 Android 上算繪 UI 時,需要標準通訊管道。您將使用 AG-UI 通訊協定。
AG-UI 是雙向傳輸層通訊協定,可將代理和 UI 用戶端之間的訊息類型標準化。代理可以向用戶端通知生命週期事件、簡訊、工具呼叫和狀態管理。用戶端則可將使用者文字訊息、工具呼叫結果和自訂動作事件傳回代理。
在伺服器端,它會產生格式為標準伺服器傳送事件的更新 (例如包含 JSON 差異的 event: TEXT_MESSAGE_CONTENT)。在 Android 上,Kotlin SDK 會監聽這個串流,並自動將酬載對應至類型安全的用戶端事件:
// BookingAssistantViewModel.kt

import com.agui.client.agent.HttpAgent
import com.agui.client.agent.HttpAgentConfig
import com.agui.core.types.RunAgentInput
import com.agui.core.types.UserMessage
import com.agui.core.types.TextMessageStartEvent
import com.agui.core.types.TextMessageContentEvent
import com.agui.core.types.TextMessageEndEvent

val config = HttpAgentConfig(
    agentId = "booking-assistant",
    threadId = threadId,
    url = "https://<your-backend-url>"
)
val agent = HttpAgent(config, httpClient)

// Set up the input with the session thread and user instruction
val input = RunAgentInput(
    threadId = threadId,
    runId = runId,
    messages = listOf(UserMessage("Book a flight to Paris"))
)

// Run the agent flow and collect lifecycle events
agent.runAgentObservable(input)
    .collect { event ->
        when (event) {
            is TextMessageStartEvent -> { /* ... */ }
            is TextMessageContentEvent -> { /* ... */ }
            is TextMessageEndEvent -> {
                // Handle the completed message
            }
        }
    }
接著,您可以編寫 UI 來轉譯這些不同類型的標準化 AG-UI 事件。這會提供典型的「聊天機器人」體驗:
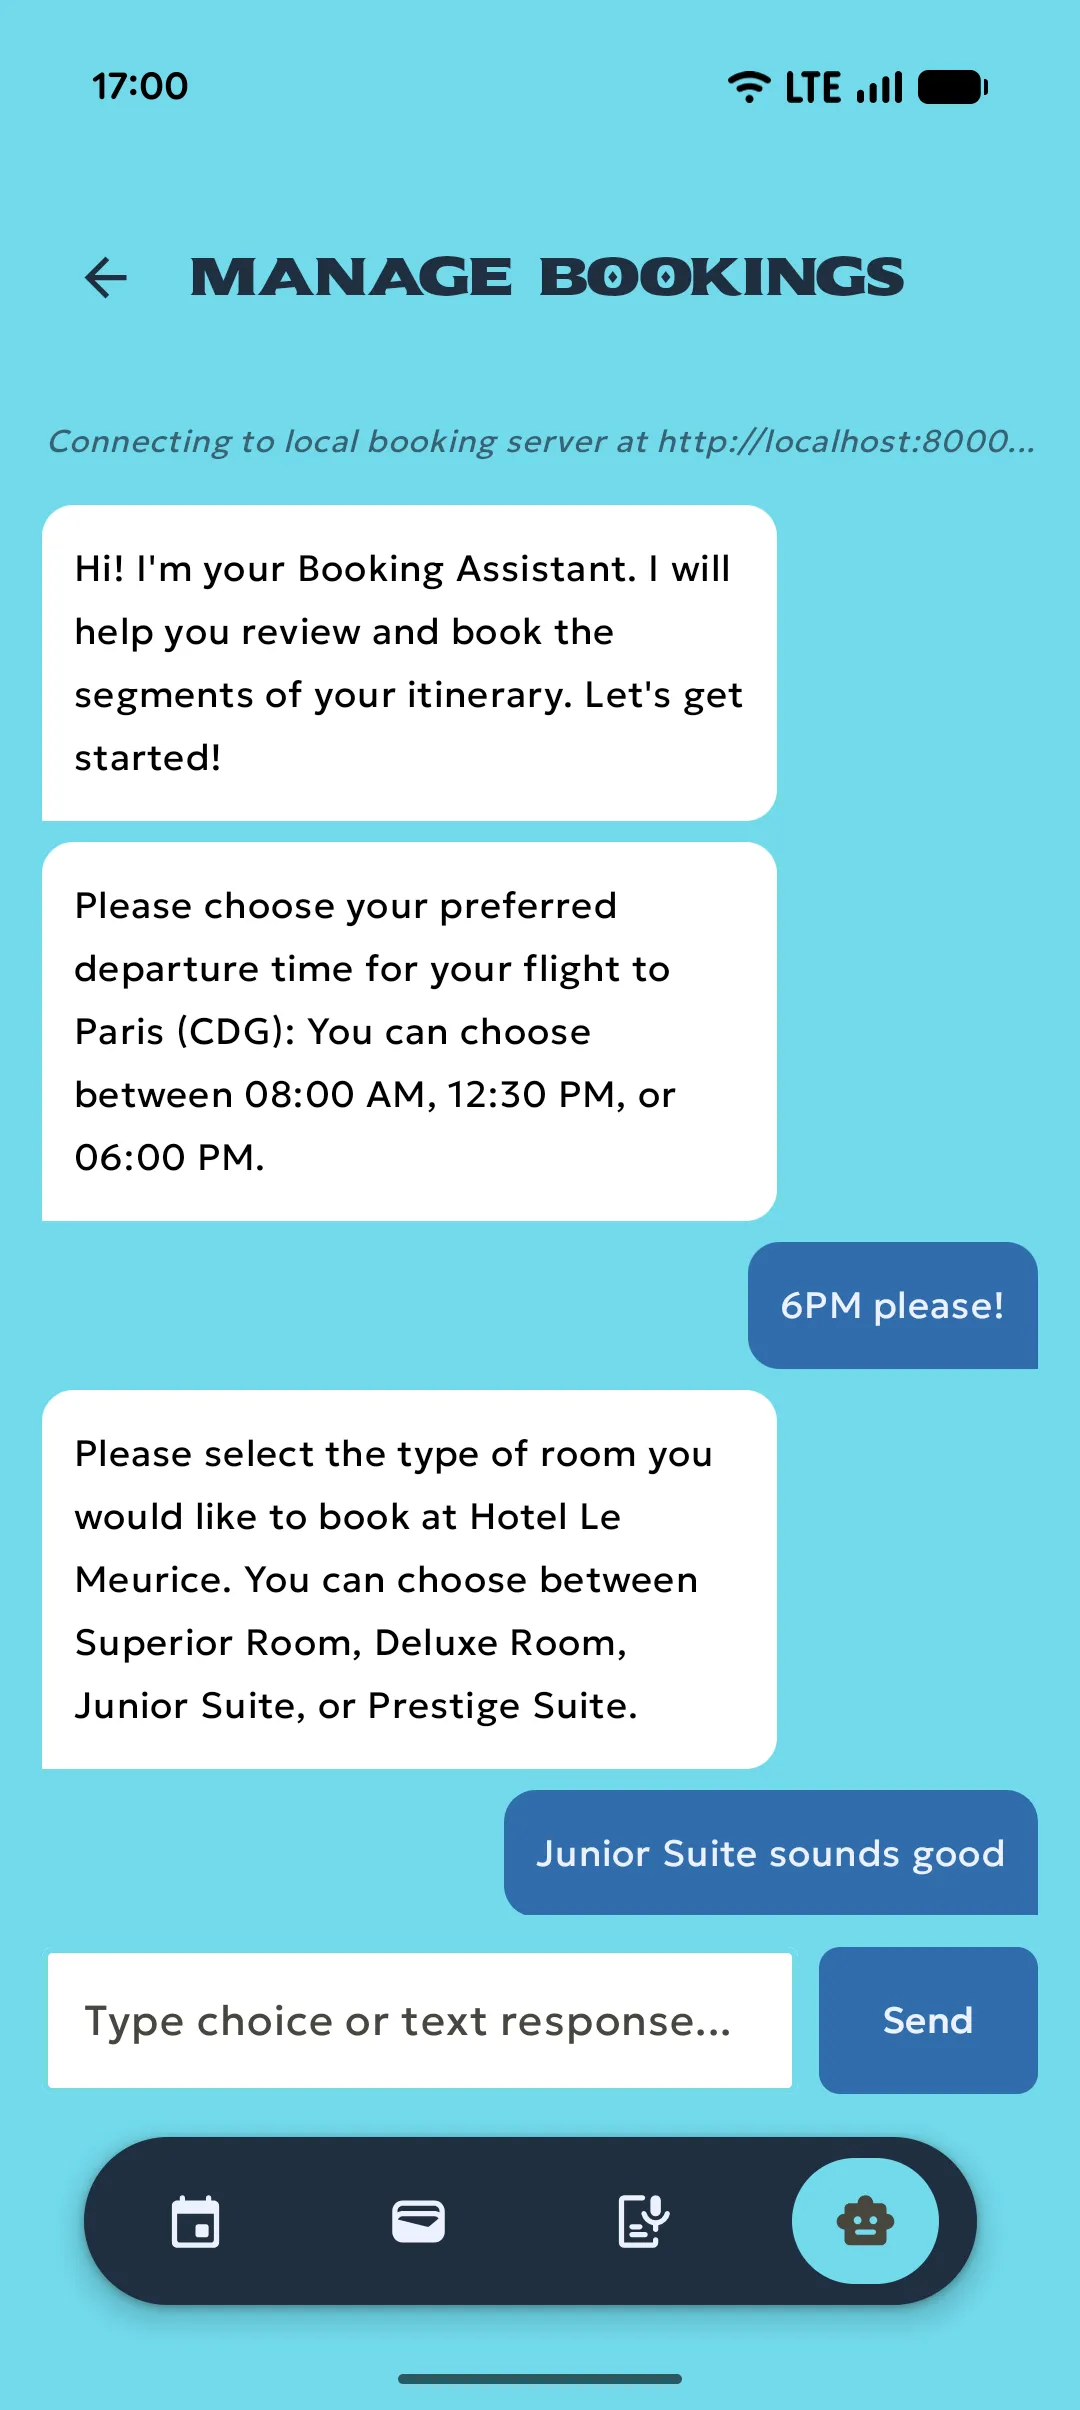
讓代理透過 A2UI 與 UI 互動
傳統聊天機器人通常會傳回純文字或自訂 JSON 酬載。建構複雜介面時,用戶端應用程式必須剖析這些酬載,並對應至特定的預建畫面。這會產生依附關係:每次新增功能、變更版面配置或支援新的使用者互動時,都必須同時更新後端代理程式和行動應用程式。這需要發布應用程式更新,並等待使用者安裝。
為解決這個問題,請使用 A2UI 通訊協定。A2UI 可讓代理描述要在用戶端動態轉譯的 UI 元件。用戶端應用程式會宣告支援的元件目錄,伺服器則會傳送 JSON 酬載,指定元件版面配置和屬性:
{
  "version": "v0.9",
  "updateComponents": {
    "surfaceId": "Flight Reservation",
    "components": [
      {
        "id": "flight_option_picker",
        "component": "InteractiveOptionPicker",
        "properties": {
          "prompt": "Select a flight time:",
          "options": [
            "10:00 AM",
            "2:00 PM"
          ],
          "selectedIdx": null,
          "confirmBtnText": "Confirm Flight"
        }
      }
    ]
  }
}
伺服器會指定要算繪的目錄元件及其有效屬性值,將用戶端的視覺實作詳細資料與代理的工作流程狀態完全分離。
設計後端 UI 架構
為了讓代理正確生成這些 JSON 酬載,代理必須知道有哪些可用元件,以及這些元件接受哪些屬性。
方法是使用 ADK A2UI 整合。A2uiSchemaManager 會直接將 JSON 結構定義和版面配置指令編譯到系統提示中,不必手動為目錄中的每個元件編寫提示指令。這可確保模型學習到生成有效 A2UI 酬載時,必須遵循的確切結構和格式規則:
# server/main.py

from a2ui.schema.manager import A2uiSchemaManager
from a2ui.schema.constants import VERSION_0_9
from a2ui.schema.catalog import CatalogConfig
from a2ui.basic_catalog.provider import BasicCatalog

# Initialize A2UI Schema Manager with custom booking component catalog
schema_manager = A2uiSchemaManager(
    version=VERSION_0_9,
    catalogs=[
        BasicCatalog.get_config(version=VERSION_0_9),
        CatalogConfig.from_path(
            name="https://example.com/catalogs/booking_assistant/v1/catalog.json",
            catalog_path="booking_catalog.json"
        )
    ]
)

# Compile prompt instructions including the A2UI JSON schema
A2UI_SYSTEM_INSTRUCTION = schema_manager.generate_system_prompt(
    role_description="You are a helpful travel booking assistant.",
    ui_description="Use InteractiveOptionPicker for choices, SeatSelectionPicker for seat selection...",
    include_schema=True,
    include_examples=True,
    allowed_components=["InteractiveOptionPicker", "SeatSelectionPicker", "BookingStatus"]
)
有了這項系統指令,LLM 就能根據結構定義版面配置,準確瞭解如何制定 Android 用戶端可轉譯的元件更新。
使用 Jetpack Compose 原生算繪 A2UI
如要在 Android 上以原生方式算繪這些元件樹狀結構,請使用新的 Jetpack Compose A2UI Renderer 程式庫。
首先,請將依附元件新增至模組的 build.gradle.kts 檔案:
// android/feature/trip/booking_assistant/build.gradle.kts
dependencies {
    implementation("androidx.a2ui:a2ui-model:1.0.0-alpha01")
    implementation("androidx.a2ui.compose:compose-runtime:1.0.0-alpha01")
    implementation("androidx.a2ui.compose:compose-ui:1.0.0-alpha01")
    implementation("androidx.compose.material3:material3-a2ui:1.0.0-alpha01")
}
目錄中的每個元件類別 (例如 BookingStatusComponent) 都會定義如何將從 JSON 酬載收到的屬性,對應至 Jetpack Compose 可組合函式。
在目錄中註冊自訂元件:
// CustomBookingAssistantCatalog.kt

import androidx.a2ui.compose.ui.A2uiCatalog

fun bookingAssistantCatalog(): A2uiCatalog {
    return A2uiCatalog(
        catalogId = "https://example.com/catalogs/booking_assistant/v1/catalog.json",
        components = listOf(
            InteractiveOptionPickerComponent(),
            SeatSelectionPickerComponent(),
            BookingStatusComponent()
        )
    )
}
提示:Jetpacker 實作了專為預訂流程量身打造的自訂元件 (InteractiveOptionPicker、SeatSelectionPicker、BookingStatus)。如果代理使用標準元素 (例如文字、資訊卡、按鈕、列、欄、核取方塊和日期時間挑選器),material3-a2ui 也會提供 materialA2uiBasicCatalogV1(...),讓您直接使用 Material 3 實作,不必編寫任何自訂元件。
注意:為確保後端和行動用戶端保持一致,兩者都依賴相同的目錄定義 ID (https://example.com/catalogs/booking_assistant/v1/catalog.json)。如果您在後端目錄中新增或修改屬性,則必須提高版本號碼,並更新相符的 Kotlin 元件類別,以免發生剖析錯誤。
在 BookingAssistantViewModel 中,使用 A2uiMessageProcessor 處理 A2UI 訊息,並更新使用中的介面:
// BookingAssistantViewModel.kt
import androidx.lifecycle.ViewModel
import androidx.a2ui.model.processor.A2uiSurfaceModel
import androidx.a2ui.compose.ui.A2uiMessageProcessor
import kotlinx.coroutines.flow.StateFlow

class BookingAssistantViewModel : ViewModel() {
    private val messageProcessor = A2uiMessageProcessor(
        catalogs = listOf(bookingAssistantCatalog())
    )
    val activeSurfaces: StateFlow<List<A2uiSurfaceModel>> = messageProcessor.activeSurfaces

    init {
        viewModelScope.launch(Dispatchers.Default) { processor.collectMessages() }
    }

    // ...
}
在 Compose 畫面中,收集這些途徑,並使用 androidx.compose.material3:material3-a2ui 的官方 A2uiSurface 可組合函式算繪每個途徑。A2uiSurface 會自動處理反應式元件狀態觀測、Material 3 載入指標、錯誤備用方案,以及更新之間的動畫轉換:
// BookingAssistantScreen.kt
import androidx.compose.runtime.Composable
import androidx.compose.runtime.collectAsState
import androidx.compose.foundation.lazy.LazyColumn
import androidx.compose.foundation.lazy.items
import androidx.compose.material3.a2ui.A2uiSurface

@Composable
fun BookingAssistantScreen(
    viewModel: BookingAssistantViewModel,
    modifier: Modifier = Modifier
) {
    val activeSurfaces by viewModel.activeSurfaces.collectAsState()
    LazyColumn(
        modifier = modifier.fillMaxWidth(),
        verticalArrangement = Arrangement.spacedBy(16.dp)
    ) {
        items(activeSurfaces) { surfaceModel ->
            Card(modifier = Modifier.fillMaxWidth()) {
                A2uiSurface(
                    surfaceModel = surfaceModel,
                    modifier = Modifier.fillMaxWidth().wrapContentHeight()
                )
            }
        }
    }
}
現在,您會看到代理在後端執行時生成的幾個 UI 介面:
合併運用各種策略
只要在雲端託管代理工作流程,並搭配使用 AG-UI 和 A2UI 通訊協定,就能建構由 AI 模型直接驅動的動態原生 Android 介面。AG-UI 建立即時雙向串流管道,用於傳送訊息和生命週期事件,而 A2UI 則讓雲端代理動態描述互動式 UI 元件,使用戶端應用程式與逐步後端自動化調度管理邏輯完全分離。
歡迎前往 GitHub 查看 Jetpacker 的完整原始碼,並觀看「使用 Google AI 建構智慧型 Android 應用程式」影片,進一步瞭解如何將代理工作流程直接整合至應用程式。
歡迎閱讀本系列網誌文章的其他部分:
▪️ 第 1 部分:應用程式簡介和高階總覽。
📱 第 2 部分:裝置端智慧功能。深入瞭解 ML Kit 的 GenAI API 和 Gemini Nano,建構隱私優先的功能,例如行程摘要、收據剖析和本機音訊處理。
☁️ 第 3 部分:混合和雲端推論。瞭解如何使用 Firebase AI Logic,根據 Google 地圖和網頁內容等實際資料,為 LLM 回答建立基準。
⚙️ 第 4 部分:系統整合。使用 AppFunctions 整合 Android 智慧系統。
🤖 第 5 部分 (本篇貼文):應用程式內 Agentic Workflows。運用 A2UI 和 ADK 提供的端對端預訂助理,擴充應用程式功能。
想進一步瞭解 Android 開發嗎?歡迎在 YouTube 或 LinkedIn 追蹤 Android 開發人員!
本網誌文章中的所有程式碼片段均遵循下列著作權通知:
Copyright 2026 Google LLC.
SPDX-License-Identifier: Apache-2.0
-
 使用指南
歡迎回到「建構智慧型 Android 應用程式」系列網誌文章。我們將把基本的 Android 應用程式,轉換為個人化、智慧型且具備代理功能的體驗。
Thomas Ezan, Jolanda Verhoef, Caren Chang • 閱讀時間:8 分鐘 -

 使用指南
Jetpacker 是我們團隊為今年 Google I/O 大會從頭打造的技術展示應用程式 (使用 Antigravity 建構)。Jetpacker 的核心功能是協助使用者規劃、探索及享受下一趟精彩冒險。
Jolanda Verhoef • 閱讀時間:4 分鐘 -

 使用指南
歡迎回到「建構智慧型 Android 應用程式」系列網誌文章,我們將把基本的 Android 應用程式,轉換為個人化、智慧型且具備代理功能的體驗。在上一篇文章中,我們介紹了 Jetpacker,這是我們在整個系列中使用的示範應用程式。
Caren Chang • 閱讀時間:6 分鐘
每週透過電子郵件接收最新的 Android 開發人員洞察資訊。