
Gemini Developer API, Google'ın Gemini modellerine erişmenizi sağlar. Bu sayede, Android uygulamalarınıza sohbet, görüntü üretme (Nano Banana ile) ve metin, resim, ses ve video girişine dayalı metin üretme gibi son teknoloji üretken yapay zeka özellikleri ekleyebilirsiniz.
Gemini Pro ve Flash modellerine erişmek için Firebase AI Logic ile Gemini Developer API'yi kullanabilirsiniz. Kredi kartı gerektirmeden kullanmaya başlayabilir ve cömert bir ücretsiz katmandan yararlanabilirsiniz. Entegrasyonunuzu küçük bir kullanıcı tabanıyla doğruladıktan sonra ücretli katmana geçerek ölçeklendirebilirsiniz.

Başlarken
Gemini API ile doğrudan uygulamanızdan etkileşimde bulunmadan önce birkaç işlem yapmanız gerekir. Örneğin, istem oluşturma hakkında bilgi edinmenin yanı sıra Firebase'i ve uygulamanızı SDK'yı kullanacak şekilde ayarlamanız gerekir.
İstemlerle deneme yapma
İstemlerle denemeler yapmak, Android uygulamanız için en iyi ifadeyi, içeriği ve biçimi bulmanıza yardımcı olabilir. Google AI Studio, uygulamanızın kullanım alanları için istemlerin prototipini oluşturmak ve istemleri tasarlamak üzere kullanabileceğiniz bir Entegre Geliştirme Ortamı'dır (IDE).
Kullanım alanınız için etkili istemler oluşturmak, sürecin kritik bir parçası olan kapsamlı denemeler yapmayı gerektirir. İstem oluşturma hakkında daha fazla bilgiyi Firebase dokümanlarında bulabilirsiniz.
İsteminizden memnun kaldığınızda, kodunuza ekleyebileceğiniz kod snippet'lerini almak için <> düğmesini tıklayın.
Firebase projesi oluşturma ve uygulamanızı Firebase'e bağlama
API'yi uygulamanızdan çağırmaya hazır olduğunuzda, Firebase'i ve SDK'yı uygulamanızda ayarlamak için Firebase AI Logic başlangıç kılavuzunun "1. Adım" bölümündeki talimatları uygulayın.
Gradle bağımlılığını ekleyin
Uygulama modülünüze aşağıdaki Gradle bağımlılığını ekleyin:
Kotlin
dependencies {
  // ... other androidx dependencies

  // Import the BoM for the Firebase platform
  implementation(platform("com.google.firebase:firebase-bom:34.15.0"))

  // Add the dependency for the Firebase AI Logic library When using the BoM,
  // you don't specify versions in Firebase library dependencies
  implementation("com.google.firebase:firebase-ai")
}
Java
dependencies {
  // Import the BoM for the Firebase platform
  implementation(platform("com.google.firebase:34.15.0"))

  // Add the dependency for the Firebase AI Logic library When using the BoM,
  // you don't specify versions in Firebase library dependencies
  implementation("com.google.firebase:firebase-ai")

  // Required for one-shot operations (to use `ListenableFuture` from Guava
  // Android)
  implementation("com.google.guava:guava:31.0.1-android")

  // Required for streaming operations (to use `Publisher` from Reactive
  // Streams)
  implementation("org.reactivestreams:reactive-streams:1.0.4")
}
Üretken modeli başlatma
GenerativeModel öğesini oluşturup model adını belirterek başlayın:
Kotlin
// Start by instantiating a GenerativeModel and specifying the model name: val model = Firebase.ai(backend = GenerativeBackend.googleAI()) .generativeModel("gemini-2.5-flash")
Java
GenerativeModel firebaseAI = FirebaseAI.getInstance(GenerativeBackend.googleAI()) .generativeModel("gemini-2.5-flash"); GenerativeModelFutures model = GenerativeModelFutures.from(firebaseAI);
Gemini Developer API ile kullanılabilecek modeller hakkında daha fazla bilgi edinin. Ayrıca, model parametrelerini yapılandırma hakkında daha fazla bilgi edinebilirsiniz.
Uygulamanızdan Gemini Developer API ile etkileşim kurma
Firebase'i ve uygulamanızı SDK'yı kullanacak şekilde ayarladığınıza göre artık uygulamanızdan Gemini Developer API ile etkileşim kurmaya hazırsınız.
Metin oluşturun
Metin yanıtı oluşturmak için isteminizle birlikte generateContent() işlevini çağırın.
Kotlin
scope.launch { val response = model.generateContent("Write a story about a magic backpack.") }
Java
Content prompt = new Content.Builder() .addText("Write a story about a magic backpack.") .build(); ListenableFuture<GenerateContentResponse> response = model.generateContent(prompt); Futures.addCallback(response, new FutureCallback<GenerateContentResponse>() { @Override public void onSuccess(GenerateContentResponse result) { String resultText = result.getText(); } @Override public void onFailure(Throwable t) { t.printStackTrace(); } }, executor);
Resimlerden ve diğer medyadan metin oluşturma
Ayrıca metin ve resimler veya diğer medya türlerini içeren bir istemden de metin oluşturabilirsiniz. generateContent() işlevini çağırırken medyayı satır içi veri olarak iletebilirsiniz.
Örneğin, bit eşlem kullanmak için image içerik türünü kullanın:
Kotlin
scope.launch { val response = model.generateContent( content { image(bitmap) text("what is the object in the picture?") } ) }
Java
Content content = new Content.Builder() .addImage(bitmap) .addText("what is the object in the picture?") .build(); ListenableFuture<GenerateContentResponse> response = model.generateContent(content); Futures.addCallback(response, new FutureCallback<GenerateContentResponse>() { @Override public void onSuccess(GenerateContentResponse result) { String resultText = result.getText(); } @Override public void onFailure(Throwable t) { t.printStackTrace(); } }, executor);
Ses dosyası iletmek için inlineData içerik türünü kullanın:
Kotlin
scope.launch { val contentResolver = applicationContext.contentResolver contentResolver.openInputStream(audioUri).use { stream -> stream?.let { val bytes = it.readBytes() val prompt = content { inlineData(bytes, "audio/mpeg") // Specify the appropriate audio MIME type text("Transcribe this audio recording.") } val response = model.generateContent(prompt) } } }
Java
ContentResolver resolver = applicationContext.getContentResolver(); try (InputStream stream = resolver.openInputStream(audioUri)) { File audioFile = new File(new URI(audioUri.toString())); int audioSize = (int) audioFile.length(); byte[] audioBytes = new byte[audioSize]; if (stream != null) { stream.read(audioBytes, 0, audioBytes.length); stream.close(); // Provide a prompt that includes audio specified earlier and text Content prompt = new Content.Builder() .addInlineData(audioBytes, "audio/mpeg") // Specify the appropriate audio MIME type .addText("Transcribe what's said in this audio recording.") .build(); // To generate text output, call `generateContent` with the prompt ListenableFuture<GenerateContentResponse> response = model.generateContent(prompt); Futures.addCallback(response, new FutureCallback<GenerateContentResponse>() { @Override public void onSuccess(GenerateContentResponse result) { String text = result.getText(); Log.d(TAG, (text == null) ? "" : text); } @Override public void onFailure(Throwable t) { Log.e(TAG, "Failed to generate a response", t); } }, executor); } else { Log.e(TAG, "Error getting input stream for file."); // Handle the error appropriately } } catch (IOException e) { Log.e(TAG, "Failed to read the audio file", e); } catch (URISyntaxException e) { Log.e(TAG, "Invalid audio file", e); }
Video dosyası sağlamak için inlineData içerik türünü kullanmaya devam edin:
Kotlin
scope.launch { val contentResolver = applicationContext.contentResolver contentResolver.openInputStream(videoUri).use { stream -> stream?.let { val bytes = it.readBytes() val prompt = content { inlineData(bytes, "video/mp4") // Specify the appropriate video MIME type text("Describe the content of this video") } val response = model.generateContent(prompt) } } }
Java
ContentResolver resolver = applicationContext.getContentResolver(); try (InputStream stream = resolver.openInputStream(videoUri)) { File videoFile = new File(new URI(videoUri.toString())); int videoSize = (int) videoFile.length(); byte[] videoBytes = new byte[videoSize]; if (stream != null) { stream.read(videoBytes, 0, videoBytes.length); stream.close(); // Provide a prompt that includes video specified earlier and text Content prompt = new Content.Builder() .addInlineData(videoBytes, "video/mp4") .addText("Describe the content of this video") .build(); // To generate text output, call generateContent with the prompt ListenableFuture<GenerateContentResponse> response = model.generateContent(prompt); Futures.addCallback(response, new FutureCallback<GenerateContentResponse>() { @Override public void onSuccess(GenerateContentResponse result) { String resultText = result.getText(); System.out.println(resultText); } @Override public void onFailure(Throwable t) { t.printStackTrace(); } }, executor); } } catch (IOException e) { e.printStackTrace(); } catch (URISyntaxException e) { e.printStackTrace(); }
Benzer şekilde, PDF (application/pdf) ve düz metin (text/plain) dokümanlarını da ilgili MIME türlerini parametre olarak ileterek aktarabilirsiniz.
Çok aşamalı etkileşimli sohbet
Ayrıca çok aşamalı etkileşimleri de destekleyebilirsiniz. startChat() işleviyle sohbet başlatın. İsteğe bağlı olarak modele mesaj geçmişi sağlayabilirsiniz. Ardından, sohbet mesajları göndermek için sendMessage() işlevini çağırın.
Kotlin
val chat = model.startChat( history = listOf( content(role = "user") { text("Hello, I have 2 dogs in my house.") }, content(role = "model") { text("Great to meet you. What would you like to know?") } ) ) scope.launch { val response = chat.sendMessage("How many paws are in my house?") }
Java
Content.Builder userContentBuilder = new Content.Builder(); userContentBuilder.setRole("user"); userContentBuilder.addText("Hello, I have 2 dogs in my house."); Content userContent = userContentBuilder.build(); Content.Builder modelContentBuilder = new Content.Builder(); modelContentBuilder.setRole("model"); modelContentBuilder.addText("Great to meet you. What would you like to know?"); Content modelContent = modelContentBuilder.build(); List<Content> history = Arrays.asList(userContent, modelContent); // Initialize the chat ChatFutures chat = model.startChat(history); // Create a new user message Content.Builder messageBuilder = new Content.Builder(); messageBuilder.setRole("user"); messageBuilder.addText("How many paws are in my house?"); Content message = messageBuilder.build(); // Send the message ListenableFuture<GenerateContentResponse> response = chat.sendMessage(message); Futures.addCallback(response, new FutureCallback<GenerateContentResponse>() { @Override public void onSuccess(GenerateContentResponse result) { String resultText = result.getText(); System.out.println(resultText); } @Override public void onFailure(Throwable t) { t.printStackTrace(); } }, executor);
Android'de Nano Banana ile görüntü oluşturma
Gemini 2.5 Flash görüntü modeli (diğer adıyla Nano Banana), dünya bilgisi ve akıl yürütme özelliklerinden yararlanarak görüntü oluşturup düzenleyebilir. Bağlama uygun resimler oluşturur, metin ve resim çıkışlarını sorunsuz bir şekilde karıştırır veya araya yerleştirir. Ayrıca, uzun metin dizileri içeren doğru görseller oluşturabilir ve bağlamı koruyarak sohbete dayalı görüntü düzenlemeyi destekler.
Bu kılavuzda, Android için Firebase AI Logic SDK'sını kullanarak Gemini 2.5 Flash Image modelinin (Nano Banana) nasıl kullanılacağı açıklanmaktadır. Gemini ile görüntü oluşturma hakkında daha fazla bilgi için Firebase'de Gemini ile görüntü oluşturma belgelerine bakın.
Üretken modeli başlatma
GenerativeModel oluşturun ve model adını gemini-2.5-flash-image-preview olarak belirtin. responseModalities'yı hem TEXT hem de IMAGE'yi içerecek şekilde yapılandırdığınızı doğrulayın.
Kotlin
val model = Firebase.ai(backend = GenerativeBackend.googleAI()).generativeModel( modelName = "gemini-2.5-flash-image-preview", // Configure the model to respond with text and images (required) generationConfig = generationConfig { responseModalities = listOf( ResponseModality.TEXT, ResponseModality.IMAGE ) } )
Java
GenerativeModel ai = FirebaseAI.getInstance(GenerativeBackend.googleAI()).generativeModel( "gemini-2.5-flash-image-preview", // Configure the model to respond with text and images (required) new GenerationConfig.Builder() .setResponseModalities(Arrays.asList(ResponseModality.TEXT, ResponseModality.IMAGE)) .build() ); GenerativeModelFutures model = GenerativeModelFutures.from(ai);
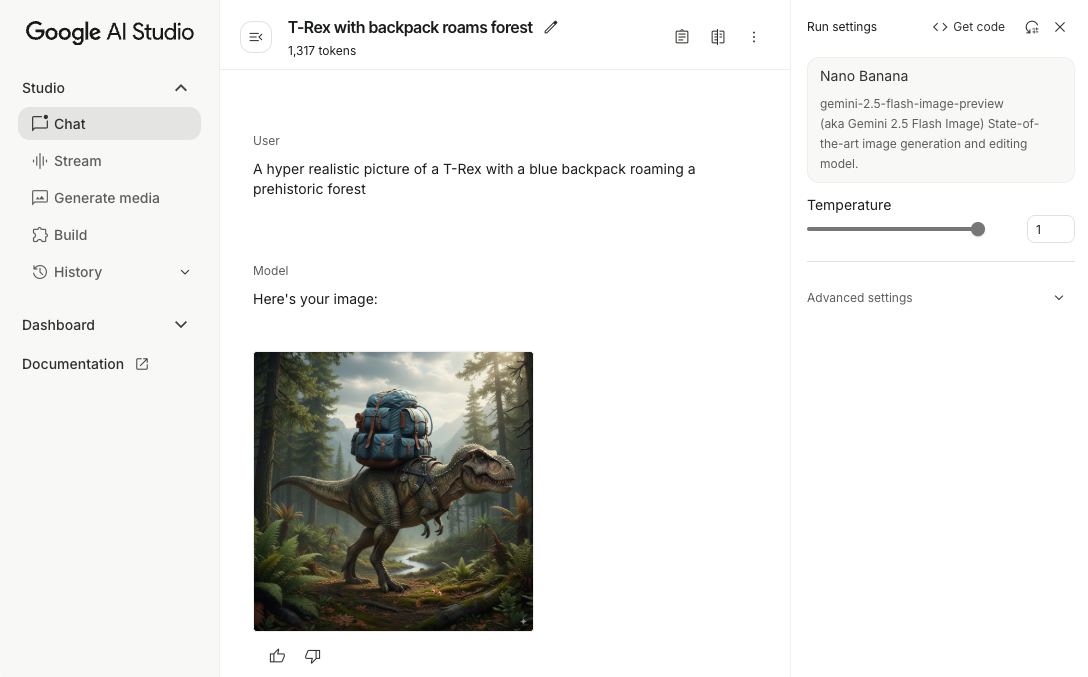
Görüntü oluşturma (yalnızca metin girişi)
Yalnızca metin içeren bir istem girerek Gemini modelinden görüntü oluşturmasını isteyebilirsiniz:
Kotlin
scope.launch { // Provide a text prompt instructing the model to generate an image val prompt = "A hyper realistic picture of a t-rex with a blue bag pack roaming a pre-historic forest." // To generate image output, call `generateContent` with the text input val generatedImageAsBitmap: Bitmap? = model.generateContent(prompt) .candidates.first().content.parts.filterIsInstance<ImagePart>() .firstOrNull()?.image }
Java
// Provide a text prompt instructing the model to generate an image Content prompt = new Content.Builder() .addText("Generate an image of the Eiffel Tower with fireworks in the background.") .build(); // To generate an image, call `generateContent` with the text input ListenableFuture<GenerateContentResponse> response = model.generateContent(prompt); Futures.addCallback(response, new FutureCallback<GenerateContentResponse>() { @Override public void onSuccess(GenerateContentResponse result) { // iterate over all the parts in the first candidate in the result object for (Part part : result.getCandidates().get(0).getContent().getParts()) { if (part instanceof ImagePart) { ImagePart imagePart = (ImagePart) part; // The returned image as a bitmap Bitmap generatedImageAsBitmap = imagePart.getImage(); break; } } } @Override public void onFailure(Throwable t) { t.printStackTrace(); } }, executor);
Resimleri düzenleme (metin ve resim girişi)
İsteminizde hem metin hem de bir veya daha fazla resim sağlayarak Gemini modelinden mevcut resimleri düzenlemesini isteyebilirsiniz:
Kotlin
scope.launch { // Provide a text prompt instructing the model to edit the image val prompt = content { image(bitmap) text("Edit this image to make it look like a cartoon") } // To edit the image, call `generateContent` with the prompt (image and text input) val generatedImageAsBitmap: Bitmap? = model.generateContent(prompt) .candidates.first().content.parts.filterIsInstance<ImagePart>().firstOrNull()?.image // Handle the generated text and image }
Java
// Provide an image for the model to edit Bitmap bitmap = BitmapFactory.decodeResource(resources, R.drawable.scones); // Provide a text prompt instructing the model to edit the image Content promptcontent = new Content.Builder() .addImage(bitmap) .addText("Edit this image to make it look like a cartoon") .build(); // To edit the image, call `generateContent` with the prompt (image and text input) ListenableFuture<GenerateContentResponse> response = model.generateContent(promptcontent); Futures.addCallback(response, new FutureCallback<GenerateContentResponse>() { @Override public void onSuccess(GenerateContentResponse result) { // iterate over all the parts in the first candidate in the result object for (Part part : result.getCandidates().get(0).getContent().getParts()) { if (part instanceof ImagePart) { ImagePart imagePart = (ImagePart) part; Bitmap generatedImageAsBitmap = imagePart.getImage(); break; } } } @Override public void onFailure(Throwable t) { t.printStackTrace(); } }, executor);
Çok aşamalı etkileşimli sohbetle görüntüleri yineleme ve düzenleme
Görüntü düzenlemeye yönelik sohbet tarzı bir yaklaşım için çok aşamalı etkileşimi kullanabilirsiniz. Bu sayede, orijinal resmi yeniden göndermeye gerek kalmadan düzenlemeleri iyileştirmek için takip eden istekler gönderilebilir.
Öncelikle startChat() ile sohbet başlatın. İsteğe bağlı olarak mesaj geçmişi de sağlayabilirsiniz. Ardından, sonraki mesajlar için sendMessage() simgesini kullanın:
Kotlin
scope.launch { // Create the initial prompt instructing the model to edit the image val prompt = content { image(bitmap) text("Edit this image to make it look like a cartoon") } // Initialize the chat val chat = model.startChat() // To generate an initial response, send a user message with the image and text prompt var response = chat.sendMessage(prompt) // Inspect the returned image var generatedImageAsBitmap: Bitmap? = response .candidates.first().content.parts.filterIsInstance<ImagePart>().firstOrNull()?.image // Follow up requests do not need to specify the image again response = chat.sendMessage("But make it old-school line drawing style") generatedImageAsBitmap = response .candidates.first().content.parts.filterIsInstance<ImagePart>().firstOrNull()?.image }
Java
// Provide an image for the model to edit Bitmap bitmap = BitmapFactory.decodeResource(resources, R.drawable.scones); // Initialize the chat ChatFutures chat = model.startChat(); // Create the initial prompt instructing the model to edit the image Content prompt = new Content.Builder() .setRole("user") .addImage(bitmap) .addText("Edit this image to make it look like a cartoon") .build(); // To generate an initial response, send a user message with the image and text prompt ListenableFuture<GenerateContentResponse> response = chat.sendMessage(prompt); // Extract the image from the initial response ListenableFuture<Bitmap> initialRequest = Futures.transform(response, result -> { for (Part part : result.getCandidates().get(0).getContent().getParts()) { if (part instanceof ImagePart) { ImagePart imagePart = (ImagePart) part; return imagePart.getImage(); } } return null; }, executor); // Follow up requests do not need to specify the image again ListenableFuture<GenerateContentResponse> modelResponseFuture = Futures.transformAsync( initialRequest, generatedImage -> { Content followUpPrompt = new Content.Builder() .addText("But make it old-school line drawing style") .build(); return chat.sendMessage(followUpPrompt); }, executor); // Add a final callback to check the reworked image Futures.addCallback(modelResponseFuture, new FutureCallback<GenerateContentResponse>() { @Override public void onSuccess(GenerateContentResponse result) { for (Part part : result.getCandidates().get(0).getContent().getParts()) { if (part instanceof ImagePart) { ImagePart imagePart = (ImagePart) part; Bitmap generatedImageAsBitmap = imagePart.getImage(); break; } } } @Override public void onFailure(Throwable t) { t.printStackTrace(); } }, executor);
Dikkat edilmesi gereken noktalar ve sınırlamalar
Aşağıdaki noktaları ve sınırlamaları göz önünde bulundurun:
- Çıkış Biçimi: Resimler, maksimum boyutu 1.024 piksel olan PNG'ler olarak oluşturulur.
- Giriş Türleri: Model, görüntü oluşturma için ses veya video girişlerini desteklemez.
- Dil Desteği: En iyi performans için şu dilleri kullanın:
İngilizce (
en), Meksika İspanyolcası (es-mx), Japonca (ja-jp), Basitleştirilmiş Çince (zh-cn) ve Hintçe (hi-in). - Üretimle İlgili Sorunlar:
- Resim oluşturma özelliği her zaman tetiklenmeyebilir ve bazen yalnızca metin içeren bir çıktı elde edilebilir. Resim çıkışlarını açıkça istemeyi deneyin (örneğin, "resim oluştur", "ilerledikçe resim sağla", "resmi güncelle").
- Model, oluşturma işlemini yarıda durdurabilir. Tekrar deneyin veya farklı bir istem kullanın.
- Model, metni resim olarak oluşturabilir. Metin çıkışlarını açıkça istemeyi deneyin (örneğin, "resimlerle birlikte anlatı metni oluştur").
Daha fazla ayrıntı için Firebase belgelerini inceleyin.
Sonraki adımlar
Uygulamanızı ayarladıktan sonra aşağıdaki sonraki adımları göz önünde bulundurun:
- GitHub'daki Android Hızlı Başlangıç Firebase örnek uygulamasını ve Android AI Örnek Kataloğu'nu inceleyin.
- Uygulamanızı üretime hazırlayın. Bu kapsamda, Gemini API'nin yetkisiz istemciler tarafından kötüye kullanılmasını önlemek için Firebase Uygulama Kontrolü'nü ayarlayın.
- Firebase AI Logic hakkında daha fazla bilgiyi Firebase dokümanlarında bulabilirsiniz.