
API для разработчиков Gemini предоставляет доступ к моделям Google Gemini, позволяя внедрять передовые функции генеративного ИИ в ваши приложения для Android, включая диалоговый чат, генерацию изображений (с помощью Nano Banana) и генерацию текста на основе текстовых, графических, аудио- и видеоданных.
Для доступа к моделям Gemini Pro и Flash вы можете использовать API разработчика Gemini с Firebase AI Logic. Это позволит вам начать работу без необходимости ввода данных кредитной карты и предоставит щедрый бесплатный тарифный план. После проверки интеграции с небольшой базой пользователей вы можете масштабировать систему, перейдя на платный тариф.

Начиная
Прежде чем напрямую взаимодействовать с API Gemini из своего приложения, вам необходимо выполнить несколько предварительных действий, включая ознакомление с процедурой запроса подтверждения, а также настройку Firebase и вашего приложения для использования SDK.
Поэкспериментируйте с подсказками.
Экспериментируя с подсказками, вы сможете найти оптимальные формулировки, содержание и формат для вашего Android-приложения. Google AI Studio — это интегрированная среда разработки (IDE), которую можно использовать для создания прототипов и разработки подсказок для сценариев использования вашего приложения.
Создание эффективных подсказок для вашего конкретного случая требует обширных экспериментов, что является критически важной частью процесса. Подробнее о подсказках можно узнать в документации Firebase .
Когда вы будете удовлетворены результатом, нажмите кнопку <> , чтобы получить фрагменты кода, которые вы можете добавить в свой код.
Создайте проект Firebase и подключите ваше приложение к Firebase.
Когда вы будете готовы вызывать API из своего приложения, следуйте инструкциям в «Шаге 1» руководства по началу работы с Firebase AI Logic, чтобы настроить Firebase и SDK в вашем приложении.
Добавьте зависимость Gradle.
Добавьте следующую зависимость Gradle в модуль вашего приложения:
Котлин
dependencies {
  // ... other androidx dependencies

  // Import the BoM for the Firebase platform
  implementation(platform("com.google.firebase:firebase-bom:34.15.0"))

  // Add the dependency for the Firebase AI Logic library When using the BoM,
  // you don't specify versions in Firebase library dependencies
  implementation("com.google.firebase:firebase-ai")
}
Java
dependencies {
  // Import the BoM for the Firebase platform
  implementation(platform("com.google.firebase:34.15.0"))

  // Add the dependency for the Firebase AI Logic library When using the BoM,
  // you don't specify versions in Firebase library dependencies
  implementation("com.google.firebase:firebase-ai")

  // Required for one-shot operations (to use `ListenableFuture` from Guava
  // Android)
  implementation("com.google.guava:guava:31.0.1-android")

  // Required for streaming operations (to use `Publisher` from Reactive
  // Streams)
  implementation("org.reactivestreams:reactive-streams:1.0.4")
}
Инициализируйте генеративную модель.
Для начала создайте экземпляр GenerativeModel и укажите имя модели:
Котлин
// Start by instantiating a GenerativeModel and specifying the model name: val model = Firebase.ai(backend = GenerativeBackend.googleAI()) .generativeModel("gemini-2.5-flash")
Java
GenerativeModel firebaseAI = FirebaseAI.getInstance(GenerativeBackend.googleAI()) .generativeModel("gemini-2.5-flash"); GenerativeModelFutures model = GenerativeModelFutures.from(firebaseAI);
Узнайте больше о доступных моделях для использования с API разработчика Gemini. Вы также можете узнать больше о настройке параметров модели .
Взаимодействуйте с API разработчика Gemini из своего приложения.
Теперь, когда вы настроили Firebase и ваше приложение для использования SDK, вы готовы взаимодействовать с API разработчика Gemini из своего приложения.
Сгенерировать текст
Для генерации текстового ответа вызовите функцию generateContent() с вашим приглашением.
Котлин
scope.launch { val response = model.generateContent("Write a story about a magic backpack.") }
Java
Content prompt = new Content.Builder() .addText("Write a story about a magic backpack.") .build(); ListenableFuture<GenerateContentResponse> response = model.generateContent(prompt); Futures.addCallback(response, new FutureCallback<GenerateContentResponse>() { @Override public void onSuccess(GenerateContentResponse result) { String resultText = result.getText(); } @Override public void onFailure(Throwable t) { t.printStackTrace(); } }, executor);
Создание текста из изображений и других медиафайлов.
Вы также можете генерировать текст из подсказки, которая включает текст, изображения или другие медиафайлы. При вызове функции generateContent() вы можете передать медиафайлы в виде встроенных данных.
Например, для использования растрового изображения укажите тип содержимого image :
Котлин
scope.launch { val response = model.generateContent( content { image(bitmap) text("what is the object in the picture?") } ) }
Java
Content content = new Content.Builder() .addImage(bitmap) .addText("what is the object in the picture?") .build(); ListenableFuture<GenerateContentResponse> response = model.generateContent(content); Futures.addCallback(response, new FutureCallback<GenerateContentResponse>() { @Override public void onSuccess(GenerateContentResponse result) { String resultText = result.getText(); } @Override public void onFailure(Throwable t) { t.printStackTrace(); } }, executor);
Для передачи аудиофайла используйте тип содержимого inlineData :
Котлин
scope.launch { val contentResolver = applicationContext.contentResolver contentResolver.openInputStream(audioUri).use { stream -> stream?.let { val bytes = it.readBytes() val prompt = content { inlineData(bytes, "audio/mpeg") // Specify the appropriate audio MIME type text("Transcribe this audio recording.") } val response = model.generateContent(prompt) } } }
Java
ContentResolver resolver = applicationContext.getContentResolver(); try (InputStream stream = resolver.openInputStream(audioUri)) { File audioFile = new File(new URI(audioUri.toString())); int audioSize = (int) audioFile.length(); byte[] audioBytes = new byte[audioSize]; if (stream != null) { stream.read(audioBytes, 0, audioBytes.length); stream.close(); // Provide a prompt that includes audio specified earlier and text Content prompt = new Content.Builder() .addInlineData(audioBytes, "audio/mpeg") // Specify the appropriate audio MIME type .addText("Transcribe what's said in this audio recording.") .build(); // To generate text output, call `generateContent` with the prompt ListenableFuture<GenerateContentResponse> response = model.generateContent(prompt); Futures.addCallback(response, new FutureCallback<GenerateContentResponse>() { @Override public void onSuccess(GenerateContentResponse result) { String text = result.getText(); Log.d(TAG, (text == null) ? "" : text); } @Override public void onFailure(Throwable t) { Log.e(TAG, "Failed to generate a response", t); } }, executor); } else { Log.e(TAG, "Error getting input stream for file."); // Handle the error appropriately } } catch (IOException e) { Log.e(TAG, "Failed to read the audio file", e); } catch (URISyntaxException e) { Log.e(TAG, "Invalid audio file", e); }
А чтобы предоставить видеофайл, продолжайте использовать тип содержимого inlineData :
Котлин
scope.launch { val contentResolver = applicationContext.contentResolver contentResolver.openInputStream(videoUri).use { stream -> stream?.let { val bytes = it.readBytes() val prompt = content { inlineData(bytes, "video/mp4") // Specify the appropriate video MIME type text("Describe the content of this video") } val response = model.generateContent(prompt) } } }
Java
ContentResolver resolver = applicationContext.getContentResolver(); try (InputStream stream = resolver.openInputStream(videoUri)) { File videoFile = new File(new URI(videoUri.toString())); int videoSize = (int) videoFile.length(); byte[] videoBytes = new byte[videoSize]; if (stream != null) { stream.read(videoBytes, 0, videoBytes.length); stream.close(); // Provide a prompt that includes video specified earlier and text Content prompt = new Content.Builder() .addInlineData(videoBytes, "video/mp4") .addText("Describe the content of this video") .build(); // To generate text output, call generateContent with the prompt ListenableFuture<GenerateContentResponse> response = model.generateContent(prompt); Futures.addCallback(response, new FutureCallback<GenerateContentResponse>() { @Override public void onSuccess(GenerateContentResponse result) { String resultText = result.getText(); System.out.println(resultText); } @Override public void onFailure(Throwable t) { t.printStackTrace(); } }, executor); } } catch (IOException e) { e.printStackTrace(); } catch (URISyntaxException e) { e.printStackTrace(); }
Аналогичным образом, вы также можете передавать документы в формате PDF ( application/pdf ) и в формате обычного текста ( text/plain ), передавая в качестве параметра их соответствующий MIME-тип.
Многоходовой чат
Вы также можете поддерживать многоходовые диалоги. Инициализируйте чат с помощью функции startChat() . При желании вы можете предоставить модели историю сообщений. Затем вызовите функцию sendMessage() для отправки сообщений чата.
Котлин
val chat = model.startChat( history = listOf( content(role = "user") { text("Hello, I have 2 dogs in my house.") }, content(role = "model") { text("Great to meet you. What would you like to know?") } ) ) scope.launch { val response = chat.sendMessage("How many paws are in my house?") }
Java
Content.Builder userContentBuilder = new Content.Builder(); userContentBuilder.setRole("user"); userContentBuilder.addText("Hello, I have 2 dogs in my house."); Content userContent = userContentBuilder.build(); Content.Builder modelContentBuilder = new Content.Builder(); modelContentBuilder.setRole("model"); modelContentBuilder.addText("Great to meet you. What would you like to know?"); Content modelContent = modelContentBuilder.build(); List<Content> history = Arrays.asList(userContent, modelContent); // Initialize the chat ChatFutures chat = model.startChat(history); // Create a new user message Content.Builder messageBuilder = new Content.Builder(); messageBuilder.setRole("user"); messageBuilder.addText("How many paws are in my house?"); Content message = messageBuilder.build(); // Send the message ListenableFuture<GenerateContentResponse> response = chat.sendMessage(message); Futures.addCallback(response, new FutureCallback<GenerateContentResponse>() { @Override public void onSuccess(GenerateContentResponse result) { String resultText = result.getText(); System.out.println(resultText); } @Override public void onFailure(Throwable t) { t.printStackTrace(); } }, executor);
Создавайте изображения на Android с помощью Nano Banana.
Модель Gemini 2.5 Flash Image (также известная как Nano Banana) способна генерировать и редактировать изображения, используя знания об окружающем мире и логические рассуждения. Она создает контекстно релевантные изображения, плавно смешивая или чередуя текст и изображения. Она также может создавать точные визуальные образы с длинными текстовыми последовательностями и поддерживает редактирование изображений в режиме диалога, сохраняя при этом контекст.
В этом руководстве описано, как использовать модель изображений Gemini 2.5 Flash (Nano Banana) с помощью Firebase AI Logic SDK для Android. Более подробную информацию о создании изображений с помощью Gemini см. в документации « Создание изображений с помощью Gemini в Firebase» .
Инициализируйте генеративную модель.
Создайте экземпляр GenerativeModel и укажите имя модели gemini-2.5-flash-image-preview . Убедитесь, что вы настроили responseModalities таким образом, чтобы они включали как TEXT , так и IMAGE .
Котлин
val model = Firebase.ai(backend = GenerativeBackend.googleAI()).generativeModel( modelName = "gemini-2.5-flash-image-preview", // Configure the model to respond with text and images (required) generationConfig = generationConfig { responseModalities = listOf( ResponseModality.TEXT, ResponseModality.IMAGE ) } )
Java
GenerativeModel ai = FirebaseAI.getInstance(GenerativeBackend.googleAI()).generativeModel( "gemini-2.5-flash-image-preview", // Configure the model to respond with text and images (required) new GenerationConfig.Builder() .setResponseModalities(Arrays.asList(ResponseModality.TEXT, ResponseModality.IMAGE)) .build() ); GenerativeModelFutures model = GenerativeModelFutures.from(ai);
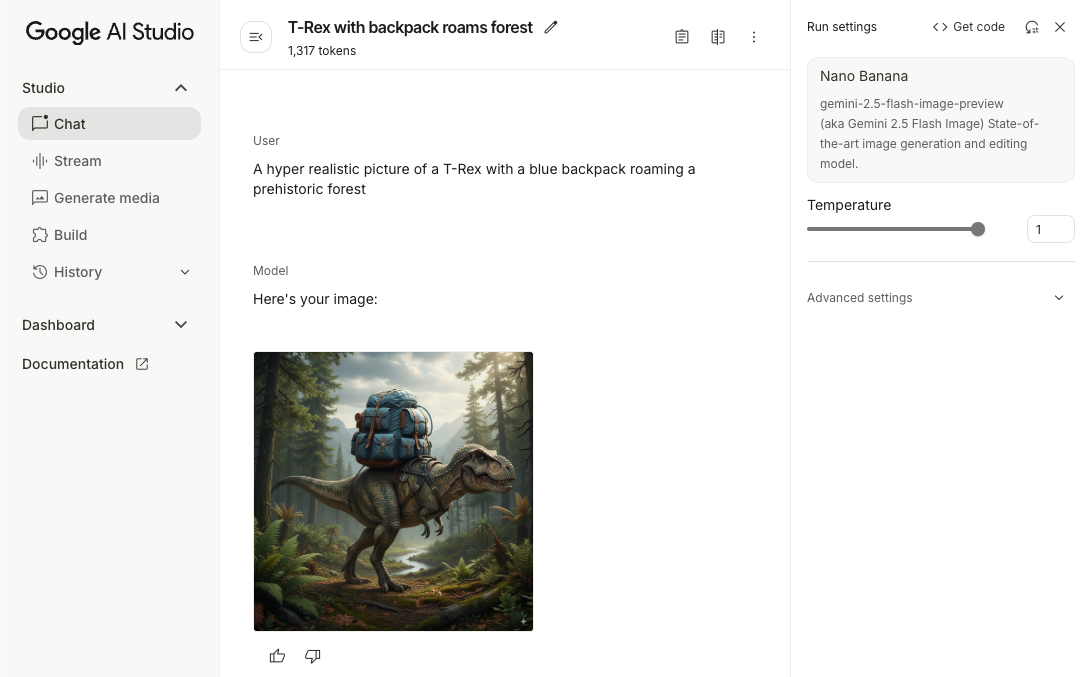
Создание изображений (ввод только текста)
Вы можете дать указание модели Gemini генерировать изображения, предоставив текстовую подсказку:
Котлин
scope.launch { // Provide a text prompt instructing the model to generate an image val prompt = "A hyper realistic picture of a t-rex with a blue bag pack roaming a pre-historic forest." // To generate image output, call `generateContent` with the text input val generatedImageAsBitmap: Bitmap? = model.generateContent(prompt) .candidates.first().content.parts.filterIsInstance<ImagePart>() .firstOrNull()?.image }
Java
// Provide a text prompt instructing the model to generate an image Content prompt = new Content.Builder() .addText("Generate an image of the Eiffel Tower with fireworks in the background.") .build(); // To generate an image, call `generateContent` with the text input ListenableFuture<GenerateContentResponse> response = model.generateContent(prompt); Futures.addCallback(response, new FutureCallback<GenerateContentResponse>() { @Override public void onSuccess(GenerateContentResponse result) { // iterate over all the parts in the first candidate in the result object for (Part part : result.getCandidates().get(0).getContent().getParts()) { if (part instanceof ImagePart) { ImagePart imagePart = (ImagePart) part; // The returned image as a bitmap Bitmap generatedImageAsBitmap = imagePart.getImage(); break; } } } @Override public void onFailure(Throwable t) { t.printStackTrace(); } }, executor);
Редактирование изображений (ввод текста и изображений)
Вы можете попросить модель Gemini отредактировать существующие изображения, указав в запросе текст и одно или несколько изображений:
Котлин
scope.launch { // Provide a text prompt instructing the model to edit the image val prompt = content { image(bitmap) text("Edit this image to make it look like a cartoon") } // To edit the image, call `generateContent` with the prompt (image and text input) val generatedImageAsBitmap: Bitmap? = model.generateContent(prompt) .candidates.first().content.parts.filterIsInstance<ImagePart>().firstOrNull()?.image // Handle the generated text and image }
Java
// Provide an image for the model to edit Bitmap bitmap = BitmapFactory.decodeResource(resources, R.drawable.scones); // Provide a text prompt instructing the model to edit the image Content promptcontent = new Content.Builder() .addImage(bitmap) .addText("Edit this image to make it look like a cartoon") .build(); // To edit the image, call `generateContent` with the prompt (image and text input) ListenableFuture<GenerateContentResponse> response = model.generateContent(promptcontent); Futures.addCallback(response, new FutureCallback<GenerateContentResponse>() { @Override public void onSuccess(GenerateContentResponse result) { // iterate over all the parts in the first candidate in the result object for (Part part : result.getCandidates().get(0).getContent().getParts()) { if (part instanceof ImagePart) { ImagePart imagePart = (ImagePart) part; Bitmap generatedImageAsBitmap = imagePart.getImage(); break; } } } @Override public void onFailure(Throwable t) { t.printStackTrace(); } }, executor);
Редактируйте и прорабатывайте изображения в многоэтапном чате.
Для более интерактивного подхода к редактированию изображений можно использовать многоходовый чат. Это позволяет отправлять дополнительные запросы на уточнение правок без необходимости повторной отправки исходного изображения.
Сначала инициализируйте чат с помощью startChat() , при желании указав историю сообщений. Затем используйте sendMessage() для отправки последующих сообщений:
Котлин
scope.launch { // Create the initial prompt instructing the model to edit the image val prompt = content { image(bitmap) text("Edit this image to make it look like a cartoon") } // Initialize the chat val chat = model.startChat() // To generate an initial response, send a user message with the image and text prompt var response = chat.sendMessage(prompt) // Inspect the returned image var generatedImageAsBitmap: Bitmap? = response .candidates.first().content.parts.filterIsInstance<ImagePart>().firstOrNull()?.image // Follow up requests do not need to specify the image again response = chat.sendMessage("But make it old-school line drawing style") generatedImageAsBitmap = response .candidates.first().content.parts.filterIsInstance<ImagePart>().firstOrNull()?.image }
Java
// Provide an image for the model to edit Bitmap bitmap = BitmapFactory.decodeResource(resources, R.drawable.scones); // Initialize the chat ChatFutures chat = model.startChat(); // Create the initial prompt instructing the model to edit the image Content prompt = new Content.Builder() .setRole("user") .addImage(bitmap) .addText("Edit this image to make it look like a cartoon") .build(); // To generate an initial response, send a user message with the image and text prompt ListenableFuture<GenerateContentResponse> response = chat.sendMessage(prompt); // Extract the image from the initial response ListenableFuture<Bitmap> initialRequest = Futures.transform(response, result -> { for (Part part : result.getCandidates().get(0).getContent().getParts()) { if (part instanceof ImagePart) { ImagePart imagePart = (ImagePart) part; return imagePart.getImage(); } } return null; }, executor); // Follow up requests do not need to specify the image again ListenableFuture<GenerateContentResponse> modelResponseFuture = Futures.transformAsync( initialRequest, generatedImage -> { Content followUpPrompt = new Content.Builder() .addText("But make it old-school line drawing style") .build(); return chat.sendMessage(followUpPrompt); }, executor); // Add a final callback to check the reworked image Futures.addCallback(modelResponseFuture, new FutureCallback<GenerateContentResponse>() { @Override public void onSuccess(GenerateContentResponse result) { for (Part part : result.getCandidates().get(0).getContent().getParts()) { if (part instanceof ImagePart) { ImagePart imagePart = (ImagePart) part; Bitmap generatedImageAsBitmap = imagePart.getImage(); break; } } } @Override public void onFailure(Throwable t) { t.printStackTrace(); } }, executor);
Соображения и ограничения
Обратите внимание на следующие соображения и ограничения:
- Формат вывода : Изображения генерируются в формате PNG с максимальным размером 1024 пикселя.
- Типы входных данных : Данная модель не поддерживает аудио- или видеовходы для генерации изображений.
- Поддержка языков : Для оптимальной работы используйте следующие языки: английский (
en), мексиканский испанский (es-mx), японский (ja-jp), упрощенный китайский (zh-cn) и хинди (hi-in). - Проблемы поколений :
- Генерация изображений может запускаться не всегда, иногда приводя к выводу только текста. Попробуйте явно запросить вывод изображений (например, «сгенерировать изображение», «предоставлять изображения по мере работы», «обновить изображение»).
- Генерация модели может прерваться на полпути. Попробуйте еще раз или введите другую подсказку .
- Модель может генерировать текст в виде изображения. Попробуйте явно указать, какой текст должен быть на выходе (например, «сгенерировать повествовательный текст вместе с иллюстрациями»).
Для получения более подробной информации см. документацию Firebase .
Следующие шаги
После настройки приложения выполните следующие шаги:
- Ознакомьтесь с примером приложения Android Quickstart Firebase и каталогом примеров Android AI на GitHub.
- Подготовьте ваше приложение к работе в продакшене , включая настройку Firebase App Check для защиты API Gemini от злоупотреблений со стороны неавторизованных клиентов.
- Подробнее о Firebase AI Logic можно узнать в документации Firebase .