앱 레이아웃
컬렉션을 사용해 정리하기
내 환경설정을 기준으로 콘텐츠를 저장하고 분류하세요.
Compose 사용해 보기
Wear OS용 Jetpack Compose는 Wear OS에 권장되는 UI 도구 키트입니다.
여러 시계 모양 처리 방법을 이해한 후 사용할 노출 영역을 결정합니다.
일반적인 앱 레이아웃은 다음과 같습니다.
-
단일 화면(가장 간단함): 스크롤 없이 한 번에 표시되는 항목으로 UI 요소가 제한됩니다.
-
세로 컨테이너(가장 일반적): 표시되는 화면 부분을 넘어 콘텐츠가 존재하며 스크롤하여 액세스할 수 있습니다.
-
기타 옵션: 목록 또는 페이징, 2D 화면 이동
이러한 레이아웃 유형은 다음 섹션에서 설명합니다.
여러 화면이 필요하다면 레이아웃 유형을 조합하여 사용할 수 있습니다.
참고: 활동의 경우 ComponentActivity
또는 FragmentActivity
(프래그먼트를 사용하는 경우)에서 상속받습니다.
다른 활동 유형은 Wear OS에 필요하지 않은 모바일 전용 UI 요소를 사용합니다.
단일 화면
사용자가 스크롤하지 않고도 단일 화면에서 모든 요소를 볼 수 있습니다. 즉, 적은 수의 요소만 포함할 수 있습니다.
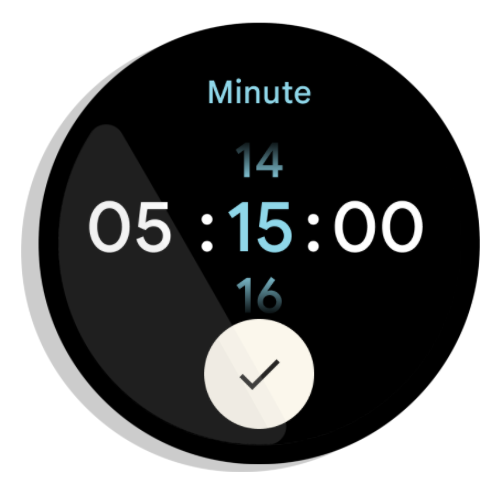
그림 1. 단일 화면 레이아웃 예
단일 화면은 BoxInsetLayout
, ConstraintLayout
과 함께 잘 작동하여 요소를 정렬합니다.
세로 컨테이너
세로 컨테이너는 가장 일반적인 앱 레이아웃 유형입니다. 일부 콘텐츠는 화면에 표시되지 않지만 스크롤하여 액세스할 수 있습니다.
그림 2는 시계의 원형 화면에서 콘텐츠의 일부만 볼 수 있는 완전한 앱 레이아웃을 여러 개 보여줍니다. 이 예에서 기본 콘텐츠는 컨테이너의 상단에 있고 기타 중요한 사용자 여정(CUJ) 및 설정은 하단에 있습니다. 이는 콘텐츠 배치에 관한 권장사항입니다.
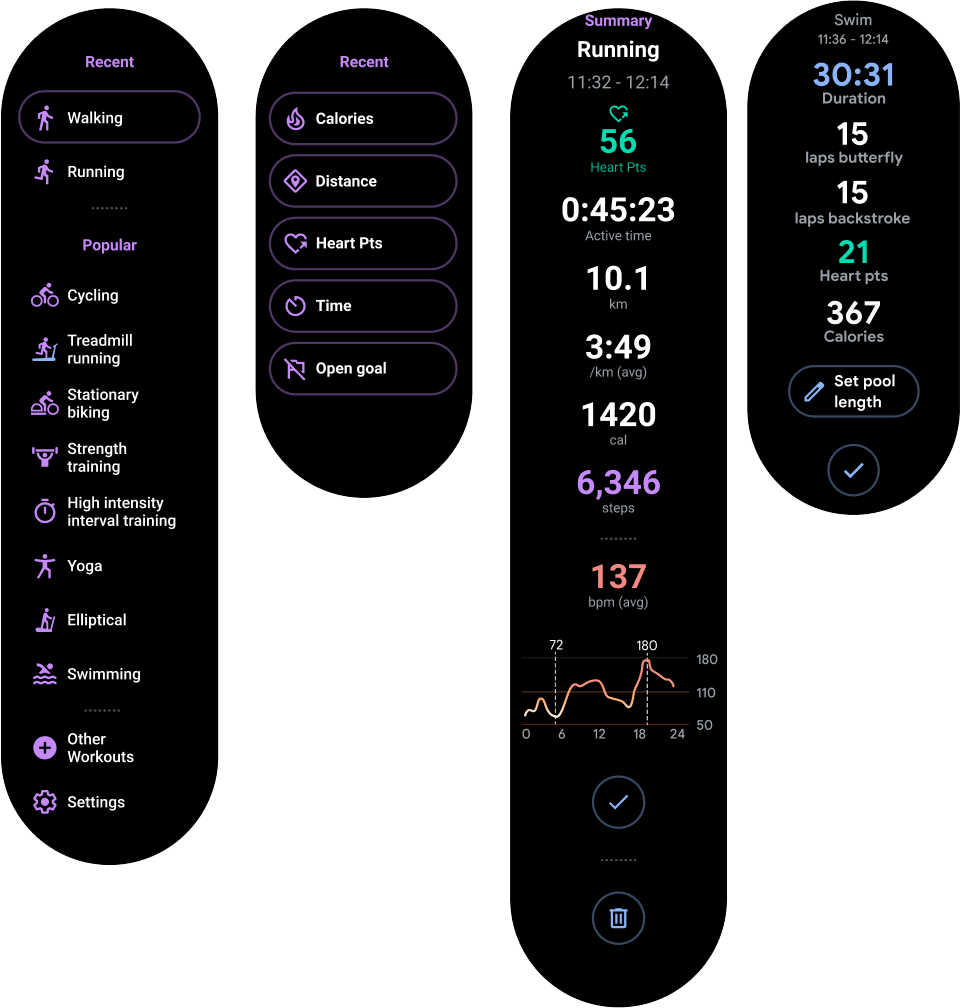
그림 2. 세로 컨테이너 레이아웃 예
단일 화면 앱 레이아웃과 달리 BoxInsetLayout
을 사용하지 마세요. 대신 NestedScrollView
내에서 ConstraintLayout
을 사용하세요.
ConstraintLayout
내에서 앱에 가장 적합한 위젯을 배치합니다. 이렇게 하면 원형 디스플레이 측면의 추가 공간을 활용할 수 있습니다.
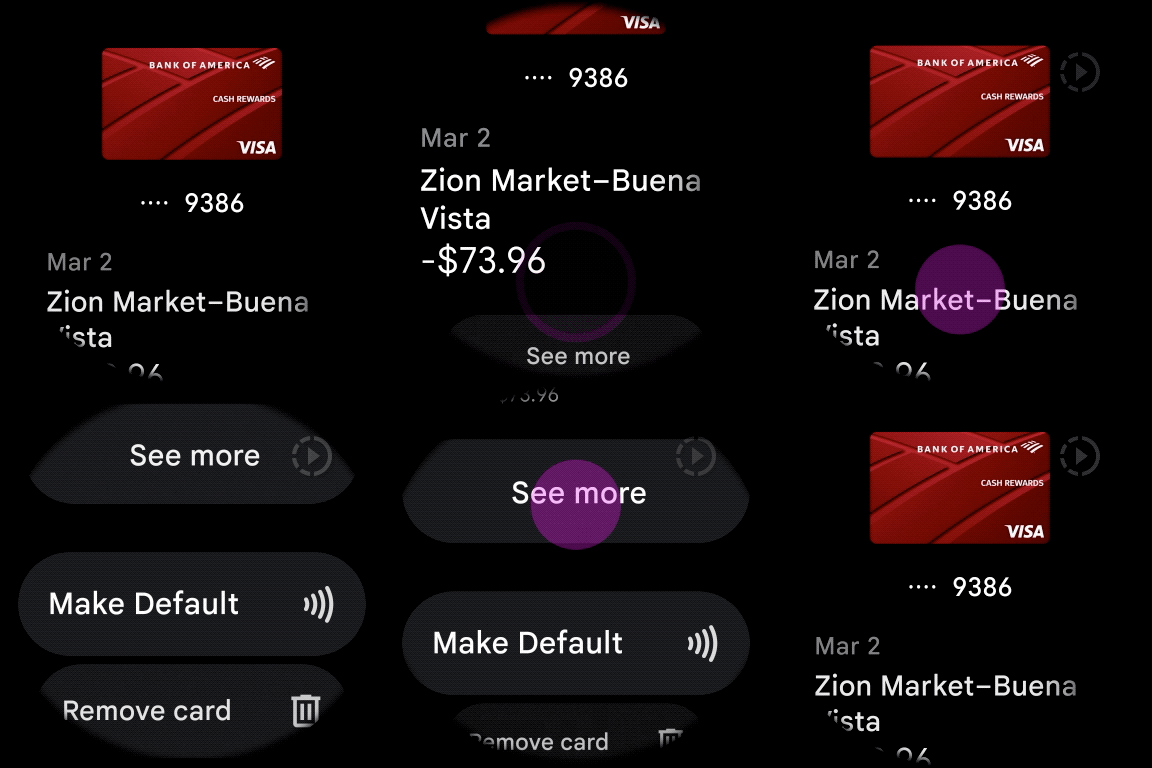
그림 3. NestedScrollView
내 ConstraintLayout
의 콘텐츠
세로 컨테이너의 상단과 하단에 있는 콘텐츠가 그림 3의 예와 같이 원형 디스플레이의 상단과 하단에 맞도록 충분히 작아야 합니다.
참고: 가능하면 XML에서 android:scrollbars="vertical"
을 설정하여 NestedScrollView
에 스크롤 표시기를 추가하세요. 이렇게 하면 사용 가능한 콘텐츠가 더 있다는 것을 사용자가 파악할 수 있으며, 콘텐츠 전체와 비교했을 때 자신의 위치가 어디인지 확인할 수 있습니다.
앱 레이아웃의 기타 옵션
-
목록: 웨어러블 노출 영역에 최적화된
WearableRecyclerView
위젯으로 대량의 데이터를 표시합니다. 자세한 내용은 Wear OS에서 목록 만들기를 참고하세요.
-
가로 페이징: 동위 화면이 여러 개인 사용 사례의 경우 가로 스와이프를 사용합니다. 가로 페이징을 사용한다면 왼쪽 가장자리에 스와이프하여 닫기를 지원해야 합니다.
-
2D 화면 이동: 지도와 같은 사용 사례에서는 사용자가 다양한 방향으로 드래그하여 화면 이동할 수 있습니다. 활동이 전체 화면을 차지하는 경우 스와이프하여 닫기를 사용 설정합니다.
이 페이지에 나와 있는 콘텐츠와 코드 샘플에는 콘텐츠 라이선스에서 설명하는 라이선스가 적용됩니다. 자바 및 OpenJDK는 Oracle 및 Oracle 계열사의 상표 또는 등록 상표입니다.
최종 업데이트: 2025-07-26(UTC)
[[["이해하기 쉬움","easyToUnderstand","thumb-up"],["문제가 해결됨","solvedMyProblem","thumb-up"],["기타","otherUp","thumb-up"]],[["필요한 정보가 없음","missingTheInformationINeed","thumb-down"],["너무 복잡함/단계 수가 너무 많음","tooComplicatedTooManySteps","thumb-down"],["오래됨","outOfDate","thumb-down"],["번역 문제","translationIssue","thumb-down"],["샘플/코드 문제","samplesCodeIssue","thumb-down"],["기타","otherDown","thumb-down"]],["최종 업데이트: 2025-07-26(UTC)"],[],[],null,["# App layouts\n\nTry the Compose way \nJetpack Compose on Wear OS is the recommended UI toolkit for Wear OS. \n[Handle different screen sizes using Compose on Wear OS →](/training/wearables/compose/screen-size) \n\n\nAfter you understand how to\n[handle different watch shapes](/training/wearables/apps/layouts),\ndecide which surface you want to use.\n\n\nCommon app layouts include the following:\n\n- Single screen (simplest): UI elements are limited to what is visible at one time without scrolling.\n- Vertical container (most common): content exists beyond the viewable portion of the screen and is accessible by scrolling.\n- Other options: lists, paging, or 2D panning.\n\nThese layout types are described in the sections that follow.\nYou can use a combination of layout types if you need multiple screens.\n\n\n**Note:** For your activity, inherit from either a\n`ComponentActivity` or, if you use fragments, a `FragmentActivity`.\nThe other activity types use mobile-specific UI elements that you don't need for Wear OS.\n\nSingle screen\n-------------\n\n\nThe user sees all elements in a single screen without scrolling. This means you can include only\na small number of elements.\n\n\n**Figure 1.** An example of a single screen layout.\n\n\nSingle screens work well with a\n[BoxInsetLayout](/reference/androidx/wear/widget/BoxInsetLayout)\nin combination with a\n[ConstraintLayout](/reference/androidx/constraintlayout/widget/ConstraintLayout)\nto arrange your elements.\n\nVertical container\n------------------\n\n\nA vertical container is the most common type of app layout. Some content isn't\nvisible on the screen, but it is accessible by scrolling.\n\n\nFigure 2 shows several complete app layouts in which only a portion of the\ncontent can be seen on the circular screen of a watch. In these examples, the main\ncontent is in the top\nportion of the container, and other Critical User Journeys (CUJs) and settings are\nat the bottom. This is a best practice for laying out content.\n\n\n**Figure 2.** Examples of vertical container layouts.\n\nUnlike in a single screen app layout, don't use `BoxInsetLayout`. Instead, use\na `ConstraintLayout` inside a\n[NestedScrollView](/reference/androidx/core/widget/NestedScrollView).\nInside the `ConstraintLayout`, place whatever widgets make the most sense for\nyour app. This lets you take advantage of the extra space on the sides of a circular display.\n\n\n**Figure 3.** Content in a `ConstraintLayout` inside a\n`NestedScrollView`.\n\n\nMake sure the content at the top and bottom of your vertical container is small enough to fit in\nthe top and bottom of a circular display, as in the example in figure 3.\n\n**Note:**\nWhen possible, add a scroll indicator to your `NestedScrollView` by setting\n`android:scrollbars=\"vertical\"` in the XML. This helps users identify that there is\nmore content available and helps them see where they are in relation to all the content.\n\nOther options for app layouts\n-----------------------------\n\n- **Lists** : display large sets of data with the `WearableRecyclerView` widget optimized for Wearable surfaces. For more information, see [Create lists on Wear OS](/training/wearables/apps/lists).\n- **Horizontal paging** : for use cases with multiple sibling screens, use a [horizontal swipe](/guide/navigation/navigation-swipe-view-2). If you use horizontal paging, you must support swipe-to-dismiss for the left edge.\n- **2D Panning** : for use cases like maps, users can [drag to pan](/training/gestures/scale#pan) in different directions. Enable [swipe-to-dismiss](/training/wearables/apps/exit#swipe-to-dismiss) if your activity takes up the entire screen."]]