
一般的に、ユーザーはテレビを操作する際、視聴前の入力を最小限にすることを好みます。 説明します。多くの TV ユーザーにとって理想的なシナリオは、「TV の前に座り、電源を入れ、コンテンツを視聴する」というものです。最小限のステップ 一般的に、ユーザーが好むコンテンツにユーザーを誘導するのがよいでしょう。
注: 推奨事項の作成には、ここで説明する API を使用してください。 Android 7.1(API レベル 25)以前の Android バージョンで実行されているアプリでのみ利用可能。供給 Android 8.0(API レベル 26)以降で実行されるアプリの推奨事項については、 おすすめのチャンネル。
Android フレームワークは、レコメンデーション行を提供することで最小限の入力インタラクションを支援 をタップします。おすすめのコンテンツは、テレビのホーム画面の最上部に表示され、 。アプリのコンテンツ カタログからおすすめ情報を提供することで、 ユーザーをアプリに呼び戻すことができます
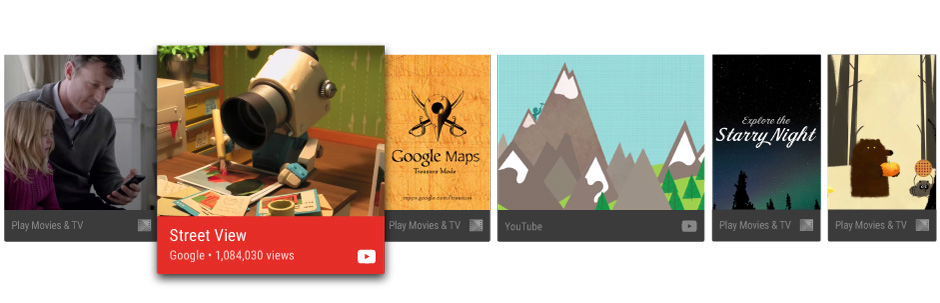
図 1. 最適化案行の例。
このガイドでは、おすすめを作成して Android フレームワークに提供する方法について説明します。 ユーザーがアプリのコンテンツを簡単に見つけて楽しめるようになります。次のサンプル実装もご覧ください: <ph type="x-smartling-placeholder"></ph> Leanback サンプルアプリ をタップします。
おすすめに関するベスト プラクティス
ユーザーはおすすめを利用することで、目当てのコンテンツやアプリをすばやく見つけることができます。作成中 ユーザーとの関連性が高い質の高いおすすめ情報が表示されることは、 優れたユーザーエクスペリエンスを提供できますこのため、データ アナリストが解決すべき問題や ユーザーに提示する推奨事項を厳重に管理します。
おすすめのタイプ
おすすめを作成する際は、未完了の視聴アクティビティや、未完了の視聴アクティビティにユーザーを誘導する それを関連コンテンツに拡張する アクティビティを提案しますここでは、Google Cloud で 次のことをおすすめします
- 続きのコンテンツ: ユーザーが再開できる次のエピソードに関するおすすめ 表示されます。または、一時停止した映画、テレビ番組、ポッドキャストの続きからのおすすめを利用します 数クリックするだけで、一時停止中のコンテンツを再開できます。
- 新しいコンテンツ: 初回リリースの新エピソードなど、ユーザーが 別のシリーズの視聴を終了しました。また、アプリでユーザーが登録、フォロー、追跡を 追跡中のコンテンツのリストにある未視聴のアイテムに対して、新しいおすすめコンテンツを使用します。
- 関連コンテンツ: ユーザーの興味 / 関心に基づく分析できます
最適なユーザー エクスペリエンスのためにおすすめカードをデザインする方法について詳しくは、 Android TV デザイン仕様のおすすめの行。
おすすめを更新する
おすすめを更新する際には、単に削除して再投稿しないでください。このような行為を行うと、 最適化案の行の末尾に表示することもできます。たとえば、 ムービー、再生済み、<ph type="x-smartling-placeholder"></ph> おすすめから除外できます。
おすすめをカスタマイズする
ユーザー インターフェースを設定して、おすすめカードをカスタマイズしてブランディング情報を伝えることができます。 カードの前景と背景画像、色、アプリアイコン、タイトル、サブタイトルなどの要素が含まれます。 詳しくは以下をご覧ください。 Android TV デザイン仕様のおすすめの行。
おすすめをグループ化する
必要に応じて、おすすめのソースに基づいておすすめをグループ化できます。たとえば、お客様のアプリは は、ユーザーが購読しているコンテンツのレコメンデーションと、ユーザーが購読しているコンテンツに対するレコメンデーション、という 2 つのグループのレコメンデーションを提示します。 ユーザーが知らない可能性のある新しい急上昇コンテンツのおすすめが表示されます。
グループの作成時または更新時に、グループごとに推奨のランク付けと並べ替えが行われます。 クリックしますおすすめを表示するグループ情報を指定することで、 無関係なおすすめ順より下位におすすめしません。
使用
NotificationCompat.Builder.setGroup(): 推奨事項のグループキー文字列を設定します。対象
たとえば、あるおすすめを、新しい急上昇コンテンツを含むグループに属するものとしてマークする、
setGroup("trending") を呼び出すこともできます。
おすすめサービスを作成する
コンテンツのおすすめはバックグラウンド処理で作成されます。アプリケーションで リスティングを定期的に追加するサービスを作成し、 システムのおすすめのリストにアプリのカタログに追加します。
次のコード例は、IntentService を拡張して
アプリケーションのレコメンデーション サービスを作成します。
Kotlin
class UpdateRecommendationsService : IntentService("RecommendationService") {
    override protected fun onHandleIntent(intent: Intent) {
        Log.d(TAG, "Updating recommendation cards")
        val recommendations = VideoProvider.getMovieList()
        if (recommendations == null) return

        var count = 0

        try {
            val builder = RecommendationBuilder()
                    .setContext(applicationContext)
                    .setSmallIcon(R.drawable.videos_by_google_icon)

            for (entry in recommendations.entrySet()) {
                for (movie in entry.getValue()) {
                    Log.d(TAG, "Recommendation - " + movie.getTitle())

                    builder.setBackground(movie.getCardImageUrl())
                            .setId(count + 1)
                            .setPriority(MAX_RECOMMENDATIONS - count)
                            .setTitle(movie.getTitle())
                            .setDescription(getString(R.string.popular_header))
                            .setImage(movie.getCardImageUrl())
                            .setIntent(buildPendingIntent(movie))
                            .build()
                    if (++count >= MAX_RECOMMENDATIONS) {
                        break
                    }
                }
                if (++count >= MAX_RECOMMENDATIONS) {
                    break
                }
            }
        } catch (e: IOException) {
            Log.e(TAG, "Unable to update recommendation", e)
        }
    }

    private fun buildPendingIntent(movie: Movie): PendingIntent {
        val detailsIntent = Intent(this, DetailsActivity::class.java)
        detailsIntent.putExtra("Movie", movie)

        val stackBuilder = TaskStackBuilder.create(this)
        stackBuilder.addParentStack(DetailsActivity::class.java)
        stackBuilder.addNextIntent(detailsIntent)

        // Ensure a unique PendingIntents, otherwise all
        // recommendations end up with the same PendingIntent
        detailsIntent.setAction(movie.getId().toString())

        val intent = stackBuilder.getPendingIntent(0, PendingIntent.FLAG_UPDATE_CURRENT)
        return intent
    }

    companion object {
        private val TAG = "UpdateRecommendationsService"
        private val MAX_RECOMMENDATIONS = 3
    }
}
Java
public class UpdateRecommendationsService extends IntentService {
    private static final String TAG = "UpdateRecommendationsService";
    private static final int MAX_RECOMMENDATIONS = 3;

    public UpdateRecommendationsService() {
        super("RecommendationService");
    }

    @Override
    protected void onHandleIntent(Intent intent) {
        Log.d(TAG, "Updating recommendation cards");
        HashMap<String, List<Movie>> recommendations = VideoProvider.getMovieList();
        if (recommendations == null) return;

        int count = 0;

        try {
            RecommendationBuilder builder = new RecommendationBuilder()
                    .setContext(getApplicationContext())
                    .setSmallIcon(R.drawable.videos_by_google_icon);

            for (Map.Entry<String, List<Movie>> entry : recommendations.entrySet()) {
                for (Movie movie : entry.getValue()) {
                    Log.d(TAG, "Recommendation - " + movie.getTitle());

                    builder.setBackground(movie.getCardImageUrl())
                            .setId(count + 1)
                            .setPriority(MAX_RECOMMENDATIONS - count)
                            .setTitle(movie.getTitle())
                            .setDescription(getString(R.string.popular_header))
                            .setImage(movie.getCardImageUrl())
                            .setIntent(buildPendingIntent(movie))
                            .build();

                    if (++count >= MAX_RECOMMENDATIONS) {
                        break;
                    }
                }
                if (++count >= MAX_RECOMMENDATIONS) {
                    break;
                }
            }
        } catch (IOException e) {
            Log.e(TAG, "Unable to update recommendation", e);
        }
    }

    private PendingIntent buildPendingIntent(Movie movie) {
        Intent detailsIntent = new Intent(this, DetailsActivity.class);
        detailsIntent.putExtra("Movie", movie);

        TaskStackBuilder stackBuilder = TaskStackBuilder.create(this);
        stackBuilder.addParentStack(DetailsActivity.class);
        stackBuilder.addNextIntent(detailsIntent);
        // Ensure a unique PendingIntents, otherwise all
        // recommendations end up with the same PendingIntent
        detailsIntent.setAction(Long.toString(movie.getId()));

        PendingIntent intent = stackBuilder.getPendingIntent(0, PendingIntent.FLAG_UPDATE_CURRENT);
        return intent;
    }
}
このサービスをシステムで認識して実行するには、 指定します。次のコード スニペットは、このクラスをサービスとして宣言する方法を示しています。
<manifest ... >
  <application ... >
    ...

    <service
            android:name="com.example.android.tvleanback.UpdateRecommendationsService"
            android:enabled="true" />
  </application>
</manifest>
おすすめを作成する
レコメンデーション サービスの実行が開始したら、レコメンデーションを作成して
実装します。フレームワークは推奨事項を Notification オブジェクトとして受け取ります。このオブジェクトは特定のテンプレートを使用し、特定の
あります。
値を設定する
おすすめカードの UI 要素の値を設定するには、以下に示すようにビルダークラスを作成します。 次のビルダー パターンを使用します。まずは最適化案カードの価値を設定します あります。
Kotlin
class RecommendationBuilder {
    ...

    fun setTitle(title: String): RecommendationBuilder {
        this.title = title
        return this
    }

    fun setDescription(description: String): RecommendationBuilder {
        this.description = description
        return this
    }

    fun setImage(uri: String): RecommendationBuilder {
        imageUri = uri
        return this
    }

    fun setBackground(uri: String): RecommendationBuilder {
        backgroundUri = uri
        return this
    }

...
Java
public class RecommendationBuilder {
    ...

    public RecommendationBuilder setTitle(String title) {
            this.title = title;
            return this;
        }

        public RecommendationBuilder setDescription(String description) {
            this.description = description;
            return this;
        }

        public RecommendationBuilder setImage(String uri) {
            imageUri = uri;
            return this;
        }

        public RecommendationBuilder setBackground(String uri) {
            backgroundUri = uri;
            return this;
        }
...
通知を作成する
値を設定したら、通知を作成して、ビルダーから値を割り当てます。
クラスに通知し、NotificationCompat.Builder.build() を呼び出します。
また 忘れずに
setLocalOnly()
NotificationCompat.BigPictureStyleの通知は表示されません
できます。
次のコードサンプルは、推奨事項を作成する方法を示しています。
Kotlin
class RecommendationBuilder {
    ...

    @Throws(IOException::class)
    fun build(): Notification {
        ...

        val notification = NotificationCompat.BigPictureStyle(
        NotificationCompat.Builder(context)
                .setContentTitle(title)
                .setContentText(description)
                .setPriority(priority)
                .setLocalOnly(true)
                .setOngoing(true)
                .setColor(context.resources.getColor(R.color.fastlane_background))
                .setCategory(Notification.CATEGORY_RECOMMENDATION)
                .setLargeIcon(image)
                .setSmallIcon(smallIcon)
                .setContentIntent(intent)
                .setExtras(extras))
                .build()

        return notification
    }
}
Java
public class RecommendationBuilder {
    ...

    public Notification build() throws IOException {
        ...

        Notification notification = new NotificationCompat.BigPictureStyle(
                new NotificationCompat.Builder(context)
                        .setContentTitle(title)
                        .setContentText(description)
                        .setPriority(priority)
                        .setLocalOnly(true)
                        .setOngoing(true)
                        .setColor(context.getResources().getColor(R.color.fastlane_background))
                        .setCategory(Notification.CATEGORY_RECOMMENDATION)
                        .setLargeIcon(image)
                        .setSmallIcon(smallIcon)
                        .setContentIntent(intent)
                        .setExtras(extras))
                .build();

        return notification;
    }
}
おすすめサービスを実行する
最新のコンテンツを作成するために、アプリのおすすめサービスは定期的に実行する必要があります
おすすめします。サービスを実行するには、タイマーを実行して
定期的に更新することもできます。次のコードサンプルでは、BroadcastReceiver クラスを拡張して、レコメンデーション サービスの定期的な実行を開始します。
30 分ごと:
Kotlin
class BootupActivity : BroadcastReceiver() {
    override fun onReceive(context: Context, intent: Intent) {
        Log.d(TAG, "BootupActivity initiated")
        if (intent.action.endsWith(Intent.ACTION_BOOT_COMPLETED)) {
            scheduleRecommendationUpdate(context)
        }
    }

    private fun scheduleRecommendationUpdate(context: Context) {
        Log.d(TAG, "Scheduling recommendations update")
        val alarmManager = context.getSystemService(Context.ALARM_SERVICE) as AlarmManager
        val recommendationIntent = Intent(context, UpdateRecommendationsService::class.java)
        val alarmIntent = PendingIntent.getService(context, 0, recommendationIntent, 0)
        alarmManager.setInexactRepeating(AlarmManager.ELAPSED_REALTIME_WAKEUP,
                INITIAL_DELAY,
                AlarmManager.INTERVAL_HALF_HOUR,
                alarmIntent
        )
    }

    companion object {
        private val TAG = "BootupActivity"
        private val INITIAL_DELAY:Long = 5000
    }
}
Java
public class BootupActivity extends BroadcastReceiver {
    private static final String TAG = "BootupActivity";

    private static final long INITIAL_DELAY = 5000;

    @Override
    public void onReceive(Context context, Intent intent) {
        Log.d(TAG, "BootupActivity initiated");
        if (intent.getAction().endsWith(Intent.ACTION_BOOT_COMPLETED)) {
            scheduleRecommendationUpdate(context);
        }
    }

    private void scheduleRecommendationUpdate(Context context) {
        Log.d(TAG, "Scheduling recommendations update");

        AlarmManager alarmManager = (AlarmManager) context.getSystemService(Context.ALARM_SERVICE);
        Intent recommendationIntent = new Intent(context, UpdateRecommendationsService.class);
        PendingIntent alarmIntent = PendingIntent.getService(context, 0, recommendationIntent, 0);

        alarmManager.setInexactRepeating(AlarmManager.ELAPSED_REALTIME_WAKEUP,
                INITIAL_DELAY,
                AlarmManager.INTERVAL_HALF_HOUR,
                alarmIntent);
    }
}
この BroadcastReceiver クラスの実装は、起動後に実行する必要があります。
インストールしているテレビデバイスの画面。これを実現するには、このクラスをアプリに登録します。
デバイスの起動プロセスの完了をリッスンするインテント フィルタを記述できます。「
次のサンプルコードは、この構成をマニフェストに追加する方法を示しています。
<manifest ... >
  <application ... >
    <receiver android:name="com.example.android.tvleanback.BootupActivity"
              android:enabled="true"
              android:exported="false">
      <intent-filter>
        <action android:name="android.intent.action.BOOT_COMPLETED"/>
      </intent-filter>
    </receiver>
  </application>
</manifest>
重要: 起動完了の通知を受け取るには、
RECEIVE_BOOT_COMPLETED 権限をリクエストします。
詳しくは、ACTION_BOOT_COMPLETED をご覧ください。
推奨事項のサービスクラスにonHandleIntent()
その推奨事項をマネージャーに送信します。
Kotlin
val notification = notificationBuilder.build()
notificationManager.notify(id, notification)
Java
Notification notification = notificationBuilder.build();
notificationManager.notify(id, notification);