인증 관리자는 Android 14에 도입된 API 모음으로서 사용자 이름-비밀번호, 패스키 및 제휴 로그인 솔루션(예: Google 계정으로 로그인)과 같은 멀티 로그인 방법을 지원합니다. Credential Manager API가 호출되면 Android 시스템은 기기에 설치된 모든 사용자 인증 정보 제공업체의 사용자 인증 정보를 집계합니다. 이 문서에서는 이러한 사용자 인증 정보 제공업체의 통합 엔드포인트를 제공하는 API 집합을 설명합니다.
설정
사용자 인증 정보 제공업체의 기능을 구현하기 전에 다음 섹션에 나와 있는 설정 단계를 완료하세요.
종속 항목 선언
인증 관리자 라이브러리의 최신 버전을 사용하려면 앱 모듈의 빌드 스크립트에 다음 종속 항목을 추가합니다.
Kotlin
dependencies {
    implementation("androidx.credentials:credentials:1.6.0-rc01")
}
Groovy
dependencies {
    implementation "androidx.credentials:credentials:1.6.0-rc01"
}
매니페스트 파일에서 서비스 요소 선언
앱의 매니페스트 파일 AndroidManifest.xml에서 다음 예와 같이 androidx.credentials 라이브러리의 CredentialProviderService 클래스를 확장하는 서비스 클래스의 <service> 선언을 포함해야 합니다.
<service android:name=".MyCredentialProviderService"
    android:enabled="true"
    android:exported="true"
    android:label="My Credential Provider"
    android:icon="@mipmap/ic_launcher"
    android:permission="android.permission.BIND_CREDENTIAL_PROVIDER_SERVICE"
    tools:targetApi="upside_down_cake">
    <intent-filter>
        <action android:name="android.service.credentials.CredentialProviderService"/>
    </intent-filter>
    <meta-data
        android:name="android.credentials.provider"
        android:resource="@xml/provider"/>
</service>
이전 예에 표시된 권한과 인텐트 필터는 인증 관리자 흐름이 예상대로 작동하는 데 반드시 필요합니다. Android 시스템만 이 서비스에 바인딩할 수 있도록 하려면 권한이 필요합니다. 인텐트 필터는 인증 관리자가 이 서비스를 사용자 인증 정보 제공업체로 검색하는 데 사용됩니다.
지원되는 사용자 인증 정보 유형 선언
res/xml 디렉터리에서 provider.xml이라는 새 파일을 만듭니다. 이 파일에서 라이브러리의 각 사용자 인증 정보 유형에 정의된 상수를 통해 서비스에서 지원하는 사용자 인증 정보 유형을 선언합니다. 다음 예에서 서비스는 기존 비밀번호뿐만 아니라 패스키, 즉 TYPE_PASSWORD_CREDENTIAL 및 TYPE_PUBLIC_KEY_CREDENTIAL로 정의된 상수를 지원합니다.
<credential-provider xmlns:android="http://schemas.android.com/apk/res/android">
    <capabilities>
        <capability name="android.credentials.TYPE_PASSWORD_CREDENTIAL" />
        <capability name="androidx.credentials.TYPE_PUBLIC_KEY_CREDENTIAL" />
    </capabilities>
</credential-provider>
이전 API 수준에서 사용자 인증 정보 제공업체는 비밀번호 및 기타 데이터의 자동 완성과 같은 API와 통합됩니다. 이러한 제공업체는 동일한 내부 인프라를 사용하여 기존 사용자 인증 정보 유형을 저장하는 동시에 패스키를 포함한 다른 사용자 인증 정보 유형을 지원하도록 확장할 수 있습니다.
제공업체 상호작용에 대한 2단계 접근 방식
인증 관리자는 다음과 같이 두 단계로 사용자 인증 정보 제공업체와 상호작용합니다.
- 첫 번째 단계는 시작/쿼리 단계로, 시스템이 사용자 인증 정보 제공업체 서비스에 바인딩되고
Begin…요청과 함께onBeginGetCredentialRequest(),onBeginCreateCredentialRequest()또는onClearCredentialStateRequest()메서드를 호출합니다. 제공업체는 이러한 요청을 처리하고Begin…응답으로 응답하여 계정 선택기에 표시될 시각적 옵션을 나타내는 항목으로 채워야 합니다. 각 항목에는PendingIntent가 설정되어 있어야 합니다. - 사용자가 항목을 선택하면 선택 단계가 시작되고 항목과 연결된
PendingIntent가 실행되어 해당하는 제공업체 활동이 표시됩니다. 사용자가 이 활동과의 상호작용을 완료하면 사용자 인증 정보 제공업체는 활동을 종료하기 전에 활동 결과에 관한 응답을 설정해야 합니다. 그런 다음 이 응답은 인증 관리자를 호출한 클라이언트 앱으로 전송됩니다.
패스키 생성 처리
패스키 생성 쿼리 처리
클라이언트 앱이 패스키를 생성하고 사용자 인증 정보 제공업체를 사용하여 저장하려는 경우 createCredential API를 호출합니다. 실제로 패스키가 저장소에 저장되도록 사용자 인증 정보 제공업체 서비스에서 이 요청을 처리하려면 다음 섹션에 나와 있는 단계를 완료합니다.
CredentialProviderService에서 확장된 서비스의onBeginCreateCredentialRequest()메서드를 재정의합니다.- 상응하는
BeginCreateCredentialResponse를 생성하고 콜백을 통해 전달하여BeginCreateCredentialRequest를 처리합니다. BeginCreateCredentialResponse를 구성하는 동안 필수CreateEntries를 추가합니다. 각CreateEntry는 사용자 인증 정보를 저장할 수 있는 계정에 해당해야 하며 다른 필수 메타데이터와 함께PendingIntent가 설정되어 있어야 합니다.
다음 예는 이러한 단계를 구현하는 방법을 보여줍니다.
override fun onBeginCreateCredentialRequest(
    request: BeginCreateCredentialRequest,
    cancellationSignal: CancellationSignal,
    callback: OutcomeReceiver<BeginCreateCredentialResponse, CreateCredentialException>,
) {
    val response: BeginCreateCredentialResponse? = processCreateCredentialRequest(request)
    if (response != null) {
        callback.onResult(response)
    } else {
        callback.onError(CreateCredentialUnknownException())
    }
}

fun processCreateCredentialRequest(request: BeginCreateCredentialRequest): BeginCreateCredentialResponse? {
    when (request) {
        is BeginCreatePublicKeyCredentialRequest -> {
            // Request is passkey type
            return handleCreatePasskeyQuery(request)
        }
    }
    // Request not supported
    return null
}

private fun handleCreatePasskeyQuery(
    request: BeginCreatePublicKeyCredentialRequest
): BeginCreateCredentialResponse {

    // Adding two create entries - one for storing credentials to the 'Personal'
    // account, and one for storing them to the 'Family' account. These
    // accounts are local to this sample app only.
    val createEntries: MutableList<CreateEntry> = mutableListOf()
    createEntries.add(
        CreateEntry(
            PERSONAL_ACCOUNT_ID,
            createNewPendingIntent(PERSONAL_ACCOUNT_ID, CREATE_PASSKEY_INTENT)
        )
    )

    createEntries.add(
        CreateEntry(
            FAMILY_ACCOUNT_ID,
            createNewPendingIntent(FAMILY_ACCOUNT_ID, CREATE_PASSKEY_INTENT)
        )
    )

    return BeginCreateCredentialResponse(createEntries)
}

private fun createNewPendingIntent(accountId: String, action: String): PendingIntent {
    val intent = Intent(action).setPackage(PACKAGE_NAME)

    // Add your local account ID as an extra to the intent, so that when
    // user selects this entry, the credential can be saved to this
    // account
    intent.putExtra(EXTRA_KEY_ACCOUNT_ID, accountId)

    return PendingIntent.getActivity(
        applicationContext, UNIQUE_REQ_CODE,
        intent,
        (
            PendingIntent.FLAG_MUTABLE
                or PendingIntent.FLAG_UPDATE_CURRENT
            )
    )
}
PendingIntent 구성은 다음을 준수해야 합니다.
- 상응하는 Activity는 필요한 생체 인식 메시지, 확인 또는 선택이 표시되도록 설정되어야 합니다.
- 상응하는 활동이 호출될 때 제공업체에 필요한 모든 필수 데이터는
PendingIntent를 생성하는 데 사용되는 인텐트에 추가 데이터로 설정되어야 합니다(예: 생성 흐름의accountId). PendingIntent는 시스템이 최종 요청을 인텐트 추가 항목에 추가할 수 있도록PendingIntent.FLAG_MUTABLE플래그로 구성되어야 합니다.PendingIntent는PendingIntent.FLAG_ONE_SHOT플래그를 사용하여 구성해서는 안 됩니다. 사용자가 항목을 선택할 수 있으며, 뒤로 돌아가서 그 항목을 다시 선택하면PendingIntent가 두 번 실행되기 때문입니다.PendingIntent는 각 항목이 고유한PendingIntent를 가질 수 있도록 고유한 요청 코드로 구성되어야 합니다.
패스키 생성 요청의 항목 선택 처리
- 사용자가 이전에 채워진
CreateEntry를 선택하면 이에 상응하는PendingIntent가 호출되고 연결된 제공업체Activity가 생성됩니다. - Activity의
onCreate메서드가 호출되면 연결된 인텐트에 액세스하고PendingIntentHander클래스에 전달하여ProviderCreateCredentialRequest를 가져옵니다. - 요청에서
requestJson,callingAppInfo,clientDataHash를 추출합니다. - 인텐트 추가 항목에서 로컬
accountId를 추출합니다. 이는 샘플 앱별로 구현하며 필수는 아닙니다. 이 계정 ID를 사용하여 이 특정 계정 ID에 대한 사용자 인증 정보를 저장할 수 있습니다. requestJson을 검증합니다. 아래 예에서는PublicKeyCredentialCreationOptions와 같은 로컬 데이터 클래스를 사용하여 입력 JSON을 WebAuthn 사양에 따라 구조화된 클래스로 변환합니다. 사용자 인증 정보 제공업체로서 이를 자체 파서로 대체할 수 있습니다.- 호출이 네이티브 Android 앱에서 시작된 경우 통화 앱의 애셋 링크를 확인합니다.
- 인증 프롬프트 표시 아래 예에서는 Android Biometric API를 사용합니다.
- 인증에 성공하면
credentialId와 키 쌍을 생성합니다. callingAppInfo.packageName에 대해 로컬 데이터베이스에 비공개 키를 저장합니다.- 공개 키와
credentialId로 구성된 웹 인증 API JSON 응답을 생성합니다. 아래 예에서는AuthenticatorAttestationResponse및FidoPublicKeyCredential과 같은 로컬 유틸리티 클래스를 사용합니다. 이러한 클래스는 앞서 언급된 사양에 따라 JSON을 구성하는 데 도움이 됩니다. 사용자 인증 정보 제공업체는 이러한 클래스를 자체 빌더로 대체할 수 있습니다. - 위에서 생성된 JSON으로
CreatePublicKeyCredentialResponse를 구성합니다. PendingIntentHander.setCreateCredentialResponse()를 통해Intent의 추가 항목으로CreatePublicKeyCredentialResponse를 설정하고 이 인텐트를 Activity의 결과로 설정합니다.- Activity를 완료합니다
아래의 코드 예는 이러한 단계를 보여줍니다. onCreate()가 호출된 후에는 Activity 클래스에서 이 코드를 처리해야 합니다.
override fun onCreate(savedInstanceState: Bundle?, persistentState: PersistableBundle?) {
    super.onCreate(savedInstanceState, persistentState)
    // ...

    val request =
        PendingIntentHandler.retrieveProviderCreateCredentialRequest(intent)

    val accountId = intent.getStringExtra(CredentialsRepo.EXTRA_KEY_ACCOUNT_ID)
    if (request != null && request.callingRequest is CreatePublicKeyCredentialRequest) {
        val publicKeyRequest: CreatePublicKeyCredentialRequest =
            request.callingRequest as CreatePublicKeyCredentialRequest
        createPasskey(
            publicKeyRequest.requestJson,
            request.callingAppInfo,
            publicKeyRequest.clientDataHash,
            accountId
        )
    }
}

@SuppressLint("RestrictedApi")
fun createPasskey(
    requestJson: String,
    callingAppInfo: CallingAppInfo?,
    clientDataHash: ByteArray?,
    accountId: String?
) {
    val request = PublicKeyCredentialCreationOptions(requestJson)

    val biometricPrompt = BiometricPrompt(
        this,
        { }, // Pass in your own executor
        object : AuthenticationCallback() {
            override fun onAuthenticationError(errorCode: Int, errString: CharSequence) {
                super.onAuthenticationError(errorCode, errString)
                finish()
            }

            override fun onAuthenticationFailed() {
                super.onAuthenticationFailed()
                finish()
            }

            @RequiresApi(VERSION_CODES.P)
            override fun onAuthenticationSucceeded(
                result: AuthenticationResult
            ) {
                super.onAuthenticationSucceeded(result)

                // Generate a credentialId
                val credentialId = ByteArray(32)
                SecureRandom().nextBytes(credentialId)

                // Generate a credential key pair
                val spec = ECGenParameterSpec("secp256r1")
                val keyPairGen = KeyPairGenerator.getInstance("EC")
                keyPairGen.initialize(spec)
                val keyPair = keyPairGen.genKeyPair()

                // Save passkey in your database as per your own implementation

                // Create AuthenticatorAttestationResponse object to pass to
                // FidoPublicKeyCredential

                val response = AuthenticatorAttestationResponse(
                    requestOptions = request,
                    credentialId = credentialId,
                    credentialPublicKey = getPublicKeyFromKeyPair(keyPair),
                    origin = appInfoToOrigin(callingAppInfo!!),
                    up = true,
                    uv = true,
                    be = true,
                    bs = true,
                    packageName = callingAppInfo.packageName
                )

                val credential = FidoPublicKeyCredential(
                    rawId = credentialId,
                    response = response,
                    authenticatorAttachment = "", // Add your authenticator attachment
                )
                val result = Intent()

                val createPublicKeyCredResponse =
                    CreatePublicKeyCredentialResponse(credential.json())

                // Set the CreateCredentialResponse as the result of the Activity
                PendingIntentHandler.setCreateCredentialResponse(
                    result,
                    createPublicKeyCredResponse
                )
                setResult(RESULT_OK, result)
                finish()
            }
        }
    )

    val promptInfo = BiometricPrompt.PromptInfo.Builder()
        .setTitle("Use your screen lock")
        .setSubtitle("Create passkey for ${request.rp.name}")
        .setAllowedAuthenticators(
            BiometricManager.Authenticators.BIOMETRIC_STRONG
            /* or BiometricManager.Authenticators.DEVICE_CREDENTIAL */
        )
        .build()
    biometricPrompt.authenticate(promptInfo)
}

@RequiresApi(VERSION_CODES.P)
fun appInfoToOrigin(info: CallingAppInfo): String {
    val cert = info.signingInfo.apkContentsSigners[0].toByteArray()
    val md = MessageDigest.getInstance("SHA-256")
    val certHash = md.digest(cert)
    // This is the format for origin
    return "android:apk-key-hash:${b64Encode(certHash)}"
}
비밀번호 생성 요청에 대한 쿼리 처리
비밀번호 생성 요청에 대한 쿼리를 처리하려면 다음 단계를 따르세요.
- 이전 섹션에서 언급한
processCreateCredentialRequest()메서드 내에서 비밀번호 요청을 처리하기 위한 스위치 블록 내에 다른 케이스를 추가합니다. BeginCreateCredentialResponse를 구성하는 동안 필수CreateEntries를 추가합니다.- 각
CreateEntry는 사용자 인증 정보를 저장할 수 있는 계정에 해당해야 하며 다른 메타데이터와 함께PendingIntent가 설정되어 있어야 합니다.
다음 예는 이러한 단계를 실행하는 방법을 보여줍니다.
fun processCreateCredentialRequest(
    request: BeginCreateCredentialRequest
): BeginCreateCredentialResponse? {
    when (request) {
        is BeginCreatePublicKeyCredentialRequest -> {
            // Request is passkey type
            return handleCreatePasskeyQuery(request)
        }

        is BeginCreatePasswordCredentialRequest -> {
            // Request is password type
            return handleCreatePasswordQuery(request)
        }
    }
    return null
}

@RequiresApi(VERSION_CODES.M)
private fun handleCreatePasswordQuery(
    request: BeginCreatePasswordCredentialRequest
): BeginCreateCredentialResponse {
    val createEntries: MutableList<CreateEntry> = mutableListOf()

    // Adding two create entries - one for storing credentials to the 'Personal'
    // account, and one for storing them to the 'Family' account. These
    // accounts are local to this sample app only.
    createEntries.add(
        CreateEntry(
            PERSONAL_ACCOUNT_ID,
            createNewPendingIntent(PERSONAL_ACCOUNT_ID, CREATE_PASSWORD_INTENT)
        )
    )
    createEntries.add(
        CreateEntry(
            FAMILY_ACCOUNT_ID,
            createNewPendingIntent(FAMILY_ACCOUNT_ID, CREATE_PASSWORD_INTENT)
        )
    )

    return BeginCreateCredentialResponse(createEntries)
}
비밀번호 생성 요청에 대한 항목 선택 처리
사용자가 채워진 CreateEntry를 선택하면 상응하는 PendingIntent가 실행되고 연결된 Activity가 표시됩니다. onCreate에 전달된 연결된 인텐트에 액세스하고 PendingIntentHander 클래스에 전달하여 ProviderCreateCredentialRequest 메서드를 가져옵니다.
아래 예는 이 프로세스를 구현하는 방법을 보여줍니다. 이 코드는 Activity의 onCreate() 메서드에서 처리해야 합니다.
val createRequest = PendingIntentHandler.retrieveProviderCreateCredentialRequest(intent)
val accountId = intent.getStringExtra(CredentialsRepo.EXTRA_KEY_ACCOUNT_ID)

if (createRequest == null) {
    return
}

val request: CreatePasswordRequest = createRequest.callingRequest as CreatePasswordRequest

// Fetch the ID and password from the request and save it in your database
mDatabase.addNewPassword(
    PasswordInfo(
        request.id,
        request.password,
        createRequest.callingAppInfo.packageName
    )
)

// Set the final response back
val result = Intent()
val response = CreatePasswordResponse()
PendingIntentHandler.setCreateCredentialResponse(result, response)
setResult(Activity.RESULT_OK, result)
finish()
사용자 로그인 처리
사용자 로그인은 다음 단계에 따라 처리됩니다.
- 클라이언트 앱이 사용자를 로그인하려고 하면
GetCredentialRequest인스턴스가 준비됩니다. - Android 프레임워크는 이러한 서비스에 바인딩하여 이 요청을 적용 가능한 모든 사용자 인증 정보 제공업체에 전파합니다.
- 그런 다음 제공업체 서비스는
BeginGetCredentialOption목록이 포함된BeginGetCredentialRequest를 수신합니다. 각각에는 일치하는 사용자 인증 정보를 가져오는 데 사용할 수 있는 매개변수가 포함됩니다.
사용자 인증 정보 제공업체 서비스에서 이 요청을 처리하려면 다음 단계를 완료하세요.
요청을 처리하려면
onBeginGetCredentialRequest()메서드를 재정의합니다. 사용자 인증 정보가 잠겨 있으면 응답에AuthenticationAction을 즉시 설정하고 콜백을 호출할 수 있습니다.private val unlockEntryTitle = "Authenticate to continue" override fun onBeginGetCredentialRequest( request: BeginGetCredentialRequest, cancellationSignal: CancellationSignal, callback: OutcomeReceiver<BeginGetCredentialResponse, GetCredentialException>, ) { if (isAppLocked()) { callback.onResult( BeginGetCredentialResponse( authenticationActions = mutableListOf( AuthenticationAction( unlockEntryTitle, createUnlockPendingIntent() ) ) ) ) return } try { response = processGetCredentialRequest(request) callback.onResult(response) } catch (e: GetCredentialException) { callback.onError(GetCredentialUnknownException()) } }credentialEntries를 반환하기 전에 사용자 인증 정보를 잠금 해제해야 하는 제공업체는 사용자를 앱의 잠금 해제 흐름으로 이동하는 대기 중인 인텐트를 설정해야 합니다.private fun createUnlockPendingIntent(): PendingIntent { val intent = Intent(UNLOCK_INTENT).setPackage(PACKAGE_NAME) return PendingIntent.getActivity( applicationContext, UNIQUE_REQUEST_CODE, intent, ( PendingIntent.FLAG_MUTABLE or PendingIntent.FLAG_UPDATE_CURRENT ) ) }로컬 데이터베이스에서 사용자 인증 정보를 가져오고
CredentialEntries를 사용하여 선택기에 표시되도록 설정합니다. 패스키의 경우credentialId를 인텐트의 추가 항목으로 설정하여 사용자가 이 항목을 선택할 때 어떤 사용자 인증 정보에 매핑되는지 알 수 있습니다.companion object { // These intent actions are specified for corresponding activities // that are to be invoked through the PendingIntent(s) private const val GET_PASSKEY_INTENT_ACTION = "PACKAGE_NAME.GET_PASSKEY" private const val GET_PASSWORD_INTENT_ACTION = "PACKAGE_NAME.GET_PASSWORD" } fun processGetCredentialRequest( request: BeginGetCredentialRequest ): BeginGetCredentialResponse { val callingPackageInfo = request.callingAppInfo val callingPackageName = callingPackageInfo?.packageName.orEmpty() val credentialEntries: MutableList<CredentialEntry> = mutableListOf() for (option in request.beginGetCredentialOptions) { when (option) { is BeginGetPasswordOption -> { credentialEntries.addAll( populatePasswordData( callingPackageName, option ) ) } is BeginGetPublicKeyCredentialOption -> { credentialEntries.addAll( populatePasskeyData( callingPackageInfo, option ) ) } else -> { Log.i(TAG, "Request not supported") } } } return BeginGetCredentialResponse(credentialEntries) }데이터베이스에서 사용자 인증 정보를 쿼리하고 사용자 인증 정보를 채울 패스키 및 비밀번호 항목을 만듭니다.
private fun populatePasskeyData(
    callingAppInfo: CallingAppInfo?,
    option: BeginGetPublicKeyCredentialOption
): List<CredentialEntry> {
    val passkeyEntries: MutableList<CredentialEntry> = mutableListOf()
    val request = PublicKeyCredentialRequestOptions(option.requestJson)
    // Get your credentials from database where you saved during creation flow
    val creds = getCredentialsFromInternalDb(request.rpId)
    val passkeys = creds.passkeys
    for (passkey in passkeys) {
        val data = Bundle()
        data.putString("credId", passkey.credId)
        passkeyEntries.add(
            PublicKeyCredentialEntry(
                context = applicationContext,
                username = passkey.username,
                pendingIntent = createNewPendingIntent(
                    GET_PASSKEY_INTENT_ACTION,
                    data
                ),
                beginGetPublicKeyCredentialOption = option,
                displayName = passkey.displayName,
                icon = passkey.icon
            )
        )
    }
    return passkeyEntries
}

// Fetch password credentials and create password entries to populate to the user
private fun populatePasswordData(
    callingPackage: String,
    option: BeginGetPasswordOption
): List<CredentialEntry> {
    val passwordEntries: MutableList<CredentialEntry> = mutableListOf()

    // Get your password credentials from database where you saved during
    // creation flow
    val creds = getCredentialsFromInternalDb(callingPackage)
    val passwords = creds.passwords
    for (password in passwords) {
        passwordEntries.add(
            PasswordCredentialEntry(
                context = applicationContext,
                username = password.username,
                pendingIntent = createNewPendingIntent(
                    GET_PASSWORD_INTENT
                ),
                beginGetPasswordOption = option,
                displayName = password.username,
                icon = password.icon
            )
        )
    }
    return passwordEntries
}

private fun createNewPendingIntent(
    action: String,
    extra: Bundle? = null
): PendingIntent {
    val intent = Intent(action).setPackage(PACKAGE_NAME)
    if (extra != null) {
        intent.putExtra("CREDENTIAL_DATA", extra)
    }

    return PendingIntent.getActivity(
        applicationContext, UNIQUE_REQUEST_CODE, intent,
        (PendingIntent.FLAG_MUTABLE or PendingIntent.FLAG_UPDATE_CURRENT)
    )
}
사용자 인증 정보를 쿼리하고 채우면 이제 패스키든 비밀번호든 사용자가 선택한 사용자 인증 정보의 선택 단계를 처리해야 합니다.
패스키에 대한 사용자 선택 처리
- 상응하는 Activity의
onCreate메서드에서 연결된 인텐트를 가져오고PendingIntentHandler.retrieveProviderGetCredentialRequest()에 전달합니다. - 위에서 가져온 요청에서
GetPublicKeyCredentialOption을 추출합니다. 그런 다음 이 옵션에서requestJson과clientDataHash를 추출합니다. - 해당
PendingIntent가 설정되었을 때 사용자 인증 정보 제공업체가 채운 인텐트 추가 항목에서credentialId를 추출합니다. - 위에서 액세스한 요청 매개변수를 사용하여 로컬 데이터베이스에서 패스키를 추출합니다.
추출된 메타데이터와 사용자 인증을 통해 패스키가 유효하다고 어설션합니다.
val getRequest = PendingIntentHandler.retrieveProviderGetCredentialRequest(intent)
val publicKeyRequest = getRequest?.credentialOptions?.first() as GetPublicKeyCredentialOption

val requestInfo = intent.getBundleExtra("CREDENTIAL_DATA")
val credIdEnc = requestInfo?.getString("credId").orEmpty()

// Get the saved passkey from your database based on the credential ID from the PublicKeyRequest
val passkey = mDatabase.getPasskey(credIdEnc)

// Decode the credential ID, private key and user ID
val credId = b64Decode(credIdEnc)
val privateKey = b64Decode(passkey.credPrivateKey)
val uid = b64Decode(passkey.uid)

val origin = appInfoToOrigin(getRequest.callingAppInfo)
val packageName = getRequest.callingAppInfo.packageName

validatePasskey(
    publicKeyRequest.requestJson,
    origin,
    packageName,
    uid,
    passkey.username,
    credId,
    privateKey
)
사용자를 검증하려면 생체 인식 메시지(또는 다른 어설션 메서드)를 표시합니다. 아래의 코드 스니펫은 Android Biometric API를 사용합니다.
인증에 성공하면 W3 웹 인증 어설션 사양을 기반으로 JSON 응답을 구성합니다. 아래의 코드 스니펫에서는
AuthenticatorAssertionResponse와 같은 도우미 데이터 클래스가 구조화된 매개변수를 가져와 필수 JSON 형식으로 변환하는 데 사용됩니다. 응답에는 WebAuthn 사용자 인증 정보 비공개 키의 디지털 서명이 포함됩니다. 신뢰 당사자 서버는 이 서명을 확인하여 로그인하기 전에 사용자를 인증할 수 있습니다.위에서 생성된 JSON을 사용하여
PublicKeyCredential을 생성하고 최종GetCredentialResponse에 설정합니다. 이 활동의 결과에 이 최종 응답을 설정합니다.
다음 예는 이러한 단계를 구현하는 방법을 보여줍니다.
val request = PublicKeyCredentialRequestOptions(requestJson)
val privateKey: ECPrivateKey = convertPrivateKey(privateKeyBytes)

val biometricPrompt = BiometricPrompt(
    this,
    { }, // Pass in your own executor
    object : BiometricPrompt.AuthenticationCallback() {
        override fun onAuthenticationError(
            errorCode: Int,
            errString: CharSequence
        ) {
            super.onAuthenticationError(errorCode, errString)
            finish()
        }

        override fun onAuthenticationFailed() {
            super.onAuthenticationFailed()
            finish()
        }

        override fun onAuthenticationSucceeded(
            result: BiometricPrompt.AuthenticationResult
        ) {
            super.onAuthenticationSucceeded(result)
            val response = AuthenticatorAssertionResponse(
                requestOptions = request,
                credentialId = credId,
                origin = origin,
                up = true,
                uv = true,
                be = true,
                bs = true,
                userHandle = uid,
                packageName = packageName
            )

            val sig = Signature.getInstance("SHA256withECDSA")
            sig.initSign(privateKey)
            sig.update(response.dataToSign())
            response.signature = sig.sign()

            val credential = FidoPublicKeyCredential(
                rawId = credId,
                response = response,
                authenticatorAttachment = "", // Add your authenticator attachment
            )
            val result = Intent()
            val passkeyCredential = PublicKeyCredential(credential.json())
            PendingIntentHandler.setGetCredentialResponse(
                result, GetCredentialResponse(passkeyCredential)
            )
            setResult(RESULT_OK, result)
            finish()
        }
    }
)

val promptInfo = BiometricPrompt.PromptInfo.Builder()
    .setTitle("Use your screen lock")
    .setSubtitle("Use passkey for ${request.rpId}")
    .setAllowedAuthenticators(
        BiometricManager.Authenticators.BIOMETRIC_STRONG
        /* or BiometricManager.Authenticators.DEVICE_CREDENTIAL */
    )
    .build()
biometricPrompt.authenticate(promptInfo)
비밀번호 인증을 위한 사용자 선택 처리
- 상응하는 활동에서
onCreate에 전달된 인텐트에 액세스하고PendingIntentHandler를 사용하여ProviderGetCredentialRequest를 추출합니다. 요청에서
GetPasswordOption을 사용하여 수신 패키지 이름의 비밀번호 사용자 인증 정보를 가져옵니다.val getRequest = PendingIntentHandler.retrieveProviderGetCredentialRequest(intent) val passwordOption = getRequest?.credentialOptions?.first() as GetPasswordOption val username = passwordOption.allowedUserIds.first() // Fetch the credentials for the calling app package name val creds = mDatabase.getCredentials(callingAppInfo.packageName) val passwords = creds.passwords val it = passwords.iterator() var password = "" while (it.hasNext()) { val passwordItemCurrent = it.next() if (passwordItemCurrent.username == username) { password = passwordItemCurrent.password break } }정보를 가져온 후에는 선택한 비밀번호 사용자 인증 정보에 대한 응답을 설정합니다.
// Set the response back
val result = Intent()
val passwordCredential = PasswordCredential(username, password)
PendingIntentHandler.setGetCredentialResponse(
    result, GetCredentialResponse(passwordCredential)
)
setResult(Activity.RESULT_OK, result)
finish()
인증 작업 항목 선택 처리
앞서 설명한 대로 사용자 인증 정보 제공업체는 사용자 인증 정보가 잠겨 있는 경우 AuthenticationAction을 설정할 수 있습니다. 사용자가 이 항목을 선택하면 PendingIntent에 설정된 인텐트 작업에 상응하는 Activity가 호출됩니다. 그러면 사용자 인증 정보 제공업체가 생체 인식 인증 흐름 또는 유사한 메커니즘을 표시하여 사용자 인증 정보를 잠금 해제할 수 있습니다. 성공 시 사용자 인증 정보 제공업체는 이제 사용자 인증 정보가 잠금 해제되므로 위에서 설명한 사용자 로그인 처리와 비슷한 BeginGetCredentialResponse를 구성해야 합니다. 그런 다음 준비된 인텐트를 결과로 설정하고 Activity가 완료되기 전에 PendingIntentHandler.setBeginGetCredentialResponse() 메서드를 통해 이 응답을 설정해야 합니다.
사용자 인증 정보 요청 지우기
클라이언트 앱이 사용자 인증 정보 선택을 위해 유지된 모든 상태를 삭제해야 한다고 요청할 수 있습니다. 예를 들어 사용자 인증 정보 제공업체가 이전에 선택한 사용자 인증 정보를 기억하여 다음 번에 반환만 할 수도 있습니다. 클라이언트 앱은 이 API를 호출하고 고정 선택이 삭제될 것으로 예상합니다. 사용자 인증 정보 제공업체 서비스는 onClearCredentialStateRequest() 메서드를 재정의하여 이 요청을 처리할 수 있습니다.
override fun onClearCredentialStateRequest(
    request: ProviderClearCredentialStateRequest,
    cancellationSignal: CancellationSignal,
    callback: OutcomeReceiver<Void?, ClearCredentialException>
) {
    // Delete any maintained state as appropriate.
}
제공업체의 설정 페이지로 연결하는 기능 추가
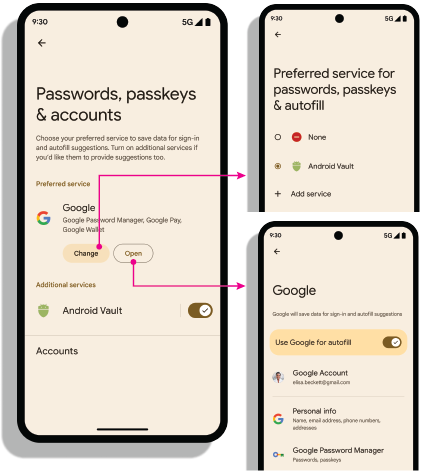
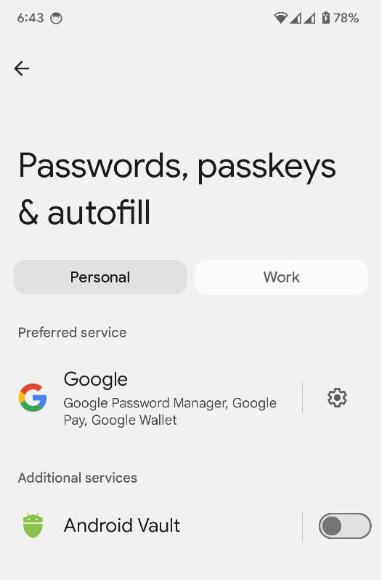
사용자가 비밀번호, 패스키, 자동 완성 화면에서 제공업체의 설정을 열 수 있도록 인증 관리자 앱은 res/xml/provider.xml에서 credential-provider settingsActivity 매니페스트 속성을 구현해야 합니다. 이 속성을 사용하면 사용자가 비밀번호, 패스키, 자동 완성 서비스 목록에서 제공업체 이름을 클릭할 경우 인텐트를 사용하여 앱의 자체 설정 화면을 열 수 있습니다. 이 속성의 값을 설정 화면에서 실행할 활동의 이름으로 설정합니다.
<credential-provider
    xmlns:android="http://schemas.android.com/apk/res/android"
    android:settingsSubtitle="Example settings provider name"
    android:settingsActivity="com.example.SettingsActivity">
    <capabilities>
        <capability name="android.credentials.TYPE_PUBLIC_KEY_CREDENTIAL" />
    </capabilities>
</credential-provider>

설정 인텐트
설정 열기: android.settings.CREDENTIAL_PROVIDER 인텐트는 사용자가 기본 및 추가 사용자 인증 정보 제공자를 선택할 수 있는 설정 화면을 표시합니다.

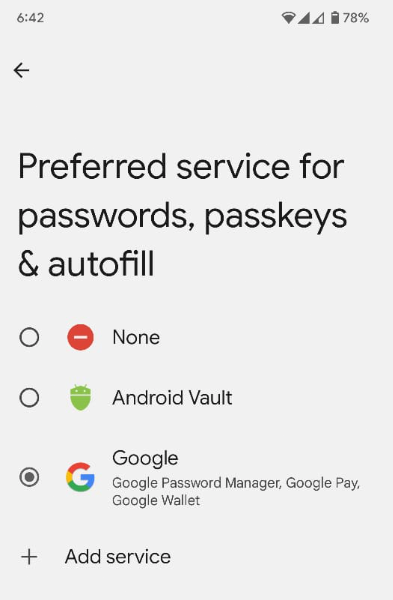
기본 사용자 인증 정보 서비스: ACTION_REQUEST_SET_AUTOFILL_SERVICE 인텐트는 사용자를 기본 제공업체 선택 화면으로 리디렉션합니다. 이 화면에서 선택한 제공업체가 기본 사용자 인증 정보 및 자동 완성 제공업체가 됩니다.

권한이 있는 앱의 허용 목록 가져오기
웹브라우저와 같은 권한이 있는 앱은 인증 관리자 GetCredentialRequest() 및 CreatePublicKeyCredentialRequest() 메서드의 origin 매개변수를 설정하여 다른 신뢰 당사자 대신 인증 관리자를 호출합니다. 이러한 요청을 처리하기 위해 사용자 인증 정보 제공업체는 getOrigin() API를 사용하여 origin을 가져옵니다.
origin을 가져오려면 사용자 인증 정보 제공업체 앱이 권한이 있고 신뢰할 수 있는 호출자 목록을 androidx.credentials.provider.CallingAppInfo's getOrigin() API에 전달해야 합니다. 이 허용 목록은 유효한 JSON 객체여야 합니다. signingInfo에서 가져온 packageName 및 인증서 지문이 getOrigin() API에 전달된 privilegedAllowlist에 있는 앱의 것과 일치하는 경우 origin이 반환됩니다. origin 값이 확보되면 제공업체 앱은 이를 권한이 있는 호출로 간주하고 호출 앱의 서명을 사용하여 origin을 계산하는 대신 AuthenticatorResponse의 클라이언트 데이터에 이 origin을 설정해야 합니다.
origin을 가져오면 서명 요청 중에 clientDataJSON을 조합하고 해싱하는 대신 CreatePublicKeyCredentialRequest() 또는 GetPublicKeyCredentialOption()에 직접 제공되는 clientDataHash를 사용하세요. JSON 파싱 문제를 방지하려면 증명 및 어설션 응답에서 clientDataJSON의 자리표시자 값을 설정합니다. Google 비밀번호 관리자는 getOrigin() 호출에 공개적으로 사용 가능한 허용 목록을 사용합니다. 사용자 인증 정보 제공업체는 이 목록을 사용하거나 API에 설명된 JSON 형식으로 자체 목록을 제공할 수 있습니다. 사용할 목록을 선택하는 것은 제공업체가 결정합니다. 서드 파티 사용자 인증 정보 제공업체를 통해 권한이 있는 액세스를 얻으려면 서드 파티에서 제공한 문서를 참고하세요.
기기에서 제공업체 사용 설정
사용자는 기기 설정 > 비밀번호 및 계정 > 제공업체 > 사용 설정 또는 사용 중지를 통해 제공업체를 사용 설정해야 합니다.
fun createSettingsPendingIntent(): PendingIntent
