
Credential Manager 是指在 Android 14 中推出的一組 API,可支援多種登入方式,例如使用者名稱密碼、密碼金鑰,以及聯合登入解決方案 (例如使用 Google 帳戶登入)。叫用 Credential Manager API 時,Android 系統會匯總裝置上安裝的所有憑證提供者的憑證。本文件會說明為憑證提供者賦予整合端點的 API 組合。
設定
在憑證提供者中實作功能之前,請先完成以下各節所述的設定步驟。
宣告依附元件
將下列依附元件新增至應用程式模組的建構指令碼,即可使用最新版的 Credential Manager 程式庫:
Kotlin
dependencies {
    implementation("androidx.credentials:credentials:1.7.0-alpha02")
}
Groovy
dependencies {
    implementation "androidx.credentials:credentials:1.7.0-alpha02"
}
在資訊清單檔案中宣告服務元素
在應用程式的資訊清單檔案 AndroidManifest.xml 中,針對可擴充 androidx.credentials 程式庫中 CredentialProviderService 類別的服務類別,加入 <service> 宣告,如以下範例所示。
<service android:name=".MyCredentialProviderService"
    android:enabled="true"
    android:exported="true"
    android:label="My Credential Provider"
    android:icon="@mipmap/ic_launcher"
    android:permission="android.permission.BIND_CREDENTIAL_PROVIDER_SERVICE"
    tools:targetApi="upside_down_cake">
    <intent-filter>
        <action android:name="android.service.credentials.CredentialProviderService"/>
    </intent-filter>
    <meta-data
        android:name="android.credentials.provider"
        android:resource="@xml/provider"/>
</service>
上述的權限和意圖篩選器是確保 Credential Manager 流程正常運作的要素。為確保只有 Android 系統繫結至這項服務,就需要使用這項權限。意圖篩選器則是用來偵測這項服務,並將這項服務當做憑證提供者,供 Credential Manager 使用。
宣告支援的憑證類型
在 res/xml 目錄中,建立名為 provider.xml 的新檔案。在此檔案中,透過程式庫中每種憑證類型定義的常數,宣告服務支援的憑證類型。在以下範例中,這項服務支援傳統密碼和密碼金鑰,而這些項目的常數分別定義為 TYPE_PASSWORD_CREDENTIAL 和 TYPE_PUBLIC_KEY_CREDENTIAL:
<credential-provider xmlns:android="http://schemas.android.com/apk/res/android">
    <capabilities>
        <capability name="android.credentials.TYPE_PASSWORD_CREDENTIAL" />
        <capability name="androidx.credentials.TYPE_PUBLIC_KEY_CREDENTIAL" />
    </capabilities>
</credential-provider>
在之前的 API 級別中,憑證提供者會整合可自動填入密碼和其他資料的 API。這些提供者可以使用相同的內部基礎架構儲存現有的憑證類型,同時擴充該架構來支援其他憑證,包括密碼金鑰。
與提供者互動的兩階段方法
Credential Manager 與憑證提供者的互動分為兩個階段:
- 第一階段是「開始/查詢階段」,系統會繫結至憑證提供者服務,並叫用含有
Begin…要求的onBeginGetCredentialRequest()、onBeginCreateCredentialRequest()或onClearCredentialStateRequest()方法。提供者必須處理這些要求,回應時則須使用Begin…回應,並填入代表帳戶選取器所顯示視覺選項的項目。每個項目都必須設定PendingIntent。 - 使用者選取項目後,就會進入「選取階段」,觸發與該項目相關聯的
PendingIntent,進而顯示相對應的提供者活動。當使用者完成與活動的互動後,憑證提供者必須先設定活動結果的回應,才能結束活動。接著,此回應就會傳送至叫用 Credential Manager 的用戶端應用程式。
處理密碼金鑰建立作業
處理密碼金鑰建立作業的查詢
當用戶端應用程式想要建立密碼金鑰,並透過憑證提供者儲存密碼金鑰時,就會呼叫 createCredential API。如要在憑證提供者服務中處理這項要求,讓密碼金鑰實際儲存在儲存空間內,請完成下列各節所述的步驟。
- 在由
CredentialProviderService擴充的服務中覆寫onBeginCreateCredentialRequest()方法。 - 建構相對應的
BeginCreateCredentialResponse,並透過回呼傳遞此回應,藉此處理BeginCreateCredentialRequest。 - 建構
BeginCreateCredentialResponse時,請新增必要的CreateEntries。每個CreateEntry都應對應至可儲存憑證的帳戶,且必須設定PendingIntent和其他所需的中繼資料。
以下範例說明如何實作這些步驟。
override fun onBeginCreateCredentialRequest(
    request: BeginCreateCredentialRequest,
    cancellationSignal: CancellationSignal,
    callback: OutcomeReceiver<BeginCreateCredentialResponse, CreateCredentialException>,
) {
    val response: BeginCreateCredentialResponse? = processCreateCredentialRequest(request)
    if (response != null) {
        callback.onResult(response)
    } else {
        callback.onError(CreateCredentialUnknownException())
    }
}

fun processCreateCredentialRequest(request: BeginCreateCredentialRequest): BeginCreateCredentialResponse? {
    when (request) {
        is BeginCreatePublicKeyCredentialRequest -> {
            // Request is passkey type
            return handleCreatePasskeyQuery(request)
        }
    }
    // Request not supported
    return null
}

private fun handleCreatePasskeyQuery(
    request: BeginCreatePublicKeyCredentialRequest
): BeginCreateCredentialResponse {

    // Adding two create entries - one for storing credentials to the 'Personal'
    // account, and one for storing them to the 'Family' account. These
    // accounts are local to this sample app only.
    val createEntries: MutableList<CreateEntry> = mutableListOf()
    createEntries.add(
        CreateEntry(
            PERSONAL_ACCOUNT_ID,
            createNewPendingIntent(PERSONAL_ACCOUNT_ID, CREATE_PASSKEY_INTENT)
        )
    )

    createEntries.add(
        CreateEntry(
            FAMILY_ACCOUNT_ID,
            createNewPendingIntent(FAMILY_ACCOUNT_ID, CREATE_PASSKEY_INTENT)
        )
    )

    return BeginCreateCredentialResponse(createEntries)
}

private fun createNewPendingIntent(accountId: String, action: String): PendingIntent {
    val intent = Intent(action).setPackage(PACKAGE_NAME)

    // Add your local account ID as an extra to the intent, so that when
    // user selects this entry, the credential can be saved to this
    // account
    intent.putExtra(EXTRA_KEY_ACCOUNT_ID, accountId)

    return PendingIntent.getActivity(
        applicationContext, UNIQUE_REQ_CODE,
        intent,
        (
            PendingIntent.FLAG_MUTABLE
                or PendingIntent.FLAG_UPDATE_CURRENT
            )
    )
}
PendingIntent 建構項目必須遵循下列規範:
- 對應的活動應設為顯示任何所需的生物特徵辨識提示、確認作業或選取項目。
- 系統叫用相對應的活動時,提供者所需的任何資料都應設為用來建立
PendingIntent的意圖額外項目,例如建立流程中的accountId。 PendingIntent必須使用PendingIntent.FLAG_MUTABLE旗標建構,系統才能將最終要求附加至意圖額外項目。- 請勿使用旗標
PendingIntent.FLAG_ONE_SHOT建構PendingIntent,因為使用者可能會選取項目、返回,然後重新選取,導致PendingIntent觸發兩次。 - 請務必使用專屬的要求代碼建構
PendingIntent,讓每個項目都有對應的PendingIntent。
處理密碼金鑰建立要求的項目選取作業
- 當使用者選取先前填入的
CreateEntry時,系統會叫用對應的PendingIntent,並建立相關聯的提供者Activity。 - 叫用活動的
onCreate方法後,請存取相關聯的意圖並傳入PendingIntentHander類別,取得ProviderCreateCredentialRequest。 - 從要求中擷取
requestJson、callingAppInfo和clientDataHash。 - 從意圖額外項目擷取本機
accountId。這是範例應用程式所需的實作項目,不一定要執行。這個帳戶 ID 可用來儲存這組憑證和此特定帳戶 ID。 - 驗證
requestJson。以下範例使用PublicKeyCredentialCreationOptions等本機資料類別,根據 WebAuthn 規格將輸入 JSON 轉換為結構化類別。憑證提供者可改為使用自己的剖析器。 - 如果呼叫來自原生 Android 應用程式,請查看通話應用程式的資產連結。
- 顯示驗證提示。以下範例使用 Android Biometric API。
- 驗證成功後,請產生
credentialId和金鑰組。 - 將私密金鑰儲存至針對
callingAppInfo.packageName的本機資料庫。 - 建構 Web Authentication API JSON 回應,其中包含公開金鑰和
credentialId。以下範例使用AuthenticatorAttestationResponse和FidoPublicKeyCredential等本機公用程式類別,根據先前所述的規格建構 JSON。憑證提供者可將這些類別替換為自己的建構工具。 - 使用在上述步驟中產生的 JSON,建構
CreatePublicKeyCredentialResponse。 - 透過
PendingIntentHander.setCreateCredentialResponse()將Intent設為CreatePublicKeyCredentialResponse上的額外項目,然後將該意圖設為活動的結果。 - 完成活動。
以下程式碼範例會示範這些步驟。叫用 onCreate() 後,就需要在活動類別中處理這個程式碼。
override fun onCreate(savedInstanceState: Bundle?, persistentState: PersistableBundle?) {
    super.onCreate(savedInstanceState, persistentState)
    // ...

    val request =
        PendingIntentHandler.retrieveProviderCreateCredentialRequest(intent)

    val accountId = intent.getStringExtra(CredentialsRepo.EXTRA_KEY_ACCOUNT_ID)
    if (request != null && request.callingRequest is CreatePublicKeyCredentialRequest) {
        val publicKeyRequest: CreatePublicKeyCredentialRequest =
            request.callingRequest as CreatePublicKeyCredentialRequest
        createPasskey(
            publicKeyRequest.requestJson,
            request.callingAppInfo,
            publicKeyRequest.clientDataHash,
            accountId
        )
    }
}

@SuppressLint("RestrictedApi")
fun createPasskey(
    requestJson: String,
    callingAppInfo: CallingAppInfo?,
    clientDataHash: ByteArray?,
    accountId: String?
) {
    val request = PublicKeyCredentialCreationOptions(requestJson)

    val biometricPrompt = BiometricPrompt(
        this,
        { }, // Pass in your own executor
        object : AuthenticationCallback() {
            override fun onAuthenticationError(errorCode: Int, errString: CharSequence) {
                super.onAuthenticationError(errorCode, errString)
                finish()
            }

            override fun onAuthenticationFailed() {
                super.onAuthenticationFailed()
                finish()
            }

            @RequiresApi(VERSION_CODES.P)
            override fun onAuthenticationSucceeded(
                result: AuthenticationResult
            ) {
                super.onAuthenticationSucceeded(result)

                // Generate a credentialId
                val credentialId = ByteArray(32)
                SecureRandom().nextBytes(credentialId)

                // Generate a credential key pair
                val spec = ECGenParameterSpec("secp256r1")
                val keyPairGen = KeyPairGenerator.getInstance("EC")
                keyPairGen.initialize(spec)
                val keyPair = keyPairGen.genKeyPair()

                // Save passkey in your database as per your own implementation

                // Create AuthenticatorAttestationResponse object to pass to
                // FidoPublicKeyCredential

                val response = AuthenticatorAttestationResponse(
                    requestOptions = request,
                    credentialId = credentialId,
                    credentialPublicKey = getPublicKeyFromKeyPair(keyPair),
                    origin = appInfoToOrigin(callingAppInfo!!),
                    up = true,
                    uv = true,
                    be = true,
                    bs = true,
                    packageName = callingAppInfo.packageName
                )

                val credential = FidoPublicKeyCredential(
                    rawId = credentialId,
                    response = response,
                    authenticatorAttachment = "", // Add your authenticator attachment
                )
                val result = Intent()

                val createPublicKeyCredResponse =
                    CreatePublicKeyCredentialResponse(credential.json())

                // Set the CreateCredentialResponse as the result of the Activity
                PendingIntentHandler.setCreateCredentialResponse(
                    result,
                    createPublicKeyCredResponse
                )
                setResult(RESULT_OK, result)
                finish()
            }
        }
    )

    val promptInfo = BiometricPrompt.PromptInfo.Builder()
        .setTitle("Use your screen lock")
        .setSubtitle("Create passkey for ${request.rp.name}")
        .setAllowedAuthenticators(
            BiometricManager.Authenticators.BIOMETRIC_STRONG
            /* or BiometricManager.Authenticators.DEVICE_CREDENTIAL */
        )
        .build()
    biometricPrompt.authenticate(promptInfo)
}

@RequiresApi(VERSION_CODES.P)
fun appInfoToOrigin(info: CallingAppInfo): String {
    val cert = info.signingInfo.apkContentsSigners[0].toByteArray()
    val md = MessageDigest.getInstance("SHA-256")
    val certHash = md.digest(cert)
    // This is the format for origin
    return "android:apk-key-hash:${b64Encode(certHash)}"
}
處理密碼建立要求的查詢
如要處理密碼建立要求的查詢,請按照下列步驟操作:
- 在上一節提及的
processCreateCredentialRequest()方法中,請在 switch 區塊中新增另一個案例,用於處理密碼要求。 - 建構
BeginCreateCredentialResponse時,請新增必要的CreateEntries。 - 每個
CreateEntry都應對應至可儲存憑證的帳戶,且必須設定PendingIntent和其他中繼資料。
以下範例說明如何實作這些步驟:
fun processCreateCredentialRequest(
    request: BeginCreateCredentialRequest
): BeginCreateCredentialResponse? {
    when (request) {
        is BeginCreatePublicKeyCredentialRequest -> {
            // Request is passkey type
            return handleCreatePasskeyQuery(request)
        }

        is BeginCreatePasswordCredentialRequest -> {
            // Request is password type
            return handleCreatePasswordQuery(request)
        }
    }
    return null
}

@RequiresApi(VERSION_CODES.M)
private fun handleCreatePasswordQuery(
    request: BeginCreatePasswordCredentialRequest
): BeginCreateCredentialResponse {
    val createEntries: MutableList<CreateEntry> = mutableListOf()

    // Adding two create entries - one for storing credentials to the 'Personal'
    // account, and one for storing them to the 'Family' account. These
    // accounts are local to this sample app only.
    createEntries.add(
        CreateEntry(
            PERSONAL_ACCOUNT_ID,
            createNewPendingIntent(PERSONAL_ACCOUNT_ID, CREATE_PASSWORD_INTENT)
        )
    )
    createEntries.add(
        CreateEntry(
            FAMILY_ACCOUNT_ID,
            createNewPendingIntent(FAMILY_ACCOUNT_ID, CREATE_PASSWORD_INTENT)
        )
    )

    return BeginCreateCredentialResponse(createEntries)
}
處理密碼建立要求的項目選取作業
當使用者選取已填入資料的 CreateEntry 時,對應的 PendingIntent 會執行並啟動相關聯的活動。存取透過 onCreate 傳入的相關聯意圖,並將該意圖傳入 PendingIntentHander 類別,取得 ProviderCreateCredentialRequest 方法。
以下範例說明如何實作此程序。這段程式碼需要在活動的 onCreate() 方法中處理。
val createRequest = PendingIntentHandler.retrieveProviderCreateCredentialRequest(intent)
val accountId = intent.getStringExtra(CredentialsRepo.EXTRA_KEY_ACCOUNT_ID)

if (createRequest == null) {
    return
}

val request: CreatePasswordRequest = createRequest.callingRequest as CreatePasswordRequest

// Fetch the ID and password from the request and save it in your database
mDatabase.addNewPassword(
    PasswordInfo(
        request.id,
        request.password,
        createRequest.callingAppInfo.packageName
    )
)

// Set the final response back
val result = Intent()
val response = CreatePasswordResponse()
PendingIntentHandler.setCreateCredentialResponse(result, response)
setResult(Activity.RESULT_OK, result)
finish()
處理使用者登入作業
處理使用者登入作業的步驟如下:
- 當用戶端應用程式嘗試讓使用者登入時,應用程式會準備
GetCredentialRequest例項。 - Android 架構會繫結至所有適用的憑證提供者,將這項要求套用到這些服務。
- 提供者服務會接收含有
BeginGetCredentialOption清單的BeginGetCredentialRequest,每個清單都包含可擷取相符憑證的參數。
如要在憑證提供者服務中處理這項要求,請完成下列步驟:
覆寫
onBeginGetCredentialRequest()方法來處理要求。請注意,如果憑證已鎖定,您可以在回應中立即設定AuthenticationAction並叫用回呼。private val unlockEntryTitle = "Authenticate to continue" override fun onBeginGetCredentialRequest( request: BeginGetCredentialRequest, cancellationSignal: CancellationSignal, callback: OutcomeReceiver<BeginGetCredentialResponse, GetCredentialException>, ) { if (isAppLocked()) { callback.onResult( BeginGetCredentialResponse( authenticationActions = mutableListOf( AuthenticationAction( unlockEntryTitle, createUnlockPendingIntent() ) ) ) ) return } try { response = processGetCredentialRequest(request) callback.onResult(response) } catch (e: GetCredentialException) { callback.onError(GetCredentialUnknownException()) } }如果提供者必須先解鎖憑證才能傳回
credentialEntries,就必須設定待處理意圖,將使用者導向至應用程式的解鎖流程:private fun createUnlockPendingIntent(): PendingIntent { val intent = Intent(UNLOCK_INTENT).setPackage(PACKAGE_NAME) return PendingIntent.getActivity( applicationContext, UNIQUE_REQUEST_CODE, intent, ( PendingIntent.FLAG_MUTABLE or PendingIntent.FLAG_UPDATE_CURRENT ) ) }從本機資料庫擷取憑證,並使用
CredentialEntries將憑證設為顯示在選取器中。若是密碼金鑰,您可以將credentialId設為意圖額外項目,以便在使用者選取這個項目時,得知其對應的憑證。companion object { // These intent actions are specified for corresponding activities // that are to be invoked through the PendingIntent(s) private const val GET_PASSKEY_INTENT_ACTION = "PACKAGE_NAME.GET_PASSKEY" private const val GET_PASSWORD_INTENT_ACTION = "PACKAGE_NAME.GET_PASSWORD" } fun processGetCredentialRequest( request: BeginGetCredentialRequest ): BeginGetCredentialResponse { val callingPackageInfo = request.callingAppInfo val callingPackageName = callingPackageInfo?.packageName.orEmpty() val credentialEntries: MutableList<CredentialEntry> = mutableListOf() for (option in request.beginGetCredentialOptions) { when (option) { is BeginGetPasswordOption -> { credentialEntries.addAll( populatePasswordData( callingPackageName, option ) ) } is BeginGetPublicKeyCredentialOption -> { credentialEntries.addAll( populatePasskeyData( callingPackageInfo, option ) ) } else -> { Log.i(TAG, "Request not supported") } } } return BeginGetCredentialResponse(credentialEntries) }從資料庫查詢憑證,建立要填入的密碼金鑰和密碼項目。
private fun populatePasskeyData(
    callingAppInfo: CallingAppInfo?,
    option: BeginGetPublicKeyCredentialOption
): List<CredentialEntry> {
    val passkeyEntries: MutableList<CredentialEntry> = mutableListOf()
    val request = PublicKeyCredentialRequestOptions(option.requestJson)
    // Get your credentials from database where you saved during creation flow
    val creds = getCredentialsFromInternalDb(request.rpId)
    val passkeys = creds.passkeys
    for (passkey in passkeys) {
        val data = Bundle()
        data.putString("credId", passkey.credId)
        passkeyEntries.add(
            PublicKeyCredentialEntry(
                context = applicationContext,
                username = passkey.username,
                pendingIntent = createNewPendingIntent(
                    GET_PASSKEY_INTENT_ACTION,
                    data
                ),
                beginGetPublicKeyCredentialOption = option,
                displayName = passkey.displayName,
                icon = passkey.icon
            )
        )
    }
    return passkeyEntries
}

// Fetch password credentials and create password entries to populate to the user
private fun populatePasswordData(
    callingPackage: String,
    option: BeginGetPasswordOption
): List<CredentialEntry> {
    val passwordEntries: MutableList<CredentialEntry> = mutableListOf()

    // Get your password credentials from database where you saved during
    // creation flow
    val creds = getCredentialsFromInternalDb(callingPackage)
    val passwords = creds.passwords
    for (password in passwords) {
        passwordEntries.add(
            PasswordCredentialEntry(
                context = applicationContext,
                username = password.username,
                pendingIntent = createNewPendingIntent(
                    GET_PASSWORD_INTENT
                ),
                beginGetPasswordOption = option,
                displayName = password.username,
                icon = password.icon
            )
        )
    }
    return passwordEntries
}

private fun createNewPendingIntent(
    action: String,
    extra: Bundle? = null
): PendingIntent {
    val intent = Intent(action).setPackage(PACKAGE_NAME)
    if (extra != null) {
        intent.putExtra("CREDENTIAL_DATA", extra)
    }

    return PendingIntent.getActivity(
        applicationContext, UNIQUE_REQUEST_CODE, intent,
        (PendingIntent.FLAG_MUTABLE or PendingIntent.FLAG_UPDATE_CURRENT)
    )
}
查詢並填入憑證後,就需要針對使用者選取的憑證處理選取階段,無論所選憑證是密碼金鑰或密碼都一樣。
處理使用者選取密碼金鑰的作業
- 在與活動對應的
onCreate方法中,擷取相關聯的意圖,並傳遞至PendingIntentHandler.retrieveProviderGetCredentialRequest()。 - 從上述步驟所擷取的要求中,擷取
GetPublicKeyCredentialOption。接著從這個選項中擷取requestJson和clientDataHash。 - 從意圖額外項目中擷取
credentialId。在設定對應的PendingIntent時,憑證提供者就會填入該額外項目。 - 使用在上述步驟中存取的要求參數,從本機資料庫擷取密碼金鑰。
使用所擷取的中繼資料和使用者驗證,建立表示密碼金鑰有效的斷言。
val getRequest = PendingIntentHandler.retrieveProviderGetCredentialRequest(intent)
val publicKeyRequest = getRequest?.credentialOptions?.first() as GetPublicKeyCredentialOption

val requestInfo = intent.getBundleExtra("CREDENTIAL_DATA")
val credIdEnc = requestInfo?.getString("credId").orEmpty()

// Get the saved passkey from your database based on the credential ID from the PublicKeyRequest
val passkey = mDatabase.getPasskey(credIdEnc)

// Decode the credential ID, private key and user ID
val credId = b64Decode(credIdEnc)
val privateKey = b64Decode(passkey.credPrivateKey)
val uid = b64Decode(passkey.uid)

val origin = appInfoToOrigin(getRequest.callingAppInfo)
val packageName = getRequest.callingAppInfo.packageName

validatePasskey(
    publicKeyRequest.requestJson,
    origin,
    packageName,
    uid,
    passkey.username,
    credId,
    privateKey
)
如要驗證使用者,請顯示生物特徵辨識提示,或其他斷言方法。下方的程式碼片段使用 Android Biometric API。
驗證成功後,請根據 W3 網路驗證斷言規格建構 JSON 回應。在下方程式碼片段中,
AuthenticatorAssertionResponse等輔助資料類別會擷取結構化參數,並將參數轉換為所需的 JSON 格式。回應中包含 WebAuthn 憑證私密金鑰的數位簽章。依賴方的伺服器可以驗證這個簽章,在使用者登入前進行身分驗證。使用在上述步驟中產生的 JSON 建構
PublicKeyCredential,並在最終的GetCredentialResponse上設定該憑證。請設定此活動結果的最終回應。
以下範例說明如何實作這些步驟:
val request = PublicKeyCredentialRequestOptions(requestJson)
val privateKey: ECPrivateKey = convertPrivateKey(privateKeyBytes)

val biometricPrompt = BiometricPrompt(
    this,
    { }, // Pass in your own executor
    object : BiometricPrompt.AuthenticationCallback() {
        override fun onAuthenticationError(
            errorCode: Int,
            errString: CharSequence
        ) {
            super.onAuthenticationError(errorCode, errString)
            finish()
        }

        override fun onAuthenticationFailed() {
            super.onAuthenticationFailed()
            finish()
        }

        override fun onAuthenticationSucceeded(
            result: BiometricPrompt.AuthenticationResult
        ) {
            super.onAuthenticationSucceeded(result)
            val response = AuthenticatorAssertionResponse(
                requestOptions = request,
                credentialId = credId,
                origin = origin,
                up = true,
                uv = true,
                be = true,
                bs = true,
                userHandle = uid,
                packageName = packageName
            )

            val sig = Signature.getInstance("SHA256withECDSA")
            sig.initSign(privateKey)
            sig.update(response.dataToSign())
            response.signature = sig.sign()

            val credential = FidoPublicKeyCredential(
                rawId = credId,
                response = response,
                authenticatorAttachment = "", // Add your authenticator attachment
            )
            val result = Intent()
            val passkeyCredential = PublicKeyCredential(credential.json())
            PendingIntentHandler.setGetCredentialResponse(
                result, GetCredentialResponse(passkeyCredential)
            )
            setResult(RESULT_OK, result)
            finish()
        }
    }
)

val promptInfo = BiometricPrompt.PromptInfo.Builder()
    .setTitle("Use your screen lock")
    .setSubtitle("Use passkey for ${request.rpId}")
    .setAllowedAuthenticators(
        BiometricManager.Authenticators.BIOMETRIC_STRONG
        /* or BiometricManager.Authenticators.DEVICE_CREDENTIAL */
    )
    .build()
biometricPrompt.authenticate(promptInfo)
處理密碼驗證的使用者選取作業
- 在對應的活動中,存取傳入
onCreate的意圖,並使用PendingIntentHandler擷取ProviderGetCredentialRequest。 在要求中使用
GetPasswordOption,擷取傳入套件名稱的密碼憑證。val getRequest = PendingIntentHandler.retrieveProviderGetCredentialRequest(intent) val passwordOption = getRequest?.credentialOptions?.first() as GetPasswordOption val username = passwordOption.allowedUserIds.first() // Fetch the credentials for the calling app package name val creds = mDatabase.getCredentials(callingAppInfo.packageName) val passwords = creds.passwords val it = passwords.iterator() var password = "" while (it.hasNext()) { val passwordItemCurrent = it.next() if (passwordItemCurrent.username == username) { password = passwordItemCurrent.password break } }在擷取憑證後,設定所選密碼憑證的回應。
// Set the response back
val result = Intent()
val passwordCredential = PasswordCredential(username, password)
PendingIntentHandler.setGetCredentialResponse(
    result, GetCredentialResponse(passwordCredential)
)
setResult(Activity.RESULT_OK, result)
finish()
處理驗證動作項目的選取作業
如先前所述,如果憑證已鎖定,憑證提供者可以設定 AuthenticationAction。如果使用者選取這個項目,系統會叫用與 PendingIntent 中設定的意圖動作相對應的活動。接著,憑證提供者就能提供生物特徵辨識驗證流程或類似機制,用來解鎖憑證。成功解鎖後,憑證提供者必須建構 BeginGetCredentialResponse,這類似於上文所述的使用者登入處理方法,因為憑證現已上鎖。請務必在設定所準備意圖及活動結束之前,先透過 PendingIntentHandler.setBeginGetCredentialResponse() 方法設定這個回應。
清除憑證要求
用戶端應用程式可能會要求必須清除憑證選取作業保留的任何狀態,例如憑證提供者可能會記住先前選取的憑證,並在下次只傳回該憑證。用戶端應用程式會呼叫這個 API,並預期系統會清除固定的選取項目。憑證提供者服務可以覆寫 onClearCredentialStateRequest() 方法來處理這項要求:
override fun onClearCredentialStateRequest(
    request: ProviderClearCredentialStateRequest,
    cancellationSignal: CancellationSignal,
    callback: OutcomeReceiver<Void?, ClearCredentialException>
) {
    // Delete any maintained state as appropriate.
}
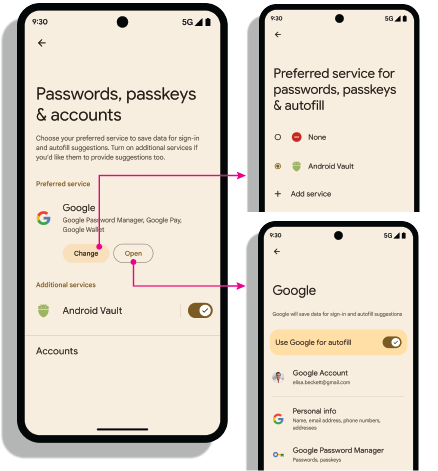
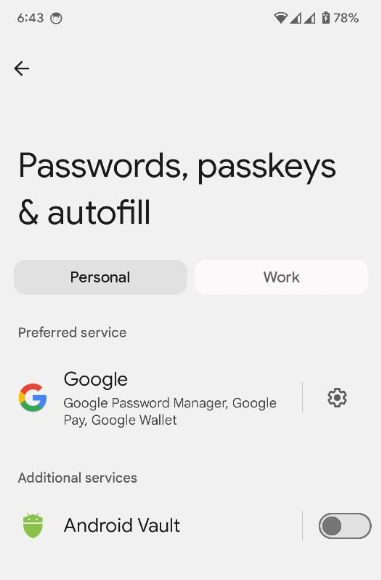
新增連結至供應商設定頁面的功能
如要讓使用者從「密碼、密碼金鑰和自動填入」畫面開啟提供者的設定,憑證提供者應用程式應在 res/xml/provider.xml 中實作 credential-provider settingsActivity 資訊清單屬性。如果使用者點選「密碼、密碼金鑰和自動填入」服務清單中的供應商名稱,這項屬性可讓您使用意圖開啟應用程式本身的設定畫面。將這個屬性的值設為要從設定畫面啟動的活動名稱。
<credential-provider
    xmlns:android="http://schemas.android.com/apk/res/android"
    android:settingsSubtitle="Example settings provider name"
    android:settingsActivity="com.example.SettingsActivity">
    <capabilities>
        <capability name="android.credentials.TYPE_PUBLIC_KEY_CREDENTIAL" />
    </capabilities>
</credential-provider>
設定意圖
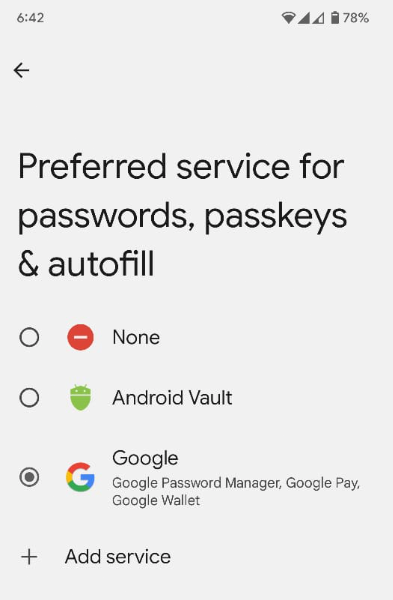
開啟設定:android.settings.CREDENTIAL_PROVIDER 意圖會顯示設定畫面,使用者可以在其中選取偏好和其他憑證供應商。
偏好的憑證服務:ACTION_REQUEST_SET_AUTOFILL_SERVICE intent 會將使用者重新導向偏好的供應商選取畫面。這個畫面中選取的供應商會成為偏好的憑證和自動填入供應商。
取得具有特殊權限的應用程式許可清單
網路瀏覽器等具有特殊權限的應用程式可在 Credential Manager GetCredentialRequest() 和 CreatePublicKeyCredentialRequest() 方法中設定 origin 參數,代表其他信賴方呼叫 Credential Manager。為處理這些要求,憑證提供者會使用 getOrigin() API 擷取 origin。
為擷取 origin,憑證提供者應用程式需要將具有特殊權限且受信任的呼叫端清單傳入 androidx.credentials.provider.CallingAppInfo's getOrigin() API。這個許可清單必須是有效的 JSON 物件。如果 packageName 和從 signingInfo 取得的憑證指紋,與傳遞至 getOrigin() API 的 privilegedAllowlist 所列應用程式相符,系統就會傳回 origin。取得 origin 值後,供應商應用程式應將此視為具特殊權限的呼叫,在 AuthenticatorResponse 中的用戶端資料設定這個 origin,不會使用呼叫應用程式的簽章來計算 origin。
如果您擷取 origin,請使用 CreatePublicKeyCredentialRequest() 或 GetPublicKeyCredentialOption() 直接提供的 clientDataHash,不要在簽署要求期間組合及雜湊處理 clientDataJSON 為避免發生 JSON 剖析問題,請在驗證和斷言回應中設定 clientDataJSON 的預留位置值。Google 密碼管理工具針對 getOrigin() 的呼叫採用公開發布的許可清單。憑證提供者可以使用這份清單,或以 API 描述的 JSON 格式自行提供清單。提供者可自行選擇要使用的清單。如要取得第三方憑證提供者的特殊權限存取權,請參閱第三方提供的說明文件。
在裝置上啟用提供者
使用者必須依序點選「裝置設定」>「密碼與帳戶」>「你的提供者」>「啟用或停用」,才能啟用提供者。
fun createSettingsPendingIntent(): PendingIntent