
এই পৃষ্ঠাটি আপনাকে দেখাবে কিভাবে আপনি একটি একক প্রকল্প থেকে আপনার অ্যাপের বিভিন্ন সংস্করণ তৈরি করতে বিল্ড ভেরিয়েন্ট কনফিগার করতে পারেন এবং কীভাবে আপনার নির্ভরতা এবং স্বাক্ষর কনফিগারেশন সঠিকভাবে পরিচালনা করতে হয়।
প্রতিটি বিল্ড ভেরিয়েন্ট আপনার অ্যাপের একটি ভিন্ন সংস্করণ উপস্থাপন করে যা আপনি তৈরি করতে পারেন। উদাহরণস্বরূপ, আপনি আপনার অ্যাপের একটি সংস্করণ তৈরি করতে চাইতে পারেন যা সীমিত সামগ্রী সহ বিনামূল্যে এবং আরেকটি অর্থপ্রদানকারী সংস্করণ যাতে আরও কিছু অন্তর্ভুক্ত থাকে। আপনি API স্তর বা অন্যান্য ডিভাইসের বৈচিত্র্যের উপর ভিত্তি করে বিভিন্ন ডিভাইসকে লক্ষ্য করে আপনার অ্যাপের বিভিন্ন সংস্করণ তৈরি করতে পারেন।
বিল্ড ভেরিয়েন্ট হল গ্র্যাডেলের একটি নির্দিষ্ট নিয়মের সেট ব্যবহার করে আপনার বিল্ড টাইপ এবং প্রোডাক্ট ফ্লেভারে কনফিগার করা সেটিংস, কোড এবং রিসোর্সগুলিকে একত্রিত করার ফলাফল। যদিও আপনি সরাসরি বিল্ড ভেরিয়েন্টগুলি কনফিগার করেন না, আপনি বিল্ড টাইপ এবং প্রোডাক্ট ফ্লেভারগুলি কনফিগার করেন যা সেগুলি তৈরি করে।
উদাহরণস্বরূপ, একটি "ডেমো" পণ্যের স্বাদ নির্দিষ্ট বৈশিষ্ট্য এবং ডিভাইসের প্রয়োজনীয়তা নির্দিষ্ট করতে পারে, যেমন কাস্টম সোর্স কোড, রিসোর্স এবং ন্যূনতম API স্তর, যখন "ডিবাগ" বিল্ড টাইপ বিভিন্ন বিল্ড এবং প্যাকেজিং সেটিংস প্রয়োগ করে, যেমন ডিবাগ বিকল্প এবং সাইনিং কী। এই দুটিকে একত্রিত করে এমন বিল্ড ভেরিয়েন্ট হল আপনার অ্যাপের "ডেমোডিবাগ" সংস্করণ, এবং এতে "ডেমো" পণ্যের স্বাদ, "ডিবাগ" বিল্ড টাইপ এবং main/ উৎস সেটে অন্তর্ভুক্ত কনফিগারেশন এবং রিসোর্সের সংমিশ্রণ অন্তর্ভুক্ত থাকে।
বিল্ডের ধরণগুলি কনফিগার করুন
আপনি module-level build.gradle.kts ফাইলের android ব্লকের ভিতরে বিল্ড টাইপ তৈরি এবং কনফিগার করতে পারেন। যখন আপনি একটি নতুন মডিউল তৈরি করেন, তখন Android Studio স্বয়ংক্রিয়ভাবে debug এবং release বিল্ড টাইপ তৈরি করে। যদিও debug build টাইপ বিল্ড কনফিগারেশন ফাইলে প্রদর্শিত হয় না, Android Studio এটি debuggable true দিয়ে কনফিগার করে। এটি আপনাকে নিরাপদ Android ডিভাইসে অ্যাপটি ডিবাগ করতে দেয় এবং একটি জেনেরিক ডিবাগ কীস্টোর দিয়ে অ্যাপ সাইনিং কনফিগার করতে দেয়।
আপনি যদি কিছু সেটিংস যোগ করতে বা পরিবর্তন করতে চান, তাহলে আপনার কনফিগারেশনে ডিবাগ বিল্ড টাইপ যোগ করতে পারেন। নিম্নলিখিত নমুনাটি ডিবাগ বিল্ড টাইপের জন্য একটি applicationIdSuffix নির্দিষ্ট করে এবং একটি "স্টেজিং" বিল্ড টাইপ কনফিগার করে যা ডিবাগ বিল্ড টাইপ থেকে সেটিংস ব্যবহার করে শুরু করা হয়:
কোটলিন
android {
    defaultConfig {
        manifestPlaceholders["hostName"] = "www.example.com"
        ...
    }
    buildTypes {
        getByName("release") {
            isMinifyEnabled = true
            proguardFiles(getDefaultProguardFile("proguard-android.txt"), "proguard-rules.pro")
        }

        getByName("debug") {
            applicationIdSuffix = ".debug"
            isDebuggable = true
        }

        /**
         * The `initWith` property lets you copy configurations from other build types,
         * then configure only the settings you want to change. This one copies the debug build
         * type, and then changes the manifest placeholder and application ID.
         */
        create("staging") {
            initWith(getByName("debug"))
            manifestPlaceholders["hostName"] = "internal.example.com"
            applicationIdSuffix = ".debugStaging"
        }
    }
}
খাঁজকাটা
android {
    defaultConfig {
        manifestPlaceholders = [hostName:"www.example.com"]
        ...
    }
    buildTypes {
        release {
            minifyEnabled true
            proguardFiles getDefaultProguardFile('proguard-android.txt'), 'proguard-rules.pro'
        }

        debug {
            applicationIdSuffix ".debug"
            debuggable true
        }

        /**
         * The `initWith` property lets you copy configurations from other build types,
         * then configure only the settings you want to change. This one copies the debug build
         * type, and then changes the manifest placeholder and application ID.
         */
        staging {
            initWith debug
            manifestPlaceholders = [hostName:"internal.example.com"]
            applicationIdSuffix ".debugStaging"
        }
    }
}
দ্রষ্টব্য: যখন আপনি একটি বিল্ড কনফিগারেশন ফাইলে পরিবর্তন করেন, তখন Android Studio আপনাকে আপনার প্রকল্পটিকে নতুন কনফিগারেশনের সাথে সিঙ্ক করতে বাধ্য করে। আপনার প্রকল্পটি সিঙ্ক করতে, পরিবর্তন করার সময় প্রদর্শিত বিজ্ঞপ্তি বারে Sync Now এ ক্লিক করুন অথবা Sync Project এ ক্লিক করুন। টুলবার থেকে। যদি অ্যান্ড্রয়েড স্টুডিও আপনার কনফিগারেশনে কোনও ত্রুটি লক্ষ্য করে, তাহলে বার্তা উইন্ডোটি সমস্যাটি বর্ণনা করে।
বিল্ড টাইপ দিয়ে আপনি যে সমস্ত বৈশিষ্ট্য কনফিগার করতে পারেন সে সম্পর্কে আরও জানতে, BuildType রেফারেন্সটি পড়ুন।
পণ্যের স্বাদ কনফিগার করুন
প্রোডাক্ট ফ্লেভার তৈরি করা বিল্ড টাইপ তৈরির মতোই। আপনার বিল্ড কনফিগারেশনের productFlavors ব্লকে প্রোডাক্ট ফ্লেভার যোগ করুন এবং আপনার পছন্দসই সেটিংস অন্তর্ভুক্ত করুন। প্রোডাক্ট ফ্লেভারগুলি defaultConfig এর মতো একই বৈশিষ্ট্য সমর্থন করে, কারণ defaultConfig আসলে ProductFlavor ক্লাসের অন্তর্গত। এর অর্থ হল আপনি defaultConfig ব্লকের সমস্ত ফ্লেভারের জন্য বেস কনফিগারেশন প্রদান করতে পারেন এবং প্রতিটি ফ্লেভার এই ডিফল্ট মানগুলির যেকোনো একটি পরিবর্তন করতে পারে, যেমন applicationId । অ্যাপ্লিকেশন আইডি সম্পর্কে আরও জানতে, অ্যাপ্লিকেশন আইডি সেট করুন পড়ুন।
দ্রষ্টব্য: আপনাকে এখনও main/ ম্যানিফেস্ট ফাইলে package অ্যাট্রিবিউট ব্যবহার করে একটি প্যাকেজের নাম উল্লেখ করতে হবে। R ক্লাস উল্লেখ করতে বা কোনও আপেক্ষিক কার্যকলাপ বা পরিষেবা নিবন্ধন সমাধান করতে আপনার সোর্স কোডে সেই প্যাকেজের নামটিও ব্যবহার করতে হবে। এটি আপনাকে প্রতিটি পণ্যের ফ্লেভারকে প্যাকেজিং এবং বিতরণের জন্য একটি অনন্য আইডি দেওয়ার জন্য applicationId ব্যবহার করতে দেয়, আপনার সোর্স কোড পরিবর্তন না করেই।
সকল ফ্লেভার অবশ্যই একটি নামকৃত ফ্লেভার ডাইমেনশনের অন্তর্গত হতে হবে, যা পণ্যের ফ্লেভারের একটি গ্রুপ। আপনাকে অবশ্যই সকল ফ্লেভারকে একটি ফ্লেভার ডাইমেনশনে বরাদ্দ করতে হবে; অন্যথায়, আপনি নিম্নলিখিত বিল্ড ত্রুটি পাবেন।
  Error: All flavors must now belong to a named flavor dimension.
  The flavor 'flavor_name' is not assigned to a flavor dimension.
যদি একটি প্রদত্ত মডিউল শুধুমাত্র একটি ফ্লেভার ডাইমেনশন নির্দিষ্ট করে, তাহলে Android Gradle প্লাগইন স্বয়ংক্রিয়ভাবে মডিউলের সমস্ত ফ্লেভারকে সেই ডাইমেনশনে বরাদ্দ করে।
নিম্নলিখিত কোড নমুনাটি "version" নামে একটি ফ্লেভার ডাইমেনশন তৈরি করে এবং "ডেমো" এবং "পূর্ণ" প্রোডাক্ট ফ্লেভার যোগ করে। এই ফ্লেভারগুলি তাদের নিজস্ব applicationIdSuffix এবং versionNameSuffix প্রদান করে:
কোটলিন
android {
    ...
    defaultConfig {...}
    buildTypes {
        getByName("debug"){...}
        getByName("release"){...}
    }
    // Specifies one flavor dimension.
    flavorDimensions += "version"
    productFlavors {
        create("demo") {
            // Assigns this product flavor to the "version" flavor dimension.
            // If you are using only one dimension, this property is optional,
            // and the plugin automatically assigns all the module's flavors to
            // that dimension.
            dimension = "version"
            applicationIdSuffix = ".demo"
            versionNameSuffix = "-demo"
        }
        create("full") {
            dimension = "version"
            applicationIdSuffix = ".full"
            versionNameSuffix = "-full"
        }
    }
}
খাঁজকাটা
android {
    ...
    defaultConfig {...}
    buildTypes {
        debug{...}
        release{...}
    }
    // Specifies one flavor dimension.
    flavorDimensions "version"
    productFlavors {
        demo {
            // Assigns this product flavor to the "version" flavor dimension.
            // If you are using only one dimension, this property is optional,
            // and the plugin automatically assigns all the module's flavors to
            // that dimension.
            dimension "version"
            applicationIdSuffix ".demo"
            versionNameSuffix "-demo"
        }
        full {
            dimension "version"
            applicationIdSuffix ".full"
            versionNameSuffix "-full"
        }
    }
}
দ্রষ্টব্য: যদি আপনার কাছে এমন একটি লিগ্যাসি অ্যাপ থাকে (আগস্ট ২০২১ সালের আগে তৈরি) যা আপনি Google Play তে APK ব্যবহার করে বিতরণ করেন, তাহলে Google Play তে একাধিক APK সাপোর্ট ব্যবহার করে আপনার অ্যাপ বিতরণ করতে, সমস্ত ভেরিয়েন্টের জন্য একই applicationId মান নির্ধারণ করুন এবং প্রতিটি ভেরিয়েন্টকে একটি আলাদা versionCode দিন। Google Play তে আপনার অ্যাপের বিভিন্ন ভেরিয়েন্টকে আলাদা অ্যাপ হিসেবে বিতরণ করতে, আপনাকে প্রতিটি ভেরিয়েন্টের জন্য একটি আলাদা applicationId বরাদ্দ করতে হবে।
আপনার পণ্যের স্বাদ তৈরি এবং কনফিগার করার পরে, বিজ্ঞপ্তি বারে Sync Now এ ক্লিক করুন। সিঙ্ক সম্পূর্ণ হয়ে গেলে, Gradle স্বয়ংক্রিয়ভাবে আপনার বিল্ডের ধরণ এবং পণ্যের স্বাদের উপর ভিত্তি করে বিল্ড ভেরিয়েন্ট তৈরি করে এবং <product-flavor><Build-Type> অনুসারে তাদের নামকরণ করে। উদাহরণস্বরূপ, যদি আপনি "ডেমো" এবং "পূর্ণ" পণ্যের স্বাদ তৈরি করেন এবং ডিফল্ট "ডিবাগ" এবং "রিলিজ" বিল্ড প্রকারগুলি রাখেন, তাহলে Gradle নিম্নলিখিত বিল্ড ভেরিয়েন্ট তৈরি করে:
-
demoDebug -
demoRelease -
fullDebug -
fullRelease
কোন বিল্ড ভেরিয়েন্ট তৈরি এবং চালানো হবে তা নির্বাচন করতে, বিল্ড > বিল্ড ভেরিয়েন্ট নির্বাচন করুন এবং মেনু থেকে একটি বিল্ড ভেরিয়েন্ট নির্বাচন করুন। প্রতিটি বিল্ড ভেরিয়েন্টকে তার নিজস্ব বৈশিষ্ট্য এবং সংস্থান দিয়ে কাস্টমাইজ করা শুরু করতে, আপনাকে এই পৃষ্ঠায় বর্ণিত সোর্স সেট তৈরি এবং পরিচালনা করতে হবে।
বিল্ড ভেরিয়েন্টের জন্য অ্যাপ্লিকেশন আইডি পরিবর্তন করুন
যখন আপনি আপনার অ্যাপের জন্য একটি APK বা AAB তৈরি করেন, তখন বিল্ড টুলগুলি build.gradle.kts ফাইল থেকে defaultConfig ব্লকে সংজ্ঞায়িত অ্যাপ্লিকেশন আইডি দিয়ে অ্যাপটিকে ট্যাগ করে, যেমনটি নিম্নলিখিত উদাহরণে দেখানো হয়েছে। যাইহোক, যদি আপনি আপনার অ্যাপের বিভিন্ন সংস্করণ তৈরি করতে চান যা Google Play Store-এ পৃথক তালিকা হিসাবে প্রদর্শিত হবে, যেমন একটি "ফ্রি" এবং "প্রো" সংস্করণ, তাহলে আপনাকে পৃথক বিল্ড ভেরিয়েন্ট তৈরি করতে হবে যার প্রতিটির একটি আলাদা অ্যাপ্লিকেশন আইডি থাকবে।
এই ক্ষেত্রে, প্রতিটি বিল্ড ভেরিয়েন্টকে একটি পৃথক পণ্য ফ্লেভার হিসাবে সংজ্ঞায়িত করুন। productFlavors ব্লকের ভিতরে প্রতিটি ফ্লেভারের জন্য, আপনি applicationId প্রোপার্টিটি পুনরায় সংজ্ঞায়িত করতে পারেন, অথবা আপনি applicationIdSuffix ব্যবহার করে ডিফল্ট অ্যাপ্লিকেশন আইডিতে একটি সেগমেন্ট যুক্ত করতে পারেন, যেমনটি এখানে দেখানো হয়েছে:
কোটলিন
android {
    defaultConfig {
        applicationId = "com.example.myapp"
    }
    productFlavors {
        create("free") {
            applicationIdSuffix = ".free"
        }
        create("pro") {
            applicationIdSuffix = ".pro"
        }
    }
}
খাঁজকাটা
android {
    defaultConfig {
        applicationId "com.example.myapp"
    }
    productFlavors {
        free {
            applicationIdSuffix ".free"
        }
        pro {
            applicationIdSuffix ".pro"
        }
    }
}
এইভাবে, "ফ্রি" পণ্যের স্বাদের জন্য অ্যাপ্লিকেশন আইডি হল "com.example.myapp.free"।
আপনি আপনার বিল্ড টাইপের উপর ভিত্তি করে একটি সেগমেন্ট যুক্ত করতে applicationIdSuffix ব্যবহার করতে পারেন, যেমনটি এখানে দেখানো হয়েছে:
কোটলিন
android {
    ...
    buildTypes {
        getByName("debug") {
            applicationIdSuffix = ".debug"
        }
    }
}
খাঁজকাটা
android {
    ...
    buildTypes {
        debug {
            applicationIdSuffix ".debug"
        }
    }
}
যেহেতু গ্র্যাডেল পণ্যের স্বাদের পরে বিল্ড টাইপ কনফিগারেশন প্রয়োগ করে, তাই "ফ্রি ডিবাগ" বিল্ড ভেরিয়েন্টের জন্য অ্যাপ্লিকেশন আইডি হল "com.example.myapp.free.debug"। যখন আপনি একই ডিভাইসে ডিবাগ এবং রিলিজ বিল্ড উভয়ই রাখতে চান তখন এটি কার্যকর, কারণ কোনও দুটি অ্যাপের একই অ্যাপ্লিকেশন আইডি থাকতে পারে না।
যদি আপনার কাছে এমন একটি লিগ্যাসি অ্যাপ থাকে (আগস্ট ২০২১ সালের আগে তৈরি) যা আপনি Google Play তে APK ব্যবহার করে বিতরণ করেন, এবং আপনি একই অ্যাপ তালিকা ব্যবহার করে একাধিক APK বিতরণ করতে চান যার প্রতিটি APK একটি ভিন্ন ডিভাইস কনফিগারেশনকে লক্ষ্য করে, যেমন API স্তর, তাহলে আপনাকে প্রতিটি বিল্ড ভেরিয়েন্টের জন্য একই অ্যাপ্লিকেশন আইডি ব্যবহার করতে হবে তবে প্রতিটি APK কে একটি ভিন্নversionCode দিতে হবে। আরও তথ্যের জন্য, একাধিক APK সমর্থন সম্পর্কে পড়ুন। AAB ব্যবহার করে প্রকাশনা প্রভাবিত হয় না, কারণ এটি একটি একক আর্টিফ্যাক্ট ব্যবহার করে যা ডিফল্টরূপে একটি একক সংস্করণ কোড এবং অ্যাপ্লিকেশন আইডি ব্যবহার করে। টিপস: যদি আপনার ম্যানিফেস্ট ফাইলে অ্যাপ্লিকেশন আইডি উল্লেখ করার প্রয়োজন হয়, তাহলে আপনি যেকোনো ম্যানিফেস্ট অ্যাট্রিবিউটে ${applicationId} প্লেসহোল্ডার ব্যবহার করতে পারেন। একটি বিল্ডের সময়, Gradle এই ট্যাগটিকে প্রকৃত অ্যাপ্লিকেশন আইডি দিয়ে প্রতিস্থাপন করে। আরও তথ্যের জন্য, ম্যানিফেস্টে বিল্ড ভেরিয়েবল ইনজেক্ট করুন দেখুন।
স্বাদের মাত্রার সাথে একাধিক পণ্যের স্বাদ একত্রিত করুন
কিছু ক্ষেত্রে, আপনি একাধিক পণ্যের স্বাদ থেকে কনফিগারেশন একত্রিত করতে চাইতে পারেন। উদাহরণস্বরূপ, আপনি API স্তরের উপর ভিত্তি করে "পূর্ণ" এবং "ডেমো" পণ্যের স্বাদের জন্য বিভিন্ন কনফিগারেশন তৈরি করতে চাইতে পারেন। এটি করার জন্য, Android Gradle প্লাগইন আপনাকে স্বাদের মাত্রা হিসাবে পণ্যের স্বাদের একাধিক গ্রুপ তৈরি করতে দেয়।
আপনার অ্যাপ তৈরি করার সময়, Gradle আপনার সংজ্ঞায়িত প্রতিটি ফ্লেভার ডাইমেনশন থেকে একটি প্রোডাক্ট ফ্লেভার কনফিগারেশন, একটি বিল্ড টাইপ কনফিগারেশনের সাথে একত্রিত করে, চূড়ান্ত বিল্ড ভেরিয়েন্ট তৈরি করে। Gradle একই ফ্লেভার ডাইমেনশনের পণ্য ফ্লেভারগুলিকে একত্রিত করে না।
নিম্নলিখিত কোড নমুনাটি flavorDimensions প্রপার্টি ব্যবহার করে একটি "mode" ফ্লেভার ডাইমেনশন তৈরি করে "full" এবং "demo" প্রোডাক্ট ফ্লেভারগুলিকে গ্রুপ করে এবং API স্তরের উপর ভিত্তি করে প্রোডাক্ট ফ্লেভার কনফিগারেশনগুলিকে গ্রুপ করে একটি "api" ফ্লেভার ডাইমেনশন তৈরি করে:
কোটলিন
android {
  ...
  buildTypes {
    getByName("debug") {...}
    getByName("release") {...}
  }

  // Specifies the flavor dimensions you want to use. The order in which you
  // list the dimensions determines their priority, from highest to lowest,
  // when Gradle merges variant sources and configurations. You must assign
  // each product flavor you configure to one of the flavor dimensions.
  flavorDimensions += listOf("api", "mode")

  productFlavors {
    create("demo") {
      // Assigns this product flavor to the "mode" flavor dimension.
      dimension = "mode"
      ...
    }

    create("full") {
      dimension = "mode"
      ...
    }

    // Configurations in the "api" product flavors override those in "mode"
    // flavors and the defaultConfig block. Gradle determines the priority
    // between flavor dimensions based on the order in which they appear next
    // to the flavorDimensions property, with the first dimension having a higher
    // priority than the second, and so on.
    create("minApi24") {
      dimension = "api"
      minSdk = 24
      // To ensure the target device receives the version of the app with
      // the highest compatible API level, assign version codes in increasing
      // value with API level.
      versionCode = 30000 + (android.defaultConfig.versionCode ?: 0)
      versionNameSuffix = "-minApi24"
      ...
    }

    create("minApi23") {
      dimension = "api"
      minSdk = 23
      versionCode = 20000  + (android.defaultConfig.versionCode ?: 0)
      versionNameSuffix = "-minApi23"
      ...
    }

    create("minApi21") {
      dimension = "api"
      minSdk = 21
      versionCode = 10000  + (android.defaultConfig.versionCode ?: 0)
      versionNameSuffix = "-minApi21"
      ...
    }
  }
}
...
খাঁজকাটা
android {
  ...
  buildTypes {
    debug {...}
    release {...}
  }

  // Specifies the flavor dimensions you want to use. The order in which you
  // list the dimensions determines their priority, from highest to lowest,
  // when Gradle merges variant sources and configurations. You must assign
  // each product flavor you configure to one of the flavor dimensions.
  flavorDimensions "api", "mode"

  productFlavors {
    demo {
      // Assigns this product flavor to the "mode" flavor dimension.
      dimension "mode"
      ...
    }

    full {
      dimension "mode"
      ...
    }

    // Configurations in the "api" product flavors override those in "mode"
    // flavors and the defaultConfig block. Gradle determines the priority
    // between flavor dimensions based on the order in which they appear next
    // to the flavorDimensions property, with the first dimension having a higher
    // priority than the second, and so on.
    minApi24 {
      dimension "api"
      minSdkVersion 24
      // To ensure the target device receives the version of the app with
      // the highest compatible API level, assign version codes in increasing
      // value with API level.

      versionCode 30000 + android.defaultConfig.versionCode
      versionNameSuffix "-minApi24"
      ...
    }

    minApi23 {
      dimension "api"
      minSdkVersion 23
      versionCode 20000  + android.defaultConfig.versionCode
      versionNameSuffix "-minApi23"
      ...
    }

    minApi21 {
      dimension "api"
      minSdkVersion 21
      versionCode 10000  + android.defaultConfig.versionCode
      versionNameSuffix "-minApi21"
      ...
    }
  }
}
...
গ্রেডল যে বিল্ড ভেরিয়েন্ট তৈরি করে তার সংখ্যা প্রতিটি ফ্লেভার ডাইমেনশনে থাকা ফ্লেভারের সংখ্যা এবং আপনার কনফিগার করা বিল্ড টাইপের সংখ্যার গুণফলের সমান। যখন গ্রেডল প্রতিটি বিল্ড ভেরিয়েন্ট বা সংশ্লিষ্ট আর্টিফ্যাক্টের নামকরণ করে, তখন উচ্চ-অগ্রাধিকার ফ্লেভার ডাইমেনশনের পণ্যের ফ্লেভার প্রথমে প্রদর্শিত হয়, তারপরে নিম্ন-অগ্রাধিকার ডাইমেনশনের ফ্লেভারগুলি এবং তারপরে বিল্ড টাইপ।
পূর্ববর্তী বিল্ড কনফিগারেশনটিকে উদাহরণ হিসেবে ব্যবহার করে, গ্র্যাডেল নিম্নলিখিত নামকরণ স্কিম সহ মোট ১২টি বিল্ড ভেরিয়েন্ট তৈরি করে:
- বিল্ড ভেরিয়েন্ট:
[minApi24, minApi23, minApi21][Demo, Full][Debug, Release] - সংশ্লিষ্ট APK:
app-[minApi24, minApi23, minApi21]-[demo, full]-[debug, release].apk - উদাহরণস্বরূপ,
- বিল্ড ভেরিয়েন্ট:
minApi24DemoDebug - সংশ্লিষ্ট APK:
app-minApi24-demo-debug.apk
প্রতিটি পণ্যের স্বাদ এবং বিল্ড ভেরিয়েন্টের জন্য আপনি যে সোর্স সেট ডিরেক্টরি তৈরি করতে পারেন তার পাশাপাশি, আপনি প্রতিটি পণ্যের স্বাদের সংমিশ্রণের জন্য সোর্স সেট ডিরেক্টরিও তৈরি করতে পারেন। উদাহরণস্বরূপ, আপনি src/demoMinApi24/java/ ডিরেক্টরিতে জাভা সোর্স তৈরি এবং যোগ করতে পারেন, এবং Gradle শুধুমাত্র সেই দুটি পণ্যের স্বাদকে একত্রিত করে এমন একটি ভেরিয়েন্ট তৈরি করার সময় সেই সোর্সগুলি ব্যবহার করে।
পণ্যের স্বাদের সংমিশ্রণের জন্য আপনি যে সোর্স সেটগুলি তৈরি করেন সেগুলি প্রতিটি পণ্যের স্বাদের সাথে সম্পর্কিত সোর্স সেটগুলির চেয়ে বেশি অগ্রাধিকার পায়। সোর্স সেট এবং গ্রেডল কীভাবে রিসোর্সগুলিকে একত্রিত করে সে সম্পর্কে আরও জানতে, সোর্স সেটগুলি কীভাবে তৈরি করবেন সে সম্পর্কে বিভাগটি পড়ুন।
ফিল্টারের ধরণ
Gradle আপনার কনফিগার করা পণ্যের স্বাদ এবং বিল্ড প্রকারের প্রতিটি সম্ভাব্য সংমিশ্রণের জন্য একটি বিল্ড ভেরিয়েন্ট তৈরি করে। তবে, কিছু বিল্ড ভেরিয়েন্ট থাকতে পারে যা আপনার প্রয়োজন হয় না বা আপনার প্রকল্পের প্রেক্ষাপটে অর্থহীন। নির্দিষ্ট বিল্ড ভেরিয়েন্ট কনফিগারেশন অপসারণ করতে, আপনার মডিউল-স্তরের build.gradle.kts ফাইলে একটি ভেরিয়েন্ট ফিল্টার তৈরি করুন।
পূর্ববর্তী বিভাগের বিল্ড কনফিগারেশনটি উদাহরণ হিসেবে ব্যবহার করে, ধরুন আপনি অ্যাপের ডেমো সংস্করণের জন্য শুধুমাত্র API লেভেল 23 এবং তার বেশি সমর্থন করার পরিকল্পনা করছেন। আপনি variantFilter ব্লক ব্যবহার করে "minApi21" এবং "demo" পণ্যের স্বাদগুলিকে একত্রিত করে এমন সমস্ত বিল্ড ভেরিয়েন্ট কনফিগারেশন ফিল্টার করতে পারেন:
কোটলিন
android {
  ...
  buildTypes {...}

  flavorDimensions += listOf("api", "mode")
  productFlavors {
    create("demo") {...}
    create("full") {...}
    create("minApi24") {...}
    create("minApi23") {...}
    create("minApi21") {...}
  }
}

androidComponents {
    beforeVariants { variantBuilder ->
        // To check for a certain build type, use variantBuilder.buildType == "<buildType>"
        if (variantBuilder.productFlavors.containsAll(listOf("api" to "minApi21", "mode" to "demo"))) {
            // Gradle ignores any variants that satisfy the conditions above.
            variantBuilder.enable = false
        }
    }
}
...
খাঁজকাটা
android {
  ...
  buildTypes {...}

  flavorDimensions "api", "mode"
  productFlavors {
    demo {...}
    full {...}
    minApi24 {...}
    minApi23 {...}
    minApi21 {...}
  }

  variantFilter { variant ->
      def names = variant.flavors*.name
      // To check for a certain build type, use variant.buildType.name == "<buildType>"
      if (names.contains("minApi21") && names.contains("demo")) {
          // Gradle ignores any variants that satisfy the conditions above.
          setIgnore(true)
      }
  }
}
...
একবার আপনি আপনার বিল্ড কনফিগারেশনে একটি ভেরিয়েন্ট ফিল্টার যোগ করে নোটিফিকেশন বারে Sync Now এ ক্লিক করলে, Gradle আপনার নির্দিষ্ট শর্ত পূরণ করে এমন যেকোনো বিল্ড ভেরিয়েন্টকে উপেক্ষা করে। আপনি যখন Build > Select Build Variant মেনু বার থেকে অথবা Build Variants এ ক্লিক করেন তখন বিল্ড ভেরিয়েন্টগুলি আর মেনুতে প্রদর্শিত হয় না। টুল উইন্ডো বারে।
সোর্স সেট তৈরি করুন
ডিফল্টরূপে, অ্যান্ড্রয়েড স্টুডিও আপনার সমস্ত বিল্ড ভেরিয়েন্টের মধ্যে আপনি যা ভাগ করতে চান তার জন্য main/ উৎস সেট এবং ডিরেক্টরি তৈরি করে। তবে, আপনি নির্দিষ্ট বিল্ড প্রকার, পণ্যের স্বাদ, পণ্যের স্বাদের সংমিশ্রণ ( ফ্লেভার ডাইমেনশন ব্যবহার করার সময়) এবং বিল্ড ভেরিয়েন্টের জন্য গ্রেডল কোন ফাইল কম্পাইল এবং প্যাকেজ করবে তা নিয়ন্ত্রণ করার জন্য নতুন সোর্স সেট তৈরি করতে পারেন।
উদাহরণস্বরূপ, আপনি main/ উৎস সেটে মৌলিক কার্যকারিতা সংজ্ঞায়িত করতে পারেন এবং বিভিন্ন ক্লায়েন্টের জন্য আপনার অ্যাপের ব্র্যান্ডিং পরিবর্তন করতে পণ্যের স্বাদের উৎস সেট ব্যবহার করতে পারেন, অথবা শুধুমাত্র ডিবাগ বিল্ড টাইপ ব্যবহার করে এমন বিল্ড ভেরিয়েন্টের জন্য বিশেষ অনুমতি এবং লগিং কার্যকারিতা অন্তর্ভুক্ত করতে পারেন।
গ্র্যাডেল আশা করে যে সোর্স সেট ফাইল এবং ডিরেক্টরিগুলি একটি নির্দিষ্ট উপায়ে সংগঠিত হবে, যেমনটি main/ সোর্স সেট। উদাহরণস্বরূপ, গ্র্যাডেল আশা করে যে কোটলিন বা জাভা ক্লাস ফাইলগুলি যা আপনার "ডিবাগ" বিল্ড টাইপের সাথে নির্দিষ্ট src/debug/kotlin/ অথবা src/debug/java/ ডিরেক্টরিতে অবস্থিত।
অ্যান্ড্রয়েড গ্র্যাডেল প্লাগইন একটি কার্যকর গ্র্যাডেল টাস্ক প্রদান করে যা আপনাকে দেখায় যে আপনার প্রতিটি বিল্ড টাইপ, প্রোডাক্ট ফ্লেভার এবং বিল্ড ভেরিয়েন্টের জন্য আপনার ফাইলগুলি কীভাবে সংগঠিত করবেন। উদাহরণস্বরূপ, টাস্ক আউটপুট থেকে নিম্নলিখিত নমুনাটি বর্ণনা করে যে গ্র্যাডেল "ডিবাগ" বিল্ড টাইপের জন্য নির্দিষ্ট ফাইলগুলি কোথায় খুঁজে পাবে:
------------------------------------------------------------
Project :app
------------------------------------------------------------

...

debug
----
Compile configuration: debugCompile
build.gradle name: android.sourceSets.debug
Java sources: [app/src/debug/java]
Kotlin sources: [app/src/debug/kotlin, app/src/debug/java]
Manifest file: app/src/debug/AndroidManifest.xml
Android resources: [app/src/debug/res]
Assets: [app/src/debug/assets]
AIDL sources: [app/src/debug/aidl]
RenderScript sources: [app/src/debug/rs]
JNI sources: [app/src/debug/jni]
JNI libraries: [app/src/debug/jniLibs]
Java-style resources: [app/src/debug/resources]
এই আউটপুটটি দেখতে, নিম্নলিখিতভাবে এগিয়ে যান:
- টুল উইন্ডো বারে Gradle- এ ক্লিক করুন।
MyApplication > Tasks > android এ যান এবং sourceSets এ ডাবল-ক্লিক করুন।
টাস্ক ফোল্ডারটি দেখতে, আপনাকে সিঙ্কের সময় গ্র্যাডলকে টাস্ক তালিকা তৈরি করতে দিতে হবে। এটি করতে, এই পদক্ষেপগুলি অনুসরণ করুন:
- ফাইল > সেটিংস > পরীক্ষামূলক ( অ্যান্ড্রয়েড স্টুডিও > সেটিংস > ম্যাকওএস-এ পরীক্ষামূলক ) ক্লিক করুন।
- অনির্বাচন করুন গ্র্যাডল সিঙ্কের সময় গ্র্যাডল টাস্ক তালিকা তৈরি করবেন না ।
- গ্র্যাডেল কাজটি সম্পাদন করার পর, আউটপুট প্রদর্শনের জন্য রান উইন্ডোটি খোলে।
দ্রষ্টব্য: টাস্ক আউটপুট আপনাকে দেখায় যে আপনার অ্যাপের জন্য পরীক্ষা চালানোর জন্য আপনি যে ফাইলগুলি ব্যবহার করতে চান, যেমন test/ এবং androidTest/ টেস্টিং সোর্স সেট , তার জন্য সোর্স সেটগুলি কীভাবে সংগঠিত করবেন।
যখন আপনি একটি নতুন বিল্ড ভেরিয়েন্ট তৈরি করেন, তখন অ্যান্ড্রয়েড স্টুডিও আপনার জন্য সোর্স সেট ডিরেক্টরি তৈরি করে না, তবে এটি আপনাকে সাহায্য করার জন্য কয়েকটি বিকল্প দেয়। উদাহরণস্বরূপ, আপনার "ডিবাগ" বিল্ড টাইপের জন্য কেবল java/ ডিরেক্টরি তৈরি করতে:
- প্রজেক্ট প্যানটি খুলুন এবং প্যানের উপরের মেনু থেকে প্রজেক্ট ভিউ নির্বাচন করুন।
-
MyProject/app/src/তে নেভিগেট করুন। -
srcডিরেক্টরিতে ডান-ক্লিক করুন এবং New > Directory নির্বাচন করুন। - Gradle Source Sets এর অধীনে থাকা মেনু থেকে, full/java নির্বাচন করুন।
- এন্টার টিপুন।
অ্যান্ড্রয়েড স্টুডিও আপনার ডিবাগ বিল্ড টাইপের জন্য একটি সোর্স সেট ডিরেক্টরি তৈরি করে এবং তারপর এর ভিতরে java/ ডিরেক্টরি তৈরি করে। বিকল্পভাবে, যখন আপনি আপনার প্রোজেক্টে একটি নির্দিষ্ট বিল্ড ভেরিয়েন্টের জন্য একটি নতুন ফাইল যোগ করেন তখন অ্যান্ড্রয়েড স্টুডিও আপনার জন্য ডিরেক্টরি তৈরি করতে পারে।
উদাহরণস্বরূপ, আপনার "ডিবাগ" বিল্ড টাইপের জন্য একটি মান XML ফাইল তৈরি করতে:
- প্রজেক্ট প্যানে,
srcডিরেক্টরিতে ডান-ক্লিক করুন এবং New > XML > Values XML File নির্বাচন করুন। - XML ফাইলের নাম লিখুন অথবা ডিফল্ট নামটি রাখুন।
- টার্গেট সোর্স সেটের পাশের মেনু থেকে, ডিবাগ নির্বাচন করুন।
- Finish এ ক্লিক করুন।
যেহেতু "ডিবাগ" বিল্ড টাইপটি টার্গেট সোর্স সেট হিসেবে নির্দিষ্ট করা হয়েছিল, তাই XML ফাইল তৈরি করার সময় অ্যান্ড্রয়েড স্টুডিও স্বয়ংক্রিয়ভাবে প্রয়োজনীয় ডিরেক্টরি তৈরি করে। ফলে ডিরেক্টরি কাঠামোটি চিত্র ১ এর মতো দেখাচ্ছে।
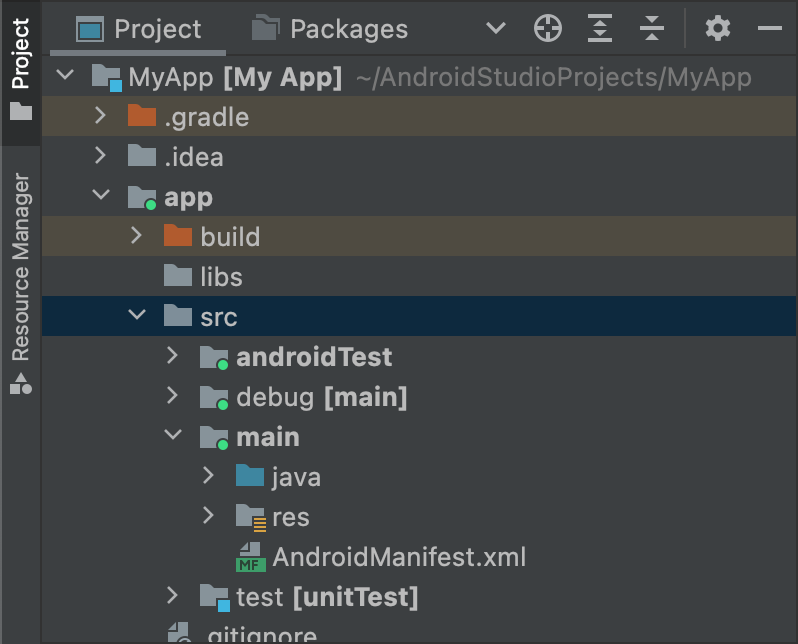
চিত্র ১. "ডিবাগ" বিল্ড টাইপের জন্য নতুন সোর্স সেট ডিরেক্টরি।
সক্রিয় উৎস সেটগুলির আইকনে একটি সবুজ সূচক থাকে যা দেখায় যে তারা সক্রিয়। debug উৎস সেটটি [main] এর সাথে যুক্ত করা হয় যাতে দেখা যায় যে এটি main উৎস সেটের সাথে একত্রিত হবে।
একই পদ্ধতি ব্যবহার করে, আপনি পণ্যের স্বাদের জন্য সোর্স সেট ডিরেক্টরি তৈরি করতে পারেন, যেমন src/demo/ , এবং বিল্ড ভেরিয়েন্ট তৈরি করতে পারেন, যেমন src/demoDebug/ । এছাড়াও, আপনি টেস্টিং সোর্স সেট তৈরি করতে পারেন যা নির্দিষ্ট বিল্ড ভেরিয়েন্টগুলিকে লক্ষ্য করে, যেমন src/androidTestDemoDebug/ । আরও জানতে, টেস্টিং সোর্স সেট সম্পর্কে পড়ুন।
ডিফল্ট সোর্স সেট কনফিগারেশন পরিবর্তন করুন
যদি আপনার এমন সোর্স থাকে যা গ্র্যাডেলের প্রত্যাশা অনুযায়ী ডিফল্ট সোর্স সেট ফাইল স্ট্রাকচারের সাথে সংগঠিত না থাকে, যেমনটি পূর্ববর্তী বিভাগে সোর্স সেট তৈরি সম্পর্কে বর্ণনা করা হয়েছে, তাহলে আপনি sourceSets ব্লক ব্যবহার করে গ্র্যাডেল সোর্স সেটের প্রতিটি উপাদানের জন্য ফাইল সংগ্রহ করার জন্য কোথায় তাকাবে তা পরিবর্তন করতে পারেন।
sourceSets ব্লকটি অবশ্যই android ব্লকের মধ্যে থাকতে হবে। আপনাকে সোর্স ফাইলগুলি স্থানান্তর করতে হবে না; আপনাকে কেবল Gradle-কে module-level build.gradle.kts ফাইলের সাথে সম্পর্কিত পাথ(গুলি) প্রদান করতে হবে, যেখানে Gradle প্রতিটি সোর্স সেট কম্পোনেন্টের জন্য ফাইল খুঁজে পেতে পারে। আপনি কোন কম্পোনেন্টগুলি কনফিগার করতে পারেন এবং আপনি সেগুলিকে একাধিক ফাইল বা ডিরেক্টরিতে ম্যাপ করতে পারেন কিনা তা জানতে, Android Gradle প্লাগইন API রেফারেন্স দেখুন।
নিম্নলিখিত কোড নমুনাটি app/other/ ডিরেক্টরি থেকে main সোর্স সেটের নির্দিষ্ট উপাদানগুলিতে সোর্স ম্যাপ করে এবং androidTest সোর্স সেটের রুট ডিরেক্টরি পরিবর্তন করে:
কোটলিন
android {
  ...
  // Encapsulates configurations for the main source set.
  sourceSets.getByName("main") {
    // Changes the directory for Java sources. The default directory is
    // 'src/main/java'.
    java.setSrcDirs(listOf("other/java"))

    // If you list multiple directories, Gradle uses all of them to collect
    // sources. Because Gradle gives these directories equal priority, if
    // you define the same resource in more than one directory, you receive an
    // error when merging resources. The default directory is 'src/main/res'.
    res.setSrcDirs(listOf("other/res1", "other/res2"))

    // Note: Avoid specifying a directory that is a parent to one
    // or more other directories you specify. For example, avoid the following:
    // res.srcDirs = ['other/res1', 'other/res1/layouts', 'other/res1/strings']
    // Specify either only the root 'other/res1' directory or only the
    // nested 'other/res1/layouts' and 'other/res1/strings' directories.

    // For each source set, you can specify only one Android manifest.
    // By default, Android Studio creates a manifest for your main source
    // set in the src/main/ directory.
    manifest.srcFile("other/AndroidManifest.xml")
    ...
  }

  // Create additional blocks to configure other source sets.
  sourceSets.getByName("androidTest") {
      // If all the files for a source set are located under a single root
      // directory, you can specify that directory using the setRoot property.
      // When gathering sources for the source set, Gradle looks only in locations
      // relative to the root directory you specify. For example, after applying the
      // configuration below for the androidTest source set, Gradle looks for Java
      // sources only in the src/tests/java/ directory.
      setRoot("src/tests")
      ...
  }
}
...
খাঁজকাটা
android {
  ...
  sourceSets {
    // Encapsulates configurations for the main source set.
    main {
      // Changes the directory for Java sources. The default directory is
      // 'src/main/java'.
      java.srcDirs = ['other/java']

      // If you list multiple directories, Gradle uses all of them to collect
      // sources. Because Gradle gives these directories equal priority, if
      // you define the same resource in more than one directory, you receive an
      // error when merging resources. The default directory is 'src/main/res'.
      res.srcDirs = ['other/res1', 'other/res2']

      // Note: Avoid specifying a directory that is a parent to one
      // or more other directories you specify. For example, avoid the following:
      // res.srcDirs = ['other/res1', 'other/res1/layouts', 'other/res1/strings']
      // Specify either only the root 'other/res1' directory or only the
      // nested 'other/res1/layouts' and 'other/res1/strings' directories.

      // For each source set, you can specify only one Android manifest.
      // By default, Android Studio creates a manifest for your main source
      // set in the src/main/ directory.
      manifest.srcFile 'other/AndroidManifest.xml'
      ...
    }

    // Create additional blocks to configure other source sets.
    androidTest {

      // If all the files for a source set are located under a single root
      // directory, you can specify that directory using the setRoot property.
      // When gathering sources for the source set, Gradle looks only in locations
      // relative to the root directory you specify. For example, after applying the
      // configuration below for the androidTest source set, Gradle looks for Java
      // sources only in the src/tests/java/ directory.
      setRoot 'src/tests'
      ...
    }
  }
}
...
মনে রাখবেন যে একটি সোর্স ডিরেক্টরি শুধুমাত্র একটি সোর্স সেটের অন্তর্গত হতে পারে। উদাহরণস্বরূপ, আপনি test এবং androidTest সোর্স সেট উভয়ের সাথে একই টেস্ট সোর্স শেয়ার করতে পারবেন না। এর কারণ হল Android Studio প্রতিটি সোর্স সেটের জন্য আলাদা IntelliJ মডিউল তৈরি করে এবং সোর্স সেট জুড়ে ডুপ্লিকেট কন্টেন্ট রুট সমর্থন করতে পারে না।
সোর্স সেট দিয়ে তৈরি করুন
আপনি যে কোড এবং রিসোর্সগুলি প্যাকেজ করতে চান তা নির্দিষ্ট কনফিগারেশনের সাথে রাখার জন্য সোর্স সেট ডিরেক্টরি ব্যবহার করতে পারেন। উদাহরণস্বরূপ, যদি আপনি "demoDebug" বিল্ড ভেরিয়েন্ট তৈরি করেন, যা একটি "demo" পণ্যের স্বাদ এবং "debug" বিল্ড ধরণের ক্রসপ্রোডাক্ট, তাহলে Gradle এই ডিরেক্টরিগুলি দেখে এবং তাদের নিম্নলিখিত অগ্রাধিকার দেয়:
-
src/demoDebug/(বিল্ড ভেরিয়েন্ট সোর্স সেট) -
src/debug/(বিল্ড টাইপ সোর্স সেট) -
src/demo/(পণ্যের স্বাদের উৎস সেট) -
src/main/(প্রধান উৎস সেট)
পণ্যের স্বাদের সংমিশ্রণের জন্য তৈরি সোর্স সেটগুলিতে অবশ্যই সমস্ত স্বাদের মাত্রা অন্তর্ভুক্ত থাকতে হবে। উদাহরণস্বরূপ, বিল্ড ভেরিয়েন্ট সোর্স সেটটি অবশ্যই বিল্ড টাইপ এবং সমস্ত স্বাদের মাত্রার সংমিশ্রণ হতে হবে। একাধিক কিন্তু সমস্ত স্বাদের মাত্রা নয় এমন ফোল্ডারগুলিকে অন্তর্ভুক্ত করে এমন কোড এবং সংস্থানগুলিকে একত্রিত করা সমর্থিত নয়।
যদি আপনি একাধিক পণ্যের স্বাদ একত্রিত করেন , তাহলে পণ্যের স্বাদের মধ্যে অগ্রাধিকার নির্ধারিত হয় তারা কোন স্বাদের মাত্রার সাথে সম্পর্কিত। android.flavorDimensions সম্পত্তির সাথে স্বাদের মাত্রা তালিকাভুক্ত করার সময়, আপনার তালিকাভুক্ত প্রথম স্বাদের মাত্রার সাথে সম্পর্কিত পণ্যের স্বাদগুলি দ্বিতীয় স্বাদের মাত্রার সাথে সম্পর্কিত পণ্যের স্বাদগুলির চেয়ে বেশি অগ্রাধিকার পায়, ইত্যাদি। অতিরিক্তভাবে, পণ্যের স্বাদের সংমিশ্রণের জন্য আপনি যে উৎস সেটগুলি তৈরি করেন সেগুলি একটি পৃথক পণ্যের স্বাদের সাথে সম্পর্কিত উৎস সেটগুলির তুলনায় বেশি অগ্রাধিকার পায়।
Gradle যখন কোড এবং রিসোর্সগুলিকে একত্রিত করে তখন অগ্রাধিকার ক্রম নির্ধারণ করে যে কোন সোর্স সেটের অগ্রাধিকার বেশি। যেহেতু demoDebug/ source set ডিরেক্টরিতে সম্ভবত সেই বিল্ড ভেরিয়েন্টের জন্য নির্দিষ্ট ফাইল থাকে, যদি demoDebug/ debug/ এ এমন একটি ফাইল থাকে যা debug/ এও সংজ্ঞায়িত করা হয়, তাহলে Gradle demoDebug/ source সেটের ফাইলটি ব্যবহার করে। একইভাবে, Gradle main/ একই ফাইলের তুলনায় বিল্ড টাইপ এবং প্রোডাক্ট ফ্লেভার সোর্স সেটের ফাইলগুলিকে উচ্চতর অগ্রাধিকার দেয়। নিম্নলিখিত বিল্ড নিয়মগুলি প্রয়োগ করার সময় Gradle এই অগ্রাধিকার ক্রম বিবেচনা করে:
-
kotlin/অথবাjava/ডিরেক্টরিতে থাকা সমস্ত সোর্স কোড একসাথে কম্পাইল করা হয় যাতে একটি একক আউটপুট তৈরি হয়।দ্রষ্টব্য: একটি নির্দিষ্ট বিল্ড ভেরিয়েন্টের জন্য, যদি Gradle একই Kotlin বা Java ক্লাস সংজ্ঞায়িত দুটি বা ততোধিক সোর্স সেট ডিরেক্টরির সম্মুখীন হয় তবে একটি বিল্ড ত্রুটি ছুঁড়ে দেয়। উদাহরণস্বরূপ, একটি ডিবাগ অ্যাপ তৈরি করার সময়, আপনি
src/debug/Utility.ktএবংsrc/main/Utility.ktউভয়ই সংজ্ঞায়িত করতে পারবেন না, কারণ Gradle বিল্ড প্রক্রিয়া চলাকালীন এই দুটি ডিরেক্টরি দেখে এবং একটি "ডুপ্লিকেট ক্লাস" ত্রুটি ছুঁড়ে দেয়। আপনি যদি বিভিন্ন বিল্ড ধরণের জন্যUtility.ktএর বিভিন্ন সংস্করণ চান, তবে প্রতিটি বিল্ড ধরণের ফাইলের নিজস্ব সংস্করণ সংজ্ঞায়িত করতে হবে এবং এটিকেmain/source সেটে অন্তর্ভুক্ত করতে হবে না। - ম্যানিফেস্টগুলিকে একটি একক ম্যানিফেস্টে একত্রিত করা হয়। পূর্ববর্তী উদাহরণে তালিকার মতো একই ক্রমে অগ্রাধিকার দেওয়া হয়। অর্থাৎ, একটি বিল্ড টাইপের জন্য ম্যানিফেস্ট সেটিংস একটি পণ্যের স্বাদের জন্য ম্যানিফেস্ট সেটিংসকে ওভাররাইড করে, ইত্যাদি। আরও জানতে, ম্যানিফেস্ট মার্জিং সম্পর্কে পড়ুন।
-
values/ডিরেক্টরিতে থাকা ফাইলগুলিকে একসাথে মার্জ করা হয়। যদি দুটি ফাইলের নাম একই হয়, যেমন দুটিstrings.xmlফাইল, তাহলে পূর্ববর্তী উদাহরণে তালিকার মতো একই ক্রমে অগ্রাধিকার দেওয়া হয়। অর্থাৎ, বিল্ড টাইপ সোর্স সেটে একটি ফাইলে সংজ্ঞায়িত মানগুলি পণ্যের স্বাদে একই ফাইলে সংজ্ঞায়িত মানগুলিকে ওভাররাইড করে, ইত্যাদি। -
res/এবংasset/ডিরেক্টরিগুলিতে থাকা সম্পদগুলি একসাথে প্যাকেজ করা হয়। যদি দুটি বা ততোধিক উৎস সেটে একই নামের সম্পদ সংজ্ঞায়িত করা থাকে, তাহলে পূর্ববর্তী উদাহরণের তালিকার মতো একই ক্রমে অগ্রাধিকার দেওয়া হয়। - অ্যাপ তৈরির সময় গ্র্যাডেল লাইব্রেরি মডিউল নির্ভরতার সাথে অন্তর্ভুক্ত রিসোর্স এবং ম্যানিফেস্টগুলিকে সর্বনিম্ন অগ্রাধিকার দেয়।
নির্ভরতা ঘোষণা করুন
একটি নির্দিষ্ট বিল্ড ভেরিয়েন্ট বা টেস্টিং সোর্স সেটের জন্য নির্ভরতা কনফিগার করতে, নিম্নলিখিত উদাহরণে দেখানো হয়েছে, Implementation কীওয়ার্ডের আগে বিল্ড ভেরিয়েন্ট বা টেস্টিং সোর্স সেটের নাম প্রিফিক্স করুন:
কোটলিন
dependencies {
    // Adds the local "mylibrary" module as a dependency to the "free" flavor.
    "freeImplementation"(project(":mylibrary"))

    // Adds a remote binary dependency only for local tests.
    testImplementation("junit:junit:4.12")

    // Adds a remote binary dependency only for the instrumented test APK.
    androidTestImplementation("com.android.support.test.espresso:espresso-core:3.6.1")
}
খাঁজকাটা
dependencies {
    // Adds the local "mylibrary" module as a dependency to the "free" flavor.
    freeImplementation project(":mylibrary")

    // Adds a remote binary dependency only for local tests.
    testImplementation 'junit:junit:4.12'

    // Adds a remote binary dependency only for the instrumented test APK.
    androidTestImplementation 'com.android.support.test.espresso:espresso-core:3.6.1'
}
নির্ভরতা কনফিগার করার বিষয়ে আরও তথ্যের জন্য, বিল্ড নির্ভরতা যোগ করুন দেখুন।
বৈকল্পিক-সচেতন নির্ভরতা ব্যবস্থাপনা ব্যবহার করুন
অ্যান্ড্রয়েড গ্রেডল প্লাগইন 3.0.0 এবং উচ্চতর সংস্করণে একটি নতুন নির্ভরতা প্রক্রিয়া অন্তর্ভুক্ত রয়েছে যা লাইব্রেরি ব্যবহার করার সময় স্বয়ংক্রিয়ভাবে ভেরিয়েন্টগুলির সাথে মেলে। এর অর্থ হল একটি অ্যাপের debug ভেরিয়েন্ট স্বয়ংক্রিয়ভাবে একটি লাইব্রেরির debug ভেরিয়েন্ট ব্যবহার করে, ইত্যাদি। এটি ফ্লেভার ব্যবহার করার সময়ও কাজ করে: একটি অ্যাপের freeDebug ভেরিয়েন্ট একটি লাইব্রেরির freeDebug ভেরিয়েন্ট ব্যবহার করবে।
প্লাগইনটি সঠিকভাবে ভেরিয়েন্টের সাথে মেলানোর জন্য, আপনাকে নিম্নলিখিত বিভাগে বর্ণিত ম্যাচিং ফলব্যাক প্রদান করতে হবে, যেখানে সরাসরি মিল সম্ভব নয়।
উদাহরণস্বরূপ, ধরুন আপনার অ্যাপটি "স্টেজিং" নামক একটি বিল্ড টাইপ কনফিগার করে, কিন্তু এর লাইব্রেরি ডিপেন্ডেন্সিগুলির মধ্যে একটি তা করে না। যখন প্লাগইনটি আপনার অ্যাপের "স্টেজিং" সংস্করণ তৈরি করার চেষ্টা করে, তখন এটি জানতে পারবে না যে লাইব্রেরির কোন সংস্করণটি ব্যবহার করতে হবে, এবং আপনি নিম্নলিখিতগুলির মতো একটি ত্রুটি বার্তা দেখতে পাবেন:
Error:Failed to resolve: Could not resolve project :mylibrary.
Required by:
    project :app
ভেরিয়েন্ট ম্যাচিং সম্পর্কিত বিল্ড ত্রুটিগুলি সমাধান করুন
প্লাগইনটিতে DSL উপাদান রয়েছে যা আপনাকে নিয়ন্ত্রণ করতে সাহায্য করবে যে কীভাবে Gradle এমন পরিস্থিতি সমাধান করে যেখানে একটি অ্যাপ এবং একটি নির্ভরতার মধ্যে সরাসরি বৈকল্পিক মিল সম্ভব নয়।
ভেরিয়েন্ট-সচেতন নির্ভরতা ম্যাচিং সম্পর্কিত সমস্যাগুলির একটি তালিকা এবং DSL বৈশিষ্ট্য ব্যবহার করে কীভাবে সেগুলি সমাধান করা যায় তা নীচে দেওয়া হল:আপনার অ্যাপে এমন একটি বিল্ড টাইপ রয়েছে যা লাইব্রেরি নির্ভরতায় থাকে না।
উদাহরণস্বরূপ, আপনার অ্যাপে একটি "স্টেজিং" বিল্ড টাইপ রয়েছে, কিন্তু একটি ডিপেন্ডেন্সিতে কেবল "ডিবাগ" এবং "রিলিজ" বিল্ড টাইপ অন্তর্ভুক্ত রয়েছে।
মনে রাখবেন যে, যখন লাইব্রেরি ডিপেন্ডেন্সিতে এমন একটি বিল্ড টাইপ থাকে যা আপনার অ্যাপে থাকে না, তখন কোনও সমস্যা হয় না। কারণ প্লাগইনটি কখনই ডিপেন্ডেন্সি থেকে সেই বিল্ড টাইপটি অনুরোধ করে না।
এখানে দেখানো হয়েছে, প্রদত্ত বিল্ড ধরণের জন্য বিকল্প মিল নির্দিষ্ট করতে
matchingFallbacksব্যবহার করুন:কোটলিন
// In the app's build.gradle.kts file.
android {
    buildTypes {
        getByName("debug") {}
        getByName("release") {}
        create("staging") {
            // Specifies a sorted list of fallback build types that the
            // plugin can try to use when a dependency does not include a
            // "staging" build type. You may specify as many fallbacks as you
            // like, and the plugin selects the first build type that's
            // available in the dependency.
            matchingFallbacks += listOf("debug", "qa", "release")
        }
    }
}
খাঁজকাটা
// In the app's build.gradle file.
android {
    buildTypes {
        debug {}
        release {}
        staging {
            // Specifies a sorted list of fallback build types that the
            // plugin can try to use when a dependency does not include a
            // "staging" build type. You may specify as many fallbacks as you
            // like, and the plugin selects the first build type that's
            // available in the dependency.
            matchingFallbacks = ['debug', 'qa', 'release']
        }
    }
}
অ্যাপ এবং এর লাইব্রেরি নির্ভরতা উভয় ক্ষেত্রেই বিদ্যমান একটি নির্দিষ্ট স্বাদের মাত্রার জন্য, আপনার অ্যাপে এমন স্বাদ রয়েছে যা লাইব্রেরিতে নেই।
উদাহরণস্বরূপ, আপনার অ্যাপ এবং এর লাইব্রেরি নির্ভরতা উভয়ের ক্ষেত্রেই একটি "স্তর" ফ্লেভার ডাইমেনশন অন্তর্ভুক্ত থাকে। তবে, অ্যাপের "স্তর" ডাইমেনশনে "ফ্রি" এবং "পেইড" ফ্লেভার অন্তর্ভুক্ত থাকে, কিন্তু একটি ডিপেনডেন্সিতে একই মাত্রার জন্য শুধুমাত্র "ডেমো" এবং "পেইড" ফ্লেভার অন্তর্ভুক্ত থাকে।
মনে রাখবেন যে অ্যাপ এবং এর লাইব্রেরি নির্ভরতা উভয় ক্ষেত্রেই বিদ্যমান একটি নির্দিষ্ট স্বাদের মাত্রার জন্য, যখন কোনও লাইব্রেরিতে এমন একটি পণ্যের স্বাদ অন্তর্ভুক্ত থাকে যা আপনার অ্যাপে নেই, তখন কোনও সমস্যা হয় না। কারণ প্লাগইনটি কখনই নির্ভরতা থেকে সেই স্বাদের অনুরোধ করে না।
অ্যাপের "ফ্রি" পণ্যের স্বাদের জন্য বিকল্প মিলগুলি নির্দিষ্ট করতে
matchingFallbacksব্যবহার করুন, যেমনটি এখানে দেখানো হয়েছে:কোটলিন
// In the app's build.gradle.kts file.
android {
    defaultConfig{
    // Don't configure matchingFallbacks in the defaultConfig block.
    // Instead, specify fallbacks for a given product flavor in the
    // productFlavors block, as shown below.
  }
    flavorDimensions += "tier"
    productFlavors {
        create("paid") {
            dimension = "tier"
            // Because the dependency already includes a "paid" flavor in its
            // "tier" dimension, you don't need to provide a list of fallbacks
            // for the "paid" flavor.
        }
        create("free") {
            dimension = "tier"
            // Specifies a sorted list of fallback flavors that the plugin
            // can try to use when a dependency's matching dimension does
            // not include a "free" flavor. Specify as many
            // fallbacks as you like; the plugin selects the first flavor
            // that's available in the dependency's "tier" dimension.
            matchingFallbacks += listOf("demo", "trial")
        }
    }
}
খাঁজকাটা
// In the app's build.gradle file.
android {
    defaultConfig{
    // Don't configure matchingFallbacks in the defaultConfig block.
    // Instead, specify fallbacks for a given product flavor in the
    // productFlavors block, as shown below.
  }
    flavorDimensions 'tier'
    productFlavors {
        paid {
            dimension 'tier'
            // Because the dependency already includes a "paid" flavor in its
            // "tier" dimension, you don't need to provide a list of fallbacks
            // for the "paid" flavor.
        }
        free {
            dimension 'tier'
            // Specifies a sorted list of fallback flavors that the plugin
            // can try to use when a dependency's matching dimension does
            // not include a "free" flavor. Specify as many
            // fallbacks as you like; the plugin selects the first flavor
            // that's available in the dependency's "tier" dimension.
            matchingFallbacks = ['demo', 'trial']
        }
    }
}
একটি লাইব্রেরি নির্ভরতায় এমন একটি স্বাদের মাত্রা থাকে যা আপনার অ্যাপে থাকে না।
উদাহরণস্বরূপ, একটি লাইব্রেরি ডিপেন্ডেন্সিতে "minApi" মাত্রার জন্য ফ্লেভার থাকে, কিন্তু আপনার অ্যাপে শুধুমাত্র "tier" মাত্রার জন্য ফ্লেভার থাকে। যখন আপনি আপনার অ্যাপের "freeDebug" সংস্করণ তৈরি করতে চান, তখন প্লাগইনটি জানে না যে নির্ভরতার "minApi23Debug" নাকি "minApi18Debug" সংস্করণ ব্যবহার করতে হবে।
মনে রাখবেন যে আপনার অ্যাপে যখন এমন কোনও ফ্লেভার ডাইমেনশন থাকে যা লাইব্রেরি ডিপেন্ডেন্সিতে থাকে না, তখন কোনও সমস্যা নেই। কারণ প্লাগইনটি কেবলমাত্র ডিপেন্ডেন্সিতে থাকা ডাইমেনশনের ফ্লেভারের সাথে মেলে। উদাহরণস্বরূপ, যদি কোনও ডিপেন্ডেন্সিতে ABI-এর জন্য কোনও ডাইমেনশন না থাকে, তাহলে আপনার অ্যাপের "freeX86Debug" ভার্সনটি ডিপেন্ডেন্সির "freeDebug" ভার্সন ব্যবহার করবে।
নিম্নলিখিত নমুনায় দেখানো অনুপস্থিত মাত্রা থেকে প্লাগইন নির্বাচন করার জন্য ডিফল্ট ফ্লেভার নির্দিষ্ট করতে
defaultConfigব্লকেmissingDimensionStrategyব্যবহার করুন। আপনিproductFlavorsব্লকেও আপনার নির্বাচনগুলিকে ওভাররাইড করতে পারেন, যাতে প্রতিটি ফ্লেভার একটি অনুপস্থিত মাত্রার জন্য একটি ভিন্ন ম্যাচিং কৌশল নির্দিষ্ট করতে পারে।কোটলিন
// In the app's build.gradle.kts file.
android {
    defaultConfig{
    // Specifies a sorted list of flavors that the plugin can try to use from
    // a given dimension. This tells the plugin to select the "minApi18" flavor
    // when encountering a dependency that includes a "minApi" dimension.
    // You can include additional flavor names to provide a
    // sorted list of fallbacks for the dimension.
    missingDimensionStrategy("minApi", "minApi18", "minApi23")
    // Specify a missingDimensionStrategy property for each
    // dimension that exists in a local dependency but not in your app.
    missingDimensionStrategy("abi", "x86", "arm64")
    }
    flavorDimensions += "tier"
    productFlavors {
        create("free") {
            dimension = "tier"
            // You can override the default selection at the product flavor
            // level by configuring another missingDimensionStrategy property
            // for the "minApi" dimension.
            missingDimensionStrategy("minApi", "minApi23", "minApi18")
        }
        create("paid") {}
    }
}
খাঁজকাটা
// In the app's build.gradle file.
android {
    defaultConfig{
    // Specifies a sorted list of flavors that the plugin can try to use from
    // a given dimension. This tells the plugin to select the "minApi18" flavor
    // when encountering a dependency that includes a "minApi" dimension.
    // You can include additional flavor names to provide a
    // sorted list of fallbacks for the dimension.
    missingDimensionStrategy 'minApi', 'minApi18', 'minApi23'
    // Specify a missingDimensionStrategy property for each
    // dimension that exists in a local dependency but not in your app.
    missingDimensionStrategy 'abi', 'x86', 'arm64'
    }
    flavorDimensions 'tier'
    productFlavors {
        free {
            dimension 'tier'
            // You can override the default selection at the product flavor
            // level by configuring another missingDimensionStrategy property
            // for the 'minApi' dimension.
            missingDimensionStrategy 'minApi', 'minApi23', 'minApi18'
        }
        paid {}
    }
}
আরও তথ্যের জন্য, Android Gradle plugin DSL রেফারেন্সে matchingFallbacks এবং missingDimensionStrategy দেখুন।
স্বাক্ষর সেটিংস কনফিগার করুন
আপনি যদি এই বিল্ডের জন্য একটি সাইনিং কনফিগারেশন স্পষ্টভাবে সংজ্ঞায়িত না করেন তবে গ্র্যাডেল আপনার রিলিজ বিল্ডের APK বা AAB সাইন করে না। যদি আপনার কাছে এখনও সাইনিং কী না থাকে, তাহলে Android Studio ব্যবহার করে একটি আপলোড কী এবং কীস্টোর তৈরি করুন ।
Gradle বিল্ড কনফিগারেশন ব্যবহার করে আপনার রিলিজ বিল্ড টাইপের জন্য সাইনিং কনফিগারেশন ম্যানুয়ালি কনফিগার করতে:
- একটি কীস্টোর তৈরি করুন। কীস্টোর হল একটি বাইনারি ফাইল যাতে একগুচ্ছ ব্যক্তিগত কী থাকে। আপনার কীস্টোরটি অবশ্যই একটি নিরাপদ স্থানে রাখতে হবে।
- একটি প্রাইভেট কী তৈরি করুন। আপনার অ্যাপটি বিতরণের জন্য স্বাক্ষর করার জন্য একটি প্রাইভেট কী ব্যবহার করা হয় এবং এটি কখনও অ্যাপের সাথে অন্তর্ভুক্ত করা হয় না বা অননুমোদিত তৃতীয় পক্ষের কাছে প্রকাশ করা হয় না।
মডিউল-স্তরের
build.gradle.ktsফাইলে সাইনিং কনফিগারেশন যোগ করুন:কোটলিন
...
android {
    ...
    defaultConfig {...}
    signingConfigs {
        create("release") {
            storeFile = file("myreleasekey.keystore")
            storePassword = "password"
            keyAlias = "MyReleaseKey"
            keyPassword = "password"
        }
    }
    buildTypes {
        getByName("release") {
            ...
            signingConfig = signingConfigs.getByName("release")
        }
    }
}
খাঁজকাটা
...
android {
    ...
    defaultConfig {...}
    signingConfigs {
        release {
            storeFile file("myreleasekey.keystore")
            storePassword "password"
            keyAlias "MyReleaseKey"
            keyPassword "password"
        }
    }
    buildTypes {
        release {
            ...
            signingConfig signingConfigs.release
        }
    }
}
দ্রষ্টব্য: বিল্ড ফাইলের ভিতরে আপনার রিলিজ কী এবং কীস্টোরের পাসওয়ার্ড অন্তর্ভুক্ত করা একটি ভালো নিরাপত্তা অনুশীলন নয়। পরিবর্তে, পরিবেশ ভেরিয়েবল থেকে এই পাসওয়ার্ডগুলি পেতে বিল্ড ফাইলটি কনফিগার করুন অথবা বিল্ড প্রক্রিয়া আপনাকে এই পাসওয়ার্ডগুলির জন্য অনুরোধ জানাবে।
পরিবেশ ভেরিয়েবল থেকে এই পাসওয়ার্ডগুলি পেতে:
কোটলিন
storePassword = System.getenv("KSTOREPWD")
keyPassword = System.getenv("KEYPWD")
খাঁজকাটা
storePassword System.getenv("KSTOREPWD")
keyPassword System.getenv("KEYPWD")
বিকল্পভাবে, আপনি একটি স্থানীয় বৈশিষ্ট্য ফাইল থেকে কীস্টোর লোড করতে পারেন। নিরাপত্তার কারণে, এই ফাইলটি সোর্স কন্ট্রোলে যোগ করবেন না। পরিবর্তে, প্রতিটি ডেভেলপারের জন্য এটি স্থানীয়ভাবে সেট আপ করুন। আরও জানতে, আপনার বিল্ড ফাইল থেকে সাইনিং তথ্য সরান পড়ুন।
এই প্রক্রিয়াটি সম্পন্ন করার পরে, আপনি আপনার অ্যাপটি বিতরণ করতে এবং Google Play তে প্রকাশ করতে পারবেন।
সতর্কতা: আপনার কীস্টোর এবং প্রাইভেট কী একটি নিরাপদ স্থানে রাখুন এবং নিশ্চিত করুন যে আপনার কাছে সেগুলির নিরাপদ ব্যাকআপ আছে। আপনি যদি Play App Signing ব্যবহার করেন এবং আপনার আপলোড কী হারিয়ে ফেলেন, তাহলে আপনি Play Console ব্যবহার করে রিসেট করার অনুরোধ করতে পারেন। আপনি যদি Play App Signing ছাড়াই একটি অ্যাপ প্রকাশ করেন (আগস্ট ২০২১ সালের আগে তৈরি অ্যাপগুলির জন্য) এবং আপনার অ্যাপ সাইনিং কী হারিয়ে ফেলেন, তাহলে আপনি আপনার অ্যাপের কোনও আপডেট প্রকাশ করতে পারবেন না, কারণ আপনাকে সর্বদা একই কী দিয়ে আপনার অ্যাপের সমস্ত সংস্করণে স্বাক্ষর করতে হবে।
Wear OS অ্যাপগুলিতে সাইন ইন করা
Wear OS অ্যাপ প্রকাশ করার সময়, ঘড়ির APK এবং ঐচ্ছিক ফোনের APK উভয়ই একই কী দিয়ে স্বাক্ষরিত হতে হবে। Wear OS অ্যাপের প্যাকেজিং এবং স্বাক্ষর সম্পর্কে আরও তথ্যের জন্য, প্যাকেজ এবং বিতরণ Wear অ্যাপ দেখুন।