
Credential Manager หมายถึงชุด API ที่เปิดตัวใน Android 14 ซึ่งรองรับวิธีการลงชื่อเข้าสู่ระบบพร้อมกันหลายบัญชี เช่น ชื่อผู้ใช้และรหัสผ่าน พาสคีย์ และโซลูชันการลงชื่อเข้าใช้แบบรวมศูนย์ (เช่น ลงชื่อเข้าใช้ด้วย Google) เมื่อเรียกใช้ Credential Manager API ระบบ Android จะรวบรวมข้อมูลเข้าสู่ระบบจากผู้ให้บริการข้อมูลเข้าสู่ระบบทั้งหมด ที่ติดตั้งในอุปกรณ์ เอกสารนี้อธิบายชุด API ที่ มีปลายทางการผสานรวมสำหรับผู้ให้บริการข้อมูลเข้าสู่ระบบเหล่านี้
ตั้งค่า
ก่อนที่จะใช้ฟังก์ชันการทำงานในผู้ให้บริการข้อมูลเข้าสู่ระบบ ให้ทำตาม ขั้นตอนการตั้งค่าที่แสดงในส่วนต่อไปนี้
ประกาศทรัพยากร Dependency
เพิ่มทรัพยากร Dependency ต่อไปนี้ลงในสคริปต์บิลด์ของโมดูลแอปเพื่อใช้ไลบรารี Credential Manager เวอร์ชันล่าสุด
Kotlin
dependencies {
    implementation("androidx.credentials:credentials:1.7.0-alpha02")
}
Groovy
dependencies {
    implementation "androidx.credentials:credentials:1.7.0-alpha02"
}
ประกาศองค์ประกอบบริการในไฟล์ Manifest
ในไฟล์ Manifest ของแอป AndroidManifest.xml ให้ใส่<service> การประกาศสำหรับคลาสบริการที่ขยายคลาส CredentialProviderService จากไลบรารี androidx.credentials ดังที่แสดงในตัวอย่างต่อไปนี้
<service android:name=".MyCredentialProviderService"
    android:enabled="true"
    android:exported="true"
    android:label="My Credential Provider"
    android:icon="@mipmap/ic_launcher"
    android:permission="android.permission.BIND_CREDENTIAL_PROVIDER_SERVICE"
    tools:targetApi="upside_down_cake">
    <intent-filter>
        <action android:name="android.service.credentials.CredentialProviderService"/>
    </intent-filter>
    <meta-data
        android:name="android.credentials.provider"
        android:resource="@xml/provider"/>
</service>
สิทธิ์และตัวกรอง Intent ที่แสดงในตัวอย่างก่อนหน้าเป็นส่วนสำคัญเพื่อให้ Credential Manager ทำงานได้ตามที่คาดไว้ ต้องมีสิทธิ์เพื่อให้เชื่อมโยงเฉพาะระบบ Android กับบริการนี้ ตัวกรอง Intent ใช้เพื่อช่วยให้ค้นพบบริการนี้ในฐานะผู้ให้บริการข้อมูลเข้าสู่ระบบที่ Credential Manager ใช้
ประกาศประเภทข้อมูลเข้าสู่ระบบที่รองรับ
ในไดเรกทอรี res/xml ให้สร้างไฟล์ใหม่ชื่อ provider.xml ในไฟล์นี้ ให้ประกาศประเภทข้อมูลเข้าสู่ระบบที่บริการของคุณรองรับผ่านค่าคงที่ที่กำหนดไว้สำหรับข้อมูลเข้าสู่ระบบแต่ละประเภทในไลบรารี ในตัวอย่างต่อไปนี้ บริการรองรับทั้งรหัสผ่านแบบเดิมและพาสคีย์ โดยค่าคงที่สำหรับรหัสผ่านแบบเดิมและพาสคีย์จะกำหนดเป็น TYPE_PASSWORD_CREDENTIAL และ TYPE_PUBLIC_KEY_CREDENTIAL ตามลำดับ
<credential-provider xmlns:android="http://schemas.android.com/apk/res/android">
    <capabilities>
        <capability name="android.credentials.TYPE_PASSWORD_CREDENTIAL" />
        <capability name="androidx.credentials.TYPE_PUBLIC_KEY_CREDENTIAL" />
    </capabilities>
</credential-provider>
ในระดับ API ก่อนหน้า ผู้ให้บริการข้อมูลเข้าสู่ระบบจะผสานรวมกับ API เช่น การป้อนข้อความอัตโนมัติ สำหรับรหัสผ่านและข้อมูลอื่นๆ ผู้ให้บริการเหล่านี้สามารถใช้โครงสร้างพื้นฐานภายในเดียวกัน เพื่อจัดเก็บข้อมูลเข้าสู่ระบบประเภทที่มีอยู่แล้ว พร้อมทั้งขยายโครงสร้างพื้นฐานเพื่อ รองรับข้อมูลเข้าสู่ระบบอื่นๆ รวมถึงพาสคีย์
แนวทางการโต้ตอบกับผู้ให้บริการแบบ 2 เฟส
Credential Manager จะโต้ตอบกับผู้ให้บริการข้อมูลเข้าสู่ระบบใน 2 ระยะ ดังนี้
- ระยะแรกคือระยะเริ่มต้น/การค้นหา ซึ่งระบบจะเชื่อมโยงกับบริการผู้ให้บริการข้อมูลเข้าสู่ระบบและเรียกใช้เมธอด
onBeginGetCredentialRequest()onBeginCreateCredentialRequest()หรือonClearCredentialStateRequest()ด้วยคำขอBegin…ผู้ให้บริการต้องประมวลผลคำขอเหล่านี้และตอบกลับด้วยBegin…โดยป้อนรายการที่แสดงถึงตัวเลือกภาพที่จะแสดงใน ตัวเลือกบัญชี แต่ละรายการต้องมีชุดPendingIntent - เมื่อผู้ใช้เลือกรายการแล้ว ระยะการเลือกจะเริ่มขึ้น และระบบจะทริกเกอร์
PendingIntentที่เชื่อมโยงกับรายการดังกล่าว ซึ่งจะแสดง กิจกรรมของผู้ให้บริการที่เกี่ยวข้อง เมื่อผู้ใช้โต้ตอบกับกิจกรรมนี้เสร็จแล้ว ผู้ให้บริการข้อมูลเข้าสู่ระบบต้องตั้งค่าการตอบกลับเป็นผลลัพธ์ของกิจกรรมก่อนที่จะสิ้นสุดกิจกรรม จากนั้นระบบจะส่งการตอบกลับนี้ไปยังแอปไคลเอ็นต์ที่เรียกใช้ Credential Manager
จัดการการสร้างพาสคีย์
จัดการคำค้นหาสำหรับการสร้างพาสคีย์
เมื่อแอปไคลเอ็นต์ต้องการสร้างพาสคีย์และจัดเก็บไว้กับผู้ให้บริการข้อมูลเข้าสู่ระบบ แอปจะเรียกใช้ API createCredential หากต้องการจัดการคำขอนี้ในบริการผู้ให้บริการข้อมูลเข้าสู่ระบบเพื่อให้ระบบจัดเก็บพาสคีย์ไว้ในพื้นที่เก็บข้อมูลของคุณจริงๆ ให้ทำตามขั้นตอนที่แสดงในส่วนต่อไปนี้
- แทนที่เมธอด
onBeginCreateCredentialRequest()ในบริการที่ขยายจากCredentialProviderService - จัดการ
BeginCreateCredentialRequestโดยสร้างBeginCreateCredentialResponseที่สอดคล้องกันและส่งผ่าน Callback - ขณะสร้าง
BeginCreateCredentialResponseให้เพิ่มCreateEntriesที่จำเป็นCreateEntryแต่ละรายการควรสอดคล้องกับบัญชีที่บันทึกข้อมูลเข้าสู่ระบบได้ และต้องมีPendingIntentที่ตั้งค่าไว้พร้อมกับข้อมูลเมตาอื่นๆ ที่จำเป็น
ตัวอย่างต่อไปนี้แสดงวิธีใช้ขั้นตอนเหล่านี้
override fun onBeginCreateCredentialRequest(
    request: BeginCreateCredentialRequest,
    cancellationSignal: CancellationSignal,
    callback: OutcomeReceiver<BeginCreateCredentialResponse, CreateCredentialException>,
) {
    val response: BeginCreateCredentialResponse? = processCreateCredentialRequest(request)
    if (response != null) {
        callback.onResult(response)
    } else {
        callback.onError(CreateCredentialUnknownException())
    }
}

fun processCreateCredentialRequest(request: BeginCreateCredentialRequest): BeginCreateCredentialResponse? {
    when (request) {
        is BeginCreatePublicKeyCredentialRequest -> {
            // Request is passkey type
            return handleCreatePasskeyQuery(request)
        }
    }
    // Request not supported
    return null
}

private fun handleCreatePasskeyQuery(
    request: BeginCreatePublicKeyCredentialRequest
): BeginCreateCredentialResponse {

    // Adding two create entries - one for storing credentials to the 'Personal'
    // account, and one for storing them to the 'Family' account. These
    // accounts are local to this sample app only.
    val createEntries: MutableList<CreateEntry> = mutableListOf()
    createEntries.add(
        CreateEntry(
            PERSONAL_ACCOUNT_ID,
            createNewPendingIntent(PERSONAL_ACCOUNT_ID, CREATE_PASSKEY_INTENT)
        )
    )

    createEntries.add(
        CreateEntry(
            FAMILY_ACCOUNT_ID,
            createNewPendingIntent(FAMILY_ACCOUNT_ID, CREATE_PASSKEY_INTENT)
        )
    )

    return BeginCreateCredentialResponse(createEntries)
}

private fun createNewPendingIntent(accountId: String, action: String): PendingIntent {
    val intent = Intent(action).setPackage(PACKAGE_NAME)

    // Add your local account ID as an extra to the intent, so that when
    // user selects this entry, the credential can be saved to this
    // account
    intent.putExtra(EXTRA_KEY_ACCOUNT_ID, accountId)

    return PendingIntent.getActivity(
        applicationContext, UNIQUE_REQ_CODE,
        intent,
        (
            PendingIntent.FLAG_MUTABLE
                or PendingIntent.FLAG_UPDATE_CURRENT
            )
    )
}
การสร้างPendingIntentต้องเป็นไปตามข้อกำหนดต่อไปนี้
- ควรตั้งค่ากิจกรรมที่เกี่ยวข้องเพื่อแสดงข้อความแจ้ง การยืนยัน หรือการเลือกไบโอเมตริกที่จำเป็น
- ระบบควรตั้งค่าข้อมูลที่จำเป็นซึ่งผู้ให้บริการต้องการเมื่อมีการเรียกใช้กิจกรรมที่เกี่ยวข้องเป็นค่าพิเศษใน Intent ที่ใช้สร้าง
PendingIntentเช่นaccountIdในขั้นตอนการสร้าง PendingIntentต้องสร้างด้วยแฟล็กPendingIntent.FLAG_MUTABLEเพื่อให้ระบบสามารถต่อท้ายคำขอสุดท้าย กับส่วนเพิ่มเติมของ Intent ได้- คุณต้องไม่สร้าง
PendingIntentด้วยแฟล็กPendingIntent.FLAG_ONE_SHOTเนื่องจากผู้ใช้อาจเลือกรายการหนึ่ง แล้วย้อนกลับและ เลือกรายการนั้นอีกครั้ง ซึ่งจะทำให้PendingIntentทริกเกอร์ 2 ครั้ง - คุณต้องสร้าง
PendingIntentโดยใช้รหัสคำขอที่ไม่ซ้ำกันเพื่อให้ แต่ละรายการมีPendingIntentที่สอดคล้องกันของตัวเอง
จัดการการเลือกรายการสำหรับคำขอสร้างพาสคีย์
- เมื่อผู้ใช้เลือก
CreateEntryที่ป้อนข้อมูลไว้ก่อนหน้านี้ ระบบจะเรียกใช้PendingIntentที่เกี่ยวข้องและสร้างผู้ให้บริการActivityที่เชื่อมโยง - หลังจากเรียกใช้เมธอด
onCreateของกิจกรรมแล้ว ให้เข้าถึง Intent ที่เชื่อมโยงและส่งไปยังคลาสPendingIntentHanderเพื่อรับProviderCreateCredentialRequest - ดึง
requestJsoncallingAppInfoและclientDataHashจากคำขอ - ดึงข้อมูล
accountIdในเครื่องจากส่วนพิเศษของ Intent นี่คือการติดตั้งใช้งานแอปตัวอย่าง เฉพาะ และไม่จำเป็นต้องดำเนินการ คุณใช้รหัสบัญชีนี้เพื่อจัดเก็บข้อมูลเข้าสู่ระบบนี้เทียบกับรหัสบัญชีนี้ได้ - ตรวจสอบความถูกต้องของ
requestJsonตัวอย่างด้านล่างใช้คลาสข้อมูลภายใน เช่นPublicKeyCredentialCreationOptionsเพื่อแปลง JSON อินพุตเป็น คลาสที่มีโครงสร้างตามข้อกำหนดของ WebAuthn ในฐานะผู้ให้บริการข้อมูลเข้าสู่ระบบ คุณสามารถ แทนที่ด้วยตัวแยกวิเคราะห์ของคุณเองได้ - ตรวจสอบ asset-link สำหรับแอปการโทร หากการโทรมาจาก แอป Android ดั้งเดิม
- แสดงพรอมต์การตรวจสอบสิทธิ์ ตัวอย่างด้านล่างใช้ API Biometric ของ Android
- เมื่อการตรวจสอบสิทธิ์สำเร็จแล้ว ให้สร้าง
credentialIdและคู่คีย์ - บันทึกคีย์ส่วนตัวในฐานข้อมูลของเครื่องเทียบกับ
callingAppInfo.packageName - สร้างการตอบกลับ JSON ของ Web Authentication API ที่ประกอบด้วยคีย์สาธารณะและ
credentialIdตัวอย่างด้านล่าง ใช้คลาสยูทิลิตีในเครื่อง เช่นAuthenticatorAttestationResponseและFidoPublicKeyCredentialซึ่งช่วยสร้าง JSON ตามข้อกำหนดที่กล่าวถึงก่อนหน้านี้ ในฐานะผู้ให้บริการข้อมูลเข้าสู่ระบบ คุณสามารถแทนที่คลาสเหล่านี้ด้วย ตัวสร้างของคุณเองได้ - สร้าง
CreatePublicKeyCredentialResponseด้วย JSON ที่สร้างขึ้น ข้างต้น - ตั้งค่า
CreatePublicKeyCredentialResponseเป็นส่วนเสริมในIntentผ่านPendingIntentHander.setCreateCredentialResponse()และตั้งค่า Intent นั้นเป็นผลลัพธ์ของกิจกรรม - ทำกิจกรรมให้เสร็จ
ตัวอย่างโค้ดด้านล่างแสดงขั้นตอนเหล่านี้ คุณต้องจัดการโค้ดนี้ในคลาส Activity เมื่อมีการเรียกใช้ onCreate()
override fun onCreate(savedInstanceState: Bundle?, persistentState: PersistableBundle?) {
    super.onCreate(savedInstanceState, persistentState)
    // ...

    val request =
        PendingIntentHandler.retrieveProviderCreateCredentialRequest(intent)

    val accountId = intent.getStringExtra(CredentialsRepo.EXTRA_KEY_ACCOUNT_ID)
    if (request != null && request.callingRequest is CreatePublicKeyCredentialRequest) {
        val publicKeyRequest: CreatePublicKeyCredentialRequest =
            request.callingRequest as CreatePublicKeyCredentialRequest
        createPasskey(
            publicKeyRequest.requestJson,
            request.callingAppInfo,
            publicKeyRequest.clientDataHash,
            accountId
        )
    }
}

@SuppressLint("RestrictedApi")
fun createPasskey(
    requestJson: String,
    callingAppInfo: CallingAppInfo?,
    clientDataHash: ByteArray?,
    accountId: String?
) {
    val request = PublicKeyCredentialCreationOptions(requestJson)

    val biometricPrompt = BiometricPrompt(
        this,
        { }, // Pass in your own executor
        object : AuthenticationCallback() {
            override fun onAuthenticationError(errorCode: Int, errString: CharSequence) {
                super.onAuthenticationError(errorCode, errString)
                finish()
            }

            override fun onAuthenticationFailed() {
                super.onAuthenticationFailed()
                finish()
            }

            @RequiresApi(VERSION_CODES.P)
            override fun onAuthenticationSucceeded(
                result: AuthenticationResult
            ) {
                super.onAuthenticationSucceeded(result)

                // Generate a credentialId
                val credentialId = ByteArray(32)
                SecureRandom().nextBytes(credentialId)

                // Generate a credential key pair
                val spec = ECGenParameterSpec("secp256r1")
                val keyPairGen = KeyPairGenerator.getInstance("EC")
                keyPairGen.initialize(spec)
                val keyPair = keyPairGen.genKeyPair()

                // Save passkey in your database as per your own implementation

                // Create AuthenticatorAttestationResponse object to pass to
                // FidoPublicKeyCredential

                val response = AuthenticatorAttestationResponse(
                    requestOptions = request,
                    credentialId = credentialId,
                    credentialPublicKey = getPublicKeyFromKeyPair(keyPair),
                    origin = appInfoToOrigin(callingAppInfo!!),
                    up = true,
                    uv = true,
                    be = true,
                    bs = true,
                    packageName = callingAppInfo.packageName
                )

                val credential = FidoPublicKeyCredential(
                    rawId = credentialId,
                    response = response,
                    authenticatorAttachment = "", // Add your authenticator attachment
                )
                val result = Intent()

                val createPublicKeyCredResponse =
                    CreatePublicKeyCredentialResponse(credential.json())

                // Set the CreateCredentialResponse as the result of the Activity
                PendingIntentHandler.setCreateCredentialResponse(
                    result,
                    createPublicKeyCredResponse
                )
                setResult(RESULT_OK, result)
                finish()
            }
        }
    )

    val promptInfo = BiometricPrompt.PromptInfo.Builder()
        .setTitle("Use your screen lock")
        .setSubtitle("Create passkey for ${request.rp.name}")
        .setAllowedAuthenticators(
            BiometricManager.Authenticators.BIOMETRIC_STRONG
            /* or BiometricManager.Authenticators.DEVICE_CREDENTIAL */
        )
        .build()
    biometricPrompt.authenticate(promptInfo)
}

@RequiresApi(VERSION_CODES.P)
fun appInfoToOrigin(info: CallingAppInfo): String {
    val cert = info.signingInfo.apkContentsSigners[0].toByteArray()
    val md = MessageDigest.getInstance("SHA-256")
    val certHash = md.digest(cert)
    // This is the format for origin
    return "android:apk-key-hash:${b64Encode(certHash)}"
}
จัดการคำค้นหาสำหรับคำขอสร้างรหัสผ่าน
หากต้องการจัดการคำค้นหาสำหรับคำขอสร้างรหัสผ่าน ให้ทำดังนี้
- ภายใน
processCreateCredentialRequest()เมธอดที่กล่าวถึงใน ส่วนก่อนหน้า ให้เพิ่มอีกเคสหนึ่งภายในบล็อก switch เพื่อจัดการ คำขอรหัสผ่าน - ขณะสร้าง
BeginCreateCredentialResponseให้เพิ่มCreateEntriesที่จำเป็น CreateEntryแต่ละรายการควรสอดคล้องกับบัญชีที่บันทึกข้อมูลเข้าสู่ระบบได้ และต้องมีPendingIntentตั้งค่าไว้พร้อมกับข้อมูลเมตาอื่นๆ
ตัวอย่างต่อไปนี้แสดงวิธีใช้ขั้นตอนเหล่านี้
fun processCreateCredentialRequest(
    request: BeginCreateCredentialRequest
): BeginCreateCredentialResponse? {
    when (request) {
        is BeginCreatePublicKeyCredentialRequest -> {
            // Request is passkey type
            return handleCreatePasskeyQuery(request)
        }

        is BeginCreatePasswordCredentialRequest -> {
            // Request is password type
            return handleCreatePasswordQuery(request)
        }
    }
    return null
}

@RequiresApi(VERSION_CODES.M)
private fun handleCreatePasswordQuery(
    request: BeginCreatePasswordCredentialRequest
): BeginCreateCredentialResponse {
    val createEntries: MutableList<CreateEntry> = mutableListOf()

    // Adding two create entries - one for storing credentials to the 'Personal'
    // account, and one for storing them to the 'Family' account. These
    // accounts are local to this sample app only.
    createEntries.add(
        CreateEntry(
            PERSONAL_ACCOUNT_ID,
            createNewPendingIntent(PERSONAL_ACCOUNT_ID, CREATE_PASSWORD_INTENT)
        )
    )
    createEntries.add(
        CreateEntry(
            FAMILY_ACCOUNT_ID,
            createNewPendingIntent(FAMILY_ACCOUNT_ID, CREATE_PASSWORD_INTENT)
        )
    )

    return BeginCreateCredentialResponse(createEntries)
}
จัดการการเลือกรายการสำหรับคำขอสร้างรหัสผ่าน
เมื่อผู้ใช้เลือก CreateEntry ที่ป้อนข้อมูลไว้ PendingIntent ที่เกี่ยวข้องจะทำงานและแสดงกิจกรรมที่เชื่อมโยง เข้าถึง Intent ที่เชื่อมโยงซึ่งส่งผ่านใน onCreate และส่งผ่านไปยังคลาส PendingIntentHander เพื่อรับเมธอด ProviderCreateCredentialRequest
ตัวอย่างด้านล่างแสดงวิธีใช้กระบวนการนี้ คุณต้องจัดการโค้ดนี้ในเมธอด onCreate() ของกิจกรรม
val createRequest = PendingIntentHandler.retrieveProviderCreateCredentialRequest(intent)
val accountId = intent.getStringExtra(CredentialsRepo.EXTRA_KEY_ACCOUNT_ID)

if (createRequest == null) {
    return
}

val request: CreatePasswordRequest = createRequest.callingRequest as CreatePasswordRequest

// Fetch the ID and password from the request and save it in your database
mDatabase.addNewPassword(
    PasswordInfo(
        request.id,
        request.password,
        createRequest.callingAppInfo.packageName
    )
)

// Set the final response back
val result = Intent()
val response = CreatePasswordResponse()
PendingIntentHandler.setCreateCredentialResponse(result, response)
setResult(Activity.RESULT_OK, result)
finish()
จัดการการลงชื่อเข้าใช้ของผู้ใช้
ระบบจะจัดการการลงชื่อเข้าใช้ของผู้ใช้ด้วยขั้นตอนต่อไปนี้
- เมื่อแอปไคลเอ็นต์พยายามลงชื่อเข้าใช้ผู้ใช้ แอปจะเตรียมอินสแตนซ์
GetCredentialRequest - เฟรมเวิร์ก Android จะส่งต่อคำขอนี้ไปยังผู้ให้บริการข้อมูลเข้าสู่ระบบที่เกี่ยวข้องทั้งหมดโดยการเชื่อมโยงกับบริการเหล่านี้
- จากนั้นบริการของผู้ให้บริการจะได้รับ
BeginGetCredentialRequestซึ่ง มีรายการBeginGetCredentialOptionแต่ละรายการมี พารามิเตอร์ที่ใช้ดึงข้อมูลเข้าสู่ระบบที่ตรงกันได้
หากต้องการจัดการคำขอนี้ในบริการผู้ให้บริการข้อมูลเข้าสู่ระบบ ให้ทำตาม ขั้นตอนต่อไปนี้
ลบล้างเมธอด
onBeginGetCredentialRequest()เพื่อจัดการคำขอ โปรดทราบว่าหากข้อมูลเข้าสู่ระบบถูกล็อก คุณจะตั้งค่าAuthenticationActionในคำตอบและเรียกใช้การเรียกกลับได้ทันทีprivate val unlockEntryTitle = "Authenticate to continue" override fun onBeginGetCredentialRequest( request: BeginGetCredentialRequest, cancellationSignal: CancellationSignal, callback: OutcomeReceiver<BeginGetCredentialResponse, GetCredentialException>, ) { if (isAppLocked()) { callback.onResult( BeginGetCredentialResponse( authenticationActions = mutableListOf( AuthenticationAction( unlockEntryTitle, createUnlockPendingIntent() ) ) ) ) return } try { response = processGetCredentialRequest(request) callback.onResult(response) } catch (e: GetCredentialException) { callback.onError(GetCredentialUnknownException()) } }ผู้ให้บริการที่กำหนดให้ปลดล็อกข้อมูลเข้าสู่ระบบก่อนส่งคืน
credentialEntriesจะต้องตั้งค่า PendingIntent ที่นำผู้ใช้ไปยัง ขั้นตอนการปลดล็อกของแอปprivate fun createUnlockPendingIntent(): PendingIntent { val intent = Intent(UNLOCK_INTENT).setPackage(PACKAGE_NAME) return PendingIntent.getActivity( applicationContext, UNIQUE_REQUEST_CODE, intent, ( PendingIntent.FLAG_MUTABLE or PendingIntent.FLAG_UPDATE_CURRENT ) ) }ดึงข้อมูลเข้าสู่ระบบจากฐานข้อมูลในเครื่องและตั้งค่าโดยใช้
CredentialEntriesเพื่อให้แสดงในตัวเลือก สำหรับพาสคีย์ คุณสามารถตั้งค่าcredentialIdเป็นส่วนเพิ่มเติมใน Intent เพื่อให้ทราบว่าข้อมูลเข้าสู่ระบบใดที่ แมปกับรายการนี้เมื่อผู้ใช้เลือกรายการดังกล่าวcompanion object { // These intent actions are specified for corresponding activities // that are to be invoked through the PendingIntent(s) private const val GET_PASSKEY_INTENT_ACTION = "PACKAGE_NAME.GET_PASSKEY" private const val GET_PASSWORD_INTENT_ACTION = "PACKAGE_NAME.GET_PASSWORD" } fun processGetCredentialRequest( request: BeginGetCredentialRequest ): BeginGetCredentialResponse { val callingPackageInfo = request.callingAppInfo val callingPackageName = callingPackageInfo?.packageName.orEmpty() val credentialEntries: MutableList<CredentialEntry> = mutableListOf() for (option in request.beginGetCredentialOptions) { when (option) { is BeginGetPasswordOption -> { credentialEntries.addAll( populatePasswordData( callingPackageName, option ) ) } is BeginGetPublicKeyCredentialOption -> { credentialEntries.addAll( populatePasskeyData( callingPackageInfo, option ) ) } else -> { Log.i(TAG, "Request not supported") } } } return BeginGetCredentialResponse(credentialEntries) }ค้นหาข้อมูลเข้าสู่ระบบจากฐานข้อมูล สร้างรายการพาสคีย์และรหัสผ่านเพื่อ ป้อนข้อมูล
private fun populatePasskeyData(
    callingAppInfo: CallingAppInfo?,
    option: BeginGetPublicKeyCredentialOption
): List<CredentialEntry> {
    val passkeyEntries: MutableList<CredentialEntry> = mutableListOf()
    val request = PublicKeyCredentialRequestOptions(option.requestJson)
    // Get your credentials from database where you saved during creation flow
    val creds = getCredentialsFromInternalDb(request.rpId)
    val passkeys = creds.passkeys
    for (passkey in passkeys) {
        val data = Bundle()
        data.putString("credId", passkey.credId)
        passkeyEntries.add(
            PublicKeyCredentialEntry(
                context = applicationContext,
                username = passkey.username,
                pendingIntent = createNewPendingIntent(
                    GET_PASSKEY_INTENT_ACTION,
                    data
                ),
                beginGetPublicKeyCredentialOption = option,
                displayName = passkey.displayName,
                icon = passkey.icon
            )
        )
    }
    return passkeyEntries
}

// Fetch password credentials and create password entries to populate to the user
private fun populatePasswordData(
    callingPackage: String,
    option: BeginGetPasswordOption
): List<CredentialEntry> {
    val passwordEntries: MutableList<CredentialEntry> = mutableListOf()

    // Get your password credentials from database where you saved during
    // creation flow
    val creds = getCredentialsFromInternalDb(callingPackage)
    val passwords = creds.passwords
    for (password in passwords) {
        passwordEntries.add(
            PasswordCredentialEntry(
                context = applicationContext,
                username = password.username,
                pendingIntent = createNewPendingIntent(
                    GET_PASSWORD_INTENT
                ),
                beginGetPasswordOption = option,
                displayName = password.username,
                icon = password.icon
            )
        )
    }
    return passwordEntries
}

private fun createNewPendingIntent(
    action: String,
    extra: Bundle? = null
): PendingIntent {
    val intent = Intent(action).setPackage(PACKAGE_NAME)
    if (extra != null) {
        intent.putExtra("CREDENTIAL_DATA", extra)
    }

    return PendingIntent.getActivity(
        applicationContext, UNIQUE_REQUEST_CODE, intent,
        (PendingIntent.FLAG_MUTABLE or PendingIntent.FLAG_UPDATE_CURRENT)
    )
}
เมื่อค้นหาและป้อนข้อมูลเข้าสู่ระบบแล้ว ตอนนี้คุณต้องจัดการ ระยะการเลือกสำหรับข้อมูลเข้าสู่ระบบที่ผู้ใช้เลือก ไม่ว่าจะเป็น พาสคีย์หรือรหัสผ่าน
การจัดการการเลือกผู้ใช้สำหรับพาสคีย์
- ใน
onCreateเมธอดของกิจกรรมที่เกี่ยวข้อง ให้เรียกข้อมูล Intent ที่เชื่อมโยง แล้วส่งไปยังPendingIntentHandler.retrieveProviderGetCredentialRequest() - ดึงข้อมูล
GetPublicKeyCredentialOptionจากคำขอที่ดึงข้อมูล ข้างต้น จากนั้นดึงข้อมูลrequestJsonและclientDataHashจาก ตัวเลือกนี้ - ดึงข้อมูล
credentialIdจากข้อมูลเพิ่มเติมของ Intent ซึ่งผู้ให้บริการข้อมูลเข้าสู่ระบบจะป้อนข้อมูลเมื่อตั้งค่าPendingIntentที่เกี่ยวข้อง - ดึงพาสคีย์จากฐานข้อมูลในเครื่องโดยใช้พารามิเตอร์คำขอที่เข้าถึงด้านบน
ยืนยันว่าพาสคีย์ใช้ได้กับข้อมูลเมตาที่แยกออกมาและการยืนยันตัวตนของผู้ใช้
val getRequest = PendingIntentHandler.retrieveProviderGetCredentialRequest(intent)
val publicKeyRequest = getRequest?.credentialOptions?.first() as GetPublicKeyCredentialOption

val requestInfo = intent.getBundleExtra("CREDENTIAL_DATA")
val credIdEnc = requestInfo?.getString("credId").orEmpty()

// Get the saved passkey from your database based on the credential ID from the PublicKeyRequest
val passkey = mDatabase.getPasskey(credIdEnc)

// Decode the credential ID, private key and user ID
val credId = b64Decode(credIdEnc)
val privateKey = b64Decode(passkey.credPrivateKey)
val uid = b64Decode(passkey.uid)

val origin = appInfoToOrigin(getRequest.callingAppInfo)
val packageName = getRequest.callingAppInfo.packageName

validatePasskey(
    publicKeyRequest.requestJson,
    origin,
    packageName,
    uid,
    passkey.username,
    credId,
    privateKey
)
แสดงข้อความแจ้งข้อมูลไบโอเมตริก (หรือวิธีการยืนยันอื่นๆ) เพื่อตรวจสอบผู้ใช้ ข้อมูลโค้ดด้านล่างใช้ Android Biometric API
เมื่อการตรวจสอบสิทธิ์สำเร็จแล้ว ให้สร้างการตอบกลับ JSON ตามข้อกำหนดการยืนยันการตรวจสอบสิทธิ์บนเว็บของ W3 ในข้อมูลโค้ดด้านล่างนี้ ระบบจะใช้คลาสข้อมูลตัวช่วย เช่น
AuthenticatorAssertionResponseเพื่อรับพารามิเตอร์ที่มีโครงสร้างและแปลงเป็นรูปแบบ JSON ที่จำเป็น การตอบกลับมีลายเซ็นดิจิทัลจากคีย์ส่วนตัวของข้อมูลเข้าสู่ระบบ WebAuthn เซิร์ฟเวอร์ของ Relying Party สามารถยืนยัน ลายเซ็นนี้เพื่อตรวจสอบสิทธิ์ผู้ใช้ก่อนลงชื่อเข้าใช้สร้าง
PublicKeyCredentialโดยใช้ JSON ที่สร้างขึ้นข้างต้นและ ตั้งค่าในGetCredentialResponseสุดท้าย ตั้งค่าการตอบกลับสุดท้ายนี้ในผลลัพธ์ของกิจกรรมนี้
ตัวอย่างต่อไปนี้แสดงวิธีใช้ขั้นตอนเหล่านี้
val request = PublicKeyCredentialRequestOptions(requestJson)
val privateKey: ECPrivateKey = convertPrivateKey(privateKeyBytes)

val biometricPrompt = BiometricPrompt(
    this,
    { }, // Pass in your own executor
    object : BiometricPrompt.AuthenticationCallback() {
        override fun onAuthenticationError(
            errorCode: Int,
            errString: CharSequence
        ) {
            super.onAuthenticationError(errorCode, errString)
            finish()
        }

        override fun onAuthenticationFailed() {
            super.onAuthenticationFailed()
            finish()
        }

        override fun onAuthenticationSucceeded(
            result: BiometricPrompt.AuthenticationResult
        ) {
            super.onAuthenticationSucceeded(result)
            val response = AuthenticatorAssertionResponse(
                requestOptions = request,
                credentialId = credId,
                origin = origin,
                up = true,
                uv = true,
                be = true,
                bs = true,
                userHandle = uid,
                packageName = packageName
            )

            val sig = Signature.getInstance("SHA256withECDSA")
            sig.initSign(privateKey)
            sig.update(response.dataToSign())
            response.signature = sig.sign()

            val credential = FidoPublicKeyCredential(
                rawId = credId,
                response = response,
                authenticatorAttachment = "", // Add your authenticator attachment
            )
            val result = Intent()
            val passkeyCredential = PublicKeyCredential(credential.json())
            PendingIntentHandler.setGetCredentialResponse(
                result, GetCredentialResponse(passkeyCredential)
            )
            setResult(RESULT_OK, result)
            finish()
        }
    }
)

val promptInfo = BiometricPrompt.PromptInfo.Builder()
    .setTitle("Use your screen lock")
    .setSubtitle("Use passkey for ${request.rpId}")
    .setAllowedAuthenticators(
        BiometricManager.Authenticators.BIOMETRIC_STRONG
        /* or BiometricManager.Authenticators.DEVICE_CREDENTIAL */
    )
    .build()
biometricPrompt.authenticate(promptInfo)
การจัดการการเลือกของผู้ใช้สำหรับการตรวจสอบสิทธิ์ด้วยรหัสผ่าน
- ในกิจกรรมที่เกี่ยวข้อง ให้เข้าถึง Intent ที่ส่งไปยัง
onCreateและดึงข้อมูลProviderGetCredentialRequestโดยใช้PendingIntentHandler ใช้
GetPasswordOptionในคำขอเพื่อดึงข้อมูลเข้าสู่ระบบ รหัสผ่านสำหรับชื่อแพ็กเกจขาเข้าval getRequest = PendingIntentHandler.retrieveProviderGetCredentialRequest(intent) val passwordOption = getRequest?.credentialOptions?.first() as GetPasswordOption val username = passwordOption.allowedUserIds.first() // Fetch the credentials for the calling app package name val creds = mDatabase.getCredentials(callingAppInfo.packageName) val passwords = creds.passwords val it = passwords.iterator() var password = "" while (it.hasNext()) { val passwordItemCurrent = it.next() if (passwordItemCurrent.username == username) { password = passwordItemCurrent.password break } }เมื่อดึงข้อมูลแล้ว ให้ตั้งค่าการตอบกลับสำหรับข้อมูลเข้าสู่ระบบรหัสผ่านที่เลือก
// Set the response back
val result = Intent()
val passwordCredential = PasswordCredential(username, password)
PendingIntentHandler.setGetCredentialResponse(
    result, GetCredentialResponse(passwordCredential)
)
setResult(Activity.RESULT_OK, result)
finish()
จัดการการเลือกรายการการดำเนินการตรวจสอบสิทธิ์
ดังที่กล่าวไว้ก่อนหน้านี้ ผู้ให้บริการข้อมูลเข้าสู่ระบบสามารถตั้งค่า
AuthenticationAction ได้หากมีการล็อกข้อมูลเข้าสู่ระบบ หากผู้ใช้เลือกรายการนี้ ระบบจะเรียกใช้กิจกรรมที่สอดคล้องกับการดำเนินการผ่าน Intent ที่ตั้งค่าไว้ใน
PendingIntent จากนั้นผู้ให้บริการข้อมูลเข้าสู่ระบบจะแสดงขั้นตอนการตรวจสอบสิทธิ์ด้วยข้อมูลไบโอเมตริก
หรือกลไกที่คล้ายกันเพื่อปลดล็อกข้อมูลเข้าสู่ระบบได้ เมื่อสำเร็จแล้ว ผู้ให้บริการข้อมูลเข้าสู่ระบบต้องสร้าง BeginGetCredentialResponseคล้ายกับ วิธีจัดการการลงชื่อเข้าใช้ของผู้ใช้ที่อธิบายไว้ข้างต้น เนื่องจากตอนนี้ระบบได้ปลดล็อกข้อมูลเข้าสู่ระบบแล้ว จากนั้นต้องตั้งค่าการตอบกลับนี้ผ่านเมธอด
PendingIntentHandler.setBeginGetCredentialResponse() ก่อนที่จะตั้งค่า Intent ที่เตรียมไว้เป็นผลลัพธ์และปิด Activity
ล้างคำขอข้อมูลเข้าสู่ระบบ
แอปไคลเอ็นต์อาจขอให้ล้างสถานะที่เก็บไว้สำหรับการเลือกข้อมูลเข้าสู่ระบบ เช่น ผู้ให้บริการข้อมูลเข้าสู่ระบบอาจจดจำข้อมูลเข้าสู่ระบบที่เลือกไว้ก่อนหน้านี้และแสดงเฉพาะข้อมูลดังกล่าวในครั้งถัดไป แอปไคลเอ็นต์เรียกใช้ API นี้และ
คาดหวังให้ระบบล้างการเลือกแบบติดหนึบ บริการผู้ให้บริการข้อมูลเข้าสู่ระบบ
สามารถจัดการคำขอนี้ได้โดยการลบล้างเมธอด
onClearCredentialStateRequest()
override fun onClearCredentialStateRequest(
    request: ProviderClearCredentialStateRequest,
    cancellationSignal: CancellationSignal,
    callback: OutcomeReceiver<Void?, ClearCredentialException>
) {
    // Delete any maintained state as appropriate.
}
เพิ่มความสามารถในการลิงก์ไปยังหน้าการตั้งค่าของผู้ให้บริการ
หากต้องการอนุญาตให้ผู้ใช้เปิดการตั้งค่าของผู้ให้บริการจากหน้าจอรหัสผ่าน พาสคีย์ และการป้อนข้อความอัตโนมัติ แอปผู้ให้บริการข้อมูลเข้าสู่ระบบควรใช้แอตทริบิวต์ไฟล์ Manifest credential-provider settingsActivity ใน res/xml/provider.xml แอตทริบิวต์นี้ช่วยให้คุณใช้ Intent เพื่อเปิดหน้าจอการตั้งค่าของแอปเองได้ หากผู้ใช้คลิกชื่อผู้ให้บริการในรายการบริการรหัสผ่าน
พาสคีย์ และการป้อนข้อความอัตโนมัติ ตั้งค่าของแอตทริบิวต์นี้เป็น
ชื่อของกิจกรรมที่จะเปิดจากหน้าจอการตั้งค่า
<credential-provider
    xmlns:android="http://schemas.android.com/apk/res/android"
    android:settingsSubtitle="Example settings provider name"
    android:settingsActivity="com.example.SettingsActivity">
    <capabilities>
        <capability name="android.credentials.TYPE_PUBLIC_KEY_CREDENTIAL" />
    </capabilities>
</credential-provider>
ความตั้งใจในการตั้งค่า
เปิดการตั้งค่า: Intent android.settings.CREDENTIAL_PROVIDER จะแสดงหน้าจอการตั้งค่าที่ผู้ใช้สามารถเลือกผู้ให้บริการข้อมูลเข้าสู่ระบบที่ต้องการและผู้ให้บริการเพิ่มเติมได้
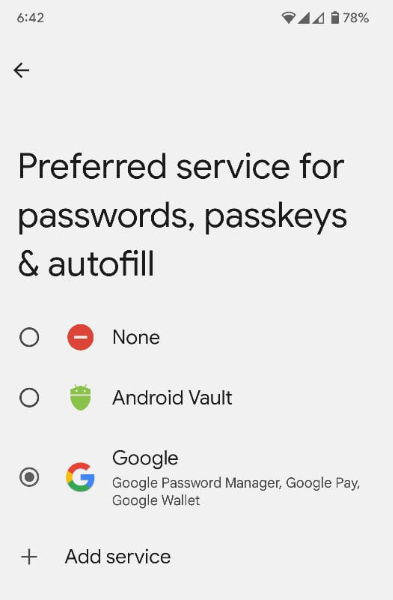
บริการข้อมูลเข้าสู่ระบบที่ต้องการ: Intent ACTION_REQUEST_SET_AUTOFILL_SERVICE จะเปลี่ยนเส้นทางผู้ใช้ไปยังหน้าจอการเลือกผู้ให้บริการที่ต้องการ ผู้ให้บริการที่เลือกในหน้าจอนี้
จะกลายเป็นผู้ให้บริการข้อมูลเข้าสู่ระบบและการป้อนข้อความอัตโนมัติที่ต้องการ
รับรายการที่อนุญาตของแอปที่มีสิทธิ์
แอปที่มีสิทธิ์ เช่น เว็บเบราว์เซอร์ จะเรียกใช้ Credential Manager ในนามของ
บุคคลที่สามอื่นๆ โดยการตั้งค่าพารามิเตอร์ origin ใน Credential
Manager GetCredentialRequest() และ
CreatePublicKeyCredentialRequest() หากต้องการดำเนินการตามคำขอเหล่านี้
ผู้ให้บริการข้อมูลเข้าสู่ระบบจะดึงข้อมูล origin โดยใช้ getOrigin()
API
หากต้องการเรียกข้อมูล origin แอปผู้ให้บริการข้อมูลเข้าสู่ระบบจะต้องส่งรายการผู้เรียกที่ได้รับสิทธิ์และเชื่อถือได้ไปยัง androidx.credentials.provider.CallingAppInfo's getOrigin() API รายการที่อนุญาตนี้
ต้องเป็นออบเจ็กต์ JSON ที่ถูกต้อง ระบบจะแสดงผล origin หาก packageName และ
ลายนิ้วมือของใบรับรองที่ได้จาก signingInfo ตรงกับลายนิ้วมือของแอป
ที่พบใน privilegedAllowlist ซึ่งส่งไปยัง getOrigin() API หลังจากได้รับค่า
originแล้ว แอปของผู้ให้บริการควรพิจารณาว่าการเรียกนี้เป็นสิทธิ์พิเศษ
และตั้งค่า origin ในข้อมูลไคลเอ็นต์
ใน AuthenticatorResponse แทนที่จะคำนวณ
originโดยใช้ลายเซ็นของแอปที่เรียก
หากเรียก origin ให้ใช้ clientDataHash ที่ระบุไว้โดยตรง
ใน CreatePublicKeyCredentialRequest() หรือ
GetPublicKeyCredentialOption() แทนการประกอบและแฮช
clientDataJSON ระหว่างคำขอลายเซ็น หากต้องการหลีกเลี่ยงปัญหาการแยกวิเคราะห์ JSON ให้ตั้งค่าตัวยึดตำแหน่งสำหรับ clientDataJSON ในการรับรองและการยืนยัน
การตอบกลับ เครื่องมือจัดการรหัสผ่านบน Google ใช้รายการที่อนุญาตที่เปิดให้ใช้งานอย่างอิสระ
สำหรับการเรียกไปยัง getOrigin() ในฐานะผู้ให้บริการข้อมูลเข้าสู่ระบบ คุณสามารถใช้รายการนี้หรือระบุรายการของคุณเองในรูปแบบ JSON ที่อธิบายไว้ใน API ผู้ให้บริการจะเป็นผู้เลือกว่าจะใช้รายการใด หากต้องการรับสิทธิ์เข้าถึงระดับสูงด้วยผู้ให้บริการข้อมูลเข้าสู่ระบบบุคคลที่สาม โปรดดูเอกสารประกอบที่บุคคลที่สามจัดทำ
เปิดใช้ผู้ให้บริการในอุปกรณ์
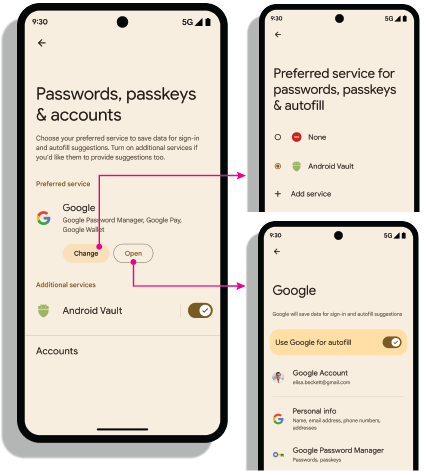
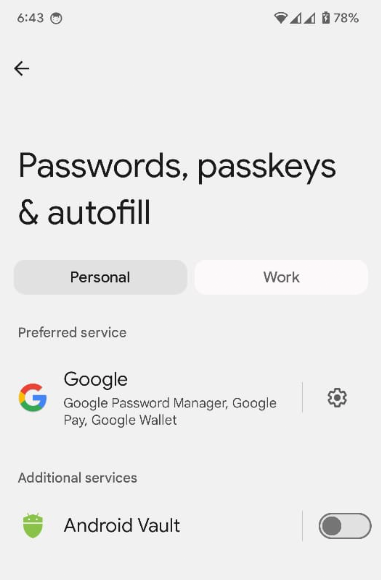
ผู้ใช้ต้องเปิดใช้ผู้ให้บริการผ่าน การตั้งค่าอุปกรณ์ > รหัสผ่านและบัญชี > ผู้ให้บริการ > เปิดใช้หรือปิดใช้
fun createSettingsPendingIntent(): PendingIntent