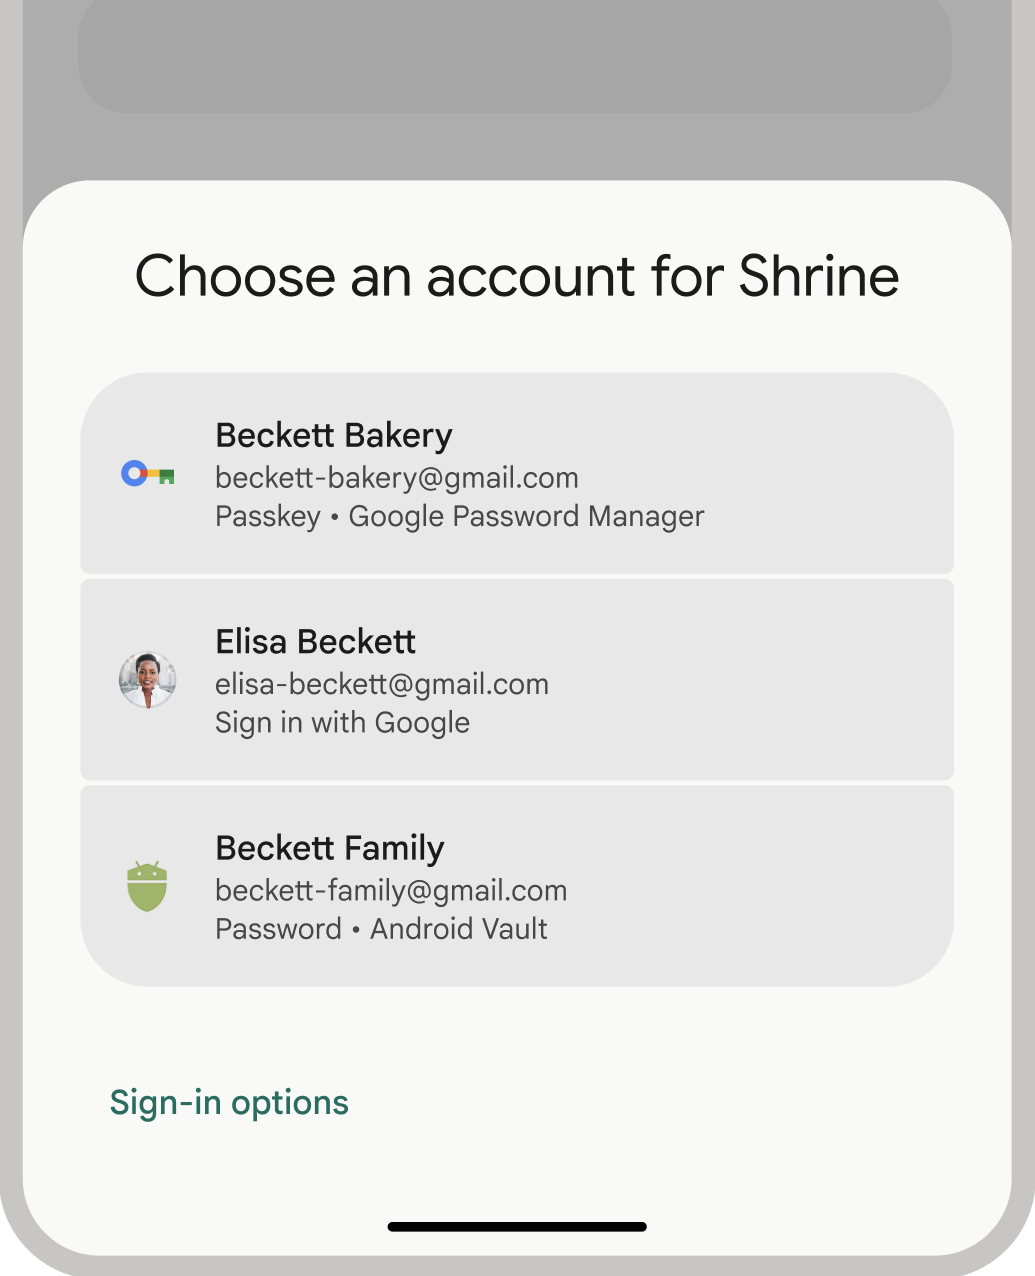
Credential Manager एक Jetpack API है. यह एक ही एपीआई में, साइन इन करने के कई तरीकों के साथ काम करता है. जैसे, उपयोगकर्ता नाम और पासवर्ड, पासकी, और फ़ेडरेटेड साइन इन के समाधान (जैसे, 'Google से साइन इन करें'). इससे डेवलपर के लिए इंटिग्रेशन को आसान बनाना होता है.
इसके अलावा, Credential Manager की मदद से, उपयोगकर्ताओं के लिए पुष्टि करने के सभी तरीकों के लिए एक ही साइन इन इंटरफ़ेस उपलब्ध होता है. इससे लोग, ऐप्लिकेशन में आसानी से साइन इन कर पाएंगे. भले ही, उन्होंने साइन इन करने का कोई भी तरीका चुना हो.
इस पेज पर, पासकी के कॉन्सेप्ट के बारे में बताया गया है. साथ ही, क्रेडेंशियल मैनेजर एपीआई का इस्तेमाल करके, पासकी के साथ-साथ पुष्टि करने के अन्य तरीकों के लिए क्लाइंट-साइड सहायता लागू करने का तरीका भी बताया गया है. अक्सर पूछे जाने वाले सवालों का एक अलग पेज भी होता है, जहां ज़्यादा जानकारी वाले और खास सवालों के जवाब होते हैं.
Credential Manager API को बेहतर बनाने के लिए, आपका सुझाव, शिकायत या राय हमारे लिए अहम है. नीचे दिए गए लिंक का इस्तेमाल करके, एपीआई को बेहतर बनाने के लिए सुझाव या समस्याएं शेयर करें:
पासकी के बारे में जानकारी
पासवर्ड की जगह पासकी इस्तेमाल करना ज़्यादा सुरक्षित और आसान है. पासकी की मदद से, उपयोगकर्ता ऐप्लिकेशन और वेबसाइटों में साइन इन कर सकते हैं. इसके लिए, उन्हें बायोमेट्रिक सेंसर (जैसे, फ़िंगरप्रिंट या चेहरे की पहचान), पिन या पैटर्न का इस्तेमाल करना होगा. इससे उपयोगकर्ताओं को साइन-इन करने का बेहतरीन अनुभव मिलता है. इससे, उन्हें उपयोगकर्ता नाम या पासवर्ड याद रखने की ज़रूरत नहीं पड़ती.
पासकी, WebAuthn (वेब ऑथेंटिकेशन) पर निर्भर करती हैं. यह एक स्टैंडर्ड है, जिसे FIDO एलायंस और वर्ल्ड वाइड वेब कंसोर्टियम (W3C) ने मिलकर डेवलप किया है. WebAuthn, उपयोगकर्ता की पुष्टि करने के लिए, सार्वजनिक पासकोड क्रिप्टोग्राफ़ी का इस्तेमाल करता है. जिस वेबसाइट या ऐप्लिकेशन में उपयोगकर्ता साइन इन कर रहा है वह सार्वजनिक कुंजी देख सकता है और उसे सेव कर सकता है. हालांकि, वह निजी कुंजी कभी नहीं देख सकता. निजी कुंजी को गुप्त और सुरक्षित रखा जाता है. साथ ही, पासकी यूनीक होती हैं और वेबसाइट या ऐप्लिकेशन से जुड़ी होती हैं. इसलिए, पासकी को फ़िशिंग के ज़रिए हासिल नहीं किया जा सकता. इससे पासकी की सुरक्षा और बेहतर हो जाती है.
क्रेडेंशियल मैनेजर की मदद से, उपयोगकर्ता पासकी बना सकते हैं और उन्हें Google Password Manager में सेव कर सकते हैं.
क्रेडेंशियल मैनेजर की मदद से पासकी की मदद से पुष्टि करने की प्रोसेस आसानी से लागू करने का तरीका जानने के लिए, पासकी की मदद से उपयोगकर्ता की पुष्टि करना लेख पढ़ें.
ज़रूरी शर्तें
हार्डवेयर सुरक्षा कुंजियों का इस्तेमाल करता है, तो आपको फ़िलहाल FIDO का इस्तेमाल जारी रखना चाहिए.क्रेडेंशियल मैनेजर का इस्तेमाल करने के लिए, इस सेक्शन में दिया गया तरीका अपनाएं.
प्लैटफ़ॉर्म का नया वर्शन इस्तेमाल करें
क्रेडेंशियल मैनेजर, Android 4.4 (एपीआई लेवल 19) और इसके बाद के वर्शन पर काम करता है.
अपने ऐप्लिकेशन में डिपेंडेंसी जोड़ना
अपने ऐप्लिकेशन मॉड्यूल की बिल्ड स्क्रिप्ट में ये डिपेंडेंसी जोड़ें:
Kotlin
dependencies { implementation("androidx.credentials:credentials:1.5.0-alpha05") // optional - needed for credentials support from play services, for devices running // Android 13 and below. implementation("androidx.credentials:credentials-play-services-auth:1.5.0-alpha05") }
ग्रूवी
dependencies { implementation "androidx.credentials:credentials:1.5.0-alpha05" // optional - needed for credentials support from play services, for devices running // Android 13 and below. implementation "androidx.credentials:credentials-play-services-auth:1.5.0-alpha05" }
ProGuard फ़ाइल में क्लास को सुरक्षित रखना
अपने मॉड्यूल की proguard-rules.pro
फ़ाइल में, ये निर्देश जोड़ें:
-if class androidx.credentials.CredentialManager
-keep class androidx.credentials.playservices.** {
*;
}
अपने ऐप्लिकेशन को छोटा करने, उसे धुंधला करने, और ऑप्टिमाइज़ करने के तरीके के बारे में ज़्यादा जानें.
डिजिटल ऐसेट लिंक के लिए सहायता जोड़ना
अपने Android ऐप्लिकेशन के लिए पासकी से जुड़ी सहायता चालू करने के लिए, अपने ऐप्लिकेशन को उस वेबसाइट से जोड़ें जिसका मालिकाना हक आपके ऐप्लिकेशन पर है. इस असोसिएशन का एलान करने के लिए, यह तरीका अपनाएं:
डिजिटल ऐसेट लिंक की JSON फ़ाइल बनाएं. उदाहरण के लिए, यह एलान करने के लिए कि
https://signin.example.com
वेबसाइट औरcom.example
पैकेज नाम वाला Android ऐप्लिकेशन, साइन-इन क्रेडेंशियल शेयर कर सकता है, इस कॉन्टेंट के साथassetlinks.json
नाम की फ़ाइल बनाएं:[ { "relation" : [ "delegate_permission/common.handle_all_urls", "delegate_permission/common.get_login_creds" ], "target" : { "namespace" : "android_app", "package_name" : "com.example.android", "sha256_cert_fingerprints" : [ SHA_HEX_VALUE ] } } ]
relation
फ़ील्ड, एक या एक से ज़्यादा स्ट्रिंग का कलेक्शन होता है. इन स्ट्रिंग से, एलान की जा रही रिलेशनशिप के बारे में पता चलता है. यह बताने के लिए कि ऐप्लिकेशन और साइटें साइन इन करने के क्रेडेंशियल शेयर करती हैं, संबंधों कोdelegate_permission/handle_all_urls
औरdelegate_permission/common.get_login_creds
के तौर पर बताएं.target
फ़ील्ड एक ऑब्जेक्ट है, जो उस एसेट के बारे में बताता है जिस पर एलान लागू होता है. इन फ़ील्ड से किसी वेबसाइट की पहचान की जाती है:namespace
web
site
वेबसाइट का यूआरएल,
https://domain[:optional_port]
फ़ॉर्मैट में; उदाहरण के लिए,https://www.example.com
.domain एट्रिब्यूट की वैल्यू पूरी तरह क्वालिफ़ाइड होनी चाहिए. साथ ही, एचटीटीपीएस के लिए पोर्ट 443 का इस्तेमाल करते समय, optional_port को हटा दिया जाना चाहिए.
site
टारगेट सिर्फ़ रूट डोमेन हो सकता है: किसी ऐप्लिकेशन को किसी खास सबडायरेक्ट्री से असोसिएट नहीं किया जा सकता. यूआरएल में पाथ शामिल न करें, जैसे कि आखिर में स्लैश.सबडोमेन को इससे मिलता-जुलता नहीं माना जाता: इसका मतलब है कि अगर domain को
www.example.com
के तौर पर बताया जाता है, तोwww.counter.example.com
डोमेन आपके ऐप्लिकेशन से नहीं जुड़ा होता है.ये फ़ील्ड किसी Android ऐप्लिकेशन की पहचान करते हैं:
namespace
android_app
package_name
ऐप्लिकेशन के मेनिफ़ेस्ट में बताया गया पैकेज का नाम. उदाहरण के लिए, com.example.android
sha256_cert_fingerprints
आपके ऐप्लिकेशन के साइनिंग सर्टिफ़िकेट के SHA256 फ़िंगरप्रिंट. साइन इन करने के लिए इस्तेमाल किए जाने वाले डोमेन पर, डिजिटल ऐसेट लिंक JSON फ़ाइल को यहां होस्ट करें:
https://domain[:optional_port]/.well-known/assetlinks.json
उदाहरण के लिए, अगर आपका साइन-इन डोमेन
signin.example.com
है, तो JSON फ़ाइल कोhttps://signin.example.com/.well-known/assetlinks.json
पर होस्ट करें.डिजिटल ऐसेट लिंक फ़ाइल का MIME टाइप, JSON होना चाहिए. पक्का करें कि जवाब में सर्वर,
Content-Type: application/json
हेडर भेजे.पक्का करें कि आपके होस्ट ने Google को आपकी डिजिटल एसेट लिंक फ़ाइल को वापस पाने की अनुमति दी हो. अगर आपके पास
robots.txt
फ़ाइल है, तो उसमें Googlebot एजेंट को/.well-known/assetlinks.json
को फिर से पाने की अनुमति होनी चाहिए. ज़्यादातर साइटें, अपने-आप काम करने वाले किसी भी एजेंट को/.well-known/
पाथ में फ़ाइलें वापस पाने की अनुमति दे सकती हैं. इससे अन्य सेवाएं, उन फ़ाइलों के मेटाडेटा को ऐक्सेस कर सकती हैं:User-agent: * Allow: /.well-known/
<application>
में मौजूद मेनिफ़ेस्ट फ़ाइल में यह लाइन जोड़ें:<meta-data android:name="asset_statements" android:resource="@string/asset_statements" />
अगर क्रेडेंशियल मैनेजर की मदद से पासवर्ड से साइन इन किया जा रहा है, तो मेनिफ़ेस्ट में डिजिटल ऐसेट लिंकिंग को कॉन्फ़िगर करने के लिए यह तरीका अपनाएं. अगर सिर्फ़ पासकी का इस्तेमाल किया जा रहा है, तो यह चरण ज़रूरी नहीं है.
Android ऐप्लिकेशन में असोसिएशन की जानकारी दें. ऐसा ऑब्जेक्ट जोड़ें जिसमें, लोड करने के लिए
assetlinks.json
फ़ाइलों के बारे में बताया गया हो. आपको स्ट्रिंग में इस्तेमाल किए गए सभी अपस्ट्रॉफ़ और कोटेशन मार्क को एस्केप करना होगा. उदाहरण के लिए:<string name="asset_statements" translatable="false"> [{ \"include\": \"https://signin.example.com/.well-known/assetlinks.json\" }] </string>
> GET /.well-known/assetlinks.json HTTP/1.1 > User-Agent: curl/7.35.0 > Host: signin.example.com < HTTP/1.1 200 OK < Content-Type: application/json
क्रेडेंशियल मैनेजर को कॉन्फ़िगर करना
CredentialManager
ऑब्जेक्ट को कॉन्फ़िगर और शुरू करने के लिए, यहां दिए गए लॉजिक के जैसे लॉजिक जोड़ें:
Kotlin
// Use your app or activity context to instantiate a client instance of // CredentialManager. val credentialManager = CredentialManager.create(context)
Java
// Use your app or activity context to instantiate a client instance of // CredentialManager. CredentialManager credentialManager = CredentialManager.create(context)
क्रेडेंशियल फ़ील्ड दिखाना
Android 14 और उसके बाद के वर्शन पर, isCredential
एट्रिब्यूट का इस्तेमाल, क्रेडेंशियल फ़ील्ड के बारे में बताने के लिए किया जा सकता है. जैसे, उपयोगकर्ता नाम या पासवर्ड फ़ील्ड. इस एट्रिब्यूट से पता चलता है कि यह व्यू, क्रेडेंशियल फ़ील्ड है. इसका मकसद, क्रेडेंशियल मैनेजर और तीसरे पक्ष के क्रेडेंशियल देने वाले प्रोग्राम के साथ काम करना है. साथ ही, ऑटोमैटिक भरने की सेवाओं को ऑटोमैटिक भरने के बेहतर सुझाव देने में मदद करना है. जब ऐप्लिकेशन, CredentialManager API का इस्तेमाल करता है, तो उस क्रेडेंशियल मैनेजर की बॉटम शीट दिखती है जिसमें उपलब्ध क्रेडेंशियल मौजूद होते हैं. साथ ही, उपयोगकर्ता नाम या पासवर्ड के लिए, ऑटोमैटिक भरने की सुविधा का फ़िल डायलॉग दिखाने की ज़रूरत नहीं होती है. इसी तरह से, पासवर्ड के लिए ऑटोमैटिक भरने की सुविधा का सेव किया गया डायलॉग दिखाने की ज़रूरत नहीं होती. ऐसा इसलिए, क्योंकि ऐप्लिकेशन क्रेडेंशियल सेव करने के लिए, Credential Manager API का अनुरोध करेगा.
isCredential
एट्रिब्यूट का इस्तेमाल करने के लिए, उसे काम के व्यू में जोड़ें:
<TextView
android:layout_width="match_parent"
android:layout_height="wrap_content"
android:isCredential="true"
...
/>
अपने उपयोगकर्ता के तौर पर साइन इन करें
उपयोगकर्ता के खाते से जुड़ी सभी पासकी और पासवर्ड के विकल्प वापस पाने के लिए, यह तरीका अपनाएं:
पासवर्ड और पासकी की मदद से पुष्टि करने के विकल्पों को शुरू करना:
Kotlin
// Retrieves the user's saved password for your app from their // password provider. val getPasswordOption = GetPasswordOption() // Get passkey from the user's public key credential provider. val getPublicKeyCredentialOption = GetPublicKeyCredentialOption( requestJson = requestJson )
Java
// Retrieves the user's saved password for your app from their // password provider. GetPasswordOption getPasswordOption = new GetPasswordOption(); // Get passkey from the user's public key credential provider. GetPublicKeyCredentialOption getPublicKeyCredentialOption = new GetPublicKeyCredentialOption(requestJson);
साइन-इन अनुरोध बनाने के लिए, पिछले चरण में मिले विकल्पों का इस्तेमाल करें.
Kotlin
val getCredRequest = GetCredentialRequest( listOf(getPasswordOption, getPublicKeyCredentialOption) )
Java
GetCredentialRequest getCredRequest = new GetCredentialRequest.Builder() .addCredentialOption(getPasswordOption) .addCredentialOption(getPublicKeyCredentialOption) .build();
साइन-इन फ़्लो लॉन्च करने के लिए:
Kotlin
coroutineScope.launch { try { val result = credentialManager.getCredential( // Use an activity-based context to avoid undefined system UI // launching behavior. context = activityContext, request = getCredRequest ) handleSignIn(result) } catch (e : GetCredentialException) { handleFailure(e) } } fun handleSignIn(result: GetCredentialResponse) { // Handle the successfully returned credential. val credential = result.credential when (credential) { is PublicKeyCredential -> { val responseJson = credential.authenticationResponseJson // Share responseJson i.e. a GetCredentialResponse on your server to // validate and authenticate } is PasswordCredential -> { val username = credential.id val password = credential.password // Use id and password to send to your server to validate // and authenticate } is CustomCredential -> { // If you are also using any external sign-in libraries, parse them // here with the utility functions provided. if (credential.type == ExampleCustomCredential.TYPE) { try { val ExampleCustomCredential = ExampleCustomCredential.createFrom(credential.data) // Extract the required credentials and complete the authentication as per // the federated sign in or any external sign in library flow } catch (e: ExampleCustomCredential.ExampleCustomCredentialParsingException) { // Unlikely to happen. If it does, you likely need to update the dependency // version of your external sign-in library. Log.e(TAG, "Failed to parse an ExampleCustomCredential", e) } } else { // Catch any unrecognized custom credential type here. Log.e(TAG, "Unexpected type of credential") } } else -> { // Catch any unrecognized credential type here. Log.e(TAG, "Unexpected type of credential") } } }
Java
credentialManager.getCredentialAsync( // Use activity based context to avoid undefined // system UI launching behavior activity, getCredRequest, cancellationSignal, <executor>, new CredentialManagerCallback<GetCredentialResponse, GetCredentialException>() { @Override public void onResult(GetCredentialResponse result) { handleSignIn(result); } @Override public void onError(GetCredentialException e) { handleFailure(e); } } ); public void handleSignIn(GetCredentialResponse result) { // Handle the successfully returned credential. Credential credential = result.getCredential(); if (credential instanceof PublicKeyCredential) { String responseJson = ((PublicKeyCredential) credential).getAuthenticationResponseJson(); // Share responseJson i.e. a GetCredentialResponse on your server to validate and authenticate } else if (credential instanceof PasswordCredential) { String username = ((PasswordCredential) credential).getId(); String password = ((PasswordCredential) credential).getPassword(); // Use id and password to send to your server to validate and authenticate } else if (credential instanceof CustomCredential) { if (ExampleCustomCredential.TYPE.equals(credential.getType())) { try { ExampleCustomCredential customCred = ExampleCustomCredential.createFrom(customCredential.getData()); // Extract the required credentials and complete the // authentication as per the federated sign in or any external // sign in library flow } catch (ExampleCustomCredential.ExampleCustomCredentialParsingException e) { // Unlikely to happen. If it does, you likely need to update the // dependency version of your external sign-in library. Log.e(TAG, "Failed to parse an ExampleCustomCredential", e); } } else { // Catch any unrecognized custom credential type here. Log.e(TAG, "Unexpected type of credential"); } } else { // Catch any unrecognized credential type here. Log.e(TAG, "Unexpected type of credential"); } }
पासकी मिलने पर, JSON अनुरोध को फ़ॉर्मैट करने का तरीका यहां बताया गया है:
{
"challenge": "T1xCsnxM2DNL2KdK5CLa6fMhD7OBqho6syzInk_n-Uo",
"allowCredentials": [],
"timeout": 1800000,
"userVerification": "required",
"rpId": "credential-manager-app-test.glitch.me"
}
नीचे दिए गए उदाहरण में बताया गया है कि सार्वजनिक कुंजी वाला क्रेडेंशियल मिलने के बाद, JSON रिस्पॉन्स कैसा दिख सकता है:
{
"id": "KEDetxZcUfinhVi6Za5nZQ",
"type": "public-key",
"rawId": "KEDetxZcUfinhVi6Za5nZQ",
"response": {
"clientDataJSON": "eyJ0eXBlIjoid2ViYXV0aG4uZ2V0IiwiY2hhbGxlbmdlIjoiVDF4Q3NueE0yRE5MMktkSzVDTGE2Zk1oRDdPQnFobzZzeXpJbmtfbi1VbyIsIm9yaWdpbiI6ImFuZHJvaWQ6YXBrLWtleS1oYXNoOk1MTHpEdll4UTRFS1R3QzZVNlpWVnJGUXRIOEdjVi0xZDQ0NEZLOUh2YUkiLCJhbmRyb2lkUGFja2FnZU5hbWUiOiJjb20uZ29vZ2xlLmNyZWRlbnRpYWxtYW5hZ2VyLnNhbXBsZSJ9",
"authenticatorData": "j5r_fLFhV-qdmGEwiukwD5E_5ama9g0hzXgN8thcFGQdAAAAAA",
"signature": "MEUCIQCO1Cm4SA2xiG5FdKDHCJorueiS04wCsqHhiRDbbgITYAIgMKMFirgC2SSFmxrh7z9PzUqr0bK1HZ6Zn8vZVhETnyQ",
"userHandle": "2HzoHm_hY0CjuEESY9tY6-3SdjmNHOoNqaPDcZGzsr0"
}
}
कोई क्रेडेंशियल उपलब्ध न होने पर, अपवादों को मैनेज करना
कुछ मामलों में, हो सकता है कि उपयोगकर्ता के पास कोई क्रेडेंशियल उपलब्ध न हो या वह उपलब्ध क्रेडेंशियल का इस्तेमाल करने की सहमति न दे. अगर getCredential()
को शुरू किया गया है और कोई क्रेडेंशियल नहीं मिलता है, तो NoCredentialException
दिखता है. ऐसा होने पर, आपके कोड को NoCredentialException
इंस्टेंस हैंडल करने चाहिए.
Kotlin
try {
val credential = credentialManager.getCredential(credentialRequest)
} catch (e: NoCredentialException) {
Log.e("CredentialManager", "No credential available", e)
}
Java
try {
Credential credential = credentialManager.getCredential(credentialRequest);
} catch (NoCredentialException e) {
Log.e("CredentialManager", "No credential available", e);
}
Android 14 या इसके बाद वाले वर्शन में, खाता चुनने वाले टूल का इस्तेमाल करके, इंतज़ार का समय कम किया जा सकता है. इसके लिए, getCredential()
को कॉल करने से पहले prepareGetCredential()
तरीका इस्तेमाल करें.
Kotlin
val response = credentialManager.prepareGetCredential(
GetCredentialRequest(
listOf(
<getPublicKeyCredentialOption>,
<getPasswordOption>
)
)
}
Java
GetCredentialResponse response = credentialManager.prepareGetCredential(
new GetCredentialRequest(
Arrays.asList(
new PublicKeyCredentialOption(),
new PasswordOption()
)
)
);
prepareGetCredential()
वाला तरीका, यूज़र इंटरफ़ेस (यूआई) एलिमेंट नहीं शुरू करता. यह सिर्फ़ तैयारी करने में आपकी मदद करता है, ताकि बाद में getCredential()
एपीआई की मदद से, बाकी क्रेडेंशियल पाने की कार्रवाई (जिसमें यूज़र इंटरफ़ेस शामिल हैं) शुरू की जा सके.
कैश मेमोरी में सेव किया गया डेटा, PrepareGetCredentialResponse
ऑब्जेक्ट में दिखाया जाता है. अगर मौजूदा क्रेडेंशियल पहले से मौजूद हैं, तो नतीजों को कैश मेमोरी में सेव किया जाएगा. इसके बाद, खाता सिलेक्टर को कैश मेमोरी में सेव किए गए डेटा के साथ लाने के लिए, बचे हुए getCredential()
एपीआई को लॉन्च किया जा सकता है.
रजिस्ट्रेशन फ़्लो
पुष्टि करने के लिए, किसी उपयोगकर्ता को पासकी या पासवर्ड का इस्तेमाल करके रजिस्टर किया जा सकता है.
पासकी बनाना
उपयोगकर्ताओं को पासकी रजिस्टर करने और फिर से पुष्टि करने के लिए इसका इस्तेमाल करने का विकल्प देने के लिए, CreatePublicKeyCredentialRequest
ऑब्जेक्ट की मदद से उपयोगकर्ता क्रेडेंशियल रजिस्टर करें.
Kotlin
fun createPasskey(requestJson: String, preferImmediatelyAvailableCredentials: Boolean) { val createPublicKeyCredentialRequest = CreatePublicKeyCredentialRequest( // Contains the request in JSON format. Uses the standard WebAuthn // web JSON spec. requestJson = requestJson, // Defines whether you prefer to use only immediately available // credentials, not hybrid credentials, to fulfill this request. // This value is false by default. preferImmediatelyAvailableCredentials = preferImmediatelyAvailableCredentials, ) // Execute CreateCredentialRequest asynchronously to register credentials // for a user account. Handle success and failure cases with the result and // exceptions, respectively. coroutineScope.launch { try { val result = credentialManager.createCredential( // Use an activity-based context to avoid undefined system // UI launching behavior context = activityContext, request = createPublicKeyCredentialRequest, ) handlePasskeyRegistrationResult(result) } catch (e : CreateCredentialException){ handleFailure(e) } } } fun handleFailure(e: CreateCredentialException) { when (e) { is CreatePublicKeyCredentialDomException -> { // Handle the passkey DOM errors thrown according to the // WebAuthn spec. handlePasskeyError(e.domError) } is CreateCredentialCancellationException -> { // The user intentionally canceled the operation and chose not // to register the credential. } is CreateCredentialInterruptedException -> { // Retry-able error. Consider retrying the call. } is CreateCredentialProviderConfigurationException -> { // Your app is missing the provider configuration dependency. // Most likely, you're missing the // "credentials-play-services-auth" module. } is CreateCredentialUnknownException -> ... is CreateCredentialCustomException -> { // You have encountered an error from a 3rd-party SDK. If you // make the API call with a request object that's a subclass of // CreateCustomCredentialRequest using a 3rd-party SDK, then you // should check for any custom exception type constants within // that SDK to match with e.type. Otherwise, drop or log the // exception. } else -> Log.w(TAG, "Unexpected exception type ${e::class.java.name}") } }
Java
public void createPasskey(String requestJson, boolean preferImmediatelyAvailableCredentials) { CreatePublicKeyCredentialRequest createPublicKeyCredentialRequest = // `requestJson` contains the request in JSON format. Uses the standard // WebAuthn web JSON spec. // `preferImmediatelyAvailableCredentials` defines whether you prefer // to only use immediately available credentials, not hybrid credentials, // to fulfill this request. This value is false by default. new CreatePublicKeyCredentialRequest( requestJson, preferImmediatelyAvailableCredentials); // Execute CreateCredentialRequest asynchronously to register credentials // for a user account. Handle success and failure cases with the result and // exceptions, respectively. credentialManager.createCredentialAsync( // Use an activity-based context to avoid undefined system // UI launching behavior requireActivity(), createPublicKeyCredentialRequest, cancellationSignal, executor, new CredentialManagerCallback<CreateCredentialResponse, CreateCredentialException>() { @Override public void onResult(CreateCredentialResponse result) { handleSuccessfulCreatePasskeyResult(result); } @Override public void onError(CreateCredentialException e) { if (e instanceof CreatePublicKeyCredentialDomException) { // Handle the passkey DOM errors thrown according to the // WebAuthn spec. handlePasskeyError(((CreatePublicKeyCredentialDomException)e).getDomError()); } else if (e instanceof CreateCredentialCancellationException) { // The user intentionally canceled the operation and chose not // to register the credential. } else if (e instanceof CreateCredentialInterruptedException) { // Retry-able error. Consider retrying the call. } else if (e instanceof CreateCredentialProviderConfigurationException) { // Your app is missing the provider configuration dependency. // Most likely, you're missing the // "credentials-play-services-auth" module. } else if (e instanceof CreateCredentialUnknownException) { } else if (e instanceof CreateCredentialCustomException) { // You have encountered an error from a 3rd-party SDK. If // you make the API call with a request object that's a // subclass of // CreateCustomCredentialRequest using a 3rd-party SDK, // then you should check for any custom exception type // constants within that SDK to match with e.type. // Otherwise, drop or log the exception. } else { Log.w(TAG, "Unexpected exception type " + e.getClass().getName()); } } } ); }
JSON अनुरोध को फ़ॉर्मैट करना
पासकी बनाने के बाद, आपको इसे उपयोगकर्ता के खाते से जोड़ना होगा. साथ ही, पासकी की सार्वजनिक कुंजी को अपने सर्वर पर सेव करना होगा. पासकी बनाते समय, JSON अनुरोध को फ़ॉर्मैट करने का तरीका जानने के लिए, नीचे दिया गया कोड उदाहरण देखें.
अपने ऐप्लिकेशन में आसानी से पुष्टि करने की सुविधा जोड़ने के बारे में बताने वाली इस ब्लॉग पोस्ट में, पासकी बनाते समय और पासकी का इस्तेमाल करके पुष्टि करते समय, अपने JSON अनुरोध को फ़ॉर्मैट करने का तरीका बताया गया है. इसमें यह भी बताया गया है कि पासवर्ड, पुष्टि करने का एक असरदार तरीका क्यों नहीं हैं. साथ ही, इसमें मौजूदा बायोमेट्रिक क्रेडेंशियल का फ़ायदा पाने, अपने ऐप्लिकेशन को अपनी मालिकाना हक वाली वेबसाइट से जोड़ने, पासकी बनाने, और पासकी का इस्तेमाल करके पुष्टि करने का तरीका भी बताया गया है.
{
"challenge": "abc123",
"rp": {
"name": "Credential Manager example",
"id": "credential-manager-test.example.com"
},
"user": {
"id": "def456",
"name": "helloandroid@gmail.com",
"displayName": "helloandroid@gmail.com"
},
"pubKeyCredParams": [
{
"type": "public-key",
"alg": -7
},
{
"type": "public-key",
"alg": -257
}
],
"timeout": 1800000,
"attestation": "none",
"excludeCredentials": [
{"id": "ghi789", "type": "public-key"},
{"id": "jkl012", "type": "public-key"}
],
"authenticatorSelection": {
"authenticatorAttachment": "platform",
"requireResidentKey": true,
"residentKey": "required",
"userVerification": "required"
}
}
authenticatorAttachment के लिए वैल्यू सेट करना
authenticatorAttachment
पैरामीटर को सिर्फ़ क्रेडेंशियल बनाने के समय सेट किया जा सकता है. इसके लिए, platform
, cross-platform
या कोई वैल्यू सबमिट की जा सकती है. ज़्यादातर मामलों में, वैल्यू सबमिट करने का सुझाव नहीं दिया जाता.
platform
: उपयोगकर्ता के मौजूदा डिवाइस को रजिस्टर करने या साइन इन करने के बाद, पासवर्ड का इस्तेमाल करने वाले उपयोगकर्ता को पासकी पर अपग्रेड करने के लिए कहने के लिए,authenticatorAttachment
कोplatform
पर सेट करें.cross-platform
: आम तौर पर, इस वैल्यू का इस्तेमाल मल्टी-फ़ैक्टर क्रेडेंशियल रजिस्टर करते समय किया जाता है. पासकी में इसका इस्तेमाल नहीं किया जाता.- कोई वैल्यू नहीं: उपयोगकर्ताओं को अपने पसंदीदा डिवाइसों (जैसे, खाता सेटिंग में) पर पासकी बनाने की सुविधा देने के लिए, जब कोई उपयोगकर्ता पासकी जोड़ने का विकल्प चुनता है, तो
authenticatorAttachment
पैरामीटर की वैल्यू नहीं दी जानी चाहिए. ज़्यादातर मामलों में, पैरामीटर को बिना जानकारी के छोड़ना सबसे अच्छा विकल्प होता है.
डुप्लीकेट पासकी बनाने से रोकना
excludeCredentials
विकल्प में क्रेडेंशियल आईडी की जानकारी दें, ताकि अगर नई पासकी एक ही सेवा देने वाली कंपनी के साथ पहले से मौजूद हो, तो उसे बनाने से रोका जा सके.
JSON रिस्पॉन्स को मैनेज करना
नीचे दिया गया कोड स्निपेट, सार्वजनिक पासकोड क्रेडेंशियल बनाने के लिए JSON रिस्पॉन्स का उदाहरण दिखाता है. लौटाए गए सार्वजनिक पासकोड के क्रेडेंशियल को मैनेज करने के तरीके के बारे में ज़्यादा जानें.
{
"id": "KEDetxZcUfinhVi6Za5nZQ",
"type": "public-key",
"rawId": "KEDetxZcUfinhVi6Za5nZQ",
"response": {
"clientDataJSON": "eyJ0eXBlIjoid2ViYXV0aG4uY3JlYXRlIiwiY2hhbGxlbmdlIjoibmhrUVhmRTU5SmI5N1Z5eU5Ka3ZEaVh1Y01Fdmx0ZHV2Y3JEbUdyT0RIWSIsIm9yaWdpbiI6ImFuZHJvaWQ6YXBrLWtleS1oYXNoOk1MTHpEdll4UTRFS1R3QzZVNlpWVnJGUXRIOEdjVi0xZDQ0NEZLOUh2YUkiLCJhbmRyb2lkUGFja2FnZU5hbWUiOiJjb20uZ29vZ2xlLmNyZWRlbnRpYWxtYW5hZ2VyLnNhbXBsZSJ9",
"attestationObject": "o2NmbXRkbm9uZWdhdHRTdG10oGhhdXRoRGF0YViUj5r_fLFhV-qdmGEwiukwD5E_5ama9g0hzXgN8thcFGRdAAAAAAAAAAAAAAAAAAAAAAAAAAAAEChA3rcWXFH4p4VYumWuZ2WlAQIDJiABIVgg4RqZaJyaC24Pf4tT-8ONIZ5_Elddf3dNotGOx81jj3siWCAWXS6Lz70hvC2g8hwoLllOwlsbYatNkO2uYFO-eJID6A"
}
}
क्लाइंट डेटा JSON से ऑरिजिन की पुष्टि करें
origin
उस ऐप्लिकेशन या वेबसाइट को दिखाता है जिससे अनुरोध आता है. साथ ही, पासकी इसका इस्तेमाल फ़िशिंग अटैक से बचाने के लिए करती हैं.
आपके ऐप्लिकेशन के सर्वर को, क्लाइंट के डेटा के ऑरिजिन की जांच करनी होगी. यह जांच, अनुमति पा चुके ऐप्लिकेशन और वेबसाइटों की अनुमति वाली सूची के हिसाब से की जाती है. अगर सर्वर को किसी ऐसे ऐप्लिकेशन या वेबसाइट से अनुरोध मिलता है जिसका सोर्स स्वीकार नहीं किया गया है, तो अनुरोध अस्वीकार कर दिया जाना चाहिए.
वेब केस में, origin
उस साइट के ऑरिजिन को दिखाता है जहां क्रेडेंशियल से साइन इन किया गया था. उदाहरण के लिए, https://www.example.com:8443/store?category=shoes#athletic
का यूआरएल दिया गया है , तो origin
का यूआरएल https://www.example.com:8443
होगा.
Android ऐप्लिकेशन के लिए, उपयोगकर्ता एजेंट, कॉल करने वाले ऐप्लिकेशन के हस्ताक्षर में origin
को अपने-आप सेट करता है. पासकी एपीआई के कॉलर की पुष्टि करने के लिए, यह ज़रूरी है कि आपके सर्वर पर इस हस्ताक्षर की पुष्टि की जाए. Android origin
एक यूआरआई है, जो APK साइनिंग सर्टिफ़िकेट के SHA-256 हैश से लिया जाता है. जैसे:
android:apk-key-hash:<sha256_hash-of-apk-signing-cert>
किसी पासकोड सेव करने की जगह में मौजूद, साइनिंग सर्टिफ़िकेट के SHA-256 हैश देखने के लिए, टर्मिनल में यह कमांड चलाएं:
keytool -list -keystore <path-to-apk-signing-keystore>
SHA-256 हैश, कोलन से डीलिमिटेड हेक्साडेसिमल फ़ॉर्मैट (91:F7:CB:F9:D6:81…
) में होते हैं. साथ ही, Android origin
की वैल्यू, base64url की मदद से कोड में बदली गई होती हैं.
इस Python उदाहरण में, हैश फ़ॉर्मैट को काम करने वाले, कोलन से अलग किए गए हैक्साडेसिमल फ़ॉर्मैट में बदलने का तरीका बताया गया है:
import binascii
import base64
fingerprint = '91:F7:CB:F9:D6:81:53:1B:C7:A5:8F:B8:33:CC:A1:4D:AB:ED:E5:09:C5'
print("android:apk-key-hash:" + base64.urlsafe_b64encode(binascii.a2b_hex(fingerprint.replace(':', ''))).decode('utf8').replace('=', ''))
fingerprint
की वैल्यू को अपनी वैल्यू से बदलें. यहां नतीजे का एक उदाहरण दिया गया है:
android:apk-key-hash:kffL-daBUxvHpY-4M8yhTavt5QnFEI2LsexohxrGPYU
इसके बाद, उस स्ट्रिंग को अपने सर्वर पर अनुमति वाले ऑरिजिन के तौर पर मैच किया जा सकता है. अगर आपके पास कई हस्ताक्षर करने के सर्टिफ़िकेट हैं, जैसे कि डीबग करने और रिलीज़ करने के लिए सर्टिफ़िकेट या कई ऐप्लिकेशन हैं, तो इस प्रोसेस को दोहराएं और सर्वर पर उन सभी ऑरिजिन को मान्य के तौर पर स्वीकार करें.
किसी उपयोगकर्ता का पासवर्ड सेव करना
अगर उपयोगकर्ता आपके ऐप्लिकेशन में पुष्टि करने के फ़्लो के लिए उपयोगकर्ता नाम और पासवर्ड देता है, तो आपके पास एक ऐसा उपयोगकर्ता क्रेडेंशियल रजिस्टर करने का विकल्प है जिसका इस्तेमाल उपयोगकर्ता की पुष्टि करने के लिए किया जा सकता है. ऐसा करने के लिए, CreatePasswordRequest
ऑब्जेक्ट बनाएं:
Kotlin
fun registerPassword(username: String, password: String) { // Initialize a CreatePasswordRequest object. val createPasswordRequest = CreatePasswordRequest(id = username, password = password) // Create credential and handle result. coroutineScope.launch { try { val result = credentialManager.createCredential( // Use an activity based context to avoid undefined // system UI launching behavior. activityContext, createPasswordRequest ) handleRegisterPasswordResult(result) } catch (e: CreateCredentialException) { handleFailure(e) } } }
Java
void registerPassword(String username, String password) { // Initialize a CreatePasswordRequest object. CreatePasswordRequest createPasswordRequest = new CreatePasswordRequest(username, password); // Register the username and password. credentialManager.createCredentialAsync( // Use an activity-based context to avoid undefined // system UI launching behavior requireActivity(), createPasswordRequest, cancellationSignal, executor, new CredentialManagerCallback<CreateCredentialResponse, CreateCredentialException>() { @Override public void onResult(CreateCredentialResponse result) { handleResult(result); } @Override public void onError(CreateCredentialException e) { handleFailure(e); } } ); }
क्रेडेंशियल वापस पाने की सुविधा
अगर किसी उपयोगकर्ता के पास उस डिवाइस का ऐक्सेस नहीं है जिसमें उसने अपने क्रेडेंशियल सेव किए थे, तो उसे सुरक्षित ऑनलाइन बैकअप से क्रेडेंशियल वापस पाने होंगे. क्रेडेंशियल वापस पाने की इस प्रोसेस में मदद करने के तरीके के बारे में ज़्यादा जानने के लिए, इस ब्लॉग पोस्ट में "ऐक्सेस वापस पाना या नए डिवाइस जोड़ना" सेक्शन पढ़ें: Google Password Manager में पासकी की सुरक्षा.
पासकी एंडपॉइंट के जाने-पहचाने यूआरएल वाले पासवर्ड मैनेजमेंट टूल के लिए सहायता जोड़ना
हमारा सुझाव है कि पासकी के एंडपॉइंट के लिए, जाने-पहचाने यूआरएल के साथ काम करने की सुविधा जोड़ें. इससे, पासवर्ड और क्रेडेंशियल मैनेजमेंट टूल के साथ आसानी से इंटिग्रेट किया जा सकेगा और आने वाले समय में इन टूल के साथ काम किया जा सकेगा. यह एक ओपन प्रोटोकॉल है, ताकि पार्टनर, पासकी के साथ काम करने की सुविधा का आधिकारिक तौर पर विज्ञापन कर सकें. साथ ही, पासकी को रजिस्टर करने और मैनेज करने के लिए सीधे लिंक उपलब्ध करा सकें.
https://example.com
पर मौजूद किसी भरोसेमंद पक्ष के लिए, जिसकी वेबसाइट के साथ-साथ Android और iOS ऐप्लिकेशन भी हैं, उसका जाना-पहचाना यूआरएलhttps://example.com/.well-known/passkey-endpoints
होगा.यूआरएल के बारे में क्वेरी किए जाने पर, रिस्पॉन्स में इस स्कीमा का इस्तेमाल होना चाहिए
{ "enroll": "https://example.com/account/manage/passkeys/create" "manage": "https://example.com/account/manage/passkeys" }
यह लिंक वेब के बजाय सीधे आपके ऐप्लिकेशन में खुले, इसके लिए Android ऐप्लिकेशन के लिंक का इस्तेमाल करें.
ज़्यादा जानकारी के लिए, GitHub पर पासकी एंडपॉइंट के लोकप्रिय यूआरएल के बारे में जानकारी देने वाले लेख को पढ़ें.
पासकी मैनेज करने में लोगों की मदद करें. इसके लिए, उन्हें बताएं कि पासकी किस कंपनी ने बनाई हैं
किसी ऐप्लिकेशन से जुड़ी कई पासकी मैनेज करते समय, उपयोगकर्ताओं को एक समस्या का सामना करना पड़ता है. यह समस्या, बदलाव करने या मिटाने के लिए सही पासकी की पहचान करने से जुड़ी होती है. इस समस्या को हल करने के लिए, हमारा सुझाव है कि ऐप्लिकेशन और वेबसाइटें, ऐप्लिकेशन की सेटिंग स्क्रीन पर पासकी की सूची में अतिरिक्त जानकारी शामिल करें. जैसे, क्रेडेंशियल बनाने वाली कंपनी, क्रेडेंशियल बनाने की तारीख, और आखिरी बार इस्तेमाल करने की तारीख. पासकी से जुड़े AAGUID की जांच करके, सेवा देने वाली कंपनी की जानकारी मिलती है. AAGUID, पासकी के पुष्टि करने वाले डेटा के हिस्से के तौर पर मिल सकता है.
उदाहरण के लिए, अगर कोई उपयोगकर्ता Android डिवाइस पर, Google Password Manager का इस्तेमाल करके पासकी बनाता है, तो आरपी को एक AAGUID मिलता है. यह कुछ ऐसा दिखता है: "ea9b8d66-4d01-1d21-3ce4-b6b48cb575d4". भरोसेमंद पक्ष, पासकी की सूची में पासकी के लिए एनोटेशन जोड़ सकता है. इससे यह पता चलता है कि पासकी को Google Password Manager का इस्तेमाल करके बनाया गया था.
किसी AAGUID को पासकी देने वाली कंपनी से मैप करने के लिए, आरपी कम्यूनिटी से मिले AAGUID की रिपॉज़िटरी का इस्तेमाल कर सकते हैं. पासकी की सेवा देने वाली कंपनी का नाम और आइकॉन ढूंढने के लिए, सूची में AAGUID खोजें.
AAGUID इंटिग्रेशन के बारे में ज़्यादा जानें.
सामान्य गड़बड़ियां हल करना
नीचे दी गई टेबल में, कई सामान्य गड़बड़ी के कोड और जानकारी दी गई है. साथ ही, गड़बड़ी की वजहों के बारे में कुछ जानकारी दी गई है:
गड़बड़ी का कोड और जानकारी | वजह |
---|---|
साइन इन करने में समस्या होने पर: 16: साइन इन करने के लिए कई बार अनुरोध रद्द करने की वजह से, कॉलर को कुछ समय के लिए ब्लॉक कर दिया गया है. | अगर डिवाइस डेवलप करने के दौरान 24 घंटे का यह कूलडाउन पीरियड आपको दिखता है, तो Google Play services से ऐप्लिकेशन का स्टोरेज मिटाकर, इसे रीसेट किया जा सकता है. इसके अलावा, किसी टेस्ट डिवाइस या एम्युलेटर पर कूलडाउन की अवधि को टॉगल करने के लिए, Dialer ऐप्लिकेशन पर जाएं और यह कोड डालें:
|
साइन इन शुरू करने में हुई गड़बड़ी: 8: कोई अनजान अंदरूनी गड़बड़ी. |
|
CreatePublicKeyCredentialDomException: आने वाले अनुरोध की पुष्टि नहीं की जा सकती | ऐप्लिकेशन का पैकेज आईडी, आपके सर्वर पर रजिस्टर नहीं है. अपने सर्वर साइड इंटिग्रेशन में इसकी पुष्टि करें. |
CreateCredentialUnknownException: During save password, found password failure response from one tap 16: Skipping password saving since the user is likely prompted with Android Autofill | यह गड़बड़ी सिर्फ़ Android 13 और इससे पहले के वर्शन पर दिखती है. साथ ही, यह सिर्फ़ तब दिखती है, जब Google, ऑटोमैटिक भरने की सुविधा देने वाली कंपनी हो. इस मामले में, लोगों को ऑटोमैटिक भरने की सुविधा की मदद से सेव करने का प्रॉम्प्ट दिखता है और पासवर्ड, Google Password Manager में सेव हो जाता है. ध्यान दें कि 'Google की मदद से जानकारी अपने-आप भरने की सुविधा' का इस्तेमाल करके सेव किए गए क्रेडेंशियल, Credential Manager API के साथ दोनों तरफ़ शेयर किए जाते हैं. इसलिए, इस गड़बड़ी को अनदेखा किया जा सकता है. |
अन्य संसाधन
Credential Manager API और पासकी के बारे में ज़्यादा जानने के लिए, यहां दिए गए रिसॉर्स देखें:
- पासकी के यूज़र इंटरफ़ेस (यूएक्स) से जुड़ी गाइड
- वीडियो: पासकी की सुविधा वाले Android ऐप्लिकेशन में पासवर्ड का इस्तेमाल कम करने का तरीका
- कोडलैब: अपने Android ऐप्लिकेशन में, क्रेडेंशियल मैनेजर एपीआई का इस्तेमाल करके पुष्टि करने की प्रोसेस को आसान बनाने का तरीका जानें
- सैंपल ऐप्लिकेशन: CredentialManager