جدول
با مجموعهها، منظم بمانید
ذخیره و طبقهبندی محتوا براساس اولویتهای شما.
TableLayout
یک ViewGroup
است که عناصر View
کودک را در سطرها و ستون ها نمایش می دهد.
توجه: برای عملکرد بهتر و پشتیبانی ابزار، در عوض باید طرح خود را با ConstraintLayout بسازید .

TableLayout
فرزندان خود را در ردیف ها و ستون ها قرار می دهد. کانتینرهای TableLayout خطوط مرزی را برای سطرها، ستون ها یا سلول های خود نمایش نمی دهند. جدول به اندازه ردیفی که بیشترین سلول را دارد، ستون خواهد داشت. یک جدول می تواند سلول ها را خالی بگذارد. سلول ها می توانند چندین ستون را پوشش دهند، همانطور که در HTML می توانند. میتوانید با استفاده از فیلد span
در کلاس TableRow.LayoutParams
، ستونها را پهن کنید.
توجه: سلول ها نمی توانند چندین ردیف را پوشش دهند.
اشیاء TableRow
نماهای فرزند یک TableLayout هستند (هر TableRow یک ردیف را در جدول تعریف می کند). هر ردیف دارای صفر یا چند سلول است که هر کدام با هر نوع نمای دیگری تعریف می شوند. بنابراین، سلول های یک ردیف ممکن است از انواع مختلفی از اشیاء View، مانند اشیاء ImageView یا TextView تشکیل شده باشند. یک سلول همچنین ممکن است یک شی ViewGroup باشد (به عنوان مثال، می توانید TableLayout دیگری را به عنوان یک سلول تودرتو قرار دهید).
طرح نمونه زیر دارای دو ردیف و دو خانه در هر کدام است. اسکرین شات همراه نتیجه را با حاشیه های سلولی به صورت خطوط نقطه چین نشان می دهد (برای جلوه بصری اضافه شده است).
<?xml version="1.0" encoding="utf-8"?>
<TableLayout xmlns:android="http://schemas.android.com/apk/res/android"
android:layout_width="match_parent"
android:layout_height="match_parent"
android:stretchColumns="1">
<TableRow>
<TextView
android:text="@string/table_layout_4_open"
android:padding="3dip" />
<TextView
android:text="@string/table_layout_4_open_shortcut"
android:gravity="right"
android:padding="3dip" />
</TableRow>
<TableRow>
<TextView
android:text="@string/table_layout_4_save"
android:padding="3dip" />
<TextView
android:text="@string/table_layout_4_save_shortcut"
android:gravity="right"
android:padding="3dip" />
</TableRow>
</TableLayout>
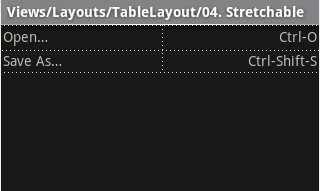
ستونها را میتوان پنهان کرد، علامتگذاری کرد تا فضای صفحه نمایش را کشیده و پر کند، یا میتوان آنها را بهعنوان قابل انقباض علامتگذاری کرد تا ستون را مجبور به کوچک شدن کند تا زمانی که جدول به صفحه نمایش برسد. برای جزئیات بیشتر به مستندات TableLayout reference
مراجعه کنید.
مثال
- پروژه جدیدی به نام HelloTableLayout را شروع کنید.
- فایل
res/layout/main.xml
باز کنید و موارد زیر را وارد کنید:<?xml version="1.0" encoding="utf-8"?>
<TableLayout xmlns:android="http://schemas.android.com/apk/res/android"
android:layout_width="match_parent"
android:layout_height="match_parent"
android:stretchColumns="1">
<TableRow>
<TextView
android:layout_column="1"
android:text="Open..."
android:padding="3dip" />
<TextView
android:text="Ctrl-O"
android:gravity="right"
android:padding="3dip" />
</TableRow>
<TableRow>
<TextView
android:layout_column="1"
android:text="Save..."
android:padding="3dip" />
<TextView
android:text="Ctrl-S"
android:gravity="right"
android:padding="3dip" />
</TableRow>
<TableRow>
<TextView
android:layout_column="1"
android:text="Save As..."
android:padding="3dip" />
<TextView
android:text="Ctrl-Shift-S"
android:gravity="right"
android:padding="3dip" />
</TableRow>
<View
android:layout_height="2dip"
android:background="#FF909090" />
<TableRow>
<TextView
android:text="X"
android:padding="3dip" />
<TextView
android:text="Import..."
android:padding="3dip" />
</TableRow>
<TableRow>
<TextView
android:text="X"
android:padding="3dip" />
<TextView
android:text="Export..."
android:padding="3dip" />
<TextView
android:text="Ctrl-E"
android:gravity="right"
android:padding="3dip" />
</TableRow>
<View
android:layout_height="2dip"
android:background="#FF909090" />
<TableRow>
<TextView
android:layout_column="1"
android:text="Quit"
android:padding="3dip" />
</TableRow>
</TableLayout>
توجه کنید که این چگونه به ساختار یک جدول HTML شباهت دارد. عنصر TableLayout
مانند عنصر <table>
HTML است. TableRow
مانند یک عنصر ><tr>>
است. اما برای سلول ها، می توانید از هر نوع عنصر View
استفاده کنید. در این مثال برای هر سلول از TextView
استفاده شده است. در بین برخی از ردیف ها، یک View
اصلی نیز وجود دارد که برای کشیدن یک خط افقی استفاده می شود.
- مطمئن شوید که HelloTableLayout Activity شما این طرحبندی را در متد
onCreate()
بارگیری میکند: کاتلین
override fun onCreate(savedInstanceState: Bundle?) {
super.onCreate(savedInstanceState)
setContentView(R.layout.main)
}
جاوا
public void onCreate(Bundle savedInstanceState) {
super.onCreate(savedInstanceState);
setContentView(R.layout.main);
}
روش setContentView(int)
فایل طرحبندی را برای Activity
بارگیری میکند، که توسط شناسه منبع مشخص شده است - R.layout.main
به فایل طرحبندی res/layout/main.xml
اشاره دارد.
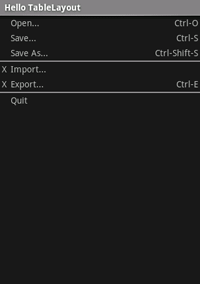
- برنامه را اجرا کنید.
شما باید موارد زیر را ببینید:
محتوا و نمونه کدها در این صفحه مشمول پروانههای توصیفشده در پروانه محتوا هستند. جاوا و OpenJDK علامتهای تجاری یا علامتهای تجاری ثبتشده Oracle و/یا وابستههای آن هستند.
تاریخ آخرین بهروزرسانی 2025-07-29 بهوقت ساعت هماهنگ جهانی.
[[["درک آسان","easyToUnderstand","thumb-up"],["مشکلم را برطرف کرد","solvedMyProblem","thumb-up"],["غیره","otherUp","thumb-up"]],[["اطلاعاتی که نیاز دارم وجود ندارد","missingTheInformationINeed","thumb-down"],["بیشازحد پیچیده/ مراحل بسیار زیاد","tooComplicatedTooManySteps","thumb-down"],["قدیمی","outOfDate","thumb-down"],["مشکل ترجمه","translationIssue","thumb-down"],["مشکل کد / نمونهها","samplesCodeIssue","thumb-down"],["غیره","otherDown","thumb-down"]],["تاریخ آخرین بهروزرسانی 2025-07-29 بهوقت ساعت هماهنگ جهانی."],[],[],null,["# Table\n\n[TableLayout](/reference/android/widget/TableLayout) is a [ViewGroup](/reference/android/view/ViewGroup) that\ndisplays child [View](/reference/android/view/View) elements in rows and columns.\n\n**Note:**\nFor better performance and tooling support, you should instead [build your layout with ConstraintLayout](/training/constraint-layout).\n\n\n[TableLayout](/reference/android/widget/TableLayout) positions its children into rows and\ncolumns. TableLayout containers do not display border lines for their rows,\ncolumns, or cells. The table will have as many columns as the row with the\nmost cells. A table can leave cells empty. Cells can span multiple columns,\nas they can in HTML. You can span columns by using the `span`\nfield in the [TableRow.LayoutParams](/reference/android/widget/TableRow.LayoutParams) class.\n\n\n**Note:** Cells cannot span multiple rows.\n\n\n[TableRow](/reference/android/widget/TableRow) objects are the child views of a TableLayout\n(each TableRow defines a single row in the table). Each row has zero or more\ncells, each of which is defined by any kind of other View. So, the cells of\na row may be composed of a variety of View objects, like ImageView or\nTextView objects. A cell may also be a ViewGroup object (for example, you\ncan nest another TableLayout as a cell).\n\n\nThe following sample layout has two rows and two cells in each. The\naccompanying screenshot shows the result, with cell borders displayed as\ndotted lines (added for visual effect). \n\n```xml\n\u003c?xml version=\"1.0\" encoding=\"utf-8\"?\u003e\n\u003cTableLayout xmlns:android=\"http://schemas.android.com/apk/res/android\"\n android:layout_width=\"match_parent\"\n android:layout_height=\"match_parent\"\n android:stretchColumns=\"1\"\u003e\n \u003cTableRow\u003e\n \u003cTextView\n android:text=\"@string/table_layout_4_open\"\n android:padding=\"3dip\" /\u003e\n \u003cTextView\n android:text=\"@string/table_layout_4_open_shortcut\"\n android:gravity=\"right\"\n android:padding=\"3dip\" /\u003e\n \u003c/TableRow\u003e\n\n \u003cTableRow\u003e\n \u003cTextView\n android:text=\"@string/table_layout_4_save\"\n android:padding=\"3dip\" /\u003e\n \u003cTextView\n android:text=\"@string/table_layout_4_save_shortcut\"\n android:gravity=\"right\"\n android:padding=\"3dip\" /\u003e\n \u003c/TableRow\u003e\n\u003c/TableLayout\u003e\n```\n\nColumns can be hidden, marked to stretch and fill the available screen space,\nor can be marked as shrinkable to force the column to shrink until the table\nfits the screen. See the [TableLayout reference](/reference/android/widget/TableLayout)\ndocumentation for more details.\n\nExample\n-------\n\n1. Start a new project named *HelloTableLayout*.\n2. Open the `res/layout/main.xml` file and insert the following: \n\n ```xml\n \u003c?xml version=\"1.0\" encoding=\"utf-8\"?\u003e\n \u003cTableLayout xmlns:android=\"http://schemas.android.com/apk/res/android\"\n android:layout_width=\"match_parent\"\n android:layout_height=\"match_parent\"\n android:stretchColumns=\"1\"\u003e\n\n \u003cTableRow\u003e\n \u003cTextView\n android:layout_column=\"1\"\n android:text=\"Open...\"\n android:padding=\"3dip\" /\u003e\n \u003cTextView\n android:text=\"Ctrl-O\"\n android:gravity=\"right\"\n android:padding=\"3dip\" /\u003e\n \u003c/TableRow\u003e\n\n \u003cTableRow\u003e\n \u003cTextView\n android:layout_column=\"1\"\n android:text=\"Save...\"\n android:padding=\"3dip\" /\u003e\n \u003cTextView\n android:text=\"Ctrl-S\"\n android:gravity=\"right\"\n android:padding=\"3dip\" /\u003e\n \u003c/TableRow\u003e\n\n \u003cTableRow\u003e\n \u003cTextView\n android:layout_column=\"1\"\n android:text=\"Save As...\"\n android:padding=\"3dip\" /\u003e\n \u003cTextView\n android:text=\"Ctrl-Shift-S\"\n android:gravity=\"right\"\n android:padding=\"3dip\" /\u003e\n \u003c/TableRow\u003e\n\n \u003cView\n android:layout_height=\"2dip\"\n android:background=\"#FF909090\" /\u003e\n\n \u003cTableRow\u003e\n \u003cTextView\n android:text=\"X\"\n android:padding=\"3dip\" /\u003e\n \u003cTextView\n android:text=\"Import...\"\n android:padding=\"3dip\" /\u003e\n \u003c/TableRow\u003e\n\n \u003cTableRow\u003e\n \u003cTextView\n android:text=\"X\"\n android:padding=\"3dip\" /\u003e\n \u003cTextView\n android:text=\"Export...\"\n android:padding=\"3dip\" /\u003e\n \u003cTextView\n android:text=\"Ctrl-E\"\n android:gravity=\"right\"\n android:padding=\"3dip\" /\u003e\n \u003c/TableRow\u003e\n\n \u003cView\n android:layout_height=\"2dip\"\n android:background=\"#FF909090\" /\u003e\n\n \u003cTableRow\u003e\n \u003cTextView\n android:layout_column=\"1\"\n android:text=\"Quit\"\n android:padding=\"3dip\" /\u003e\n \u003c/TableRow\u003e\n \u003c/TableLayout\u003e\n ```\n\n Notice how this resembles the structure of an HTML table. The [TableLayout](/reference/android/widget/TableLayout)\n element is like the HTML `\u003ctable\u003e` element; [TableRow](/reference/android/widget/TableRow) is like\n a `\u003e\u003ctr\u003e\u003e` element;\n but for the cells, you can use any kind of [View](/reference/android/view/View) element. In this example, a\n [TextView](/reference/android/widget/TextView) is used for each cell. In between some of the rows, there is also a\n basic [View](/reference/android/view/View), which is used to draw a horizontal line.\n3. Make sure your *HelloTableLayout* Activity loads this layout in the [onCreate()](/reference/android/app/Activity#onCreate(android.os.Bundle)) method: \n\n ### Kotlin\n\n ```kotlin\n override fun onCreate(savedInstanceState: Bundle?) {\n super.onCreate(savedInstanceState)\n setContentView(R.layout.main)\n }\n ```\n\n ### Java\n\n ```java\n public void onCreate(Bundle savedInstanceState) {\n super.onCreate(savedInstanceState);\n setContentView(R.layout.main);\n }\n ```\n\n The [setContentView(int)](/reference/android/app/Activity#setContentView(int)) method loads the\n layout file for the [Activity](/reference/android/app/Activity), specified by the resource\n ID --- `R.layout.main` refers to the `res/layout/main.xml` layout\n file.\n4. Run the application.\n\nYou should see the following:"]]