
자동 완성 서비스는 다른 앱의 뷰에 데이터를 삽입하여 사용자가 양식을 쉽게 작성할 수 있도록 지원하는 앱입니다. 자동 완성 서비스는 앱의 뷰에서 사용자 데이터를 가져오고 나중에 사용하기 위해 저장할 수도 있습니다. 자동 완성 서비스는 일반적으로 사용자 데이터를 관리하는 앱(예: 비밀번호 관리자)에서 제공됩니다.
Android에서는 Android 8.0(API 수준 26) 이상에서 제공되는 자동 완성 프레임워크로 쉽게 양식을 작성할 수 있습니다. 사용자는 기기에 자동 완성 서비스를 제공하는 앱이 있을 때만 자동 완성 기능을 사용할 수 있습니다.
이 페이지에서는 앱에 자동 완성 서비스를 구현하는 방법을 보여줍니다. 서비스를 구현하는 방법을 보여주는 코드 샘플을 찾고 있다면 Java 또는 Kotlin의 AutofillFramework 샘플을 참고하세요. 자동 완성 서비스의 작동 방식에 관한 자세한 내용은 AutofillService 및 AutofillManager 클래스의 참조 페이지를 참고하세요.
매니페스트 선언 및 권한
자동 완성 서비스를 제공하는 앱에는 서비스의 구현을 설명하는 선언을 포함해야 합니다. 이 선언을 지정하려면 앱 매니페스트에 <service> 요소를 넣습니다. <service> 요소는 다음 속성과 요소를 포함해야 합니다.
- 서비스를 구현하는 앱에서
AutofillService의 서브클래스를 가리키는android:name속성 BIND_AUTOFILL_SERVICE권한을 선언하는android:permission속성- 필수
<action>하위 요소가android.service.autofill.AutofillService작업을 지정하는<intent-filter>요소 - 서비스에 추가 구성 매개변수를 제공하는 데 사용할 수 있는
<meta-data>요소(선택사항)
다음 예는 자동 완성 서비스의 선언을 나타냅니다.
<service
    android:name=".MyAutofillService"
    android:label="My Autofill Service"
    android:permission="android.permission.BIND_AUTOFILL_SERVICE">
    <intent-filter>
        <action android:name="android.service.autofill.AutofillService" />
    </intent-filter>
    <meta-data
        android:name="android.autofill"
        android:resource="@xml/service_configuration" />
</service>
<meta-data> 요소에는 서비스에 관한 더 자세한 내용이 포함된 XML 리소스를 가리키는 android:resource 속성이 포함됩니다. 앞의 예에서 service_configuration 리소스는 사용자가 서비스를 구성할 수 있도록 허용하는 활동을 지정합니다. 다음 예는 service_configuration XML 리소스를 나타냅니다.
<autofill-service
  xmlns:android="http://schemas.android.com/apk/res/android"
  android:settingsActivity="com.example.android.SettingsActivity" />
XML 리소스에 관한 자세한 내용은 앱 리소스 개요를 참고하세요.
서비스 활성화를 위한 메시지 표시
앱을 자동 완성 서비스로 사용하려면 앱이 BIND_AUTOFILL_SERVICE 권한을 선언하고, 사용자가 기기 설정에서 이를 사용 설정해야 합니다. 앱에서 자동 완성 서비스가 사용 설정된 서비스인지 확인하려면 AutofillManager 클래스의 hasEnabledAutofillServices() 메서드를 호출하면 됩니다.
앱이 현재 자동 완성 서비스가 아닌 경우 ACTION_REQUEST_SET_AUTOFILL_SERVICE 인텐트를 사용하여 사용자에게 자동 완성 설정을 변경하라고 요청할 수 있습니다. 인텐트는 사용자가 호출자의 패키지와 일치하는 자동 완성 서비스를 선택한 경우 RESULT_OK 값을 반환합니다.
클라이언트 뷰 작성
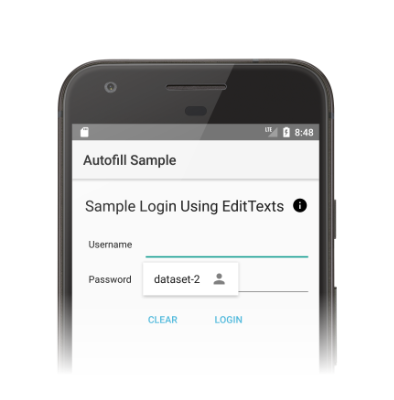
자동 완성 서비스는 사용자가 다른 앱과 상호작용할 때 클라이언트 뷰를 작성하라는 요청을 받습니다. 자동 완성 서비스에 해당 요청을 만족하는 사용자 데이터가 있는 경우, 데이터는 응답과 함께 전송됩니다. Android 시스템은 그림 1과 같이 사용 가능한 데이터를 포함한 자동 완성 UI를 표시합니다.
자동 완성 프레임워크는 Android 시스템이 자동 완성 서비스에 바인딩되는 시간을 최소화하도록 설계된 뷰를 작성하는 워크플로를 정의합니다. Android 시스템은 요청마다 onFillRequest() 메서드를 호출하여 서비스에 AssistStructure 객체를 전송합니다.
자동 완성 서비스는 이전에 저장한 사용자 데이터로 요청을 충족할 수 있는지 확인합니다. 요청을 충족할 수 있는 경우, 서비스는 해당 데이터를 Dataset 객체에 패키징합니다. 서비스는 onSuccess() 메서드를 호출하여 Dataset 객체가 포함된 FillResponse 객체를 전달합니다. 서비스가 요청을 충족할 만한 데이터를 가지고 있지 않은 경우, 서비스는 onSuccess() 메서드에 null을 전달합니다. 요청을 처리하는 중에 오류가 발생하면 서비스가 onFailure() 메서드를 호출합니다.
워크플로에 관한 자세한 내용은 AutofillService 참조 페이지의 설명을 참고하세요.
다음 코드는 onFillRequest() 메서드의 예를 보여줍니다.
Kotlin
override fun onFillRequest(
    request: FillRequest,
    cancellationSignal: CancellationSignal,
    callback: FillCallback
) {
    // Get the structure from the request
    val context: List<FillContext> = request.fillContexts
    val structure: AssistStructure = context[context.size - 1].structure

    // Traverse the structure looking for nodes to fill out
    val parsedStructure: ParsedStructure = parseStructure(structure)

    // Fetch user data that matches the fields
    val (username: String, password: String) = fetchUserData(parsedStructure)

    // Build the presentation of the datasets
    val usernamePresentation = RemoteViews(packageName, android.R.layout.simple_list_item_1)
    usernamePresentation.setTextViewText(android.R.id.text1, "my_username")
    val passwordPresentation = RemoteViews(packageName, android.R.layout.simple_list_item_1)
    passwordPresentation.setTextViewText(android.R.id.text1, "Password for my_username")

    // Add a dataset to the response
    val fillResponse: FillResponse = FillResponse.Builder()
            .addDataset(Dataset.Builder()
                    .setValue(
                            parsedStructure.usernameId,
                            AutofillValue.forText(username),
                            usernamePresentation
                    )
                    .setValue(
                            parsedStructure.passwordId,
                            AutofillValue.forText(password),
                            passwordPresentation
                    )
                    .build())
            .build()

    // If there are no errors, call onSuccess() and pass the response
    callback.onSuccess(fillResponse)
}

data class ParsedStructure(var usernameId: AutofillId, var passwordId: AutofillId)

data class UserData(var username: String, var password: String)
자바
@Override
public void onFillRequest(FillRequest request, CancellationSignal cancellationSignal, FillCallback callback) {
    // Get the structure from the request
    List<FillContext> context = request.getFillContexts();
    AssistStructure structure = context.get(context.size() - 1).getStructure();

    // Traverse the structure looking for nodes to fill out
    ParsedStructure parsedStructure = parseStructure(structure);

    // Fetch user data that matches the fields
    UserData userData = fetchUserData(parsedStructure);

    // Build the presentation of the datasets
    RemoteViews usernamePresentation = new RemoteViews(getPackageName(), android.R.layout.simple_list_item_1);
    usernamePresentation.setTextViewText(android.R.id.text1, "my_username");
    RemoteViews passwordPresentation = new RemoteViews(getPackageName(), android.R.layout.simple_list_item_1);
    passwordPresentation.setTextViewText(android.R.id.text1, "Password for my_username");

    // Add a dataset to the response
    FillResponse fillResponse = new FillResponse.Builder()
            .addDataset(new Dataset.Builder()
                    .setValue(parsedStructure.usernameId,
                            AutofillValue.forText(userData.username), usernamePresentation)
                    .setValue(parsedStructure.passwordId,
                            AutofillValue.forText(userData.password), passwordPresentation)
                    .build())
            .build();

    // If there are no errors, call onSuccess() and pass the response
    callback.onSuccess(fillResponse);
}

class ParsedStructure {
    AutofillId usernameId;
    AutofillId passwordId;
}

class UserData {
    String username;
    String password;
}
한 서비스에 요청을 충족하는 데이터 세트가 두 개 이상 있을 수 있습니다. 이 경우, Android 시스템은 자동 완성 UI에 여러 개의 옵션(데이터 세트마다 하나씩)을 표시합니다. 다음 코드 예는 응답 하나에서 여러 개의 데이터 세트를 제공하는 방법을 보여줍니다.
Kotlin
// Add multiple datasets to the response
val fillResponse: FillResponse = FillResponse.Builder()
        .addDataset(Dataset.Builder()
                .setValue(parsedStructure.usernameId,
                        AutofillValue.forText(user1Data.username), username1Presentation)
                .setValue(parsedStructure.passwordId,
                        AutofillValue.forText(user1Data.password), password1Presentation)
                .build())
        .addDataset(Dataset.Builder()
                .setValue(parsedStructure.usernameId,
                        AutofillValue.forText(user2Data.username), username2Presentation)
                .setValue(parsedStructure.passwordId,
                        AutofillValue.forText(user2Data.password), password2Presentation)
                .build())
        .build()
자바
// Add multiple datasets to the response
FillResponse fillResponse = new FillResponse.Builder()
        .addDataset(new Dataset.Builder()
                .setValue(parsedStructure.usernameId,
                        AutofillValue.forText(user1Data.username), username1Presentation)
                .setValue(parsedStructure.passwordId,
                        AutofillValue.forText(user1Data.password), password1Presentation)
                .build())
        .addDataset(new Dataset.Builder()
                .setValue(parsedStructure.usernameId,
                        AutofillValue.forText(user2Data.username), username2Presentation)
                .setValue(parsedStructure.passwordId,
                        AutofillValue.forText(user2Data.password), password2Presentation)
                .build())
        .build();
자동 완성 서비스는 AssistStructure의 ViewNode 객체로 이동하여 요청을 충족하는 데 필요한 자동 완성 데이터를 검색할 수 있습니다.
서비스는 ViewNode 클래스의 메서드(예: getAutofillId())를 사용하여 자동 완성 데이터를 가져올 수 있습니다.
서비스는 뷰의 콘텐츠가 요청을 충족할 수 있는지 확인하기 위해 콘텐츠를 설명할 수 있어야 합니다. 서비스가 뷰의 콘텐츠를 설명할 때 사용할 수 있는 첫 번째 접근 방법은 autofillHints 속성을 사용하는 것입니다. 그러나 클라이언트 앱이 뷰에서 이 속성을 명시적으로 제공해야만 서비스에서 이 속성을 사용할 수 있습니다.
클라이언트 앱이 autofillHints 속성을 제공하지 않는 경우, 서비스는 자체적인 휴리스틱을 사용하여 콘텐츠를 설명해야 합니다. 서비스는 다른 클래스의 메서드(예: getText(), getHint())를 사용하여 뷰 콘텐츠에 관한 정보를 가져올 수 있습니다. 자세한 내용은 자동 완성에 맞는 힌트 제공을 참고하세요.
다음 예는 AssistStructure를 순회하고 ViewNode 객체에서 자동 완성 데이터를 가져오는 방법을 보여줍니다.
Kotlin
fun traverseStructure(structure: AssistStructure) {
    val windowNodes: List<AssistStructure.WindowNode> =
            structure.run {
                (0 until windowNodeCount).map { getWindowNodeAt(it) }
            }

    windowNodes.forEach { windowNode: AssistStructure.WindowNode ->
        val viewNode: ViewNode? = windowNode.rootViewNode
        traverseNode(viewNode)
    }
}

fun traverseNode(viewNode: ViewNode?) {
    if (viewNode?.autofillHints?.isNotEmpty() == true) {
        // If the client app provides autofill hints, you can obtain them using
        // viewNode.getAutofillHints();
    } else {
        // Or use your own heuristics to describe the contents of a view
        // using methods such as getText() or getHint()
    }

    val children: List<ViewNode>? =
            viewNode?.run {
                (0 until childCount).map { getChildAt(it) }
            }

    children?.forEach { childNode: ViewNode ->
        traverseNode(childNode)
    }
}
자바
public void traverseStructure(AssistStructure structure) {
    int nodes = structure.getWindowNodeCount();

    for (int i = 0; i < nodes; i++) {
        WindowNode windowNode = structure.getWindowNodeAt(i);
        ViewNode viewNode = windowNode.getRootViewNode();
        traverseNode(viewNode);
    }
}

public void traverseNode(ViewNode viewNode) {
    if(viewNode.getAutofillHints() != null && viewNode.getAutofillHints().length > 0) {
        // If the client app provides autofill hints, you can obtain them using
        // viewNode.getAutofillHints();
    } else {
        // Or use your own heuristics to describe the contents of a view
        // using methods such as getText() or getHint()
    }

    for(int i = 0; i < viewNode.getChildCount(); i++) {
        ViewNode childNode = viewNode.getChildAt(i);
        traverseNode(childNode);
    }
}
사용자 데이터 저장
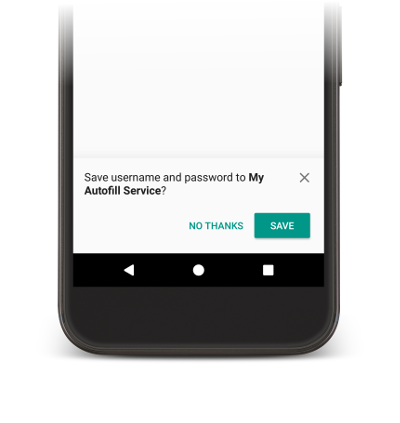
자동 완성 서비스는 앱에서 뷰를 작성하기 위해 사용자 데이터를 필요로 합니다. 사용자가 직접 뷰를 작성할 경우, 그림 2와 같이 현재 자동 완성 서비스에 데이터를 저장하라는 메시지가 표시됩니다.
데이터를 저장하려면 서비스가 나중에 사용하기 위해 데이터를 저장하려고 한다는 의도를 표시해야 합니다. Android 시스템이 데이터 저장 요청을 보내기 전에, 서비스가 뷰를 작성할 수 있는 작성 요청이 있습니다. 데이터 저장에 관심이 있음을 나타내기 위해 이 서비스는 작성 요청에 대한 응답에 SaveInfo 객체를 포함합니다. SaveInfo 객체에는 최소 다음의 데이터가 포함됩니다.
- 저장되는 사용자 데이터 유형. 사용 가능한
SAVE_DATA값의 목록은SaveInfo를 참고하세요. - 저장 요청을 트리거하기 위해 변경해야 할 최소한의 뷰 세트.
예를 들어 로그인 양식의 경우 일반적으로 사용자가
username및password뷰를 업데이트해야 저장 요청을 트리거할 수 있습니다.
다음 코드 예에서 알 수 있듯이 SaveInfo 객체는 FillResponse 객체와 연결됩니다.
Kotlin
override fun onFillRequest(
    request: FillRequest,
    cancellationSignal: CancellationSignal,
    callback: FillCallback
) {
    // ...
    // Builder object requires a non-null presentation
    val notUsed = RemoteViews(packageName, android.R.layout.simple_list_item_1)

    val fillResponse: FillResponse = FillResponse.Builder()
            .addDataset(
                    Dataset.Builder()
                            .setValue(parsedStructure.usernameId, null, notUsed)
                            .setValue(parsedStructure.passwordId, null, notUsed)
                            .build()
            )
            .setSaveInfo(
                    SaveInfo.Builder(
                            SaveInfo.SAVE_DATA_TYPE_USERNAME or SaveInfo.SAVE_DATA_TYPE_PASSWORD,
                            arrayOf(parsedStructure.usernameId, parsedStructure.passwordId)
                    ).build()
            )
            .build()
    // ...
}
자바
@Override
public void onFillRequest(FillRequest request, CancellationSignal cancellationSignal, FillCallback callback) {
    // ...
    // Builder object requires a non-null presentation
    RemoteViews notUsed = new RemoteViews(getPackageName(), android.R.layout.simple_list_item_1);

    FillResponse fillResponse = new FillResponse.Builder()
            .addDataset(new Dataset.Builder()
                    .setValue(parsedStructure.usernameId, null, notUsed)
                    .setValue(parsedStructure.passwordId, null, notUsed)
                    .build())
            .setSaveInfo(new SaveInfo.Builder(
                    SaveInfo.SAVE_DATA_TYPE_USERNAME | SaveInfo.SAVE_DATA_TYPE_PASSWORD,
                    new AutofillId[] {parsedStructure.usernameId, parsedStructure.passwordId})
                    .build())
            .build();
    // ...
}
자동 완성 서비스는 onSaveRequest() 메서드에서 사용자 데이터를 유지하는 로직을 구현할 수 있습니다. 이는 대체로 클라이언트 활동이 종료된 후 또는 클라이언트 앱이 commit()을 호출할 때 호출됩니다. 다음 코드는 onSaveRequest() 메서드의 예를 보여줍니다.
Kotlin
override fun onSaveRequest(request: SaveRequest, callback: SaveCallback) {
    // Get the structure from the request
    val context: List<FillContext> = request.fillContexts
    val structure: AssistStructure = context[context.size - 1].structure

    // Traverse the structure looking for data to save
    traverseStructure(structure)

    // Persist the data - if there are no errors, call onSuccess()
    callback.onSuccess()
}
자바
@Override
public void onSaveRequest(SaveRequest request, SaveCallback callback) {
    // Get the structure from the request
    List<FillContext> context = request.getFillContexts();
    AssistStructure structure = context.get(context.size() - 1).getStructure();

    // Traverse the structure looking for data to save
    traverseStructure(structure);

    // Persist the data - if there are no errors, call onSuccess()
    callback.onSuccess();
}
자동 완성 서비스는 민감한 데이터를 유지하기 전에 암호화해야 합니다. 하지만, 사용자 데이터에는 민감하지 않은 라벨이나 데이터가 포함될 수 있습니다. 예를 들어 사용자 계정에는 데이터를 업무 또는 개인 계정으로 표시하는 라벨이 포함될 수 있습니다. 서비스는 라벨을 암호화해서는 안 됩니다. 라벨을 암호화하지 않아야 사용자가 인증하지 않은 경우 서비스에서 프레젠테이션 뷰의 라벨을 사용할 수 있습니다. 그런 다음, 사용자가 인증하면 서비스에서 라벨을 실제 데이터로 대체할 수 있습니다.
자동 완성 저장 UI 연기
Android 10부터는 여러 화면을 사용하여 자동 완성 워크플로를 구현할 경우(예: 사용자 이름 필드를 위한 화면 1개와 비밀번호를 위한 화면 1개), SaveInfo.FLAG_DELAY_SAVE 플래그를 사용하여 자동 완성 저장 UI를 연기할 수 있습니다.
이 플래그를 설정하면 SaveInfo 응답과 연결된 자동 완성 컨텍스트가 커밋될 때 자동 완성 저장 UI가 트리거되지 않습니다. 대신, 같은 작업 내에 있는 별도의 활동을 사용하여 나중에 작성 요청을 전달한 다음 저장 요청을 사용하여 UI를 표시할 수 있습니다. 자세한 내용은 SaveInfo.FLAG_DELAY_SAVE를 참고하세요.
사용자 인증 필요
자동 완성 서비스에서는 뷰를 작성하려면 사용자에게 인증을 요구함으로써 보안 수준을 강화할 수 있습니다. 다음 시나리오는 사용자 인증을 구현하는 데 좋은 방법입니다.
- 앱의 사용자 데이터는 기본 비밀번호 또는 지문 스캔을 사용하여 잠금 해제해야 합니다.
- 카드 인증 코드(CVC)를 사용하여 신용카드 세부정보와 같은 특정 데이터 세트를 잠금 해제해야 합니다.
데이터 잠금 해제를 하려면 사용자 인증을 요구하는 서비스에서는 표준 문안 데이터 또는 라벨을 제공하고 인증을 처리할 Intent를 지정할 수 있습니다. 인증 플로가 완료된 뒤에 요청을 처리하기 위해 추가 데이터가 필요한 경우, 필요한 데이터를 인텐트에 추가하면 됩니다. 그러면 인증 활동이 앱의 AutofillService 클래스에 데이터를 반환할 수 있습니다.
다음 코드 예는 요청에 인증이 필요하다고 지정하는 방법을 보여줍니다.
Kotlin
val authPresentation = RemoteViews(packageName, android.R.layout.simple_list_item_1).apply {
    setTextViewText(android.R.id.text1, "requires authentication")
}
val authIntent = Intent(this, AuthActivity::class.java).apply {
    // Send any additional data required to complete the request
    putExtra(MY_EXTRA_DATASET_NAME, "my_dataset")
}

val intentSender: IntentSender = PendingIntent.getActivity(
        this,
        1001,
        authIntent,
        PendingIntent.FLAG_CANCEL_CURRENT
).intentSender

// Build a FillResponse object that requires authentication
val fillResponse: FillResponse = FillResponse.Builder()
        .setAuthentication(autofillIds, intentSender, authPresentation)
        .build()
자바
RemoteViews authPresentation = new RemoteViews(getPackageName(), android.R.layout.simple_list_item_1);
authPresentation.setTextViewText(android.R.id.text1, "requires authentication");
Intent authIntent = new Intent(this, AuthActivity.class);

// Send any additional data required to complete the request
authIntent.putExtra(MY_EXTRA_DATASET_NAME, "my_dataset");
IntentSender intentSender = PendingIntent.getActivity(
                this,
                1001,
                authIntent,
                PendingIntent.FLAG_CANCEL_CURRENT
        ).getIntentSender();

// Build a FillResponse object that requires authentication
FillResponse fillResponse = new FillResponse.Builder()
        .setAuthentication(autofillIds, intentSender, authPresentation)
        .build();
활동이 인증 플로를 완료하고 나면 setResult() 메서드를 호출하여 RESULT_OK 값을 전달하고 데이터 세트가 채워진 FillResponse 객체에 추가로 EXTRA_AUTHENTICATION_RESULT를 설정해야 합니다. 다음 코드는 인증 플로가 완료된 후 결과를 반환하는 방법을 보여줍니다.
Kotlin
// The data sent by the service and the structure are included in the intent
val datasetName: String? = intent.getStringExtra(MY_EXTRA_DATASET_NAME)
val structure: AssistStructure = intent.getParcelableExtra(EXTRA_ASSIST_STRUCTURE)
val parsedStructure: ParsedStructure = parseStructure(structure)
val (username, password) = fetchUserData(parsedStructure)

// Build the presentation of the datasets
val usernamePresentation =
        RemoteViews(packageName, android.R.layout.simple_list_item_1).apply {
            setTextViewText(android.R.id.text1, "my_username")
        }
val passwordPresentation =
        RemoteViews(packageName, android.R.layout.simple_list_item_1).apply {
            setTextViewText(android.R.id.text1, "Password for my_username")
        }

// Add the dataset to the response
val fillResponse: FillResponse = FillResponse.Builder()
        .addDataset(Dataset.Builder()
                .setValue(
                        parsedStructure.usernameId,
                        AutofillValue.forText(username),
                        usernamePresentation
                )
                .setValue(
                        parsedStructure.passwordId,
                        AutofillValue.forText(password),
                        passwordPresentation
                )
                .build()
        ).build()

val replyIntent = Intent().apply {
    // Send the data back to the service
    putExtra(MY_EXTRA_DATASET_NAME, datasetName)
    putExtra(EXTRA_AUTHENTICATION_RESULT, fillResponse)
}

setResult(Activity.RESULT_OK, replyIntent)
자바
Intent intent = getIntent();

// The data sent by the service and the structure are included in the intent
String datasetName = intent.getStringExtra(MY_EXTRA_DATASET_NAME);
AssistStructure structure = intent.getParcelableExtra(EXTRA_ASSIST_STRUCTURE);
ParsedStructure parsedStructure = parseStructure(structure);
UserData userData = fetchUserData(parsedStructure);

// Build the presentation of the datasets
RemoteViews usernamePresentation = new RemoteViews(getPackageName(), android.R.layout.simple_list_item_1);
usernamePresentation.setTextViewText(android.R.id.text1, "my_username");
RemoteViews passwordPresentation = new RemoteViews(getPackageName(), android.R.layout.simple_list_item_1);
passwordPresentation.setTextViewText(android.R.id.text1, "Password for my_username");

// Add the dataset to the response
FillResponse fillResponse = new FillResponse.Builder()
        .addDataset(new Dataset.Builder()
                .setValue(parsedStructure.usernameId,
                        AutofillValue.forText(userData.username), usernamePresentation)
                .setValue(parsedStructure.passwordId,
                        AutofillValue.forText(userData.password), passwordPresentation)
                .build())
        .build();

Intent replyIntent = new Intent();

// Send the data back to the service
replyIntent.putExtra(MY_EXTRA_DATASET_NAME, datasetName);
replyIntent.putExtra(EXTRA_AUTHENTICATION_RESULT, fillResponse);

setResult(RESULT_OK, replyIntent);
신용카드 데이터 세트를 잠금 해제해야 하는 시나리오에서는 서비스가 CVC를 요청하는 UI를 표시하면 됩니다. 데이터 세트가 잠금 해제될 때까지 표준 문안 데이터(예: 은행 이름, 신용카드 번호의 마지막 네 자리)를 표시하여 데이터를 숨길 수 있습니다. 다음 예는 데이터 세트에 관한 인증을 요구하며 사용자가 CVC를 제공할 때까지 데이터를 숨기는 방법을 보여줍니다.
Kotlin
// Parse the structure and fetch payment data
val parsedStructure: ParsedStructure = parseStructure(structure)
val paymentData: Payment = fetchPaymentData(parsedStructure)

// Build the presentation that shows the bank and the last four digits of the
// credit card number, such as 'Bank-1234'
val maskedPresentation: String = "${paymentData.bank}-" +
        paymentData.creditCardNumber.substring(paymentData.creditCardNumber.length - 4)
val authPresentation = RemoteViews(packageName, android.R.layout.simple_list_item_1).apply {
    setTextViewText(android.R.id.text1, maskedPresentation)
}

// Prepare an intent that displays the UI that asks for the CVC
val cvcIntent = Intent(this, CvcActivity::class.java)
val cvcIntentSender: IntentSender = PendingIntent.getActivity(
        this,
        1001,
        cvcIntent,
        PendingIntent.FLAG_CANCEL_CURRENT
).intentSender

// Build a FillResponse object that includes a Dataset that requires authentication
val fillResponse: FillResponse = FillResponse.Builder()
        .addDataset(
                Dataset.Builder()
                        // The values in the dataset are replaced by the actual
                        // data once the user provides the CVC
                        .setValue(parsedStructure.creditCardId, null, authPresentation)
                        .setValue(parsedStructure.expDateId, null, authPresentation)
                        .setAuthentication(cvcIntentSender)
                        .build()
        ).build()
자바
// Parse the structure and fetch payment data
ParsedStructure parsedStructure = parseStructure(structure);
Payment paymentData = fetchPaymentData(parsedStructure);

// Build the presentation that shows the bank and the last four digits of the
// credit card number, such as 'Bank-1234'
String maskedPresentation = paymentData.bank + "-" +
    paymentData.creditCardNumber.subString(paymentData.creditCardNumber.length - 4);
RemoteViews authPresentation = new RemoteViews(getPackageName(), android.R.layout.simple_list_item_1);
authPresentation.setTextViewText(android.R.id.text1, maskedPresentation);

// Prepare an intent that displays the UI that asks for the CVC
Intent cvcIntent = new Intent(this, CvcActivity.class);
IntentSender cvcIntentSender = PendingIntent.getActivity(
        this,
        1001,
        cvcIntent,
        PendingIntent.FLAG_CANCEL_CURRENT
).getIntentSender();

// Build a FillResponse object that includes a Dataset that requires authentication
FillResponse fillResponse = new FillResponse.Builder()
        .addDataset(new Dataset.Builder()
                // The values in the dataset are replaced by the actual
                // data once the user provides the CVC
                .setValue(parsedStructure.creditCardId, null, authPresentation)
                .setValue(parsedStructure.expDateId, null, authPresentation)
                .setAuthentication(cvcIntentSender)
                .build())
        .build();
활동이 CVC를 인증하고 나면 setResult() 메서드를 호출하여 RESULT_OK 값을 전달하고, 신용카드 번호와 만료일이 포함된 Dataset 객체에 추가로 EXTRA_AUTHENTICATION_RESULT를 설정합니다. 인증이 필요한 데이터 세트가 새 데이터 세트로 대체되고 즉시 뷰가 작성됩니다. 다음 코드는 사용자가 CVC를 제공한 후 데이터 세트를 어떻게 반환하는지 보여줍니다.
Kotlin
// Parse the structure and fetch payment data.
val parsedStructure: ParsedStructure = parseStructure(structure)
val paymentData: Payment = fetchPaymentData(parsedStructure)

// Build a non-null RemoteViews object to use as the presentation when
// creating the Dataset object. This presentation isn't actually used, but the
// Builder object requires a non-null presentation.
val notUsed = RemoteViews(packageName, android.R.layout.simple_list_item_1)

// Create a dataset with the credit card number and expiration date.
val responseDataset: Dataset = Dataset.Builder()
        .setValue(
                parsedStructure.creditCardId,
                AutofillValue.forText(paymentData.creditCardNumber),
                notUsed
        )
        .setValue(
                parsedStructure.expDateId,
                AutofillValue.forText(paymentData.expirationDate),
                notUsed
        )
        .build()

val replyIntent = Intent().apply {
    putExtra(EXTRA_AUTHENTICATION_RESULT, responseDataset)
}
Java
// Parse the structure and fetch payment data.
ParsedStructure parsedStructure = parseStructure(structure);
Payment paymentData = fetchPaymentData(parsedStructure);

// Build a non-null RemoteViews object to use as the presentation when
// creating the Dataset object. This presentation isn't actually used, but the
// Builder object requires a non-null presentation.
RemoteViews notUsed = new RemoteViews(getPackageName(), android.R.layout.simple_list_item_1);

// Create a dataset with the credit card number and expiration date.
Dataset responseDataset = new Dataset.Builder()
        .setValue(parsedStructure.creditCardId,
                AutofillValue.forText(paymentData.creditCardNumber), notUsed)
        .setValue(parsedStructure.expDateId,
                AutofillValue.forText(paymentData.expirationDate), notUsed)
        .build();

Intent replyIntent = new Intent();
replyIntent.putExtra(EXTRA_AUTHENTICATION_RESULT, responseDataset);
논리적 그룹으로 데이터 정리
자동 완성 서비스는 개념을 다른 도메인으로부터 분리하는 논리적 그룹에 데이터를 구성해야 합니다. 이 페이지에서는 이러한 논리 그룹을 파티션이라고 합니다. 다음 목록은 파티션과 필드의 일반적 예를 나타냅니다.
- 사용자 인증 정보: 사용자 이름과 비밀번호 필드가 포함됩니다.
- 주소: 도로명, 구/군/시 및 우편번호 필드가 포함됩니다.
- 결제 정보: 신용카드 번호, 만료일 및 인증 코드 필드가 포함됩니다.
자동 완성 서비스가 데이터의 파티션을 올바로 나누면 사용자 데이터를 더욱 잘 보호할 수 있습니다. 데이터를 데이터 세트의 두 개 이상 파티션에 노출하지 않기 때문입니다. 예를 들어, 사용자 인증 정보가 포함된 데이터 세트에는 결제 정보를 포함할 필요가 없습니다. 데이터를 파티션으로 구성하면 서비스가 요청을 충족하는 데 필요한 최소한의 정보만 노출하게 됩니다.
데이터를 파티션으로 구성하면 서비스가 여러 파티션의 뷰가 있는 활동을 채우면서 관련 데이터를 최소한의 양만 클라이언트 앱에 전송할 수 있습니다. 예를 들어 사용자 이름, 비밀번호, 거리, 도시의 뷰가 포함된 활동과 다음 데이터가 있는 자동 완성 서비스를 생각해 보세요.
| 파티션 | 필드 1 | 필드 2 |
|---|---|---|
| 사용자 인증 정보 | work_username | work_password |
| personal_username | personal_password | |
| 주소 | work_street | work_city |
| personal_street | personal_city |
서비스는 업무 및 개인 계정 모두의 사용자 인증 정보 파티션을 포함하는 데이터 세트를 준비할 수 있습니다. 사용자가 데이터 세트를 선택하면 후속 자동 완성 응답은 사용자의 첫 번째 선택에 따라 직장 또는 개인 주소를 제공할 수 있습니다.
서비스는 AssistStructure 객체를 순회하는 동안 isFocused() 메서드를 호출해 요청을 보낸 필드를 식별할 수 있습니다.
이렇게 하면 서비스가 적절한 파티션 데이터로 FillResponse를 준비할 수 있습니다.
SMS 일회성 코드 자동 완성
자동 완성 서비스에서는 사용자가 SMS Retriever API를 사용하여 전송된 일회성 코드를 손쉽게 입력할 수 있습니다.
이 기능을 사용하려면 다음 요구사항을 충족해야 합니다.
- 자동 완성 서비스가 Android 9(API 수준 28) 이상에서 실행 중입니다.
- 사용자가 SMS에서 일회성 코드를 읽을 수 있도록 자동 완성 서비스에 동의합니다.
- 자동 완성이 제공되는 애플리케이션에서 일회성 코드를 읽는 데 아직 SMS Retriever API를 사용하고 있지 않습니다.
자동 완성 서비스는 SmsCodeAutofillClient를 사용할 수 있습니다. 이 요소는 Google Play 서비스 19.0.56 이상에서 SmsCodeRetriever.getAutofillClient()를 호출하여 사용할 수 있습니다.
자동 완성 서비스에서 이 API를 사용하는 기본 단계는 다음과 같습니다.
- 자동 완성 서비스의
SmsCodeAutofillClient에서hasOngoingSmsRequest를 사용하여, 자동 완성 기능을 사용 중인 애플리케이션의 패키지 이름에 이미 활성화된 요청이 있는지 확인합니다.false가 반환되는 경우에만 자동 완성 서비스에서 추천 메시지를 표시합니다. - 자동 완성 서비스의
SmsCodeAutofillClient에서checkPermissionState를 사용하여, 자동 완성 서비스에 일회성 코드를 자동 완성할 권한이 있는지 확인합니다. 이 권한 상태는NONE,GRANTED또는DENIED일 수 있습니다. 자동 완성 서비스는NONE및GRANTED상태인 경우에 추천 메시지를 표시합니다. - 자동 완성 인증 활동에서 SMS 코드 결과(사용 가능한 경우)를 받으려면
SmsRetriever.SEND_PERMISSION권한을 사용하여SmsCodeRetriever.SMS_CODE_RETRIEVED_ACTION을 수신 대기하는BroadcastReceiver를 등록합니다. SMS를 사용하여 전송된 일회성 코드를 수신 대기하려면
SmsCodeAutofillClient에서startSmsCodeRetriever를 호출합니다. 사용자가 SMS에서 일회용 코드를 가져올 권한을 자동 완성 서비스에 부여하면 이 코드는 권한을 부여받은 시간부터 1~5분 동안 수신된 SMS 메시지를 검색합니다.자동 완성 서비스에서 일회성 코드를 읽기 위해 사용자에게 권한을 요청해야 하는 경우
startSmsCodeRetriever에서 반환된Task에 오류가 발생하면서ResolvableApiException이 반환될 수 있습니다. 이 경우ResolvableApiException.startResolutionForResult()메서드를 호출하여 권한 요청의 동의 대화상자를 표시해야 합니다.인텐트에서 SMS 코드 결과를 수신한 후 SMS 코드를 자동 완성 응답으로 반환합니다.
Chrome에서 자동 완성 사용 설정하기
Chrome에서는 서드 파티 자동 완성 서비스가 기본적으로 양식을 자동 완성하여 사용자에게 더 원활하고 간단한 사용자 환경을 제공할 수 있습니다. 서드 파티 자동 완성 서비스를 사용하여 비밀번호, 패스키, 주소, 결제 데이터와 같은 기타 정보를 자동 완성하려면 사용자가 Chrome 설정에서 다른 서비스를 사용하여 자동 완성을 선택해야 합니다.
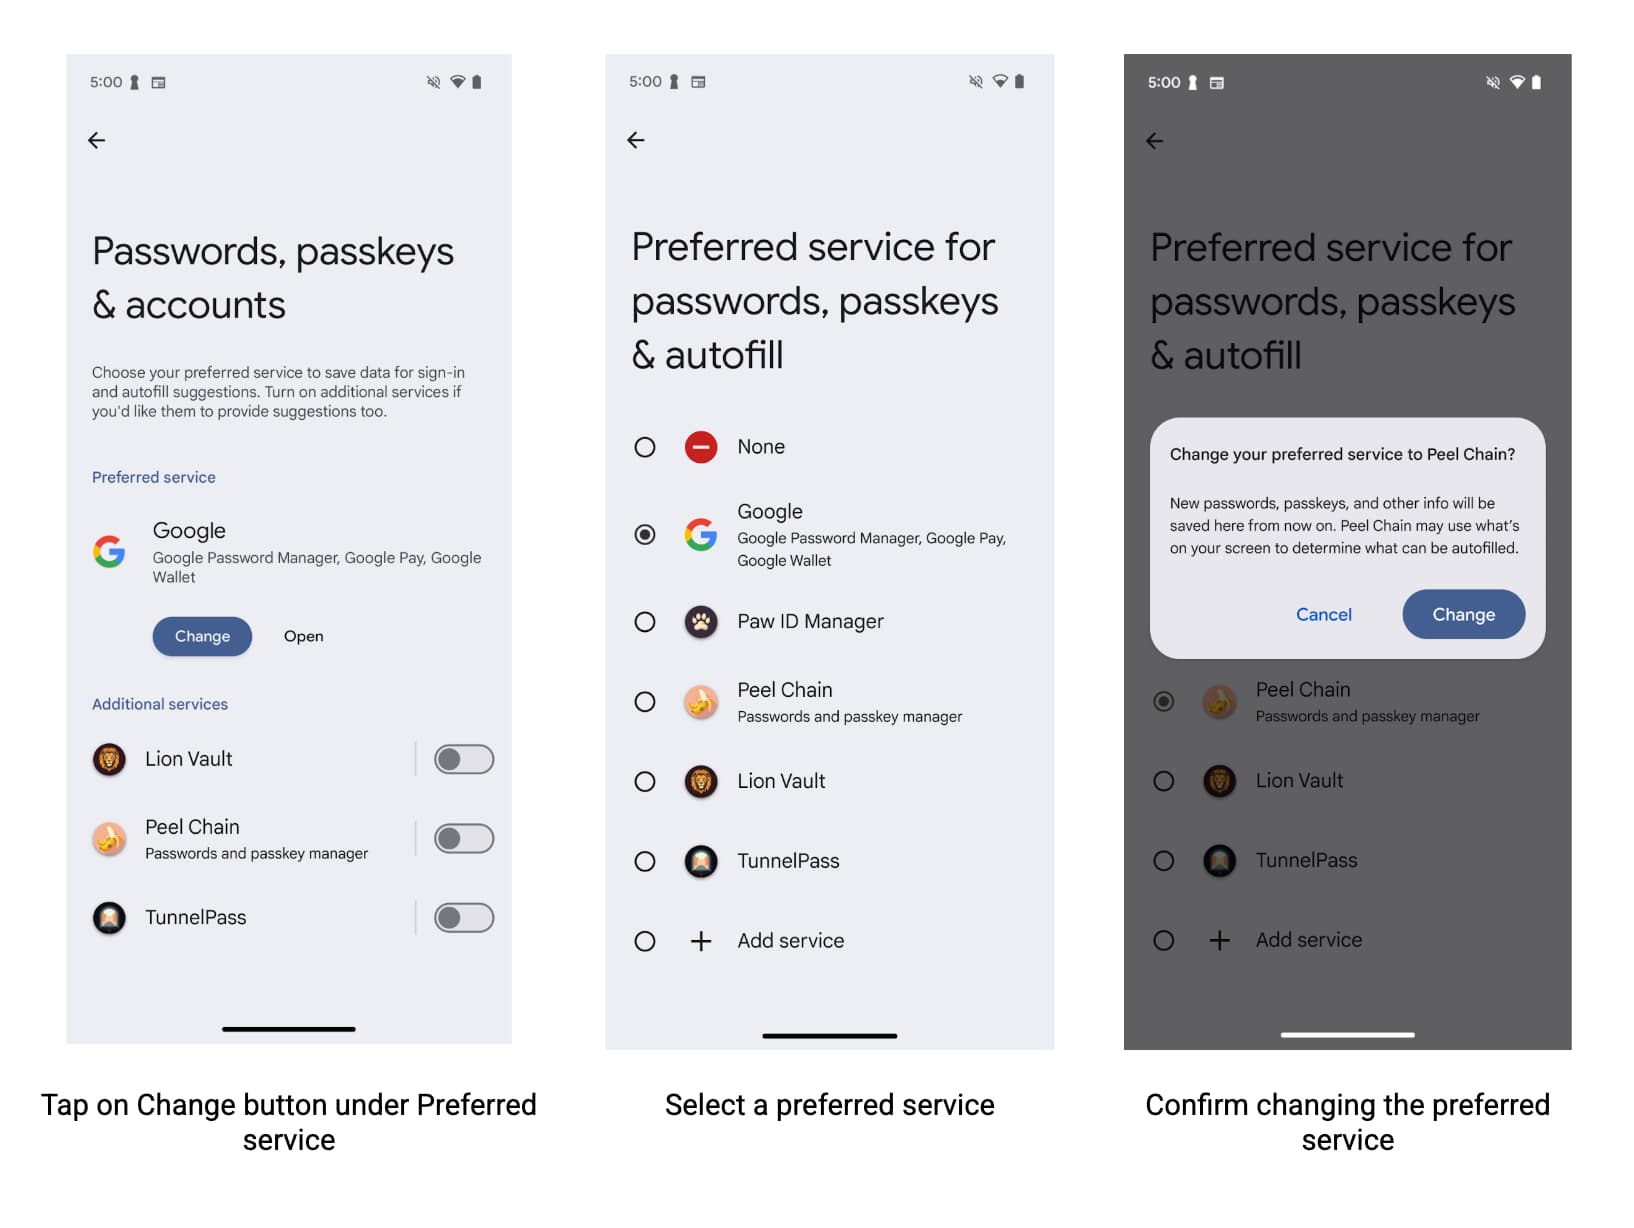
사용자가 Android에서 서비스와 Chrome을 통해 최상의 자동 완성 환경을 이용할 수 있도록 자동 완성 서비스 제공업체는 사용자에게 Chrome 설정에서 선호하는 서비스 제공업체를 지정하도록 권장해야 합니다.
사용자가 전환 버튼을 사용 설정하도록 지원하기 위해 개발자는 다음 작업을 할 수 있습니다.
- Chrome 설정을 쿼리하고 사용자가 서드 파티 자동 완성 서비스를 사용하기 원하는지 알아봅니다.
- 사용자가 서드 파티 자동 완성 서비스를 사용 설정할 수 있는 Chrome 설정 페이지로 연결되는 딥 링크
호환성 모드의 최대 Chrome 버전 지정
Chrome은 Android 자동 완성을 위해 버전 137부터 호환성 모드 지원을 중단했습니다. 호환성 모드를 유지하면 안정성 문제가 발생할 수 있습니다. 안정성을 위해 호환성 모드를 지원하는 Chrome 패키지의 최대 버전을 다음과 같이 지정합니다.
<autofill-service>
  ...
  <compatibility-package android:name="com.android.chrome" android:maxLongVersionCode="711900039" />
  <compatibility-package android:name="com.chrome.beta" android:maxLongVersionCode="711900039" />
  <compatibility-package android:name="com.chrome.dev" android:maxLongVersionCode="711900039" />
  <compatibility-package android:name="com.chrome.canary" android:maxLongVersionCode="711900039" />
  ...
</autofill-service>
Chrome 설정 읽기
모든 앱은 Chrome이 Android 자동 완성을 사용할 수 있는 서드 파티 자동 완성 모드를 사용하는지 읽을 수 있습니다. Chrome은 Android의 ContentProvider를 사용하여 이 정보를 전달합니다. Android 매니페스트에서 설정을 읽어올 채널을 선언합니다.
<uses-permission android:name="android.permission.READ_USER_DICTIONARY"/>
<queries>
 <!-- To Query Chrome Beta: -->
 <package android:name="com.chrome.beta" />

 <!-- To Query Chrome Stable: -->
 <package android:name="com.android.chrome" />
</queries>
그런 다음 Android의 ContentResolver를 사용하여 콘텐츠 URI를 빌드하여 정보를 요청합니다.
Kotlin
val CHROME_CHANNEL_PACKAGE = "com.android.chrome" // Chrome Stable.
val CONTENT_PROVIDER_NAME = ".AutofillThirdPartyModeContentProvider"
val THIRD_PARTY_MODE_COLUMN = "autofill_third_party_state"
val THIRD_PARTY_MODE_ACTIONS_URI_PATH = "autofill_third_party_mode"

val uri = Uri.Builder()
    .scheme(ContentResolver.SCHEME_CONTENT)
    .authority(CHROME_CHANNEL_PACKAGE + CONTENT_PROVIDER_NAME)
    .path(THIRD_PARTY_MODE_ACTIONS_URI_PATH)
    .build()

val cursor = contentResolver.query(
    uri,
    arrayOf(THIRD_PARTY_MODE_COLUMN), // projection
    null, // selection
    null, // selectionArgs
    null  // sortOrder
)

if (cursor == null) {
  // Terminate now! Chromium versions older than this don't provide this information.
}

cursor?.use { // Use the safe call operator and the use function for auto-closing
    if (it.moveToFirst()) { // Check if the cursor has any rows
        val index = it.getColumnIndex(THIRD_PARTY_MODE_COLUMN)
        if (index != -1) { // Check if the column exists
          val value = it.getInt(index)
          if (0 == value) {
              // 0 means that the third party mode is turned off. Chrome uses its built-in
              // password manager. This is the default for new users.
          } else {
              // 1 means that the third party mode is turned on. Chrome forwards all
              // autofill requests to Android Autofill. Users have to opt-in for this.
          }
        } else {
          // Handle the case where the column doesn't exist.  Log a warning, perhaps.
          Log.w("Autofill", "Column $THIRD_PARTY_MODE_COLUMN not found in cursor")
        }
    }
} // The cursor is automatically closed here
자바
final String CHROME_CHANNEL_PACKAGE = "com.android.chrome";  // Chrome Stable.
final String CONTENT_PROVIDER_NAME = ".AutofillThirdPartyModeContentProvider";
final String THIRD_PARTY_MODE_COLUMN = "autofill_third_party_state";
final String THIRD_PARTY_MODE_ACTIONS_URI_PATH = "autofill_third_party_mode";

final Uri uri = new Uri.Builder()
                  .scheme(ContentResolver.SCHEME_CONTENT)
                  .authority(CHROME_CHANNEL_PACKAGE + CONTENT_PROVIDER_NAME)
                  .path(THIRD_PARTY_MODE_ACTIONS_URI_PATH)
                  .build();

final Cursor cursor = getContentResolver().query(
                  uri,
                  /*projection=*/new String[] {THIRD_PARTY_MODE_COLUMN},
                  /*selection=*/ null,
                  /*selectionArgs=*/ null,
                  /*sortOrder=*/ null);

if (cursor == null) {
  // Terminate now! Chromium versions older than this don't provide this information.
}

cursor.moveToFirst(); // Retrieve the result;

int index = cursor.getColumnIndex(THIRD_PARTY_MODE_COLUMN);

if (0 == cursor.getInt(index)) {
  // 0 means that the third party mode is turned off. Chrome uses its built-in
  // password manager. This is the default for new users.
} else {
  // 1 means that the third party mode is turned on. Chrome forwards all
  // autofill requests to Android Autofill. Users have to opt-in for this.
}
Chrome 설정으로 연결되는 딥 링크
사용자가 서드 파티 자동 완성 서비스를 사용 설정할 수 있는 Chrome 설정 페이지로 딥 링크하려면 Android Intent를 사용하세요. 이 예와 같이 작업과 카테고리를 구성해야 합니다.
Kotlin
val autofillSettingsIntent = Intent(Intent.ACTION_APPLICATION_PREFERENCES)
autofillSettingsIntent.addCategory(Intent.CATEGORY_DEFAULT)
autofillSettingsIntent.addCategory(Intent.CATEGORY_APP_BROWSER)
autofillSettingsIntent.addCategory(Intent.CATEGORY_PREFERENCE)

// Invoking the intent with a chooser allows users to select the channel they
// want to configure. If only one browser reacts to the intent, the chooser is
// skipped.
val chooser = Intent.createChooser(autofillSettingsIntent, "Pick Chrome Channel")
startActivity(chooser)

// If the caller knows which Chrome channel they want to configure,
// they can instead add a package hint to the intent, e.g.
val specificChromeIntent = Intent(Intent.ACTION_APPLICATION_PREFERENCES) // Create a *new* intent
specificChromeIntent.addCategory(Intent.CATEGORY_DEFAULT)
specificChromeIntent.addCategory(Intent.CATEGORY_APP_BROWSER)
specificChromeIntent.addCategory(Intent.CATEGORY_PREFERENCE)
specificChromeIntent.setPackage("com.android.chrome") // Set the package on the *new* intent
startActivity(specificChromeIntent) // Start the *new* intent
자바
Intent autofillSettingsIntent = new Intent(Intent.ACTION_APPLICATION_PREFERENCES);
autofillSettingsIntent.addCategory(Intent.CATEGORY_DEFAULT);
autofillSettingsIntent.addCategory(Intent.CATEGORY_APP_BROWSER);
autofillSettingsIntent.addCategory(Intent.CATEGORY_PREFERENCE);

// Invoking the intent with a chooser allows users to select the channel they
// want to configure. If only one browser reacts to the intent, the chooser is
// skipped.
Intent chooser = Intent.createChooser(autofillSettingsIntent, "Pick Chrome Channel");
startActivity(chooser);

// If the caller knows which Chrome channel they want to configure,
// they can instead add a package hint to the intent, e.g.
autofillSettingsIntent.setPackage("com.android.chrome");
startActivity(autofillSettingsIntent);
고급 자동 완성 시나리오
다음 시나리오에서 자동 완성 기능을 사용하세요.
키보드와 통합
Android 11부터는 플랫폼에서 풀다운 메뉴를 사용하는 대신 키보드 및 기타 입력 방식 편집기 (IME)를 사용하여 자동 완성 추천을 인라인으로 표시할 수 있습니다. 자동 완성 서비스에서 이 기능을 지원하는 방법에 관한 자세한 내용은 키보드와 자동 완성 통합을 참고하세요.
데이터 세트 페이지로 나누기
대량 자동 완성 응답의 경우 요청을 처리하는 데 필요한 원격 객체를 나타내는 Binder 객체의 허용된 트랜잭션 크기를 초과할 수 있습니다. 이 시나리오에서 Android 시스템이 예외를 발생시키지 않게 하려면, 한 번에 Dataset 객체를 20개 이하로 추가하여 FillResponse를 작은 크기로 유지하면 됩니다. 대답에 더 많은 데이터 세트가 필요한 경우, 사용자에게 더 많은 정보가 있다는 것을 알려주고 다음 데이터 세트 그룹(선택된 경우)을 가져오는 데이터 세트를 추가하면 됩니다. 자세한 내용은 addDataset(Dataset)를 참조하세요.
데이터 분할을 여러 화면에 저장
앱은 신규 사용자 계정을 만드는 등 동일한 활동 내에서 여러 화면에 사용자 데이터를 분할하는 경우가 많습니다. 예를 들어 첫 번째 화면에서 사용자 이름을 묻고 두 번째 화면에서 비밀번호를 묻습니다. 이 경우 자동 완성 서비스는 사용자가 관련 필드에 데이터를 모두 입력할 때까지 기다려야만 자동 완성 저장 UI를 표시할 수 있습니다. 이러한 시나리오를 처리하려면 다음 단계를 따르세요.
- 첫 번째 작성 요청에서 화면에 표시된 부분 필드의 자동 완성 ID가 포함된 클라이언트 상태 번들을 응답에 추가합니다.
- 두 번째 작성 요청에서 클라이언트 상태 번들을 검색하고 클라이언트 상태에서 이전 요청에 설정된 자동 완성 ID를 가져온 다음 이 ID와
FLAG_SAVE_ON_ALL_VIEWS_INVISIBLE플래그를 두 번째 응답에서 사용된SaveInfo객체에 추가합니다. 저장 요청에서 적절한
FillContext객체를 사용하여 각 필드의 값을 가져옵니다. 작성 요청 하나에 작성 컨텍스트가 하나씩 있습니다.자세한 내용은 여러 화면으로 분할된 데이터 저장을 참고하세요.
각 요청에 초기화 및 해제 로직 제공
Android 시스템은 자동 완성 요청이 있을 때마다 서비스에 바인딩되고 onConnected() 메서드를 호출합니다. 서비스가 요청을 처리하고 나면 Android 시스템이 onDisconnected() 메서드를 호출하고 서비스로부터 바인드를 해제합니다. onConnected()를 구현하여 요청을 처리하기 전에 실행되는 코드를 제공하고, onDisconnected()를 구현하여 요청을 처리한 후에 실행되는 코드를 제공할 수 있습니다.
자동 완성 저장 UI 맞춤 설정
자동 완성 서비스는 자동 완성 저장 UI를 맞춤설정하여 서비스에서 데이터를 저장하도록 할지 여부를 사용자가 결정할 수 있도록 합니다. 서비스는 텍스트 또는 맞춤 설정된 뷰를 통해 저장될 데이터에 관한 추가 정보를 제공할 수 있습니다. 또한 서비스는 저장 요청을 취소하는 버튼의 모양을 변경하고 사용자가 그 버튼을 탭하면 알림을 받을 수 있습니다.
자세한 내용은 SaveInfo 참조 문서를 확인하세요.
호환성 모드
호환성 모드에서는 자동 완성 서비스가 자동 완성 용도로 접근성 가상 구조를 사용할 수 있습니다. 이 기능은 자동 완성 API를 명시적으로 구현하지 않는 브라우저에서 자동 완성 기능을 제공하는 데 특히 유용합니다.
호환성 모드를 사용하여 자동 완성 서비스를 테스트하려면 호환성 모드를 필요로 하는 브라우저 또는 앱을 허용 목록에 명시적으로 추가해야 합니다. 다음 명령어를 실행하면 이미 허용 목록에 있는 패키지를 확인할 수 있습니다.
$ adb shell settings get global autofill_compat_mode_allowed_packages
테스트 중인 패키지가 목록에 없으면 다음 명령어를 실행하여 추가합니다. 여기서 pkgX는 앱의 패키지입니다.
$ adb shell settings put global autofill_compat_mode_allowed_packages pkg1[resId1]:pkg2[resId1,resId2]
앱이 브라우저인 경우 resIdx를 사용하여 렌더링된 페이지의 URL이 포함된 입력 필드의 리소스 ID를 지정합니다.
호환성 모드에는 다음과 같은 제한 사항이 있습니다.
- 저장 요청은 서비스가
FLAG_SAVE_ON_ALL_VIEWS_INVISIBLE플래그를 사용하거나setTrigger()메서드가 호출될 때 트리거됩니다.FLAG_SAVE_ON_ALL_VIEWS_INVISIBLE은 호환성 모드를 사용할 때 기본적으로 설정됩니다. onSaveRequest(SaveRequest, SaveCallback)메서드에서 노드의 텍스트 값을 사용하지 못할 수도 있습니다.
호환성 모드 및 그와 관련된 제한 사항에 관한 자세한 내용은 AutofillService 클래스 참조 문서를 참고하세요.