
หน้านี้อธิบายวิธีที่ SDK ของบุคคลที่สามสามารถผสานรวมการติดตั้งจากในหน้าเว็บ ซึ่งเป็นฟีเจอร์ทดสอบใหม่สำหรับ Google Play ที่แสดงรายละเอียดผลิตภัณฑ์แอป Google Play ในอินเทอร์เฟซแบบครึ่งหน้า การติดตั้งในบรรทัดช่วยให้ผู้ใช้ได้รับประสบการณ์การติดตั้งแอปที่ราบรื่นโดยไม่ต้องออกจากบริบทของแอป
นักพัฒนา SDK บุคคลที่สามสามารถผสานรวมฟีเจอร์การติดตั้งในบรรทัดเข้ากับ SDK ของตนเพื่อช่วยให้นักพัฒนาแอปที่ใช้ SDK เหล่านั้นเข้าถึงการติดตั้งในบรรทัดสำหรับแอปของตนได้
ข้อกำหนด
หากต้องการให้อินเทอร์เฟซครึ่งชีตของการติดตั้งแบบอินไลน์ปรากฏในแอป ให้ทำดังนี้
- Google Play ต้องมีเวอร์ชันขั้นต่ำเป็น 40.4
- API ระดับ Android ต้องเป็น23 ขึ้นไป
สถาปัตยกรรมกระบวนการ
สถาปัตยกรรมกระบวนการติดตั้งแบบอินไลน์แสดงอยู่ในรูปที่ต่อไปนี้
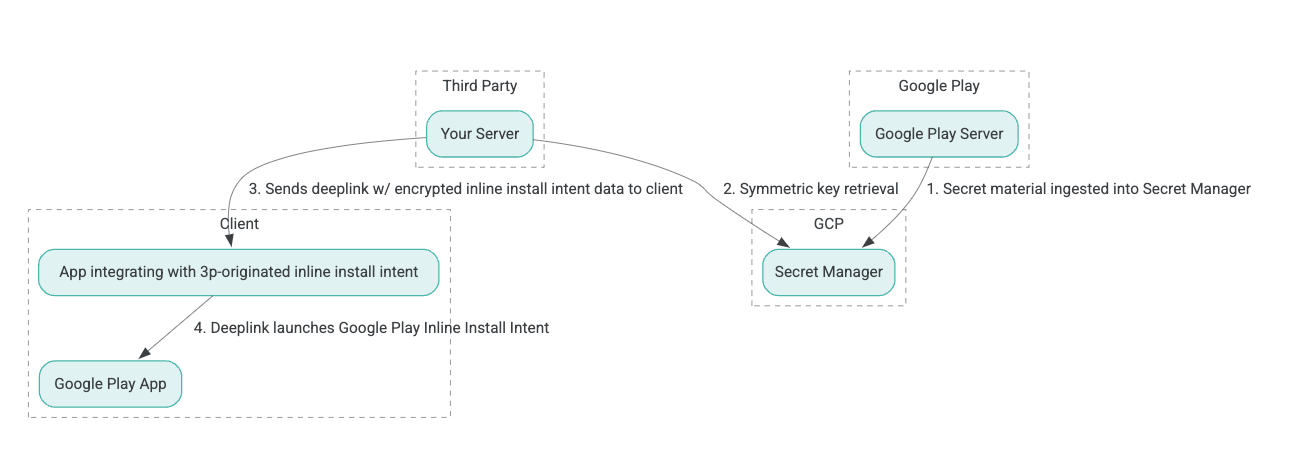
- เซิร์ฟเวอร์ของ Google Play จะสร้างคีย์การเข้ารหัส Authenticated Encryption with Associated Data (AEAD) และส่งคีย์ไปยังอินสแตนซ์ Secret Manager ของ Google Cloud Platform (GCP)
- ผู้ผสานรวมบุคคลที่สามจะดึงคีย์ AEAD จาก GCP Secret Manager
- โปรแกรมผสานรวมบุคคลที่สามจะเข้ารหัสข้อมูลการติดตั้งในบรรทัด
Intentสร้างข้อความที่เข้ารหัสซึ่งส่งผ่านใน Deep Link ที่ใช้เรียกใช้ Intent การติดตั้งในบรรทัด และส่ง Deep Link ไปยังไคลเอ็นต์ในการตอบกลับ - เมื่อมีการคลิก Deep Link แอป Google Play จะจัดการ Intent
หากต้องการกำหนดค่า SDK ของบุคคลที่สามให้ใช้กระบวนการติดตั้งในบรรทัด ให้ทำตาม ขั้นตอนต่อไปนี้
สร้างบัญชีบริการในโปรเจ็กต์ Google Cloud
ในขั้นตอนนี้ คุณจะตั้งค่าบัญชีบริการโดยใช้คอนโซล Google Cloud
- ตั้งค่าโปรเจ็กต์ Google Cloud โดยทำดังนี้
- สร้างองค์กร Google Cloud เมื่อสร้างบัญชี Google Workspace หรือ Cloud Identity และเชื่อมโยงกับชื่อโดเมน ระบบจะสร้างทรัพยากรขององค์กรโดยอัตโนมัติ โปรดดูรายละเอียดที่หัวข้อ การสร้างและจัดการทรัพยากรขององค์กร
- เข้าสู่ระบบคอนโซล GCP โดยใช้บัญชี Google Cloud ที่สร้างในขั้นตอนก่อนหน้า จากนั้นสร้างโปรเจ็กต์ Google Cloud โปรดดูรายละเอียดที่หัวข้อ สร้างโปรเจ็กต์ Google Cloud
- สร้างบัญชีบริการในโปรเจ็กต์ที่อยู่ในระบบคลาวด์ของ Google ที่สร้างขึ้น ระบบจะใช้บัญชีบริการเป็นข้อมูลประจำตัวของ Google Cloud เพื่อเข้าถึงคีย์สมมาตรในนามของเซิร์ฟเวอร์ โปรดดูรายละเอียดที่หัวข้อสร้างบัญชีบริการ
- ใช้รหัสลูกค้า Google Workspace (GWCID) / รหัส Dasher เดียวกันกับที่ ป้อนในแบบฟอร์มแสดงความสนใจ
- สร้างและดาวน์โหลดคีย์ส่วนตัวของบัญชีบริการนั้น
- สร้างคีย์สำหรับบัญชีบริการนั้น โปรดดูรายละเอียดที่หัวข้อสร้างคีย์บัญชีบริการ
- ดาวน์โหลดคีย์บัญชีบริการและเก็บไว้ในเซิร์ฟเวอร์เพื่อให้เข้าถึงได้ เนื่องจากระบบจะใช้คีย์นี้ในการตรวจสอบสิทธิ์เพื่อเข้าถึงทรัพยากร Google Cloud สำหรับคีย์สมมาตร โปรดดูรายละเอียดที่หัวข้อรับคีย์บัญชีบริการ
ดึงข้อมูลเข้าสู่ระบบ
ในขั้นตอนนี้ คุณจะดึงคีย์แบบสมมาตรจาก Secret Manager และจัดเก็บคีย์อย่างปลอดภัย (เช่น ในไฟล์ JSON) ในที่เก็บข้อมูลเซิร์ฟเวอร์ของคุณเอง คีย์นี้ใช้เพื่อสร้างข้อความที่เข้ารหัสของข้อมูลการติดตั้งในบรรทัด
ค่า secret_id/secretId หมายถึงชื่อลับภายใน Secret
Manager ซึ่งระบบจะสร้างชื่อนี้โดยการนำหน้า hsdp-3p-key- ไปยังค่า sdk_id ที่ Play ระบุ เช่น หาก sdk_id คือ abc ชื่อลับ
คือ hsdp-3p-key-abc
ระบบจะอัปเดตเวอร์ชันของข้อมูลลับทุกวันอังคารเวลา 14:00 น. (UTC) คีย์ที่เก่าเป็นอันดับ 2 จะยังคงใช้งานได้จนกว่าจะมีการหมุนเวียนครั้งถัดไป และควรดึงข้อมูลคีย์ มาจัดเก็บใหม่ทุกสัปดาห์
ตัวอย่าง Python
ตัวอย่างโค้ดต่อไปนี้ใช้โทเค็นเพื่อการเข้าถึงที่จัดเก็บไว้ในไฟล์ JSON เพื่อเข้าถึงเนื้อหาคีย์ใน GCP Secret Manager และพิมพ์ลงในคอนโซล
#!/usr/bin/env python3
# Import the Secret Manager client library.
from google.cloud import secretmanager
from google.oauth2 import service_account
import google_crc32c

# Create a service account key file.
service_account_key_file = "<json key file of the service account>"
credentials = service_account.Credentials.from_service_account_file(service_account_key_file)

# Create the Secret Manager client.
client = secretmanager.SecretManagerServiceClient(
  credentials=credentials
)

# Build the resource name of the secret version.
name = f"projects/prod-play-hsdp-3p-caller-auth/secrets/<secret_id>/versions/latest"

# Access the secret version.
response = client.access_secret_version(request={"name": name})

# Verify payload checksum.
crc32c = google_crc32c.Checksum()
crc32c.update(response.payload.data)
if response.payload.data_crc32c != int(crc32c.hexdigest(), 16):
    print("Data corruption detected.")

# A keyset created with "tinkey create-keyset --key-template=AES256_GCM". Note
# that this keyset has the secret key information in cleartext.
keyset = response.payload.data.decode("UTF-8")

# WARNING: Do not print the secret in a production environment. Please store it
# in a secure storage.
with open('<key file name>', 'w') as f:
    f.write(keyset)
ตัวอย่าง Java
ตัวอย่างโค้ดต่อไปนี้ใช้โทเค็นเพื่อการเข้าถึงที่จัดเก็บไว้ในไฟล์ JSON เพื่อเข้าถึงเนื้อหาคีย์ใน GCP Secret Manager และเขียนลงในไฟล์ JSON
import static java.nio.charset.StandardCharsets.UTF_8;
import com.google.api.gax.core.CredentialsProvider;
import com.google.api.gax.core.FixedCredentialsProvider;
import com.google.auth.oauth2.ServiceAccountCredentials;
import com.google.cloud.secretmanager.v1.AccessSecretVersionResponse;
import com.google.cloud.secretmanager.v1.SecretManagerServiceClient;
import com.google.cloud.secretmanager.v1.SecretManagerServiceSettings;
import com.google.cloud.secretmanager.v1.SecretVersionName;
import java.io.FileInputStream;
import java.io.IOException;
import java.io.PrintWriter;
import java.nio.file.Files;
import java.nio.file.Paths;
import java.util.zip.CRC32C;
import java.util.zip.Checksum;

/** */
final class ThirdPartySecretAccessGuide {

  private ThirdPartySecretAccessGuide() {}

  public static void main(String[] args) throws IOException {
    accessSecretVersion();
  }

  public static void accessSecretVersion() throws IOException {
    // TODO(developer): Replace these variables before running the sample.
    String projectId = "projectId";
    String secretId = "secretId";
    String versionId = "versionId";
    String accessTokenPrivateKeyPath = "path/to/credentials.json";
    String secretMaterialOutputPath = "path/to/secret.json";
    accessSecretVersion(
        projectId, secretId, versionId, accessTokenPrivateKeyPath, secretMaterialOutputPath);
  }

  // Access the payload for the given secret version if one exists. The version
  // can be a version number as a string (e.g. "5") or an alias (e.g. "latest").
  public static void accessSecretVersion(
      String projectId,
      String secretId,
      String versionId,
      String accessTokenPrivateKeyPath,
      String secretMaterialOutputPath)
      throws IOException {

    // We can explicitly instantiate the SecretManagerServiceClient (below) from a json file if we:
    // 1. Create a CredentialsProvider from a FileInputStream of the JSON file,
    CredentialsProvider credentialsProvider =
        FixedCredentialsProvider.create(
            ServiceAccountCredentials.fromStream(new FileInputStream(accessTokenPrivateKeyPath)));

    // 2. Build a SecretManagerService Settings object from that credentials provider, and
    SecretManagerServiceSettings secretManagerServiceSettings =
        SecretManagerServiceSettings.newBuilder()
            .setCredentialsProvider(credentialsProvider)
            .build();

    // 3. Initialize client that will be used to send requests by passing the settings object to
    // create(). This client only needs to be created once, and can be reused for multiple requests.
    // After completing all of your requests, call the "close" method on the client to safely clean
    // up any remaining background resources.
    try (SecretManagerServiceClient client =
        SecretManagerServiceClient.create(secretManagerServiceSettings)) {
      SecretVersionName secretVersionName = SecretVersionName.of(projectId, secretId, versionId);

      // Access the secret version.
      AccessSecretVersionResponse response = client.accessSecretVersion(secretVersionName);

      // Verify checksum. The used library is available in Java 9+.
      // If using Java 8, you may use the following:
      // https://github.com/google/guava/blob/e62d6a0456420d295089a9c319b7593a3eae4a83/guava/src/com/google/common/hash/Hashing.java#L395
      byte[] data = response.getPayload().getData().toByteArray();
      Checksum checksum = new CRC32C();
      checksum.update(data, 0, data.length);
      if (response.getPayload().getDataCrc32C() != checksum.getValue()) {
        System.out.printf("Data corruption detected.");
        return;
      }

      String payload = response.getPayload().getData().toStringUtf8();
      // Print the secret payload.
      //
      // WARNING: Do not print the secret in a production environment - this
      // snippet is showing how to access the secret material.
      System.out.printf("Plaintext: %s\n", payload);

      // Write the JSON secret material payload to a json file
      try (PrintWriter out =
          new PrintWriter(Files.newBufferedWriter(Paths.get(secretMaterialOutputPath), UTF_8))) {
        out.write(payload);
      } catch (Exception e) {
        e.printStackTrace();
      }
    }
  }
}
ตั้งค่าข้อมูลรับรองเริ่มต้นของแอปพลิเคชัน
หากไม่ต้องการใช้ CredentialsProvider เพื่อส่งคีย์ส่วนตัวไปยังไฟล์ JSON ในการติดตั้งใช้งาน Java คุณสามารถแก้ไขการติดตั้งใช้งานได้โดยการตั้งค่าข้อมูลรับรองเริ่มต้นของแอปพลิเคชัน (ADC) ดังนี้
- บอกไลบรารีของไคลเอ็นต์ว่าคีย์บัญชีบริการอยู่ที่ใด
- เพิ่มทรัพยากร Dependency ของ Maven ลงในโปรเจ็กต์ Java
- โทรหา
SecretManagerServiceClient.create()ซึ่งจะรับ การตรวจสอบสิทธิ์โดยอัตโนมัติ (เนื่องจากขั้นตอนที่ 1)
ขั้นตอนเหล่านี้จะแก้ไขการติดตั้งใช้งาน Java โดยทำดังนี้
- ไม่จำเป็นต้องสร้างออบเจ็กต์
CredentialsProviderและSecretManagerServiceSettings - เปลี่ยนการเรียกใช้เป็น
SecretManagerServiceClient.create()เพื่อไม่ให้มี อาร์กิวเมนต์
สร้างข้อความที่เข้ารหัสและสร้าง Deep Link
ในขั้นตอนนี้ คุณจะใช้ไลบรารีวิทยาการเข้ารหัส Tink เพื่อสร้าง enifd
(InlineInstallDataข้อความที่เข้ารหัส) จากออบเจ็กต์ InlineInstallDataprotobuf
InlineInstallData proto มีการกำหนดไว้ดังนี้
syntax = "proto2";
package hsdpexperiments;
option java_package = "com.google.hsdpexperiments";
option java_multiple_files = true;

// InlineInstallData is used by 3p auth callers to generate "encrypted inline
// flow data" (enifd) which is decrypted in PGS to verify authenticity and
// freshness.
message InlineInstallData {
  // The timestamp which indicates the time encrypted data is generated.
  // Used to validate freshness (i.e. generation time in past 4 hours).
  // Required.
  optional int64 timestamp_ms = 1;

  // The docid of the app that we want to open inline install page for.
  // This is the package name.
  // Required.
  optional string target_package_name = 2;

  // This is the name of the app requesting the ad from Google Ad Serving
  // system.
  // Required.
  optional string caller_package_name = 3;

  // This is the advertising id that will be collected by 3P Ad SDKs.
  // Optional.
  optional string advertising_id = 4;

  // This is used to indicate the network from where the inline install was
  // requested.
  // Required.
  optional string ad_network_id = 5;
}
ในขั้นตอนนี้ คุณยังสร้าง URL ของ Deep Link โดยใช้พารามิเตอร์ต่อไปนี้ได้ด้วย
| ทุ่ง | คำอธิบาย | ต้องระบุ |
|---|---|---|
| id | ชื่อแพ็กเกจของแอปที่จะติดตั้ง | ใช่ |
| ในบรรทัด | ตั้งค่าเป็น true หากมีการขอแผ่นครึ่งหน้าสำหรับการติดตั้งจากในหน้าเว็บ หากเป็น
false Intent Deep Link จะนำไปยัง Google Play |
ใช่ |
| enifd | ตัวระบุที่เข้ารหัสสำหรับ SDK ของบุคคลที่สาม | ใช่ |
| lft | ตัวระบุภายใน | ใช่ |
| 3pAuthCallerId | ตัวระบุ SDK | ใช่ |
| ข้อมูล | พารามิเตอร์ที่ไม่บังคับเพื่อระบุเป้าหมายสำหรับข้อมูลสินค้าใน Store ที่กำหนดเอง | ไม่ |
| ผู้บอกต่อ | สตริงการติดตามผู้เข้าชม ที่ไม่บังคับ | ไม่ |
ตัวอย่าง Python
คำสั่งต่อไปนี้สร้างโค้ด Python จาก InlineInstallData.proto
protoc InlineInstallData.proto --python_out=.
โค้ดตัวอย่าง Python ต่อไปนี้สร้าง InlineInstallData และเข้ารหัสด้วยคีย์แบบสมมาตรเพื่อสร้างข้อความที่เข้ารหัส
#!/usr/bin/env python3

# Import the Secret Manager client library.
import base64
import time
import inline_install_data_pb2 as InlineInstallData
import tink
from tink import aead
from tink import cleartext_keyset_handle

# Read the stored symmetric key.
with open("example3psecret.json", "r") as f:
  keyset = f.read()

"""Encrypt and decrypt using AEAD."""
# Register the AEAD key managers. This is needed to create an Aead primitive later.
aead.register()

# Create a keyset handle from the cleartext keyset in the previous
# step. The keyset handle provides abstract access to the underlying keyset to
# limit access of the raw key material. WARNING: In practice, it is unlikely
# you will want to use a cleartext_keyset_handle, as it implies that your key
# material is passed in cleartext, which is a security risk.
keyset_handle = cleartext_keyset_handle.read(tink.JsonKeysetReader(keyset))

# Retrieve the Aead primitive we want to use from the keyset handle.
primitive = keyset_handle.primitive(aead.Aead)

inlineInstallData = InlineInstallData.InlineInstallData()
inlineInstallData.timestamp_ms = int(time.time() * 1000)
inlineInstallData.target_package_name = "x.y.z"
inlineInstallData.caller_package_name = "a.b.c"
inlineInstallData.ad_network_id = "<sdk_id>"

# Use the primitive to encrypt a message. In this case the primary key of the
# keyset will be used (which is also the only key in this example).
ciphertext = primitive.encrypt(inlineInstallData.SerializeToString(), b'<sdk_id>')
print(f"InlineInstallData Ciphertext: {ciphertext}")

# Base64 Encoded InlineInstallData Ciphertext
enifd = base64.urlsafe_b64encode(ciphertext).decode('utf-8')
print(enifd)

# Deeplink
print(f"https://play.google.com/d?id={inlineInstallData.target_package_name}\&inline=true\&enifd={enifd}\&lft=1\&3pAuthCallerId={inlineInstallData.ad_network_id}")
เรียกใช้สคริปต์ Python โดยเรียกใช้คำสั่งต่อไปนี้
python <file_name>.py
ตัวอย่าง Java
คำสั่งต่อไปนี้จะสร้างโค้ด Java จาก InlineInstallData.proto
protoc InlineInstallData.proto --java_out=.
โค้ดตัวอย่าง Java ต่อไปนี้สร้าง InlineInstallData และเข้ารหัสด้วยคีย์แบบสมมาตรเพื่อสร้างข้อความเข้ารหัส
package com.google.hsdpexperiments;

import static com.google.common.io.BaseEncoding.base64Url;
import static java.nio.charset.StandardCharsets.UTF_8;

import com.google.common.flags.Flag;
import com.google.common.flags.FlagSpec;
import com.google.common.flags.Flags;
import com.google.crypto.tink.Aead;
import com.google.crypto.tink.InsecureSecretKeyAccess;
import com.google.crypto.tink.KeysetHandle;
import com.google.crypto.tink.TinkJsonProtoKeysetFormat;
import com.google.crypto.tink.aead.AeadConfig;
import java.nio.file.Files;
import java.nio.file.Path;
import java.nio.file.Paths;
import java.security.Security;
import java.time.Duration;
import org.conscrypt.Conscrypt;

/** info on encryption in https://github.com/google/tink#learn-more */
final class ThirdPartyEnifdGuide {

  @FlagSpec(
      name = "third_party_id",
      help = "the identifier associated with the 3p for which to generate the enifd")
  private static final Flag<String> thirdPartyAuthCallerId = Flag.value("");

  @FlagSpec(name = "package_name", help = "the package name of the target app")
  private static final Flag<String> packageName = Flag.value("");


  @FlagSpec(name = "caller_package_name", help = "the package name of the caller app")
  private static final Flag<String> callerPackageName = Flag.value("");

  @FlagSpec(name = "secret_filename", help = "the path to the json file with the secret material")
  private static final Flag<String> secretFilename = Flag.value("");

  private ThirdPartyEnifdGuide() {}

  public static void main(String[] args) throws Exception {
    // parse flags
    Flags.parse(args);

    // File keyFile = new File(args[0]);
    Path keyFile = Paths.get(secretFilename.get());

    // Create structured inline flow data
    InlineInstallData idrp =
        InlineInstallData.newBuilder()
            .setTargetPackageName(packageName.get())
            .setCallerPackageName(callerPackageName.get())
            .setTimestampMs(System.currentTimeMillis())
            .setAdNetworkId(thirdPartyAuthCallerId.get())
            .build();

    // we can print this out here to make sure it's well formatted, this will help debug
    System.out.println(idrp.toString());

    // Register all AEAD key types with the Tink runtime.
    Conscrypt.checkAvailability();
    Security.addProvider(Conscrypt.newProvider());
    AeadConfig.register();

    // Read AEAD key downloaded from secretmanager into keysethandle
    KeysetHandle handle =
        TinkJsonProtoKeysetFormat.parseKeyset(
            new String(Files.readAllBytes(keyFile), UTF_8), InsecureSecretKeyAccess.get());

    // Generate enifd using tink library
    Aead aead = handle.getPrimitive(Aead.class);
    byte[] plaintext = idrp.toByteArray();
    byte[] ciphertext = aead.encrypt(plaintext, thirdPartyAuthCallerId.get().getBytes(UTF_8));
    String enifd = base64Url().omitPadding().encode(ciphertext);

    // Build deeplink, escaping ampersands (TODO: verify this is necessary while testing e2e)
    String deeplink =
        "https://play.google.com/d?id="
            + packageName.get()
            + "\\&inline=true\\&enifd="
            + enifd
            + "\\&lft=1\\&3pAuthCallerId="
            + thirdPartyAuthCallerId.get();

    System.out.println(deeplink);
  }
}
สุดท้าย ให้สร้างโปรแกรม Java เป็นไบนารีและเรียกใช้โดยใช้โค้ดต่อไปนี้
path/to/binary/ThirdPartyEnifdGuide --secret_filename=path/to/jsonfile/example3psecret.json --package_name=<package_name_of_target_app> --third_party_id=<3p_caller_auth_id>
- แฟล็ก
secret_filenameระบุเส้นทางไปยังไฟล์ JSON ที่มี เนื้อหาที่เป็นความลับ package_nameคือแฟล็กที่เป็นรหัสเอกสารของแอปเป้าหมาย- ใช้แฟล็ก
third_party_idเพื่อระบุรหัสการตรวจสอบสิทธิ์ผู้โทรบุคคลที่สาม (นั่นคือ<sdk_id>)
เปิดใช้ Intent การติดตั้งจากในหน้าเว็บ
หากต้องการทดสอบ Deep Link ที่สร้างขึ้นในขั้นตอนก่อนหน้า ให้เชื่อมต่อ อุปกรณ์ Android (ตรวจสอบว่าได้เปิดใช้การแก้ไขข้อบกพร่อง USB แล้ว) กับเวิร์กสเตชันที่ติดตั้ง ADB แล้วเรียกใช้คำสั่งต่อไปนี้
adb shell am start "<output_from_the_previous_python_or_java_code>"
ในโค้ดไคลเอ็นต์ ให้ส่ง Intent โดยใช้วิธีใดวิธีหนึ่งต่อไปนี้ (Kotlin หรือ Java)
Kotlin
val intent = Intent(Intent.ACTION_VIEW)
val deepLinkUrl = "<output_from_the_previous_python_or_java_code>"
intent.setPackage("com.android.vending")
intent.data = Uri.parse(deepLinkUrl)
val packageManager = context.getPackageManager()
if (intent.resolveActivity(packageManager) != null) {
  startActivityForResult(intent, 0)
} else {
  // Fallback to deep linking to full Play Store.
}
Java
Intent intent = new Intent(Intent.ACTION_VIEW);
String id = "exampleAppToBeInstalledId";
String deepLinkUrl = "<output_from_the_previous_python_or_java_code>";
intent.setPackage("com.android.vending");
intent.setData(Uri.parse(deepLinkUrl));
PackageManager packageManager = context.getPackageManager();
if (intent.resolveActivity(packageManager) != null) {
  startActivityForResult(intent, 0);
} else {
  // Fallback to deep linking to full Play Store.
}
ภาคผนวก
ส่วนต่อไปนี้มีคำแนะนำเพิ่มเติมเกี่ยวกับกรณีการใช้งานบางอย่าง
เตรียมสภาพแวดล้อม Python
หากต้องการเรียกใช้โค้ดตัวอย่าง Python ให้ตั้งค่าสภาพแวดล้อม Python ในเวิร์กสเตชัน และติดตั้งทรัพยากร Dependency ที่จำเป็น
ตั้งค่าสภาพแวดล้อม Python
ติดตั้ง python3.11 (หากติดตั้งแล้ว ให้ข้ามขั้นตอนนี้)
sudo apt install python3.11ติดตั้ง pip:
sudo apt-get install pipติดตั้ง
virtualenvsudo apt install python3-virtualenvสร้างสภาพแวดล้อมเสมือน (จำเป็นสำหรับทรัพยากร Dependency ของ Tink)
virtualenv inlineinstall --python=/usr/bin/python3.11
เข้าสู่สภาพแวดล้อมเสมือนโดยทำดังนี้
source inlineinstall/bin/activateอัปเดต pip โดยทำดังนี้
python -m pip install --upgrade pipติดตั้งทรัพยากร Dependency ที่จำเป็น
ติดตั้ง Tink
pip install tinkติดตั้ง Google crc32c โดยทำดังนี้
pip install google-crc32cติดตั้ง Secret Manager
pip install google-cloud-secret-managerติดตั้งคอมไพเลอร์ Protobuf
sudo apt install protobuf-compiler
การสร้าง enifd ของ C++
ต่อไปนี้เป็นตัวอย่าง C++ ที่เราเขียนและตรวจสอบภายในเพื่อสร้าง enifd
คุณสร้าง enifd ได้โดยใช้โค้ด C++ ดังนี้
// A command-line example for using Tink AEAD w/ key template aes128gcmsiv to
// encrypt an InlineInstallData proto.
#include <chrono>
#include <iostream>
#include <memory>
#include <string>

#include "<path_to_protoc_output>/inline_install_data.proto.h"
#include "absl/flags/flag.h"
#include "absl/flags/parse.h"
#include "absl/strings/escaping.h"
#include "absl/strings/string_view.h"
#include "tink/cc/aead.h"
#include "tink/cc/aead_config.h"
#include "tink/cc/aead_key_templates.h"
#include "tink/cc/config/global_registry.h"
#include "tink/cc/examples/util/util.h"
#include "tink/cc/keyset_handle.h"
#include "tink/cc/util/status.h"
#include "tink/cc/util/statusor.h"

ABSL_FLAG(std::string, keyset_filename, "",
          "Keyset file (downloaded from secretmanager) in JSON format");
ABSL_FLAG(std::string, associated_data, "",
          "Associated data for AEAD (default: empty");

namespace {

using ::crypto::tink::Aead;
using ::crypto::tink::AeadConfig;
using ::crypto::tink::KeysetHandle;
using ::crypto::tink::util::Status;
using ::crypto::tink::util::StatusOr;

}  // namespace

namespace tink_cc_examples {

// AEAD example CLI implementation.
void AeadCli(const std::string& keyset_filename,
             absl::string_view associated_data) {
  Status result = AeadConfig::Register();
  if (!result.ok()) {
    std::clog << "Failed to register AeadConfig";
    return;
  }

  // Read the keyset from file.
  StatusOr<std::unique_ptr<KeysetHandle>> keyset_handle =
      ReadJsonCleartextKeyset(keyset_filename);
  if (!keyset_handle.ok()) {
    std::clog << "Failed to read json keyset";
    return;
  }

  // Get the primitive.
  StatusOr<std::unique_ptr<Aead>> aead =
      (*keyset_handle)
          ->GetPrimitive<crypto::tink::Aead>(
              crypto::tink::ConfigGlobalRegistry());
  if (!aead.ok()) {
    std::clog << "Failed to get primitive";
    return;
  }

  // Instantiate the enifd.
  hsdpexperiments::InlineInstallData iid;

  iid.set_timestamp_ms(std::chrono::duration_cast<std::chrono::milliseconds>(
                           std::chrono::system_clock::now().time_since_epoch())
                           .count());
  iid.set_target_package_name("<TARGET_PACKAGE_NAME>");
  iid.set_caller_package_name("<CALLER_PACKAGE_NAME>");
  iid.set_ad_network_id("<SDK_ID>");

  // Compute the output.
  StatusOr<std::string> encrypt_result =
      (*aead)->Encrypt(iid.SerializeAsString(), associated_data);
  if (!encrypt_result.ok()) {
    std::clog << "Failed to encrypt Inline Install Data";
    return;
  }
  const std::string& output = encrypt_result.value();

  std::string enifd;
  absl::WebSafeBase64Escape(output, &enifd);

  std::clog << "enifd: " << enifd << '\n';
}

}  // namespace tink_cc_examples

int main(int argc, char** argv) {
  absl::ParseCommandLine(argc, argv);

  std::string keyset_filename = absl::GetFlag(FLAGS_keyset_filename);
  std::string associated_data = absl::GetFlag(FLAGS_associated_data);

  std::clog << "Using keyset from file " << keyset_filename
            << " to AEAD-encrypt inline install data with associated data '"
            << associated_data << "'." << '\n';

  tink_cc_examples::AeadCli(keyset_filename, associated_data);
  return 0;
}
โค้ดนี้ดัดแปลงมาจากตัวอย่างที่อยู่ในเอกสารประกอบของ Tink