
בדף הזה מוסבר איך ערכות SDK של צד שלישי יכולות לשלב התקנה מהאתר, תכונת בדיקה חדשה ל-Google Play שמציגה פרטים על מוצרי אפליקציות של Google Play בממשק חצי-גיליון. התקנה מוטמעת מאפשרת למשתמשים ליהנות מתהליך התקנה חלק של האפליקציה בלי לצאת מההקשר של האפליקציה.
מפתחי SDK של צד שלישי יכולים לשלב את התכונה 'התקנה מוטמעת' בערכות ה-SDK שלהם כדי לאפשר למפתחי אפליקציות שמשתמשים בערכות ה-SDK האלה לגשת להתקנות מוטמעות באפליקציות שלהם.
דרישות
כדי שממשק דף ההתקנה המוקפץ יופיע באפליקציה:
- הגרסה המינימלית של Google Play צריכה להיות 40.4.
- רמת ה-API של Android חייבת להיות 23 ומעלה.
ארכיטקטורת תהליכים
האיור הבא מציג את הארכיטקטורה של תהליך ההתקנה בתוך האפליקציה:
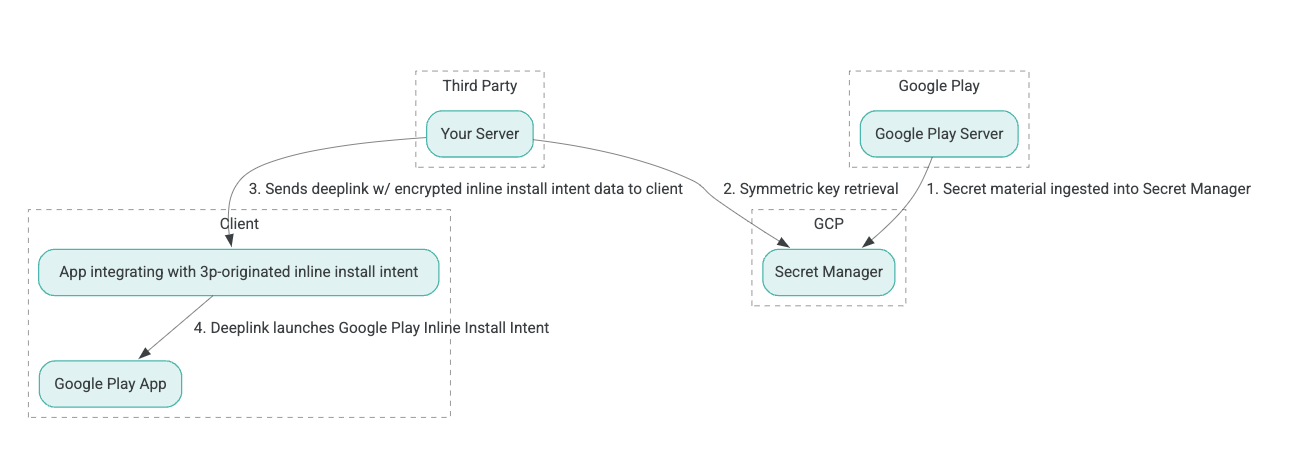
- שרתי Google Play יוצרים מפתחות הצפנה מסוג Authenticated Encryption with Associated Data (AEAD) ומטמיעים את המפתחות במופע של Google Cloud Platform (GCP) Secret Manager.
- המשלב מצד שלישי מאחזר את מפתח ה-AEAD מ-GCP Secret Manager.
- המשלב של הצד השלישי מצפין את נתוני
Intentההתקנה בתוך הדף, יוצר את הטקסט המוצפן שמועבר בקישור העומק שמשמש להפעלת כוונת ההתקנה בתוך הדף, ושולח קישורי עומק ללקוח בתגובות. - כשמקישים על קישור העומק, האפליקציה של Google Play מטפלת ב-Intent.
כדי להגדיר SDK של צד שלישי לשימוש בתהליך ההתקנה בתוך האפליקציה, מבצעים את השלבים הבאים.
יצירת חשבונות שירות בפרויקט Google Cloud
בשלב הזה מגדירים חשבון שירות באמצעות מסוף Google Cloud.
- הגדרת פרויקט ב-Google Cloud:
- יוצרים ארגון ב-Google Cloud. כשיוצרים חשבון Google Workspace או חשבון Cloud Identity ומשייכים אותו לשם הדומיין, משאב הארגון נוצר באופן אוטומטי. פרטים נוספים זמינים במאמר יצירה וניהול של משאבים ארגוניים.
- מתחברים למסוף GCP באמצעות חשבון Google Cloud שנוצר בשלב הקודם, ואז יוצרים פרויקט Google Cloud. פרטים נוספים זמינים במאמר בנושא יצירת פרויקט ב-Google Cloud.
- יוצרים חשבון שירות בפרויקט בענן של Google שנוצר. חשבון השירות משמש כ-Cloud Identity ב-Google Cloud כדי לגשת למפתח הסימטרי בשם השרתים שלכם. פרטים נוספים זמינים במאמר יצירת חשבון שירות.
- צריך להשתמש באותו מספר לקוח ב-Google Workspace (GWCID) או באותו מזהה Dasher שהוזנו בטופס ההבעת עניין.
- יוצרים ומורידים את המפתח הפרטי של חשבון השירות הזה.
- יוצרים מפתח לחשבון השירות. לפרטים נוספים, ראו יצירת מפתח לחשבון שירות.
- מורידים את המפתח של חשבון השירות ושומרים אותו בשרת, כי הוא משמש לאימות כדי לגשת למשאבים ב-Google Cloud עבור המפתחות הסימטריים. פרטים נוספים זמינים במאמר טעינת מפתח לחשבון שירות.
אחזור פרטי כניסה
בשלב הזה, מאחזרים את המפתח הסימטרי מ-Secret Manager ומאחסנים אותו בצורה מאובטחת (לדוגמה, בקובץ JSON) באחסון השרת שלכם. המפתח הזה משמש ליצירת טקסט מוצפן של נתוני ההתקנה בתוך הדף.
הערכים secret_id/secretId מתייחסים לשם הסוד ב-Secret Manager. השם הזה נוצר על ידי הוספת הקידומת hsdp-3p-key- לערך sdk_id שסופק על ידי Play. לדוגמה, אם sdk_id הוא abc, שם הסוד הוא hsdp-3p-key-abc.
גרסאות סודיות מתעדכנות מדי שבוע ביום שלישי בשעה 14:00 (שעון UTC). המפתחות השני הכי חדשים ממשיכים לפעול עד לרוטציה הבאה, וחומר המפתח צריך להיות מאוחזר ומאוחסן מדי שבוע.
דוגמה ל-Python
בדוגמה הבאה של קוד נעשה שימוש באסימון גישה שמאוחסן בקובץ JSON כדי לגשת לחומר מפתח ב-GCP Secret Manager ולהדפיס אותו במסוף.
#!/usr/bin/env python3
# Import the Secret Manager client library.
from google.cloud import secretmanager
from google.oauth2 import service_account
import google_crc32c

# Create a service account key file.
service_account_key_file = "<json key file of the service account>"
credentials = service_account.Credentials.from_service_account_file(service_account_key_file)

# Create the Secret Manager client.
client = secretmanager.SecretManagerServiceClient(
  credentials=credentials
)

# Build the resource name of the secret version.
name = f"projects/prod-play-hsdp-3p-caller-auth/secrets/<secret_id>/versions/latest"

# Access the secret version.
response = client.access_secret_version(request={"name": name})

# Verify payload checksum.
crc32c = google_crc32c.Checksum()
crc32c.update(response.payload.data)
if response.payload.data_crc32c != int(crc32c.hexdigest(), 16):
    print("Data corruption detected.")

# A keyset created with "tinkey create-keyset --key-template=AES256_GCM". Note
# that this keyset has the secret key information in cleartext.
keyset = response.payload.data.decode("UTF-8")

# WARNING: Do not print the secret in a production environment. Please store it
# in a secure storage.
with open('<key file name>', 'w') as f:
    f.write(keyset)
דוגמה ל-Java
בדוגמת הקוד הבאה נעשה שימוש באסימון גישה שמאוחסן בקובץ JSON כדי לגשת לחומר מפתח ב-GCP Secret Manager ולכתוב אותו בקובץ JSON.
import static java.nio.charset.StandardCharsets.UTF_8;
import com.google.api.gax.core.CredentialsProvider;
import com.google.api.gax.core.FixedCredentialsProvider;
import com.google.auth.oauth2.ServiceAccountCredentials;
import com.google.cloud.secretmanager.v1.AccessSecretVersionResponse;
import com.google.cloud.secretmanager.v1.SecretManagerServiceClient;
import com.google.cloud.secretmanager.v1.SecretManagerServiceSettings;
import com.google.cloud.secretmanager.v1.SecretVersionName;
import java.io.FileInputStream;
import java.io.IOException;
import java.io.PrintWriter;
import java.nio.file.Files;
import java.nio.file.Paths;
import java.util.zip.CRC32C;
import java.util.zip.Checksum;

/** */
final class ThirdPartySecretAccessGuide {

  private ThirdPartySecretAccessGuide() {}

  public static void main(String[] args) throws IOException {
    accessSecretVersion();
  }

  public static void accessSecretVersion() throws IOException {
    // TODO(developer): Replace these variables before running the sample.
    String projectId = "projectId";
    String secretId = "secretId";
    String versionId = "versionId";
    String accessTokenPrivateKeyPath = "path/to/credentials.json";
    String secretMaterialOutputPath = "path/to/secret.json";
    accessSecretVersion(
        projectId, secretId, versionId, accessTokenPrivateKeyPath, secretMaterialOutputPath);
  }

  // Access the payload for the given secret version if one exists. The version
  // can be a version number as a string (e.g. "5") or an alias (e.g. "latest").
  public static void accessSecretVersion(
      String projectId,
      String secretId,
      String versionId,
      String accessTokenPrivateKeyPath,
      String secretMaterialOutputPath)
      throws IOException {

    // We can explicitly instantiate the SecretManagerServiceClient (below) from a json file if we:
    // 1. Create a CredentialsProvider from a FileInputStream of the JSON file,
    CredentialsProvider credentialsProvider =
        FixedCredentialsProvider.create(
            ServiceAccountCredentials.fromStream(new FileInputStream(accessTokenPrivateKeyPath)));

    // 2. Build a SecretManagerService Settings object from that credentials provider, and
    SecretManagerServiceSettings secretManagerServiceSettings =
        SecretManagerServiceSettings.newBuilder()
            .setCredentialsProvider(credentialsProvider)
            .build();

    // 3. Initialize client that will be used to send requests by passing the settings object to
    // create(). This client only needs to be created once, and can be reused for multiple requests.
    // After completing all of your requests, call the "close" method on the client to safely clean
    // up any remaining background resources.
    try (SecretManagerServiceClient client =
        SecretManagerServiceClient.create(secretManagerServiceSettings)) {
      SecretVersionName secretVersionName = SecretVersionName.of(projectId, secretId, versionId);

      // Access the secret version.
      AccessSecretVersionResponse response = client.accessSecretVersion(secretVersionName);

      // Verify checksum. The used library is available in Java 9+.
      // If using Java 8, you may use the following:
      // https://github.com/google/guava/blob/e62d6a0456420d295089a9c319b7593a3eae4a83/guava/src/com/google/common/hash/Hashing.java#L395
      byte[] data = response.getPayload().getData().toByteArray();
      Checksum checksum = new CRC32C();
      checksum.update(data, 0, data.length);
      if (response.getPayload().getDataCrc32C() != checksum.getValue()) {
        System.out.printf("Data corruption detected.");
        return;
      }

      String payload = response.getPayload().getData().toStringUtf8();
      // Print the secret payload.
      //
      // WARNING: Do not print the secret in a production environment - this
      // snippet is showing how to access the secret material.
      System.out.printf("Plaintext: %s\n", payload);

      // Write the JSON secret material payload to a json file
      try (PrintWriter out =
          new PrintWriter(Files.newBufferedWriter(Paths.get(secretMaterialOutputPath), UTF_8))) {
        out.write(payload);
      } catch (Exception e) {
        e.printStackTrace();
      }
    }
  }
}
הגדרת Application Default Credentials
אם אתם לא רוצים להשתמש ב-CredentialsProvider כדי להעביר את המפתח הפרטי לקובץ JSON בהטמעה של Java, אתם יכולים לשנות את ההטמעה על ידי הגדרת Application Default Credentials (ADC):
- מציינים לספריות הלקוח איפה נמצא המפתח של חשבון השירות.
- מוסיפים יחסי תלות במאגר Maven לפרויקט Java.
- מתקשרים אל
SecretManagerServiceClient.create(), והאימות מתבצע אוטומטית (בגלל שלב 1).
השלבים האלה משנים את ההטמעה של Java באופן הבא:
- כך לא צריך ליצור את האובייקטים
CredentialsProviderו-SecretManagerServiceSettings. - שינוי השיחה ל-
SecretManagerServiceClient.create()כדי לא לכלול ארגומנטים.
יצירת טקסט מוצפן ויצירת קישור עומק
בשלב הזה, משתמשים בספריית הקריפטוגרפיה Tink כדי ליצור את enifd(InlineInstallData מידע מוצפן (ciphertext)) מאובייקט ה-protobuf InlineInstallData.
הפרוטו של InlineInstallData מוגדר כך:
syntax = "proto2";
package hsdpexperiments;
option java_package = "com.google.hsdpexperiments";
option java_multiple_files = true;

// InlineInstallData is used by 3p auth callers to generate "encrypted inline
// flow data" (enifd) which is decrypted in PGS to verify authenticity and
// freshness.
message InlineInstallData {
  // The timestamp which indicates the time encrypted data is generated.
  // Used to validate freshness (i.e. generation time in past 4 hours).
  // Required.
  optional int64 timestamp_ms = 1;

  // The docid of the app that we want to open inline install page for.
  // This is the package name.
  // Required.
  optional string target_package_name = 2;

  // This is the name of the app requesting the ad from Google Ad Serving
  // system.
  // Required.
  optional string caller_package_name = 3;

  // This is the advertising id that will be collected by 3P Ad SDKs.
  // Optional.
  optional string advertising_id = 4;

  // This is used to indicate the network from where the inline install was
  // requested.
  // Required.
  optional string ad_network_id = 5;
}
בשלב הזה בונים גם את כתובת ה-URL של קישור העומק באמצעות הפרמטרים האלה:
| שדות | תיאור | חובה |
|---|---|---|
| id | שם החבילה של האפליקציה שרוצים להתקין. | כן |
| בתוך השורה | הערך שמוגדר הוא true אם נדרש דף חצי-גליון להתקנה מהאתר, או false אם קישורי העומק של ה-Intent מפנים ל-Google Play. |
כן |
| enifd | המזהה המוצפן של ערכות SDK של צד שלישי. | כן |
| lft | מזהה פנימי. | כן |
| 3pAuthCallerId | מזהה ה-SDK. | כן |
| דף האפליקציה | פרמטר אופציונלי שמשמש לציון היעד של דף אפליקציה בהתאמה אישית. | לא |
| גורם מפנה | מחרוזת מעקב אופציונלית של מפנה. | לא |
דוגמה ל-Python
הפקודה הבאה יוצרת קוד Python מ-InlineInstallData.proto:
protoc InlineInstallData.proto --python_out=.
בדוגמת הקוד הבאה ב-Python, אנחנו בונים את InlineInstallData ומצפינים אותו באמצעות המפתח הסימטרי כדי ליצור את הטקסט המוצפן:
#!/usr/bin/env python3

# Import the Secret Manager client library.
import base64
import time
import inline_install_data_pb2 as InlineInstallData
import tink
from tink import aead
from tink import cleartext_keyset_handle

# Read the stored symmetric key.
with open("example3psecret.json", "r") as f:
  keyset = f.read()

"""Encrypt and decrypt using AEAD."""
# Register the AEAD key managers. This is needed to create an Aead primitive later.
aead.register()

# Create a keyset handle from the cleartext keyset in the previous
# step. The keyset handle provides abstract access to the underlying keyset to
# limit access of the raw key material. WARNING: In practice, it is unlikely
# you will want to use a cleartext_keyset_handle, as it implies that your key
# material is passed in cleartext, which is a security risk.
keyset_handle = cleartext_keyset_handle.read(tink.JsonKeysetReader(keyset))

# Retrieve the Aead primitive we want to use from the keyset handle.
primitive = keyset_handle.primitive(aead.Aead)

inlineInstallData = InlineInstallData.InlineInstallData()
inlineInstallData.timestamp_ms = int(time.time() * 1000)
inlineInstallData.target_package_name = "x.y.z"
inlineInstallData.caller_package_name = "a.b.c"
inlineInstallData.ad_network_id = "<sdk_id>"

# Use the primitive to encrypt a message. In this case the primary key of the
# keyset will be used (which is also the only key in this example).
ciphertext = primitive.encrypt(inlineInstallData.SerializeToString(), b'<sdk_id>')
print(f"InlineInstallData Ciphertext: {ciphertext}")

# Base64 Encoded InlineInstallData Ciphertext
enifd = base64.urlsafe_b64encode(ciphertext).decode('utf-8')
print(enifd)

# Deeplink
print(f"https://play.google.com/d?id={inlineInstallData.target_package_name}\&inline=true\&enifd={enifd}\&lft=1\&3pAuthCallerId={inlineInstallData.ad_network_id}")
מריצים את סקריפט Python באמצעות הפקודה הבאה:
python <file_name>.py
דוגמה ל-Java
הפקודה הבאה יוצרת קוד Java מ-InlineInstallData.proto:
protoc InlineInstallData.proto --java_out=.
בדוגמת הקוד הבאה ב-Java, אנחנו בונים את InlineInstallData ומצפינים אותו באמצעות המפתח הסימטרי כדי ליצור את הטקסט המוצפן:
package com.google.hsdpexperiments;

import static com.google.common.io.BaseEncoding.base64Url;
import static java.nio.charset.StandardCharsets.UTF_8;

import com.google.common.flags.Flag;
import com.google.common.flags.FlagSpec;
import com.google.common.flags.Flags;
import com.google.crypto.tink.Aead;
import com.google.crypto.tink.InsecureSecretKeyAccess;
import com.google.crypto.tink.KeysetHandle;
import com.google.crypto.tink.TinkJsonProtoKeysetFormat;
import com.google.crypto.tink.aead.AeadConfig;
import java.nio.file.Files;
import java.nio.file.Path;
import java.nio.file.Paths;
import java.security.Security;
import java.time.Duration;
import org.conscrypt.Conscrypt;

/** info on encryption in https://github.com/google/tink#learn-more */
final class ThirdPartyEnifdGuide {

  @FlagSpec(
      name = "third_party_id",
      help = "the identifier associated with the 3p for which to generate the enifd")
  private static final Flag<String> thirdPartyAuthCallerId = Flag.value("");

  @FlagSpec(name = "package_name", help = "the package name of the target app")
  private static final Flag<String> packageName = Flag.value("");


  @FlagSpec(name = "caller_package_name", help = "the package name of the caller app")
  private static final Flag<String> callerPackageName = Flag.value("");

  @FlagSpec(name = "secret_filename", help = "the path to the json file with the secret material")
  private static final Flag<String> secretFilename = Flag.value("");

  private ThirdPartyEnifdGuide() {}

  public static void main(String[] args) throws Exception {
    // parse flags
    Flags.parse(args);

    // File keyFile = new File(args[0]);
    Path keyFile = Paths.get(secretFilename.get());

    // Create structured inline flow data
    InlineInstallData idrp =
        InlineInstallData.newBuilder()
            .setTargetPackageName(packageName.get())
            .setCallerPackageName(callerPackageName.get())
            .setTimestampMs(System.currentTimeMillis())
            .setAdNetworkId(thirdPartyAuthCallerId.get())
            .build();

    // we can print this out here to make sure it's well formatted, this will help debug
    System.out.println(idrp.toString());

    // Register all AEAD key types with the Tink runtime.
    Conscrypt.checkAvailability();
    Security.addProvider(Conscrypt.newProvider());
    AeadConfig.register();

    // Read AEAD key downloaded from secretmanager into keysethandle
    KeysetHandle handle =
        TinkJsonProtoKeysetFormat.parseKeyset(
            new String(Files.readAllBytes(keyFile), UTF_8), InsecureSecretKeyAccess.get());

    // Generate enifd using tink library
    Aead aead = handle.getPrimitive(Aead.class);
    byte[] plaintext = idrp.toByteArray();
    byte[] ciphertext = aead.encrypt(plaintext, thirdPartyAuthCallerId.get().getBytes(UTF_8));
    String enifd = base64Url().omitPadding().encode(ciphertext);

    // Build deeplink, escaping ampersands (TODO: verify this is necessary while testing e2e)
    String deeplink =
        "https://play.google.com/d?id="
            + packageName.get()
            + "\\&inline=true\\&enifd="
            + enifd
            + "\\&lft=1\\&3pAuthCallerId="
            + thirdPartyAuthCallerId.get();

    System.out.println(deeplink);
  }
}
לבסוף, יוצרים את תוכנית Java לקובץ בינארי ומפעילים אותה באמצעות הקוד הבא:
path/to/binary/ThirdPartyEnifdGuide --secret_filename=path/to/jsonfile/example3psecret.json --package_name=<package_name_of_target_app> --third_party_id=<3p_caller_auth_id>
- הדגל
secret_filenameמציין את הנתיב לקובץ ה-JSON שמכיל את החומר הסודי. - הדגל
package_nameהוא מזהה המסמך של אפליקציית היעד. - הדגל
third_party_idמשמש לציון מזהה האימות של המתקשר מצד שלישי (כלומר,<sdk_id>).
הפעלת כוונת ההתקנה מהאתר
כדי לבדוק את קישור העומק שנוצר בשלב הקודם, מחברים מכשיר Android (צריך לוודא שהאפשרות 'ניפוי באגים ב-USB' מופעלת) לתחנת עבודה שמותקן בה adb ומריצים את הפקודה הבאה:
adb shell am start "<output_from_the_previous_python_or_java_code>"
בקוד הלקוח, שולחים את הכוונה באמצעות אחת מהשיטות הבאות (Kotlin או Java).
Kotlin
val intent = Intent(Intent.ACTION_VIEW)
val deepLinkUrl = "<output_from_the_previous_python_or_java_code>"
intent.setPackage("com.android.vending")
intent.data = Uri.parse(deepLinkUrl)
val packageManager = context.getPackageManager()
if (intent.resolveActivity(packageManager) != null) {
  startActivityForResult(intent, 0)
} else {
  // Fallback to deep linking to full Play Store.
}
Java
Intent intent = new Intent(Intent.ACTION_VIEW);
String id = "exampleAppToBeInstalledId";
String deepLinkUrl = "<output_from_the_previous_python_or_java_code>";
intent.setPackage("com.android.vending");
intent.setData(Uri.parse(deepLinkUrl));
PackageManager packageManager = context.getPackageManager();
if (intent.resolveActivity(packageManager) != null) {
  startActivityForResult(intent, 0);
} else {
  // Fallback to deep linking to full Play Store.
}
נספח
בקטעים הבאים מפורטות הנחיות נוספות לגבי תרחישי שימוש מסוימים.
הכנת סביבת Python
כדי להריץ את קוד לדוגמה של Python, צריך להגדיר את סביבת Python בתחנת העבודה ולהתקין את הרכיבים התלויים הנדרשים.
מגדירים את סביבת Python:
מתקינים את python3.11 (אם הוא כבר מותקן, מדלגים על השלב הזה):
sudo apt install python3.11מתקינים את pip:
sudo apt-get install pipהתקנה של
virtualenv:sudo apt install python3-virtualenvיוצרים סביבה וירטואלית (נדרש לתלות ב-Tink):
virtualenv inlineinstall --python=/usr/bin/python3.11
נכנסים לסביבה הווירטואלית:
source inlineinstall/bin/activateמעדכנים את pip:
python -m pip install --upgrade pipמתקינים את יחסי התלות הנדרשים:
מתקינים את Tink:
pip install tinkמתקינים את Google crc32c:
pip install google-crc32cמתקינים את Secret Manager:
pip install google-cloud-secret-managerמתקינים את מהדר ה-protobuf:
sudo apt install protobuf-compiler
דור שני של C++
זוהי דוגמה ב-C++ שכתבנו ואימתנו באופן פנימי כדי ליצור את enifd.
אפשר ליצור את enifd באמצעות קוד C++ באופן הבא:
// A command-line example for using Tink AEAD w/ key template aes128gcmsiv to
// encrypt an InlineInstallData proto.
#include <chrono>
#include <iostream>
#include <memory>
#include <string>

#include "<path_to_protoc_output>/inline_install_data.proto.h"
#include "absl/flags/flag.h"
#include "absl/flags/parse.h"
#include "absl/strings/escaping.h"
#include "absl/strings/string_view.h"
#include "tink/cc/aead.h"
#include "tink/cc/aead_config.h"
#include "tink/cc/aead_key_templates.h"
#include "tink/cc/config/global_registry.h"
#include "tink/cc/examples/util/util.h"
#include "tink/cc/keyset_handle.h"
#include "tink/cc/util/status.h"
#include "tink/cc/util/statusor.h"

ABSL_FLAG(std::string, keyset_filename, "",
          "Keyset file (downloaded from secretmanager) in JSON format");
ABSL_FLAG(std::string, associated_data, "",
          "Associated data for AEAD (default: empty");

namespace {

using ::crypto::tink::Aead;
using ::crypto::tink::AeadConfig;
using ::crypto::tink::KeysetHandle;
using ::crypto::tink::util::Status;
using ::crypto::tink::util::StatusOr;

}  // namespace

namespace tink_cc_examples {

// AEAD example CLI implementation.
void AeadCli(const std::string& keyset_filename,
             absl::string_view associated_data) {
  Status result = AeadConfig::Register();
  if (!result.ok()) {
    std::clog << "Failed to register AeadConfig";
    return;
  }

  // Read the keyset from file.
  StatusOr<std::unique_ptr<KeysetHandle>> keyset_handle =
      ReadJsonCleartextKeyset(keyset_filename);
  if (!keyset_handle.ok()) {
    std::clog << "Failed to read json keyset";
    return;
  }

  // Get the primitive.
  StatusOr<std::unique_ptr<Aead>> aead =
      (*keyset_handle)
          ->GetPrimitive<crypto::tink::Aead>(
              crypto::tink::ConfigGlobalRegistry());
  if (!aead.ok()) {
    std::clog << "Failed to get primitive";
    return;
  }

  // Instantiate the enifd.
  hsdpexperiments::InlineInstallData iid;

  iid.set_timestamp_ms(std::chrono::duration_cast<std::chrono::milliseconds>(
                           std::chrono::system_clock::now().time_since_epoch())
                           .count());
  iid.set_target_package_name("<TARGET_PACKAGE_NAME>");
  iid.set_caller_package_name("<CALLER_PACKAGE_NAME>");
  iid.set_ad_network_id("<SDK_ID>");

  // Compute the output.
  StatusOr<std::string> encrypt_result =
      (*aead)->Encrypt(iid.SerializeAsString(), associated_data);
  if (!encrypt_result.ok()) {
    std::clog << "Failed to encrypt Inline Install Data";
    return;
  }
  const std::string& output = encrypt_result.value();

  std::string enifd;
  absl::WebSafeBase64Escape(output, &enifd);

  std::clog << "enifd: " << enifd << '\n';
}

}  // namespace tink_cc_examples

int main(int argc, char** argv) {
  absl::ParseCommandLine(argc, argv);

  std::string keyset_filename = absl::GetFlag(FLAGS_keyset_filename);
  std::string associated_data = absl::GetFlag(FLAGS_associated_data);

  std::clog << "Using keyset from file " << keyset_filename
            << " to AEAD-encrypt inline install data with associated data '"
            << associated_data << "'." << '\n';

  tink_cc_examples::AeadCli(keyset_filename, associated_data);
  return 0;
}
הקוד הזה הוא עיבוד של דוגמה שמופיעה במסמכי Tink.