Android XR SDK พร้อมใช้งานในเวอร์ชันตัวอย่างสำหรับนักพัฒนาแอปแล้ว เราอยากฟังความคิดเห็นจากคุณ โปรดไปที่
หน้าการสนับสนุนเพื่อติดต่อเรา
เริ่มต้นใช้งานส่วนขยาย Android XR สำหรับ Unity
จัดทุกอย่างให้เป็นระเบียบอยู่เสมอด้วยคอลเล็กชัน
บันทึกและจัดหมวดหมู่เนื้อหาตามค่ากำหนดของคุณ
แต่ละฟีเจอร์มีตัวอย่างให้คุณใช้และทดลองกับการตั้งค่าโค้ดและฉาก บทแนะนำนี้จะแนะนำขั้นตอนการนำเข้าแพ็กเกจส่วนขยาย Android XR สำหรับ Unity แล้วกำหนดค่าตัวอย่างการติดตามใบหน้า
สิ่งที่ต้องมีก่อน
ก่อนทำตามขั้นตอนเหล่านี้ ให้ตรวจสอบว่าคุณได้ทำตามขั้นตอนที่อธิบายไว้ในการตั้งค่าโปรเจ็กต์ Unity แล้ว
นำเข้าแพ็กเกจ
วิธีโหลดแพ็กเกจ Unity Package Manager จาก URL ของ Git
- เปิดเครื่องมือจัดการแพ็กเกจใน Window
- เปิดเมนูเพิ่มในแถบเครื่องมือ Package Manager
- ในตัวเลือกสำหรับเพิ่มแพ็กเกจ ให้คลิกปุ่ม + (เครื่องหมายบวก)
คลิกติดตั้งแพ็กเกจจาก URL ของ git ในรายการแบบเลื่อนลง
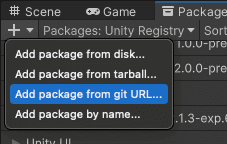
ป้อน URL ต่อไปนี้
https://github.com/android/android-xr-unity-package.git
เลือกติดตั้ง
กำหนดค่าตัวอย่างการติดตามใบหน้า
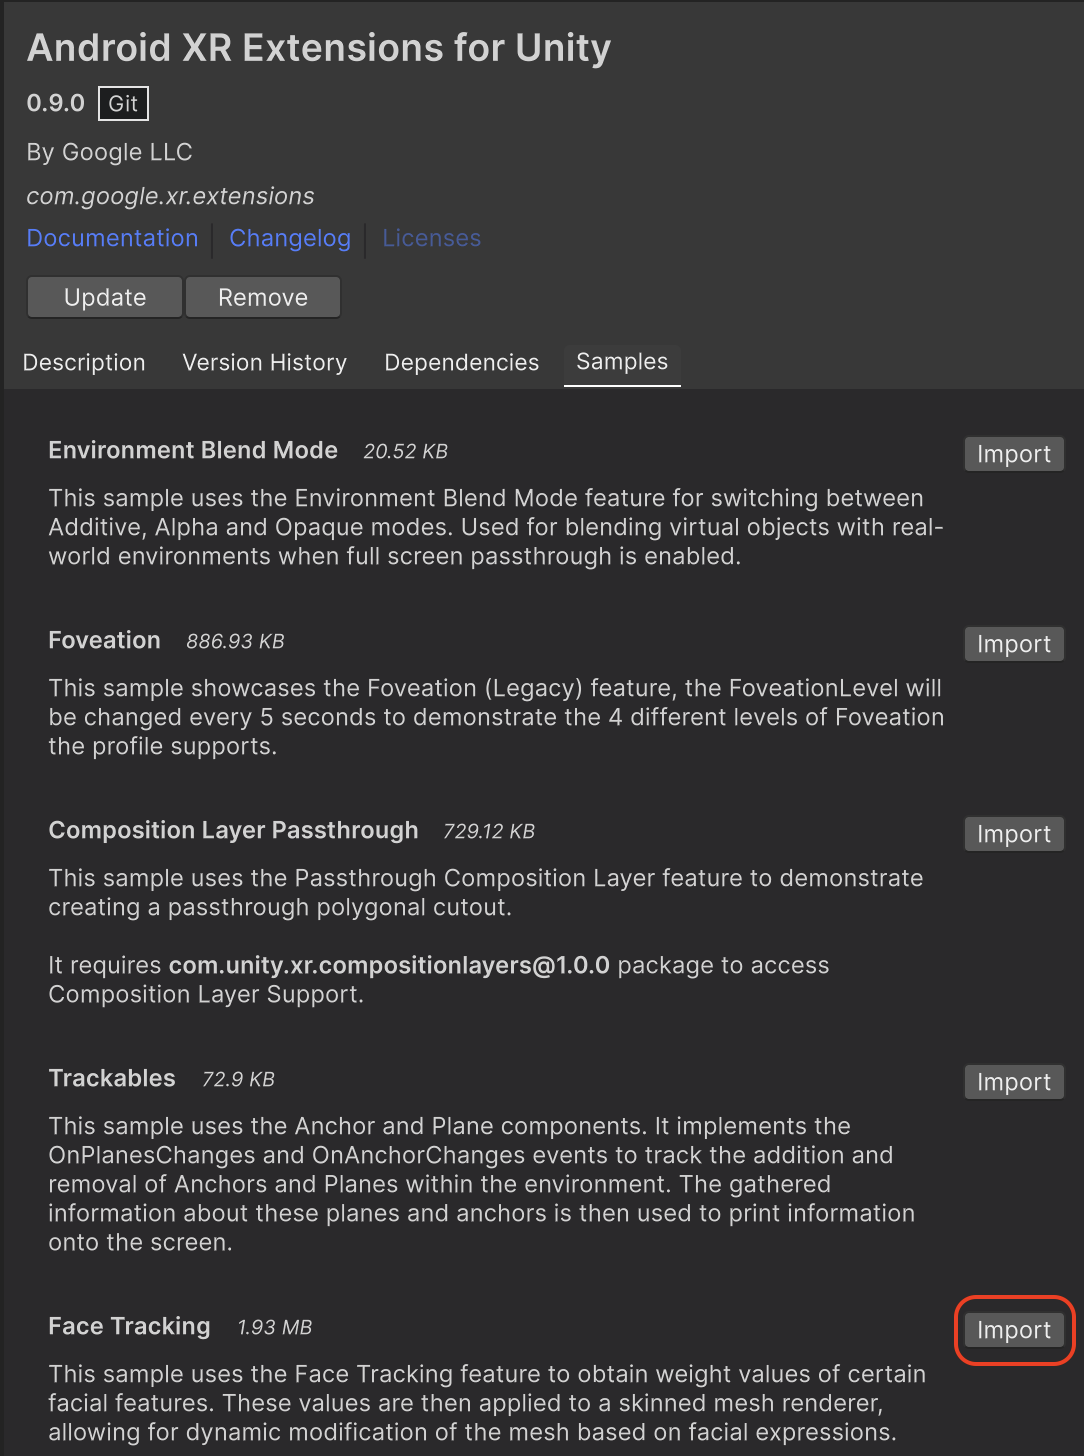
ตัวอย่างทั้งหมด รวมถึงตัวอย่างนี้จะมีไฟล์ README ที่มีวิธีการกำหนดค่าและตั้งค่าโปรเจ็กต์
วิธีนําเข้าและกําหนดค่าตัวอย่าง
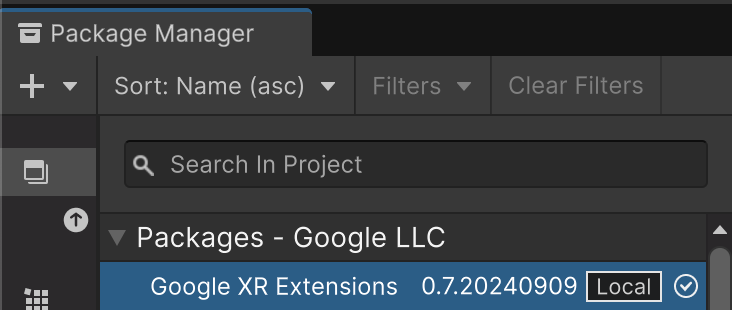
ไปที่เครื่องมือจัดการแพ็กเกจ > ในโปรเจ็กต์ > ส่วนขยาย XR ของ Android สำหรับ Unity
เลือกแท็บตัวอย่าง ค้นหาตัวอย่างการติดตามใบหน้า แล้วคลิกนําเข้า
ไปที่แก้ไข > การตั้งค่าโปรเจ็กต์ > การจัดการปลั๊กอิน XR
ในแท็บ Android ภายในผู้ให้บริการปลั๊กอิน ให้เปิดใช้ OpenXR
จากนั้นเปิดใช้กลุ่มฟีเจอร์ Android XR (ส่วนขยาย)
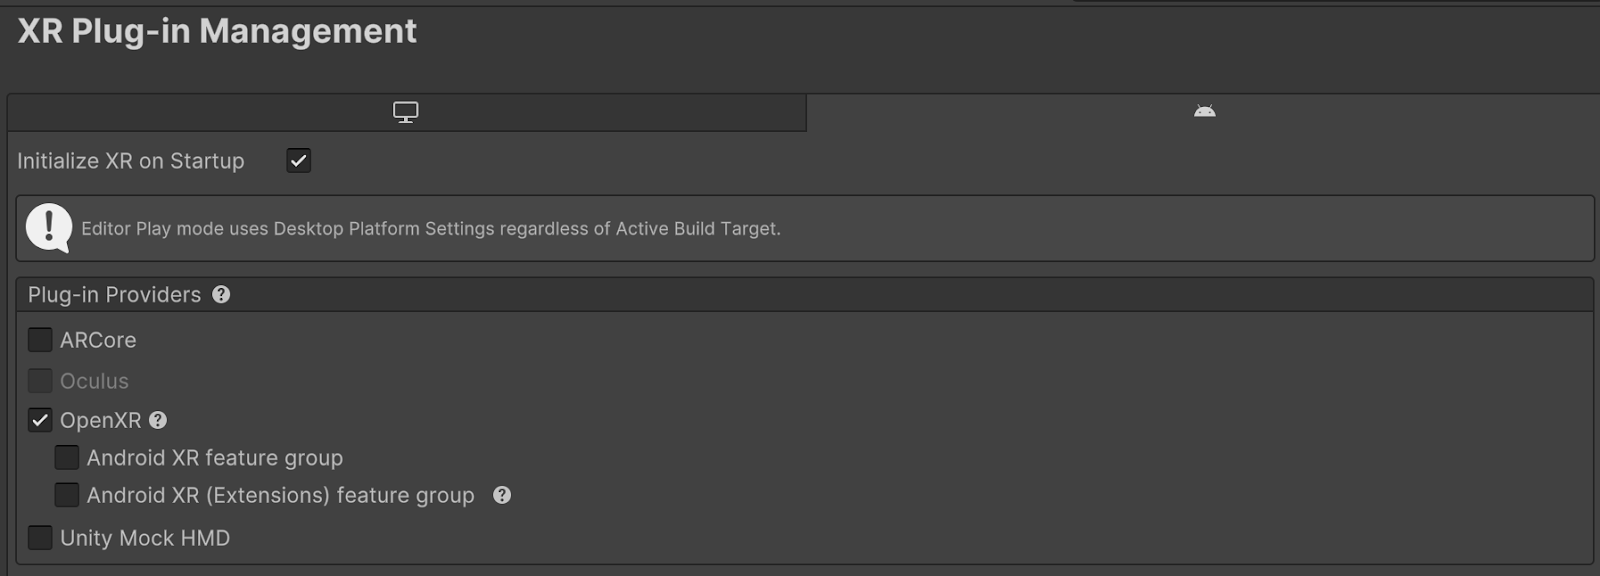
ไปที่แก้ไข > การตั้งค่าโปรเจ็กต์ > การจัดการปลั๊กอิน XR > OpenXR
เปิดใช้ Android XR: การติดตามใบหน้า

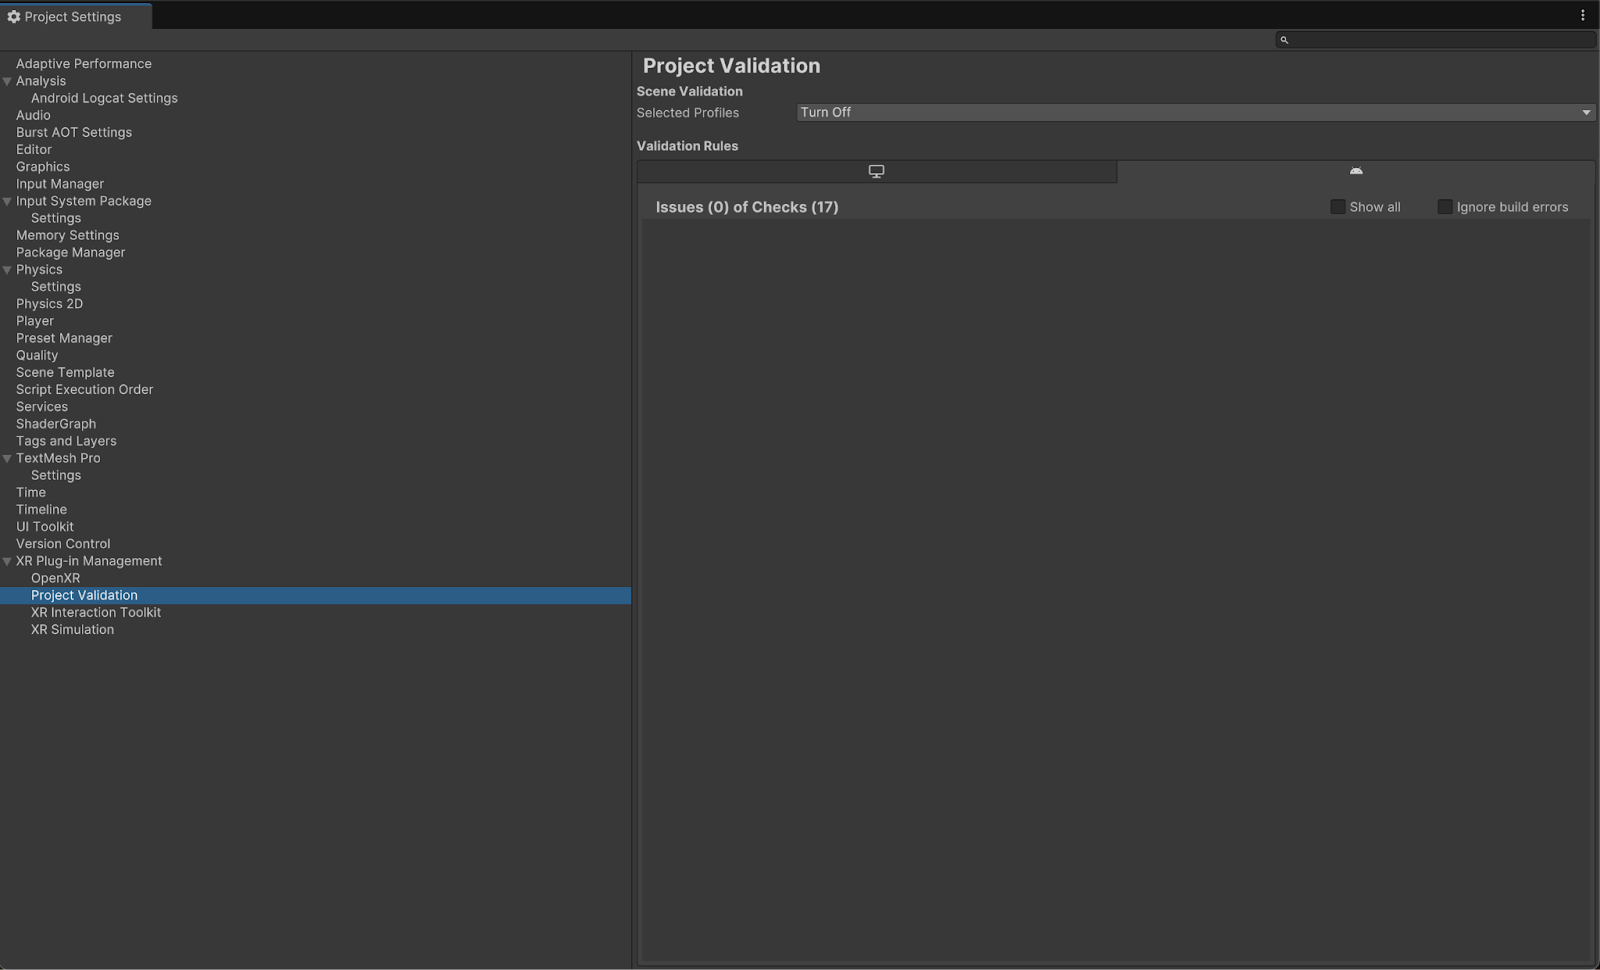
ในส่วนการจัดการปลั๊กอิน XR > การตรวจสอบโปรเจ็กต์ ให้แก้ไขปัญหาทั้งหมดที่เกี่ยวข้องกับ OpenXR ซึ่งจะช่วยกำหนดการตั้งค่าโปรแกรมเล่น
ในโปรเจ็กต์ ให้เปิดฉาก FaceTracking ซึ่งอยู่ในเนื้อหา > ตัวอย่าง > ส่วนขยาย Android XR สำหรับ Unity > เวอร์ชัน > Face Tracking

OpenXR™ และโลโก้ OpenXR เป็นเครื่องหมายการค้าของ The Khronos Group Inc. และจดทะเบียนเป็นเครื่องหมายการค้าในจีน สหภาพยุโรป ญี่ปุ่น และสหราชอาณาจักร
ตัวอย่างเนื้อหาและโค้ดในหน้าเว็บนี้ขึ้นอยู่กับใบอนุญาตที่อธิบายไว้ในใบอนุญาตการใช้เนื้อหา Java และ OpenJDK เป็นเครื่องหมายการค้าหรือเครื่องหมายการค้าจดทะเบียนของ Oracle และ/หรือบริษัทในเครือ
อัปเดตล่าสุด 2025-07-27 UTC
[[["เข้าใจง่าย","easyToUnderstand","thumb-up"],["แก้ปัญหาของฉันได้","solvedMyProblem","thumb-up"],["อื่นๆ","otherUp","thumb-up"]],[["ไม่มีข้อมูลที่ฉันต้องการ","missingTheInformationINeed","thumb-down"],["ซับซ้อนเกินไป/มีหลายขั้นตอนมากเกินไป","tooComplicatedTooManySteps","thumb-down"],["ล้าสมัย","outOfDate","thumb-down"],["ปัญหาเกี่ยวกับการแปล","translationIssue","thumb-down"],["ตัวอย่าง/ปัญหาเกี่ยวกับโค้ด","samplesCodeIssue","thumb-down"],["อื่นๆ","otherDown","thumb-down"]],["อัปเดตล่าสุด 2025-07-27 UTC"],[],[],null,["# Android XR Extensions for Unity quickstart\n\nEach feature includes a sample for you to use and play with code and scene\nsetups. This quickstart walks you through importing the Android XR Extensions\nfor Unity package and then configuring the face tracking sample.\n\nPrerequisites\n-------------\n\nBefore completing these steps, make sure you've completed the steps described in\n[Unity project setup](/develop/xr/unity/setup).\n\nImport packages\n---------------\n\nTo load a Unity Package Manager package from a Git URL:\n\n1. In **Window** , open the **Package Manager**.\n2. Open the add menu in the **Package Manager** toolbar.\n3. In the options for adding packages, click the **+** (plus) button.\n4. In the drop-down list, click **Install package from git URL**.\n\n5. Enter the following URL:\n\n https://github.com/android/android-xr-unity-package.git\n\n6. Select **Install**.\n\nConfigure the face tracking sample\n----------------------------------\n\nAll samples, including this one, include a README file containing\ninstructions on how to configure and set up the project.\n\nTo import and configure the sample:\n\n1. Go to **Package Manager** \\\u003e **In Project** \\\u003e **Android XR Extensions for Unity**.\n\n2. Select the **Samples** tab. Find the **Face Tracking** sample and click **Import**.\n\n3. Go to **Edit \\\u003e Project Settings \\\u003e XR Plug-in Management**.\n\n4. In the **Android** tab, under **Plug-in Providers** , enable **OpenXR**.\n\n Then, enable the **Android XR (Extensions) feature group** .\n5. Go to **Edit \\\u003e Project Settings \\\u003e XR Plug-in Management \\\u003e OpenXR**.\n\n6. Enable **Android XR: Face Tracking**.\n\n7. Under **XR Plug-in Management \\\u003e Project Validation**, fix all OpenXR-related\n issues. This helps configure your Player Settings.\n\n8. In your **Project** , open the **FaceTracking** scene, located in **Assets \\\u003e Samples \\\u003e Android XR Extensions for Unity \\\u003e *version* \\\u003e Face Tracking**.\n\n*** ** * ** ***\n\nOpenXR™ and the OpenXR logo are trademarks owned\nby The Khronos Group Inc. and are registered as a trademark in China,\nthe European Union, Japan and the United Kingdom."]]
