تنسيقات التطبيق
تنظيم صفحاتك في مجموعات
يمكنك حفظ المحتوى وتصنيفه حسب إعداداتك المفضّلة.
تجربة ميزة "الكتابة"
إنّ Jetpack Compose على Wear OS هو مجموعة الأدوات المقترَحة لواجهة المستخدم في Wear OS.
بعد التعرّف على كيفية
التعامل مع أشكال الساعات المختلفة،
حدِّد المساحة التي تريد استخدامها.
تشمل تصاميم التطبيقات الشائعة ما يلي:
-
شاشة واحدة (الأكثر بساطة): تقتصر عناصر واجهة المستخدم على ما يظهر في الوقت نفسه بدون
للف الصفحة.
-
الحاوية الرأسية (الأكثر شيوعًا): يظهر المحتوى خارج الجزء المرئي من الشاشة
ويمكن الوصول إليه من خلال التمرير.
-
الخيارات الأخرى: القوائم أو التنقل في الصفحات أو التمرير في اتجاهَين
يتم وصف أنواع التنسيقات هذه في الأقسام التالية.
يمكنك استخدام مجموعة من أنواع التنسيقات إذا كنت بحاجة إلى شاشات متعددة.
ملاحظة: بالنسبة إلى نشاطك، يمكنك اكتساب السمات من ComponentActivity
أو FragmentActivity
في حال استخدامك للمقاطع.
تستخدِم أنواع الأنشطة الأخرى عناصر واجهة مستخدِم خاصة بالأجهزة الجوّالة لا تحتاج إليها في Wear OS.
شاشة واحدة
يرى المستخدم جميع العناصر في شاشة واحدة بدون الانتقال إلى الأسفل أو الأعلى. وهذا يعني أنّه يمكنك تضمين
عدد صغير فقط من العناصر.
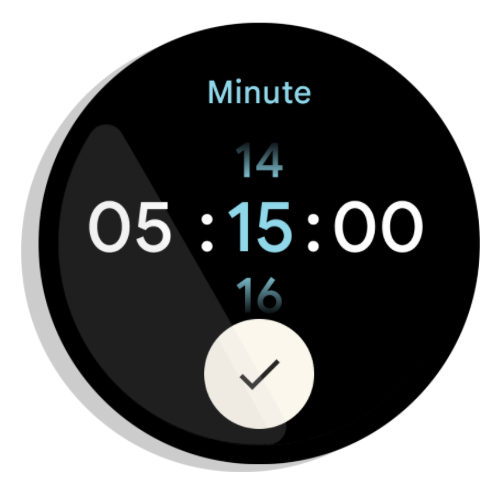
الشكل 1: مثال على تنسيق شاشة واحدة
تتوافق الشاشات الفردية بشكل جيد مع رمز
BoxInsetLayout
مع رمز
ConstraintLayout
لترتيب عناصرك.
حاوية عمودية
الحاوية العمودية هي النوع الأكثر شيوعًا لتصميم التطبيق. لا يظهر بعض المحتوى
على الشاشة، ولكن يمكن الوصول إليه من خلال الانتقال للأعلى أو للأسفل.
يعرض الشكل 2 عدة تصاميم كاملة للتطبيقات لا يظهر فيها سوى جزء من المحتوى
على الشاشة الدائرية للساعة. في هذه الأمثلة، يكون المحتوى
الرئيسي في الجزء العلوي
من الحاوية، وتكون تجارب المستخدِمين المهمة (CUJ) والإعدادات الأخرى
في أسفل الصفحة. وهذه من أفضل الممارسات لعرض المحتوى.
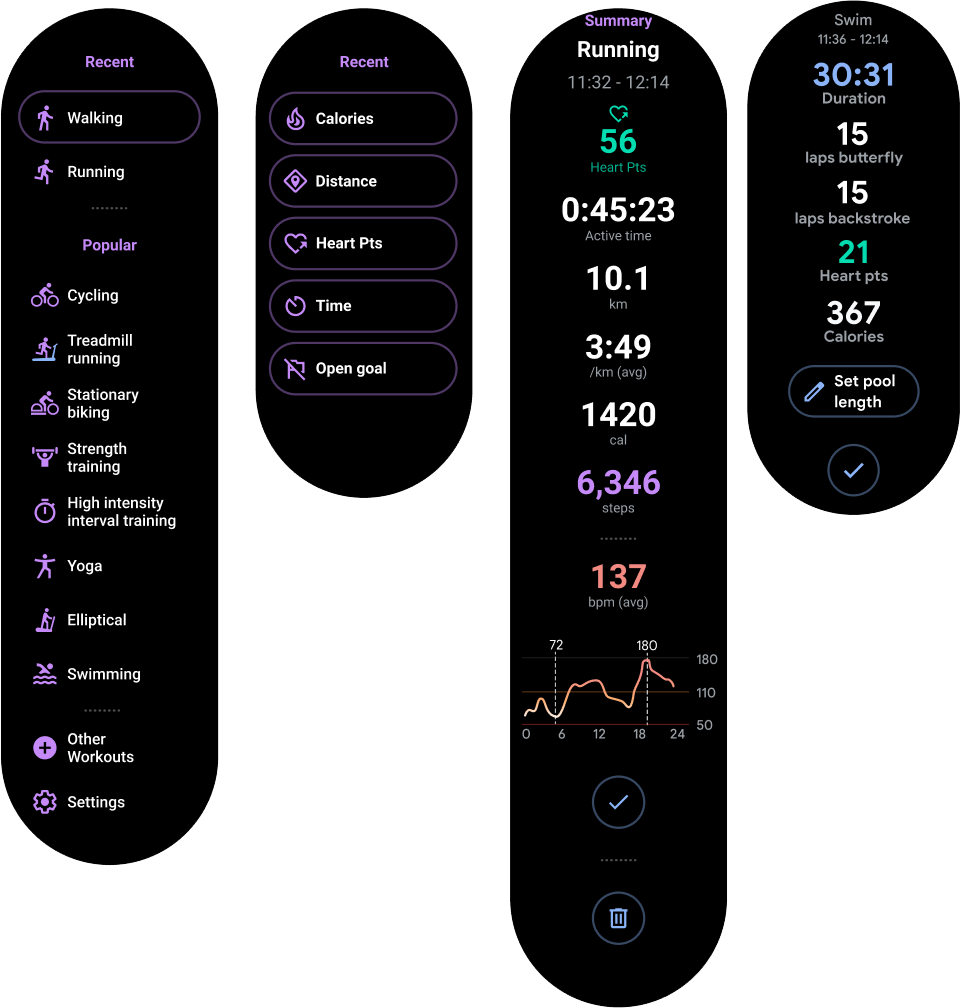
الشكل 2: أمثلة على تصاميم الحاويات الرأسية
على عكس تنسيق التطبيق المخصّص لشاشة واحدة، لا تستخدِم BoxInsetLayout
. بدلاً من ذلك، استخدِم
ConstraintLayout
داخل
NestedScrollView
.
ضِمن ConstraintLayout
، ضَع أي تطبيقات مصغّرة مناسبة لتطبيقك. يتيح لك ذلك الاستفادة من المساحة الإضافية على جانبَي الشاشة المستديرة.
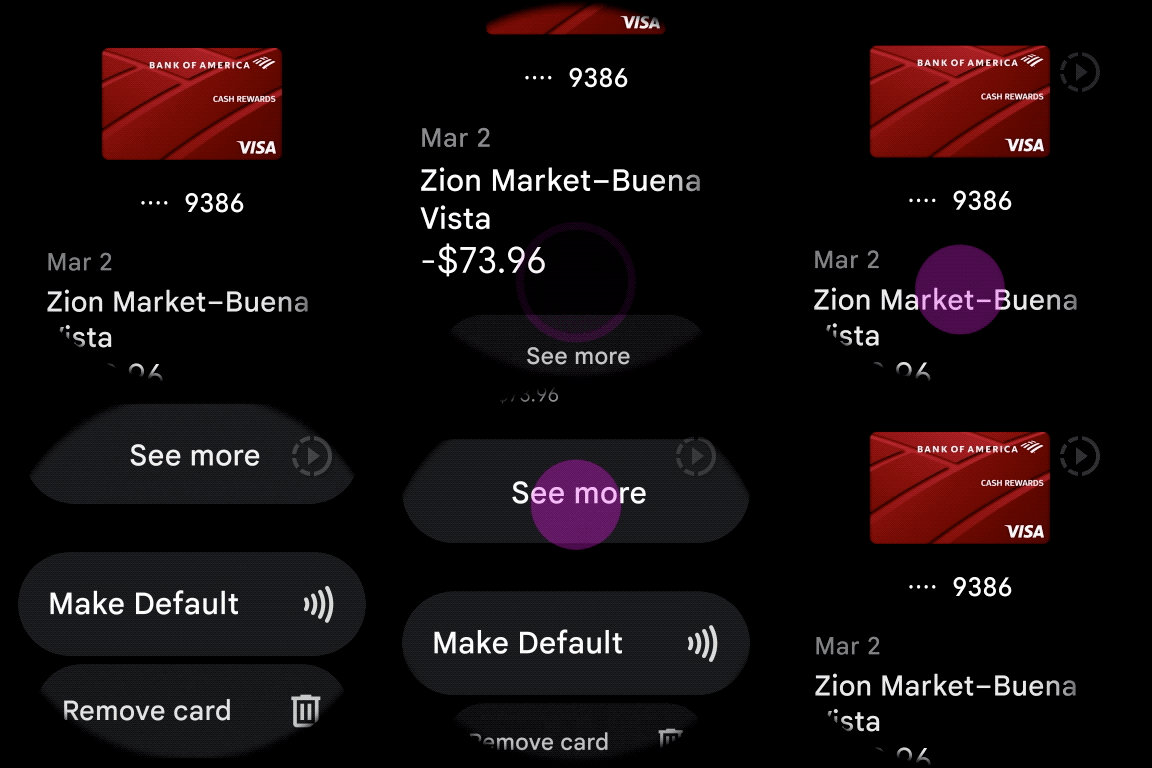
الشكل 3: المحتوى في ConstraintLayout
داخل
NestedScrollView
تأكَّد من أنّ المحتوى في أعلى وأسفل الحاوية العمودية صغير بما يكفي ليلائم
أعلى وأسفل شاشة دائرية، كما هو موضّح في المثال بالشكل 3.
ملاحظة:
أضِف مؤشرًا للانتقال إلى الأعلى أو الأسفل إلى NestedScrollView
كلما أمكن ذلك من خلال ضبط
android:scrollbars="vertical"
في ملف XML. يساعد ذلك المستخدمين في معرفة أنّه يتوفّر
المزيد من المحتوى، كما يساعدهم في معرفة مدى تقدّمهم في المحتوى.
خيارات أخرى لتنسيقات التطبيقات
-
القوائم: لعرض مجموعات كبيرة من البيانات باستخدام التطبيق المصغّر
WearableRecyclerView
المُحسَّن لشاشات الأجهزة القابلة للارتداء لمزيد من المعلومات، يُرجى الاطّلاع على مقالة
إنشاء قوائم على Wear OS.
-
التنقل الأفقي بين الصفحات: لحالات الاستخدام التي تتضمّن شاشات متعددة متسلسلة، استخدِم
التمرير السريع الأفقي. إذا كنت تستخدِم
عرض الصفحة الأفقي، يجب أن تتيح التمرير السريع للخروج من الشاشة على الحافة اليسرى.
-
التنقّل في اتجاهَين أفقيًا وعموديًا: في حالات الاستخدام، مثل الخرائط، يمكن للمستخدمين
السحب للتنقّل في اتجاهات مختلفة. فعِّل المرْر سريعًا لإغلاق إذا كان نشاطك يشغل الشاشة بالكامل.
يخضع كل من المحتوى وعيّنات التعليمات البرمجية في هذه الصفحة للتراخيص الموضحّة في ترخيص استخدام المحتوى. إنّ Java وOpenJDK هما علامتان تجاريتان مسجَّلتان لشركة Oracle و/أو الشركات التابعة لها.
تاريخ التعديل الأخير: 2025-07-26 (حسب التوقيت العالمي المتفَّق عليه)
[[["يسهُل فهم المحتوى.","easyToUnderstand","thumb-up"],["ساعَدني المحتوى في حلّ مشكلتي.","solvedMyProblem","thumb-up"],["غير ذلك","otherUp","thumb-up"]],[["لا يحتوي على المعلومات التي أحتاج إليها.","missingTheInformationINeed","thumb-down"],["الخطوات معقدة للغاية / كثيرة جدًا.","tooComplicatedTooManySteps","thumb-down"],["المحتوى قديم.","outOfDate","thumb-down"],["ثمة مشكلة في الترجمة.","translationIssue","thumb-down"],["مشكلة في العيّنات / التعليمات البرمجية","samplesCodeIssue","thumb-down"],["غير ذلك","otherDown","thumb-down"]],["تاريخ التعديل الأخير: 2025-07-26 (حسب التوقيت العالمي المتفَّق عليه)"],[],[],null,["# App layouts\n\nTry the Compose way \nJetpack Compose on Wear OS is the recommended UI toolkit for Wear OS. \n[Handle different screen sizes using Compose on Wear OS →](/training/wearables/compose/screen-size) \n\n\nAfter you understand how to\n[handle different watch shapes](/training/wearables/apps/layouts),\ndecide which surface you want to use.\n\n\nCommon app layouts include the following:\n\n- Single screen (simplest): UI elements are limited to what is visible at one time without scrolling.\n- Vertical container (most common): content exists beyond the viewable portion of the screen and is accessible by scrolling.\n- Other options: lists, paging, or 2D panning.\n\nThese layout types are described in the sections that follow.\nYou can use a combination of layout types if you need multiple screens.\n\n\n**Note:** For your activity, inherit from either a\n`ComponentActivity` or, if you use fragments, a `FragmentActivity`.\nThe other activity types use mobile-specific UI elements that you don't need for Wear OS.\n\nSingle screen\n-------------\n\n\nThe user sees all elements in a single screen without scrolling. This means you can include only\na small number of elements.\n\n\n**Figure 1.** An example of a single screen layout.\n\n\nSingle screens work well with a\n[BoxInsetLayout](/reference/androidx/wear/widget/BoxInsetLayout)\nin combination with a\n[ConstraintLayout](/reference/androidx/constraintlayout/widget/ConstraintLayout)\nto arrange your elements.\n\nVertical container\n------------------\n\n\nA vertical container is the most common type of app layout. Some content isn't\nvisible on the screen, but it is accessible by scrolling.\n\n\nFigure 2 shows several complete app layouts in which only a portion of the\ncontent can be seen on the circular screen of a watch. In these examples, the main\ncontent is in the top\nportion of the container, and other Critical User Journeys (CUJs) and settings are\nat the bottom. This is a best practice for laying out content.\n\n\n**Figure 2.** Examples of vertical container layouts.\n\nUnlike in a single screen app layout, don't use `BoxInsetLayout`. Instead, use\na `ConstraintLayout` inside a\n[NestedScrollView](/reference/androidx/core/widget/NestedScrollView).\nInside the `ConstraintLayout`, place whatever widgets make the most sense for\nyour app. This lets you take advantage of the extra space on the sides of a circular display.\n\n\n**Figure 3.** Content in a `ConstraintLayout` inside a\n`NestedScrollView`.\n\n\nMake sure the content at the top and bottom of your vertical container is small enough to fit in\nthe top and bottom of a circular display, as in the example in figure 3.\n\n**Note:**\nWhen possible, add a scroll indicator to your `NestedScrollView` by setting\n`android:scrollbars=\"vertical\"` in the XML. This helps users identify that there is\nmore content available and helps them see where they are in relation to all the content.\n\nOther options for app layouts\n-----------------------------\n\n- **Lists** : display large sets of data with the `WearableRecyclerView` widget optimized for Wearable surfaces. For more information, see [Create lists on Wear OS](/training/wearables/apps/lists).\n- **Horizontal paging** : for use cases with multiple sibling screens, use a [horizontal swipe](/guide/navigation/navigation-swipe-view-2). If you use horizontal paging, you must support swipe-to-dismiss for the left edge.\n- **2D Panning** : for use cases like maps, users can [drag to pan](/training/gestures/scale#pan) in different directions. Enable [swipe-to-dismiss](/training/wearables/apps/exit#swipe-to-dismiss) if your activity takes up the entire screen."]]