
Journeys for Android Studio از قابلیتهای بینایی و استدلال هوش مصنوعی برای پیمایش و آزمایش برنامه شما بر اساس دستورالعملهای زبان طبیعی شما استفاده میکند. مجموعه دستورالعملهای شما، که یک journey نامیده میشوند، به اقداماتی تبدیل میشوند که هوش مصنوعی روی برنامه شما انجام میدهد. علاوه بر این، میتوانید assertionهای پیچیدهتری بنویسید و توصیف کنید که هوش مصنوعی بر اساس آنچه در دستگاه میبیند، آنها را ارزیابی میکند.
و از آنجا که Gemini در مورد اینکه کدام اقدامات برای رسیدن به اهداف انجام شود، استدلال میکند، سفرها در برابر تغییرات ظریف در طرحبندی یا رفتار برنامه شما مقاومتر هستند و در نتیجه هنگام اجرا در برابر نسخههای مختلف برنامه و پیکربندیهای مختلف دستگاه، تستهای ناقص کمتری ایجاد میشود.
شما میتوانید سفرنامهها را مستقیماً از اندروید استودیو یا از خط فرمان در هر دستگاه محلی یا از راه دور مبتنی بر اندروید بنویسید و اجرا کنید. این IDE یک تجربه ویرایشگر جدید برای ساخت سفرنامهها و همچنین نتایج غنی ارائه میدهد که به شما کمک میکند تا استدلال و اجرای سفرنامه خود را در Gemini بهتر دنبال کنید.
سفرنامه بنویسید
اندروید استودیو یک قالب فایل و یک ویرایشگر جدید ارائه میدهد که ایجاد و ویرایش سفرها را آسانتر میکند. سفرها با استفاده از سینتکس XML نوشته میشوند تا توضیحات و مراحل سفر شما را سازماندهی کنند.
برای ایجاد و شروع ویرایش یک سفر، موارد زیر را انجام دهید:
- از پنل پروژه در اندروید استودیو، روی ماژول اپلیکیشنی که میخواهید برایش یک مسیر بنویسید، کلیک راست کنید.
- جدید > تست سفر را انتخاب کنید.
در کادر محاورهای که ظاهر میشود، نام و شرح سفر خود را وارد کنید.
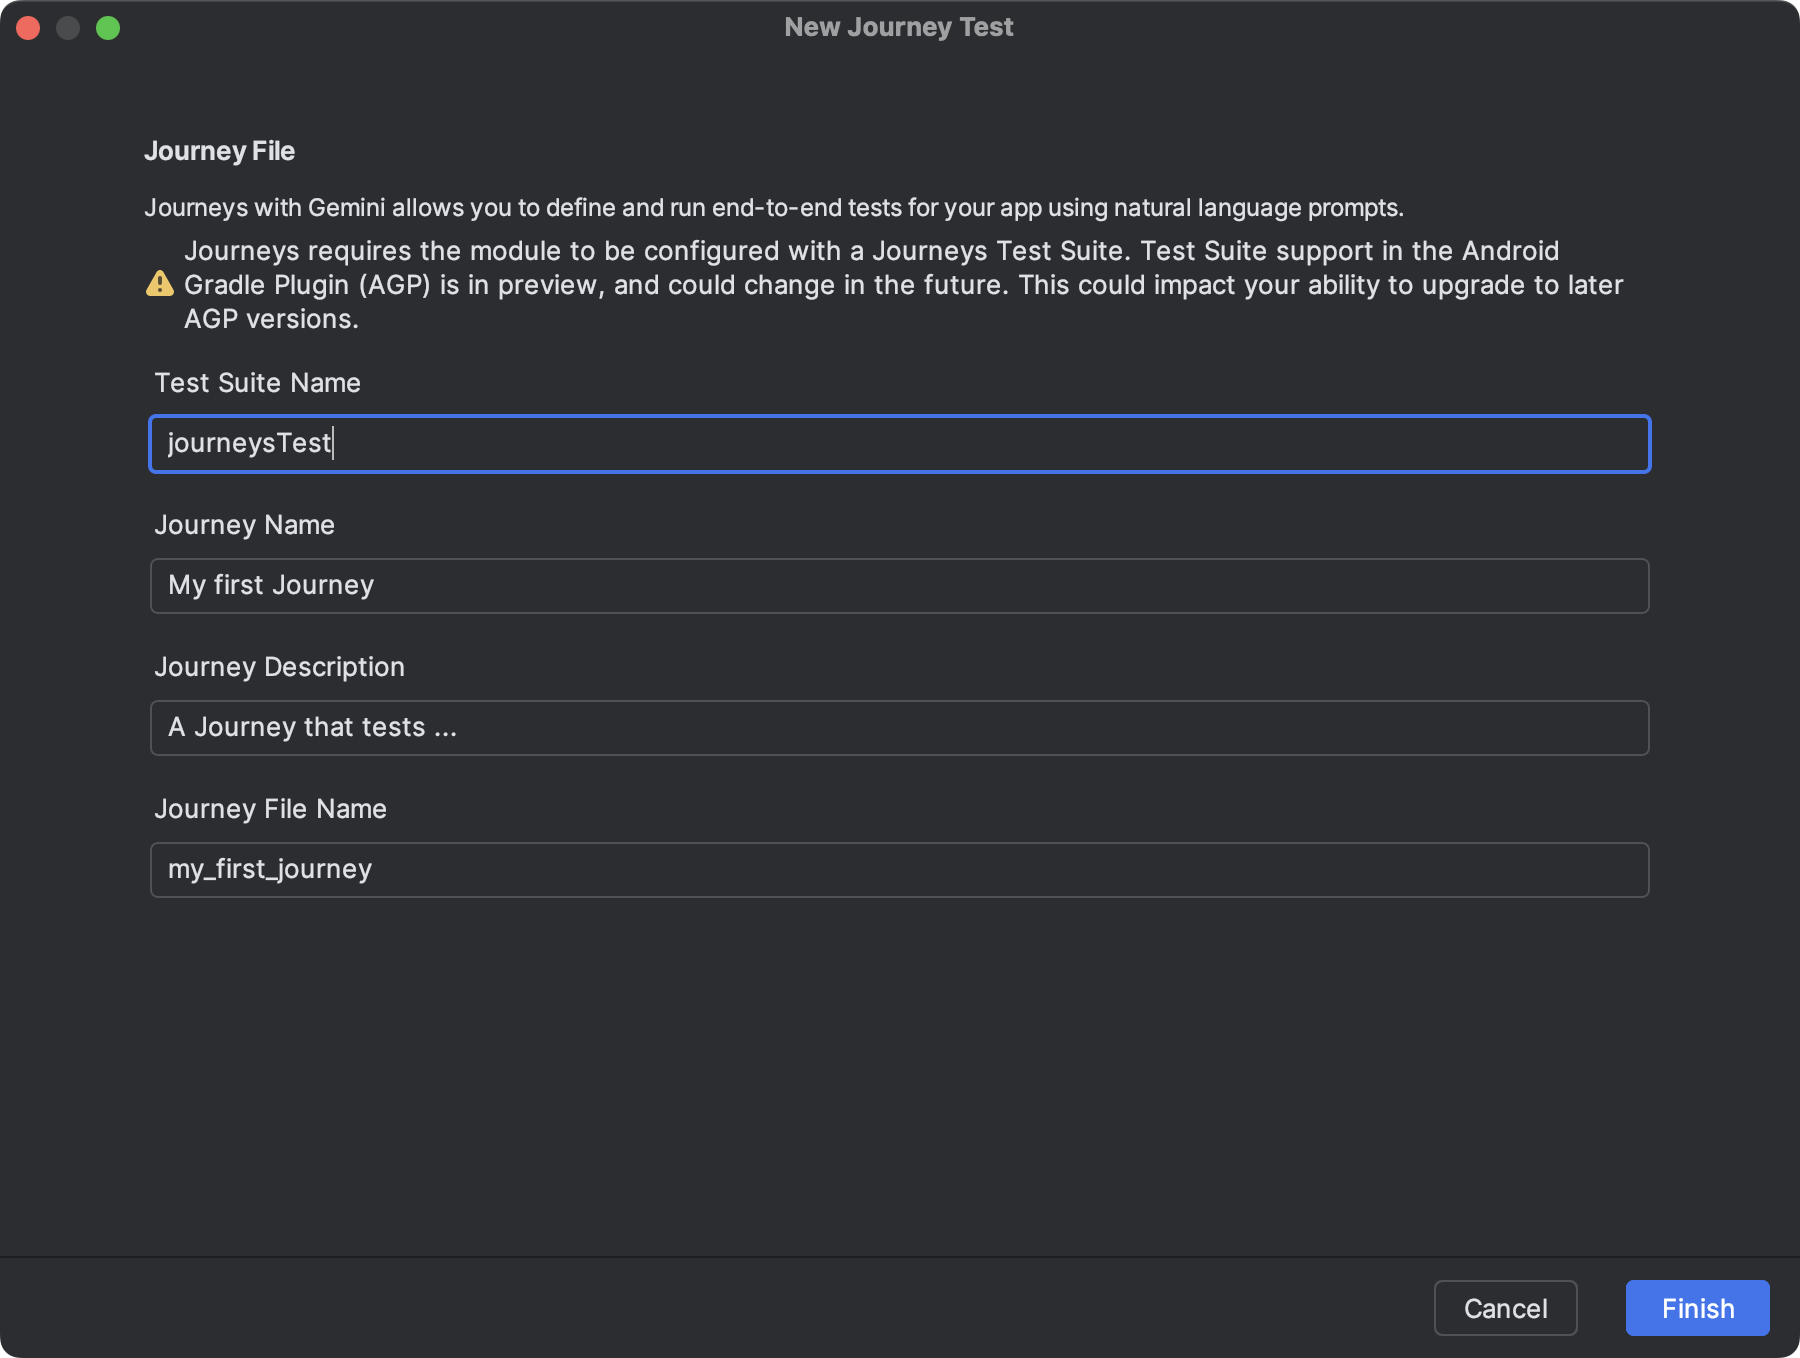
یک پنجره محاورهای در اندروید استودیو که برای ایجاد فایل سفر از آن استفاده میکنید. روی Finish کلیک کنید. اندروید استودیو یک فایل XML برای پروژه شما با نامی که انتخاب کردهاید ایجاد میکند. میتوانید از نمای Code برای ویرایش مستقیم XML یا از نمای Design برای سادهسازی ویرایش استفاده کنید.
هنگام مشاهده سفر خود در نمای طراحی ، از فیلد متنی برای توصیف هر مرحله از سفر خود استفاده کنید. هر مرحله میتواند شامل اقدامات توصیفی باشد که میخواهید Gemini انجام دهد یا اظهاراتی باشد که میخواهید Gemini ارزیابی کند.
برای شروع یک مرحله جدید در همان سفر، کلید Enter را روی صفحه کلید خود فشار دهید. میتوانید این کار را در صورت نیاز برای هر مرحله از سفری که میخواهید تعریف کنید، تکرار کنید.
پیکربندی انواع ساخت
Journeys روی نسخههای ساخت خاص برنامه شما اجرا میشود. وقتی برای اولین بار با استفاده از ویزارد، یک Journey ایجاد میکنید، مجموعه تست تولید شده طوری پیکربندی میشود که روی نسخه ساخت فعال در اندروید استودیو اجرا شود.
با این حال، اگر بعداً نوع ساخت فعال را در اندروید استودیو تغییر دهید (مثلاً به یک طعم محصول متفاوت مانند demoDebug ) بدون بهروزرسانی پیکربندی، اجرای مسیر با شکست مواجه خواهد شد. برای رفع این مشکل، باید نوع جدید را به ویژگی targetVariants در بلوک testSuites از فایل build.gradle.kts (یا build.gradle ) در سطح ماژول خود اضافه کنید.
برای مثال، برای پیکربندی مجموعه journeysTest برای نسخه demoDebug :
android {
    // ...
    testSuites {
        create("journeysTest") {
            // ...
            targetVariants += listOf("demoDebug")
        }
    }
}
نکاتی برای نوشتن سفرنامه
اگرچه هوش مصنوعی قادر به درک اکثر مراحل نوشته شده به زبانهای پشتیبانی شده است، اما پیروی از این نکات برای نوشتن سفرنامه میتواند به نتایج دقیقتر و مورد انتظارتری منجر شود:
- فرض کنید برنامه شما از قبل در پیشزمینه قرار دارد: اجرای یک مسیر، برنامه شما را بهطور خودکار راهاندازی میکند. مراحل مسیر شما باید پس از راهاندازی کامل برنامه آغاز شود. یعنی نیازی نیست «راهاندازی برنامه» را بهعنوان یک مرحله در نظر بگیرید.
- از زبان بدون ابهام استفاده کنید: دقیق بودن، سوء تعبیر را به حداقل میرساند و قابلیت اطمینان را بهبود میبخشد.
| به جایِ | این کار را انجام دهید |
|---|---|
| «دکمه رد کردن را انتخاب کنید» | «روی «رد کردن» ضربه بزنید» یا فقط «رد کردن» |
| «کلمه 'کرفس' را تایپ کنید» | «در نوار جستجو در بالای صفحه اصلی، «کرفس» را تایپ کنید» |
| «برای رد کردن، انگشت خود را بکشید» | «برای رد کردن، به چپ بکشید، کارت دیگر نباید قابل مشاهده باشد» |
- معیارهای موفقیت را به عنوان بخشی از این مرحله لحاظ کنید: این به جوزا کمک میکند تا نیت شما را بهتر درک کند و زمان تکمیل عمل و شروع عمل بعدی را روشن کند.
| به جایِ | این کار را انجام دهید |
|---|---|
| «دکمه ارسال را انتخاب کنید» | «ایمیل را با زدن دکمه ارسال ارسال کنید. این کار باید ایمیل را ببندد و شما را به صندوق ورودی بازگرداند.» |
| «برو به سبد خرید» | «روی نماد سبد خرید ضربه بزنید تا به صفحه سبد خرید هدایت شوید. مطمئن شوید که هیچ کالایی در آن وجود ندارد.» |
| «روی اولین ویدیو کلیک کنید» | «روی اولین ویدیو کلیک کنید و صبر کنید تا کاملاً بارگذاری شود» |
- مسیر خود را اصلاح کنید: اگر مسیر شما مطابق انتظار پیش نمیرود، میتوانید نتایج را مشاهده کنید و «اقدامات انجام شده» و «دلایل» مربوطه را بررسی کنید تا بفهمید چرا Gemini ممکن است مراحل را مطابق انتظار شما انجام نداده باشد. از این اطلاعات برای ارائه شفافیت بیشتر به دستورالعملهای خود استفاده کنید.
- سفر خود را به مراحل خاصتری تقسیم کنید: اگرچه هوش مصنوعی میتواند مراحل چند عملی را تفسیر کند، اما گاهی اوقات مراحل گسستهتر و جزئیتر ممکن است دقت و تکرارپذیری سفر را بهبود بخشند.
- "خطا: نتوانستیم با حداکثر تعداد تلاش مجاز، عمل را با موفقیت انجام دهیم" : اگر با این خطا مواجه شدید، سعی کنید مراحل ناموفق را به دو یا چند مرحله کوچکتر تقسیم کنید. دلیل این خطا این است که اگر هوش مصنوعی پس از تلاش برای حداکثر تعداد تعامل با برنامه شما، نتواند عمل را انجام دهد، این خطا رخ میدهد.
قابلیتهای پشتیبانیشده و پشتیبانینشده
در اینجا مروری بر قابلیتهای پشتیبانیشده و هنوز بهطور کامل پشتیبانینشده هنگام نوشتن سفرنامهها ارائه شده است. لیستهای زیر جامع نیستند.
اقدامات زیر در سفرها پشتیبانی میشوند:
- روی عناصر رابط کاربری ضربه بزنید .
- برای وارد کردن متن در فیلدهای متنی، تایپ کنید .
- برای پیمایش رابط کاربری، در جهت خاصی انگشت خود را بکشید/اسکرول کنید .
قابلیتهای زیر در حال حاضر به طور کامل پشتیبانی نمیشوند یا ممکن است به طور متناقضی عمل کنند:
- حرکات چند انگشتی (مثلاً زوم کردن با دو انگشت) - تعاملاتی که نیاز به تماس همزمان دو یا چند نقطه روی صفحه دارند، مانند زوم کردن با دو انگشت یا کشیدن دو انگشت روی صفحه.
- فشار طولانی - فشار دادن و نگه داشتن انگشت برای مدت زمانی طولانیتر از یک ضربه استاندارد.
- دوبار ضربه زدن - دو بار پشت سر هم و سریع روی یک نقطه روی صفحه ضربه بزنید.
- چرخش/تا شدن صفحه نمایش - مدیریت تغییرات در جهت دستگاه (برای مثال، بین حالت عمودی و افقی) یا وضعیت فیزیکی دستگاههای تاشو (برای مثال، باز یا بسته شدن).
- حافظه - حفظ و یادآوری اطلاعات خاص، زمینه یا ورودیهای کاربر در طول تعاملات یا مراحل قبلی.
- شمارش - ردیابی دقیق کمیتها، فراوانیها یا پیشرفت.
- دستورات شرطی - اجرای اقدامات بر اساس برآورده شدن سایر شرایط مشخص شده.
ویژگیها و قابلیتها دائماً در حال بهبود هستند. پیشنهاد میکنیم برای آشنایی با ویژگیها و قابلیتهای بیشتر، بعداً این صفحه را بررسی کنید. برای کمک به ما در بهبود Journeys، نظرات خود را با ما در میان بگذارید .
سفر خود را اجرا کنید
شما میتوانید مسیر خود را روی هر دستگاه محلی یا از راه دور موجود، مشابه هر تست ابزاری دیگری، اجرا کنید و اندروید استودیو نتایج غنیای تولید میکند که به شما در درک اجرای مسیرتان کمک میکند.
برای آزمایش یک سفر، موارد زیر را انجام دهید:
- مانند زمانی که یک تست ابزاری انجام میدهید، یک دستگاه هدف را از نوار ابزار اصلی انتخاب کنید.
- به فایل XML سفری که میخواهید تست کنید بروید و آن را در ویرایشگر باز کنید.
- در ویرایشگر، یکی از موارد زیر را انجام دهید:
- اگر در نمای طراحی (Design view) هستید، کلیک کنید
 سفر را اجرا کنید .
 - اگر در نمای کد هستید، کلیک کنید
 دستور 'test' را در حاشیه کنار جایی که نام سفر در XML تعریف شده است، اجرا کنید .
- اگر در نمای طراحی (Design view) هستید، کلیک کنید
اندروید استودیو یک پیکربندی تست سفرها (Journeys Test) برای شما ایجاد میکند و آن را روی دستگاه هدف اجرا میکند. در طول اجرا، اندروید استودیو برنامه شما را میسازد و مستقر میکند و به Gemini متصل میشود تا مشخص کند که برای هر مرحله از سفر شما چه اقداماتی باید انجام شود.
سفرها را در برابر هر برنامه از پیش نصب شده اجرا کنید
شما میتوانید یک journey را روی یک برنامه از پیش نصب شده روی دستگاه آزمایشی خود اجرا کنید. این کار در صورتی مفید است که میخواهید نسخه نهایی برنامه خود را آزمایش کنید، یا اگر هنوز برنامه خود را به Android Gradle Plugin 9.0.0 یا بالاتر بهروزرسانی نکردهاید.
- یک پروژه جدید که به Android Gradle Plugin 9.0.0 یا بالاتر بهروزرسانی شده است را باز یا ایجاد کنید .
- سفرنامه بنویس .
- پیکربندی اجرای سفر را ویرایش کنید و متغیرهای محیطی زیر را اضافه کنید. وقتی سعی میکنید یک سفر را از اندروید استودیو اجرا کنید، یک پیکربندی اجرا به طور خودکار ایجاد میشود.
-
JOURNEYS_CUSTOM_APP_IDرا روی شناسه بسته برنامه هدف تنظیم کنید.
-
- مسیر (یا مرحلهای) که ویرایش کردهاید را اجرا کنید. اندروید استودیو باید مراحل مسیر را در برنامهی هدفی که مشخص کردهاید، اجرا کند.
اجرای یک سفر از خط فرمان
برای اجرای Journeys از خط فرمان، از Android CLI استفاده کنید.
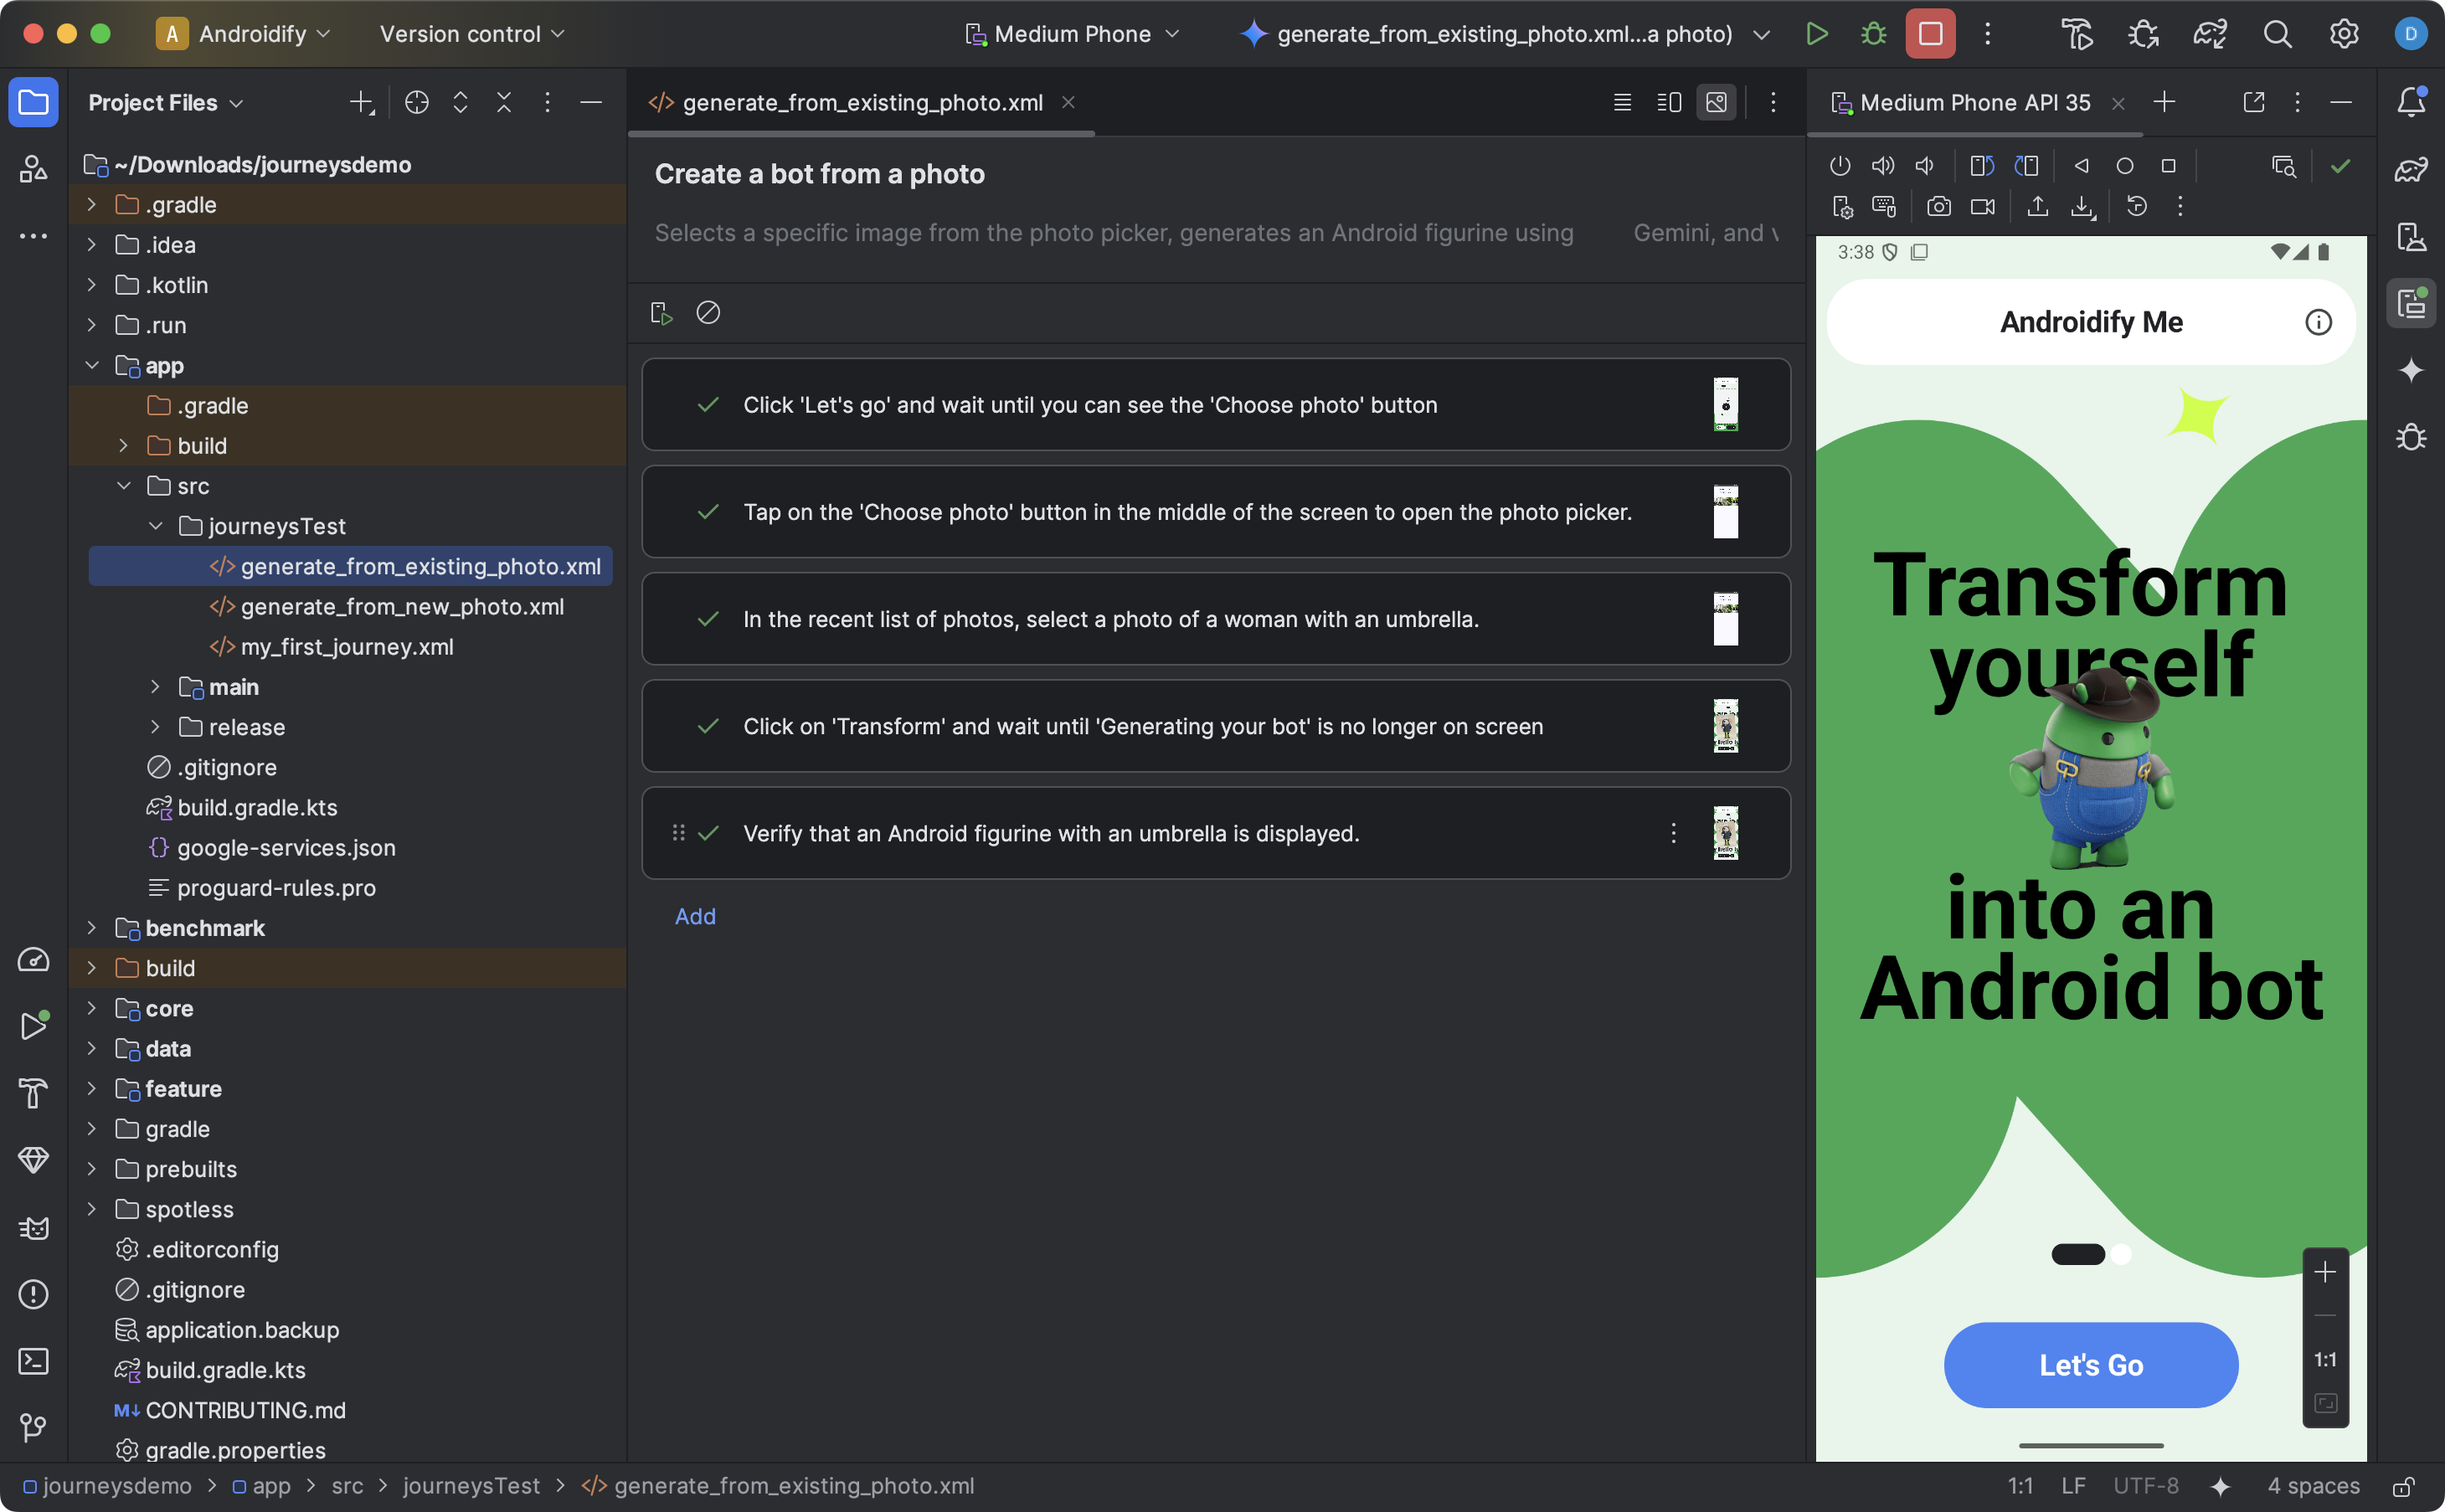
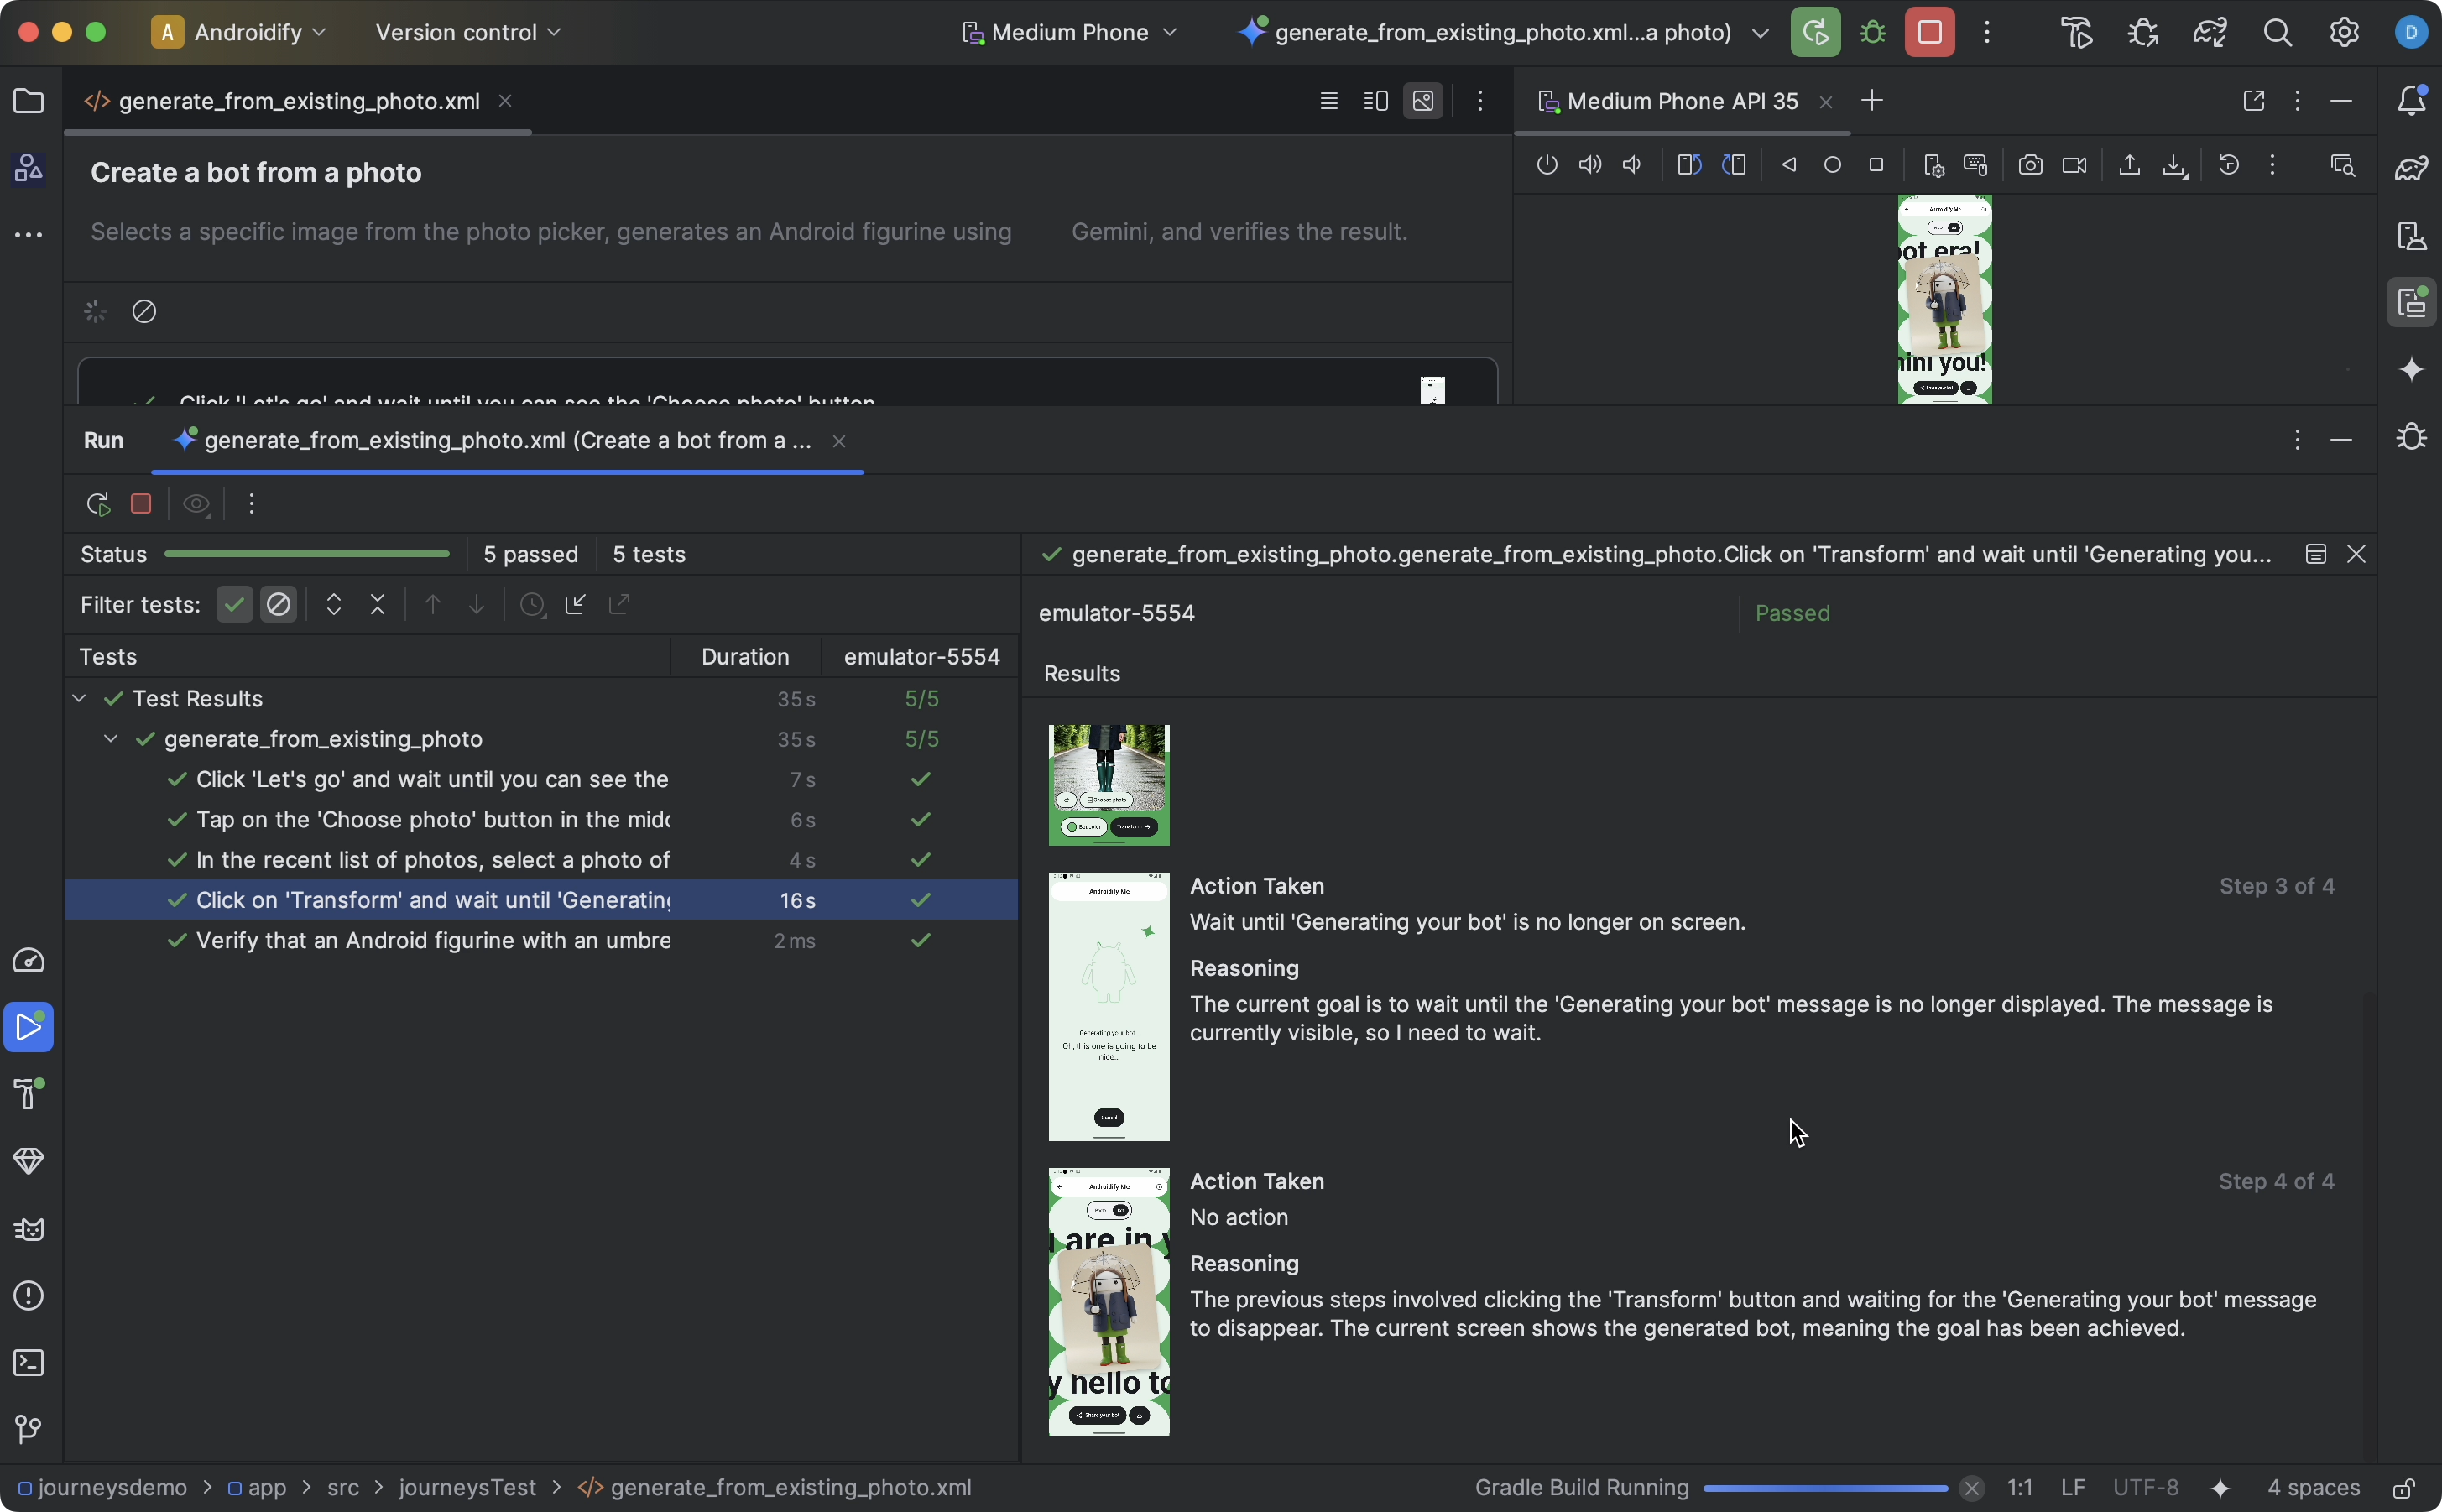
مشاهده نتایج
وقتی اندروید استودیو تست شما را تمام کرد، پنل نتایج تست به طور خودکار ظاهر میشود تا نتایج را به شما نشان دهد.
در مقایسه با سایر تستهای ابزاری که ممکن است در اندروید استودیو اجرا کنید، تفاوتهایی در نحوه نمایش نتایج سفرها وجود دارد.
- پنل تستها ، این سفر را به مراحل مجزا تقسیم میکند. میتوانید روی هر مرحله کلیک کنید تا اطلاعات بیشتری در مورد نحوه اجرای آن توسط Gemini کسب کنید.
- پنل نتایج ، اطلاعات غنیای را نشان میدهد که به شما کمک میکند بفهمید Gemini چگونه سفر شما را درک و استدلال کرده و چگونه آن را اجرا کرده است.
- اسکرینشاتهایی که برای Gemini ارسال شدهاند، برای کمک بصری در هر مرحله نشان داده میشوند.
- هر اقدام انجام شده و دلیل Gemini برای انجام آن اقدام، در کنار هر تصویر توضیح داده شده است.
- هر اقدام در این مرحله شماره گذاری شده است.
مشکلات شناخته شده
مشکلات مربوط به حافظه پنهان پیکربندی Gradle: ممکن است Journeyها هنگام فعال بودن حافظه پنهان پیکربندی Gradle رفتار غیرمنتظرهای داشته باشند. به عنوان مثال، این میتواند باعث شود که فایل journey اشتباه اجرا شود، در حالی که چندین فایل journey وجود دارد. همچنین میتواند باعث مشکلات احراز هویت شود.
برای حل این مشکل، میتوانید با تنظیم
org.gradle.configuration-cache=falseدر فایلgradle.propertiesپروژه خود، حافظه پنهان پیکربندی را غیرفعال کنید.هنگام آزمایش یک سفر، تمام مجوزهای برنامه شما به طور پیشفرض اعطا میشوند.
هنگام آزمایش یک سفر در دستگاهی که اندروید ۱۵ (سطح API ۳۵) را اجرا میکند، ممکن است هشداری روی دستگاه با عنوان « برنامه ناامن مسدود شده » برای « خزنده AndroidX » مشاهده کنید. میتوانید برای دور زدن این بررسی، روی «به هر حال نصب کن » کلیک کنید. همچنین، میتوانید گزینههای توسعهدهنده روی دستگاه را پیکربندی کنید و گزینه تأیید برنامهها از طریق USB را غیرفعال کنید.