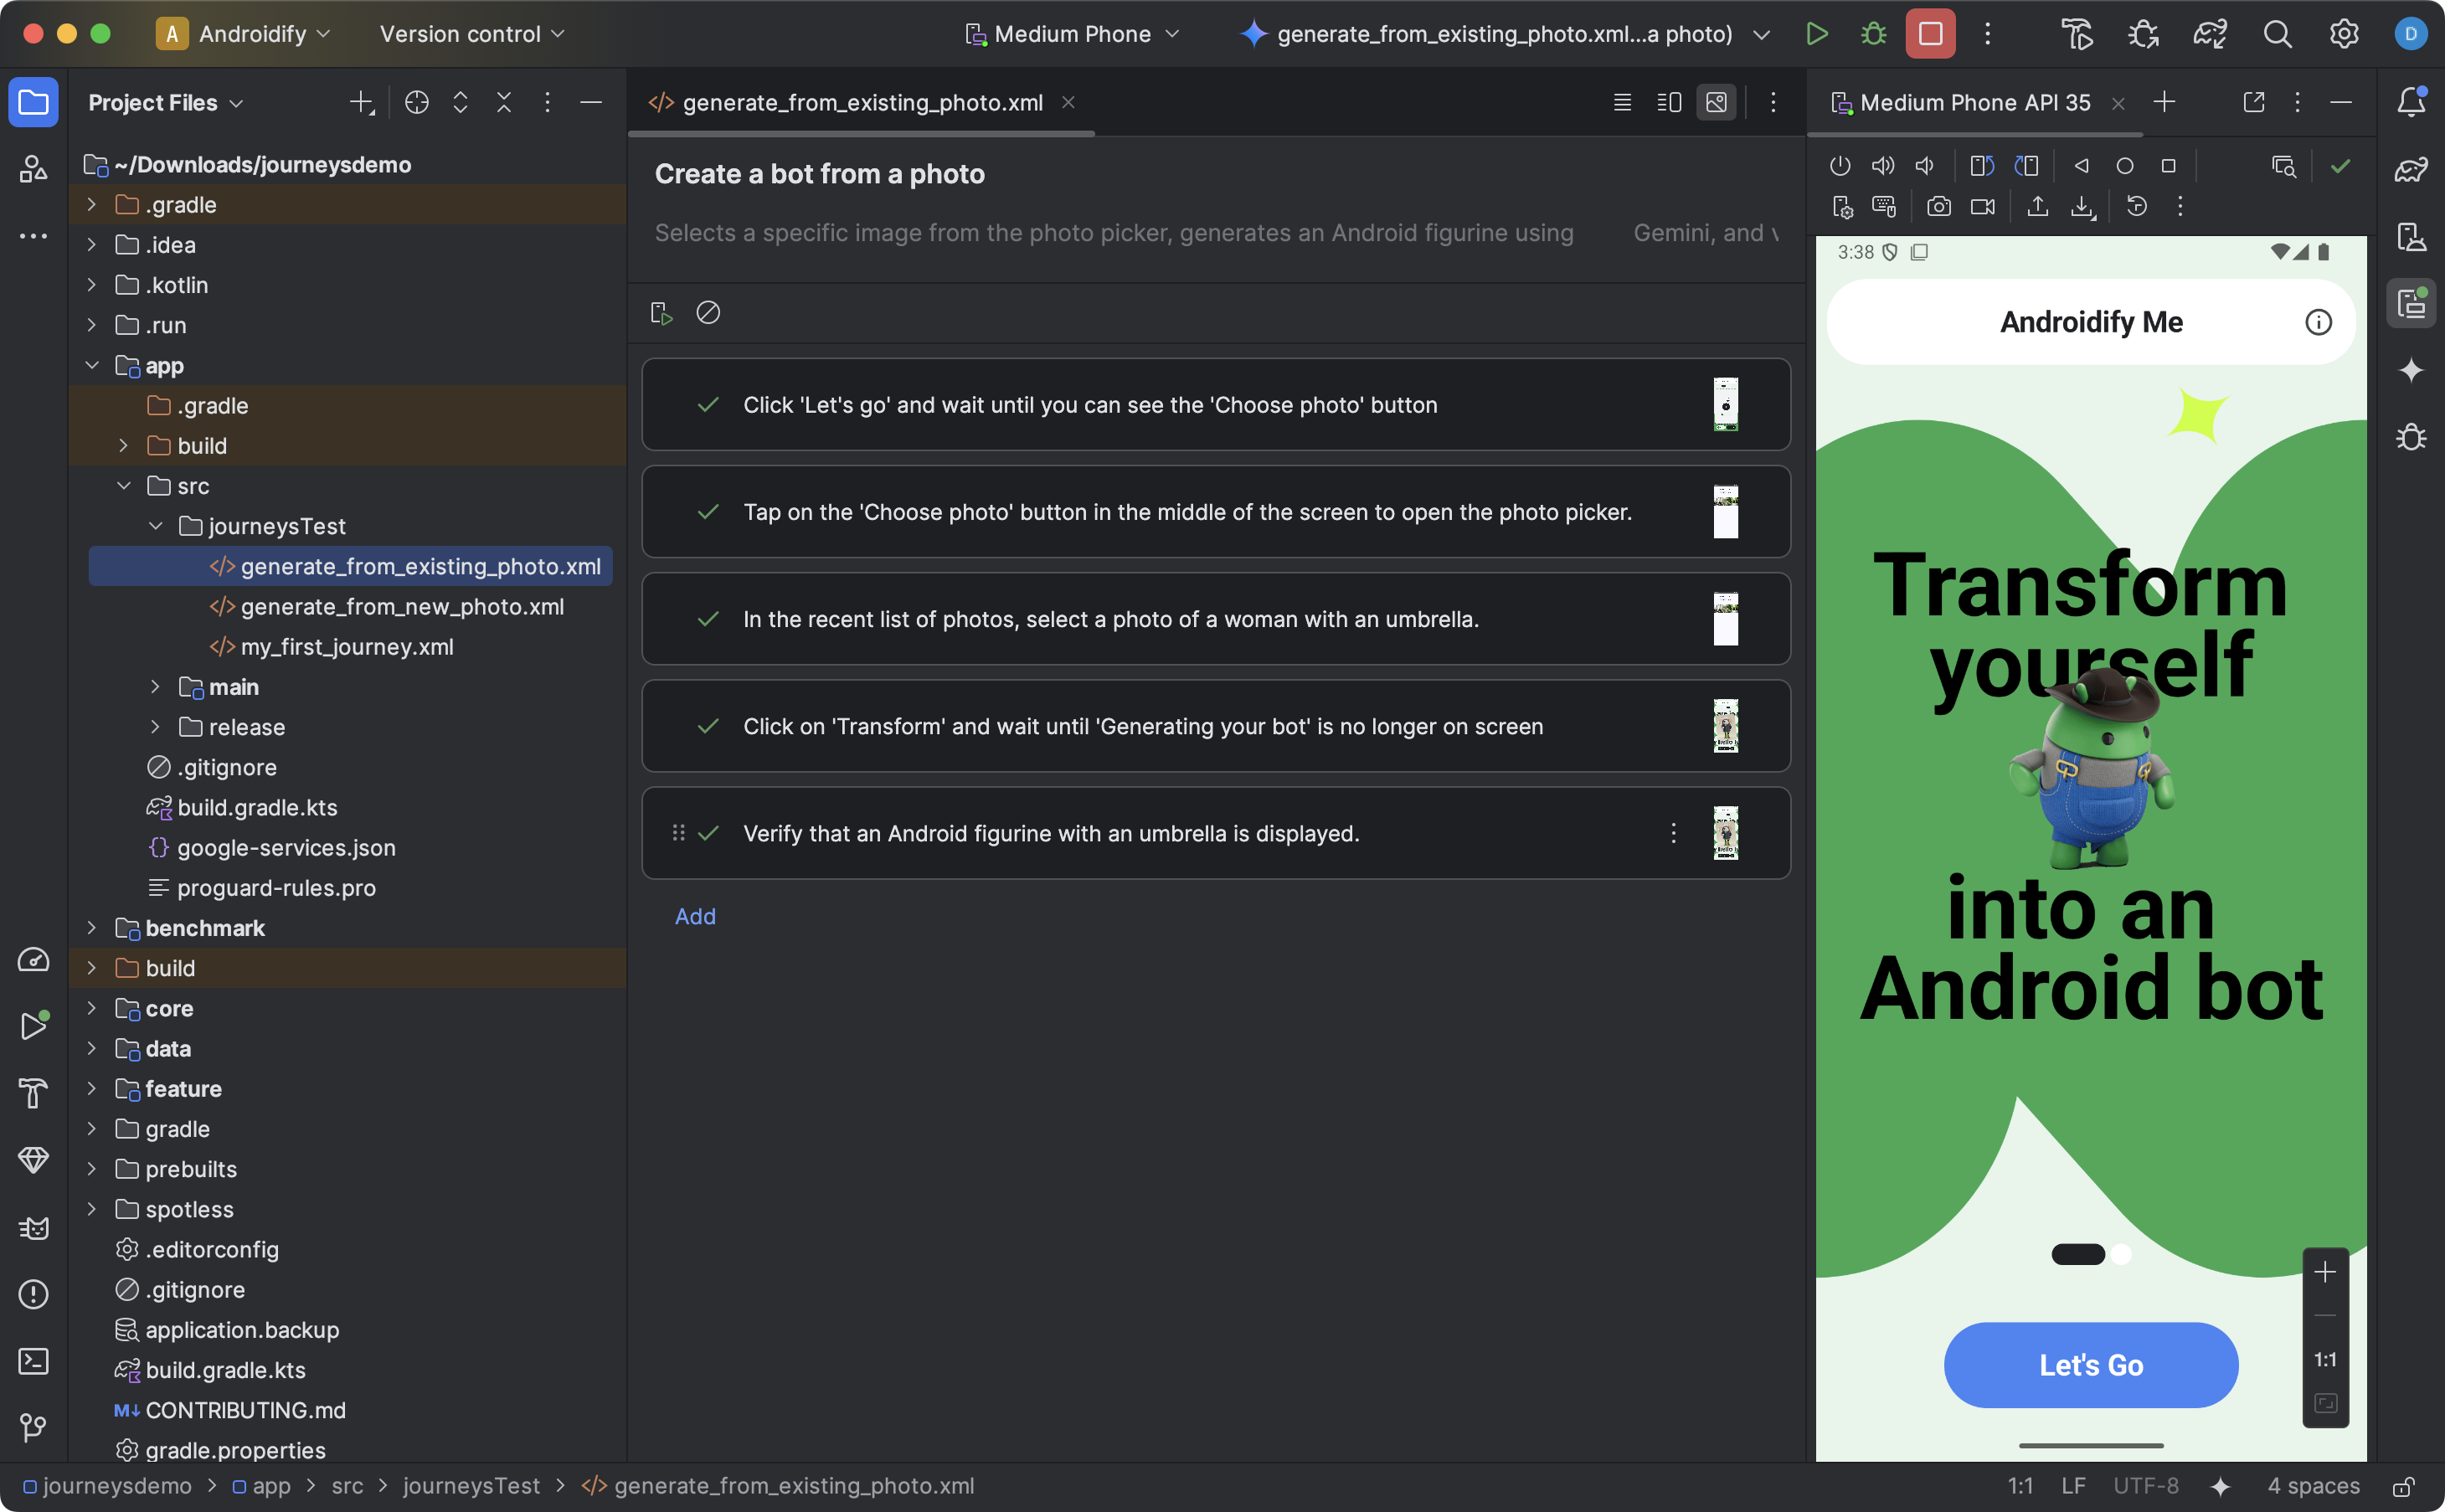
Android 스튜디오용 여정을 만들면 자연어를 사용하여 각 테스트(여정이라고 함)의 단계와 어설션을 설명할 수 있으므로 엔드 투 엔드 테스트를 쉽게 작성하고 유지관리할 수 있습니다. Gemini의 시각 및 추론 기능을 활용하면 자연어로 작성된 단계가 Gemini가 앱에서 실행하는 작업으로 변환되어 여정을 쉽게 작성하고 이해할 수 있습니다. 또한 Gemini가 여정의 통과 여부를 판단하기 위해 기기에서 확인한 내용을 기반으로 평가하는 더 복잡한 어설션을 작성하고 설명할 수 있습니다.
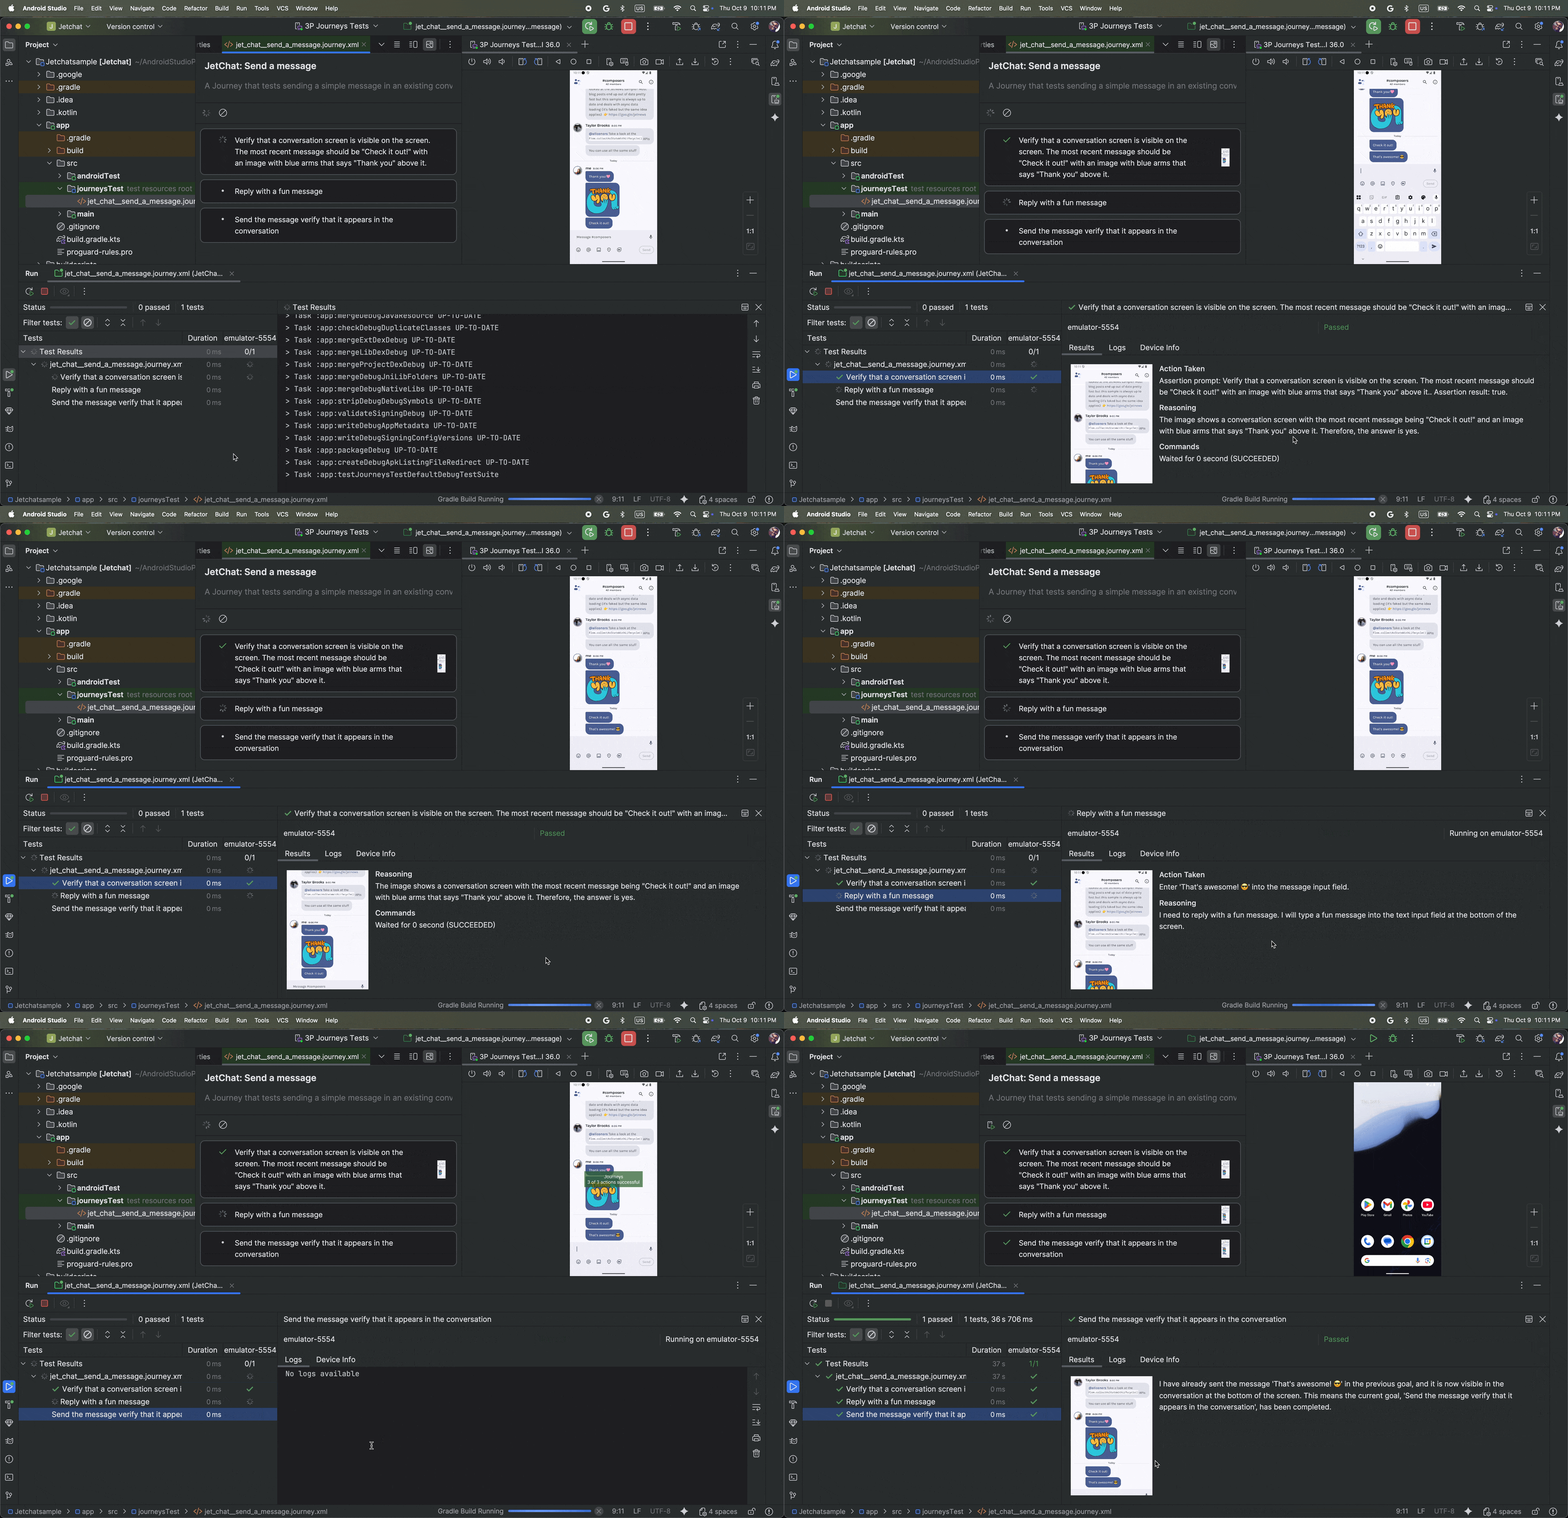
또한 Gemini는 목표를 충족하기 위해 실행할 작업을 추론하므로 앱의 레이아웃이나 동작이 미묘하게 변경되어도 여정이 더 탄력적입니다. 따라서 다양한 버전의 앱과 다양한 기기 구성에 대해 실행할 때 불안정한 테스트가 줄어듭니다.
Android 스튜디오에서 바로 로컬 또는 원격 Android 기기에 대해 여정을 작성하고 실행합니다. IDE는 여정을 작성하기 위한 새로운 편집기 환경과 Gemini의 추론 및 여정 실행을 더 잘 파악할 수 있는 풍부한 결과를 제공합니다.
여정 작성
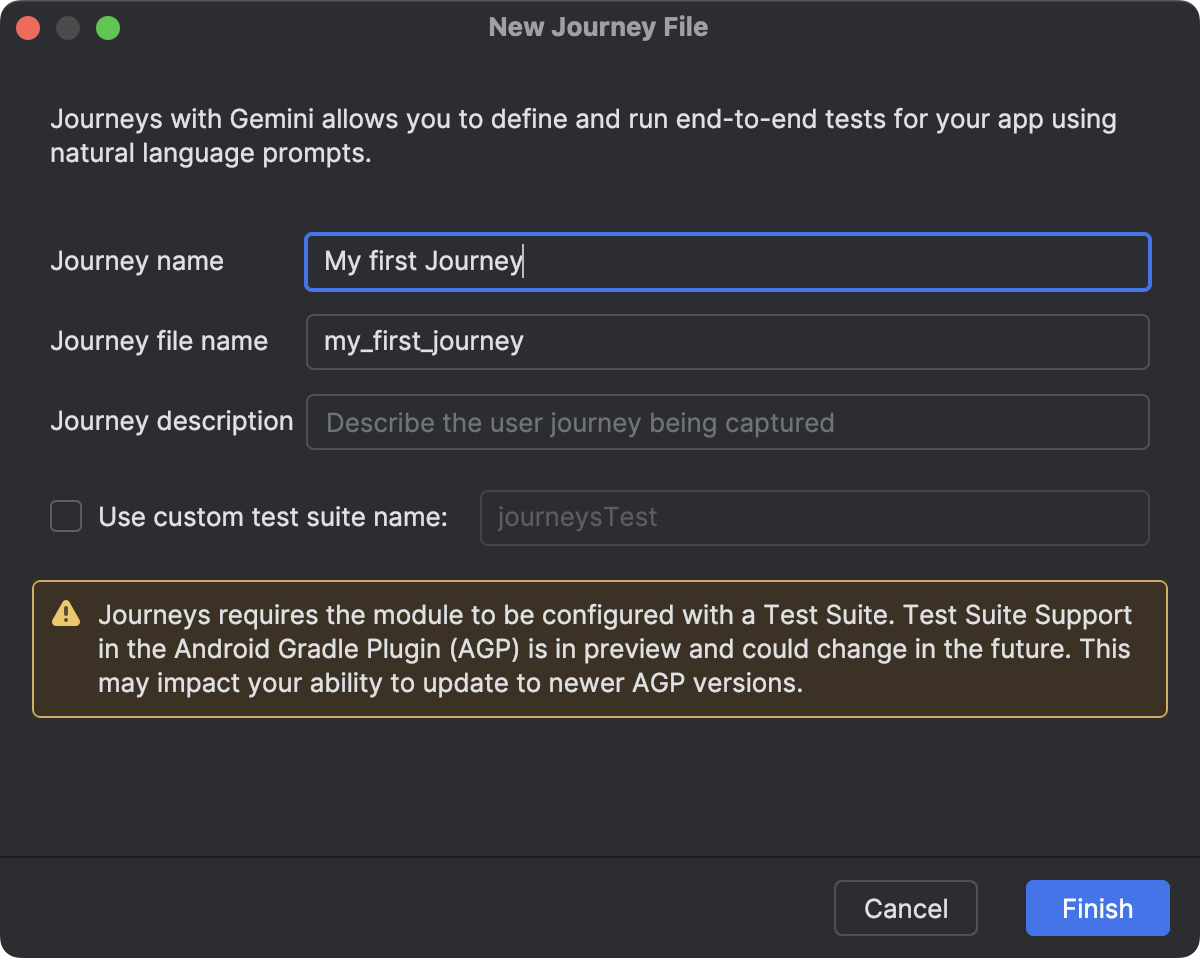
Android 스튜디오는 여정을 쉽게 만들고 수정할 수 있는 파일 템플릿과 새로운 편집기 환경을 제공합니다. 여정은 XML 구문을 사용하여 여정 설명과 단계를 정리합니다.
OK(확인)을 클릭합니다. Android 스튜디오는 선택한 이름으로 여정의 XML 파일을 만듭니다. 코드 뷰를 사용하여 XML을 직접 수정하거나 디자인 뷰를 사용하여 편집 환경을 개선할 수 있습니다.
디자인 보기에서 여정을 볼 때 텍스트 필드를 사용하여 여정의 각 단계를 설명합니다. 각 단계에는 Gemini가 수행하기를 원하는 설명 작업이나 Gemini가 평가하기를 원하는 어설션이 포함될 수 있습니다.
키보드의 Enter 키를 눌러 동일한 여정에서 새 프롬프트를 시작합니다. 정의하려는 여정의 각 단계에 대해 필요에 따라 이 단계를 반복할 수 있습니다.
여정 작성을 위한 도움말
여정을 자세하고 체계적으로 작성하면 Gemini가 의도한 여정을 더 결정론적인 방식으로 정확하게 실행할 가능성이 높아집니다. 다음은 여정을 더 효과적으로 작성하는 데 도움이 되는 몇 가지 팁입니다.
어설션을 작업과 분리: Gemini는 여정을 계속하기에 '올바른' 상태인지 확인하기 위해 앱의 상태를 지속적으로 평가합니다.
하지만 별도의 단계로 더 복잡한 어설션을 정의해야 할 수도 있습니다.
또한 '다음을 확인해', '다음을 주장해' 또는 '다음을 확인해'와 같은 핵심 문구를 사용하여 각 프롬프트를 시작하여 이 단계가 주장임을 Gemini에 알립니다.
스와이프로 Gemini 지시: Gemini는 탭이나 키보드 입력과 같은 기본 상호작용 외에도 특정 방향으로 화면을 스와이프해야 하는 작업을 지원합니다. 예를 들어 콘텐츠를 스크롤하거나 일부 UI를 닫으려면 스와이프 동작의 방향과 의도를 설명하면 됩니다. 기본적으로 Gemini는 화면 중앙에서 스와이프하지만 기기 화면의 다른 부분에서 스와이프하도록 안내할 수 있습니다.
복잡한 상호작용 및 구성 변경 피하기: Gemini는 현재 멀티 터치 동작, 화면 회전, 접기 작업과 같은 모든 상호작용 및 구성 변경을 지원하지 않습니다. Gemini 기능을 개선하기 위해 노력하고 있습니다.
여정 실행
사용 가능한 로컬 또는 원격 기기에서 다른 계측 테스트와 마찬가지로 여정을 실행할 수 있으며 Android 스튜디오는 여정 실행을 이해하는 데 도움이 되는 다양한 결과를 생성합니다.
여정을 테스트하려면 다음 단계를 따르세요.
계측 테스트를 실행할 때와 마찬가지로 기본 툴바에서 타겟 기기를 선택합니다.
테스트할 여정 XML 파일로 이동하여 편집기에서 엽니다.
편집기에서 다음 중 하나를 실행합니다.
디자인 보기에 있는 경우 여정 실행을 클릭합니다.
코드 뷰에 있는 경우 XML에서 여정 이름이 정의된 위치 옆의 여백에서 실행 을 클릭합니다.
Android 스튜디오에서 여정 테스트 구성을 만들어 대상 기기에서 실행합니다. 실행 중에 Android 스튜디오는 앱을 빌드하고 배포하며 Gemini에 연결하여 여정의 각 단계에서 취할 작업을 결정합니다.
여정을 실행하는 동안 편집기에도 제한된 결과가 표시됩니다. 예를 들어 여정의 각 단계를 실행하는 동안 스크린샷, 취한 조치, 추론이 표시됩니다. 편집기에서 썸네일 위로 마우스를 가져가면 자세한 정보를 볼 수 있습니다. 이는 여정에서 프롬프트를 반복할 때 유용합니다.
결과 보기
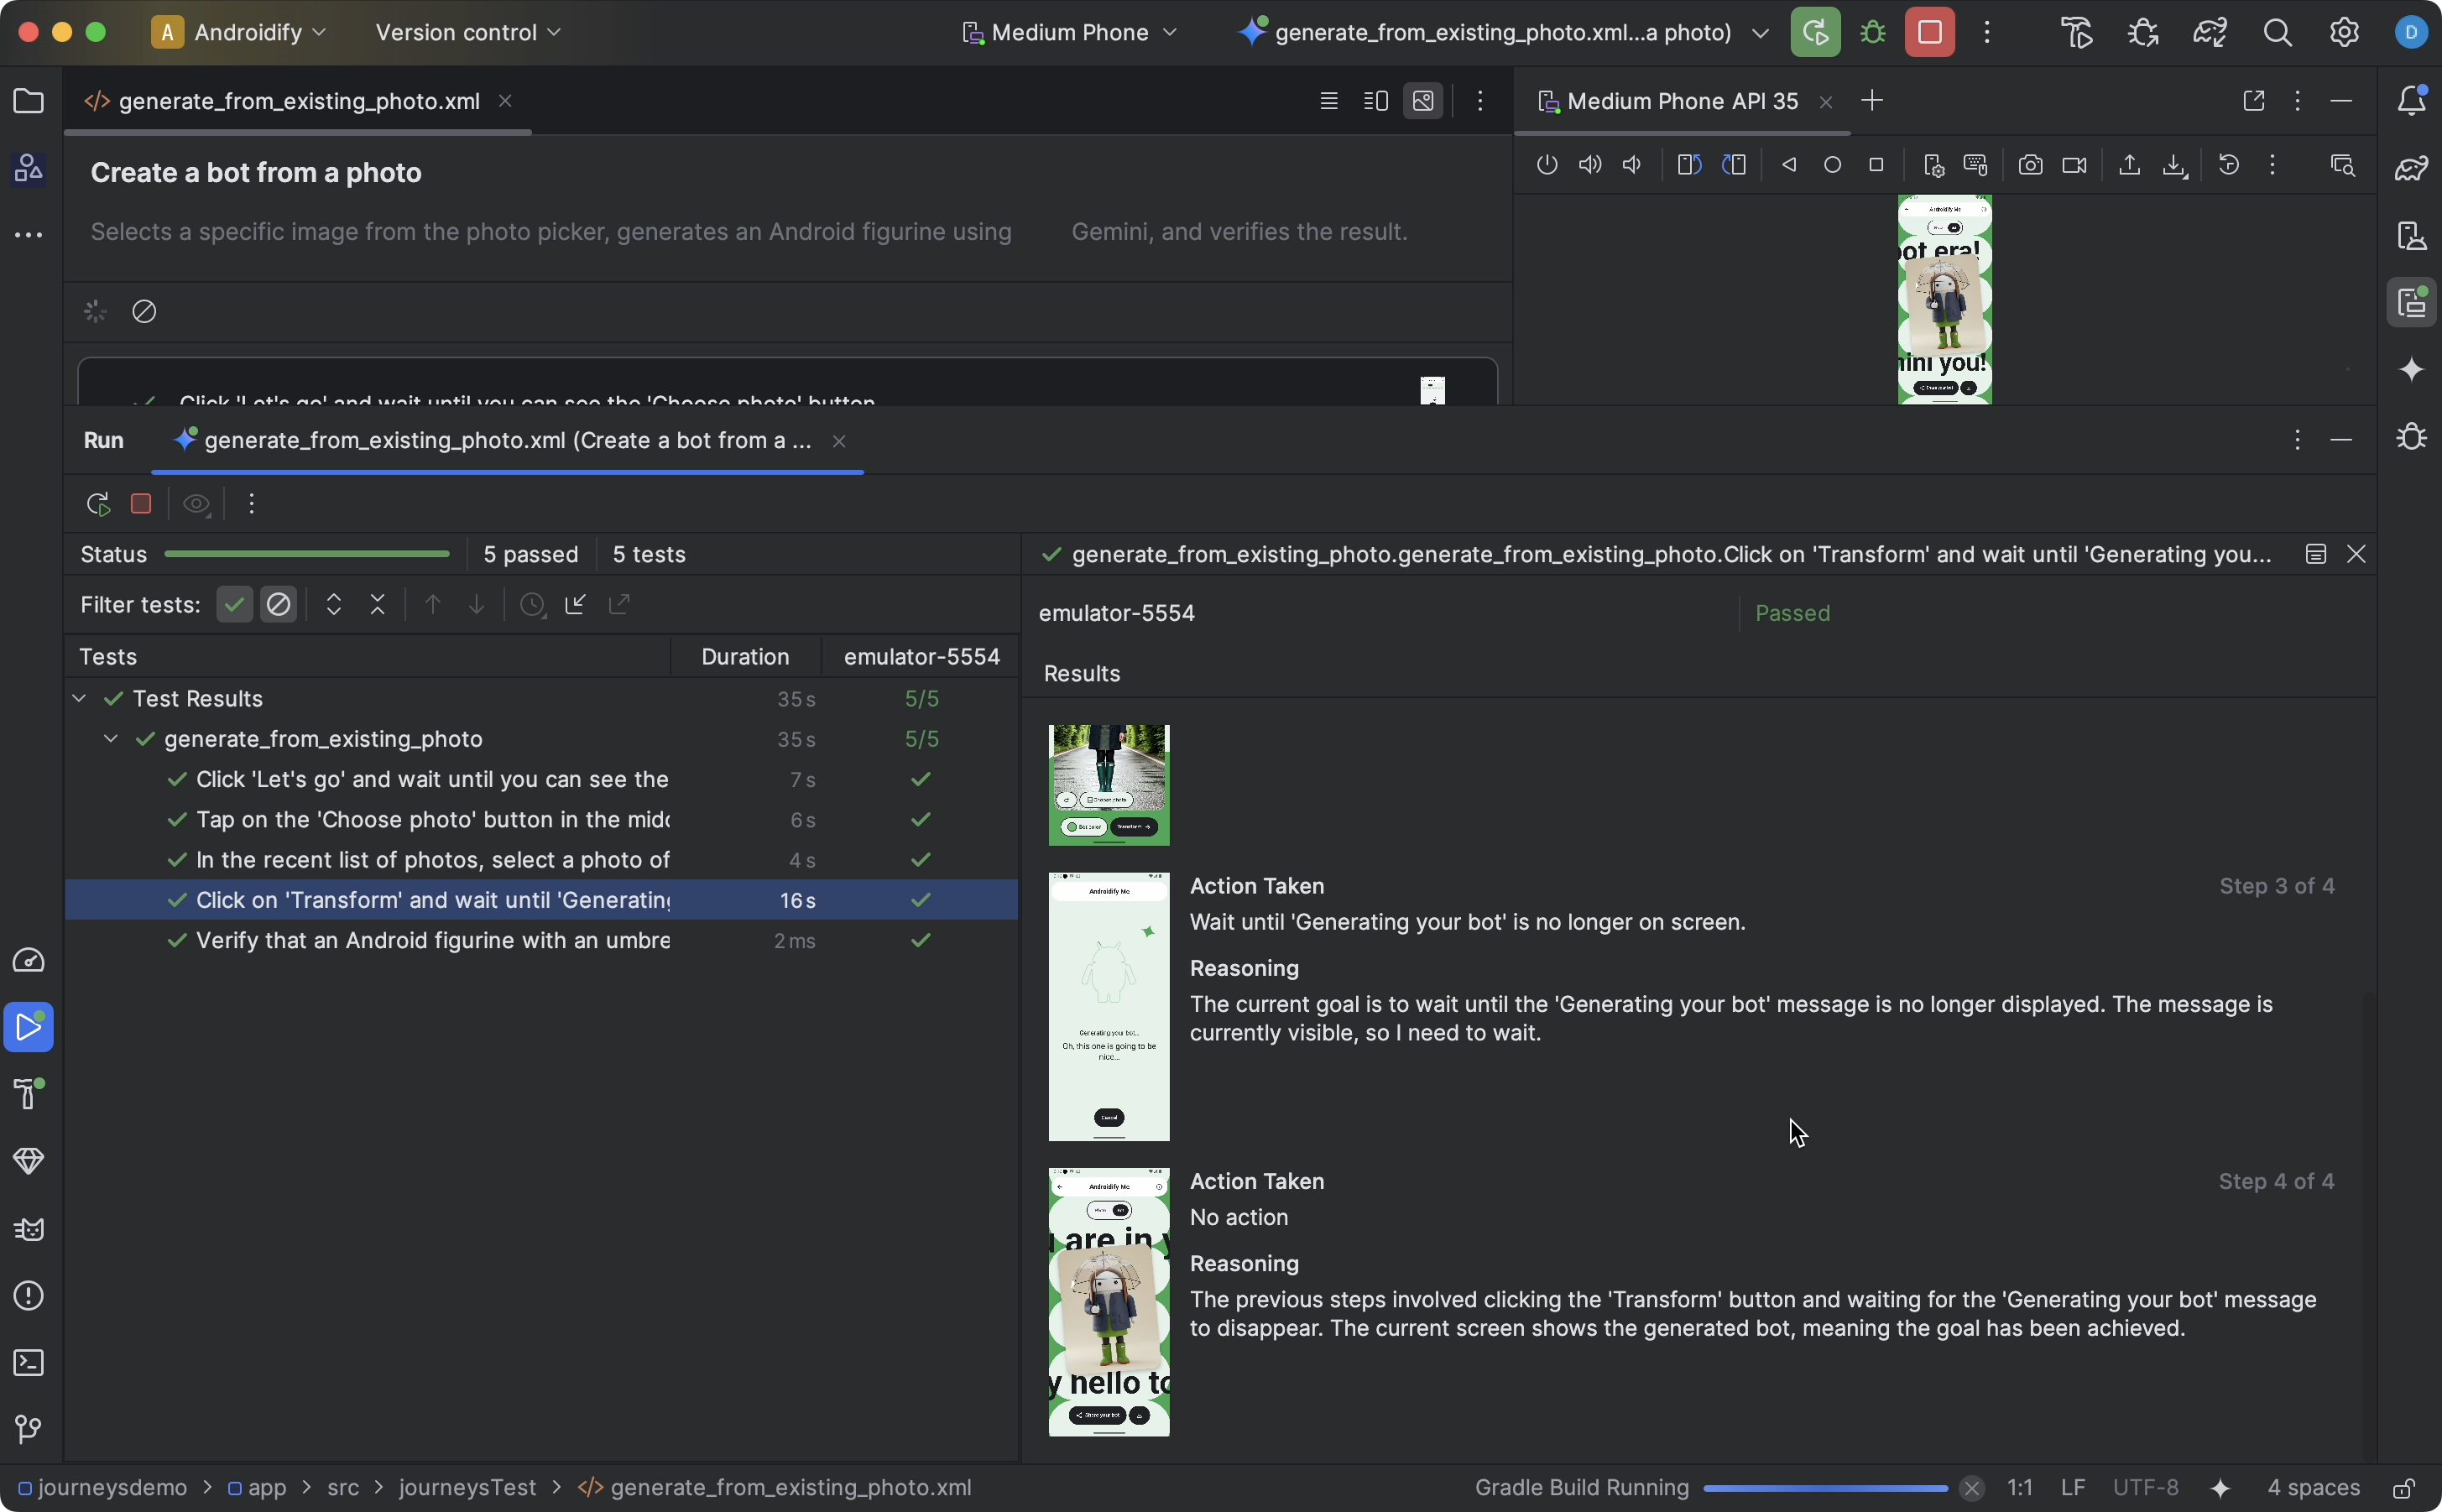
Android 스튜디오에서 여정 테스트를 완료하면 테스트 결과 패널이 자동으로 표시되어 결과를 보여줍니다.
Android 스튜디오에서 실행할 수 있는 다른 계측 테스트와 비교할 때 여정 결과가 표시되는 방식에 몇 가지 차이점이 있습니다.
테스트 패널은 여정을 개별 단계로 분류합니다. 각 단계를 클릭하여 Gemini가 어떻게 실행했는지 자세히 알아볼 수 있습니다.
결과 패널에는 Gemini가 여정을 어떻게 이해하고 추론했으며 어떻게 실행했는지 이해하는 데 도움이 되는 풍부한 정보가 표시됩니다.
Gemini에 전송된 스크린샷은 단계의 각 작업에서 시각적 보조 자료로 표시됩니다.
취해진 각 조치와 Gemini가 해당 조치를 취한 이유는 각 스크린샷 옆에 설명되어 있습니다.
단계의 각 작업에는 번호가 매겨져 있습니다.
알려진 문제
여정을 테스트할 때는 앱의 모든 권한이 기본적으로 부여됩니다.
Android 15 (API 수준 35)를 실행하는 기기에서 여정을 테스트할 때 기기에 'AndroidX 크롤러'에 대해 '안전하지 않은 앱이 차단됨'이라는 경고가 표시될 수 있습니다. 어쨌든 설치를 클릭하여 이 검사를 우회할 수 있습니다.
또는 온디바이스 개발자 옵션을 구성하고 USB를 통해 설치된 앱 확인 옵션을 사용 중지할 수 있습니다.
여정 파일은 현재 프로젝트 패널의 Android 뷰에 표시되지 않습니다. 프로젝트에서 여정 파일을 보려면 프로젝트 뷰를 사용하세요.
여정 내 여러 작업이 정확히 동일한 프롬프트를 공유하는 경우 여정 편집기에 표시되는 테스트 결과가 잘못될 수 있습니다. 구체적으로 중복 프롬프트가 있는 모든 작업에는 해당 프롬프트의 가장 최근에 업데이트된 인스턴스와 연결된 테스트 결과가 표시됩니다. 이 문제를 해결하려면 각 작업에 고유한 프롬프트가 있어야 합니다(예: 고유한 접두사 또는 접미사 추가).
새 에뮬레이터에서 키보드를 두 번째로 로드하면 스타일러스 팝업이 표시됩니다. 이 팝업으로 인해 일반적으로 텍스트 필드와 상호작용하는 테스트가 실패합니다. 이 경우 팝업을 닫고 여정을 다시 실행하세요.
앱 크롤러 아티팩트가 에이전트 근거에 표시되는 경우가 있습니다.
여정 실행이 가끔 IllegalStateException로 실패합니다. 이 경우 테스트 결과를 클릭하여 전체 오류를 확인할 수 있습니다.
Android Gradle 플러그인 (com.android.application)이 최상위 build.gradle 파일에 정의되어 있지 않으면 여정을 실행할 때 다음 오류가 표시될 수 있습니다.
Failed to apply plugin class 'com.android.tools.journeys.JourneysGradlePlugin'
이 문제를 해결하려면 플러그인이 최상위 build.gradle 파일에 정의되어 있는지 확인하세요. 자세한 내용은 Android 빌드 시스템 구성을 참고하세요.
이 페이지에 나와 있는 콘텐츠와 코드 샘플에는 콘텐츠 라이선스에서 설명하는 라이선스가 적용됩니다. 자바 및 OpenJDK는 Oracle 및 Oracle 계열사의 상표 또는 등록 상표입니다.
최종 업데이트: 2025-08-09(UTC)
[[["이해하기 쉬움","easyToUnderstand","thumb-up"],["문제가 해결됨","solvedMyProblem","thumb-up"],["기타","otherUp","thumb-up"]],[["필요한 정보가 없음","missingTheInformationINeed","thumb-down"],["너무 복잡함/단계 수가 너무 많음","tooComplicatedTooManySteps","thumb-down"],["오래됨","outOfDate","thumb-down"],["번역 문제","translationIssue","thumb-down"],["샘플/코드 문제","samplesCodeIssue","thumb-down"],["기타","otherDown","thumb-down"]],["최종 업데이트: 2025-08-09(UTC)"],[],[],null,["# Journeys for Android Studio\n\n| **Preview:** Journeys for Android Studio are available starting from Android Studio Narwhal Feature Drop \\| 2025.1.3.\n\nCreating journeys for Android Studio helps make end-to-end tests easy to write\nand maintain by letting you use natural language to describe the steps and\nassertions for each test---called a journey. By leveraging Gemini's vision and\nreasoning capabilities, steps written in natural language are converted into\nactions that Gemini performs on your app, making it both easy to write and\nunderstand your journeys. Additionally, you can write and describe more complex\nassertions, which Gemini evaluates based on what it sees on the device in order\nto determine whether your journeys pass or fail. \n\nAnd because Gemini reasons about which actions to perform to satisfy the goals,\njourneys are more resilient to subtle changes to your app's layout or behavior,\nresulting in fewer flaky tests when running against different versions of your\napp and different device configurations.\n\nWrite and run journeys right from Android Studio against any local or remote\nAndroid device. The IDE provides a new editor experience for crafting journeys\nas well as rich results that help you better follow Gemini's reasoning and\nexecution of your journey.\n| **Note:** Before you get started, download the latest [Canary version of Android\n| Studio](/studio/preview). You'll also need to make sure that you're signed into your developer account and have enabled Gemini in Android Studio.\n\nWrite a journey\n---------------\n\nAndroid Studio provides a file template and new editor experience that makes\ncreating and editing journeys easy. Journeys are written using the XML syntax to\norganize your journey description and steps.\n\nTo create and start editing a journey, do the following:\n\n1. From the **Project** panel in Android Studio, right-click on the app module for which you want to write a journey.\n2. Select **New \\\u003e Test \\\u003e Journey File**.\n3. In the dialog that appears, provide the name and description of your journey.\n4. Click **OK** . Android Studio creates an XML file for your journey with the name you chose. You can use either the **Code** view to edit the XML directly, or the **Design** view for an improved editing experience.\n5. When viewing your journey in the **Design** view, use the text field to describe each step of your journey. Each step can include descriptive actions you want Gemini to perform or assertions that you want Gemini to evaluate.\n6. Press \u003ckbd\u003eEnter\u003c/kbd\u003e on your keyboard to start a new prompt in the same journey. You can repeat this as needed for each step of the journey you want to define.\n\n### Tips for writing journeys\n\nWriting your journeys in a detailed and organized way can increase the\nlikelihood of Gemini accurately running your intended journeys in a more\ndeterministic way. Here are some tips to help you write your journeys more\neffectively:\n\n- **Separate assertions from actions:** Gemini constantly evaluates the state of your app to determine if it's in a \"correct\" state to continue the journey. However, you might need to define more complex assertions as a separate step. Additionally, start each prompt using key phrases such as \"Verify that,\" \"Assert that,\" or \"Check that\" to let Gemini know that this step is meant to be an assertion.\n- **Direct Gemini with swipes:** In addition to basic interactions, such as tapping or keyboard inputs, Gemini supports actions that require it to swipe the screen in certain directions. For example, to scroll through content or dismiss some UI simply describe the direction and intent of your swipe action. By default, Gemini swipes from the center of the screen, but you can guide it to swipe on a different part of the device screen.\n- **Avoid complex interactions and configuration changes:** Gemini currently does not support all interactions and configuration changes, such as multi-finger gestures, screen rotations, or folding actions. The team is working to improve Gemini capabilities.\n\nRun your journey\n----------------\n\nYou can run your journey on any available local or remote device, similar to any\nother instrumented test, and Android Studio generates rich results that help you\nunderstand the execution of your journey.\n\nTo test a journey, do the following:\n\n1. Select a target device from the main toolbar, like you would when running an instrumented test.\n2. Navigate to the journey XML file that you would like to test and open it in the editor.\n3. In the editor, do one of the following:\n 1. If you're in the **Design** view, click **Run Journey**.\n 2. If you're in the **Code** view, click **Run** in the gutter next to where the name of the journey is defined in the XML.\n\nAndroid Studio creates a **Journeys Test** configuration for you and runs it on\nthe target device. During execution, Android Studio builds and deploys your app,\nand connects to Gemini to determine which actions to take for each step of your\njourney.\n\nLimited results are also shown in the editor while running a journey, such as\nthe screenshots, action taken, and reasoning during the execution of each step\nin your journey. Simply hover over the thumbnail in the editor to see more\ninformation. This can be helpful when iterating on the prompts in your journey.\n\nView results\n------------\n\nWhen Android Studio completes testing your journey, the test results panel\nappears automatically to show you the results.\n\nCompared to other instrumented tests you might run in Android Studio, there are\nsome differences in how results for journeys are displayed.\n\n- The **Tests** panel breaks down the journey into the discrete steps. You can click on each step to find out more information about how Gemini executed it.\n- The **Results** panel shows rich information to help you understand how Gemini understood and reasoned about your journey, and how it was executed.\n- The screenshots that were sent to Gemini are shown for visual aid at each action in the step.\n- Each action taken and Gemini's reasoning for why it took that action is described next to each screenshot.\n- Each action in the step is numbered.\n\nKnown issues\n------------\n\n- When testing a journey, all permissions for your app are granted by default.\n- When testing a journey on a device running Android 15 (API level 35), you might see a warning on the device that says \"Unsafe App Blocked\" for \"AndroidX Crawler\". You can click **Install anyway** to bypass this check. Alternatively, you can [Configure on-device developer options](/studio/debug/dev-options) and disable the option to **Verify apps over USB**.\n- Journey files do not currently appear in the **Android** view in the **Projects** panel. To see journey files in your project, use the **Project** view.\n- If multiple actions within a journey share the exact same prompt, the test results displayed in the journey editor may be incorrect. Specifically, all actions with the duplicate prompt will show the test results associated with the most recently updated instance of that prompt. To work around this, ensure each action has a unique prompt---for example, by adding a distinct prefix or suffix.\n- A stylus popup appears the second time the keyboard is loaded on a fresh emulator. This popup usually causes tests that interact with text fields to fail. When this occurs, dismiss the popup and rerun the journey.\n- App crawler artifacts might occasionally appear in agent rationale.\n- Journey execution occasionally fails with an `IllegalStateException`. When this happens, you can click on **Test Results** to see the full error.\n- If the Android Gradle Plugin (`com.android.application`) isn't defined in the\n top-level `build.gradle` file, you may see the following error when running a\n journey:\n\n Failed to apply plugin class 'com.android.tools.journeys.JourneysGradlePlugin'\n\n To resolve this, ensure that the plugin is defined in the top-level\n `build.gradle` file. See [Configure the Android build system](/build#top-level)\n for more information."]]