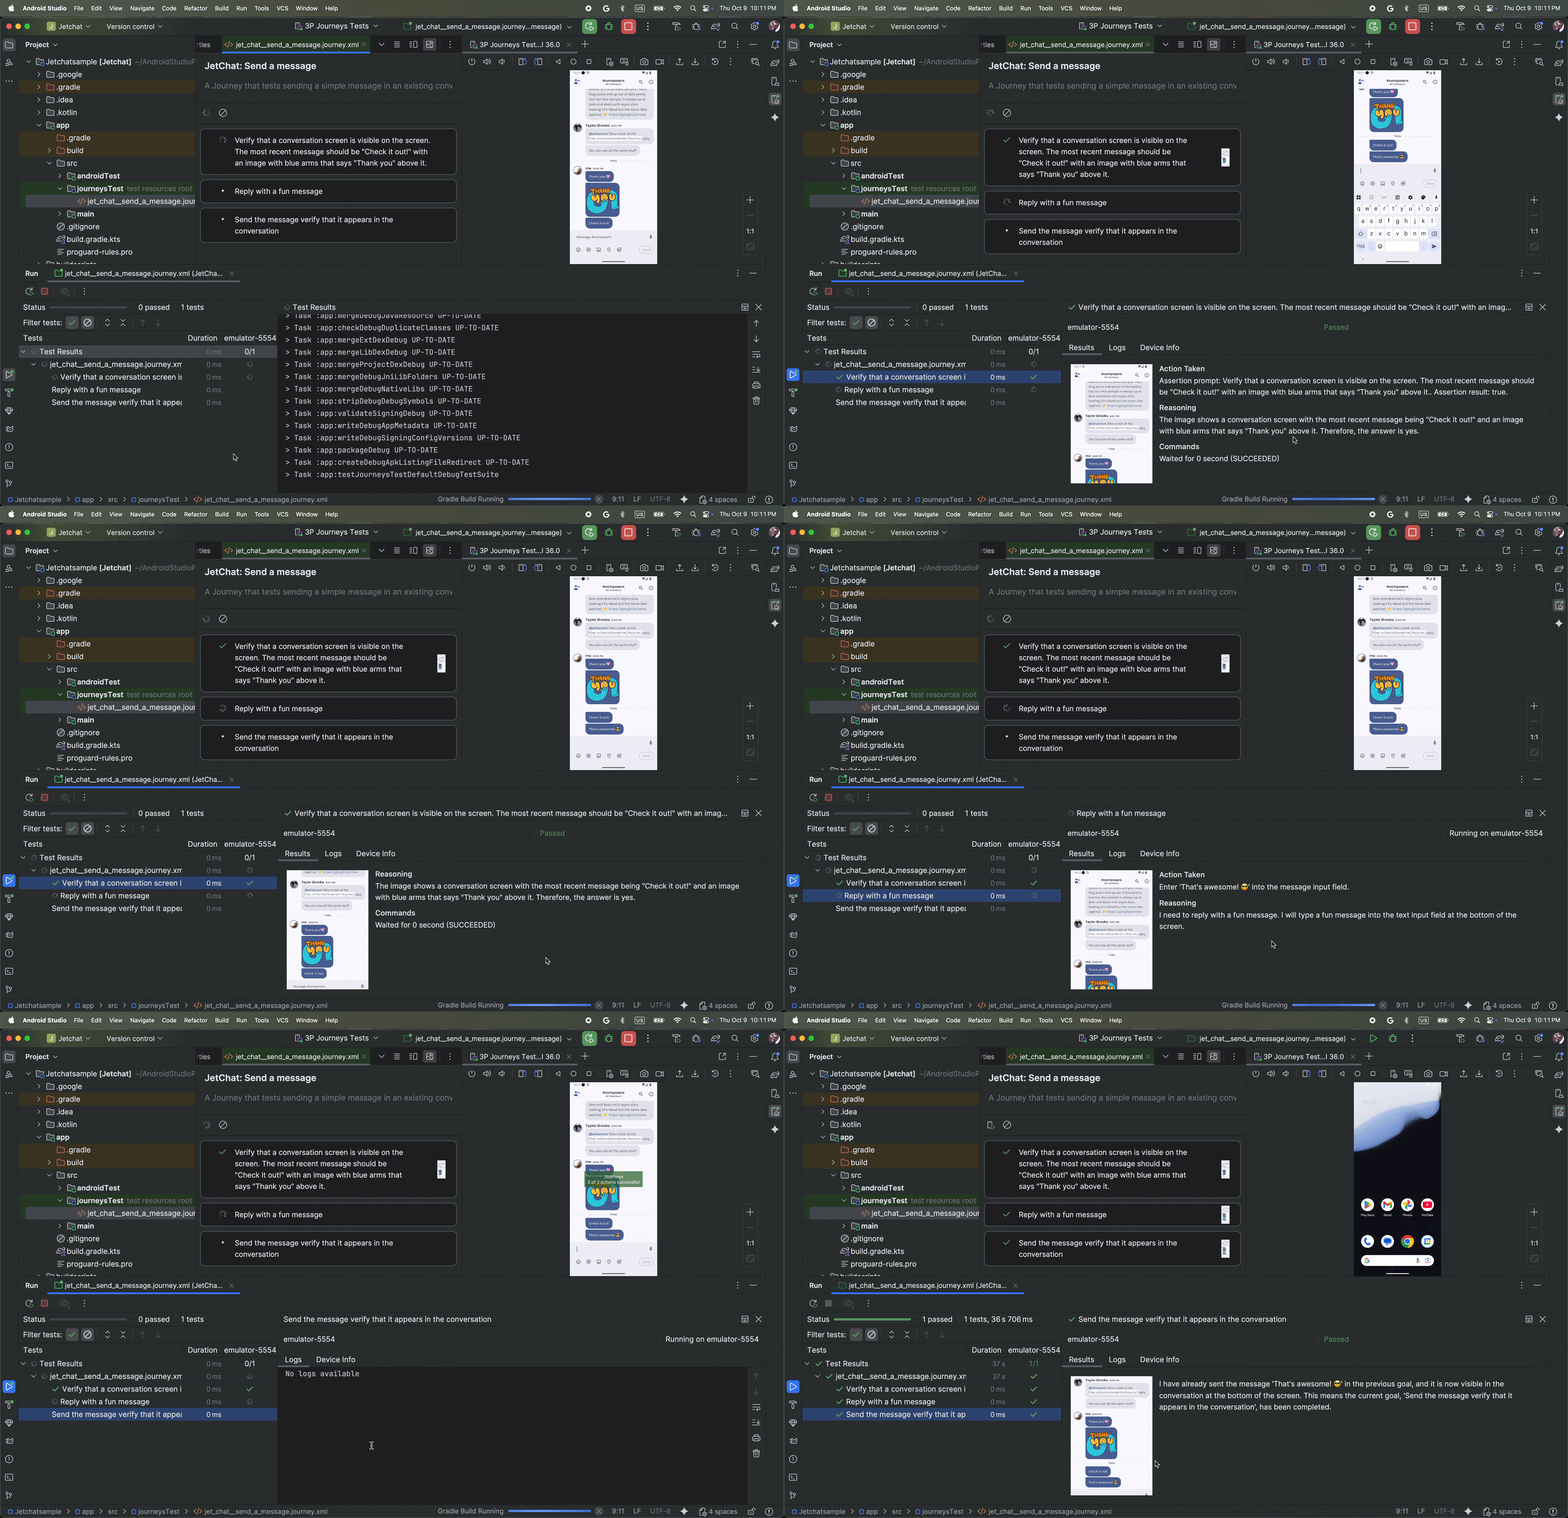
התכונה 'מסלולי משתמש' ב-Android Studio משתמשת ביכולות הראייה וההסקה של AI כדי לנווט באפליקציה ולבדוק אותה על סמך ההוראות שלכם בשפה טבעית. קבוצת ההוראות שלכם, שנקראת מסע, מומרת לפעולות שה-AI מבצע באפליקציה. בנוסף, אתם יכולים לכתוב ולתאר טענות מורכבות יותר, שה-AI מעריך על סמך מה שהוא רואה במכשיר.

בנוסף, Gemini מנתח אילו פעולות צריך לבצע כדי להשיג את היעדים, ולכן המסלולים עמידים יותר לשינויים קלים בפריסה או בהתנהגות של האפליקציה. כתוצאה מכך, כשמריצים בדיקות מול גרסאות שונות של האפליקציה והגדרות שונות של המכשיר, יש פחות בדיקות לא יציבות.
אתם יכולים לכתוב ולהפעיל מסלולי המרה ישירות מ-Android Studio או משורת הפקודה, בכל מכשיר מקומי או מרוחק עם Android. סביבת הפיתוח המשולבת מספקת חוויית עריכה חדשה ליצירת מסלולי המרה, וגם תוצאות מפורטות שעוזרות לכם להבין טוב יותר את ההיגיון של Gemini ואת הביצוע של מסלול ההמרה.
כתיבת מסלול
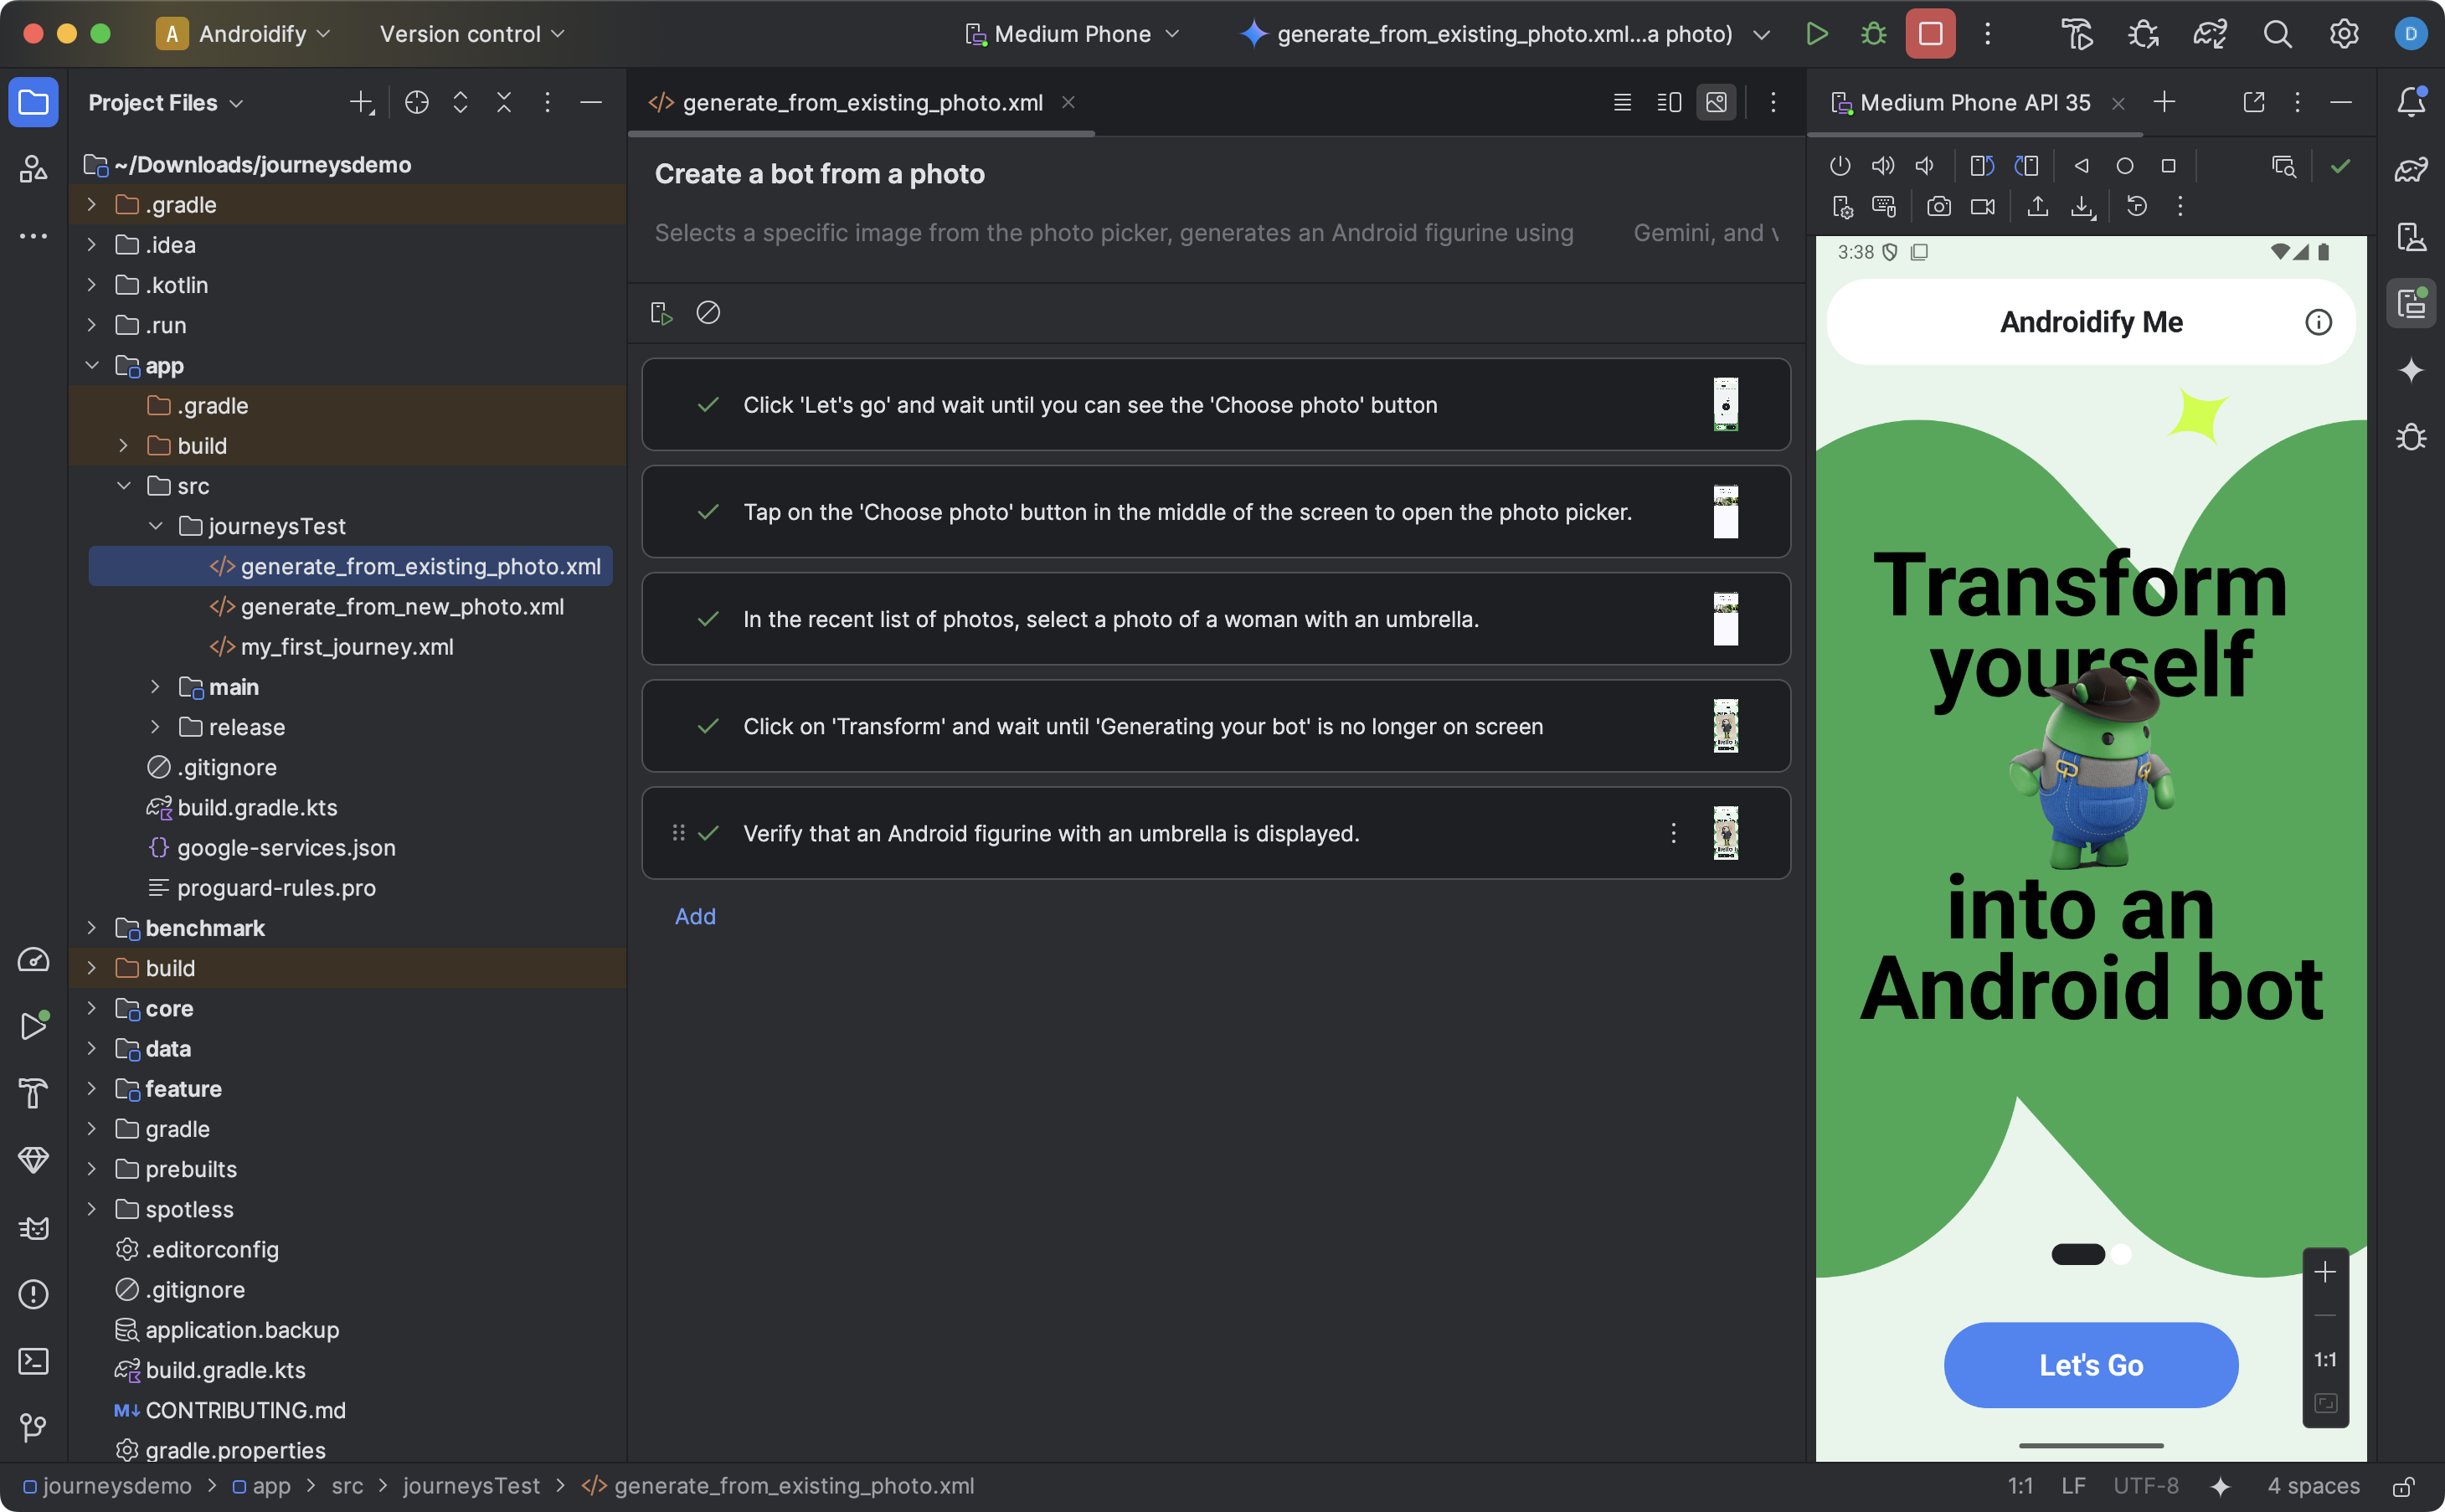
Android Studio מספק תבנית קובץ וחוויית עריכה חדשה שמקלים על יצירה ועריכה של מסלולי המרה. התהליכים נכתבים באמצעות תחביר XML כדי לארגן את תיאור התהליך והשלבים שלו.

כדי ליצור מסלול המרה ולהתחיל לערוך אותו:
- בחלונית Project ב-Android Studio, לוחצים לחיצה ימנית על מודול האפליקציה שרוצים לכתוב לו מסלול.
- בוחרים באפשרות חדש > בדיקת נתיב.
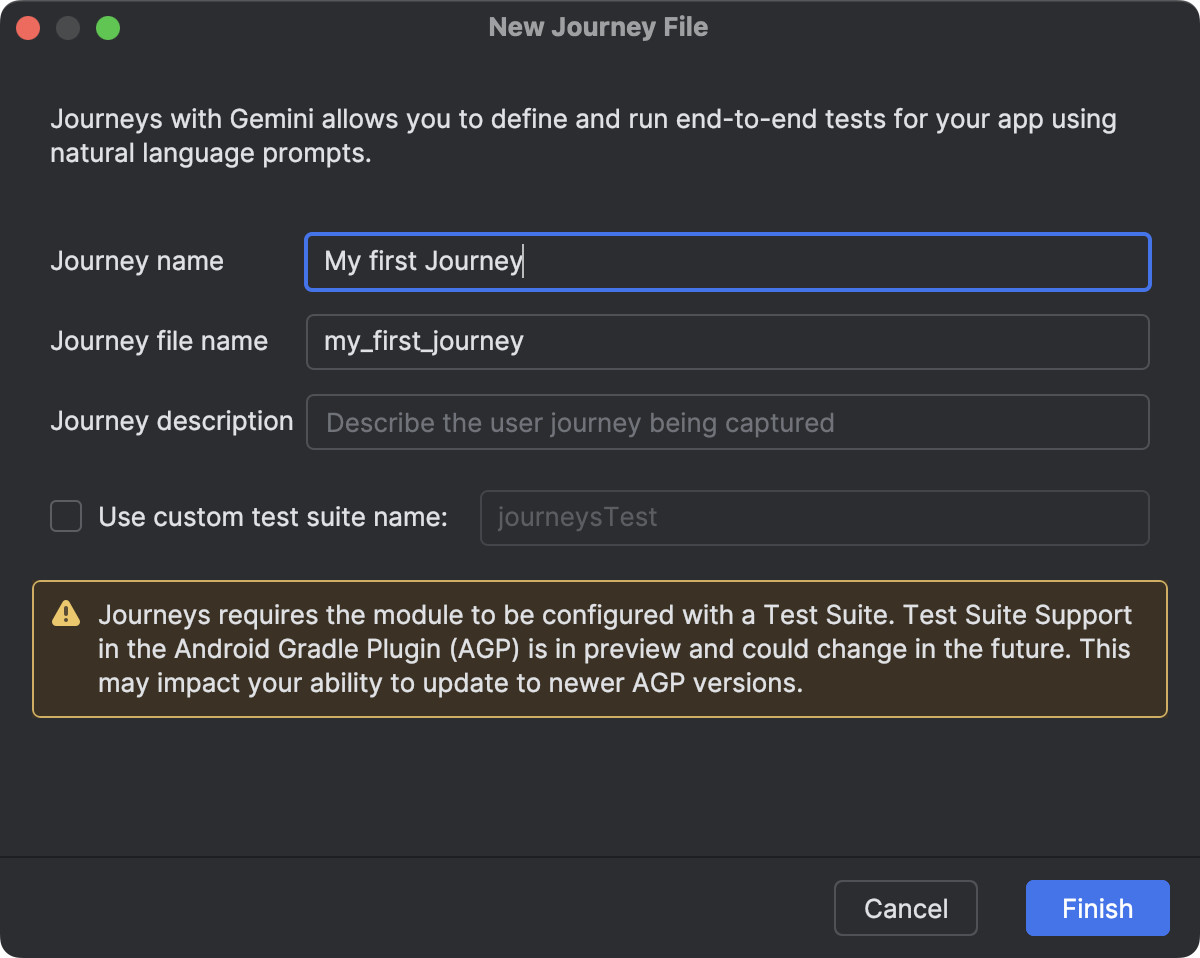
בתיבת הדו-שיח שמופיעה, מזינים את השם והתיאור של מסלול ההמרה.

תיבת דו-שיח ב-Android Studio שמשמשת ליצירת קובץ של מסלול המשתמש. לוחצים על סיום. Android Studio יוצר קובץ XML למסלול עם השם שבחרתם. אתם יכולים להשתמש בתצוגת קוד כדי לערוך את ה-XML ישירות, או בתצוגת עיצוב כדי לערוך בצורה פשוטה יותר.
כשצופים במסלול הלקוח בתצוגה עיצוב, אפשר להשתמש בשדה הטקסט כדי לתאר כל שלב במסלול הלקוח. כל שלב יכול לכלול פעולות תיאוריות שרוצים ש-Gemini יבצע או טענות שרוצים ש-Gemini יעריך.
מקישים על Enter במקלדת כדי להתחיל שלב חדש באותו מסלול. אפשר לחזור על הפעולה הזו לפי הצורך לכל שלב במסלול שרוצים להגדיר.
טיפים לכתיבת מסעות
למרות שטכנולוגיית ה-AI מסוגלת להבין את רוב השלבים שנכתבים בשפות נתמכות, הטיפים הבאים לכתיבת מסלולי המרה יכולים לעזור לכם לקבל תוצאות מדויקות יותר:
- אם האפליקציה כבר במצב פעיל: הפעלת מסלול תגרום להשקת האפליקציה באופן אוטומטי. השלבים במסלול יתחילו אחרי שהאפליקציה תושק באופן מלא. כלומר, לא צריך לכלול את השלב 'הפעלת האפליקציה'.
- השתמשו בשפה חד-משמעית: דיוק מצמצם את הסיכוי לפרשנות שגויה ומשפר את המהימנות.
| במקום | פעולה |
|---|---|
| "Select the dismiss button" (בחירה בלחצן הסגירה) | "Tap 'Dismiss'" או פשוט "Dismiss" |
| "Type 'celery'" (הקלדת 'סלרי') | "Type 'celery' in the search bar at the top of the home screen" (הקלד 'סלרי' בסרגל החיפוש בחלק העליון של מסך הבית) |
| "Swipe to dismiss" (החלקה לביטול) | "מחליקים ימינה כדי לסגור את הכרטיס, והוא לא יוצג יותר" |
- כוללים את הקריטריונים להצלחה כחלק מהשלב: כך Gemini מבין טוב יותר את הכוונה שלכם, ויודע מתי הפעולה הושלמה ואפשר להתחיל את הפעולה הבאה.
| במקום | פעולה |
|---|---|
| "Select the send button" (בחירה בלחצן השליחה) | "כדי לשלוח את האימייל, מקישים על לחצן השליחה. האימייל ייסגר ותחזרו לתיבת הדואר הנכנס". |
| "Go to the shopping cart" (מעבר אל עגלת הקניות) | "מקישים על סמל עגלת הקניות כדי לעבור לדף עגלת הקניות. בודקים אם הוא מכיל אפס פריטים" |
| "Click the first video" (לחיצה על הסרטון הראשון) | "Click the first video and wait for it to fully load" (לחיצה על הסרטון הראשון והמתנה עד לטעינה מלאה שלו) |
- שיפור התהליך: אם התהליך לא מתבצע כמצופה, אפשר לראות את התוצאות ולבדוק את 'הפעולה שבוצעה' ואת 'ההסבר' המתאים כדי להבין למה Gemini לא ביצע את השלבים כמו שציפיתם. אפשר להשתמש במידע הזה כדי להוסיף הבהרות להוראות.
- פירוק המסלול לשלבים ספציפיים יותר: למרות שה-AI יכול לפרש שלבים מרובי-פעולות, לפעמים שלבים נפרדים ומפורטים יותר יכולים לשפר את הדיוק והשחזור של המסלול.
- "שגיאה: לא ניתן להשלים את הפעולה במספר הניסיונות המקסימלי המותר": אם השגיאה הזו מופיעה, נסו לפצל את השלבים שנכשלו לשני שלבים קטנים יותר או יותר. השגיאה הזו מתרחשת אם ה-AI לא מצליח להשלים את הפעולה אחרי ניסיון של מספר מקסימלי של אינטראקציות עם האפליקציה.
יכולות נתמכות ויכולות שלא נתמכות
הנה סקירה כללית של היכולות הנתמכות והיכולות שעדיין לא נתמכות באופן מלא בכתיבת מסעות לקוחות. הרשימות הבאות הן חלקיות בלבד.
הפעולות הבאות נתמכות בתוך מסלולי לקוח:
- מקישים על רכיבי ממשק המשתמש.
- מקלידים כדי להזין טקסט בשדות טקסט.
- מחליקים או גוללים בכיוון מסוים כדי לנווט בממשק המשתמש.
בשלב הזה, אין תמיכה מלאה ביכולות הבאות, או שהן עשויות לפעול באופן לא עקבי:
- תנועות בכמה אצבעות (למשל, צביטה לשינוי מרחק התצוגה) – אינטראקציות שדורשות שתי נקודות מגע או יותר על המסך בו-זמנית, כמו צביטה לשינוי מרחק התצוגה או החלקה בשתי אצבעות.
- לחיצה ארוכה – לחיצה והחזקת האצבע למשך זמן ארוך יותר מלחיצה רגילה.
- לחיצה כפולה – לחיצה מהירה פעמיים על אותו מיקום במסך.
- סיבוב המסך/קיפול – טיפול בשינויים בכיוון המכשיר (לדוגמה, בין תצוגה לאורך לתצוגה לרוחב) או במצב הפיזי של מכשירים מתקפלים (לדוגמה, פתיחה או סגירה).
- זיכרון – שמירה ושליפה של מידע ספציפי, הקשר או קלט משתמשים מאינטראקציות או משלבים קודמים.
- ספירה – מעקב מדויק אחרי כמויות, תדירויות או התקדמות.
- משפטי תנאי – ביצוע פעולות על סמך תנאים אחרים שצוינו.
התכונות והיכולות משתפרות כל הזמן. מומלץ לחזור לדף הזה בהמשך כדי לקבל מידע על תכונות ויכולות נוספות. כדי לעזור לנו לשפר את התכונה 'מסלולי לקוחות', נשמח לקבל ממך משוב.
הפעלת המסע
אתם יכולים להריץ את התהליך בכל מכשיר מקומי או מרוחק שזמין, בדומה לכל בדיקה אחרת עם מכשור, ו-Android Studio יוצר תוצאות חיפוש מתקדמות שעוזרות לכם להבין את הביצוע של התהליך.
כדי לבדוק מסלול המרה:
- בוחרים מכשיר יעד מסרגל הכלים הראשי, כמו כשמריצים בדיקה עם מכשור.
- עוברים לקובץ ה-XML של מסלול ההמרה שרוצים לבדוק ופותחים אותו בכלי העריכה.
- בעורך, מבצעים אחת מהפעולות הבאות:
- אם אתם בתצוגה עיצוב, לוחצים על
 ואז על הפעלת מסלול.
 - אם אתם בתצוגה Code, לוחצים על
 ואז על Run 'test' בסרגל הצד שליד המקום שבו מוגדר שם המסע ב-XML.
- אם אתם בתצוגה עיצוב, לוחצים על
Android Studio יוצר בשבילכם הגדרה של בדיקת Journeys ומריץ אותה במכשיר היעד. במהלך ההרצה, Android Studio בונה את האפליקציה ומפיץ אותה, ומתחבר ל-Gemini כדי לקבוע אילו פעולות לבצע בכל שלב בתהליך.

הרצת מסלולי המרה מול כל אפליקציה שהותקנה מראש
אפשר להריץ מסלול באפליקציה שהותקנה מראש במכשיר הבדיקה. האפשרות הזו שימושית אם רוצים לבדוק גרסת ייצור של האפליקציה, או אם עדיין לא עדכנתם את האפליקציה לגרסה 9.0.0 ואילך של Android Gradle Plugin.
- פותחים או יוצרים פרויקט חדש שמעודכן לפלאגין Android Gradle בגרסה 9.0.0 ומעלה.
- כתיבת תהליך.
- עורכים את הגדרת ההרצה של המסע ומוסיפים את משתני הסביבה הבאים. כשמנסים להריץ מסלול מ-Android Studio, נוצרת אוטומטית הגדרת הרצה.
JOURNEYS_CUSTOM_APP_IDמגדירים את מזהה החבילה של אפליקציית היעד.
- מריצים את המסלול שערכתם. Android Studio אמור לבצע את השלבים של התהליך באפליקציית היעד שציינתם.
הרצת מסלול המרה משורת הפקודה
אפשר גם להריץ מסלול המרה משורת הפקודה כמשימת Gradle.
הגדרה
כדי להשתמש ב-Journeys משורת הפקודה, צריך לבצע אימות ב-Google Cloud.
הערה: בשלבים האלה נעשה שימוש ב-CLI של gcloud כדי לספק פרטי כניסה של משתמשים, וזה לא תמיד רלוונטי לכל סביבות הפיתוח. למידע נוסף על תהליך האימות שמתאים לצרכים שלכם, תוכלו לקרוא את המאמר הסבר על Application Default Credentials.
כדי להתקין את Google Cloud CLI, פועלים לפי השלבים במאמר התקנת gcloud CLI.
לפרטי כניסה של משתמשים
אפשר לבצע אישור ידני באמצעות פקודת הטרמינל הבאה:
gcloud auth application-default login
לפרטי כניסה של חשבון שירות
אם עדיין לא עשיתם זאת, פועלים לפי המדריך ליצירת פרטי כניסה לחשבון שירות עבור הפרויקט.
- מוודאים ש-IAM Service Account Credentials API מופעל בפרויקט שבו יצרתם את המפתחות של חשבון השירות.
- מוודאים שלמשתמש האדמין ולחשבון השירות יש הרשאת
Service Account Token Creator.
כדי לבצע אימות, מריצים את הפקודה הבאה:
gcloud auth application-default login --impersonate-service-account SERVICE_ACCOUNT_EMAIL
הפעלה כמשימת Gradle
מריצים את Journeys על ידי הפעלה ישירה של משימת Gradle בשורת הפקודה. אחרי שמריצים את המשימה, תוצאות הבדיקה יופיעו ביומנים, ויווצרו קבצים של תוצאות הבדיקה בפורמט HTML ו-XML.
כדי להריץ את כל המסלולים להמרת לקוחות אפשר להריץ את כל המסלולים להמרת לקוחות בחבילת הבדיקה באמצעות הפקודה הבאה.
./gradlew :app:testJourneysTestDefaultDebugTestSuite
כדי להריץ מסלול המרה יחיד
משתמשים בפקודה JOURNEYS_FILTER כדי לציין את השם של מסלול ההמרה שרוצים להריץ, באופן הבא:
JOURNEYS_FILTER=your_journey_name.journey.xml ./gradlew :app:testJourneysTestDefaultDebugTestSuite
כדי להריץ את כל המסעות בספריית משנה
מגדירים את JOURNEYS_FILTER לשם ספריית המשנה. לדוגמה, הפקודה הבאה מריצה את כל המסלולים בספריית המשנה home בספריית הבסיס של חבילת הבדיקה.
JOURNEYS_FILTER=home ./gradlew :app:testJourneysTestDefaultDebugTestSuite
הצגת התוצאות
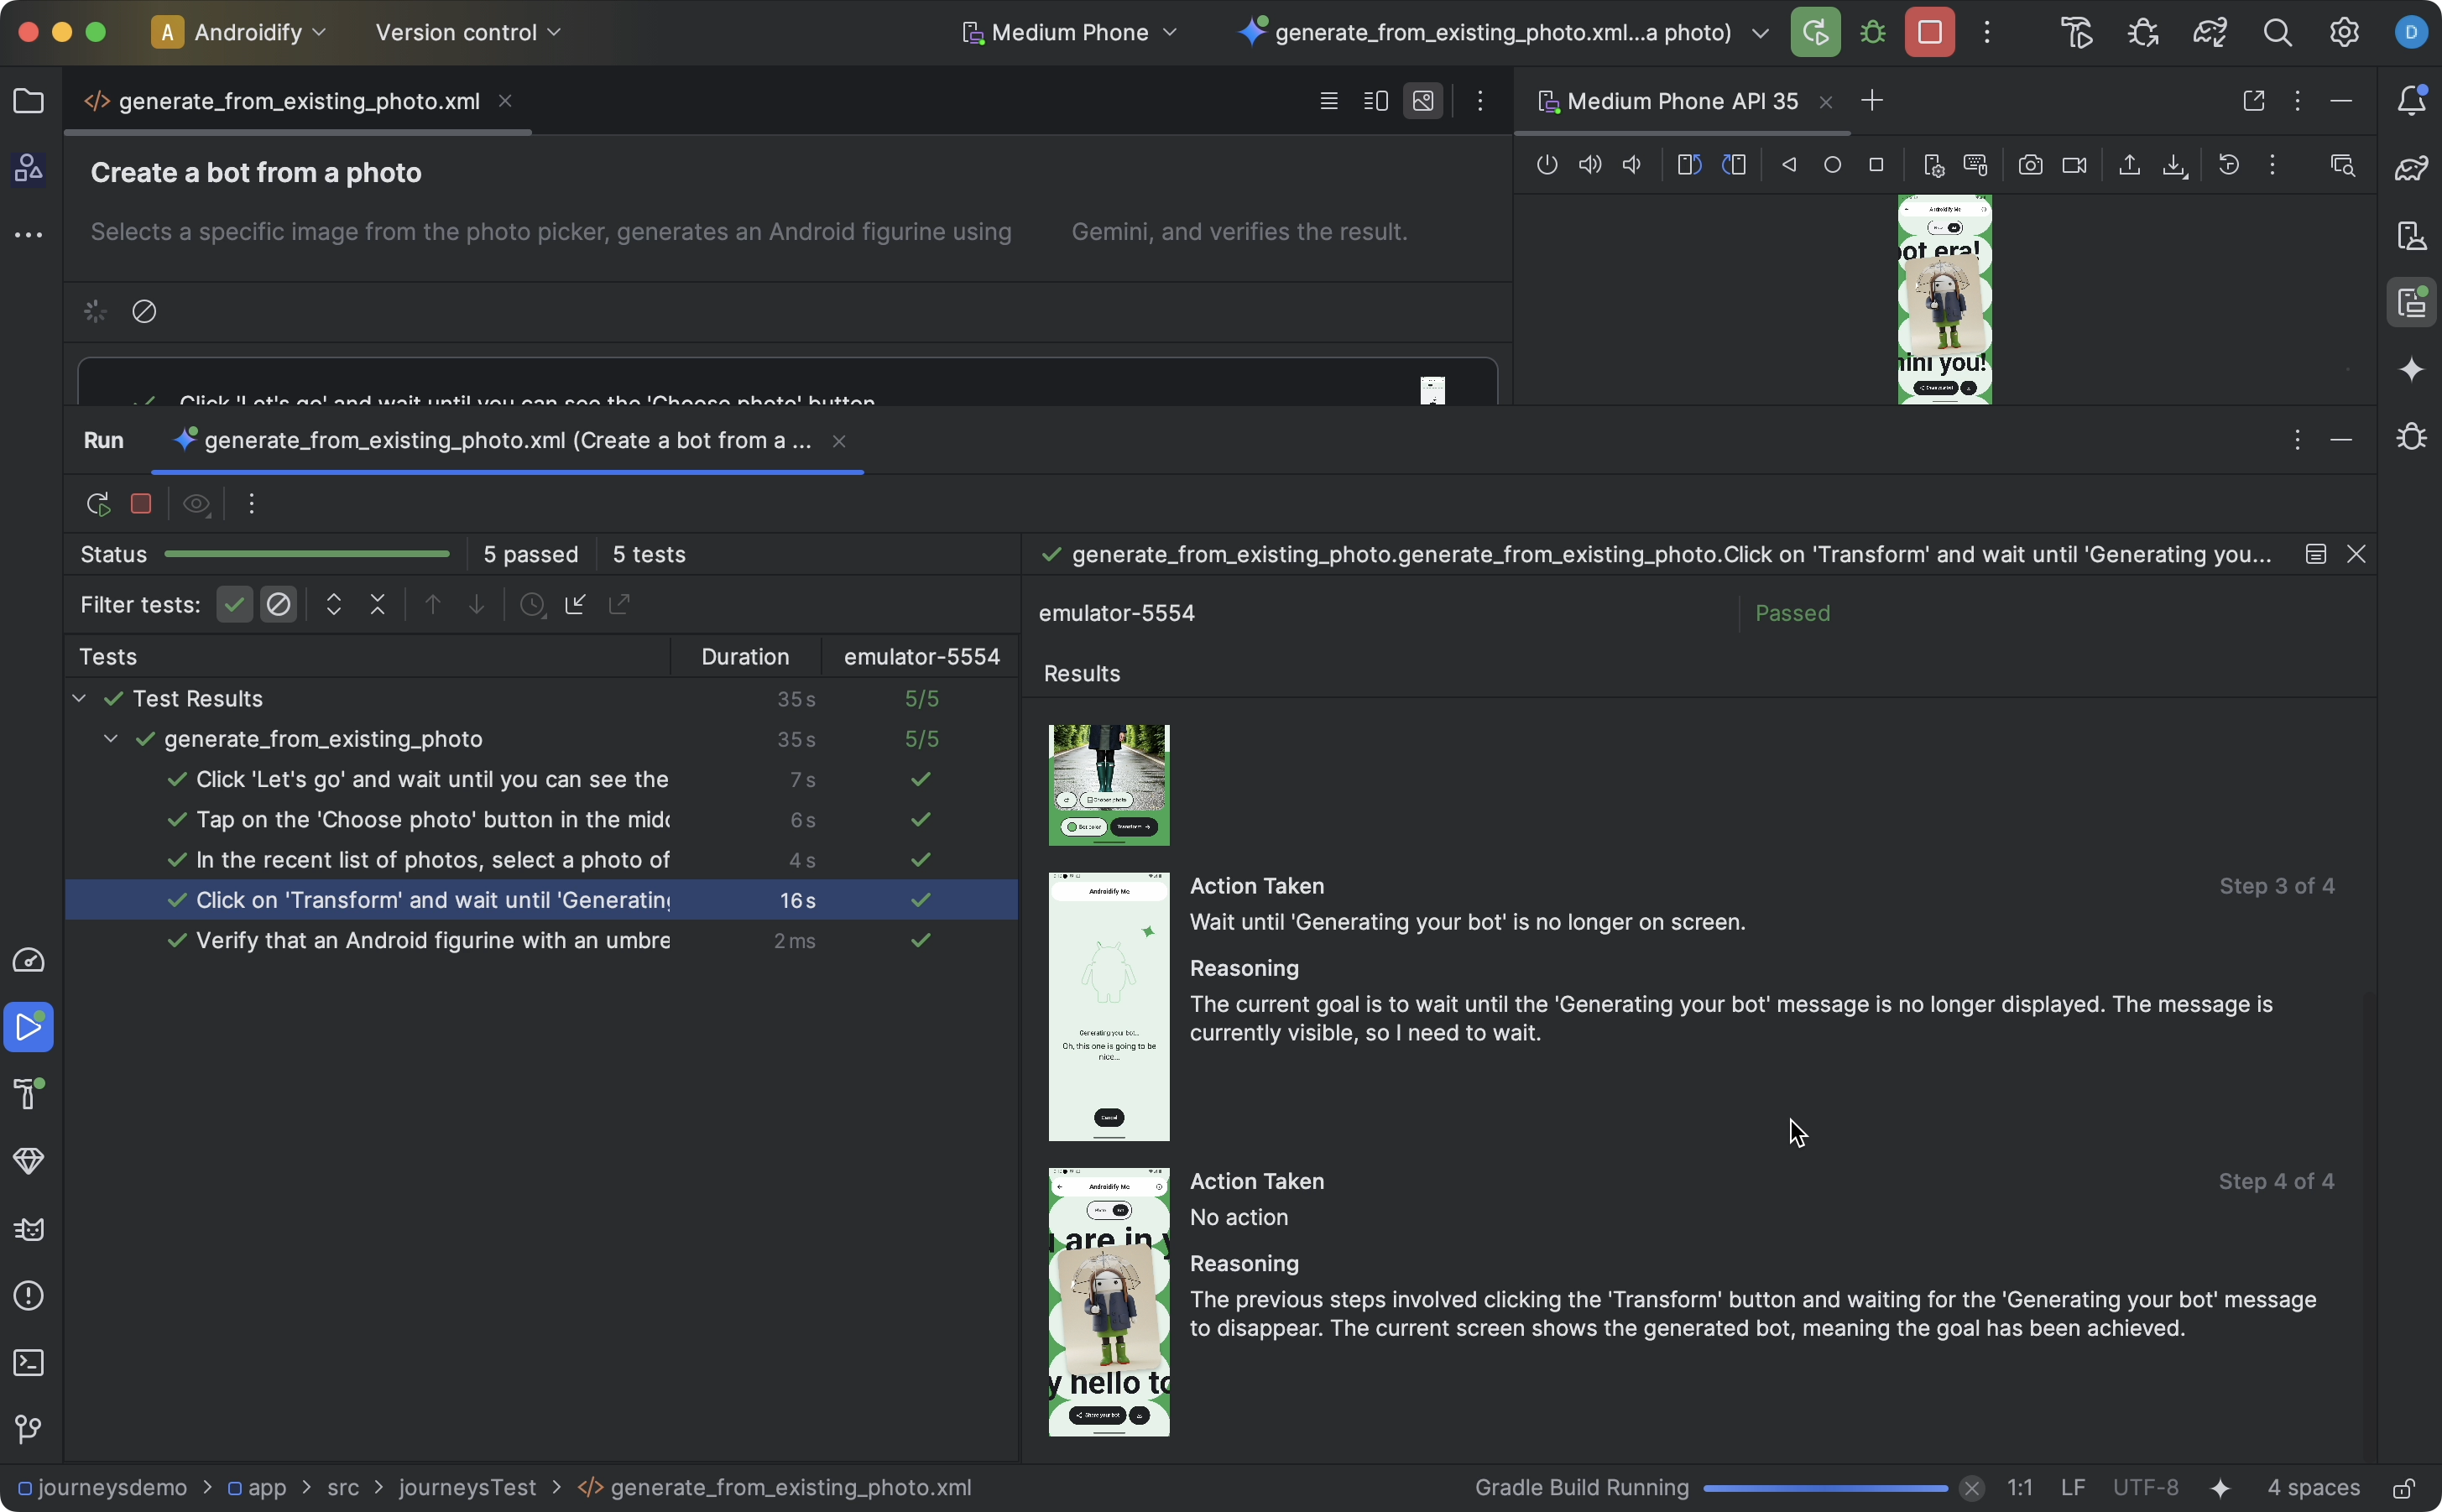
כש-Android Studio מסיים לבדוק את המסלול, חלונית תוצאות הבדיקה מופיעה אוטומטית עם התוצאות.

בהשוואה לבדיקות אחרות עם מכשור שאולי תריצו ב-Android Studio, יש כמה הבדלים באופן שבו מוצגות התוצאות של מסלולי המשתמש.
- בחלונית בדיקות מפורטים השלבים הנפרדים בתהליך. אפשר ללחוץ על כל שלב כדי לקבל מידע נוסף על האופן שבו Gemini ביצע אותו.
- בחלונית תוצאות מוצג מידע מפורט שיעזור לכם להבין איך Gemini הבין את המסלול, איך הוא נימק את הבחירה בו ואיך הוא בוצע.
- צילומי המסך שנשלחו ל-Gemini מוצגים כעזר ויזואלי בכל פעולה בשלב.
- לצד כל צילום מסך מופיע תיאור של הפעולה שבוצעה וההסבר של Gemini למה הוא ביצע את הפעולה הזו.
- כל פעולה בשלב ממוספרת.
בעיות מוכרות
- כשבודקים מסלול המרה, כל ההרשאות לאפליקציה ניתנות כברירת מחדל.
- כשבודקים מסלול במכשיר עם Android 15 (רמת API 35), יכול להיות שתוצג במכשיר אזהרה עם הכיתוב האפליקציה לא בטוחה ונחסמה עבור AndroidX Crawler. כדי לעקוף את הבדיקה הזו, אפשר ללחוץ על התקנה בכל זאת. אפשר גם להגדיר אפשרויות למפתחים במכשיר ולהשבית את האפשרות אימות אפליקציות שהותקנו מ-USB.
