
GET_EXERCISE_OBSERVATION 的小工具。對許多意圖來說,最好的回應方式就是提供使用者簡單的答案、簡短的確認訊息,或是快速的互動體驗。您可以在 Google 助理中顯示 Android 應用程式小工具,執行這類意圖。
本指南將說明如何使用小工具執行使用者向 Google 助理的查詢內容,以及如何使用「應用程式動作」小工具擴充功能程式庫改善 Google 助理的小工具體驗。
優點
小工具是小型的應用程式檢視畫面,可以內嵌到啟動器或鎖定的螢幕等 Android 介面途徑中。只要善加運用「應用程式動作」,您的小工具就能顯示在 Google 助理中,發揮更好的效果。
- 探索:主動在回應使用者的自然語言查詢時顯示小工具。
- 參與:在免持情境下顯示小工具,例如當 Google 助理在鎖定的螢幕或 Android Auto 上提供個人化搜尋結果時。
- 保留:讓使用者將 Google 助理顯示的小工具釘選到啟動器中。釘選功能須用到小工具擴充功能程式庫。
Google 助理如何顯示小工具
使用者可以透過兩種方式在 Google 助理叫用小工具:
明確叫用
如果想為已經安裝的應用程式明確叫用小工具,使用者可以如此要求 Google 助理:
- 「Ok Google,顯示範例應用程式的小工具。」
- 「範例應用程式的小工具。」
Google 助理會顯示這些小工具,並附上基本介紹:「範例應用程式說:歡迎使用小工具」。雖然 Google 助理原本就可傳回以此方法要求的小工具,應用程式開發人員無需進行任何工作,但是使用者必須要明確知道想要求哪個小工具,才能使用這個叫用方式。如要簡化探索小工具的過程,不妨採用以下章節詳述的意圖執行要求方法。
意圖執行要求
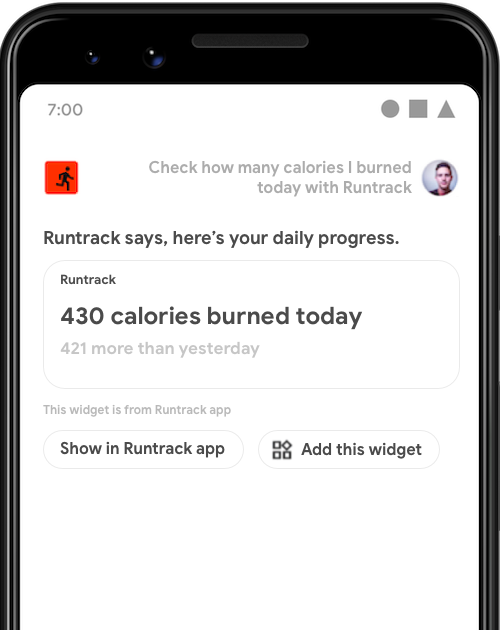
使用者向 Google 助理提出自然語言查詢後,您可以利用小工具執行這些要求,讓他們更容易找到小工具。舉例來說,您可以在使用者每次詢問「Ok Google,根據範例應用程式的數據,我這個禮拜跑了幾英里?」,因而在您的健身應用程式中觸發 GET_EXERCISE_OBSERVATION BII 時,傳回特定的小工具。整合小工具和「應用程式動作」除了可以簡化探索過程,還有以下優點:
- 參數存取權:Google 助理可以提供意圖參數,做出符合使用者需求的回應。這些意圖參數是從使用者對小工具的查詢內容中擷取而得。
- 自訂文字轉語音簡介:您可以在顯示小工具時,讓 Google 助理朗讀一段文字轉語音 (TTS) 字串。
- 釘選小工具:Google 助理會在小工具旁邊顯示「新增這個小工具」按鈕,讓使用者輕鬆在啟動器中釘選小工具。
實作小工具執行要求
請按照以下步驟操作,為意圖實作小工具執行要求:
- 按照「建立簡易小工具」說明的步驟實作 Android 小工具。
- 在應用程式的
shortcuts.xml資源檔案中,找到含有執行要求詳細資料及 BII<parameter>標記的功能,然後新增<app-widget>元素。更新小工具,以便處理參數。 - 新增必要的小工具擴充功能程式庫,讓 Google 助理將 BII 名稱和參數傳遞到小工具。這樣做也能啟用自訂 TTS 簡介和小工具釘選功能。
以下章節將說明 shortcuts.xml 的 <app-widget> 結構定義。
小工具結構定義
在 shortcuts.xml 內,<app-widget> 元素會定義為 <capability> 元素內的執行要求。除非註明為「非必要」,否則需要使用以下屬性:
| 「shortcuts.xml」標記 | 包含於 | 屬性 |
|---|---|---|
<app-widget> |
<capability> |
|
<parameter> |
<app-widget> |
|
<extra> |
<app-widget> |
|
小工具結構定義說明
<app-widget>
這是頂層小工具的執行要求元素。
屬性:
android:identifier:此執行要求的 ID。此值必須為專用值,不得與<capability>內定義的<app-widget>和<intent>執行要求元素重複。android:targetClass:用於處理意圖的AppWidgetProvider完整類別名稱。
<parameter>
用於將 BII 參數對應至意圖 <parameter> 值。您可以為每項 <app-widget> 元素定義 0 個以上的參數。執行要求時,Google 助理會將小工具執行個體的額外功能更新為採用以下格式的鍵/值組合,藉此傳遞參數:
- 鍵:針對參數定義的
android:key。 - 值:BII 從使用者語音輸入內容中擷取的值。
您可以在關聯的 AppWidgetManager 物件呼叫 getAppWidgetOptions(),以便存取這些額外功能,該物件會傳回含有觸發 BII 及其參數名稱的 Bundle。詳情請參閱「擷取參數值」。
如果想進一步瞭解 BII 參數比對,請見「參數資料和比對」。
<extra>
這是選用的標記,用於宣告這個小工具採用自訂 TTS 簡介。這個標記須使用以下屬性值:
android:name:"hasTts"android:value:"true"
程式碼範例
歡迎參考以下取自 shortcuts.xml 檔案的範例,藉此瞭解 GET_EXERCISE_OBSERVATION BII 功能的小工具執行要求設定:
<capability android:name="actions.intent.GET_EXERCISE_OBSERVATION">
  <app-widget
    android:identifier="GET_EXERCISE_OBSERVATION_1"
    android:targetClass="com.exampleapp.providers.exampleAppWidgetProvider"
    android:targetPackage="com.exampleapp">
    <parameter
      android:name="exerciseObservation.aboutExercise.name"
      android:key="exercisename">
    </parameter>
    <extra android:name="hasTts" android:value="true"/>
  </app-widget>
</capability>
每項功能都可以指定多個 <app-widget> 元素,或混合使用 <app-widget> 和 <intent> 元素。藉由此方法,您可以根據使用者提供的不同參數組合,提供自訂的使用體驗。舉例來說,如果使用者並未在查詢內容中指定下車地點,您可以將使用者導向至應用程式內的特定活動,以便他們查看上車及下車地點的設定選項。定義備用意圖詳情請見「備用意圖」章節。
擷取參數值
在以下 AppWidgetProvider 類別範例中,系統使用不公開函式 updateAppWidget() 從小工具選項 Bundle 當中擷取 BII 名稱及參數:
Kotlin
package com.example.exampleapp

//... Other module imports
import com.google.assistant.appactions.widgets.AppActionsWidgetExtension

/**
 * Implementation of App Widget functionality.
 */
class MyAppWidget : AppWidgetProvider() {
    override fun onUpdate(
        context: Context,
        appWidgetManager: AppWidgetManager,
        appWidgetIds: IntArray
    ) {
        // There might be multiple widgets active, so update all of them
        for (appWidgetId in appWidgetIds) {
            updateAppWidget(context, appWidgetManager, appWidgetId)
        }
    }

    private fun updateAppWidget(
        context: Context,
        appWidgetManager: AppWidgetManager,
        appWidgetId: Int
    ) {
        val widgetText: CharSequence = context.getString(R.string.appwidget_text)

        // Construct the RemoteViews object
        val views = RemoteViews(context.packageName, R.layout.my_app_widget)
        views.setTextViewText(R.id.appwidget_text, widgetText)

        // Extract the name and parameters of the BII from the widget options
        val optionsBundle = appWidgetManager.getAppWidgetOptions(appWidgetId)
        val bii = optionsBundle.getString(AppActionsWidgetExtension.EXTRA_APP_ACTIONS_BII) // "actions.intent.CREATE_TAXI_RESERVATION"
        val params = optionsBundle.getBundle(AppActionsWidgetExtension.EXTRA_APP_ACTIONS_PARAMS)
        if (params != null && params.containsKey("dropoff")) {
            val dropoffLocation = params.getString("dropoff")
            // Build your RemoteViews with the extracted BII parameter
            // ...
        }
        appWidgetManager.updateAppWidget(appWidgetId, views)
    }
}
Java
package com.example.exampleapp;

//... Other module imports
import com.google.assistant.appactions.widgets.AppActionsWidgetExtension;

/**
 * Implementation of App Widget functionality.
 */
public class MyAppWidget extends AppWidgetProvider {

    @Override
    public void onUpdate(Context context, AppWidgetManager appWidgetManager, int[] appWidgetIds) {
        // There might be multiple widgets active, so update all of them
        for (int appWidgetId : appWidgetIds) {
            updateAppWidget(context, appWidgetManager, appWidgetId);
        }
    }

    private static void updateAppWidget(Context context, AppWidgetManager appWidgetManager, int appWidgetId) {

        CharSequence widgetText = context.getString(R.string.appwidget_text);

        // Construct the RemoteViews object
        RemoteViews views = new RemoteViews(context.getPackageName(), R.layout.my_app_widget);
        views.setTextViewText(R.id.appwidget_text, widgetText);

        // Extract the name and parameters of the BII from the widget options
        Bundle optionsBundle = appWidgetManager.getAppWidgetOptions(appWidgetId);
        String bii =
                optionsBundle.getString(AppActionsWidgetExtension.EXTRA_APP_ACTIONS_BII); // "actions.intent.CREATE_TAXI_RESERVATION"
        Bundle params =
                optionsBundle.getBundle(AppActionsWidgetExtension.EXTRA_APP_ACTIONS_PARAMS);

        if (params != null && params.containsKey(("dropoff"))){
            String dropoffLocation = params.getString("dropoff");
            // Build your RemoteViews with the extracted BII parameter
            // ...
        }

        appWidgetManager.updateAppWidget(appWidgetId, views);
    }
}
小工具擴充功能程式庫
「應用程式動作」小工具擴充功能程式庫可以改善小工具功能,提供以語音為主的 Google 助理體驗。這個程式庫能讓小工具從觸發的 BII 接收重要的執行要求資訊,包括 BII 名稱,以及從使用者查詢內容中擷取的任何意圖參數。
藉由這個 Maven 程式庫,您可以為每個小工具提供自訂的文字轉語音 (TTS) 簡介,讓 Google 助理將使用者看到的內容統整為摘要並朗讀出來。這個程式庫也能啟用啟動器釘選功能,方便使用者在啟動器畫面上儲存 Google 助理顯示的小工具。
如要開始,請將此程式庫新增到應用程式模組 build.gradle 檔案的依附元件區段中:
dependencies {
    //...
    implementation "com.google.assistant.appactions:widgets:0.0.1"
}
自訂簡介
匯入小工具擴充功能程式庫之後,您就能為小工具提供自訂文字轉語音簡介。若要將您的定義加入小工具的 AppWidgetProvider,請用 IDE 開啟類別,然後匯入小工具擴充功能程式庫:
Kotlin
import com.google.assistant.appactions.widgets.AppActionsWidgetExtension
Java
import com.google.assistant.appactions.widgets.AppActionsWidgetExtension;
Kotlin
package com.example.exampleapp

//... Other module imports
import com.google.assistant.appactions.widgets.AppActionsWidgetExtension

/**
 * Implementation of App Widget functionality.
 */
object MyAppWidget : AppWidgetProvider() {
    fun updateAppWidget(
        context: Context?,
        appWidgetManager: AppWidgetManager,
        appWidgetId: Int
    ) {
        val appActionsWidgetExtension = AppActionsWidgetExtension.newBuilder(appWidgetManager)
            .setResponseSpeech("Hello world") // TTS to be played back to the user
            .setResponseText("Hello world!") // Response text to be displayed in Assistant
            .build()

        // Update widget with TTS
        appActionsWidgetExtension.updateWidget(appWidgetId)

        // Update widget UI
        appWidgetManager.updateAppWidget(appWidgetId, views)
    }
}
Java
package com.example.exampleapp;

//... Other module imports
import com.google.assistant.appactions.widgets.AppActionsWidgetExtension;

/**
 * Implementation of App Widget functionality.
 */
public class MyAppWidget extends AppWidgetProvider {

  static void updateAppWidget(Context context, AppWidgetManager appWidgetManager,
    int appWidgetId) {

    AppActionsWidgetExtension appActionsWidgetExtension = AppActionsWidgetExtension.newBuilder(appWidgetManager)
      .setResponseSpeech("Hello world")  // TTS to be played back to the user
      .setResponseText("Hello world!")  // Response text to be displayed in Assistant
      .build();

      // Update widget with TTS
      appActionsWidgetExtension.updateWidget(appWidgetId);

      // Update widget UI
      appWidgetManager.updateAppWidget(appWidgetId, views);
    }

}
TTS 樣式建議
請使用以下樣式建議,將 TTS 的自訂小工具簡介和系統顯示的提示最佳化。
| 建議 | 建議的做法 | 不建議的做法 |
|---|---|---|
縮寫在 TTS 提示中使用縮寫。如果訊息不使用縮寫,聽起來會很僵硬和機械化,不像自然的對話。例如,朗讀「cannot」和「do not」等字詞,聽起來可能有嚴厲、刺耳的感覺。 |
ResponseSpeech (TTS)很抱歉,我無法 (can’t) 找到預訂記錄。 ResponseText很抱歉,我無法(can’t) 找到預訂記錄。 |
ResponseSpeech (TTS)很抱歉,我無法 (cannot) 找到預訂記錄。 ResponseText很抱歉,我無法 (cannot) 找到預訂記錄。 |
逗號在含有三個以上項目的清單中,使用一系列的半形逗號可讓資訊更清晰。如果不使用半形逗號,清單中的個別項目聽起來 (或讀起來) 可能會像一組項目。舉例來說,在「水仙花, 雛菊和向日葵」中,「雛菊和向日葵」聽起來像是連在一起。在「水仙花, 雛菊, 和向日葵」中,三者顯然各自獨立。 |
ResponseSpeech (TTS)我們最熱門的品項包括黃色玫瑰, 水仙花, 雛菊, 和向日葵。 ResponseText我們最熱門的品項包括黃色玫瑰, 水仙花, 雛菊, 和向日葵。 |
ResponseSpeech (TTS)我們最熱門的品項包括黃色玫瑰, 水仙花, 雛菊和向日葵。 ResponseText我們最熱門的品項包括黃色玫瑰, 水仙花, 雛菊和向日葵。 |
數字使用數字而非文字,讓內容看起來更一目瞭然。 |
ResponseSpeech (TTS)你的血壓高 100,低 80。 ResponseText你的血壓為 100/80。 |
ResponseSpeech (TTS)你的血壓為 100/80。 ResponseText你的血壓高一百,低八十。 |
符號使用特殊符號而非文字,讓內容看起來更一目瞭然。 |
ResponseSpeech (TTS)上次購買價格是 $24.65 美元。 ResponseText上次購買價格是 $24.65 美元。 |
ResponseSpeech (TTS)上次購買價格是二十四點六五美元。 ResponseText上次購買價格是二十四點六五美元。 |
避免客套禮節客套禮節會使回應有種疏遠、官腔的感覺。建議捨棄這些用語,讓對話保持友善、不官腔的語調。 |
ResponseSpeech (TTS)你訂購的商品已送達。 ResponseText你訂購的商品已送達。 |
ResponseSpeech (TTS)當然,我會告訴你相關資訊。你訂購的商品已送達。 ResponseText當然,我會告訴你相關資訊。你訂購的商品已送達。 |
避免使用驚嘆號驚嘆號可能讓人覺得是在大吼。 |
ResponseSpeech (TTS)你今天跑了 1.5 英里。 ResponseText你今天跑了 1.5 英里。 |
ResponseSpeech (TTS)你今天跑了 1.5 英里! ResponseText你今天跑了 1.5 英里! |
時間使用數字:「5:15」,而非「五點十五分」或「五點過後十五分」。 如果是 12 時制,請使用上午或下午。 |
ResponseSpeech (TTS)你的商品應在上午 8:15 前送達。 ResponseText你的商品應在上午 8:15 前送達。 |
ResponseSpeech (TTS)你的商品應在今天早上 8 點 15 分前送達。 ResponseText你的商品應在今天早上 8 點 15 分前送達。 |
請勿長篇大論提供實用資訊,但回應要簡明扼要。請勿提供對使用者沒有實質幫助又令人備感壓力的詳細資訊。 |
ResponseSpeech (TTS)你上個月使用了 159 小時的能源。 ResponseText你上個月使用了 159 小時的能源。 |
ResponseSpeech (TTS)節能對地球與環境來說至關重要。你上個月使用了 159 小時的能源,而這個月已經使用 58 小時的能源。 ResponseText節能對地球與環境來說至關重要。你上個月使用了 159 小時的能源,而這個月已經使用 58 小時的能源。 |
使用簡短易懂的字詞簡單明瞭的用語適用範圍最廣,可讓來自各種背景的使用者都能瞭解。 |
ResponseSpeech (TTS)你上次的血糖數值是 126。 ResponseText你上次的血糖數值是 126 mg/dL。 |
ResponseSpeech (TTS)倒數第二次血液葡萄糖水準為 126。 ResponseText倒數第二次血液葡萄糖水準為 126。 |
啟動器釘選功能
借助小工具擴充功能程式庫,您可以在 Google 助理內的小工具旁邊顯示「新增這個小工具」按鈕。如要啟用釘選功能,請將下列接收器定義加入 AndroidManifest.xml:
<application>
  <receiver android:name="com.google.assistant.appactions.widgets.pinappwidget.PinAppWidgetBroadcastReceiver"
    android:exported="false">
    <intent-filter>
      <action android:name="com.google.assistant.appactions.widgets.COMPLETE_PIN_APP_WIDGET" />
    </intent-filter>
  </receiver>
  <service
    android:name=
    "com.google.assistant.appactions.widgets.pinappwidget.PinAppWidgetService"
    android:enabled="true"
    android:exported="true">
    <intent-filter>
      <action
        android:name="com.google.assistant.appactions.widgets.PIN_APP_WIDGET" />
    </intent-filter>
  </service>
</application>
目錄可用性
BII 支援內嵌清查,網站清查也可以將這些清查擴充到小工具的執行要求。
內嵌目錄
歡迎參考 shortcuts.xml 範例檔案中的下列程式碼,瞭解針對內嵌目錄和小工具執行要求所設的 START_EXERCISE BII 功能:
<capability
  android:name="actions.intent.START_EXERCISE">
  <app-widget
    android:identifier="START_EXERCISE_1"
    android:targetClass="com.example.exampleapp.StartExerciseAppWidgetProvider">
    <parameter
      android:name="exercise.name"
      android:key="exerciseName"
      app:shortcutMatchRequired="true">
    </parameter>
  </app-widget>
</capability>

<shortcut android:shortcutId="RunningShortcut">
  <intent
    android:action="android.intent.action.VIEW"
    android:targetClass="com.example.exampleapp.StartExcerciseActivity" />
  <capability-binding
    android:capability="actions.intent.START_EXERCISE"
    android:parameter="exercise.name"
    android:value="running;runs" />
</shortcut>
在上述範例中,當使用者要求 Google 助理「開始執行範例應用程式」,並觸發此功能時,<app-widget> 執行要求的選項組合會包含以下鍵/值組合:
- 鍵 =
“exerciseName” - 值 =
“RunningShortcut”
網站目錄
請參考 shortcuts.xml 範例檔案中的以下程式碼,瞭解如何針對網站目錄和小工具執行要求啟用特定功能:
<shortcuts>
  <capability
    android:name="actions.intent.START_EXERCISE">
    <app-widget
      android:identifier="START_EXERCISE_1"
      android:targetClass="com.example.exampleapp.CreateTaxiAppWidgetProvider">
      <parameter
        android:name="exercise.name"
        android:key="exerciseName"
        android:mimeType="text/*">
        <data android:pathPattern="https://exampleapp.com/exercise/.*" />
      </parameter>
    </app-widget>
  </capability>
</shortcuts>
測試應用程式動作
應用程式動作測試工具是 Android Studio 專用 Google 助理外掛程式的其中一項功能,可用來在實體或虛擬裝置上測試小工具。如要使用這個測試工具,請按照下列步驟操作:
- 連結到執行您的應用程式的測試裝置。
- 在 Android Studio 中,依序前往「Tools」>「App Actions」>「App Actions Test Tool」。
- 按一下「Create preview」。
- 在 Android Studio 中,使用您的測試裝置執行應用程式。
- 在測試裝置上使用 Google 助理應用程式,測試應用程式動作。例如,您可以說:「Ok Google,根據範例應用程式的數據,我這個禮拜跑了幾英里?」。
- 觀察應用程式行為,或使用 Android Studio 偵錯工具,確認是否達到想要的動作結果。
品質指南
本節特別說明整合應用程式動作與小工具時的重要必要條件和最佳做法。
小工具內容
- (必要條件) 您不得在小工具中顯示廣告。
- 小工具內容應該完全注重於如何執行意圖。請勿嘗試以單一小工具執行多項意圖,或加入不相關的內容。
處理身分驗證
- (必要條件) 如果使用者需通過驗證才能完成使用者流程,請傳回小工具,說明使用者需要在應用程式中繼續操作。「應用程式動作」不支援 Google 助理中的內嵌使用者驗證機制。
- 如果使用者允許應用程式透過小工具顯示資料,您可以在執行階段期間,為未經授權的使用者傳回錯誤小工具。
備用意圖
(必要條件) 在
shortcuts.xml中,每個功能皆需在小工具執行要求之外,提供備用的<intent>。備用意圖是<intent>元素,不需提供<parameter>值。這樣一來,儘管在功能內定義的其他執行要求元素需要使用參數,但使用者查詢內容中不含該參數,Google 助理依然可以執行動作。如果該功能沒有必要參數,則不在此限,此時只需要小工具執行要求就夠了。
請使用備用意圖,將應用程式開啟至相關畫面,而非主畫面。
歡迎參考 shortcuts.xml 範例檔案中的以下程式碼,瞭解 <capability> 如何搭配備用 <intent> 支援主要的 <app-widget> 執行要求:
<shortcuts>
  <capability
    android:name="actions.intent.CREATE_TAXI_RESERVATION">
    <!-- Widget with required parameter, specified using the "android:required" attribute. -->
    <app-widget
      android:identifier="CREATE_TAXI_RESERVATION_1"
      android:targetClass="com.example.myapplication.CreateTaxiAppWidgetProvider">
      <parameter
        android:name="taxiReservation.dropoffLocation.name"
        android:key="dropoff"
        android:required="true">
      </parameter>
    </app-widget>
    <!-- Fallback intent with no parameters required to successfully execute. -->
    <intent
      android:identifier="CREATE_TAXI_RESERVATION_3"
      android:action="myapplication.intent.CREATE_TAXI_RESERVATION_1"
      android:targetClass="com.example.myapplication.TaxiReservationActivity">
    </intent>
  </capability>
</shortcuts>
Google Play 資料揭露
本節明列最新版小工具擴充功能程式庫會收集哪些使用者資料。
這個 SDK 會傳送由開發人員提供的文字轉語音 (TTS) 回應,讓 Google 助理使用助理語音技術為使用者朗讀這段回應。Google 不會儲存這項資訊。
應用程式動作也可能會為了以下目的而收集用戶端應用程式的中繼資料:
- 監控不同 SDK 版本的採用率。
- 量化分析各應用程式之間的 SDK 功能使用情形。