
इस पेज पर, तीसरे पक्ष के एसडीके को वेबपेज से इंस्टॉल करने की सुविधा के साथ इंटिग्रेट करने का तरीका बताया गया है. यह Google Play की एक नई टेस्ट सुविधा है. इसकी मदद से, Google Play पर मौजूद ऐप्लिकेशन के प्रॉडक्ट की जानकारी, हाफ़ शीट इंटरफ़ेस में दिखती है. वेबपेज से इंस्टॉल करने की सुविधा की मदद से, लोग ऐप्लिकेशन के कॉन्टेक्स्ट से बाहर जाए बिना, उसे आसानी से इंस्टॉल कर सकते हैं.
तीसरे पक्ष के एसडीके डेवलपर, वेबपेज से इंस्टॉल करने की सुविधा को अपने एसडीके में इंटिग्रेट कर सकते हैं. इससे, उन एसडीके का इस्तेमाल करने वाले ऐप्लिकेशन डेवलपर, अपने ऐप्लिकेशन के लिए वेबपेज से इंस्टॉल करने की सुविधा को ऐक्सेस कर सकते हैं.
ज़रूरी शर्तें
किसी ऐप्लिकेशन में, वेबपेज से इंस्टॉल करने की सुविधा का हाफ़ शीट इंटरफ़ेस दिखने के लिए:
- Google Play का कम से कम वर्शन 40.4 होना चाहिए.
- Android का एपीआई लेवल 23 या इसके बाद का वर्शन होना चाहिए.
प्रोसेस आर्किटेक्चर
वेबपेज से इंस्टॉल करने की सुविधा की प्रोसेस आर्किटेक्चर, यहां दी गई इमेज में दिखाया गया है:
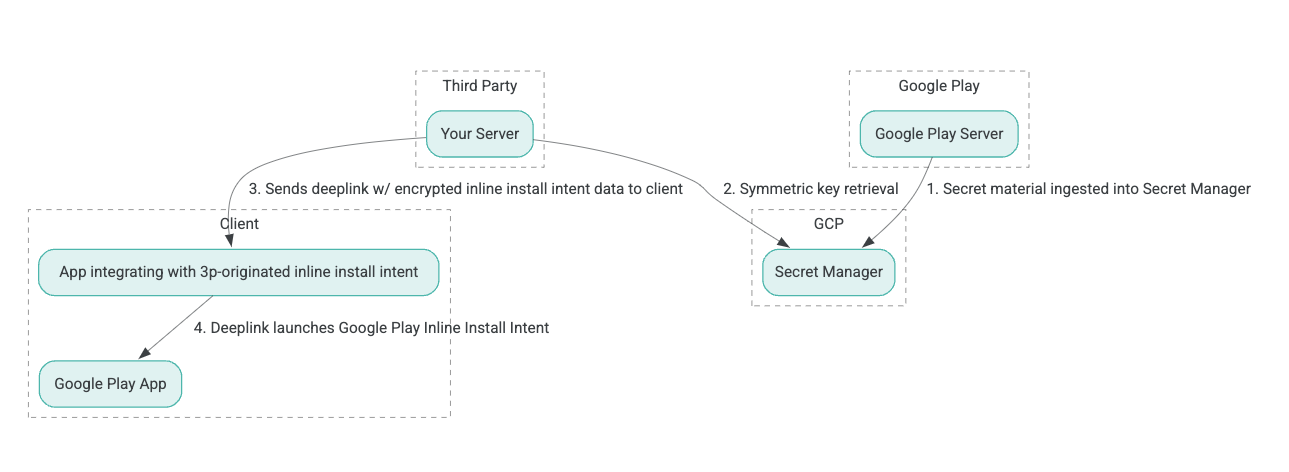
- Google Play के सर्वर, Authenticated Encryption with Associated Data (AEAD) एन्क्रिप्शन कुंजियां जनरेट करते हैं. साथ ही, इन कुंजियों को Google Cloud Platform (GCP) के Secret Manager इंस्टेंस में शामिल करते हैं.
- तीसरे पक्ष का इंटिग्रेटर, GCP Secret Manager से AEAD कुंजी को वापस लेता है.
- तीसरे पक्ष का इंटिग्रेटर, वेबपेज से इंस्टॉल करने की सुविधा के
Intentडेटा को एन्क्रिप्ट करता है. साथ ही, सिफ़रटेक्स्ट जनरेट करता है. इसे, वेबपेज से इंस्टॉल करने की सुविधा के इंटेंट को शुरू करने के लिए इस्तेमाल किए जाने वाले डीप लिंक में पास किया जाता है. इसके अलावा, रिस्पॉन्स में क्लाइंट को डीप लिंक भेजे जाते हैं. - डीप लिंक को फ़ॉलो करने पर, Google Play ऐप्लिकेशन इंटेंट को हैंडल करता है.
वेबपेज से इंस्टॉल करने की सुविधा की प्रोसेस का इस्तेमाल करने के लिए, तीसरे पक्ष के एसडीके को कॉन्फ़िगर करने के लिए यह तरीका अपनाएं.
Google Cloud प्रोजेक्ट में सेवा खाते बनाना
इस चरण में, Google Cloud Console का इस्तेमाल करके सेवा खाता सेट अप करें.
- Google Cloud प्रोजेक्ट सेट अप करें:
- Google Cloud संगठन बनाएं. Google Workspace या Cloud Identity खाता बनाने और उसे अपने डोमेन नेम से जोड़ने पर, संगठन का संसाधन अपने-आप बन जाता है. ज़्यादा जानकारी के लिए, संगठन के संसाधन बनाना और मैनेज करना लेख पढ़ें.
- पिछले चरण में बनाए गए Google Cloud खाते का इस्तेमाल करके, GCP Console में लॉग इन करें. इसके बाद, Google Cloud प्रोजेक्ट बनाएं. ज़्यादा जानकारी के लिए, Google Cloud प्रोजेक्ट बनाना लेख पढ़ें.
- बनाए गए Google Cloud प्रोजेक्ट में, सेवा खाता बनाएं. सेवा खाते का इस्तेमाल, Google Cloud Identity के तौर पर किया जाता है. इससे आपके सर्वर की ओर से सिमेट्रिक कुंजी को ऐक्सेस किया जा सकता है. ज़्यादा जानकारी के लिए, सेवा खाता बनाना लेख पढ़ें.
- इंटरेस्ट फ़ॉर्म में डाले गए Google Workspace के उसी ग्राहक आईडी (GWCID) / Dasher आईडी का इस्तेमाल करें.
- उस सेवा खाते की निजी कुंजी बनाएं और डाउनलोड करें.
- उस सेवा खाते के लिए एक कुंजी बनाएं. ज़्यादा जानकारी के लिए, सेवा खाते की कुंजी बनाना लेख पढ़ें.
- सेवा खाते की कुंजी डाउनलोड करें और उसे अपने सर्वर पर ऐक्सेस किया जा सकने वाली जगह पर सेव करें. ऐसा इसलिए, क्योंकि इसका इस्तेमाल सिमेट्रिक कुंजियों के लिए, Google Cloud के संसाधनों को ऐक्सेस करने के लिए पुष्टि करने के लिए किया जाता है. ज़्यादा जानकारी के लिए, सेवा खाते की कुंजी पाएं लेख पढ़ें.
क्रेडेंशियल वापस लेना
इस चरण में, Secret Manager से सिमेट्रिक कुंजी वापस लें और उसे अपने सर्वर स्टोरेज में सुरक्षित तरीके से सेव करें. उदाहरण के लिए, JSON फ़ाइल में. इस कुंजी का इस्तेमाल, वेबपेज से इंस्टॉल करने की सुविधा के डेटा का सिफ़रटेक्स्ट जनरेट करने के लिए किया जाता है.
secret_id/secretId की वैल्यू, Secret Manager में मौजूद सीक्रेट के नाम को रेफ़र करती हैं. यह नाम, Play की ओर से दी गई वैल्यू sdk_id में hsdp-3p-key- जोड़कर जनरेट किया जाता है. उदाहरण के लिए, अगर sdk_id abc है, तो सीक्रेट
का नाम hsdp-3p-key-abc होगा.
सीक्रेट के वर्शन, हर हफ़्ते मंगलवार को दोपहर 2 बजे यूटीसी पर अपडेट किए जाते हैं. रोटेशन के अगले अपडेट तक, दूसरी सबसे नई कुंजियां काम करती रहती हैं. साथ ही, हर हफ़्ते नई कुंजी फ़ेच करके सेव करनी चाहिए.
Python का उदाहरण
यहां दिए गए कोड के उदाहरण में, GCP Secret Manager में मौजूद कुंजी के कॉन्टेंट को ऐक्सेस करने और उसे कंसोल पर प्रिंट करने के लिए, JSON फ़ाइल में सेव किए गए ऐक्सेस टोकन का इस्तेमाल किया गया है.
#!/usr/bin/env python3
# Import the Secret Manager client library.
from google.cloud import secretmanager
from google.oauth2 import service_account
import google_crc32c

# Create a service account key file.
service_account_key_file = "<json key file of the service account>"
credentials = service_account.Credentials.from_service_account_file(service_account_key_file)

# Create the Secret Manager client.
client = secretmanager.SecretManagerServiceClient(
  credentials=credentials
)

# Build the resource name of the secret version.
name = f"projects/prod-play-hsdp-3p-caller-auth/secrets/<secret_id>/versions/latest"

# Access the secret version.
response = client.access_secret_version(request={"name": name})

# Verify payload checksum.
crc32c = google_crc32c.Checksum()
crc32c.update(response.payload.data)
if response.payload.data_crc32c != int(crc32c.hexdigest(), 16):
    print("Data corruption detected.")

# A keyset created with "tinkey create-keyset --key-template=AES256_GCM". Note
# that this keyset has the secret key information in cleartext.
keyset = response.payload.data.decode("UTF-8")

# WARNING: Do not print the secret in a production environment. Please store it
# in a secure storage.
with open('<key file name>', 'w') as f:
    f.write(keyset)
Java का उदाहरण
यहां दिए गए कोड के उदाहरण में, GCP Secret Manager में मौजूद कुंजी के कॉन्टेंट को ऐक्सेस करने और उसे JSON फ़ाइल में सेव करने के लिए, JSON फ़ाइल में सेव किए गए ऐक्सेस टोकन का इस्तेमाल किया गया है.
import static java.nio.charset.StandardCharsets.UTF_8;
import com.google.api.gax.core.CredentialsProvider;
import com.google.api.gax.core.FixedCredentialsProvider;
import com.google.auth.oauth2.ServiceAccountCredentials;
import com.google.cloud.secretmanager.v1.AccessSecretVersionResponse;
import com.google.cloud.secretmanager.v1.SecretManagerServiceClient;
import com.google.cloud.secretmanager.v1.SecretManagerServiceSettings;
import com.google.cloud.secretmanager.v1.SecretVersionName;
import java.io.FileInputStream;
import java.io.IOException;
import java.io.PrintWriter;
import java.nio.file.Files;
import java.nio.file.Paths;
import java.util.zip.CRC32C;
import java.util.zip.Checksum;

/** */
final class ThirdPartySecretAccessGuide {

  private ThirdPartySecretAccessGuide() {}

  public static void main(String[] args) throws IOException {
    accessSecretVersion();
  }

  public static void accessSecretVersion() throws IOException {
    // TODO(developer): Replace these variables before running the sample.
    String projectId = "projectId";
    String secretId = "secretId";
    String versionId = "versionId";
    String accessTokenPrivateKeyPath = "path/to/credentials.json";
    String secretMaterialOutputPath = "path/to/secret.json";
    accessSecretVersion(
        projectId, secretId, versionId, accessTokenPrivateKeyPath, secretMaterialOutputPath);
  }

  // Access the payload for the given secret version if one exists. The version
  // can be a version number as a string (e.g. "5") or an alias (e.g. "latest").
  public static void accessSecretVersion(
      String projectId,
      String secretId,
      String versionId,
      String accessTokenPrivateKeyPath,
      String secretMaterialOutputPath)
      throws IOException {

    // We can explicitly instantiate the SecretManagerServiceClient (below) from a json file if we:
    // 1. Create a CredentialsProvider from a FileInputStream of the JSON file,
    CredentialsProvider credentialsProvider =
        FixedCredentialsProvider.create(
            ServiceAccountCredentials.fromStream(new FileInputStream(accessTokenPrivateKeyPath)));

    // 2. Build a SecretManagerService Settings object from that credentials provider, and
    SecretManagerServiceSettings secretManagerServiceSettings =
        SecretManagerServiceSettings.newBuilder()
            .setCredentialsProvider(credentialsProvider)
            .build();

    // 3. Initialize client that will be used to send requests by passing the settings object to
    // create(). This client only needs to be created once, and can be reused for multiple requests.
    // After completing all of your requests, call the "close" method on the client to safely clean
    // up any remaining background resources.
    try (SecretManagerServiceClient client =
        SecretManagerServiceClient.create(secretManagerServiceSettings)) {
      SecretVersionName secretVersionName = SecretVersionName.of(projectId, secretId, versionId);

      // Access the secret version.
      AccessSecretVersionResponse response = client.accessSecretVersion(secretVersionName);

      // Verify checksum. The used library is available in Java 9+.
      // If using Java 8, you may use the following:
      // https://github.com/google/guava/blob/e62d6a0456420d295089a9c319b7593a3eae4a83/guava/src/com/google/common/hash/Hashing.java#L395
      byte[] data = response.getPayload().getData().toByteArray();
      Checksum checksum = new CRC32C();
      checksum.update(data, 0, data.length);
      if (response.getPayload().getDataCrc32C() != checksum.getValue()) {
        System.out.printf("Data corruption detected.");
        return;
      }

      String payload = response.getPayload().getData().toStringUtf8();
      // Print the secret payload.
      //
      // WARNING: Do not print the secret in a production environment - this
      // snippet is showing how to access the secret material.
      System.out.printf("Plaintext: %s\n", payload);

      // Write the JSON secret material payload to a json file
      try (PrintWriter out =
          new PrintWriter(Files.newBufferedWriter(Paths.get(secretMaterialOutputPath), UTF_8))) {
        out.write(payload);
      } catch (Exception e) {
        e.printStackTrace();
      }
    }
  }
}
ऐप्लिकेशन के डिफ़ॉल्ट क्रेडेंशियल सेट अप करना
अगर आपको Java के लागू करने के तरीके में, JSON फ़ाइल में निजी कुंजी पास करने के लिए, CredentialsProvider का इस्तेमाल नहीं करना है, तो ऐप्लिकेशन के डिफ़ॉल्ट क्रेडेंशियल (एडीसी) सेट करके, लागू करने के तरीके में बदलाव किया जा सकता है:
- क्लाइंट लाइब्रेरी को बताएं कि सेवा खाते की कुंजी कहां मिलेगी.
- Java प्रोजेक्ट में Maven डिपेंडेंसी जोड़ें.
- को कॉल करें. इससे
SecretManagerServiceClient.create()पुष्टि अपने-आप हो जाती है (पहले चरण की वजह से).
इन चरणों से, Java के लागू करने के तरीके में ये बदलाव होते हैं:
CredentialsProviderऔरSecretManagerServiceSettingsऑब्जेक्ट बनाने की ज़रूरत खत्म हो जाती है.SecretManagerServiceClient.create()को कॉल करने के तरीके में बदलाव हो जाता है. इसमें कोई आर्ग्युमेंट शामिल नहीं होता.
सिफ़रटेक्स्ट बनाना और डीप लिंक जनरेट करना
इस चरण में, InlineInstallData protobuf ऑब्जेक्ट से enifd (InlineInstallData सिफ़रटेक्स्ट) बनाने के लिए, Tink क्रिप्टोग्राफ़ी लाइब्रेरी का इस्तेमाल करें.
InlineInstallData proto को इस तरह से तय किया जाता है:
syntax = "proto2";
package hsdpexperiments;
option java_package = "com.google.hsdpexperiments";
option java_multiple_files = true;

// InlineInstallData is used by 3p auth callers to generate "encrypted inline
// flow data" (enifd) which is decrypted in PGS to verify authenticity and
// freshness.
message InlineInstallData {
  // The timestamp which indicates the time encrypted data is generated.
  // Used to validate freshness (i.e. generation time in past 4 hours).
  // Required.
  optional int64 timestamp_ms = 1;

  // The docid of the app that we want to open inline install page for.
  // This is the package name.
  // Required.
  optional string target_package_name = 2;

  // This is the name of the app requesting the ad from Google Ad Serving
  // system.
  // Required.
  optional string caller_package_name = 3;

  // This is the advertising id that will be collected by 3P Ad SDKs.
  // Optional.
  optional string advertising_id = 4;

  // This is used to indicate the network from where the inline install was
  // requested.
  // Required.
  optional string ad_network_id = 5;
}
इस चरण में, इन पैरामीटर का इस्तेमाल करके डीप लिंक यूआरएल भी बनाया जाता है:
| फ़ील्ड | ब्यौरा | ज़रूरी है |
|---|---|---|
| आईडी | इंस्टॉल किए जाने वाले ऐप्लिकेशन का पैकेज नाम. | हां |
| इनलाइन | अगर वेबपेज से इंस्टॉल करने की सुविधा का हाफ़ शीट इंटरफ़ेस चाहिए, तो इसे true पर सेट करें. अगर
false पर सेट किया जाता है, तो इंटेंट, Google Play पर डीप लिंक करता है. |
हां |
| enifd | तीसरे पक्ष के एसडीके के लिए एन्क्रिप्ट किया गया आइडेंटिफ़ायर. | हां |
| lft | एक इंटरनल आइडेंटिफ़ायर. | हां |
| 3pAuthCallerId | एसडीके आइडेंटिफ़ायर. | हां |
| स्टोर पेज | पसंद के मुताबिक बनाए गए स्टोर पेज के लिए टारगेट तय करने का एक ज़रूरी नहीं वाला पैरामीटर. | नहीं |
| रेफ़रल देने वाला | रेफ़रल देने वाले की ट्रैकिंग के लिए एक ज़रूरी नहीं वाली स्ट्रिंग. | नहीं |
Python का उदाहरण
यहां दिया गया कमांड, InlineInstallData.proto से Python कोड जनरेट करता है:
protoc InlineInstallData.proto --python_out=.
यहां दिए गए Python के सैंपल कोड में, InlineInstallData बनाया जाता है. साथ ही, सिफ़रटेक्स्ट बनाने के लिए इसे सिमेट्रिक कुंजी से एन्क्रिप्ट किया जाता है:
#!/usr/bin/env python3

# Import the Secret Manager client library.
import base64
import time
import inline_install_data_pb2 as InlineInstallData
import tink
from tink import aead
from tink import cleartext_keyset_handle

# Read the stored symmetric key.
with open("example3psecret.json", "r") as f:
  keyset = f.read()

"""Encrypt and decrypt using AEAD."""
# Register the AEAD key managers. This is needed to create an Aead primitive later.
aead.register()

# Create a keyset handle from the cleartext keyset in the previous
# step. The keyset handle provides abstract access to the underlying keyset to
# limit access of the raw key material. WARNING: In practice, it is unlikely
# you will want to use a cleartext_keyset_handle, as it implies that your key
# material is passed in cleartext, which is a security risk.
keyset_handle = cleartext_keyset_handle.read(tink.JsonKeysetReader(keyset))

# Retrieve the Aead primitive we want to use from the keyset handle.
primitive = keyset_handle.primitive(aead.Aead)

inlineInstallData = InlineInstallData.InlineInstallData()
inlineInstallData.timestamp_ms = int(time.time() * 1000)
inlineInstallData.target_package_name = "x.y.z"
inlineInstallData.caller_package_name = "a.b.c"
inlineInstallData.ad_network_id = "<sdk_id>"

# Use the primitive to encrypt a message. In this case the primary key of the
# keyset will be used (which is also the only key in this example).
ciphertext = primitive.encrypt(inlineInstallData.SerializeToString(), b'<sdk_id>')
print(f"InlineInstallData Ciphertext: {ciphertext}")

# Base64 Encoded InlineInstallData Ciphertext
enifd = base64.urlsafe_b64encode(ciphertext).decode('utf-8')
print(enifd)

# Deeplink
print(f"https://play.google.com/d?id={inlineInstallData.target_package_name}\&inline=true\&enifd={enifd}\&lft=1\&3pAuthCallerId={inlineInstallData.ad_network_id}")
Python स्क्रिप्ट को रन करने के लिए, यहां दिया गया कमांड चलाएं:
python <file_name>.py
Java का उदाहरण
यहां दिया गया कमांड, InlineInstallData.proto से Java कोड जनरेट करता है:
protoc InlineInstallData.proto --java_out=.
यहां दिए गए Java के सैंपल कोड में, InlineInstallData बनाया जाता है. साथ ही, सिफ़रटेक्स्ट बनाने के लिए इसे सिमेट्रिक कुंजी से एन्क्रिप्ट किया जाता है:
package com.google.hsdpexperiments;

import static com.google.common.io.BaseEncoding.base64Url;
import static java.nio.charset.StandardCharsets.UTF_8;

import com.google.common.flags.Flag;
import com.google.common.flags.FlagSpec;
import com.google.common.flags.Flags;
import com.google.crypto.tink.Aead;
import com.google.crypto.tink.InsecureSecretKeyAccess;
import com.google.crypto.tink.KeysetHandle;
import com.google.crypto.tink.TinkJsonProtoKeysetFormat;
import com.google.crypto.tink.aead.AeadConfig;
import java.nio.file.Files;
import java.nio.file.Path;
import java.nio.file.Paths;
import java.security.Security;
import java.time.Duration;
import org.conscrypt.Conscrypt;

/** info on encryption in https://github.com/google/tink#learn-more */
final class ThirdPartyEnifdGuide {

  @FlagSpec(
      name = "third_party_id",
      help = "the identifier associated with the 3p for which to generate the enifd")
  private static final Flag<String> thirdPartyAuthCallerId = Flag.value("");

  @FlagSpec(name = "package_name", help = "the package name of the target app")
  private static final Flag<String> packageName = Flag.value("");


  @FlagSpec(name = "caller_package_name", help = "the package name of the caller app")
  private static final Flag<String> callerPackageName = Flag.value("");

  @FlagSpec(name = "secret_filename", help = "the path to the json file with the secret material")
  private static final Flag<String> secretFilename = Flag.value("");

  private ThirdPartyEnifdGuide() {}

  public static void main(String[] args) throws Exception {
    // parse flags
    Flags.parse(args);

    // File keyFile = new File(args[0]);
    Path keyFile = Paths.get(secretFilename.get());

    // Create structured inline flow data
    InlineInstallData idrp =
        InlineInstallData.newBuilder()
            .setTargetPackageName(packageName.get())
            .setCallerPackageName(callerPackageName.get())
            .setTimestampMs(System.currentTimeMillis())
            .setAdNetworkId(thirdPartyAuthCallerId.get())
            .build();

    // we can print this out here to make sure it's well formatted, this will help debug
    System.out.println(idrp.toString());

    // Register all AEAD key types with the Tink runtime.
    Conscrypt.checkAvailability();
    Security.addProvider(Conscrypt.newProvider());
    AeadConfig.register();

    // Read AEAD key downloaded from secretmanager into keysethandle
    KeysetHandle handle =
        TinkJsonProtoKeysetFormat.parseKeyset(
            new String(Files.readAllBytes(keyFile), UTF_8), InsecureSecretKeyAccess.get());

    // Generate enifd using tink library
    Aead aead = handle.getPrimitive(Aead.class);
    byte[] plaintext = idrp.toByteArray();
    byte[] ciphertext = aead.encrypt(plaintext, thirdPartyAuthCallerId.get().getBytes(UTF_8));
    String enifd = base64Url().omitPadding().encode(ciphertext);

    // Build deeplink, escaping ampersands (TODO: verify this is necessary while testing e2e)
    String deeplink =
        "https://play.google.com/d?id="
            + packageName.get()
            + "\\&inline=true\\&enifd="
            + enifd
            + "\\&lft=1\\&3pAuthCallerId="
            + thirdPartyAuthCallerId.get();

    System.out.println(deeplink);
  }
}
आखिर में, Java प्रोग्राम को बाइनरी में बनाएं और इसे यहां दिए गए कोड का इस्तेमाल करके शुरू करें:
path/to/binary/ThirdPartyEnifdGuide --secret_filename=path/to/jsonfile/example3psecret.json --package_name=<package_name_of_target_app> --third_party_id=<3p_caller_auth_id>
secret_filenameफ़्लैग, सीक्रेट कॉन्टेंट वाली JSON फ़ाइल का पाथ तय करता है.package_nameफ़्लैग, टारगेट ऐप्लिकेशन का दस्तावेज़ आईडी होता है.third_party_idफ़्लैग का इस्तेमाल, तीसरे पक्ष के कॉलर के ऑथ आईडी (यानी,<sdk_id>) को तय करने के लिए किया जाता है.
वेबपेज से इंस्टॉल करने की सुविधा का इंटेंट लॉन्च करना
पिछले चरण में जनरेट किए गए डीप लिंक की जांच करने के लिए, किसी Android डिवाइस को ऐसे वर्कस्टेशन से कनेक्ट करें जिस पर ADB इंस्टॉल हो. साथ ही, पक्का करें कि यूएसबी डीबग करने की सुविधा चालू हो. इसके बाद, यहां दिया गया कमांड चलाएं:
adb shell am start "<output_from_the_previous_python_or_java_code>"
क्लाइंट कोड में, इंटेंट भेजने के लिए इनमें से कोई एक तरीका (Kotlin या Java) इस्तेमाल करें.
Kotlin
val intent = Intent(Intent.ACTION_VIEW)
val deepLinkUrl = "<output_from_the_previous_python_or_java_code>"
intent.setPackage("com.android.vending")
intent.data = Uri.parse(deepLinkUrl)
val packageManager = context.getPackageManager()
if (intent.resolveActivity(packageManager) != null) {
  startActivityForResult(intent, 0)
} else {
  // Fallback to deep linking to full Play Store.
}
Java
Intent intent = new Intent(Intent.ACTION_VIEW);
String id = "exampleAppToBeInstalledId";
String deepLinkUrl = "<output_from_the_previous_python_or_java_code>";
intent.setPackage("com.android.vending");
intent.setData(Uri.parse(deepLinkUrl));
PackageManager packageManager = context.getPackageManager();
if (intent.resolveActivity(packageManager) != null) {
  startActivityForResult(intent, 0);
} else {
  // Fallback to deep linking to full Play Store.
}
अपेंडिक्स
यहां दिए गए सेक्शन में, इस्तेमाल के कुछ उदाहरणों के बारे में ज़्यादा जानकारी दी गई है.
Python एनवायरमेंट तैयार करना
Python के सैंपल कोड को रन करने के लिए, अपने वर्कस्टेशन पर Python एनवायरमेंट सेट अप करें और ज़रूरी डिपेंडेंसी इंस्टॉल करें.
Python एनवायरमेंट सेट अप करें:
python3.11 इंस्टॉल करें. अगर यह पहले से इंस्टॉल है, तो इस चरण को छोड़ दें:
sudo apt install python3.11pip इंस्टॉल करें:
sudo apt-get install pipvirtualenvइंस्टॉल करें:sudo apt install python3-virtualenvएक वर्चुअल एनवायरमेंट बनाएं. यह Tink डिपेंडेंसी के लिए ज़रूरी है:
virtualenv inlineinstall --python=/usr/bin/python3.11
वर्चुअल एनवायरमेंट में जाएं:
source inlineinstall/bin/activatepip अपडेट करें:
python -m pip install --upgrade pipज़रूरी डिपेंडेंसी इंस्टॉल करें:
Tink इंस्टॉल करें:
pip install tinkGoogle crc32c इंस्टॉल करें:
pip install google-crc32cSecret Manager इंस्टॉल करें:
pip install google-cloud-secret-managerprotobuf कंपाइलर इंस्टॉल करें:
sudo apt install protobuf-compiler
C++ में enifd जनरेट करना
यहां C++ का एक उदाहरण दिया गया है. इसे हमने enifd जनरेट करने के लिए, अंदरूनी तौर पर लिखा और इसकी पुष्टि की है.
C++ कोड का इस्तेमाल करके, enifd को इस तरह जनरेट किया जा सकता है:
// A command-line example for using Tink AEAD w/ key template aes128gcmsiv to
// encrypt an InlineInstallData proto.
#include <chrono>
#include <iostream>
#include <memory>
#include <string>

#include "<path_to_protoc_output>/inline_install_data.proto.h"
#include "absl/flags/flag.h"
#include "absl/flags/parse.h"
#include "absl/strings/escaping.h"
#include "absl/strings/string_view.h"
#include "tink/cc/aead.h"
#include "tink/cc/aead_config.h"
#include "tink/cc/aead_key_templates.h"
#include "tink/cc/config/global_registry.h"
#include "tink/cc/examples/util/util.h"
#include "tink/cc/keyset_handle.h"
#include "tink/cc/util/status.h"
#include "tink/cc/util/statusor.h"

ABSL_FLAG(std::string, keyset_filename, "",
          "Keyset file (downloaded from secretmanager) in JSON format");
ABSL_FLAG(std::string, associated_data, "",
          "Associated data for AEAD (default: empty");

namespace {

using ::crypto::tink::Aead;
using ::crypto::tink::AeadConfig;
using ::crypto::tink::KeysetHandle;
using ::crypto::tink::util::Status;
using ::crypto::tink::util::StatusOr;

}  // namespace

namespace tink_cc_examples {

// AEAD example CLI implementation.
void AeadCli(const std::string& keyset_filename,
             absl::string_view associated_data) {
  Status result = AeadConfig::Register();
  if (!result.ok()) {
    std::clog << "Failed to register AeadConfig";
    return;
  }

  // Read the keyset from file.
  StatusOr<std::unique_ptr<KeysetHandle>> keyset_handle =
      ReadJsonCleartextKeyset(keyset_filename);
  if (!keyset_handle.ok()) {
    std::clog << "Failed to read json keyset";
    return;
  }

  // Get the primitive.
  StatusOr<std::unique_ptr<Aead>> aead =
      (*keyset_handle)
          ->GetPrimitive<crypto::tink::Aead>(
              crypto::tink::ConfigGlobalRegistry());
  if (!aead.ok()) {
    std::clog << "Failed to get primitive";
    return;
  }

  // Instantiate the enifd.
  hsdpexperiments::InlineInstallData iid;

  iid.set_timestamp_ms(std::chrono::duration_cast<std::chrono::milliseconds>(
                           std::chrono::system_clock::now().time_since_epoch())
                           .count());
  iid.set_target_package_name("<TARGET_PACKAGE_NAME>");
  iid.set_caller_package_name("<CALLER_PACKAGE_NAME>");
  iid.set_ad_network_id("<SDK_ID>");

  // Compute the output.
  StatusOr<std::string> encrypt_result =
      (*aead)->Encrypt(iid.SerializeAsString(), associated_data);
  if (!encrypt_result.ok()) {
    std::clog << "Failed to encrypt Inline Install Data";
    return;
  }
  const std::string& output = encrypt_result.value();

  std::string enifd;
  absl::WebSafeBase64Escape(output, &enifd);

  std::clog << "enifd: " << enifd << '\n';
}

}  // namespace tink_cc_examples

int main(int argc, char** argv) {
  absl::ParseCommandLine(argc, argv);

  std::string keyset_filename = absl::GetFlag(FLAGS_keyset_filename);
  std::string associated_data = absl::GetFlag(FLAGS_associated_data);

  std::clog << "Using keyset from file " << keyset_filename
            << " to AEAD-encrypt inline install data with associated data '"
            << associated_data << "'." << '\n';

  tink_cc_examples::AeadCli(keyset_filename, associated_data);
  return 0;
}
इस कोड को, Tink के दस्तावेज़ों में मौजूद एक सैंपल से लिया गया है.