
توضّح هذه الصفحة كيف يمكن لحِزم تطوير البرامج (SDK) التابعة لجهات خارجية دمج ميزة التثبيت المضمَّن، وهي ميزة اختبارية جديدة على Google Play تعرض تفاصيل منتجات التطبيقات على Google Play في واجهة نصف صفحة. تتيح ميزة "التثبيت بدون مغادرة التطبيق" للمستخدمين تجربة عملية سلسة لتثبيت التطبيق بدون مغادرة سياق التطبيق.
يمكن لمطوّري حِزم SDK التابعة لجهات خارجية دمج ميزة "التثبيت بدون مغادرة التطبيق" في حِزم SDK الخاصة بهم، ما يتيح لمطوّري التطبيقات الذين يستخدمون هذه الحِزم إمكانية الاستفادة من ميزة "التثبيت بدون مغادرة التطبيق" في تطبيقاتهم.
المتطلبات
لكي تظهر واجهة ورقة نصفية للتثبيت المضمّن في أحد التطبيقات، يجب استيفاء الشروط التالية:
- يجب أن يكون الحد الأدنى لإصدار Google Play هو 40.4.
- يجب أن يكون مستوى واجهة برمجة التطبيقات في Android 23 أو أعلى.
بنية العملية
يوضّح الشكل التالي بنية عملية التثبيت بدون مغادرة التطبيق:
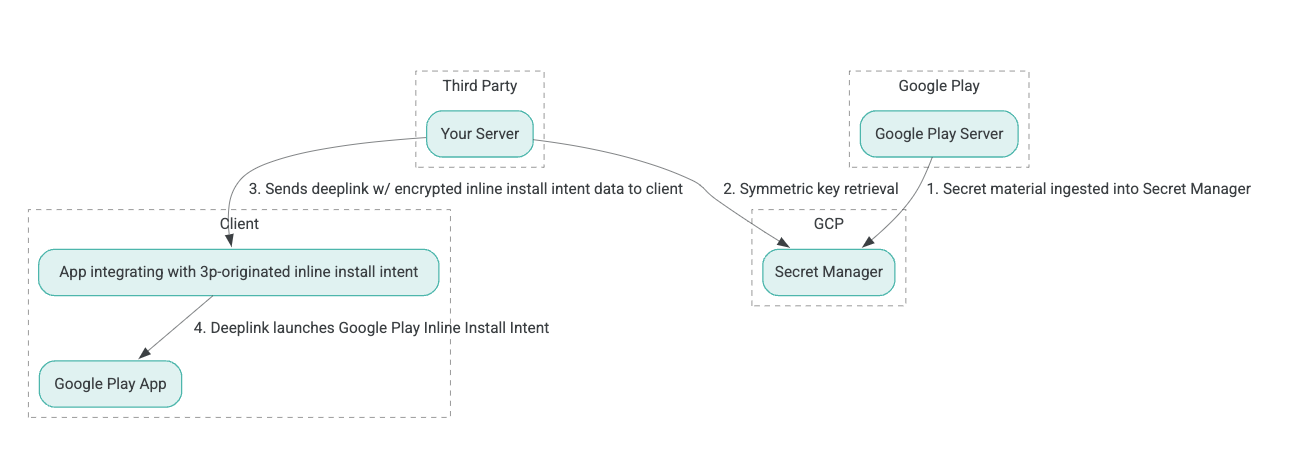
- تنشئ خوادم Google Play مفاتيح تشفير باستخدام ميزة "التشفير المصادق عليه مع البيانات المرتبطة" (AEAD) وتستوعب المفاتيح في مثيل Secret Manager على Google Cloud Platform (GCP).
- يستردّ برنامج الدمج التابع لجهة خارجية مفتاح AEAD من GCP Secret Manager.
- يعمل برنامج الدمج التابع لجهة خارجية على تشفير بيانات
Intentالتثبيت بدون مغادرة التطبيق، وإنشاء النص المشفّر الذي يتم تمريره في الرابط لصفحة في التطبيق المستخدَم لتفعيل الغرض من التثبيت بدون مغادرة التطبيق، وإرسال روابط لصفحات في التطبيق إلى العميل في الردود. - عند اتّباع الرابط لصفحة في التطبيق، يعالج تطبيق Google Play الهدف.
لضبط إعدادات حزمة تطوير برامج (SDK) تابعة لجهة خارجية لاستخدام عملية التثبيت المضمّن، أكمِل الخطوات التالية.
إنشاء حسابات خدمة في مشروع Google Cloud
في هذه الخطوة، يمكنك إعداد حساب خدمة باستخدام وحدة تحكّم Google Cloud.
- إعداد مشروع Google Cloud:
- أنشئ حسابًا للمؤسسة على Google Cloud. عند إنشاء حساب على Google Workspace أو Cloud Identity وربطه باسم نطاقك، يتم إنشاء مورد المؤسسة تلقائيًا. لمعرفة التفاصيل، يُرجى الاطّلاع على إنشاء موارد المؤسسة وإدارتها.
- سجِّل الدخول إلى وحدة تحكّم Google Cloud Platform باستخدام حساب Google Cloud الذي تم إنشاؤه في الخطوة السابقة، ثم أنشئ مشروعًا على السحابة الإلكترونية. لمعرفة التفاصيل، يُرجى الاطّلاع على مقالة إنشاء مشروع على Google Cloud.
- أنشئ حساب خدمة في مشروع Google Cloud الذي تم إنشاؤه. يُستخدَم حساب الخدمة كمعرّف Google Cloud Identity للوصول إلى المفتاح المتماثل نيابةً عن خوادمك. لمعرفة التفاصيل، يُرجى الاطّلاع على إنشاء حساب خدمة.
- استخدِم رقم تعريف عميل Google Workspace (GWCID) أو رقم تعريف Dasher نفسه الذي تم إدخاله في نموذج الاهتمام.
- أنشئ المفتاح الخاص لحساب الخدمة هذا ونزِّله.
- أنشئ مفتاحًا لحساب الخدمة هذا. لمعرفة التفاصيل، يُرجى الاطّلاع على إنشاء مفتاح حساب خدمة.
- نزِّل مفتاح حساب الخدمة واحتفِظ به في مكان يسهل الوصول إليه على الخادم، لأنّه يُستخدَم للمصادقة من أجل الوصول إلى موارد Google Cloud الخاصة بالمفاتيح المتماثلة. لمعرفة التفاصيل، يُرجى الاطّلاع على الحصول على مفتاح حساب خدمة.
استرداد بيانات الاعتماد
في هذه الخطوة، عليك استرداد المفتاح المتماثل من Secret Manager وتخزينه بشكل آمن (على سبيل المثال، في ملف JSON) في مساحة تخزين الخادم الخاص بك. يُستخدَم هذا المفتاح لإنشاء نص مشفّر لبيانات التثبيت بدون اتصال بالإنترنت.
تشير قيم secret_id/secretId إلى اسم كلمة المرور داخل Secret Manager، ويتم إنشاء هذا الاسم من خلال إضافة hsdp-3p-key- إلى القيمة sdk_id التي توفّرها Play. على سبيل المثال، إذا كان sdk_id هو abc، سيكون اسم المفتاح السري هو hsdp-3p-key-abc.
يتم تعديل الإصدارات السرية أسبوعيًا كل ثلاثاء في الساعة 2 ظهرًا بالتوقيت العالمي المتفق عليه (UTC). تستمر المفاتيح الثانية الأحدث في العمل حتى عملية التغيير التالية، ويجب جلب مواد المفاتيح وتخزينها بشكل جديد كل أسبوع.
مثال على Python
يستخدم مثال الرمز البرمجي التالي رمز دخول مخزّنًا في ملف JSON للوصول إلى مواد المفاتيح في خدمة Secret Manager على Google Cloud Platform وطباعتها في وحدة التحكّم.
#!/usr/bin/env python3
# Import the Secret Manager client library.
from google.cloud import secretmanager
from google.oauth2 import service_account
import google_crc32c

# Create a service account key file.
service_account_key_file = "<json key file of the service account>"
credentials = service_account.Credentials.from_service_account_file(service_account_key_file)

# Create the Secret Manager client.
client = secretmanager.SecretManagerServiceClient(
  credentials=credentials
)

# Build the resource name of the secret version.
name = f"projects/prod-play-hsdp-3p-caller-auth/secrets/<secret_id>/versions/latest"

# Access the secret version.
response = client.access_secret_version(request={"name": name})

# Verify payload checksum.
crc32c = google_crc32c.Checksum()
crc32c.update(response.payload.data)
if response.payload.data_crc32c != int(crc32c.hexdigest(), 16):
    print("Data corruption detected.")

# A keyset created with "tinkey create-keyset --key-template=AES256_GCM". Note
# that this keyset has the secret key information in cleartext.
keyset = response.payload.data.decode("UTF-8")

# WARNING: Do not print the secret in a production environment. Please store it
# in a secure storage.
with open('<key file name>', 'w') as f:
    f.write(keyset)
مثال على Java
يستخدم مثال الرمز البرمجي التالي رمز دخول مخزَّنًا في ملف JSON للوصول إلى مواد المفاتيح في خدمة Secret Manager على Google Cloud Platform وكتابتها في ملف JSON.
import static java.nio.charset.StandardCharsets.UTF_8;
import com.google.api.gax.core.CredentialsProvider;
import com.google.api.gax.core.FixedCredentialsProvider;
import com.google.auth.oauth2.ServiceAccountCredentials;
import com.google.cloud.secretmanager.v1.AccessSecretVersionResponse;
import com.google.cloud.secretmanager.v1.SecretManagerServiceClient;
import com.google.cloud.secretmanager.v1.SecretManagerServiceSettings;
import com.google.cloud.secretmanager.v1.SecretVersionName;
import java.io.FileInputStream;
import java.io.IOException;
import java.io.PrintWriter;
import java.nio.file.Files;
import java.nio.file.Paths;
import java.util.zip.CRC32C;
import java.util.zip.Checksum;

/** */
final class ThirdPartySecretAccessGuide {

  private ThirdPartySecretAccessGuide() {}

  public static void main(String[] args) throws IOException {
    accessSecretVersion();
  }

  public static void accessSecretVersion() throws IOException {
    // TODO(developer): Replace these variables before running the sample.
    String projectId = "projectId";
    String secretId = "secretId";
    String versionId = "versionId";
    String accessTokenPrivateKeyPath = "path/to/credentials.json";
    String secretMaterialOutputPath = "path/to/secret.json";
    accessSecretVersion(
        projectId, secretId, versionId, accessTokenPrivateKeyPath, secretMaterialOutputPath);
  }

  // Access the payload for the given secret version if one exists. The version
  // can be a version number as a string (e.g. "5") or an alias (e.g. "latest").
  public static void accessSecretVersion(
      String projectId,
      String secretId,
      String versionId,
      String accessTokenPrivateKeyPath,
      String secretMaterialOutputPath)
      throws IOException {

    // We can explicitly instantiate the SecretManagerServiceClient (below) from a json file if we:
    // 1. Create a CredentialsProvider from a FileInputStream of the JSON file,
    CredentialsProvider credentialsProvider =
        FixedCredentialsProvider.create(
            ServiceAccountCredentials.fromStream(new FileInputStream(accessTokenPrivateKeyPath)));

    // 2. Build a SecretManagerService Settings object from that credentials provider, and
    SecretManagerServiceSettings secretManagerServiceSettings =
        SecretManagerServiceSettings.newBuilder()
            .setCredentialsProvider(credentialsProvider)
            .build();

    // 3. Initialize client that will be used to send requests by passing the settings object to
    // create(). This client only needs to be created once, and can be reused for multiple requests.
    // After completing all of your requests, call the "close" method on the client to safely clean
    // up any remaining background resources.
    try (SecretManagerServiceClient client =
        SecretManagerServiceClient.create(secretManagerServiceSettings)) {
      SecretVersionName secretVersionName = SecretVersionName.of(projectId, secretId, versionId);

      // Access the secret version.
      AccessSecretVersionResponse response = client.accessSecretVersion(secretVersionName);

      // Verify checksum. The used library is available in Java 9+.
      // If using Java 8, you may use the following:
      // https://github.com/google/guava/blob/e62d6a0456420d295089a9c319b7593a3eae4a83/guava/src/com/google/common/hash/Hashing.java#L395
      byte[] data = response.getPayload().getData().toByteArray();
      Checksum checksum = new CRC32C();
      checksum.update(data, 0, data.length);
      if (response.getPayload().getDataCrc32C() != checksum.getValue()) {
        System.out.printf("Data corruption detected.");
        return;
      }

      String payload = response.getPayload().getData().toStringUtf8();
      // Print the secret payload.
      //
      // WARNING: Do not print the secret in a production environment - this
      // snippet is showing how to access the secret material.
      System.out.printf("Plaintext: %s\n", payload);

      // Write the JSON secret material payload to a json file
      try (PrintWriter out =
          new PrintWriter(Files.newBufferedWriter(Paths.get(secretMaterialOutputPath), UTF_8))) {
        out.write(payload);
      } catch (Exception e) {
        e.printStackTrace();
      }
    }
  }
}
ضبط بيانات الاعتماد التلقائية للتطبيق
إذا كنت لا تريد استخدام CredentialsProvider لتمرير المفتاح الخاص إلى ملف JSON
في تنفيذ Java، يمكنك تعديل التنفيذ من خلال ضبط
بيانات الاعتماد التلقائية للتطبيق (ADC):
- أخبِر مكتبات البرامج بمكان العثور على مفتاح حساب الخدمة.
- أضِف تبعيات Maven إلى مشروع Java.
- اتّصِل بالرقم
SecretManagerServiceClient.create()، وسيتم الرد على المكالمة وإجراء عملية المصادقة تلقائيًا (بسبب الخطوة 1).
تعدّل هذه الخطوات تنفيذ Java من خلال:
- إلغاء الحاجة إلى إنشاء العنصرَين
CredentialsProviderوSecretManagerServiceSettings - تغيير الاستدعاء إلى
SecretManagerServiceClient.create()لعدم تضمين أي وسيطات
إنشاء نص مشفّر وإنشاء رابط لصفحة معيّنة
في هذه الخطوة، يمكنك استخدام مكتبة التشفير Tink لإنشاء enifd (نص مشفّر InlineInstallData) من عنصر InlineInstallData protobuf.
يتم تحديد نموذج InlineInstallData الأوّلي على النحو التالي:
syntax = "proto2";
package hsdpexperiments;
option java_package = "com.google.hsdpexperiments";
option java_multiple_files = true;

// InlineInstallData is used by 3p auth callers to generate "encrypted inline
// flow data" (enifd) which is decrypted in PGS to verify authenticity and
// freshness.
message InlineInstallData {
  // The timestamp which indicates the time encrypted data is generated.
  // Used to validate freshness (i.e. generation time in past 4 hours).
  // Required.
  optional int64 timestamp_ms = 1;

  // The docid of the app that we want to open inline install page for.
  // This is the package name.
  // Required.
  optional string target_package_name = 2;

  // This is the name of the app requesting the ad from Google Ad Serving
  // system.
  // Required.
  optional string caller_package_name = 3;

  // This is the advertising id that will be collected by 3P Ad SDKs.
  // Optional.
  optional string advertising_id = 4;

  // This is used to indicate the network from where the inline install was
  // requested.
  // Required.
  optional string ad_network_id = 5;
}
في هذه الخطوة، يمكنك أيضًا إنشاء عنوان URL لصفحة معيّنة في التطبيق باستخدام المَعلمات التالية:
| الحقول | الوصف | مطلوب |
|---|---|---|
| id | تمثّل هذه السمة اسم الحزمة للتطبيق الذي سيتم تثبيته. | نعم |
| تضمين | اضبط القيمة على true إذا كان مطلوبًا عرض ورقة نصفية لعملية التثبيت المضمّن؛ أو على false إذا كان الربط العميق للغرض يؤدي إلى Google Play. |
نعم |
| enifd | المعرّف المشفّر لحِزم تطوير البرامج (SDK) التابعة لجهات خارجية | نعم |
| lft | معرّف داخلي | نعم |
| 3pAuthCallerId | معرّف حزمة تطوير البرامج (SDK) | نعم |
| بطاقة بيانات المتجر | مَعلمة اختيارية لتحديد الهدف من بطاقة بيانات المتجر المخصّصة. | لا |
| مُحيل | سلسلة تتبُّع المُحيل اختيارية. | لا |
مثال على Python
ينشئ الأمر التالي رمز Python من InlineInstallData.proto:
protoc InlineInstallData.proto --python_out=.
تنشئ عيّنة رمز Python البرمجي التالية InlineInstallData وتشفّرها باستخدام المفتاح المتماثل لإنشاء النص المشفّر:
#!/usr/bin/env python3

# Import the Secret Manager client library.
import base64
import time
import inline_install_data_pb2 as InlineInstallData
import tink
from tink import aead
from tink import cleartext_keyset_handle

# Read the stored symmetric key.
with open("example3psecret.json", "r") as f:
  keyset = f.read()

"""Encrypt and decrypt using AEAD."""
# Register the AEAD key managers. This is needed to create an Aead primitive later.
aead.register()

# Create a keyset handle from the cleartext keyset in the previous
# step. The keyset handle provides abstract access to the underlying keyset to
# limit access of the raw key material. WARNING: In practice, it is unlikely
# you will want to use a cleartext_keyset_handle, as it implies that your key
# material is passed in cleartext, which is a security risk.
keyset_handle = cleartext_keyset_handle.read(tink.JsonKeysetReader(keyset))

# Retrieve the Aead primitive we want to use from the keyset handle.
primitive = keyset_handle.primitive(aead.Aead)

inlineInstallData = InlineInstallData.InlineInstallData()
inlineInstallData.timestamp_ms = int(time.time() * 1000)
inlineInstallData.target_package_name = "x.y.z"
inlineInstallData.caller_package_name = "a.b.c"
inlineInstallData.ad_network_id = "<sdk_id>"

# Use the primitive to encrypt a message. In this case the primary key of the
# keyset will be used (which is also the only key in this example).
ciphertext = primitive.encrypt(inlineInstallData.SerializeToString(), b'<sdk_id>')
print(f"InlineInstallData Ciphertext: {ciphertext}")

# Base64 Encoded InlineInstallData Ciphertext
enifd = base64.urlsafe_b64encode(ciphertext).decode('utf-8')
print(enifd)

# Deeplink
print(f"https://play.google.com/d?id={inlineInstallData.target_package_name}\&inline=true\&enifd={enifd}\&lft=1\&3pAuthCallerId={inlineInstallData.ad_network_id}")
نفِّذ نص Python البرمجي من خلال تشغيل الأمر التالي:
python <file_name>.py
مثال على Java
ينشئ الأمر التالي رمز Java من InlineInstallData.proto:
protoc InlineInstallData.proto --java_out=.
ينشئ رمز Java النموذجي التالي InlineInstallData ويشفّره باستخدام المفتاح المتماثل لإنشاء النص المشفّر:
package com.google.hsdpexperiments;

import static com.google.common.io.BaseEncoding.base64Url;
import static java.nio.charset.StandardCharsets.UTF_8;

import com.google.common.flags.Flag;
import com.google.common.flags.FlagSpec;
import com.google.common.flags.Flags;
import com.google.crypto.tink.Aead;
import com.google.crypto.tink.InsecureSecretKeyAccess;
import com.google.crypto.tink.KeysetHandle;
import com.google.crypto.tink.TinkJsonProtoKeysetFormat;
import com.google.crypto.tink.aead.AeadConfig;
import java.nio.file.Files;
import java.nio.file.Path;
import java.nio.file.Paths;
import java.security.Security;
import java.time.Duration;
import org.conscrypt.Conscrypt;

/** info on encryption in https://github.com/google/tink#learn-more */
final class ThirdPartyEnifdGuide {

  @FlagSpec(
      name = "third_party_id",
      help = "the identifier associated with the 3p for which to generate the enifd")
  private static final Flag<String> thirdPartyAuthCallerId = Flag.value("");

  @FlagSpec(name = "package_name", help = "the package name of the target app")
  private static final Flag<String> packageName = Flag.value("");


  @FlagSpec(name = "caller_package_name", help = "the package name of the caller app")
  private static final Flag<String> callerPackageName = Flag.value("");

  @FlagSpec(name = "secret_filename", help = "the path to the json file with the secret material")
  private static final Flag<String> secretFilename = Flag.value("");

  private ThirdPartyEnifdGuide() {}

  public static void main(String[] args) throws Exception {
    // parse flags
    Flags.parse(args);

    // File keyFile = new File(args[0]);
    Path keyFile = Paths.get(secretFilename.get());

    // Create structured inline flow data
    InlineInstallData idrp =
        InlineInstallData.newBuilder()
            .setTargetPackageName(packageName.get())
            .setCallerPackageName(callerPackageName.get())
            .setTimestampMs(System.currentTimeMillis())
            .setAdNetworkId(thirdPartyAuthCallerId.get())
            .build();

    // we can print this out here to make sure it's well formatted, this will help debug
    System.out.println(idrp.toString());

    // Register all AEAD key types with the Tink runtime.
    Conscrypt.checkAvailability();
    Security.addProvider(Conscrypt.newProvider());
    AeadConfig.register();

    // Read AEAD key downloaded from secretmanager into keysethandle
    KeysetHandle handle =
        TinkJsonProtoKeysetFormat.parseKeyset(
            new String(Files.readAllBytes(keyFile), UTF_8), InsecureSecretKeyAccess.get());

    // Generate enifd using tink library
    Aead aead = handle.getPrimitive(Aead.class);
    byte[] plaintext = idrp.toByteArray();
    byte[] ciphertext = aead.encrypt(plaintext, thirdPartyAuthCallerId.get().getBytes(UTF_8));
    String enifd = base64Url().omitPadding().encode(ciphertext);

    // Build deeplink, escaping ampersands (TODO: verify this is necessary while testing e2e)
    String deeplink =
        "https://play.google.com/d?id="
            + packageName.get()
            + "\\&inline=true\\&enifd="
            + enifd
            + "\\&lft=1\\&3pAuthCallerId="
            + thirdPartyAuthCallerId.get();

    System.out.println(deeplink);
  }
}
أخيرًا، أنشئ برنامج Java في ملف ثنائي واستدعِه باستخدام الرمز التالي:
path/to/binary/ThirdPartyEnifdGuide --secret_filename=path/to/jsonfile/example3psecret.json --package_name=<package_name_of_target_app> --third_party_id=<3p_caller_auth_id>
- يحدّد الخيار
secret_filenameالمسار إلى ملف JSON الذي يحتوي على المادة السرية. - العلامة
package_nameهي رقم تعريف مستند التطبيق المستهدف. - يُستخدَم العلامة
third_party_idلتحديد معرّف مصادقة المتصل الخارجي (أي<sdk_id>).
تشغيل نية التثبيت المضمَّن
لاختبار الرابط العميق الذي تم إنشاؤه خلال الخطوة السابقة، وصِّل جهاز Android (تأكَّد من تفعيل تصحيح أخطاء الجهاز عبر USB) بمحطة عمل مثبَّت عليها Adb، ونفِّذ الأمر التالي:
adb shell am start "<output_from_the_previous_python_or_java_code>"
في رمز العميل، أرسِل الغرض باستخدام إحدى الطرق التالية (Kotlin أو Java).
Kotlin
val intent = Intent(Intent.ACTION_VIEW)
val deepLinkUrl = "<output_from_the_previous_python_or_java_code>"
intent.setPackage("com.android.vending")
intent.data = Uri.parse(deepLinkUrl)
val packageManager = context.getPackageManager()
if (intent.resolveActivity(packageManager) != null) {
  startActivityForResult(intent, 0)
} else {
  // Fallback to deep linking to full Play Store.
}
Java
Intent intent = new Intent(Intent.ACTION_VIEW);
String id = "exampleAppToBeInstalledId";
String deepLinkUrl = "<output_from_the_previous_python_or_java_code>";
intent.setPackage("com.android.vending");
intent.setData(Uri.parse(deepLinkUrl));
PackageManager packageManager = context.getPackageManager();
if (intent.resolveActivity(packageManager) != null) {
  startActivityForResult(intent, 0);
} else {
  // Fallback to deep linking to full Play Store.
}
الملحق
تقدّم الأقسام التالية إرشادات إضافية حول بعض حالات الاستخدام.
إعداد بيئة Python
لتشغيل نموذج الرمز البرمجي بلغة Python، عليك إعداد بيئة Python على محطة العمل وتثبيت التبعيات المطلوبة.
إعداد بيئة Python:
ثبِّت الإصدار 3.11 من Python (إذا كان مثبّتًا، يمكنك تخطّي هذه الخطوة):
sudo apt install python3.11ثبِّت pip:
sudo apt-get install pipتثبيت
virtualenv:sudo apt install python3-virtualenvأنشئ بيئة افتراضية (مطلوبة لتبعيات Tink):
virtualenv inlineinstall --python=/usr/bin/python3.11
أدخِل البيئة الافتراضية:
source inlineinstall/bin/activateتحديث pip:
python -m pip install --upgrade pipثبِّت الحِزم التابعة المطلوبة:
تثبيت Tink:
pip install tinkثبِّت Google crc32c:
pip install google-crc32cثبِّت Secret Manager:
pip install google-cloud-secret-managerثبِّت برنامج تجميع مخازن البروتوكولات المؤقتة:
sudo apt install protobuf-compiler
إنشاء ملفات enifd بلغة C++
في ما يلي مثال على رمز C++ كتبناه وتحقّقنا منه داخليًا لإنشاء enifd.
يمكن إنشاء enifd باستخدام رمز C++ على النحو التالي:
// A command-line example for using Tink AEAD w/ key template aes128gcmsiv to
// encrypt an InlineInstallData proto.
#include <chrono>
#include <iostream>
#include <memory>
#include <string>

#include "<path_to_protoc_output>/inline_install_data.proto.h"
#include "absl/flags/flag.h"
#include "absl/flags/parse.h"
#include "absl/strings/escaping.h"
#include "absl/strings/string_view.h"
#include "tink/cc/aead.h"
#include "tink/cc/aead_config.h"
#include "tink/cc/aead_key_templates.h"
#include "tink/cc/config/global_registry.h"
#include "tink/cc/examples/util/util.h"
#include "tink/cc/keyset_handle.h"
#include "tink/cc/util/status.h"
#include "tink/cc/util/statusor.h"

ABSL_FLAG(std::string, keyset_filename, "",
          "Keyset file (downloaded from secretmanager) in JSON format");
ABSL_FLAG(std::string, associated_data, "",
          "Associated data for AEAD (default: empty");

namespace {

using ::crypto::tink::Aead;
using ::crypto::tink::AeadConfig;
using ::crypto::tink::KeysetHandle;
using ::crypto::tink::util::Status;
using ::crypto::tink::util::StatusOr;

}  // namespace

namespace tink_cc_examples {

// AEAD example CLI implementation.
void AeadCli(const std::string& keyset_filename,
             absl::string_view associated_data) {
  Status result = AeadConfig::Register();
  if (!result.ok()) {
    std::clog << "Failed to register AeadConfig";
    return;
  }

  // Read the keyset from file.
  StatusOr<std::unique_ptr<KeysetHandle>> keyset_handle =
      ReadJsonCleartextKeyset(keyset_filename);
  if (!keyset_handle.ok()) {
    std::clog << "Failed to read json keyset";
    return;
  }

  // Get the primitive.
  StatusOr<std::unique_ptr<Aead>> aead =
      (*keyset_handle)
          ->GetPrimitive<crypto::tink::Aead>(
              crypto::tink::ConfigGlobalRegistry());
  if (!aead.ok()) {
    std::clog << "Failed to get primitive";
    return;
  }

  // Instantiate the enifd.
  hsdpexperiments::InlineInstallData iid;

  iid.set_timestamp_ms(std::chrono::duration_cast<std::chrono::milliseconds>(
                           std::chrono::system_clock::now().time_since_epoch())
                           .count());
  iid.set_target_package_name("<TARGET_PACKAGE_NAME>");
  iid.set_caller_package_name("<CALLER_PACKAGE_NAME>");
  iid.set_ad_network_id("<SDK_ID>");

  // Compute the output.
  StatusOr<std::string> encrypt_result =
      (*aead)->Encrypt(iid.SerializeAsString(), associated_data);
  if (!encrypt_result.ok()) {
    std::clog << "Failed to encrypt Inline Install Data";
    return;
  }
  const std::string& output = encrypt_result.value();

  std::string enifd;
  absl::WebSafeBase64Escape(output, &enifd);

  std::clog << "enifd: " << enifd << '\n';
}

}  // namespace tink_cc_examples

int main(int argc, char** argv) {
  absl::ParseCommandLine(argc, argv);

  std::string keyset_filename = absl::GetFlag(FLAGS_keyset_filename);
  std::string associated_data = absl::GetFlag(FLAGS_associated_data);

  std::clog << "Using keyset from file " << keyset_filename
            << " to AEAD-encrypt inline install data with associated data '"
            << associated_data << "'." << '\n';

  tink_cc_examples::AeadCli(keyset_filename, associated_data);
  return 0;
}
تم تعديل هذا الرمز من نموذج يمكن العثور عليه في مستندات Tink.