
1. 事前準備
在本程式碼研究室中,您將瞭解如何使用車輛專用 Android App Library,建構已排除分心因素的 Android Auto 和 Android Automotive OS 應用程式。您會先加入 Android Auto 的支援功能,接著只需完成極少的額外工作,就能建立該應用程式的變化版本,可在 Android Automotive OS 上執行。應用程式可同時在這兩個平台上執行後,您將另外建構一個畫面,以及部分基本互動功能!
軟硬體需求
- 最新版 Android Studio。
- 具備基本 Kotlin 使用經驗。
- 對 Android 服務有基本瞭解。
- 具備建立 Android 虛擬裝置並在 Android Emulator 中執行的經驗。
- 對 Android 應用程式模組化有基本瞭解。
- 對建構工具設計模式有基本瞭解。
建構項目
Android Auto | Android Automotive OS |
|
|

課程內容
- Car App Library 的用戶端與主機架構如何運作。
- 如何自行編寫
CarAppService、Session和Screen類別。 - 如何在 Android Auto 和 Android Automotive OS 之間共用實作內容。
- 如何使用電腦版車用運算主機在開發機器上執行 Android Auto。
- 如何執行 Android Automotive OS 模擬器。
2. 做好準備
取得程式碼
- 您可以在
car-codelabsGitHub 存放區的car-app-library-fundamentals目錄中找到本程式碼研究室的程式碼。如要複製這個存放區,請執行下列指令:
git clone https://github.com/android/car-codelabs.git
- 或者,您也可以將存放區下載為 ZIP 檔案:
開啟專案
- 啟動 Android Studio 後,匯入專案並只選取
car-app-library-fundamentals/start目錄。car-app-library-fundamentals/end目錄內含解決方案程式碼;如果遇到困難,或只是想查看完整專案,都可以隨時參考。
熟悉程式碼
- 在 Android Studio 中開啟專案後,請花點時間瀏覽範例程式碼。
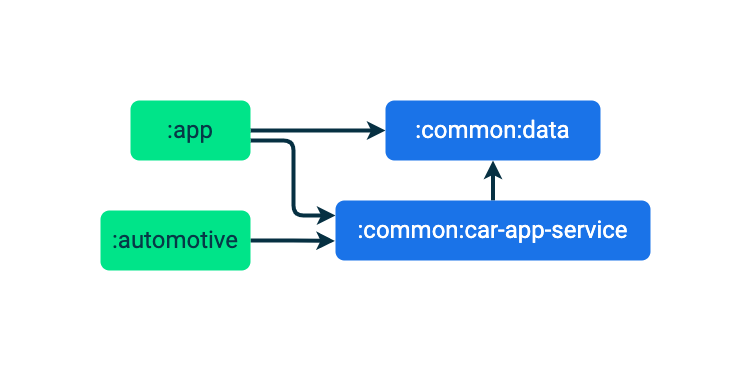
請注意,這個應用程式的範例程式碼細分為兩個模組::app 和 :common:data。

:app 模組包含行動應用程式的 UI 和邏輯,:common:data 模組則包含 Place 模型資料類別和用於讀取 Place 模型的存放區。為簡化起見,這個存放區會從硬式編碼的清單讀取資料,但在實際應用程式中,則可從資料庫或後端伺服器輕鬆讀取資料。
:app 模組加入了一個 :common:data 模組的依附元件,因此可以讀取並顯示 Place 模型的清單。
3. 瞭解車輛專用 Android App Library
車輛專用 Android App Library 是一組 Jetpack 程式庫,方便開發人員用來建構車輛專用的應用程式。這個程式庫提供範本式架構,除了提供針對駕駛情境最佳化的使用者介面,也能配合車輛專用的各種硬體設定進行調整 (例如,輸入法、螢幕尺寸和顯示比例)。開發人員可以運用這些功能,輕鬆打造應用程式,並且相信應用程式會在搭載 Android Auto 和 Android Automotive OS 的各式車輛上順暢運作。
瞭解運作方式
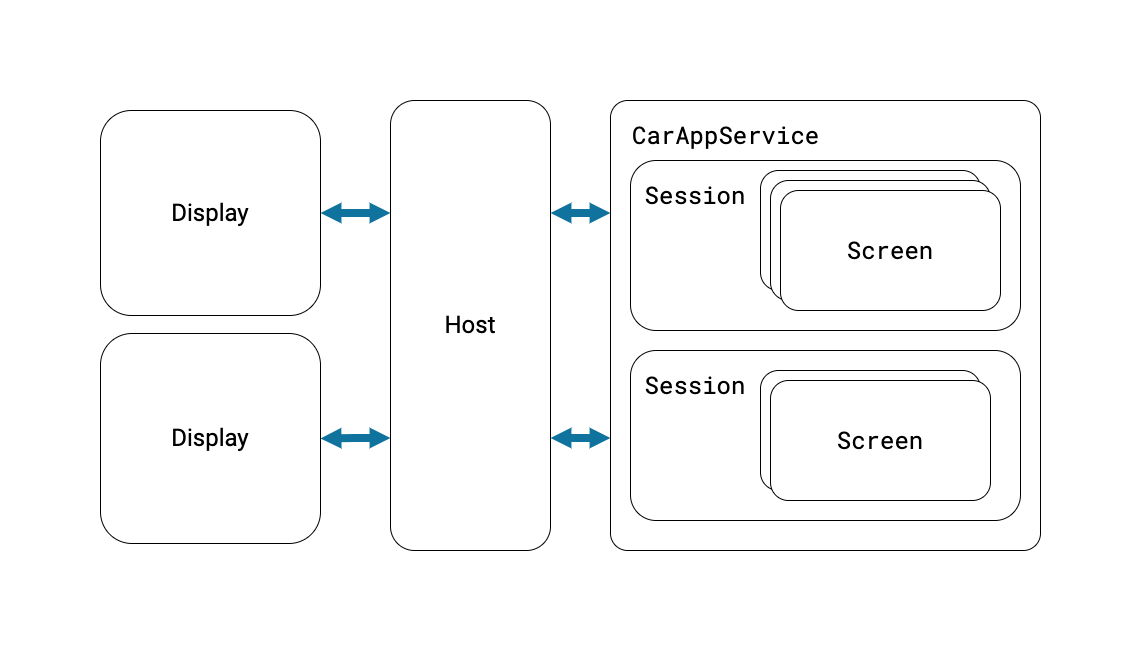
使用 Car App Library 建構的應用程式不會直接在 Android Auto 或 Android Automotive OS 中執行,而是仰賴主機應用程式,代表這類應用程式與用戶端應用程式 (您的應用程式) 通訊,並轉譯用戶端的使用者介面。Android Auto 本身就是主機,Google Automotive App Host 則是內建 Google 服務、搭載 Android Automotive OS 車輛專用的主機。
以下是建構應用程式時必須擴充的 Car App Library 主要類別:
CarAppService
CarAppService 是 Android Service 類別的子類別,可做為主機應用程式與用戶端應用程式 (例如您在本程式碼實驗室中建構的應用程式) 通訊的進入點,主要用途是建立與主機應用程式互動的 Session 例項。
工作階段
您可以將 Session 視為在車輛螢幕上執行的用戶端應用程式例項。這個類別與其他 Android 元件一樣擁有專屬生命週期,可用於在整個 Session 例項存在期間初始化及拆卸各種資源。CarAppService 與 Session 之間是一對多關係。舉例來說,一個 CarAppService 可以有兩個 Session 例項,一個用於主要螢幕,另一個用於儀表板螢幕 (適用於支援儀表板螢幕的導航應用程式)。
螢幕
Screen 例項負責產生由主機應用程式轉譯的使用者介面。這些使用者介面由多個 Template 類別表示,其中每個模型代表一個特定類型的版面配置,例如網格或清單。每個 Session 管理一個 Screen 例項堆疊,這些例項會處理應用程式不同部分的使用者流程。Screen 與 Session 一樣,擁有可供掛鉤的專屬生命週期。
您會在本程式碼實驗室的「編寫 CarAppService」一節中編寫 CarAppService、Session 和 Screen,瞭解這些類別的內部和外部。
4. 建立初始設定
開始時,請設定包含 CarAppService 的模組並宣告其依附元件。
建立 car-app-service 模組
- 在「Project」視窗中選取
:common模組後,按一下滑鼠右鍵並依序選擇「New」>「Module」選項。 - 在隨即開啟的模組精靈中,選取左側清單中的「Android Library」範本 (這樣其他模組就能將這個模組做為依附元件使用),然後使用以下各值:
- Module name:
:common:car-app-service - Package name:
com.example.places.carappservice - Minimum SDK:
API 23: Android 6.0 (Marshmallow)

設定依附元件
- 在
libs.version.toml檔案中,為androidx.car.app:app構件新增項目。
libs.version.toml
[versions]
...
carApp = "1.7.0-rc01"

[libraries]
...
androidx-car-app = { group = "androidx.car.app", name = "app", version.ref = "carApp" }
- 接著,在
:common:car-app-service模組的build.gradle.kts檔案中新增兩個依附元件。
androidx.car.app:app:這是 Car App Library 的主要構件,可提供用於建構應用程式的所有核心類別。這個程式庫還有另外三個組成構件:androidx.car.app:app-projected用於 Android Auto 專屬功能,androidx.car.app:app-automotive用於 Android Automotive OS 功能程式碼,以及androidx.car.app:app-testing用於單元測試可用的部分輔助程式。您會在程式碼研究室的後續章節用到app-projected和app-automotive。:common:data:這個資料模組與現有行動應用程式所用的資料模組相同,可讓相同的資料來源用於應用程式的所有版本。
build.gradle.kts (Module :common:car-app-service)
dependencies {
    ...
    implementation(libs.androidx.car.app)
    implementation(project(":common:data"))
    ...
}
變更完成後,應用程式自身的模組依附元件圖如下:
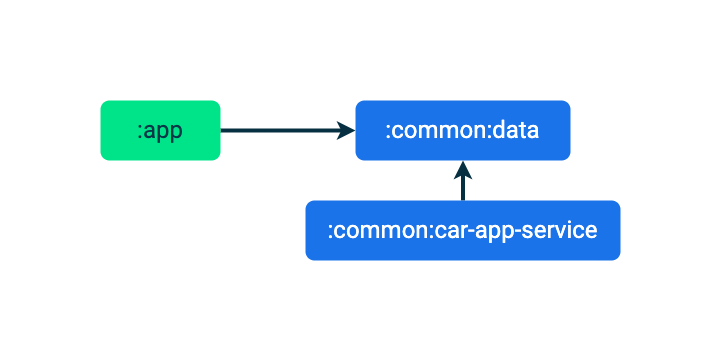
依附元件已設定完成,現在該編寫 CarAppService 了!
5. 編寫 CarAppService
- 首先,在
carappservice套件的:common:car-app-service模組內建立名為PlacesCarAppService.kt的檔案。 - 在這個檔案內,建立可擴充
CarAppService的類別並命名為PlacesCarAppService。
PlacesCarAppService.kt
import androidx.car.app.CarAppService
import androidx.car.app.Session
import androidx.car.app.SessionInfo
import androidx.car.app.validation.HostValidator

...

class PlacesCarAppService : CarAppService() {

    override fun createHostValidator(): HostValidator {
        return HostValidator.ALLOW_ALL_HOSTS_VALIDATOR
    }

   override fun onCreateSession(sessionInfo: SessionInfo): Session {
        // PlacesSession will be an unresolved reference until the next step
        return PlacesSession()
    }
}
CarAppService 抽象類別會實作 onBind 和 onUnbind 等 Service 方法,並防止後續流程覆寫這些方法,確保與主機應用程式的互通性。您只要實作 createHostValidator 和 onCreateSession 即可。
系統會在繫結 CarAppService 時參照您從 createHostValidator 傳回的 HostValidator,確保主機為可信任的裝置,並且在主機不符合定義的參數時使繫結失敗。在本程式碼研究室 (以及一般測試) 中,可以使用 ALLOW_ALL_HOSTS_VALIDATOR 輕鬆確保應用程式與主機連結,但不應用於正式版本。如果要進一步瞭解如何為正式版應用程式進行這項設定,請參閱 createHostValidator 的說明文件。
針對這個簡單的應用程式,onCreateSession 可以直接傳回 Session 的例項。如果是更複雜的應用程式,您可以在此初始化長效資源,例如應用程式在車輛上執行時所用的指標和記錄用戶端。
- 最後,您需要在
:common:car-app-service模組的AndroidManifest.xml檔案中加入PlacesCarAppService的對應<service>元素,告知作業系統以及其他應用程式 (例如主機應用程式) PlacesCarAppService 存在的情形。
AndroidManifest.xml (:common:car-app-service)
<?xml version="1.0" encoding="utf-8"?>
<manifest xmlns:android="http://schemas.android.com/apk/res/android">
    <!--
        This AndroidManifest.xml will contain all of the elements that should be shared across the
        Android Auto and Automotive OS versions of the app, such as the CarAppService <service> element
    -->

    <application>
        <service
            android:name="com.example.places.carappservice.PlacesCarAppService"
            android:exported="true">
            <intent-filter>
                <action android:name="androidx.car.app.CarAppService" />
                <category android:name="androidx.car.app.category.POI" />
            </intent-filter>
        </service>
    </application>
</manifest>
請注意以下兩個重要事項:
<action>元素可讓主機 (和啟動器) 應用程式找到這個應用程式。<category>元素會宣告應用程式類別 (本例為搜尋點),決定應用程式必須符合哪些品質標準 (詳情請見後續說明)。其他可能的值詳列於「支援的應用程式類別」。
建立 PlacesSession 類別
- 在
PlacesCarAppService.kt中加入下列程式碼:
PlacesCarAppService.kt
import android.content.Intent
import androidx.car.app.Screen

...

class PlacesSession : Session() {
    override fun onCreateScreen(intent: Intent): Screen {
        // MainScreen will be an unresolved reference until the next step
        return MainScreen(carContext)
    }
}
如果是這類的簡單應用程式,您可以直接在 onCreateScreen 中傳回主畫面。不過,由於這個方法採用 Intent 做為參數,提供更多功能的應用程式也可能會從這個方法讀取資料,然後填入多個畫面的返回堆疊,或使用其他條件式邏輯。
建立 MainScreen 類別
接下來,建立名為 screen. 的新套件。
- 在
com.example.places.carappservice套件上按一下滑鼠右鍵,依序選取「New」>「Package」(完整套件名稱是com.example.places.carappservice.screen)。您會在此放置應用程式的所有Screen子類別。 - 在
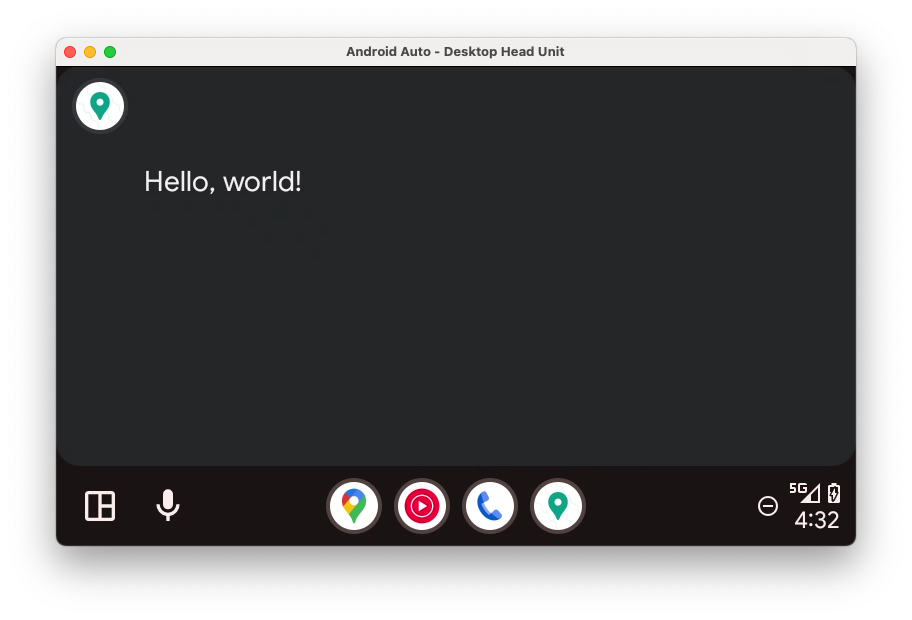
screen套件中,建立名為MainScreen.kt的檔案,用於容納擴充Screen的MainScreen類別。目前這個套件會透過PaneTemplate顯示簡單的「Hello, world!」訊息。
MainScreen.kt
import androidx.car.app.CarContext
import androidx.car.app.Screen
import androidx.car.app.model.Action
import androidx.car.app.model.Header
import androidx.car.app.model.Pane
import androidx.car.app.model.PaneTemplate
import androidx.car.app.model.Row
import androidx.car.app.model.Template

...

class MainScreen(carContext: CarContext) : Screen(carContext) {

    override fun onGetTemplate(): Template {
        val row = Row.Builder()
            .setTitle("Hello, world!")
            .build()

        val pane = Pane.Builder()
            .addRow(row)
            .build()

        return PaneTemplate.Builder(pane)
            .setHeader(
                Header.Builder()
                    .setStartHeaderAction(Action.APP_ICON)
                    .build()
            ).build()
    }
}
6. 加入 Android Auto 支援功能
雖然現在您已實作啟動及執行應用程式所需的所有邏輯,但要在 Android Auto 中執行這個應用程式,還需要進行兩項設定。
新增 car-app-service 模組的依附元件
在 :app 模組的 build.gradle.kts 檔案中新增以下內容:
build.gradle.kts (Module :app)
dependencies {
    ...
    implementation(project(":common:car-app-service"))
    ...
}
變更完成後,應用程式自身的模組依附元件圖如下:
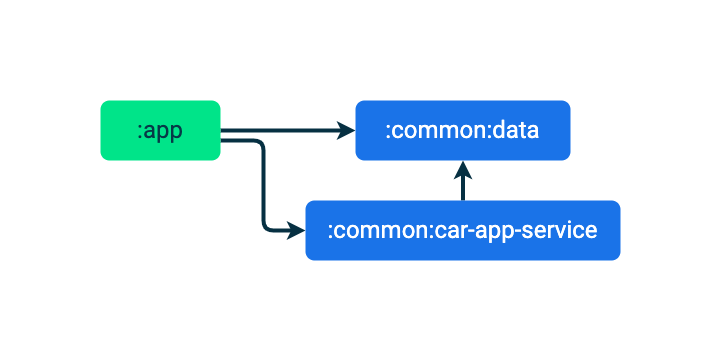
這樣一來,您剛剛在 :common:car-app-service 模組中編寫的程式碼,就能與 Car App Library 提供的其他元件 (例如系統提供的授權活動) 連結起來。
宣告 com.google.android.gms.car.application meta-data
- 在
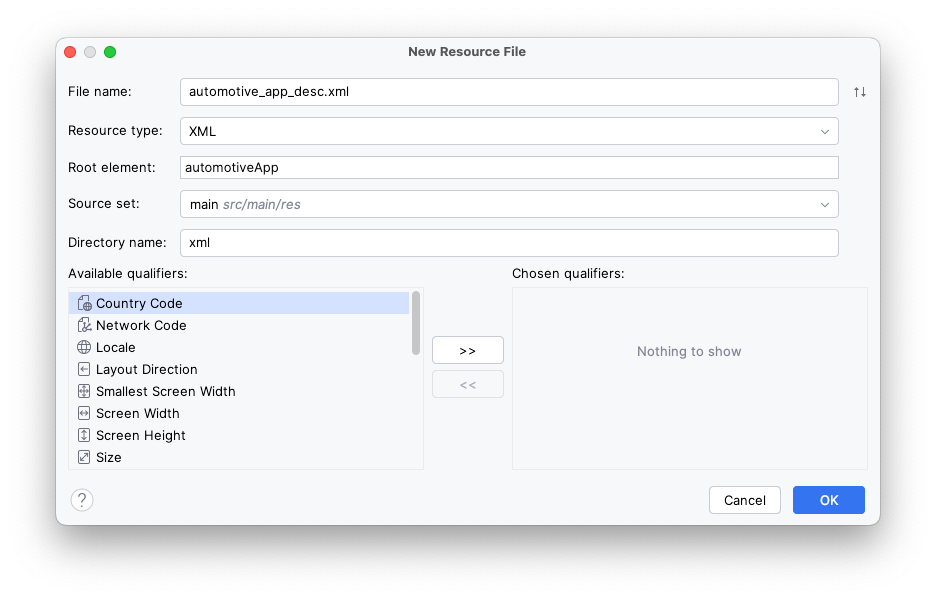
:common:car-app-service模組上按一下滑鼠右鍵,依序選取「New」>「Android Resource File」選項,然後覆寫下列各值:
- File name:
automotive_app_desc.xml - Resource type:
XML - Root element:
automotiveApp
- 在該檔案中加入以下
<uses>元素,宣告應用程式使用 Car App Library 提供的範本。
automotive_app_desc.xml
<?xml version="1.0" encoding="utf-8"?>
<automotiveApp>
    <uses name="template"/>
</automotiveApp>
- 在
:app模組的AndroidManifest.xml檔案中,新增以下<meta-data>元素,並參照您剛剛建立的automotive_app_desc.xml檔案。
AndroidManifest.xml (:app)
<application ...>

    <meta-data
        android:name="com.google.android.gms.car.application"
        android:resource="@xml/automotive_app_desc" />

    ...

</application>
Android Auto 會讀取這個檔案,瞭解應用程式支援哪些功能,在本例中是指使用 Car App Library 範本系統的功能。接著,Android Auto 會根據這項資訊處理相關行為,例如將應用程式新增至 Android Auto 啟動器,以及從通知開啟應用程式。
選用:監聽投影變更
您有時會想知道使用者裝置是否已連線至車輛,方法是使用 CarConnection API,這個 API 提供的 LiveData 可用來觀測連線狀態。
- 如要使用
CarConnectionAPI,請先在:app模組的androidx.car.app:app構件上新增依附元件。
build.gradle.kts (Module :app)
dependencies {
    ...
    implementation(libs.androidx.car.app)
    ...
}
- 基於示範用途,您可以接著建立如下的簡單可組合函式來顯示目前連線狀態。在實際應用程式中,有些記錄功能可能會擷取這個狀態,用於在投影時停用手機畫面上的部分功能,或其他用途。
MainActivity.kt
import androidx.car.app.connection.CarConnection

...

@Composable
fun ProjectionState(carConnectionType: Int, modifier: Modifier = Modifier) {
    val text = when (carConnectionType) {
        CarConnection.CONNECTION_TYPE_NOT_CONNECTED -> "Not projecting"
        CarConnection.CONNECTION_TYPE_NATIVE -> "Running on Android Automotive OS"
        CarConnection.CONNECTION_TYPE_PROJECTION -> "Projecting"
        else -> "Unknown connection type"
    }

    Text(
        text = text,
        style = MaterialTheme.typography.bodyMedium,
        modifier = modifier
    )
}
- 如以下程式碼片段所示,現在可以顯示、讀取資料,並傳入可組合函式了。
MainActivity.kt
import androidx.compose.runtime.getValue
import androidx.compose.runtime.livedata.observeAsState

...

setContent {
    val carConnectionType by CarConnection(this).type.observeAsState(initial = -1)
    PlacesTheme {
        // A surface container using the 'background' color from the theme
        Surface(
            modifier = Modifier.fillMaxSize(),
            color = MaterialTheme.colorScheme.background
        ) {
            Column {
                Text(
                    text = "Places",
                    style = MaterialTheme.typography.displayLarge,
                    modifier = Modifier.padding(8.dp)
                )
                ProjectionState(
                    carConnectionType = carConnectionType,
                    modifier = Modifier.padding(8.dp)
                )
                PlaceList(places = PlacesRepository().getPlaces())
            }
        }
    }
}
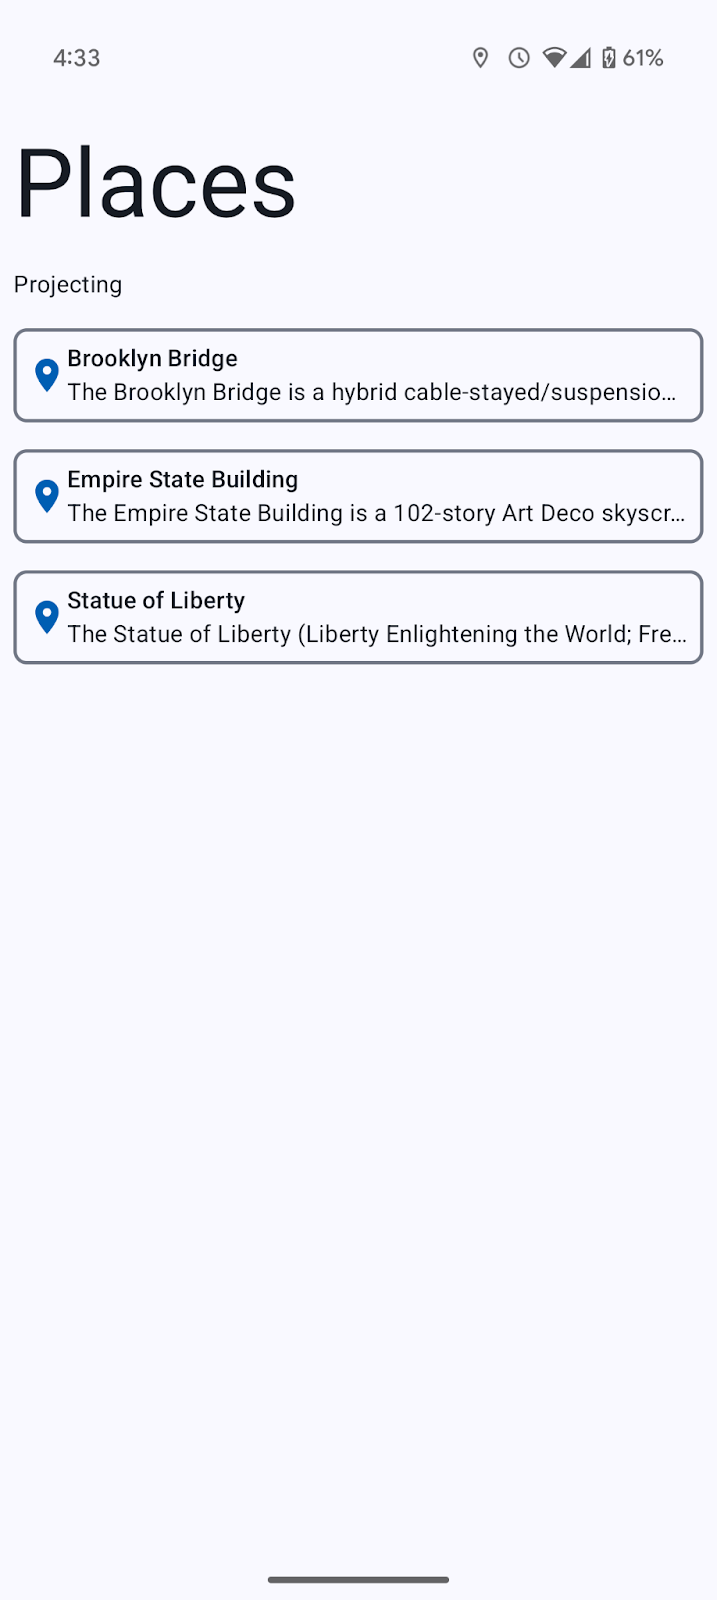
- 應用程式執行時,畫面上會顯示「Not projecting」。
7. 使用電腦版車用運算主機 (DHU) 測試
完成 CarAppService 實作和 Android Auto 設定後,現在可以執行應用程式,看看效果如何。
- 在手機上安裝應用程式,然後按照安裝及執行 DHU 的指示操作。
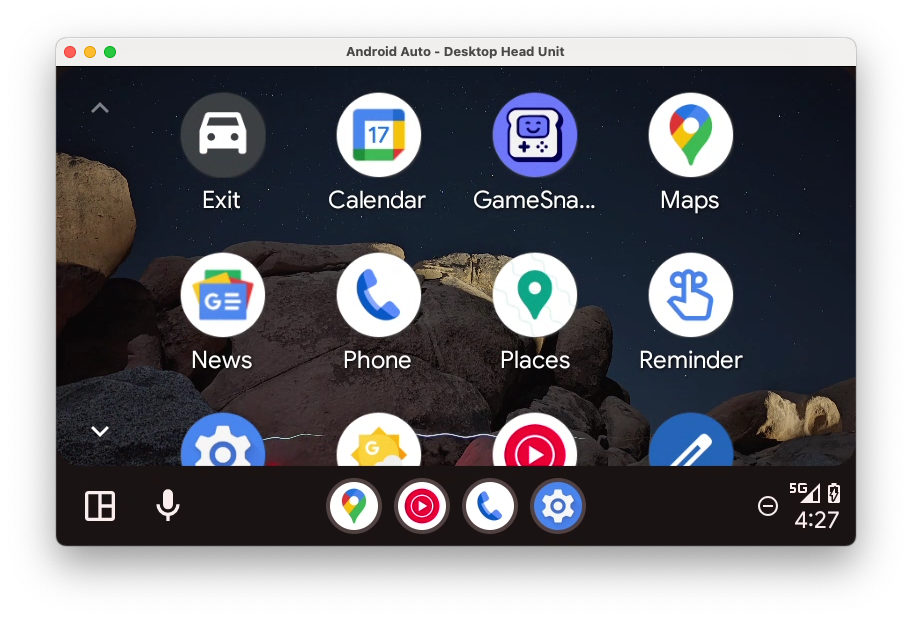
啟動並執行 DHU 後,您應該會在啟動器中看到應用程式圖示 (如果沒有,請再次檢查是否已按照上一節所述完成所有步驟,然後先從終端機退出 DHU 再重新啟動)。
糟糕,當機了!
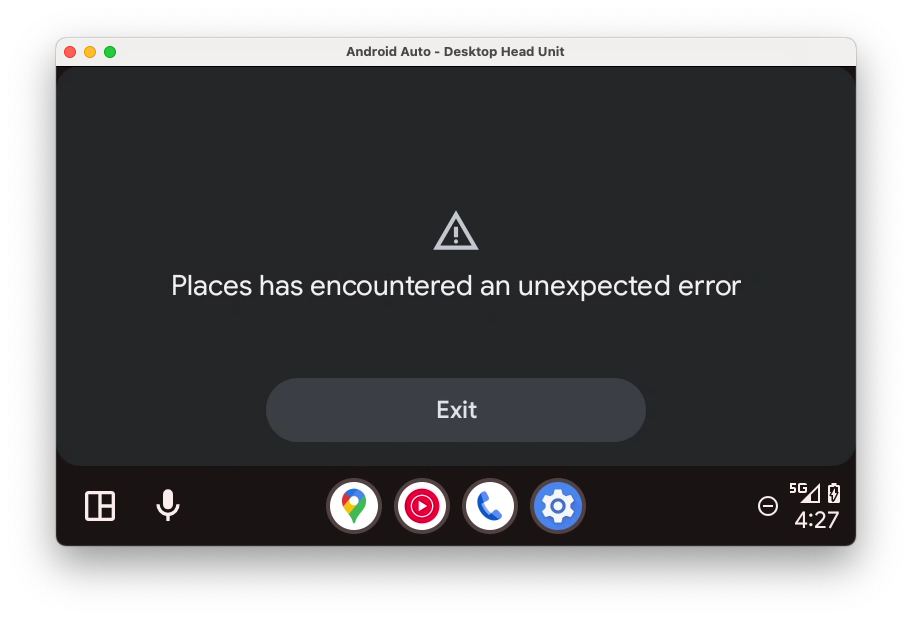
- 如要查看應用程式當機的原因,可以查看 Android Studio 中的 Logcat (您可能需要移除
package:mine的預設 Logcat 篩選器,並用is:error取代)。
Error: [type: null, cause: null, debug msg: java.lang.IllegalArgumentException: Min API level not declared in manifest (androidx.car.app.minCarApiLevel)
        at androidx.car.app.AppInfo.retrieveMinCarAppApiLevel(AppInfo.java:143)
        at androidx.car.app.AppInfo.create(AppInfo.java:91)
        at androidx.car.app.CarAppService.getAppInfo(CarAppService.java:380)
        at androidx.car.app.CarAppBinder.getAppInfo(CarAppBinder.java:255)
        at androidx.car.app.ICarApp$Stub.onTransact(ICarApp.java:182)
        at android.os.Binder.execTransactInternal(Binder.java:1285)
        at android.os.Binder.execTransact(Binder.java:1244)
]
您可以從記錄中看到,資訊清單中缺少應用程式支援的最低 API 級別宣告。新增此宣告之前,最好先瞭解為什麼這是必要項目。
和 Android 本身一樣,Car App Library 也有 API 級別的概念,因為主機和用戶端應用程式之間需要有契約,才能互相通訊。主機應用程式支援指定 API 級別及其相關功能 (基於回溯相容性,也支援更早級別的功能)。舉例來說,搭載 API 級別 2 以上的主機可以使用 SignInTemplate。但如果嘗試在僅支援 API 級別 1 的主機上使用,該主機就無法辨識範本類型,因此無法做出有效處置。
在主機與用戶端的繫結程序中,雙方支援的 API 級別必須有部分重疊,才能繫結成功。舉例來說,如果主機僅支援 API 級別 1,但用戶端應用程式需要 API 級別 2 的功能才能執行 (如這個資訊清單宣告所示),這兩個應用程式就無法連結,因為用戶端無法在主機上順利執行。因此,用戶端的資訊清單必須宣告所需的最低 API 級別,確保只有能支援的主機才能與其繫結。
- 如要設定支援的最低 API 級別,請在
:common:car-app-service模組的AndroidManfiest.xml檔案中新增以下<meta-data>元素:
AndroidManifest.xml (:common:car-app-service)
<application>
    <meta-data
        android:name="androidx.car.app.minCarApiLevel"
        android:value="1" />
    <service android:name="com.example.places.carappservice.PlacesCarAppService" ...>
        ...
    </service>
</application>
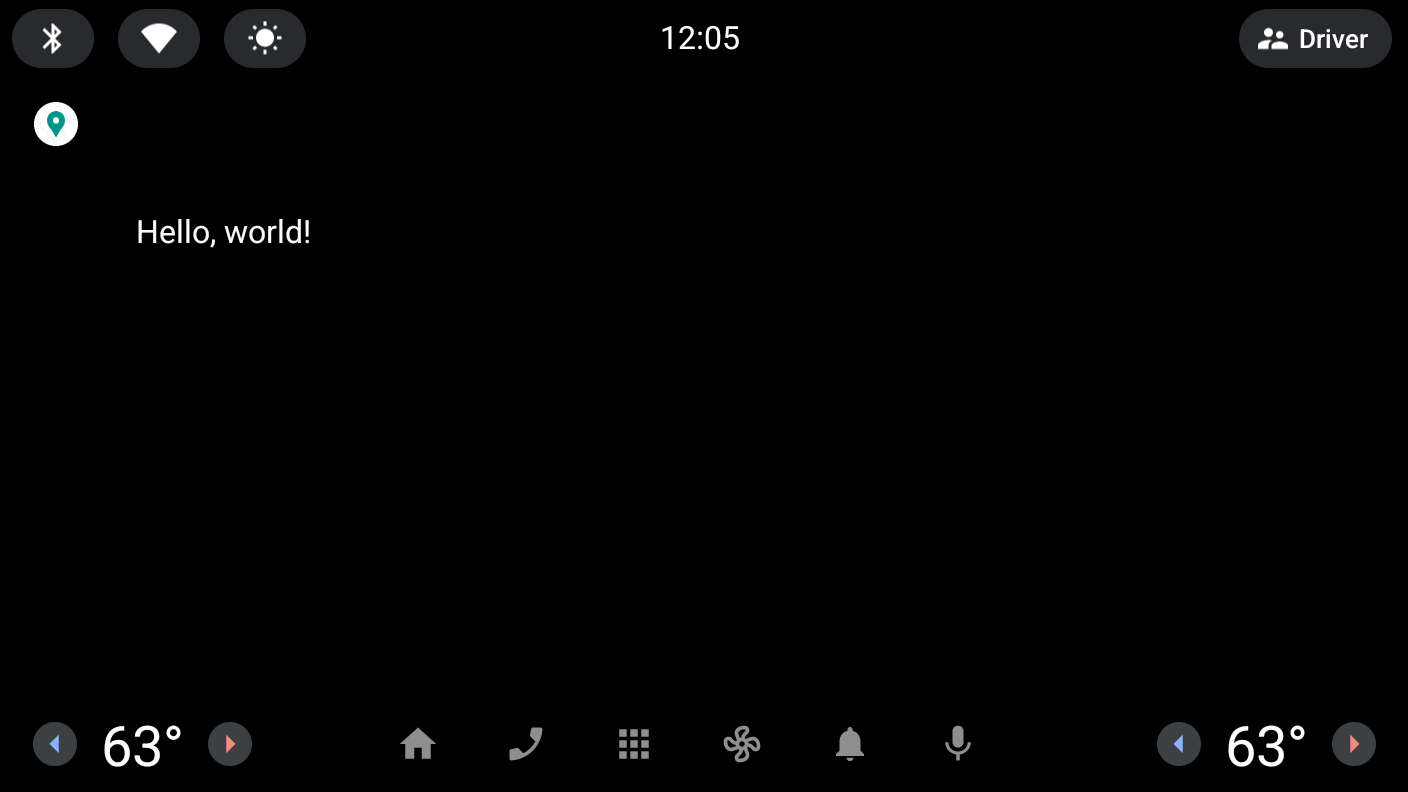
- 在 DHU 上再次安裝及啟動應用程式,應該會看到如下畫面:
為了完整起見,您也可以試著將 minCarApiLevel 設為較大的值 (例如 100),看看主機與用戶端不相容時,啟動應用程式會發生什麼情況 (提示:應用程式會當機,和沒有設定值的結果相似)。
此外,也請務必留意,就像 Android 本身一樣,您可以使用所宣告最低 API 級別以上級別的功能,但必須在執行階段確認主機支援所需級別。
選用:監聽投影變更
- 如果您在上一個步驟新增了
CarConnection事件監聽器,應該會在 DHU 執行時看到手機上的狀態更新,如下所示:
8. 新增對 Android Automotive OS 的支援
啟動並執行 Android Auto 後,請再加把勁,新增 Android Automotive OS 的支援功能。
建立 :automotive 模組
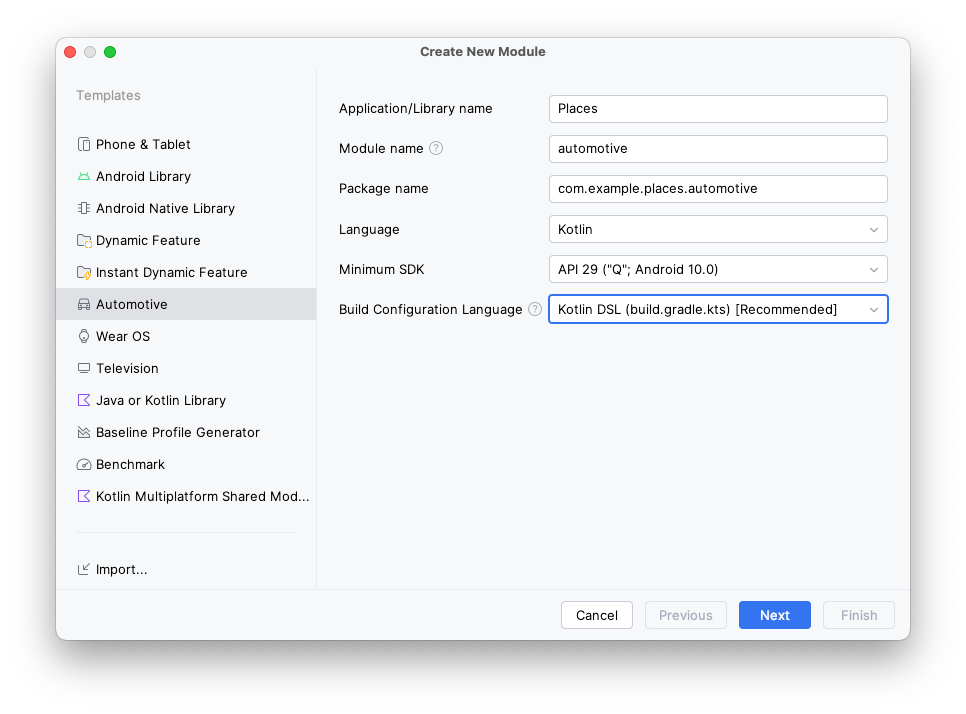
- 如要建立包含應用程式 Android Automotive OS 版本專用程式碼,請在 Android Studio 依序開啟「File」>「New」>「New Module...」,從左側範本類型清單中選取「Automotive」選項,然後採用下列各值:
- Application/Library name:
Places(與主要應用程式相同,您也可以視需要選擇不同名稱) - Module name:
automotive - Package name:
com.example.places.automotive - 語言:
Kotlin - Minimum SDK:
API 29: Android 10.0 (Q)- 所有支援 Car App Library 應用程式的 Android Automotive OS 車輛,執行最低級別為 API 29。
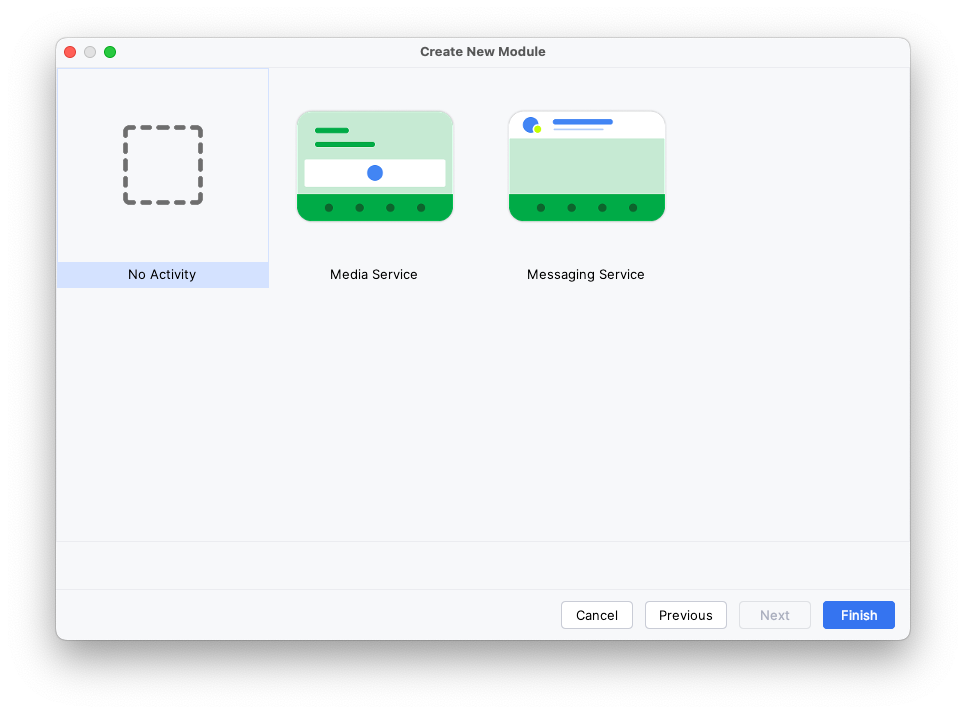
- 按一下「Next」,在下一個畫面選取「No Activity」,最後點選「Finish」。
新增依附元件
就像 Android Auto 的設定方式一樣,您需要宣告 :common:car-app-service 模組的依附元件,才能在這兩個平台共用實作內容。
此外,您還需要新增 androidx.car.app:app-automotive 構件的依附元件。不像 androidx.car.app:app-projected 構件對 Android Auto 來說是選用性質,在 Android Automotive OS 上這是必要依附元件,因為其中包含用來執行您應用程式所需的 CarAppActivity。
- 首先,在
libs.versions.toml中為androidx.car.app:app-automotive構件新增項目。
libs.version.toml
[libraries]
...
androidx-car-app-automotive = { group = "androidx.car.app", name = "app-automotive", version.ref = "carApp"}
- 如要新增依附元件,請開啟
build.gradle.kts檔案,插入下列程式碼:
build.gradle.kts (Module :automotive)
dependencies {
    ...
    implementation(project(":common:car-app-service"))
    implementation(libs.androidx.car.app.automotive)
    ...
}
變更完成後,應用程式自身的模組依附元件圖如下:
設定資訊清單
- 首先,您需要宣告兩項功能
android.hardware.type.automotive和android.software.car.templates_host為必要。
android.hardware.type.automotive 這項系統功能會指出裝置本身為車輛 (詳見 FEATURE_AUTOMOTIVE)。只有將這項功能標示為必要的應用程式,才能提交到 Play 管理中心的 Automotive OS 測試群組 (提交到其他測試群組的應用程式無法要求這項功能)。android.software.car.templates_host 是只會出現在車輛上的系統功能,內含執行範本應用程式所需的範本主機。在本程式碼實驗室中,這些變更就足以完成程式碼實驗室。建構應用程式時,請務必確認應用程式符合 Android Automotive OS 的所有 Google Play 功能需求。
AndroidManifest.xml (:automotive)
<manifest xmlns:android="http://schemas.android.com/apk/res/android">
    <uses-feature
        android:name="android.hardware.type.automotive"
        android:required="true" />
    <uses-feature
        android:name="android.software.car.templates_host"
        android:required="true" />
    ...
</manifest>
- 接著,與 Android Auto 的處理方式相同,您需要新增對
automotive_app_desc.xml檔案的參照。
請注意,這次的 android:name 屬性與先前不同,不是 com.google.android.gms.car.application,而是 com.android.automotive。像先前一樣,這會參照 :common:car-app-service 模組中的 automotive_app_desc.xml 檔案,也就是說,會在 Android Auto 和 Android Automotive OS 上使用相同的資源。此外,<meta-data> 元素位於 <application> 元素內,因此您必須變更 application 標記的自動關閉狀態。
AndroidManifest.xml (:automotive)
<application>
    ...
    <meta-data android:name="com.android.automotive"
        android:resource="@xml/automotive_app_desc"/>
    ...
</application>
- 最後,您需要為程式庫內含的
CarAppActivity新增<activity>元素。
AndroidManifest.xml (:automotive)
<manifest xmlns:android="http://schemas.android.com/apk/res/android">
    ...
    <application ...>
        ...
        <activity
            android:name="androidx.car.app.activity.CarAppActivity"
            android:exported="true"
            android:launchMode="singleTask"
            android:theme="@android:style/Theme.DeviceDefault.NoActionBar">

            <intent-filter>
                <action android:name="android.intent.action.MAIN" />
                <category android:name="android.intent.category.LAUNCHER" />
            </intent-filter>

            <meta-data
                android:name="distractionOptimized"
                android:value="true" />
        </activity>
    </application>
</manifest>
以下是這個元素執行的所有動作:
android:name列出app-automotive套件中CarAppActivity類別的完整名稱。- 將
android:exported設為true,因為這個Activity必須可由本身以外的其他應用程式 (啟動器) 啟動。 - 將
android:launchMode設為singleTask,這樣就一次只能有一個CarAppActivity例項。 - 將
android:theme設為@android:style/Theme.DeviceDefault.NoActionBar,讓應用程式占據可用的全部螢幕空間。 - 意圖篩選器指出這是應用程式的啟動器
Activity。 <meta-data>元素向系統指出,應用程式可配合使用者體驗限制使用,例如車輛行駛中的情況。
選用:從 :app 模組複製啟動器圖示
剛剛才建立 :automotive 模組會採用預設的綠色 Android 標誌圖示。
- 您可以視需要複製
:app模組中的mipmap資源目錄再貼到:automotive模組中,使用與行動應用程式相同的啟動器圖示。
9. 使用 Android Automotive OS 模擬器測試
建立 Android Automotive OS Android 虛擬裝置
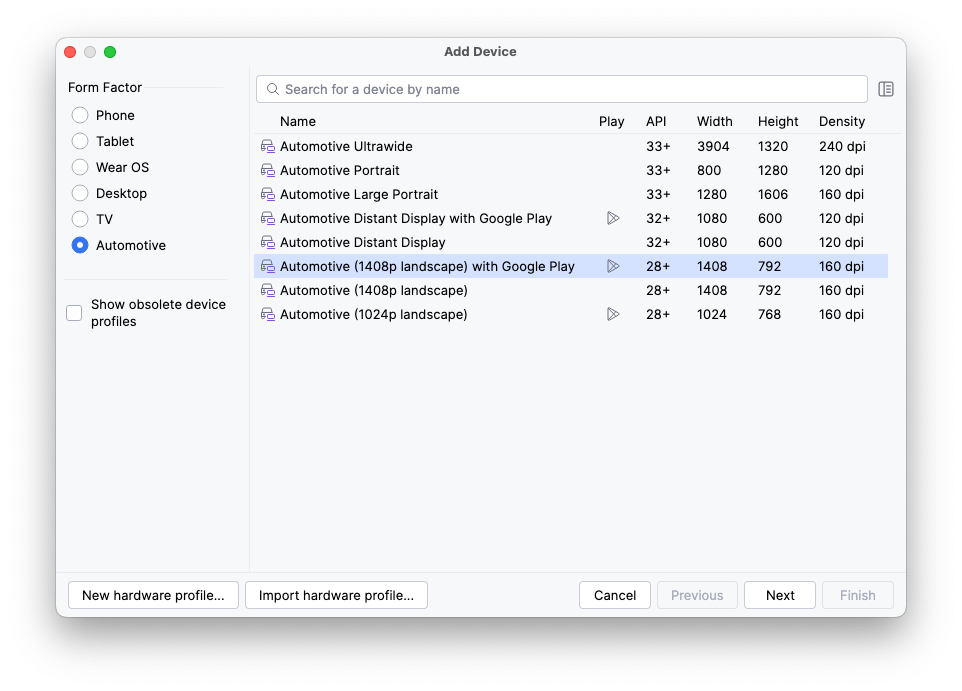
- 開啟裝置管理工具後,選取視窗左側「Category」欄下方的「Automotive」。接著,從清單中選取「Automotive (1408p landscape) with Google Play」裝置定義,點選「Next」。
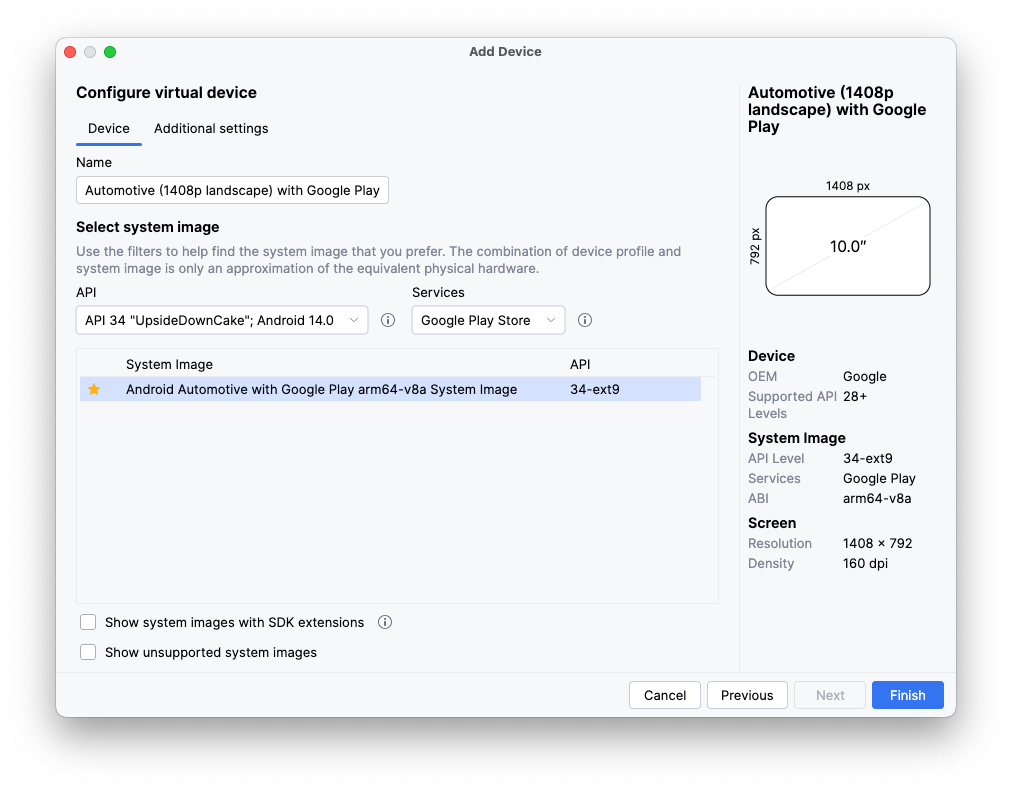
- 在下一頁中,選取 API 34 系統映像檔 (如果尚未下載,系統會自動下載),點選「Finish」建立 AVD。
執行應用程式
使用 automotive 執行設定,在剛建立的模擬器上執行應用程式。

在下一個步驟,您會在 :common:car-app-service 模組中做出變更,顯示地點清單,並讓使用者在另一個應用程式中開始導航至所選地點。
10. 新增地圖和詳細資料畫面
在主畫面新增地圖
- 首先,將
MainScreen類別onGetTemplate方法中的程式碼替換成以下內容:
MainScreen.kt
import androidx.car.app.model.CarLocation
import androidx.car.app.model.Distance
import androidx.car.app.model.DistanceSpan
import androidx.car.app.model.ItemList
import androidx.car.app.model.Metadata
import androidx.car.app.model.Place
import androidx.car.app.model.PlaceListMapTemplate
import androidx.car.app.model.PlaceMarker
import com.example.places.data.PlacesRepository

...

override fun onGetTemplate(): Template {
    val placesRepository = PlacesRepository()
    val itemListBuilder = ItemList.Builder()
        .setNoItemsMessage("No places to show")

    placesRepository.getPlaces()
        .forEach {
            itemListBuilder.addItem(
                Row.Builder()
                    .setTitle(it.name)
                    // Each item in the list *must* have a DistanceSpan applied to either the title
                    // or one of its lines of text (to help drivers make decisions)
                    .addText(SpannableString(" ").apply {
                        setSpan(
                            DistanceSpan.create(
                                Distance.create(Math.random() * 100, Distance.UNIT_KILOMETERS)
                            ), 0, 1, Spannable.SPAN_INCLUSIVE_INCLUSIVE
                        )
                    })
                    .setOnClickListener { TODO() }
                    // Setting Metadata is optional, but is required to automatically show the
                    // item's location on the provided map
                    .setMetadata(
                        Metadata.Builder()
                            .setPlace(Place.Builder(CarLocation.create(it.latitude, it.longitude))
                                // Using the default PlaceMarker indicates that the host should
                                // decide how to style the pins it shows on the map/in the list
                                .setMarker(PlaceMarker.Builder().build())
                                .build())
                            .build()
                    ).build()
            )
        }

    return PlaceListMapTemplate.Builder()
        .setTitle("Places")
        .setItemList(itemListBuilder.build())
        .build()
}
這段程式碼會讀取 PlacesRepository 中的 Place 例項清單,將每個例項轉換成 Row,再加到由 PlaceListMapTemplate 顯示的 ItemList 中。
- 再次執行應用程式 (同時在這兩個平台上,或擇一執行),看看結果如何:
Android Auto | Android Automotive OS |
|
|
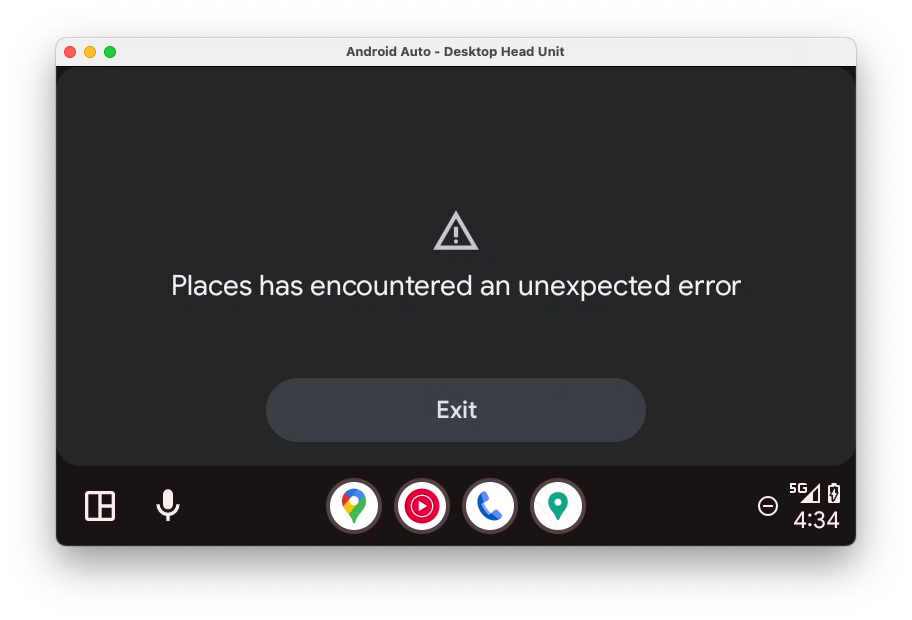
糟糕,發生了另一項錯誤,看來似乎是缺少權限。
java.lang.SecurityException: The car app does not have a required permission: androidx.car.app.MAP_TEMPLATES
        at android.os.Parcel.createExceptionOrNull(Parcel.java:2373)
        at android.os.Parcel.createException(Parcel.java:2357)
        at android.os.Parcel.readException(Parcel.java:2340)
        at android.os.Parcel.readException(Parcel.java:2282)
        ...
- 在
:common:car-app-service模組的資訊清單中加入以下<uses-permission>元素,即可修正這項錯誤。
如果應用程式使用 PlaceListMapTemplate 或發生如剛才示範的當機情形,就必須宣告這項權限。請注意,只有宣告類別為 androidx.car.app.category.POI 的應用程式,才能使用這個範本,反過來說,也就是這項權限。
AndroidManifest.xml (:common:car-app-service)
<manifest xmlns:android="http://schemas.android.com/apk/res/android">
    <uses-permission android:name="androidx.car.app.MAP_TEMPLATES" />
    ...
</manifest>
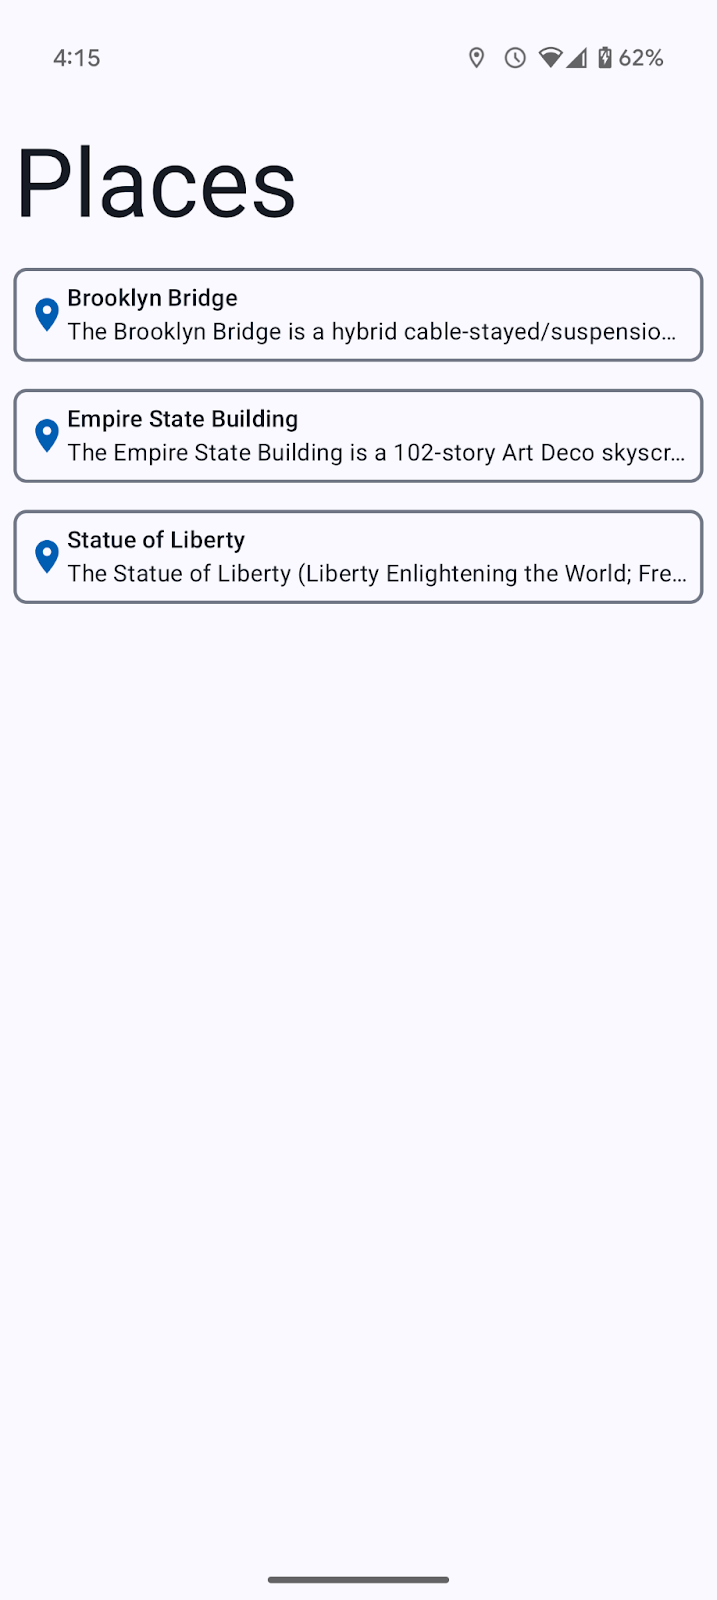
加入這項權限後再執行應用程式,在各平台上顯示的畫面應如下所示:
Android Auto | Android Automotive OS |
|
|
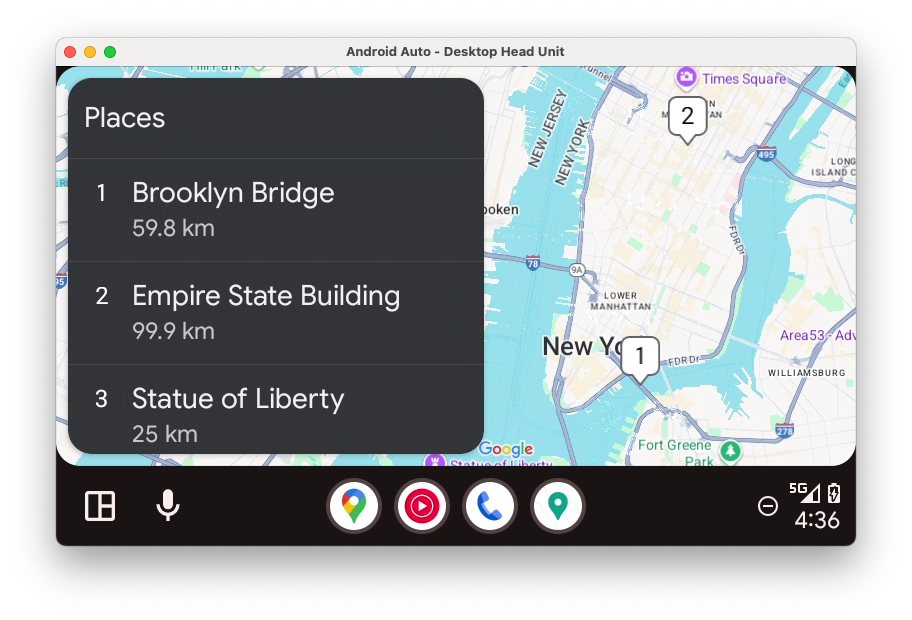

只要您提供必要的 Metadata,應用程式主機就會處理地圖轉譯作業。
新增詳細資料畫面
接下來,請新增詳細資料畫面,讓使用者能查看特定地點相關詳細資訊,並選擇要使用偏好的導航應用程式前往該地點,還是返回其他地點的清單。您可以使用 PaneTemplate 來顯示最多四列資訊,旁邊還可視需要設置動作按鈕。
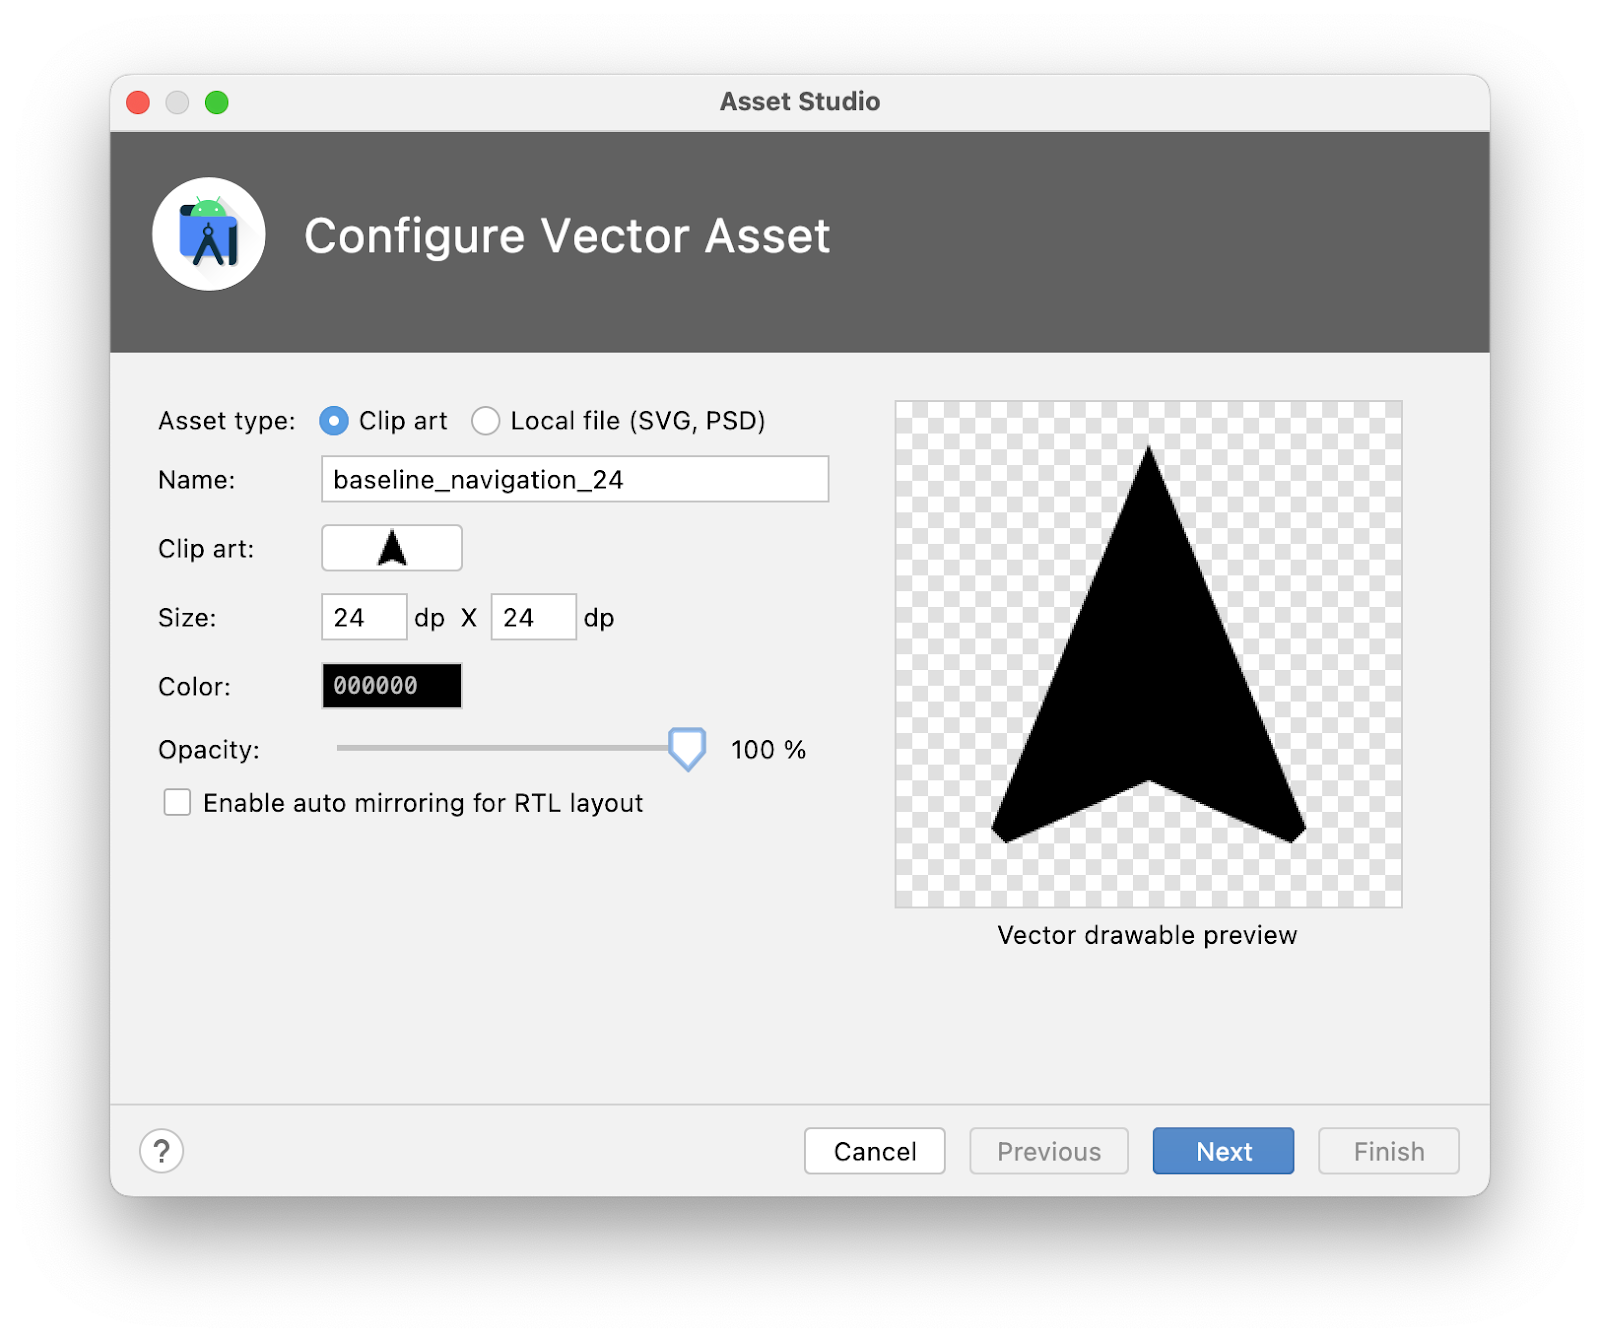
- 首先,在
:common:car-app-service模組中的res目錄上按一下滑鼠右鍵,依序點選「New」>「Vector Asset」,然後使用以下設定建立導覽圖示:
- Asset type:
Clip art - Clip art:
navigation - 名稱:
baseline_navigation_24 - Size:
24dp x24dp - 顏色:
#000000 - Opacity:
100%
- 接著,在
screen套件中的現有MainScreen.kt檔案旁,建立名為DetailScreen.kt的檔案,並加入下列程式碼:
DetailScreen.kt
import android.graphics.Color
import androidx.car.app.CarContext
import androidx.car.app.Screen
import androidx.car.app.model.Action
import androidx.car.app.model.CarColor
import androidx.car.app.model.CarIcon
import androidx.car.app.model.Header
import androidx.car.app.model.MessageTemplate
import androidx.car.app.model.Pane
import androidx.car.app.model.PaneTemplate
import androidx.car.app.model.Row
import androidx.car.app.model.Template
import androidx.core.graphics.drawable.IconCompat
import com.example.android.cars.carappservice.R
import com.example.places.data.PlacesRepository
import com.example.places.data.model.toIntent

class DetailScreen(carContext: CarContext, private val placeId: Int) : Screen(carContext) {
    private var isBookmarked = false

    override fun onGetTemplate(): Template {
        val place = PlacesRepository().getPlace(placeId)
            ?: return MessageTemplate.Builder("Place not found")
                .setHeader(
                    Header.Builder()
                        .setStartHeaderAction(Action.BACK)
                        .build()
                )
                .build()

        val navigateAction = Action.Builder()
            .setTitle("Navigate")
            .setIcon(
                CarIcon.Builder(
                    IconCompat.createWithResource(
                        carContext,
                        R.drawable.baseline_navigation_24
                    )
                ).build()
            )
            // Only certain Intent actions are supported by `startCarApp`. Check its documentation
            // for all of the details. To open another app that can handle navigating to a location
            // you must use the CarContext.ACTION_NAVIGATE action and not Intent.ACTION_VIEW like
            // you might on a phone.
            .setOnClickListener { carContext.startCarApp(place.toIntent(CarContext.ACTION_NAVIGATE)) }
            .build()

        return PaneTemplate.Builder(
            Pane.Builder()
                .addAction(navigateAction)
                .addRow(
                    Row.Builder()
                        .setTitle("Coordinates")
                        .addText("${place.latitude}, ${place.longitude}")
                        .build()
                ).addRow(
                    Row.Builder()
                        .setTitle("Description")
                        .addText(place.description)
                        .build()
                ).build()
        ).setHeader(
            Header.Builder()
                .setStartHeaderAction(Action.BACK)
                .setTitle(place.name)
                .build()
        ).build()
    }
}
請特別注意 navigateAction 的建構方式:呼叫 OnClickListener 中的 startCarApp,就是與 Android Auto 和 Android Automotive OS 上其他應用程式互動的關鍵動作。
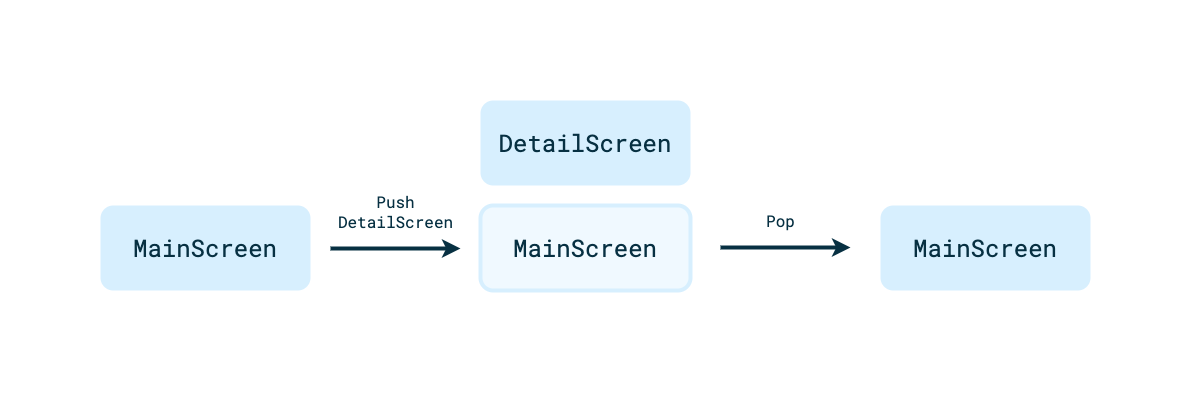
瀏覽不同畫面
現在有兩種類型的畫面,該在兩者之間加上導覽功能了。Car App Library 中的 Navigation 採用推入與彈出的堆疊模型,非常適合用於行車中完成的簡易工作流程。
- 如要從
MainScreen的其中一個清單項目前往該項目的DetailScreen,請新增下列程式碼:
MainScreen.kt
Row.Builder()
    ...
    .setOnClickListener { screenManager.push(DetailScreen(carContext, it.id)) }
    ...
從 DetailScreen 返回 MainScreen 的程序已處理完成,因為在建構 DetailScreen 上顯示的 PaneTemplate 時,已呼叫 setHeaderAction(Action.BACK)。使用者點選標頭動作時,主機會替您將目前畫面從堆疊彈出,但應用程式可視需要覆寫這項行為。
- 現在執行應用程式,查看
DetailScreen及實際的應用程式內導覽情形。
11. 更新畫面內容
許多時候,您會想讓使用者與畫面互動,因此需要變更該畫面上元素的狀態。為示範如何進行,您將建構一項功能,讓使用者在 DetailScreen 新增或移除地點的書籤。
- 首先,新增本機變數
isBookmarked來容納狀態。在實際應用程式中,這應該儲存為資料層的一部分,但如果是示範用途,本機變數已足夠。
DetailScreen.kt
class DetailScreen(carContext: CarContext, private val placeId: Int) : Screen(carContext) {
    private var isBookmarked = false
    ...
}
- 接下來,在
:common:car-app-service模組中的res目錄上按一下滑鼠右鍵,依序點選「New」>「Vector Asset」,然後使用以下設定建立兩個書籤圖示:
- Asset type:
Clip art - Name:
outline_bookmark_add_24、outline_bookmark_added_24 - Clip art:
bookmark、bookmark_added(來自 Material Symbols Outlined 來源集) - Size:
24dp x24dp - 顏色:
#000000 - Opacity:
100%
- 然後,在
DetailsScreen.kt中為書籤功能建立Action。
DetailScreen.kt
val navigateAction = ...

val bookmarkAction = Action.Builder()
    .setIcon(
        CarIcon.Builder(
            IconCompat.createWithResource(
                carContext,
                if (isBookmarked) R.drawable.outline_bookmark_added_24 else R.drawable.outline_bookmark_add_24
            )
        ).build()
    )
    .setOnClickListener {
        isBookmarked = !isBookmarked
    }.build()

...
這裡有兩個有趣的部分:
CarIcon會根據項目的狀態改變色調。- 使用
setOnClickListener來回應使用者的輸入內容,並切換書籤狀態。
- 別忘了要在
PaneTemplate.Builder呼叫addEndHeaderAction,才能使用bookmarkAction。
DetailScreen.kt
Header.Builder()
    ...
    .addEndHeaderAction(bookmarkAction)
    .build()
- 接著,執行應用程式,看看會有什麼結果:
使用者已點選圖示,但圖示未變更。
這是因為 Car App Library 有特定的「重新整理」概念。為減少致使駕駛人分心的情形,對重新整理畫面內容設有某些限制 (隨顯示的範本而異),且必須由您的程式碼明確要求每次的重新整理,也就是呼叫 Screen 類別的 invalidate 方法。只更新 onGetTemplate 中參照的某個狀態,不足以更新 UI。
- 如要修正這個問題,請按照以下方式更新
bookmarkAction的OnClickListener:
DetailScreen.kt
.setOnClickListener {
    isBookmarked = !isBookmarked
    // Request that `onGetTemplate` be called again so that updates to the
    // screen's state can be picked up
    invalidate()
}
- 再次執行應用程式,即可看到使用者點選圖示後,圖示會更新。
就是這麼簡單,您已完成一個妥善整合 Android Auto 與 Android Automotive OS 的基本應用程式!
12. 恭喜
您已成功建構第一個 Car App Library 應用程式。現在就運用所學,套用到自己的應用程式吧!
如稍早提及,若是使用 Car App Library 建構,目前只有某些類別的應用程式可以提交到 Play 商店。如果您的應用程式屬於支援的類別,就能立即開始建構!
我們會逐年增加新的應用程式類別,因此即使未能立即運用所學,仍歡迎您日後再回來查看,屆時您也許就能將應用程式擴充到車用範圍!
體驗功能
- 安裝原始設備製造商 (OEM) 的模擬器,看看在 Android Automotive OS 上,OEM 自訂功能如何改變 Car App Library 應用程式的外觀與風格。請注意,有些 OEM 模擬器並不支援 Car App Library 應用程式。
- 使用不同的 DHU 設定和 Android Automotive OS 模擬器硬體設定檔,瞭解主機應用程式如何將應用程式調整為不同螢幕尺寸。
- 查看示範應用程式如何展示 Car App Library 的完整功能。
其他資訊
- 「使用車輛專用 Android App Library」一文涵蓋本程式碼實驗室的內容及更多資訊。
- 「車輛專用 Android 應用程式程式庫設計指南」提供所有不同範本的詳細說明,以及建構應用程式時可依循的最佳做法。
- 「車用 Android 應用程式品質」頁面說明了應用程式必須符合哪些標準,才能提供優質使用者體驗並通過 Play 商店審查。