
1. Before you begin
In this pathway, you learned how to add a button to an app and how to modify the app to respond to a button click. Now, it's time to practice what you learned by building an app.
You will create an app called the Lemonade app. First, read the requirements of the Lemonade app to understand how the app should look and behave. If you want to challenge yourself, you can build the app on your own from there. If you get stuck, you can read subsequent sections to receive more hints and guidance about how to break down the problem and approach it step by step.
Work through this practice problem at a pace that's comfortable for you. Take as much time as you need to build each part of the app's functionality. The solution code for the Lemonade app is available at the end, but it's recommended that you try to build the app yourself before you check the solution. Remember that the provided solution is not the only way to build the Lemonade app, so it's completely valid to build it a different way as long as the app requirements are met.
Prerequisites
- Able to create a simple UI layout in Compose with text and image composables
- Able to build an interactive app that responds to a button click
- Basic understanding of composition and recomposition
- Familiarity with the basics of the Kotlin programming language, including functions, variables, conditionals, and lambdas
What you'll need
- A computer with internet access and Android Studio installed.
2. App overview
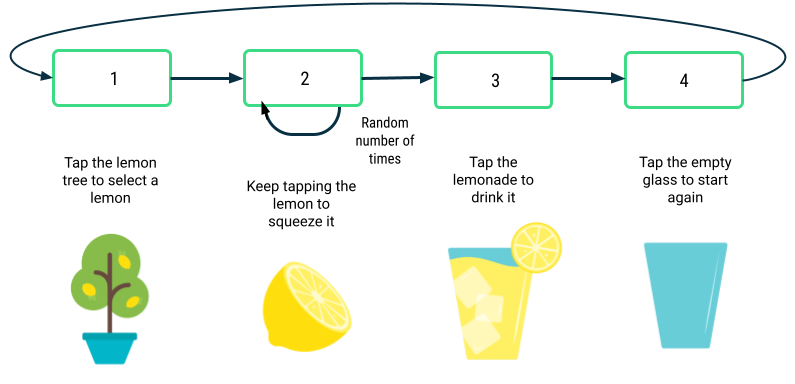
You're going to help us bring our vision of making digital lemonade to life! The goal is to create a simple, interactive app that lets you juice lemons when you tap the image on screen until you have a glass of lemonade. Consider it a metaphor or maybe just a fun way to pass the time!
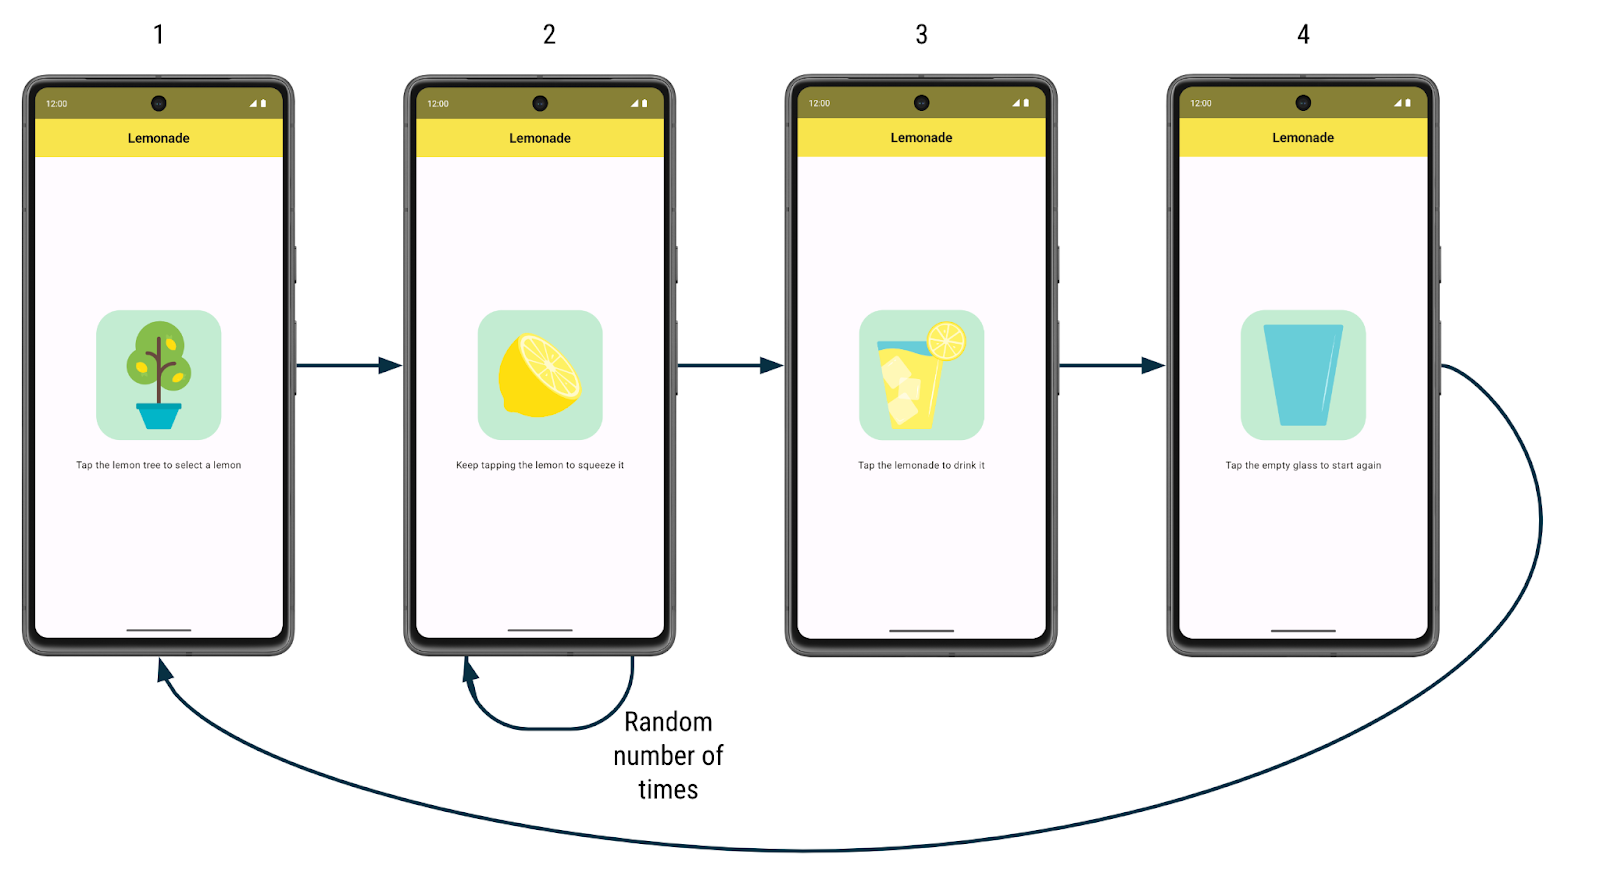
Here's how the app works:
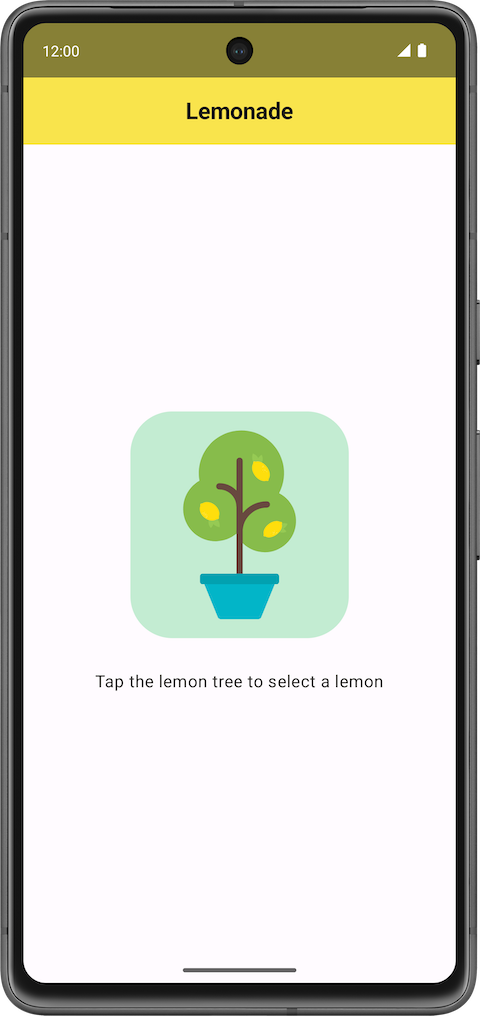
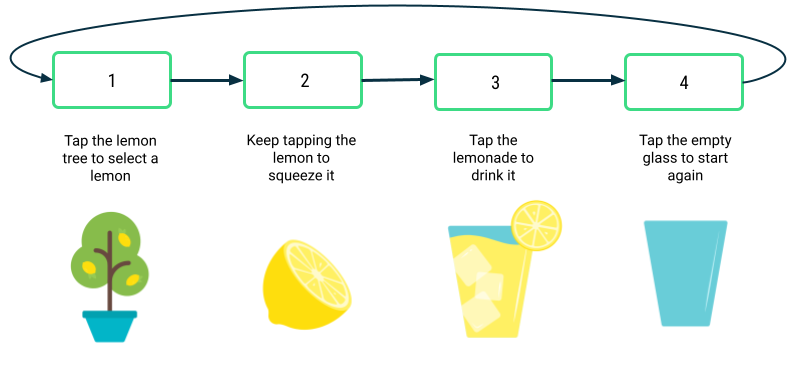
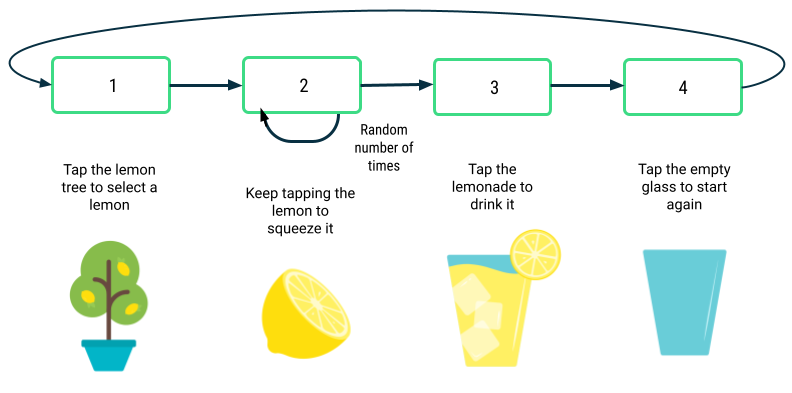
- When the user first launches the app, they see a lemon tree. There's a label that prompts them to tap the lemon tree image to "select" a lemon from the tree.
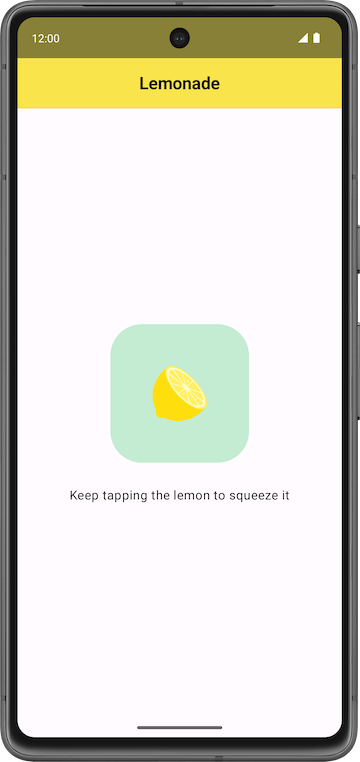
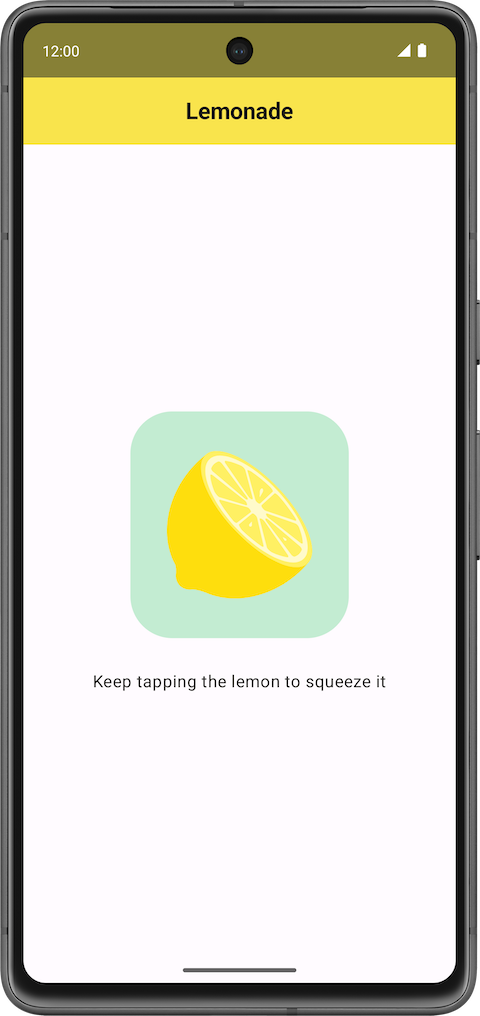
- After they tap the lemon tree, the user sees a lemon. They are prompted to tap the lemon to "squeeze" it to make lemonade. They need to tap the lemon several times to squeeze it. The number of taps required to squeeze the lemon is different each time and is a randomly generated number between 2 to 4 (inclusive).
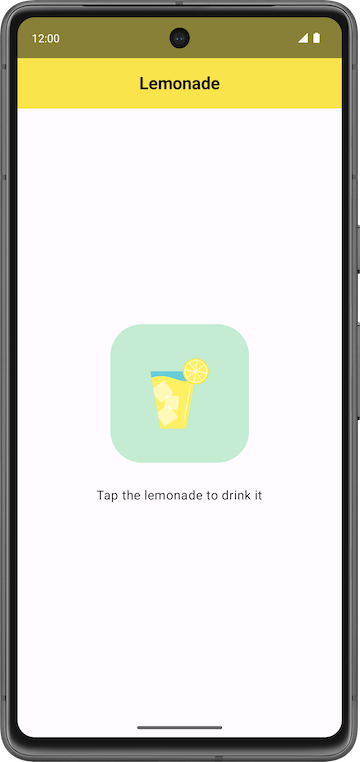
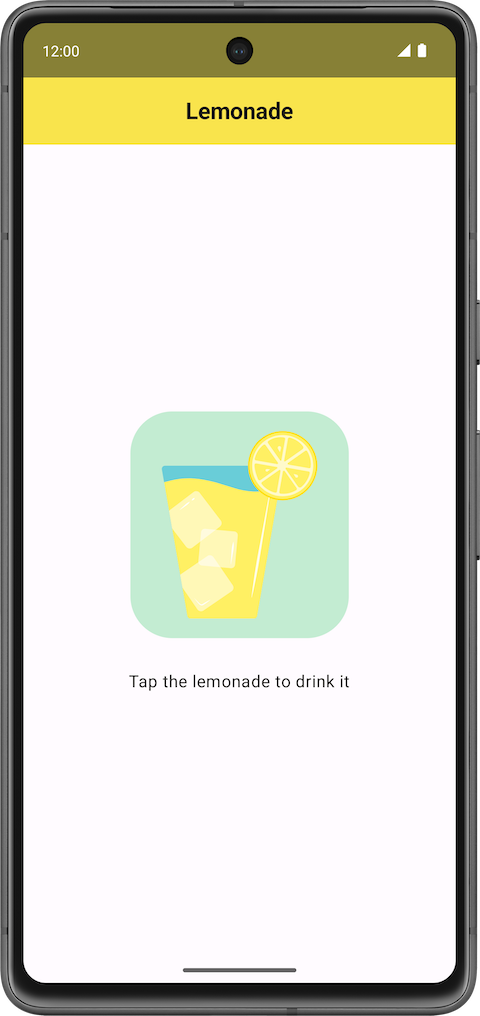
- After they've tapped the lemon the required number of times, they see a refreshing glass of lemonade! They are asked to tap the glass to "drink" the lemonade.
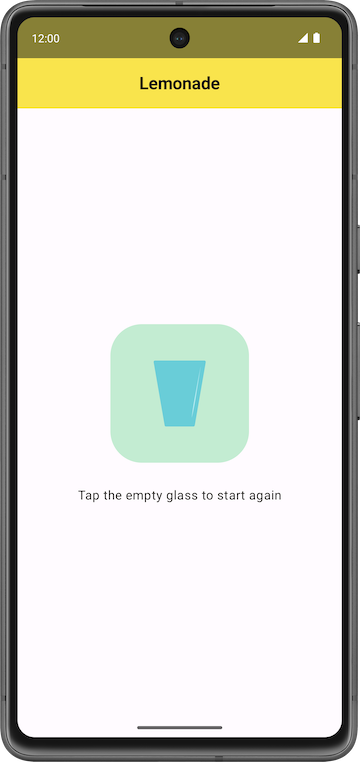
- After they tap the lemonade glass, they see an empty glass. They are asked to tap the empty glass to start again.
- After they tap the empty glass, they see the lemon tree and can begin the process again. More lemonade please!
Here are larger screenshots of how the app looks:
|
|
|
|
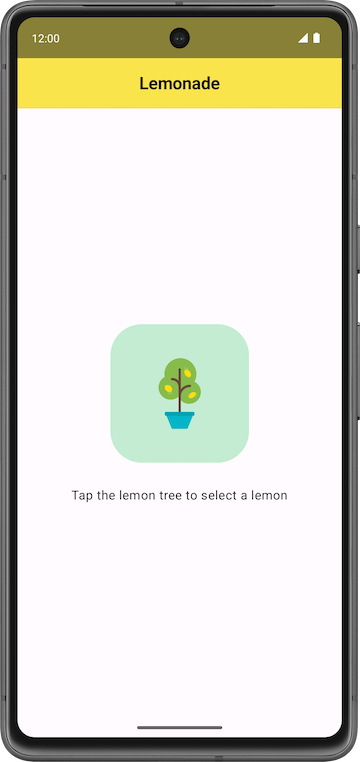
For each step of making lemonade, there's a different image and text label on the screen, and different behavior for how the app responds to a click. For example, when the user taps the lemon tree, the app shows a lemon.
Your job is to build the app's UI layout and implement the logic for the user to move through all the steps to make lemonade.
3. Get started
Create a project
In Android Studio, create a new project with the Empty Activity template with the following details:
- Name: Lemonade
- Package name: com.example.lemonade
- Minimum SDK: 24
When the app has been successfully created and the project builds, then proceed with the next section.
Add images
You're provided with four vector drawable files that you use in the Lemonade app.
Get the files:
- Download a zip file of the images for the app.
- Double click the zip file. This step unzips the images into a folder.
- Add the images into the
drawablefolder of your app. If you don't remember how to do this, see the Create an interactive Dice Roller app codelab.
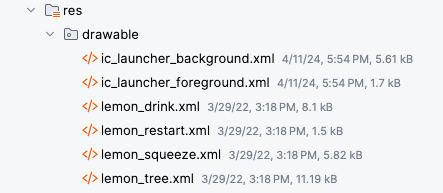
Your project folder should look like the following screenshot in which the lemon_drink.xml, lemon_restart.xml, lemon_squeeze.xml, and lemon_tree.xml assets now appear under the res > drawable directory:
- Double click a vector drawable file to see the image preview.
- Select the Design pane (not the Code or Split views) to see a full-width view of the image.

After the image files are included in your app, you can refer to them in your code. For example, if the vector drawable file is called lemon_tree.xml, then in your Kotlin code, you can refer to the drawable using its resource ID in the format of R.drawable.lemon_tree.
Add string resources
Add the following strings to your project in the res > values > strings.xml file:
Tap the lemon tree to select a lemonKeep tapping the lemon to squeeze itTap the lemonade to drink itTap the empty glass to start again
The following strings are also needed in your project. They're not displayed on the screen in the user interface, but these are used for the content description of the images in your app to describe what the images are. Add these additional strings in your app's strings.xml file:
Lemon treeLemonGlass of lemonadeEmpty glass
If you don't remember how to declare string resources in your app, see the Create an interactive Dice Roller app codelab or refer to String. Give each string resource an appropriate identifier name that describes the value it contains. For example, for the string "Lemon", you can declare it in the strings.xml file with the identifier name lemon_content_description, and then refer to it in your code using the resource ID: R.string.lemon_content_description.
Steps of making lemonade
Now you have the string resources and image assets that are needed to implement the app. Here's a summary of each step of the app and what is shown on the screen:
Step 1:
- Text:
Tap the lemon tree to select a lemon - Image: Lemon tree (
lemon_tree.xml)
Step 2:
- Text:
Keep tapping the lemon to squeeze it - Image: Lemon (
lemon_squeeze.xml)
Step 3:
- Text:
Tap the lemonade to drink it - Image: Full glass of lemonade (
lemon_drink.xml)
Step 4:
- Text:
Tap the empty glass to start again - Image: Empty glass (
lemon_restart.xml)

Add visual polish
To make your version of the app look like these final screenshots, there are a couple more visual adjustments to make in the app:
- Increase the font size of the text so that it's larger than the default font size (such as
18sp). - Add additional space in between the text label and the image below it, so they're not too close to each other (such as
16dp). - Give the button an accent color and slightly rounded corners to let the users know that they can tap the image.
If you want to challenge yourself, build the rest of the app based on the description of how it should work. If you want more guidance, proceed to the next section.
4. Plan out how to build the app
When building an app, it's a good idea to get a minimal working version of the app done first. Then gradually add more functionality until you complete all desired functionality. Identify a small piece of end-to-end functionality that you can build first.
In the Lemonade app, notice that the key part of the app is transitioning from one step to another with a different image and text label shown each time. Initially, you can ignore the special behavior of the squeeze state because you can add this functionality later after you build the foundation of the app.
Below is a proposal of the high-level overview of the steps that you can take to build the app:
- Build the UI layout for the first step of making lemonade, which prompts the user to select a lemon from the tree. You can skip the border around the image for now because that's a visual detail that you can add later.
- Implement the behavior in the app so that when the user taps the lemon tree, the app shows a lemon image and its corresponding text label. This covers the first two steps of making lemonade.

- Add code so that the app displays the rest of the steps to make lemonade, when the image is tapped each time. At this point, a single tap on the lemon can transition to displaying the glass of lemonade.
- Add custom behavior for the lemon squeeze step, so that the user needs to "squeeze", or tap, the lemon a specific number of times that's randomly generated from 2 to 4.
- Finalize the app with any other necessary visual polish details. For example, change the font size and add a border around the image to make the app look more polished. Verify that the app follows good coding practices, such as adhering to the Kotlin coding style guidelines and adding comments to your code.
If you can use these high-level steps to guide you in the implementation of the Lemonade app, go ahead and build the app on your own. If you find that you need additional guidance on each of these five steps, proceed to the next section.
5. Implement the app
Build the UI layout
First modify the app so that it displays the image of the lemon tree and its corresponding text label, which says Tap the lemon tree to select a lemon, in the center of the screen. There should also be 16dp of space in between the text and the image below it.
If it helps, you can use the following starter code in the MainActivity.kt file:
package com.example.lemonade

import android.os.Bundle
import androidx.activity.ComponentActivity
import androidx.activity.compose.setContent
import androidx.compose.foundation.layout.fillMaxSize
import androidx.compose.material3.MaterialTheme
import androidx.compose.material3.Surface
import androidx.compose.material3.Text
import androidx.compose.runtime.Composable
import androidx.compose.ui.Modifier
import androidx.compose.ui.tooling.preview.Preview
import com.example.lemonade.ui.theme.LemonadeTheme

class MainActivity : ComponentActivity() {
   override fun onCreate(savedInstanceState: Bundle?) {
       super.onCreate(savedInstanceState)
       setContent {
           LemonadeTheme {
               LemonApp()
           }
       }
   }
}

@Composable
fun LemonApp() {
   // A surface container using the 'background' color from the theme
   Surface(
       modifier = Modifier.fillMaxSize(),
       color = MaterialTheme.colorScheme.background
   ) {
       Text(text = "Hello there!")
   }
}

@Preview(showBackground = true)
@Composable
fun DefaultPreview() {
   LemonadeTheme {
       LemonApp()
   }
}
This code is similar to the code that's autogenerated by Android Studio. However, instead of a Greeting() composable, there's a LemonApp() composable defined and it doesn't expect a parameter. The DefaultPreview() composable is also updated to use the LemonApp() composable so you can preview your code easily.
After you enter this code in Android Studio, modify the LemonApp() composable, which should contain the contents of the app. Here are some questions to guide your thought process:
- What composables will you use?
- Is there a standard Compose layout component that can help you arrange the composables into the desired positions?
Go and implement this step so that you have the lemon tree and text label displayed in your app, when your app launches. Preview your composable in Android Studio to see how the UI looks as you modify your code. Run the app to ensure that it looks like the screenshot that you saw earlier in this section.
Return to these instructions when you're done, if you want more guidance on how to add behavior when the image is tapped on.
Add click behavior
Next you will add code so that when the user taps the image of the lemon tree, the image of the lemon appears along with the text label Keep tapping the lemon to squeeze it. In other words, when you tap the lemon tree, it causes the text and image to change.
Earlier in this pathway, you learned how to make a button clickable. In the case of the Lemonade app, there's no Button composable. However, you can make any composable, not just buttons, clickable when you specify the clickable modifier on it. For an example, see the clickable documentation page.
What should happen when the image is clicked? The code to implement this behavior is non-trivial, so take a step back to revisit a familiar app.
Look at the Dice Roller app
Revisit the code from the Dice Roller app to observe how the app displays different dice images based on the value of the dice roll:
MainActivity.kt in Dice Roller app
...

@Composable
fun DiceWithButtonAndImage(modifier: Modifier = Modifier) {
   var result by remember { mutableStateOf(1) }
   val imageResource = when(result) {
       1 -> R.drawable.dice_1
       2 -> R.drawable.dice_2
       3 -> R.drawable.dice_3
       4 -> R.drawable.dice_4
       5 -> R.drawable.dice_5
       else -> R.drawable.dice_6
   }
   Column(modifier = modifier, horizontalAlignment = Alignment.CenterHorizontally) {
       Image(painter = painterResource(id = imageResource), contentDescription = result.toString())
       Button(onClick = { result = (1..6).random() }) {
          Text(stringResource(id = R.string.roll))
       }
   }
}

...
Answer these questions about the Dice Roller app code:
- Which variable's value determines the appropriate dice image to display?
- What action from the user triggers that variable to change?
The DiceWithButtonAndImage() composable function stores the most recent dice roll, in the result variable, which was defined with the remember composable and mutableStateOf() function in this line of code:
var result by remember { mutableStateOf(1) }
When the result variable gets updated to a new value, Compose triggers recomposition of the DiceWithButtonAndImage() composable, which means that the composable will execute again. The result value is remembered across recompositions, so when the DiceWithButtonAndImage() composable runs again, the most recent result value is used. Using a when statement on the value of the result variable, the composable determines the new drawable resource ID to show and the Image composable displays it.
Apply what you learned to the Lemonade app
Now answer similar questions about the Lemonade app:
- Is there a variable that you can use to determine what text and image should be shown on the screen? Define that variable in your code.
- Can you use conditionals in Kotlin to have the app perform different behavior based on the value of that variable? If so, write that conditional statement in your code.
- What action from the user triggers that variable to change? Find the appropriate place in your code where that happens. Add code there to update the variable.
This section can be quite challenging to implement and requires changes in multiple places of your code to work correctly. Don't be discouraged if the app doesn't work as you expect right away. Remember that there are multiple correct ways to implement this behavior.
When you're done, run the app and verify that it works. When you launch the app, it should show the image of the lemon tree and its corresponding text label. A single tap of the image of the lemon tree should update the text label and show the image of the lemon. A tap on the lemon image shouldn't do anything for now.
Add remaining steps
Now your app can display two of the steps to make lemonade! At this point, your LemonApp() composable may look something like the following code snippet. It's okay if your code looks slightly different as long as the behavior in the app is the same.
MainActivity.kt
...
@Composable
fun LemonApp() {
   // Current step the app is displaying (remember allows the state to be retained
   // across recompositions).
   var currentStep by remember { mutableStateOf(1) }

   // A surface container using the 'background' color from the theme
   Surface(
       modifier = Modifier.fillMaxSize(),
       color = MaterialTheme.colorScheme.background
   ) {
       when (currentStep) {
           1 -> {
               Column (
                   horizontalAlignment = Alignment.CenterHorizontally,
                   verticalArrangement = Arrangement.Center,
                   modifier = Modifier.fillMaxSize()
               ){
                   Text(text = stringResource(R.string.lemon_select))
                   Spacer(modifier = Modifier.height(32.dp))
                   Image(
                       painter = painterResource(R.drawable.lemon_tree),
                       contentDescription = stringResource(R.string.lemon_tree_content_description),
                       modifier = Modifier
                           .wrapContentSize()
                           .clickable {
                               currentStep = 2
                           }
                   )
               }
           }
           2 -> {
               Column (
                   horizontalAlignment = Alignment.CenterHorizontally,
                   verticalArrangement = Arrangement.Center,
                   modifier = Modifier.fillMaxSize()
               ){
                   Text(text = stringResource(R.string.lemon_squeeze))
                   Spacer(modifier = Modifier.height(32
                       .dp))
                   Image(
                       painter = painterResource(R.drawable.lemon_squeeze),
                       contentDescription = stringResource(R.string.lemon_content_description),
                       modifier = Modifier.wrapContentSize()
                   )
               }
           }
       }
   }
}
...
Next you'll add the rest of the steps to make lemonade. A single tap of the image should move the user to the next step of making lemonade, where the text and image both update. You will need to change your code to make it more flexible to handle all steps of the app, not just the first two steps.
To have different behavior each time that the image is clicked, you need to customize the clickable behavior. More specifically, the lambda that's executed when the image is clicked needs to know which step we're moving to.
You may start to notice that there's repeated code in your app for each step of making lemonade. For the when statement in the previous code snippet, the code for case 1 is very similar to case 2 with small differences. If it's helpful, create a new composable function, called LemonTextAndImage() for example, that displays text above an image in the UI. By creating a new composable function that takes some input parameters, you have a reusable function that's useful in multiple scenarios as long as you change the inputs that you pass in. It's your job to figure out what the input parameters should be. After you create this composable function, update your existing code to call this new function in relevant places.
Another advantage to having a separate composable like LemonTextAndImage() is that your code becomes more organized and robust. When you call LemonTextAndImage(), you can be sure that both the text and image will get updated to the new values. Otherwise, it's easy to accidentally miss one case where an updated text label is displayed with the wrong image.
Here's one additional hint: You can even pass in a lambda function to a composable. Be sure to use function type notation to specify what type of function should be passed in. In the following example, a WelcomeScreen() composable is defined and accepts two input parameters: a name string and an onStartClicked() function of type () -> Unit. That means that the function takes no inputs (the empty parentheses before the arrow) and has no return value ( the Unit following the arrow). Any function that matches that function type () -> Unit can be used to set the onClick handler of this Button. When the button is clicked, the onStartClicked() function is called.
@Composable
fun WelcomeScreen(name: String, onStartClicked: () -> Unit) {
    Column {
        Text(text = "Welcome $name!")
        Button(
            onClick = onStartClicked
        ) {
            Text("Start")
        }
    }
}
Passing in a lambda to a composable is a useful pattern because then the WelcomeScreen() composable can be reused in different scenarios. The user's name and the button's onClick behavior can be different each time because they're passed in as arguments.
With this additional knowledge, go back to your code to add the remaining steps of making lemonade to your app.
Return to these instructions if you want additional guidance on how to add the custom logic around squeezing the lemon a random number of times.
Add squeeze logic
Great job! Now you have the basis of the app. Tapping the image should move you from one step to the next. It's time to add the behavior of needing to squeeze the lemon multiple times to make lemonade. The number of times that the user needs to squeeze, or tap, the lemon should be a random number between 2 to 4 (inclusive). This random number is different each time that the user picks a new lemon from the tree.
Here are some questions to guide your thought process:
- How do you generate random numbers in Kotlin?
- At what point in your code should you generate the random number?
- How do you ensure that the user tapped the lemon the required number of times before moving to the next step?
- Do you need any variables stored with the
remembercomposable so that the data doesn't get reset every time the screen is redrawn?
When you're done implementing this change, run the app. Verify that it takes multiple taps of the image of the lemon to move to the next step, and that the number of taps required each time is a random number between 2 and 4. If a single tap of the lemon image displays the lemonade glass, go back to your code to figure out what's missing and try again.
Return to these instructions if you want additional guidance on how to finalize the app.
Finalize the app
You're almost done! Add some last details to polish up the app.
As a reminder, here are the final screenshots of how the app looks:
|
|
|
|
- Vertically and horizontally center the text and images within the screen.
- Set the font size of the text to
18sp. - Add
16dpof space between the text and image. - Add a thin border of
2dparound the images with slightly rounded corners of4dp. The border has an RGB color value of105for red,205for green, and216for blue. For examples of how to add a border, you can Google search it. Or you can refer to the documentation on Border.
When you've completed these changes, run your app and then compare it with the final screenshots to ensure that they match.
As part of good coding practices, go back and add comments to your code, so that anyone who reads your code can understand your thought process more easily. Remove any import statements at the top of your file that aren't used in your code. Ensure that your code follows the Kotlin style guide. All these efforts will help make your code more readable by other people and easier to maintain!
Well done! You did an amazing job implementing the Lemonade app! That was a challenging app with many parts to figure out. Now treat yourself to a refreshing glass of lemonade. Cheers!
6. Get the solution code
Download the solution code:
Alternatively, you can clone the GitHub repository for the code:
$ git clone https://github.com/google-developer-training/basic-android-kotlin-compose-training-lemonade.git
Remember that your code doesn't need to precisely match the solution code because there are multiple ways to implement the app.
You can also browse the code in the Lemonade app GitHub repository.