Questo documento descrive come configurare una serie di test per caffè espresso comuni.
Associare una vista accanto a un'altra vista
Un layout può contenere determinate visualizzazioni non univoche. Per
ad esempio, un pulsante di chiamata ripetuto in una tabella di contatti potrebbe avere lo stesso
R.id, contengono lo stesso testo e hanno le stesse proprietà di un'altra chiamata
nella gerarchia di visualizzazione.
Ad esempio, in questa attività, la visualizzazione con il testo "7" si ripete in più
righe:
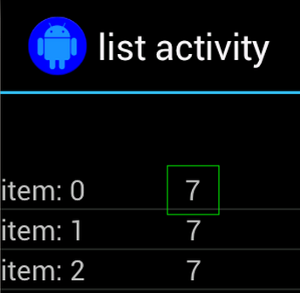
Spesso, la vista non univoca viene associata a un'etichetta univoca che si trova
ad esempio il nome del contatto accanto al pulsante di chiamata. In questo caso,
puoi utilizzare la corrispondenza hasSibling() per restringere la selezione:
Kotlin
onView(allOf(withText("7"), hasSibling(withText("item: 0"))))
    .perform(click())
Java
onView(allOf(withText("7"), hasSibling(withText("item: 0"))))
    .perform(click());
Associare una visualizzazione all'interno di una barra delle azioni
ActionBarTestActivity ha due diverse barre di azione: una
barra delle azioni e una barra delle azioni contestuali creata da un menu delle opzioni. Entrambi
le barre delle azioni hanno un elemento sempre visibile e due elementi
visibile nel menu extra. Quando viene fatto clic su un elemento, un TextView viene modificato in
contenuti dell'articolo su cui è stato fatto clic.
La corrispondenza delle icone visibili su entrambe le barre delle azioni è semplice, come mostrato nel seguente snippet di codice:
Kotlin
fun testClickActionBarItem() {
    // We make sure the contextual action bar is hidden.
    onView(withId(R.id.hide_contextual_action_bar))
        .perform(click())

    // Click on the icon - we can find it by the r.Id.
    onView(withId(R.id.action_save))
        .perform(click())

    // Verify that we have really clicked on the icon
    // by checking the TextView content.
    onView(withId(R.id.text_action_bar_result))
        .check(matches(withText("Save")))
}
Java
public void testClickActionBarItem() {
    // We make sure the contextual action bar is hidden.
    onView(withId(R.id.hide_contextual_action_bar))
        .perform(click());

    // Click on the icon - we can find it by the r.Id.
    onView(withId(R.id.action_save))
        .perform(click());

    // Verify that we have really clicked on the icon
    // by checking the TextView content.
    onView(withId(R.id.text_action_bar_result))
        .check(matches(withText("Save")));
}
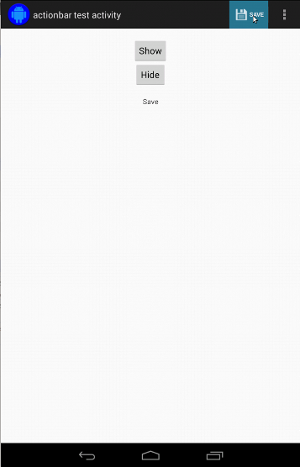
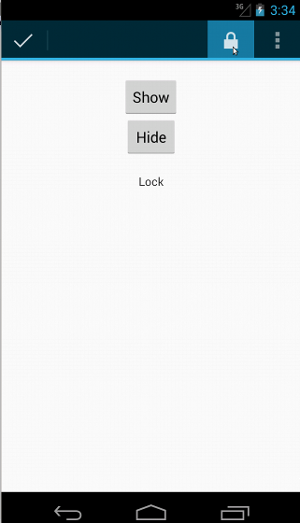
Il codice è identico per la barra delle azioni contestuali:
Kotlin
fun testClickActionModeItem() {
    // Make sure we show the contextual action bar.
    onView(withId(R.id.show_contextual_action_bar))
        .perform(click())

    // Click on the icon.
    onView((withId(R.id.action_lock)))
        .perform(click())

    // Verify that we have really clicked on the icon
    // by checking the TextView content.
    onView(withId(R.id.text_action_bar_result))
        .check(matches(withText("Lock")))
}
Java
public void testClickActionModeItem() {
    // Make sure we show the contextual action bar.
    onView(withId(R.id.show_contextual_action_bar))
        .perform(click());

    // Click on the icon.
    onView((withId(R.id.action_lock)))
        .perform(click());

    // Verify that we have really clicked on the icon
    // by checking the TextView content.
    onView(withId(R.id.text_action_bar_result))
        .check(matches(withText("Lock")));
}
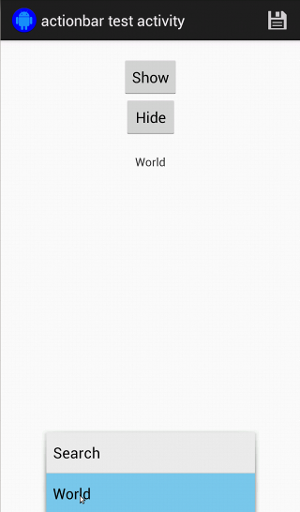
Fare clic sugli elementi nel menu extra è un po' più complicato per la normale azione barra perché alcuni dispositivi hanno un pulsante del menu extra hardware, che apre la degli elementi in eccesso in un menu delle opzioni e alcuni dispositivi hanno un overflow del software che apre un normale menu extra. Fortunatamente, Espresso se ne occupa per noi.
Per la barra delle azioni normale:
Kotlin
fun testActionBarOverflow() {
    // Make sure we hide the contextual action bar.
    onView(withId(R.id.hide_contextual_action_bar))
        .perform(click())

    // Open the options menu OR open the overflow menu, depending on whether
    // the device has a hardware or software overflow menu button.
    openActionBarOverflowOrOptionsMenu(
            ApplicationProvider.getApplicationContext<Context>())

    // Click the item.
    onView(withText("World"))
        .perform(click())

    // Verify that we have really clicked on the icon by checking
    // the TextView content.
    onView(withId(R.id.text_action_bar_result))
        .check(matches(withText("World")))
}
Java
public void testActionBarOverflow() {
    // Make sure we hide the contextual action bar.
    onView(withId(R.id.hide_contextual_action_bar))
        .perform(click());

    // Open the options menu OR open the overflow menu, depending on whether
    // the device has a hardware or software overflow menu button.
    openActionBarOverflowOrOptionsMenu(
            ApplicationProvider.getApplicationContext());

    // Click the item.
    onView(withText("World"))
        .perform(click());

    // Verify that we have really clicked on the icon by checking
    // the TextView content.
    onView(withId(R.id.text_action_bar_result))
        .check(matches(withText("World")));
}
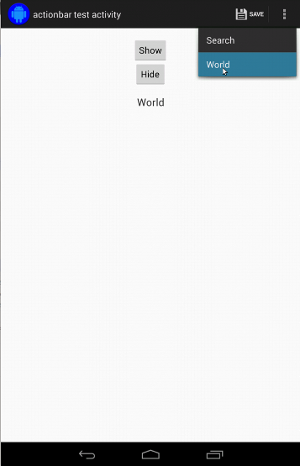
Ecco come appare sui dispositivi con un pulsante del menu extra hardware:
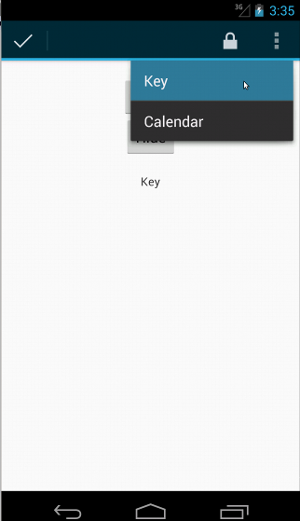
Per quanto riguarda la barra delle azioni contestuali, l'operazione è ancora molto semplice:
Kotlin
fun testActionModeOverflow() {
    // Show the contextual action bar.
    onView(withId(R.id.show_contextual_action_bar))
        .perform(click())

    // Open the overflow menu from contextual action mode.
    openContextualActionModeOverflowMenu()

    // Click on the item.
    onView(withText("Key"))
        .perform(click())

    // Verify that we have really clicked on the icon by
    // checking the TextView content.
    onView(withId(R.id.text_action_bar_result))
        .check(matches(withText("Key")))
    }
}
Java
public void testActionModeOverflow() {
    // Show the contextual action bar.
    onView(withId(R.id.show_contextual_action_bar))
        .perform(click());

    // Open the overflow menu from contextual action mode.
    openContextualActionModeOverflowMenu();

    // Click on the item.
    onView(withText("Key"))
        .perform(click());

    // Verify that we have really clicked on the icon by
    // checking the TextView content.
    onView(withId(R.id.text_action_bar_result))
        .check(matches(withText("Key")));
    }
}
Per vedere il codice completo per questi esempi, visualizza la
Esempio di ActionBarTest.java su GitHub.
Dichiarare che una vista non è mostrata
Dopo aver eseguito una serie di azioni, sicuramente vorrai affermare
lo stato dell'UI sottoposta a test. A volte potrebbe trattarsi di un caso negativo, ad esempio quando
se qualcosa non sta succedendo. Ricorda che puoi attivare qualsiasi visualizzazione "Hamcrest"
matcher in un ViewAssertion utilizzando ViewAssertions.matches().
Nell'esempio seguente, prendiamo il matcher isDisplayed() e lo invertiamo utilizzando
il matcher not() standard:
Kotlin
import androidx.test.espresso.Espresso.onView
import androidx.test.espresso.assertion.ViewAssertions.matches
import androidx.test.espresso.matcher.ViewMatchers.isDisplayed
import androidx.test.espresso.matcher.ViewMatchers.withId
import org.hamcrest.Matchers.not

onView(withId(R.id.bottom_left))
    .check(matches(not(isDisplayed())))
Java
import static androidx.test.espresso.Espresso.onView;
import static androidx.test.espresso.assertion.ViewAssertions.matches;
import static androidx.test.espresso.matcher.ViewMatchers.isDisplayed;
import static androidx.test.espresso.matcher.ViewMatchers.withId;
import static org.hamcrest.Matchers.not;

onView(withId(R.id.bottom_left))
    .check(matches(not(isDisplayed())));
L'approccio descritto sopra funziona se la visualizzazione fa ancora parte della gerarchia. Se è
non riceverai un NoMatchingViewException e dovrai usare
ViewAssertions.doesNotExist().
Dichiarare che non è presente una vista
Se la visualizzazione non rientra nella gerarchia delle visualizzazioni, questo può accadere quando
ha causato una transizione a un'altra attività; devi usare
ViewAssertions.doesNotExist():
Kotlin
import androidx.test.espresso.Espresso.onView
import androidx.test.espresso.assertion.ViewAssertions.doesNotExist
import androidx.test.espresso.matcher.ViewMatchers.withId

onView(withId(R.id.bottom_left))
    .check(doesNotExist())
Java
import static androidx.test.espresso.Espresso.onView;
import static androidx.test.espresso.assertion.ViewAssertions.doesNotExist;
import static androidx.test.espresso.matcher.ViewMatchers.withId;

onView(withId(R.id.bottom_left))
    .check(doesNotExist());
Dichiarare che un elemento dati non si trova in un adattatore
Per dimostrare che un determinato dato non si trova all'interno di un AdapterView è necessario
le cose in modo un po' diverso. Dobbiamo trovare il AdapterView che ci interessa
e interrogare i dati in suo possesso. Non è necessario utilizzare onData().
Utilizziamo invece onView() per trovare AdapterView e poi un altro
per lavorare sui dati all'interno della vista.
Per prima cosa, l'abbinamento:
Kotlin
private fun withAdaptedData(dataMatcher: Matcher<Any>): Matcher<View> {
    return object : TypeSafeMatcher<View>() {

        override fun describeTo(description: Description) {
            description.appendText("with class name: ")
            dataMatcher.describeTo(description)
        }

        public override fun matchesSafely(view: View) : Boolean {
            if (view !is AdapterView<*>) {
                return false
            }

            val adapter = view.adapter
            for (i in 0 until adapter.count) {
                if (dataMatcher.matches(adapter.getItem(i))) {
                    return true
                }
            }

            return false
        }
    }
}
Java
private static Matcher<View> withAdaptedData(final Matcher<Object> dataMatcher) {
    return new TypeSafeMatcher<View>() {

        @Override
        public void describeTo(Description description) {
            description.appendText("with class name: ");
            dataMatcher.describeTo(description);
        }

        @Override
        public boolean matchesSafely(View view) {
            if (!(view instanceof AdapterView)) {
                return false;
            }

            @SuppressWarnings("rawtypes")
            Adapter adapter = ((AdapterView) view).getAdapter();
            for (int i = 0; i < adapter.getCount(); i++) {
                if (dataMatcher.matches(adapter.getItem(i))) {
                    return true;
                }
            }

            return false;
        }
    };
}
Poi basta onView() per trovare AdapterView:
Kotlin
fun testDataItemNotInAdapter() {
    onView(withId(R.id.list))
          .check(matches(not(withAdaptedData(withItemContent("item: 168")))))
    }
}
Java
@SuppressWarnings("unchecked")
public void testDataItemNotInAdapter() {
    onView(withId(R.id.list))
          .check(matches(not(withAdaptedData(withItemContent("item: 168")))));
    }
}
Abbiamo un'affermazione che non riuscirà se un elemento uguale a "item: 168" esiste in una vista adattatore con l'elenco di ID.
Per l'esempio completo, guarda il metodo testDataItemNotInAdapter() all'interno della
AdapterViewTest.java
su GitHub.
Utilizza un gestore degli errori personalizzato
La sostituzione del valore FailureHandler predefinito di Espresso con uno personalizzato consente
gestione degli errori aggiuntiva o diversa, come l'acquisizione di uno screenshot o il passaggio
insieme a informazioni di debug aggiuntive.
L'esempio CustomFailureHandlerTest mostra come implementare una richiesta
gestore degli errori:
Kotlin
private class CustomFailureHandler(targetContext: Context) : FailureHandler {
    private val delegate: FailureHandler

    init {
        delegate = DefaultFailureHandler(targetContext)
    }

    override fun handle(error: Throwable, viewMatcher: Matcher<View>) {
        try {
            delegate.handle(error, viewMatcher)
        } catch (e: NoMatchingViewException) {
            throw MySpecialException(e)
        }

    }
}
Java
private static class CustomFailureHandler implements FailureHandler {
    private final FailureHandler delegate;

    public CustomFailureHandler(Context targetContext) {
        delegate = new DefaultFailureHandler(targetContext);
    }

    @Override
    public void handle(Throwable error, Matcher<View> viewMatcher) {
        try {
            delegate.handle(error, viewMatcher);
        } catch (NoMatchingViewException e) {
            throw new MySpecialException(e);
        }
    }
}
Questo gestore degli errori genera un MySpecialException anziché un
NoMatchingViewException e delega tutti gli altri errori al
DefaultFailureHandler. È possibile registrare CustomFailureHandler con
Espresso nel metodo setUp() del test:
Kotlin
@Throws(Exception::class)
override fun setUp() {
    super.setUp()
    getActivity()
    setFailureHandler(CustomFailureHandler(
            ApplicationProvider.getApplicationContext<Context>()))
}
Java
@Override
public void setUp() throws Exception {
    super.setUp();
    getActivity();
    setFailureHandler(new CustomFailureHandler(
            ApplicationProvider.getApplicationContext()));
}
Per ulteriori informazioni, consulta
FailureHandler
a riga di comando e
Espresso.setFailureHandler().
Scegli come target finestre non predefinite
Android supporta più finestre. Solitamente, è trasparente per gli utenti
e lo sviluppatore dell'app, ma in alcuni casi sono visibili più finestre, ad esempio
come quando una finestra di completamento automatico viene disegnata sopra la finestra principale dell'applicazione
il widget di ricerca. Per semplificare le cose, per impostazione predefinita Espresso usa un approccio euristico
indovina con quale Window intendi interagire. Questa euristica è quasi
è sempre abbastanza buono; Tuttavia, in rari casi, dovrai specificare la finestra
deve essere scelto come target da un'interazione. Puoi farlo fornendo la tua finestra root
o Root:
Kotlin
onView(withText("South China Sea"))
    .inRoot(withDecorView(not(`is`(getActivity().getWindow().getDecorView()))))
    .perform(click())
Java
onView(withText("South China Sea"))
    .inRoot(withDecorView(not(is(getActivity().getWindow().getDecorView()))))
    .perform(click());
Come nel caso di
ViewMatchers,
sono forniti un set di dati
RootMatchers.
Naturalmente, puoi sempre implementare il tuo oggetto Matcher.
Dai un'occhiata a MultipleWindowTest esempio su GitHub.
Associare un'intestazione o un piè di pagina in una visualizzazione elenco
Intestazioni e piè di pagina vengono aggiunti a ListViews utilizzando addHeaderView() e
addFooterView(). Per assicurarti che Espresso.onData() sappia quale oggetto dati
assicurati di trasmettere un valore di oggetto dati preimpostato come secondo parametro
a addHeaderView() e addFooterView(). Ad esempio:
Kotlin
const val FOOTER = "FOOTER"
...
val footerView = layoutInflater.inflate(R.layout.list_item, listView, false)
footerView.findViewById<TextView>(R.id.item_content).text = "count:"
footerView.findViewById<TextView>(R.id.item_size).text
        = data.size.toString
listView.addFooterView(footerView, FOOTER, true)
Java
public static final String FOOTER = "FOOTER";
...
View footerView = layoutInflater.inflate(R.layout.list_item, listView, false);
footerView.findViewById<TextView>(R.id.item_content).setText("count:");
footerView.findViewById<TextView>(R.id.item_size).setText(String.valueOf(data.size()));
listView.addFooterView(footerView, FOOTER, true);
Quindi, puoi scrivere un matcher per il piè di pagina:
Kotlin
import org.hamcrest.Matchers.allOf
import org.hamcrest.Matchers.instanceOf
import org.hamcrest.Matchers.`is`

fun isFooter(): Matcher<Any> {
    return allOf(`is`(instanceOf(String::class.java)),
            `is`(LongListActivity.FOOTER))
}
Java
import static org.hamcrest.Matchers.allOf;
import static org.hamcrest.Matchers.instanceOf;
import static org.hamcrest.Matchers.is;

@SuppressWarnings("unchecked")
public static Matcher<Object> isFooter() {
    return allOf(is(instanceOf(String.class)), is(LongListActivity.FOOTER));
}
Caricare la visualizzazione in un test è un'operazione semplice:
Kotlin
import androidx.test.espresso.Espresso.onData
import androidx.test.espresso.action.ViewActions.click
import androidx.test.espresso.sample.LongListMatchers.isFooter

fun testClickFooter() {
    onData(isFooter())
        .perform(click())

    // ...
}
Java
import static androidx.test.espresso.Espresso.onData;
import static androidx.test.espresso.action.ViewActions.click;
import static androidx.test.espresso.sample.LongListMatchers.isFooter;

public void testClickFooter() {
    onData(isFooter())
        .perform(click());

    // ...
}
Dai un'occhiata all'esempio di codice completo, disponibile nel metodo testClickFooter() di
AdapterViewTest.java
su GitHub.
