
地理圍欄功能結合了對使用者目前位置的認知,以及對使用者可能感興趣的鄰近地點的認知。如要標示喜好地點,請指定該地點的經緯度。如要調整該位置的鄰近地點,您必須新增半徑。緯度、經度和半徑定義了地理圍欄,在喜好地點的周圍建立一個圓形區域或圍欄。
您可以設定多個有效的地理圍欄,單一應用程式為每位裝置使用者設置的地理圍欄數量上限為 100 個。您可以針對各個地理圍欄,要求定位服務傳送進入和離開事件給您,或者先指定一段時間在地理圍欄區域內等待 (或稱「停留」),直到觸發事件。您可以指定到期時間 (以毫秒為單位),藉此限制任何地理圍欄的持續時間。地理圍欄到期後,定位服務會自動將它移除。
本課程將說明如何新增及移除地理圍欄,然後使用 BroadcastReceiver 監聽地理圍欄轉換作業。
注意:在 Wear 裝置上,Geofencing API 無法有效運用電力。我們不建議在 Wear 上使用這些 API。詳情請參閱「節省電力和電池用量」一文。
設定地理圍欄監控
要求地理圍欄監控的第一步是要求必要權限。如要使用地理圍欄,您的應用程式必須要求下列項目:
-
ACCESS_FINE_LOCATION -
ACCESS_BACKGROUND_LOCATION(如果應用程式指定的是 Android 10 (API 級別 29) 以上版本)
詳情請參閱如何要求位置存取權相關指南。
如果您想使用 BroadcastReceiver 監聽地理圍欄轉換作業,請新增指定服務名稱的元素。這個元素必須是
<application> 元素的子項:
<application
   android:allowBackup="true">
   ...
   <receiver android:name=".GeofenceBroadcastReceiver"/>
<application/>
如要存取 Location API,您必須建立 Geofencing 用戶端的例項。如要瞭解如何連接用戶端:
Kotlin
lateinit var geofencingClient: GeofencingClient

override fun onCreate(savedInstanceState: Bundle?) {
    // ...
    geofencingClient = LocationServices.getGeofencingClient(this)
}
Java
private GeofencingClient geofencingClient;

@Override
public void onCreate(Bundle savedInstanceState) {
    // ...
    geofencingClient = LocationServices.getGeofencingClient(this);
}
建立及新增地理圍欄
您的應用程式必須使用 Location API 用於建立地理圍欄物件的建構工具類別,以及用於新增這類物件的便利類別,才能建立及新增地理圍欄。此外,如要處理發生地理圍欄轉換時,從定位服務傳來的意圖,您可以定義如本節所示的 PendingIntent。
注意:在單一使用者裝置上,每個應用程式最多只能有 100 個地理圍欄。如果是多使用者裝置,則單一應用程式為每位裝置使用者設置的地理圍欄數量上限為 100 個。
建立地理圍欄物件
首先,請使用
Geofence.Builder 建立地理圍欄,並設定地理圍欄所需的半徑、持續時間和轉換類型。舉例來說,如要填入清單物件:
Kotlin
geofenceList.add(Geofence.Builder()
    // Set the request ID of the geofence. This is a string to identify this
    // geofence.
    .setRequestId(entry.key)

    // Set the circular region of this geofence.
    .setCircularRegion(
        entry.value.latitude,
        entry.value.longitude,
        Constants.GEOFENCE_RADIUS_IN_METERS
    )

    // Set the expiration duration of the geofence. This geofence gets automatically
    // removed after this period of time.
    .setExpirationDuration(Constants.GEOFENCE_EXPIRATION_IN_MILLISECONDS)

    // Set the transition types of interest. Alerts are only generated for these
    // transition. We track entry and exit transitions in this sample.
    .setTransitionTypes(Geofence.GEOFENCE_TRANSITION_ENTER or Geofence.GEOFENCE_TRANSITION_EXIT)

    // Create the geofence.
    .build())
Java
geofenceList.add(new Geofence.Builder()
    // Set the request ID of the geofence. This is a string to identify this
    // geofence.
    .setRequestId(entry.getKey())

    .setCircularRegion(
            entry.getValue().latitude,
            entry.getValue().longitude,
            Constants.GEOFENCE_RADIUS_IN_METERS
    )
    .setExpirationDuration(Constants.GEOFENCE_EXPIRATION_IN_MILLISECONDS)
    .setTransitionTypes(Geofence.GEOFENCE_TRANSITION_ENTER |
            Geofence.GEOFENCE_TRANSITION_EXIT)
    .build());
這個範例會從常數檔案擷取資料。在實務上,應用程式可能會根據使用者的位置,以動態方式建立地理圍欄。
指定地理圍欄和初始觸發條件
下列程式碼片段使用
GeofencingRequest 類別和它的
GeofencingRequestBuilder 巢狀類別來指定要監控的地理圍欄,並設定相關地理圍欄事件的觸發方式:
Kotlin
private fun getGeofencingRequest(): GeofencingRequest {
    return GeofencingRequest.Builder().apply {
        setInitialTrigger(GeofencingRequest.INITIAL_TRIGGER_ENTER)
        addGeofences(geofenceList)
    }.build()
}
Java
private GeofencingRequest getGeofencingRequest() {
    GeofencingRequest.Builder builder = new GeofencingRequest.Builder();
    builder.setInitialTrigger(GeofencingRequest.INITIAL_TRIGGER_ENTER);
    builder.addGeofences(geofenceList);
    return builder.build();
}
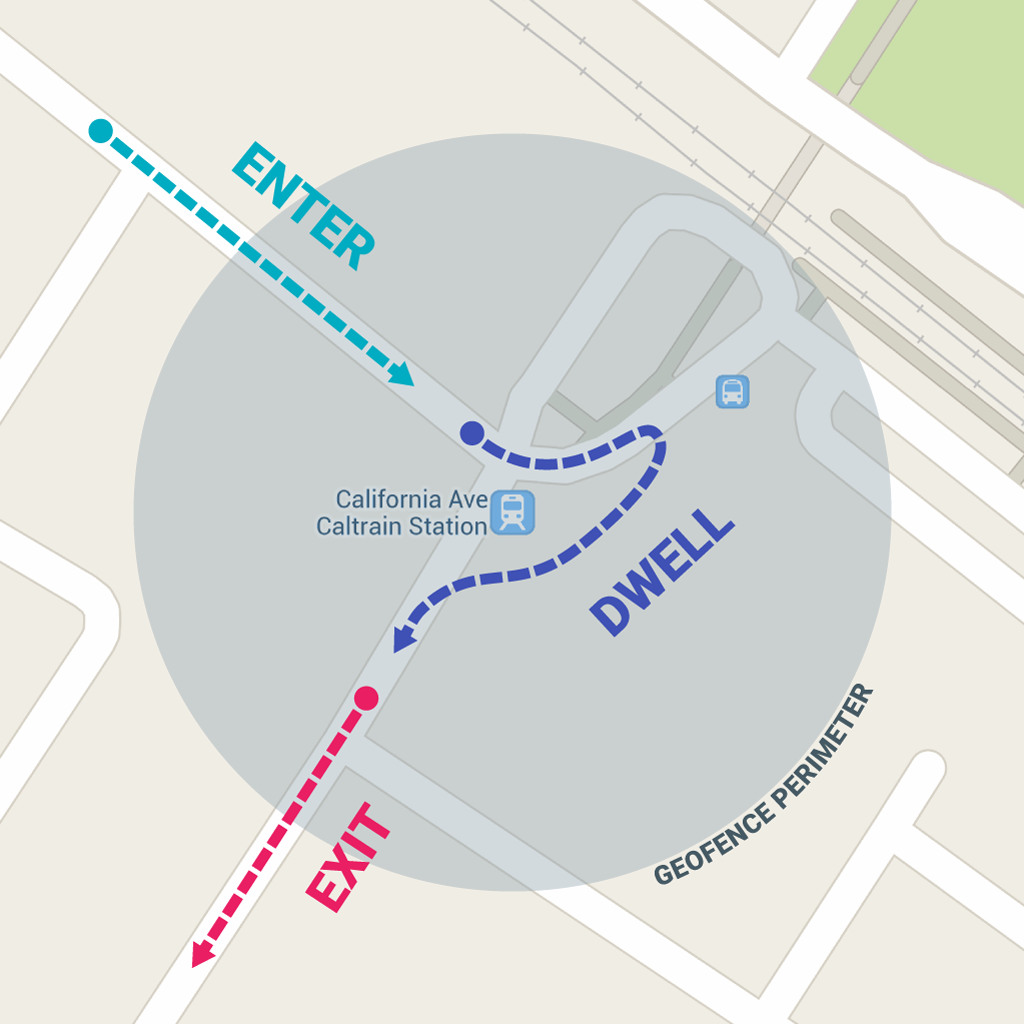
這個範例說明了兩個地理圍欄觸發條件的用法。
GEOFENCE_TRANSITION_ENTER 轉換作業會在裝置進入地理圍欄時觸發,而
GEOFENCE_TRANSITION_EXIT 轉換作業則會在裝置離開地理圍欄時觸發。指定
INITIAL_TRIGGER_ENTER 可告知定位服務,如果裝置已進入地理圍欄內,就應觸發
GEOFENCE_TRANSITION_ENTER。
在多數情況下,建議您改用
INITIAL_TRIGGER_DWELL,這樣就只有當使用者在地理圍欄內停留達到指定的持續時間時,才會觸發事件。這個方法可在裝置短暫進入及離開地理圍欄時,減少因為收到大量通知而產生的「垃圾快訊」。另一個透過地理圍欄取得最佳成果的策略,是將半徑設為至少 100 公尺。這種做法有助於反映一般 Wi-Fi 網路的位置準確度,也有助於降低裝置耗電量。
定義地理圍欄轉換作業的廣播接收器
從定位服務傳來的 Intent 可在應用程式中觸發各種動作,但「不」應用來啟動活動或片段,原因是各種元件只應在回應使用者動作時顯示在畫面上。在多數情況下,BroadcastReceiver 是處理地理圍欄轉換作業的絕佳方式。BroadcastReceiver 會在事件發生 (例如進入或退出地理圍欄的轉換作業) 時接收更新,並且可以啟動長時間執行的背景工作。
下列程式碼片段說明如何定義用於啟動 BroadcastReceiver 的 PendingIntent:
Kotlin
class MainActivity : AppCompatActivity() {

    // ...

    private val geofencePendingIntent: PendingIntent by lazy {
        // We use FLAG_UPDATE_CURRENT so that we get the same pending intent back when calling
        // addGeofences() and removeGeofences().
        val flags = PendingIntent.FLAG_UPDATE_CURRENT
        if (android.os.Build.VERSION.SDK_INT >= android.os.Build.VERSION_CODES.S) {
            // Starting on Android S+ the pending intent has to be mutable.
            flags or PendingIntent.FLAG_MUTABLE
        }
        val intent = Intent(this, GeofenceBroadcastReceiver::class.java)
        PendingIntent.getBroadcast(this, 0, intent, flags)
    }

}
Java
public class MainActivity extends AppCompatActivity {

    // ...

    private PendingIntent getGeofencePendingIntent() {
        // Reuse the PendingIntent if we already have it.
        if (geofencePendingIntent != null) {
          return geofencePendingIntent;
        }
        // We use FLAG_UPDATE_CURRENT so that we get the same pending intent back when calling
        // addGeofences() and removeGeofences().
        int flags = PendingIntent.FLAG_UPDATE_CURRENT;
        if (android.os.Build.VERSION.SDK_INT >= android.os.Build.VERSION_CODES.S) {
            // Starting on Android S+ the pending intent has to be mutable.
            flags |= PendingIntent.FLAG_MUTABLE;
        }
        Intent intent = new Intent(this, GeofenceBroadcastReceiver.class);
        geofencePendingIntent = PendingIntent.getBroadcast(this, 0, intent, flags);
        return geofencePendingIntent;
   }

}
新增地理圍欄
如要新增地理圍欄,請使用
方法,同時提供 GeofencingClient.addGeofences()
GeofencingRequest 物件和 PendingIntent。下列程式碼片段示範了如何處理結果:
Kotlin
geofencingClient?.addGeofences(getGeofencingRequest(), geofencePendingIntent)?.run {
    addOnSuccessListener {
        // Geofences added
        // ...
    }
    addOnFailureListener {
        // Failed to add geofences
        // ...
    }
}
Java
geofencingClient.addGeofences(getGeofencingRequest(), getGeofencePendingIntent())
        .addOnSuccessListener(this, new OnSuccessListener<Void>() {
            @Override
            public void onSuccess(Void aVoid) {
                // Geofences added
                // ...
            }
        })
        .addOnFailureListener(this, new OnFailureListener() {
            @Override
            public void onFailure(@NonNull Exception e) {
                // Failed to add geofences
                // ...
            }
        });
處理地理圍欄轉換作業
當定位服務偵測到使用者已進入或離開地理圍欄時,會傳出您加入新增地理圍欄要求中的 PendingIntent 內含的 Intent。如 GeofenceBroadcastReceiver 這類的廣播接收器會通知系統已叫用 Intent,且可接著從意圖中取得地理圍欄事件、判斷地理圍欄轉換作業的類型,以及判斷已觸發哪些定義的地理圍欄。廣播接收器可引導應用程式開始執行背景工作,或者視需要傳送通知做為輸出內容。
注意:在 Android 8.0 (API 級別 26) 以上版本中,如果應用程式在背景執行時監控地理圍欄,則裝置每幾分鐘就會對地理圍欄事件做出回應。如要瞭解如何根據這些回應限制調整應用程式,請參閱背景位置資訊限制一文。
下列程式碼片段說明如何定義 BroadcastReceiver,以便在發生地理圍欄轉換作業時張貼通知。使用者點選通知時,系統會顯示應用程式的主要活動:
Kotlin
class GeofenceBroadcastReceiver : BroadcastReceiver() {
    // ...
    override fun onReceive(context: Context?, intent: Intent?) {
        val geofencingEvent = GeofencingEvent.fromIntent(intent)
        if (geofencingEvent.hasError()) {
            val errorMessage = GeofenceStatusCodes
                    .getStatusCodeString(geofencingEvent.errorCode)
            Log.e(TAG, errorMessage)
            return
        }

        // Get the transition type.
        val geofenceTransition = geofencingEvent.geofenceTransition

        // Test that the reported transition was of interest.
        if (geofenceTransition == Geofence.GEOFENCE_TRANSITION_ENTER ||
                geofenceTransition == Geofence.GEOFENCE_TRANSITION_EXIT) {

            // Get the geofences that were triggered. A single event can trigger
            // multiple geofences.
            val triggeringGeofences = geofencingEvent.triggeringGeofences

            // Get the transition details as a String.
            val geofenceTransitionDetails = getGeofenceTransitionDetails(
                    this,
                    geofenceTransition,
                    triggeringGeofences
            )

            // Send notification and log the transition details.
            sendNotification(geofenceTransitionDetails)
            Log.i(TAG, geofenceTransitionDetails)
        } else {
            // Log the error.
            Log.e(TAG, getString(R.string.geofence_transition_invalid_type,
                    geofenceTransition))
        }
    }
}
Java
public class GeofenceBroadcastReceiver extends BroadcastReceiver {
    // ...
    protected void onReceive(Context context, Intent intent) {
        GeofencingEvent geofencingEvent = GeofencingEvent.fromIntent(intent);
        if (geofencingEvent.hasError()) {
            String errorMessage = GeofenceStatusCodes
                    .getStatusCodeString(geofencingEvent.getErrorCode());
            Log.e(TAG, errorMessage);
            return;
        }

        // Get the transition type.
        int geofenceTransition = geofencingEvent.getGeofenceTransition();

        // Test that the reported transition was of interest.
        if (geofenceTransition == Geofence.GEOFENCE_TRANSITION_ENTER ||
                geofenceTransition == Geofence.GEOFENCE_TRANSITION_EXIT) {

            // Get the geofences that were triggered. A single event can trigger
            // multiple geofences.
            List<Geofence> triggeringGeofences = geofencingEvent.getTriggeringGeofences();

            // Get the transition details as a String.
            String geofenceTransitionDetails = getGeofenceTransitionDetails(
                    this,
                    geofenceTransition,
                    triggeringGeofences
            );

            // Send notification and log the transition details.
            sendNotification(geofenceTransitionDetails);
            Log.i(TAG, geofenceTransitionDetails);
        } else {
            // Log the error.
            Log.e(TAG, getString(R.string.geofence_transition_invalid_type,
                    geofenceTransition));
        }
    }
}
透過 PendingIntent 偵測到轉換事件後,BroadcastReceiver 會取得地理圍欄轉換類型,並測試該類型是否屬於應用程式用以觸發通知的事件 (在本例中為 GEOFENCE_TRANSITION_ENTER 或 GEOFENCE_TRANSITION_EXIT)。接著,服務會傳送通知並記錄轉換詳細資料。
停止地理圍欄監控
如果不再需要,可以停止地理圍欄監控,這樣有助於節省裝置的電池電力和 CPU 週期。您可以在用於新增及移除地理圍欄的主要活動中停止地理圍欄監控;只要移除地理圍欄即可立即停止監控。API 提供的方法可依據要求 ID 移除地理圍欄,也可移除與指定 PendingIntent 相關聯的地理圍欄。
下列程式碼片段會依據 PendingIntent 移除地理圍欄,藉此在裝置進入或離開先前新增的地理圍欄時,停止所有後續通知:
Kotlin
geofencingClient?.removeGeofences(geofencePendingIntent)?.run {
    addOnSuccessListener {
        // Geofences removed
        // ...
    }
    addOnFailureListener {
        // Failed to remove geofences
        // ...
    }
}
Java
geofencingClient.removeGeofences(getGeofencePendingIntent())
        .addOnSuccessListener(this, new OnSuccessListener<Void>() {
            @Override
            public void onSuccess(Void aVoid) {
                // Geofences removed
                // ...
            }
        })
        .addOnFailureListener(this, new OnFailureListener() {
            @Override
            public void onFailure(@NonNull Exception e) {
                // Failed to remove geofences
                // ...
            }
        });
您可以將地理圍欄與其他位置辨識功能結合,例如定期更新位置資訊。詳情請參閱本課程中的其他主題課程。
採用地理圍欄最佳做法
本節概略說明搭配 Android 專用的 Location API 使用地理圍欄時的建議做法。
降低耗電量
您可以運用下列技巧,針對使用地理圍欄的應用程式耗電量進行最佳化:
將通知回應時間設為較高的值。這麼做可加長地理圍欄快訊的延遲時間,藉此降低耗電量。舉例來說,假如您將回應時間值設為五分鐘,則應用程式只需每五分鐘檢查一次進入或離開事件快訊。設定較低的值不一定代表使用者會在這段時間內收到通知 (例如,將這個值設為 5 秒,則可能需要更長一點的時間才能收到快訊)。
針對使用者會花費大量時間的地點 (例如住家或公司),使用較大的地理圍欄半徑。儘管較大的半徑範圍不會直接降低耗電量,卻能減少應用程式檢查進入或離開事件的頻率,藉此有效降低整體耗電量。
為地理圍欄選擇最合適的半徑範圍
為獲得最佳成果,地理圍欄的最小半徑範圍應設為介於 100 至 150 公尺之間。如果能夠連上 Wi-Fi 網路,則定位精確度通常會介於 20 至 50 公尺之間。要是能提供室內位置資訊,則精確度範圍可縮小至 5 公尺。除非您知道系統可提供地理圍欄內的室內位置資訊,否則請假定 Wi-Fi 定位精確度約為 50 公尺。
如果系統無法提供 Wi-Fi 位置資訊 (例如在鄉村地區開車時),定位精確度就會降低。精確度範圍可擴大到數百公尺至數公里。在此情況下,您應使用較大的半徑範圍來建立地理圍欄。
向使用者說明應用程式使用地理圍欄的原因
由於應用程式會於使用地理圍欄時在背景存取位置資訊,請考慮應用程式可為使用者提供哪些好處。請向他們清楚說明應用程式為何需要這項存取權,讓使用者更容易理解,同時也能提升資訊透明度。
如要進一步瞭解位置存取權相關的最佳做法 (包括地理圍欄),請參閱隱私權最佳做法頁面的說明。
利用停留轉換類型來減少垃圾快訊
如果您在開車短暫經過地理圍欄時收到大量快訊,要減少這類快訊的最佳做法就是使用
GEOFENCE_TRANSITION_DWELL (而不是
GEOFENCE_TRANSITION_ENTER) 轉換類型。這樣一來,只有在使用者於地理圍欄內停留一段指定時間後,系統才會傳送停留快訊。您可以透過設定滯留延遲來選擇時間長度。
僅在必要情況下重新註冊地理圍欄
已註冊的地理圍欄會保存在 com.google.android.gms 套件所擁有的 com.google.process.location 程序中。由於系統會在下列事件發生後還原地理圍欄,因此應用程式不需要執行任何動作來處理這些事件,:
- Google Play 服務已升級,
- 系統因資源限制而終止並重新啟動 Google Play 服務。
- 位置資訊處理程序異常終止。
由於系統無法在下列情況下復原地理圍欄,因此在下列事件發生後,如果應用程式仍需要使用地理圍欄,就必須重新註冊:
- 裝置已重新啟動。應用程式應監聽裝置的啟動完成動作,然後重新註冊所需的地理圍欄。
- 應用程式在解除安裝後重新安裝。
- 應用程式的資料遭到清除。
- Google Play 服務資料遭到清除。
- 應用程式收到
GEOFENCE_NOT_AVAILABLE快訊。這種情況通常會在停用 NLP (Android 的網路位置供應商) 後發生。
地理圍欄進入事件的疑難排解
如果裝置在進入地理圍欄時未觸發地理圍欄 (亦即未觸發
GEOFENCE_TRANSITION_ENTER 快訊),請先確認地理圍欄是否已按照本指南的說明正確註冊。
快訊無法正常運作的可能原因如下:
- 地理圍欄無法精確定位,或地理圍欄過小。在多數裝置上,地理圍欄服務只會使用網路位置資訊來觸發地理圍欄。這項服務採用此方法的原因是,網路位置資訊耗電量少得多,取得個別位置所需的時間較短,而且最重要的是能夠取得室內位置資訊。
裝置的 Wi-Fi 連線已關閉。開啟 Wi-Fi 可大幅提升定位精確度,因此在 Wi-Fi 關閉的情況下,應用程式可能會礙於包括地理圍欄半徑、裝置型號或 Android 版本在內的各項設定而無法取得地理圍欄快訊。從 Android 4.3 (API 級別 18) 開始,我們新增了「僅限 Wi-Fi 掃描模式」功能,讓使用者在停用 Wi-Fi 的情況下仍能取得精確的網路位置資訊。因此,如果 Wi-Fi 和僅限 Wi-Fi 掃描模式功能都已停用,建議您提示使用者並提供捷徑,讓他們啟用其中一項功能。請使用 SettingsClient 確保裝置的系統設定正確無誤,以準確偵測位置。
注意: 如果應用程式指定的是 Android 10 (API 級別 29) 以上版本,則除非應用程式為系統應用程式或裝置政策控制器 (DPC),否則您無法直接呼叫
WifiManager.setEnabled(),而必須改用設定面板。- 地理圍欄內沒有穩定可靠的網路連線。沒有穩定可靠的數據連線,系統就可能無法產生快訊。這是因為地理圍欄服務必須仰賴網路位置供應商才能順利運作,而網路位置供應商則需要使用數據連線。
- 快訊可能會延遲。地理圍欄服務不會持續查詢位置資訊,因此接收快訊的時間稍有延遲為正常現象。延遲時間通常不會超過 2 分鐘,且當裝置持續移動時甚至更短。如果背景位置資訊限制處於有效狀態,則平均延遲時間為 2 至 3 分鐘。如果裝置長時間處於靜止狀態,延遲時間可能會加長 (最多 6 分鐘)。
其他資源
如要進一步瞭解地理圍欄,請參閱下列資料:
範例
歡迎查看 範例應用程式,瞭解如何建立及監控地理圍欄。