
অ্যান্ড্রয়েড ডিবাগ ব্রিজ ( adb ) একটি বহুমুখী কমান্ড-লাইন টুল যা আপনাকে একটি ডিভাইসের সাথে যোগাযোগ করতে দেয়। adb কমান্ডটি ডিভাইসের বিভিন্ন কাজ, যেমন অ্যাপ ইনস্টল করা এবং ডিবাগ করা সহজ করে তোলে। adb একটি ইউনিক্স শেল-এ অ্যাক্সেস দেয় যা ব্যবহার করে আপনি ডিভাইসে বিভিন্ন কমান্ড চালাতে পারেন। এটি একটি ক্লায়েন্ট-সার্ভার প্রোগ্রাম যার তিনটি উপাদান রয়েছে:
- একটি ক্লায়েন্ট , যা কমান্ড পাঠায়। ক্লায়েন্টটি আপনার ডেভেলপমেন্ট মেশিনে চলে। আপনি একটি কমান্ড-লাইন টার্মিনাল থেকে ‘
adbকমান্ড দিয়ে ক্লায়েন্টটিকে চালু করতে পারেন। - একটি ডেমন (adbd) , যা ডিভাইসে কমান্ড চালায়। ডেমনটি প্রতিটি ডিভাইসে একটি ব্যাকগ্রাউন্ড প্রসেস হিসেবে চলে।
- একটি সার্ভার , যা ক্লায়েন্ট এবং ডেমন-এর মধ্যে যোগাযোগ পরিচালনা করে। সার্ভারটি আপনার ডেভেলপমেন্ট মেশিনে একটি ব্যাকগ্রাউন্ড প্রসেস হিসেবে চলে।
adb অ্যান্ড্রয়েড এসডিকে প্ল্যাটফর্ম টুলস প্যাকেজের অন্তর্ভুক্ত। এসডিকে ম্যানেজার ব্যবহার করে এই প্যাকেজটি ডাউনলোড করুন, যা এটিকে android_sdk /platform-tools/ ইনস্টল করে। আপনি যদি স্বতন্ত্র অ্যান্ড্রয়েড এসডিকে প্ল্যাটফর্ম টুলস প্যাকেজটি চান, তবে এটি এখান থেকে ডাউনলোড করুন ।
adb মাধ্যমে ব্যবহারের জন্য কোনো ডিভাইস সংযোগ করার বিষয়ে তথ্যের জন্য, যার মধ্যে সাধারণ সমস্যা সমাধানের জন্য কানেকশন অ্যাসিস্ট্যান্ট কীভাবে ব্যবহার করতে হয় তাও অন্তর্ভুক্ত, “Run apps on a hardware device” দেখুন।
এডিবি কীভাবে কাজ করে
যখন আপনি একটি adb ক্লায়েন্ট চালু করেন, তখন ক্লায়েন্টটি প্রথমে পরীক্ষা করে দেখে যে আগে থেকেই কোনো adb সার্ভার প্রসেস চলছে কিনা। যদি না চলে, তবে এটি সার্ভার প্রসেসটি চালু করে। সার্ভারটি চালু হলে, এটি স্থানীয় TCP পোর্ট 5037-এর সাথে সংযুক্ত হয় এবং adb ক্লায়েন্টদের পাঠানো কমান্ড শোনার জন্য অপেক্ষা করে।
দ্রষ্টব্য: সকল adb ক্লায়েন্ট adb সার্ভারের সাথে যোগাযোগের জন্য ৫০৩৭ পোর্ট ব্যবহার করে।
এরপর সার্ভারটি চলমান সমস্ত ডিভাইসের সাথে সংযোগ স্থাপন করে। এটি 5555 থেকে 5585 পরিসরের মধ্যে থাকা বিজোড় সংখ্যার পোর্টগুলো স্ক্যান করে এমুলেটরগুলো খুঁজে বের করে, যা প্রথম ১৬টি এমুলেটর ব্যবহার করে। যেখানে সার্ভারটি একটি adb ডেমন (adbd) খুঁজে পায়, সেখানে এটি সেই পোর্টের সাথে একটি সংযোগ স্থাপন করে।
প্রতিটি এমুলেটর একজোড়া ধারাবাহিক পোর্ট ব্যবহার করে — কনসোল সংযোগের জন্য একটি জোড় সংখ্যার পোর্ট এবং adb সংযোগের জন্য একটি বিজোড় সংখ্যার পোর্ট। উদাহরণস্বরূপ:
এমুলেটর ১, কনসোল: ৫৫৫৪
এমুলেটর ১, adb : ৫৫৫৫
এমুলেটর ২, কনসোল: ৫৫৫৬
এমুলেটর ২, adb : ৫৫৫৭
এবং আরও অনেক কিছু।
যেমনটি দেখানো হয়েছে, ৫৫৫৫ পোর্টে adb এর সাথে সংযুক্ত এমুলেটরটি সেই এমুলেটরেরই অনুরূপ, যার কনসোল ৫৫৫৪ পোর্টে শোনে।
সার্ভার একবার সমস্ত ডিভাইসের সাথে সংযোগ স্থাপন করে ফেললে, আপনি adb কমান্ড ব্যবহার করে সেই ডিভাইসগুলো অ্যাক্সেস করতে পারবেন। যেহেতু সার্ভার ডিভাইসগুলোর সাথে সংযোগ পরিচালনা করে এবং একাধিক adb ক্লায়েন্টের কমান্ডগুলো সামলায়, তাই আপনি যেকোনো ক্লায়েন্ট বা স্ক্রিপ্ট থেকে যেকোনো ডিভাইস নিয়ন্ত্রণ করতে পারেন।
আপনার ডিভাইসে adb ডিবাগিং চালু করুন।
USB-এর মাধ্যমে সংযুক্ত কোনো ডিভাইসের সাথে adb ব্যবহার করতে হলে, আপনাকে ডিভাইসের সিস্টেম সেটিংসে, ডেভেলপার অপশন-এর অধীনে USB ডিবাগিং চালু করতে হবে। Android 4.2 (API লেভেল 17) এবং এর পরবর্তী সংস্করণগুলিতে, ডেভেলপার অপশন স্ক্রিনটি ডিফল্টরূপে লুকানো থাকে। এটিকে দৃশ্যমান করতে, ডেভেলপার অপশন চালু করুন।
এখন আপনি আপনার ডিভাইসটি USB-এর মাধ্যমে সংযুক্ত করতে পারেন। android_sdk /platform-tools/ ডিরেক্টরি থেকে adb devices কমান্ডটি চালিয়ে আপনি আপনার ডিভাইসটি সংযুক্ত হয়েছে কিনা তা যাচাই করতে পারেন। সংযুক্ত থাকলে, আপনি ডিভাইসের নামটি "device" হিসেবে তালিকাভুক্ত দেখতে পাবেন।
দ্রষ্টব্য: আপনি যখন অ্যান্ড্রয়েড ৪.২.২ (এপিআই লেভেল ১৭) বা তার চেয়ে উন্নত সংস্করণের কোনো ডিভাইস সংযোগ করেন, তখন সিস্টেম একটি ডায়ালগ বক্স দেখায়, যেখানে জিজ্ঞাসা করা হয় যে আপনি একটি আরএসএ (RSA) কী গ্রহণ করবেন কি না, যা এই কম্পিউটারের মাধ্যমে ডিবাগিং করার সুযোগ দেয়। এই নিরাপত্তা ব্যবস্থাটি ব্যবহারকারীর ডিভাইসকে সুরক্ষিত রাখে, কারণ এটি নিশ্চিত করে যে, আপনি ডিভাইসটি আনলক করে ডায়ালগ বক্সে সম্মতি না দেওয়া পর্যন্ত ইউএসবি ডিবাগিং এবং অন্যান্য এডিবি (adb) কমান্ড চালানো যাবে না।
ইউএসবি-র মাধ্যমে কোনো ডিভাইসের সাথে সংযোগ স্থাপন সম্পর্কে আরও তথ্যের জন্য, ‘হার্ডওয়্যার ডিভাইসে অ্যাপ চালান’ পড়ুন।
ওয়াই-ফাই এর মাধ্যমে একটি ডিভাইসের সাথে সংযোগ করুন
দ্রষ্টব্য: নিচের নির্দেশাবলী Android 11 (API লেভেল 30) চালিত Wear ডিভাইসগুলির জন্য প্রযোজ্য নয়। আরও তথ্যের জন্য Wear OS অ্যাপ ডিবাগ করার নির্দেশিকাটি দেখুন।
অ্যান্ড্রয়েড ১১ (এপিআই লেভেল ৩০) এবং এর পরবর্তী সংস্করণগুলো অ্যান্ড্রয়েড ডিবাগ ব্রিজ (adb) ব্যবহার করে আপনার ওয়ার্কস্টেশন থেকে ওয়্যারলেসভাবে অ্যাপ ডেপ্লয় এবং ডিবাগ করা সমর্থন করে। উদাহরণস্বরূপ, আপনি আপনার ডিভাইসটিকে ইউএসবি-র মাধ্যমে সরাসরি সংযোগ না করেই একাধিক রিমোট ডিভাইসে আপনার ডিবাগযোগ্য অ্যাপ ডেপ্লয় করতে পারেন। এর ফলে ড্রাইভার ইনস্টলেশনের মতো সাধারণ ইউএসবি সংযোগ সংক্রান্ত সমস্যাগুলো মোকাবেলা করার প্রয়োজন হয় না।
অ্যান্ড্রয়েড ১৭-এর সাথে adb 37.0.0 যুক্ত হয়েছে এবং এতে adb Wi-Fi 2.0 আনা হয়েছে, যা পূর্ববর্তী সংস্করণের ব্যবহারযোগ্যতার অনেক সমস্যার সমাধান করে। উল্লেখযোগ্যভাবে, ডিভাইসটি যখন কোনো ওয়্যারলেস ডিবাগিং বিশ্বস্ত নেটওয়ার্কের সাথে সংযুক্ত হবে, তখন এটি স্বয়ংক্রিয়ভাবে ওয়ার্কস্টেশনের সাথে যুক্ত হয়ে যাবে।
ওয়্যারলেস ডিবাগিং ব্যবহার শুরু করার আগে, নিম্নলিখিত কাজগুলো করুন:
আপনার ওয়ার্কস্টেশন এবং ডিভাইস একই ওয়্যারলেস নেটওয়ার্কে সংযুক্ত আছে কিনা, তা নিশ্চিত করুন।
নিশ্চিত করুন যে আপনার ফোনে অ্যান্ড্রয়েড ১১ (এপিআই লেভেল ৩০) বা তার উচ্চতর সংস্করণ এবং টিভি ও WearOS-এ অ্যান্ড্রয়েড ১৩ (এপিআই লেভেল ৩৩) বা তার উচ্চতর সংস্করণ চলছে। আরও তথ্যের জন্য, আপনার অ্যান্ড্রয়েড সংস্করণ পরীক্ষা ও আপডেট করুন দেখুন।
আপনার ওয়ার্কস্টেশনে SDK প্ল্যাটফর্ম টুলস- এর সর্বশেষ সংস্করণে আপডেট করুন।
ওয়্যারলেস ডিবাগিং ব্যবহার করার জন্য, আপনাকে অবশ্যই একটি QR কোড বা পেয়ারিং কোড ব্যবহার করে আপনার ডিভাইসটিকে আপনার ওয়ার্কস্টেশনের সাথে পেয়ার করতে হবে। আপনার ওয়ার্কস্টেশন এবং ডিভাইস অবশ্যই একই ওয়্যারলেস নেটওয়ার্কে সংযুক্ত থাকতে হবে। আপনার ডিভাইসটি পেয়ার করতে, এই ধাপগুলো অনুসরণ করুন:
দ্রষ্টব্য: আপনাকে আপনার ডিভাইসটি আপনার ওয়ার্কস্টেশনের সাথে শুধুমাত্র একবারই পেয়ার করতে হবে। যতক্ষণ না আপনি স্পষ্টভাবে ডিভাইসটিকে ফরগেট করছেন বা আপনার ডিভাইস থেকে adb ডিবাগিং অনুমোদন প্রত্যাহার করছেন, ততক্ষণ পর্যন্ত এটি আপনার ওয়ার্কস্টেশনের সাথে পেয়ার করা থাকবে। ডিভাইস এবং ওয়ার্কস্টেশন একই নেটওয়ার্কে থাকলে স্বয়ংক্রিয়ভাবে সংযুক্ত হয়ে যাবে।
আপনার ডিভাইসে ডেভেলপার অপশন চালু করুন ।
আপনার ডিভাইসে, ওয়্যারলেস ডিবাগিং-এ ট্যাপ করুন:
 চিত্র ১. গুগল পিক্সেল ফোনের ওয়্যারলেস ডিবাগিং প্রম্পট ।
আপনার নেটওয়ার্কে ওয়্যারলেস ডিবাগিংয়ের অনুমতি দিন। মনে রাখবেন, ‘এই নেটওয়ার্কে সর্বদা অনুমতি দিন’ চেকবক্সটিতে ক্লিক করলে নেটওয়ার্কটি একটি বিশ্বস্ত ওয়্যারলেস ডিবাগিং নেটওয়ার্ক হিসেবে গণ্য হয়। আপনার ডিভাইসটি নেটওয়ার্কের সাথে সংযুক্ত হওয়ার সাথে সাথেই এই নেটওয়ার্কে ওয়্যারলেস ডিবাগিংয়ের অনুমতি দেবে।
আপনার ডিভাইসে, পেয়ারিং কোড ব্যবহার করে পেয়ার নির্বাচন করুন এবং ডিভাইসে প্রদর্শিত আইপি অ্যাড্রেস, পোর্ট নম্বর ও পেয়ারিং কোডটি লিখে রাখুন।
আপনার ওয়ার্কস্টেশনে একটি টার্মিনাল উইন্ডো খুলুন এবং
android_sdk/platform-tools-এ যান।আপনার ওয়ার্কস্টেশনের টার্মিনালে,
adb pair ipaddr:portচালান। উপরে উল্লিখিত আইপি অ্যাড্রেস এবং পোর্ট নম্বর ব্যবহার করুন।নির্দেশিত হলে, নিচে দেখানো অনুযায়ী পেয়ারিং কোডটি প্রবেশ করান।
 চিত্র ৩। একটি বার্তা নির্দেশ করছে যে আপনার ডিভাইসটি সফলভাবে জোড়া লাগানো হয়েছে।
আপনার ডিভাইসটি পেয়ার করার পর, ডিভাইসটি সংযুক্ত আছে কিনা তা যাচাই করুন। এখন আপনি ইউএসবি সংযোগের মতোই আপনার ডিভাইসটি ওয়্যারলেসভাবে ব্যবহার করতে পারবেন।
আপনার ওয়ার্কস্টেশন আনপেয়ার করতে, আপনার ডিভাইসে ওয়্যারলেস ডিবাগিং- এ যান। পেয়ার করা ডিভাইসগুলোর নিচে আপনার ওয়ার্কস্টেশনের নামে ট্যাপ করুন এবং 'Forget' নির্বাচন করুন। বিকল্পভাবে, আপনি আপনার ডিভাইসের সেটিংস পৃষ্ঠায় ' Revoke adb debugging authorizations'- এ ক্লিক করে আপনার ওয়ার্কস্টেশন এবং পূর্বে পেয়ার করা অন্য সব ওয়ার্কস্টেশন আনপেয়ার করতে পারেন।
যদি আপনি দ্রুত ওয়্যারলেস ডিবাগিং চালু এবং বন্ধ করতে চান, তাহলে আপনি ডেভেলপার অপশন > কুইক সেটিংস ডেভেলপার টাইলস- এ থাকা ওয়্যারলেস ডিবাগিং- এর জন্য কুইক সেটিংস ডেভেলপার টাইলস ব্যবহার করতে পারেন।
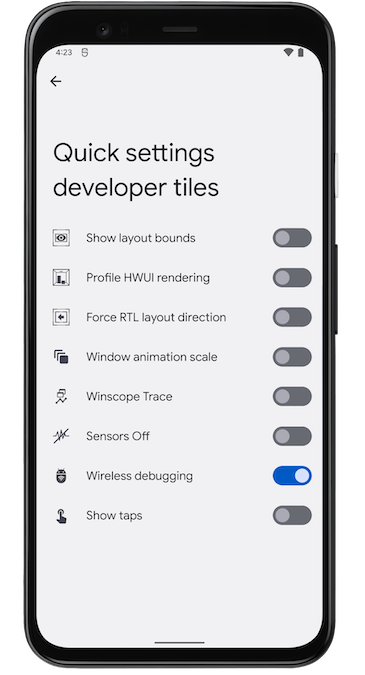 চিত্র ৪। কুইক সেটিংস ডেভেলপার টাইলস সেটিং আপনাকে দ্রুত ওয়্যারলেস ডিবাগিং চালু এবং বন্ধ করতে দেয়।

দ্রষ্টব্য: অ্যান্ড্রয়েড স্টুডিও ব্যবহারকারীরা একটি QR কোডের মাধ্যমে তাদের ডিভাইস পেয়ার করতে পারেন। এর জন্য, অ্যান্ড্রয়েড স্টুডিও-এর 'Pair devices over Wi-Fi' ডায়ালগ থেকে প্রাপ্ত QR কোডটি নির্বাচন করে স্ক্যান করুন।
ওয়্যারলেস সংযোগের সমস্যা সমাধান করুন
আপনার ডিভাইসে ওয়্যারলেসভাবে সংযোগ করতে সমস্যা হলে, সমস্যাটি সমাধান করতে নিম্নলিখিত ধাপগুলো অনুসরণ করুন।
আপনার ওয়ার্কস্টেশন এবং ডিভাইসটি পূর্বশর্তগুলো পূরণ করে কিনা তা যাচাই করুন।
ওয়ার্কস্টেশন এবং ডিভাইসটি এই বিভাগের শুরুতে তালিকাভুক্ত পূর্বশর্তগুলো পূরণ করে কিনা তা যাচাই করুন।
আপনার ওয়ার্কস্টেশনে adb সেটআপ সঠিক আছে কিনা তা পরীক্ষা করুন।
আপনার ওয়ার্কস্টেশনে ADB সেটআপ সঠিক আছে কিনা তা যাচাই করতে, আপনার ওয়ার্কস্টেশনে একটি টার্মিনাল খুলুন এবং adb server-status কমান্ডটি দিন। আউটপুটে নিম্নলিখিতটি দেখাচ্ছে কিনা তা যাচাই করুন:
-
version: "37.0.0"বা উচ্চতর: যদি তা না হয়, তাহলে SDK প্ল্যাটফর্ম টুলস -এর সর্বশেষ সংস্করণটি ডাউনলোড করুন। -
mdns_enabled: true: যদি এটিfalseসেট করা থাকে, তাহলে adb আপনার নেটওয়ার্কে ডিভাইসগুলি স্বয়ংক্রিয়ভাবে খুঁজে বের করতে পারবে না। এই সমস্যাটি সমাধান করতে, আপনাকে অবশ্যইADB_MDNSএনভায়রনমেন্ট ভেরিয়েবলটি1এ সেট করতে হবে এবং তারপরেadb kill-serverএবং তারপরadb start-serverচালিয়ে adb সার্ভারটি পুনরায় চালু করতে হবে। -
mdns_backend: LIBADBMDNS: যদি এমনটা না হয়, তাহলে adb আপনার নেটওয়ার্কে ডিভাইসগুলো স্বয়ংক্রিয়ভাবে খুঁজে বের করার জন্য একটি অপ্রচলিত লাইব্রেরি ব্যবহার করছে। এই সমস্যাটি সমাধান করতে, আপনাকে অবশ্যইADB_MDNS_OPENSCREENএনভায়রনমেন্ট ভেরিয়েবলটির মান0সেট করতে হবে এবং তারপরadb kill-serverওadb start-serverকমান্ড চালিয়ে adb সার্ভারটি পুনরায় চালু করতে হবে।
আপনার নেটওয়ার্ক mDNS সমর্থন করে কিনা তা পরীক্ষা করুন।
পেয়ার করা ডিভাইসগুলো স্বয়ংক্রিয়ভাবে খুঁজে বের করতে ও সেগুলোর সাথে সংযোগ স্থাপন করতে adb, mDNS-এর উপর নির্ভর করে। আপনার নেটওয়ার্ক mDNS সমর্থন করে কিনা তা পরীক্ষা করতে, নিম্নলিখিত পদক্ষেপগুলো অনুসরণ করুন:
আপনার ডিভাইসে, 'ওয়াই-ফাই এর মাধ্যমে কোনো ডিভাইসের সাথে সংযোগ করুন' বিভাগে বর্ণিত পদ্ধতি অনুযায়ী ওয়্যারলেস ডিবাগিং চালু করুন।
আপনার ওয়ার্কস্টেশনে একটি টার্মিনাল খুলুন এবং
adb mdns track-services --proto-text. কমান্ডটি প্রবেশ করান।যাচাই করুন যে আউটপুটটি খালি নয় এবং এতে আপনার ডিভাইসের আইপি অ্যাড্রেস ও পোর্ট নম্বরসহ একটি টিএলএস সার্ভিস রয়েছে। যদি আউটপুটটি খালি থাকে, তাহলে আপনার নেটওয়ার্ক mDNS সাপোর্ট করে না। উদাহরণ আউটপুট:
tls {
  service {
    instance: "adb-35121FDJH000R8-xyMD0H"
    service: "_adb-tls-connect._tcp"
    ipv4: "192.168.84.23"
    ipv6: "fe80:0:0:0:fc7a:299d:8d38:6c1c"
    port: 37895
    product_model: "Pixel 8"
    build_version_sdk_full: "37.0"
    given_name: "sherifeid Pixel"
    serial: "35121FDJH000R8"
    mdns_service_version: "2.0"
    hostname: "Android_CXUKYJY1.local"
  }
}
আপনার ডিভাইসটি এডিবি ওয়াই-ফাই ২.০ সমর্থন করে কিনা তা পরীক্ষা করুন।
দ্রষ্টব্য: ADB Wi-Fi 2.0 অ্যান্ড্রয়েড ১৭ এবং এর পরবর্তী সংস্করণগুলোতে সমর্থিত।
আপনার ডিভাইসটি এডিবি ওয়াই-ফাই ২.০ সমর্থন করে কিনা তা পরীক্ষা করতে, নিম্নলিখিতগুলি করুন:
আপনার ডিভাইসে, 'ওয়াই-ফাই এর মাধ্যমে কোনো ডিভাইসের সাথে সংযোগ করুন' বিভাগে বর্ণিত পদ্ধতি অনুযায়ী ওয়্যারলেস ডিবাগিং চালু করুন।
আপনার ওয়ার্কস্টেশনে একটি টার্মিনাল খুলুন এবং
adb mdns track-services --proto-text. কমান্ডটি প্রবেশ করান।আউটপুটে
mdns_service_version: "2.0"বা তার বেশি আছে কিনা তা যাচাই করুন। যদি তা না থাকে, তাহলে আপনার ডিভাইসটি অ্যান্ড্রয়েড ১৭ বা তার উচ্চতর সংস্করণে চলছে না এবং এটি ADB Wi-Fi 2.0 সমর্থন করে না। অ্যান্ড্রয়েড ১৭ বা তার উচ্চতর সংস্করণে আপডেট করতে, আপনার ডিভাইসে কোনো পেন্ডিং সিস্টেম আপডেট আছে কিনা তা পরীক্ষা করুন। আপনার অ্যান্ড্রয়েড সংস্করণ পরীক্ষা ও আপডেট করুন ।
একটি নতুন সমস্যা রিপোর্ট করুন
আপনার ডিভাইসে ওয়্যারলেসভাবে সংযোগ করতে এখনও সমস্যা হলে, আপনি একটি নতুন সমস্যা জানাতে পারেন। অনুগ্রহ করে আপনার রিপোর্টে নিম্নলিখিত তথ্যগুলো প্রদান করুন:
- আপনার ডিভাইসের লগ: সমস্যাটি পুনরায় তৈরি করুন এবং ডিভাইসের লগগুলো সংযুক্ত করুন।
- আপনার ওয়ার্কস্টেশনে adb থেকে প্রাপ্ত লগগুলি:
-
ADB_TRACE=allএনভায়রনমেন্ট ভেরিয়েবলটি সেট করুন । -
adb kill-serverএবং তারপরadb start-serverকমান্ড চালিয়ে adb সার্ভারটি পুনরায় চালু করুন । - সমস্যাটি পুনরায় সৃষ্টি করুন।
- লগ ফাইলগুলো খুঁজুন:
adb server-statusচালান এবং আউটপুটেরlog_absolute_pathএ উল্লেখিত লগ ফাইলটি সংযুক্ত করুন।
-
প্রাথমিক USB সংযোগের পর ডিভাইসের সাথে ওয়্যারলেসভাবে সংযুক্ত হন (এই বিকল্পটি শুধুমাত্র Android 10 এবং এর নিচের সংস্করণগুলিতে উপলব্ধ)
দ্রষ্টব্য: এই কার্যপ্রণালীটি অ্যান্ড্রয়েড ১১ (এবং এর পরবর্তী সংস্করণ)-এর ক্ষেত্রেও প্রযোজ্য, তবে শর্ত হলো এতে ফিজিক্যাল ইউএসবি-র মাধ্যমে একটি *প্রাথমিক* সংযোগও জড়িত থাকে।
দ্রষ্টব্য: নিম্নলিখিত নির্দেশাবলী Android 10 (API লেভেল 29) বা তার নিম্নতর সংস্করণে চালিত Wear ডিভাইসগুলির জন্য প্রযোজ্য নয়। আরও তথ্যের জন্য Wear OS অ্যাপ ডিবাগ করার নির্দেশিকাটি দেখুন।
adb সাধারণত USB-এর মাধ্যমে ডিভাইসের সাথে যোগাযোগ করে, কিন্তু আপনি Wi-Fi-এর মাধ্যমেও adb ব্যবহার করতে পারেন। Android 10 (API লেভেল 29) বা তার নিচের সংস্করণে চালিত কোনো ডিভাইস সংযোগ করতে, USB-এর মাধ্যমে এই প্রাথমিক ধাপগুলো অনুসরণ করুন:
- আপনার অ্যান্ড্রয়েড ডিভাইস এবং
adbহোস্ট কম্পিউটারকে একটি সাধারণ ওয়াই-ফাই নেটওয়ার্কে সংযুক্ত করুন। - ডিভাইসটিকে একটি ইউএসবি ক্যাবলের মাধ্যমে হোস্ট কম্পিউটারের সাথে সংযুক্ত করুন।
- টার্গেট ডিভাইসটিকে পোর্ট 5555-এ একটি TCP/IP সংযোগের জন্য লিসেন করতে সেট করুন:
adb tcpip 5555
- টার্গেট ডিভাইস থেকে ইউএসবি কেবলটি বিচ্ছিন্ন করুন।
- অ্যান্ড্রয়েড ডিভাইসটির আইপি অ্যাড্রেসটি খুঁজুন। উদাহরণস্বরূপ, একটি নেক্সাস ডিভাইসে, আপনি সেটিংস > ট্যাবলেট সম্পর্কে (বা ফোন সম্পর্কে ) > স্ট্যাটাস > আইপি অ্যাড্রেস- এ আইপি অ্যাড্রেসটি খুঁজে পেতে পারেন।
- ডিভাইসটির আইপি অ্যাড্রেস দিয়ে সংযোগ করুন:
adb connect device_ip_address:5555
- আপনার হোস্ট কম্পিউটারটি টার্গেট ডিভাইসের সাথে সংযুক্ত আছে কিনা তা নিশ্চিত করুন:
$ adb devices
List of devices attached
device_ip_address:5555 device
দ্রষ্টব্য: মনে রাখবেন যে সব অ্যাক্সেস পয়েন্ট উপযুক্ত নয়। আপনার এমন একটি অ্যাক্সেস পয়েন্ট ব্যবহার করার প্রয়োজন হতে পারে যার ফায়ারওয়াল adb সমর্থন করার জন্য সঠিকভাবে কনফিগার করা আছে।
আপনার ডিভাইসটি এখন adb এর সাথে সংযুক্ত হয়েছে।
যদি আপনার ডিভাইসের সাথে adb সংযোগ বিচ্ছিন্ন হয়ে যায়:
- নিশ্চিত করুন যে আপনার হোস্ট আপনার অ্যান্ড্রয়েড ডিভাইসের মতো একই ওয়াই-ফাই নেটওয়ার্কে সংযুক্ত আছে।
-
adb connectধাপটি পুনরায় সম্পাদন করে পুনরায় সংযোগ করুন। - যদি তাতেও কাজ না হয়, আপনার
adbhost রিসেট করুন:adb kill-server
তারপর একেবারে শুরু থেকে আবার শুরু করুন।
ডিভাইসগুলির জন্য অনুসন্ধান করুন
adb কমান্ড দেওয়ার আগে, কোন ডিভাইস ইনস্ট্যান্সগুলো adb সার্ভারের সাথে সংযুক্ত আছে তা জানা সহায়ক। devices কমান্ড ব্যবহার করে সংযুক্ত ডিভাইসগুলোর একটি তালিকা তৈরি করুন:
adb devices -l
এর জবাবে, adb প্রতিটি ডিভাইসের জন্য এই স্থিতির তথ্য প্রিন্ট করে:
- সিরিয়াল নম্বর:
adbডিভাইসটিকে তার পোর্ট নম্বর দ্বারা অনন্যভাবে শনাক্ত করার জন্য একটি স্ট্রিং তৈরি করে। এখানে একটি সিরিয়াল নম্বরের উদাহরণ দেওয়া হলো:emulator-5554 - অবস্থা: ডিভাইসটির সংযোগ অবস্থা নিম্নলিখিতগুলির মধ্যে একটি হতে পারে:
-
offline: ডিভাইসটিadbএর সাথে সংযুক্ত নয় অথবা সাড়া দিচ্ছে না। -
device: ডিভাইসটিadbসার্ভারের সাথে সংযুক্ত আছে। উল্লেখ্য যে, এই অবস্থাটির অর্থ এই নয় যে অ্যান্ড্রয়েড সিস্টেমটি সম্পূর্ণরূপে বুট হয়ে চালু হয়েছে, কারণ সিস্টেমটি বুট হওয়ার সময়েই ডিভাইসটিadbএর সাথে সংযুক্ত হয়। বুট-আপের পর, এটিই একটি ডিভাইসের স্বাভাবিক কার্যক্ষম অবস্থা। -
no deviceসংযুক্ত নেই।
-
- বিবরণ: আপনি যদি
-lঅপশনটি অন্তর্ভুক্ত করেন, তাহলেdevicesকমান্ডটি আপনাকে বলে দেবে ডিভাইসটি কী। একাধিক ডিভাইস সংযুক্ত থাকলে এই তথ্যটি সহায়ক হয়, যাতে আপনি সেগুলোকে আলাদাভাবে চিনতে পারেন।
নিম্নলিখিত উদাহরণে ` devices কমান্ড এবং এর আউটপুট দেখানো হয়েছে। এখানে তিনটি ডিভাইস চালু আছে। তালিকার প্রথম দুটি লাইন হলো এমুলেটর, এবং তৃতীয় লাইনটি হলো কম্পিউটারের সাথে সংযুক্ত একটি হার্ডওয়্যার ডিভাইস।
$ adb devices
List of devices attached
emulator-5556 device product:sdk_google_phone_x86_64 model:Android_SDK_built_for_x86_64 device:generic_x86_64
emulator-5554 device product:sdk_google_phone_x86 model:Android_SDK_built_for_x86 device:generic_x86
0a388e93      device usb:1-1 product:razor model:Nexus_7 device:flo
এমুলেটর তালিকাভুক্ত নয়
adb devices কমান্ডটির একটি ব্যতিক্রমী কমান্ড সিকোয়েন্স রয়েছে, যার কারণে চলমান এমুলেটরগুলো আপনার ডেস্কটপে দৃশ্যমান থাকা সত্ত্বেও adb devices আউটপুটে প্রদর্শিত হয় না। এটি তখন ঘটে যখন নিম্নলিখিত সমস্ত শর্ত সত্য হয়:
-
adbসার্ভারটি চালু নেই। - আপনি
emulatorকমান্ডের সাথে-portঅথবা-portsঅপশনটি ব্যবহার করবেন এবং পোর্টের মান হিসেবে 5554 থেকে 5584-এর মধ্যে একটি বিজোড় সংখ্যা বেছে নেবেন। - আপনার বেছে নেওয়া বিজোড় সংখ্যার পোর্টটি ব্যস্ত নয়, তাই নির্দিষ্ট পোর্ট নম্বরে সংযোগ স্থাপন করা যেতে পারে — অথবা, যদি সেটি ব্যস্ত থাকে, তবে এমুলেটরটি ২ নং-এ উল্লেখিত শর্ত পূরণ করে এমন অন্য একটি পোর্টে চলে যায়।
- এমুলেটর চালু করার পর আপনি
adbসার্ভারটি চালু করবেন।
এই পরিস্থিতি এড়ানোর একটি উপায় হলো এমুলেটরকে তার নিজের পোর্ট বেছে নিতে দেওয়া এবং একসাথে ১৬টির বেশি এমুলেটর না চালানো। আরেকটি উপায় হলো, নিম্নলিখিত উদাহরণগুলিতে যেমন ব্যাখ্যা করা হয়েছে, emulator কমান্ড ব্যবহার করার আগে সর্বদা adb সার্ভার চালু করা।
উদাহরণ ১: নিচের কমান্ড অনুক্রমে, adb devices কমান্ডটি adb সার্ভার চালু করে, কিন্তু ডিভাইসগুলোর তালিকা দেখা যায় না।
adb সার্ভারটি বন্ধ করুন এবং দেখানো ক্রমানুসারে নিম্নলিখিত কমান্ডগুলি প্রবেশ করান। AVD নামের জন্য, আপনার সিস্টেম থেকে একটি বৈধ AVD নাম দিন। AVD নামগুলির একটি তালিকা পেতে, emulator -list-avds টাইপ করুন। emulator কমান্ডটি android_sdk /tools ডিরেক্টরিতে রয়েছে।
$ adb kill-server
$ emulator -avd Nexus_6_API_25 -port 5555
$ adb devices

List of devices attached
* daemon not running. starting it now on port 5037 *
* daemon started successfully *
উদাহরণ ২: নিম্নলিখিত কমান্ড অনুক্রমে, adb devices ডিভাইসগুলির তালিকা প্রদর্শন করে, কারণ adb সার্ভারটি প্রথমে চালু করা হয়েছিল।
adb devices আউটপুটে এমুলেটরটি দেখতে, adb সার্ভারটি বন্ধ করুন, এবং তারপর emulator কমান্ডটি ব্যবহার করার পরে ও adb devices কমান্ডটি ব্যবহার করার আগে, নিম্নরূপভাবে এটি আবার চালু করুন:
$ adb kill-server
$ emulator -avd Nexus_6_API_25 -port 5557
$ adb start-server
$ adb devices

List of devices attached
emulator-5557 device
এমুলেটর কমান্ড-লাইন অপশন সম্পর্কে আরও তথ্যের জন্য, কমান্ড-লাইন স্টার্টআপ অপশন দেখুন।
একটি নির্দিষ্ট ডিভাইসে কমান্ড পাঠান
যদি একাধিক ডিভাইস চালু থাকে, তাহলে adb কমান্ড দেওয়ার সময় আপনাকে অবশ্যই টার্গেট ডিভাইসটি নির্দিষ্ট করতে হবে। টার্গেট নির্দিষ্ট করার জন্য, এই ধাপগুলো অনুসরণ করুন:
- টার্গেটের সিরিয়াল নম্বর পেতে
devicesকমান্ডটি ব্যবহার করুন। - একবার সিরিয়াল নম্বরটি পেয়ে গেলে,
adbকমান্ডের সাথে-sঅপশনটি ব্যবহার করে সিরিয়াল নম্বরটি নির্দিষ্ট করে দিন।- আপনি যদি অনেকগুলো
adbকমান্ড ব্যবহার করতে চান, তাহলে$ANDROID_SERIALএনভায়রনমেন্ট ভেরিয়েবলটিতে সিরিয়াল নম্বরটি সেট করতে পারেন। - যদি আপনি
-sএবং$ANDROID_SERIALউভয়ই ব্যবহার করেন,-s$ANDROID_SERIALওভাররাইড করবে।
- আপনি যদি অনেকগুলো
নিম্নলিখিত উদাহরণে, সংযুক্ত ডিভাইসগুলির তালিকা সংগ্রহ করা হয় এবং তারপরে সেই ডিভাইসগুলির মধ্যে একটির সিরিয়াল নম্বর ব্যবহার করে সেই ডিভাইসে helloWorld.apk ইনস্টল করা হয়:
$ adb devices
List of devices attached
emulator-5554 device
emulator-5555 device
0.0.0.0:6520  device

# To install on emulator-5555
$ adb -s emulator-5555 install helloWorld.apk
# To install on 0.0.0.0:6520
$ adb -s 0.0.0.0:6520 install helloWorld.apk
দ্রষ্টব্য: একাধিক ডিভাইস উপলব্ধ থাকা অবস্থায়, কোনো টার্গেট ডিভাইস নির্দিষ্ট না করে কমান্ড দিলে adb "adb: more than one device/emulator" ত্রুটিটি প্রদর্শন করে।
আপনার কাছে একাধিক ডিভাইস উপলব্ধ থাকলেও যদি সেগুলোর মধ্যে কেবল একটি এমুলেটর হয়, তবে এমুলেটরে কমান্ড পাঠানোর জন্য -e অপশনটি ব্যবহার করুন। যদি একাধিক ডিভাইস থাকে কিন্তু কেবল একটি হার্ডওয়্যার ডিভাইস সংযুক্ত থাকে, তবে হার্ডওয়্যার ডিভাইসটিতে কমান্ড পাঠানোর জন্য -d অপশনটি ব্যবহার করুন।
একটি অ্যাপ ইনস্টল করুন
আপনি adb ব্যবহার করে install কমান্ডের সাহায্যে একটি এমুলেটর বা সংযুক্ত ডিভাইসে APK ইনস্টল করতে পারেন:
adb install path_to_apk
একটি টেস্ট APK ইনস্টল করার সময় আপনাকে install কমান্ডের সাথে অবশ্যই -t অপশনটি ব্যবহার করতে হবে। আরও তথ্যের জন্য, -t দেখুন।
একাধিক APK ইনস্টল করতে install-multiple ব্যবহার করুন। এটি তখন কাজে আসে যখন আপনি প্লে কনসোল থেকে আপনার অ্যাপের জন্য কোনো নির্দিষ্ট ডিভাইসের সমস্ত APK ডাউনলোড করেন এবং সেগুলোকে কোনো এমুলেটর বা ফিজিক্যাল ডিভাইসে ইনস্টল করতে চান।
এমুলেটর/ডিভাইস ইনস্ট্যান্সে ইনস্টল করা যায় এমন একটি APK ফাইল কীভাবে তৈরি করতে হয় সে সম্পর্কে আরও তথ্যের জন্য, আপনার অ্যাপ তৈরি এবং রান করুন দেখুন।
দ্রষ্টব্য: আপনি যদি অ্যান্ড্রয়েড স্টুডিও ব্যবহার করেন, তাহলে এমুলেটর বা ডিভাইসে আপনার অ্যাপ ইনস্টল করার জন্য সরাসরি adb ব্যবহার করার প্রয়োজন নেই। এর পরিবর্তে, অ্যান্ড্রয়েড স্টুডিও আপনার জন্য অ্যাপটির প্যাকেজিং এবং ইনস্টলেশনের কাজটি করে দেয়।
পোর্ট ফরওয়ার্ডিং সেট আপ করুন
যথেচ্ছ পোর্ট ফরওয়ার্ডিং সেট আপ করতে forward কমান্ডটি ব্যবহার করুন, যা একটি নির্দিষ্ট হোস্ট পোর্টের অনুরোধগুলিকে ডিভাইসের একটি ভিন্ন পোর্টে ফরওয়ার্ড করে। নিম্নলিখিত উদাহরণটি হোস্ট পোর্ট ৬১০০-কে ডিভাইস পোর্ট ৭১০০-এ ফরওয়ার্ডিং সেট আপ করে:
adb forward tcp:6100 tcp:7100
নিম্নলিখিত উদাহরণটি হোস্ট পোর্ট ৬১০০-কে local:logd-তে ফরওয়ার্ড করার ব্যবস্থা করে:
adb forward tcp:6100 local:logd
ডিভাইসের কোনো নির্দিষ্ট পোর্টে কী পাঠানো হচ্ছে তা নির্ধারণ করার ক্ষেত্রে এটি সহায়ক হতে পারে। প্রাপ্ত সমস্ত ডেটা সিস্টেম-লগিং ডেমন-এ লেখা হবে এবং ডিভাইসের লগগুলিতে প্রদর্শিত হবে।
একটি ডিভাইসে ফাইল কপি করুন এবং ডিভাইস থেকে ফাইল কপি করুন
ডিভাইসে ফাইল কপি করতে এবং ডিভাইস থেকে ফাইল কপি করতে pull এবং push কমান্ড ব্যবহার করুন। install কমান্ডের মতো নয়, যা শুধুমাত্র একটি নির্দিষ্ট স্থানে একটি APK ফাইল কপি করে, pull এবং push কমান্ড আপনাকে ডিভাইসের যেকোনো স্থানে ইচ্ছামতো ডিরেক্টরি এবং ফাইল কপি করার সুবিধা দেয়।
ডিভাইস থেকে কোনো ফাইল বা ডিরেক্টরি এবং তার সাব-ডিরেক্টরিগুলো কপি করতে, নিম্নলিখিত পদক্ষেপগুলো অনুসরণ করুন:
adb pull remote local
ডিভাইসে কোনো ফাইল বা ডিরেক্টরি এবং তার সাব-ডিরেক্টরিগুলো কপি করতে, নিম্নলিখিত পদক্ষেপগুলো অনুসরণ করুন:
adb push local remote
আপনার ডেভেলপমেন্ট মেশিনে (লোকাল) এবং ডিভাইসে (রিমোট) থাকা টার্গেট ফাইল/ডিরেক্টরির পাথ দিয়ে local এবং ' remote প্রতিস্থাপন করুন। উদাহরণস্বরূপ:
adb push myfile.txt /sdcard/myfile.txt
adb সার্ভার বন্ধ করুন
কিছু ক্ষেত্রে, সমস্যা সমাধানের জন্য আপনাকে adb সার্ভার প্রসেসটি বন্ধ করে আবার চালু করতে হতে পারে। উদাহরণস্বরূপ, adb কোনো কমান্ডে সাড়া না দিলে এমনটা হতে পারে।
adb সার্ভার বন্ধ করতে adb kill-server কমান্ডটি ব্যবহার করুন। এরপর অন্য যেকোনো adb কমান্ড দিয়ে সার্ভারটি পুনরায় চালু করতে পারেন।
adb কমান্ড জারি করুন
আপনার ডেভেলপমেন্ট মেশিনের কমান্ড লাইন থেকে অথবা একটি স্ক্রিপ্ট থেকে নিম্নলিখিত পদ্ধতি ব্যবহার করে adb কমান্ড জারি করুন:
adb [-d | -e | -s serial_number] command
যদি কেবল একটি এমুলেটর চালু থাকে বা কেবল একটি ডিভাইস সংযুক্ত থাকে, তাহলে ডিফল্টরূপে adb কমান্ডটি সেই ডিভাইসে পাঠানো হয়। যদি একাধিক এমুলেটর চালু থাকে এবং/অথবা একাধিক ডিভাইস সংযুক্ত থাকে, তাহলে কমান্ডটি কোন টার্গেট ডিভাইসে পাঠানো হবে তা নির্দিষ্ট করার জন্য আপনাকে -d , -e , বা -s অপশনটি ব্যবহার করতে হবে।
নিম্নলিখিত কমান্ডটি ব্যবহার করে আপনি সমস্ত সমর্থিত adb কমান্ডের একটি বিস্তারিত তালিকা দেখতে পারেন:
adb --help
শেল কমান্ড জারি করুন
আপনি adb মাধ্যমে ডিভাইস কমান্ড জারি করতে বা একটি ইন্টারেক্টিভ শেল শুরু করতে shell কমান্ড ব্যবহার করতে পারেন। একটি একক কমান্ড জারি করতে, shell কমান্ডটি এইভাবে ব্যবহার করুন:
adb [-d |-e | -s serial_number] shell shell_command
ডিভাইসে একটি ইন্টারেক্টিভ শেল চালু করতে, shell কমান্ডটি এইভাবে ব্যবহার করুন:
adb [-d | -e | -s serial_number] shell
ইন্টারেক্টিভ শেল থেকে বের হতে, Control+D চাপুন অথবা exit টাইপ করুন।
অ্যান্ড্রয়েড বেশিরভাগ প্রচলিত ইউনিক্স কমান্ড-লাইন টুল সরবরাহ করে। উপলব্ধ টুলগুলির তালিকা পেতে, নিম্নলিখিত কমান্ডটি ব্যবহার করুন:
adb shell ls /system/bin
বেশিরভাগ কমান্ডের জন্য --help আর্গুমেন্টের মাধ্যমে সাহায্য পাওয়া যায়। অনেক শেল কমান্ড toybox দ্বারা সরবরাহ করা হয়। toybox-এর সমস্ত কমান্ডের জন্য প্রযোজ্য সাধারণ সাহায্য toybox --help এর মাধ্যমে পাওয়া যায়।
Android Platform Tools 23 এবং তার পরবর্তী সংস্করণগুলোতে, adb ssh(1) কমান্ডের মতোই আর্গুমেন্টগুলো পরিচালনা করে। এই পরিবর্তনটি কমান্ড ইনজেকশনের অনেক সমস্যার সমাধান করেছে এবং এর ফলে শেল মেটা ক্যারেক্টারযুক্ত কমান্ড, যেমন adb install Let\'sGo.apk , নিরাপদে চালানো সম্ভব হয়েছে। এই পরিবর্তনের ফলে শেল মেটা ক্যারেক্টারযুক্ত যেকোনো কমান্ডের ব্যাখ্যাও বদলে গেছে।
উদাহরণস্বরূপ, adb shell setprop key ' two words ' এখন একটি ত্রুটি, কারণ উদ্ধৃতি চিহ্নগুলো লোকাল শেল দ্বারা শোষিত হয়, এবং ডিভাইসটি adb shell setprop key two words দেখে। কমান্ডটি কাজ করানোর জন্য, দুইবার উদ্ধৃতি চিহ্ন ব্যবহার করুন, একবার লোকাল শেলের জন্য এবং একবার রিমোট শেলের জন্য, যেমনটি আপনি ssh(1) এর ক্ষেত্রে করেন। উদাহরণস্বরূপ, adb shell setprop key "' two words '" কাজ করে কারণ লোকাল শেল উদ্ধৃতি চিহ্নের বাইরের স্তরটি গ্রহণ করে এবং ডিভাইসটি এখনও উদ্ধৃতি চিহ্নের ভেতরের স্তরটি দেখে: setprop key 'two words' । এস্কেপিংও একটি বিকল্প, কিন্তু দুইবার উদ্ধৃতি চিহ্ন ব্যবহার করা সাধারণত সহজতর।
সিস্টেম লগ নিরীক্ষণের জন্য উপযোগী Logcat কমান্ড-লাইন টুলটিও দেখুন।
কল কার্যকলাপ ব্যবস্থাপক
adb শেলের মধ্যে, আপনি অ্যাক্টিভিটি ম্যানেজার ( am ) টুল ব্যবহার করে বিভিন্ন সিস্টেম অ্যাকশন সম্পাদন করার জন্য কমান্ড দিতে পারেন, যেমন—একটি অ্যাক্টিভিটি শুরু করা, একটি প্রসেস জোর করে বন্ধ করা, একটি ইন্টেন্ট ব্রডকাস্ট করা, ডিভাইসের স্ক্রিন প্রোপার্টি পরিবর্তন করা, এবং আরও অনেক কিছু।
শেলের মধ্যে থাকাকালীন, am সিনট্যাক্সটি হলো:
am command
আপনি রিমোট শেল-এ প্রবেশ না করেও সরাসরি adb থেকে অ্যাক্টিভিটি ম্যানেজার কমান্ড জারি করতে পারেন। উদাহরণস্বরূপ:
adb shell am start -a android.intent.action.VIEW
সারণি ১. উপলব্ধ অ্যাক্টিভিটি ম্যানেজার কমান্ডসমূহ
| আদেশ | বর্ণনা |
|---|---|
start [ options ] intent | intent দ্বারা নির্দিষ্ট একটি Activity শুরু করুন।ইনটেন্ট আর্গুমেন্টগুলোর জন্য স্পেসিফিকেশন দেখুন। বিকল্পগুলো হলো:
|
startservice [ options ] intent | intent দ্বারা নির্দিষ্ট Service শুরু করুন।ইনটেন্ট আর্গুমেন্টগুলোর জন্য স্পেসিফিকেশন দেখুন। বিকল্পগুলো হলো:
|
force-stop package | package সাথে যুক্ত সবকিছু জোরপূর্বক বন্ধ করুন। |
kill [ options ] package | package সাথে যুক্ত সমস্ত প্রসেস বন্ধ করুন। এই কমান্ডটি শুধুমাত্র সেইসব প্রসেস বন্ধ করে যেগুলো বন্ধ করা নিরাপদ এবং যা ব্যবহারকারীর অভিজ্ঞতার উপর কোনো প্রভাব ফেলবে না।বিকল্পগুলো হলো:
|
kill-all | ব্যাকগ্রাউন্ডের সমস্ত প্রসেস বন্ধ করুন। |
broadcast [ options ] intent | একটি ব্রডকাস্ট ইন্টেন্ট জারি করুন। ইনটেন্ট আর্গুমেন্টগুলোর জন্য স্পেসিফিকেশন দেখুন। বিকল্পগুলো হলো:
|
instrument [ options ] component | একটি Instrumentation ইনস্ট্যান্স দিয়ে মনিটরিং শুরু করুন। সাধারণত টার্গেট component হলো ফর্ম test_package / runner_class ।বিকল্পগুলো হলো:
|
profile start process file | process ওপর প্রোফাইলার চালু করুন এবং ফলাফল file লিখুন। |
profile stop process | process চালু থাকা অবস্থায় প্রোফাইলার বন্ধ করুন। |
dumpheap [ options ] process file | process হিপ ডাম্প করুন, file লিখুন।বিকল্পগুলো হলো:
|
dumpbitmaps [ options ] [-p process ] | process থেকে বিটম্যাপ তথ্য ডাম্প করুন (এপিআই লেভেল ৩৬ এবং তার উপরে)।বিকল্পগুলো হলো:
process নির্দিষ্ট করা না থাকে, তাহলে সমস্ত প্রসেসের বিটম্যাপ ডাম্প করা হবে। |
set-debug-app [ options ] package | অ্যাপ package ডিবাগ মোডে সেট করুন।বিকল্পগুলো হলো:
|
clear-debug-app | set-debug-app ব্যবহার করে ডিবাগিংয়ের জন্য প্যাকেজের পূর্ববর্তী সেট মুছে ফেলুন। |
monitor [ options ] | ক্র্যাশ বা এএনআর-এর জন্য পর্যবেক্ষণ শুরু করুন। বিকল্পগুলো হলো:
|
screen-compat {on | off} package | package স্ক্রিন সামঞ্জস্য মোড নিয়ন্ত্রণ করুন। |
display-size [reset | width x height ] | ডিভাইসের ডিসপ্লে সাইজ পরিবর্তন করুন। এই কমান্ডটি বিভিন্ন স্ক্রিন সাইজে আপনার অ্যাপ পরীক্ষা করার জন্য সহায়ক; এটি বড় স্ক্রিনের ডিভাইস ব্যবহার করে ছোট স্ক্রিন রেজোলিউশনের অনুকরণ করে এবং এর বিপরীতটিও করে। উদাহরণ: |
display-density dpi | ডিভাইসের ডিসপ্লে ডেনসিটি ওভাররাইড করুন। এই কমান্ডটি একটি কম-ডেনসিটির স্ক্রিন ব্যবহার করে উচ্চ-ডেনসিটির স্ক্রিনের পরিবেশ অনুকরণ করে এবং এর বিপরীতক্রমেও বিভিন্ন স্ক্রিন ডেনসিটিতে আপনার অ্যাপ পরীক্ষা করার জন্য সহায়ক। উদাহরণ: |
to-uri intent | প্রদত্ত ইন্টেন্ট স্পেসিফিকেশনটি একটি URI হিসেবে প্রিন্ট করুন। |
to-intent-uri intent | প্রদত্ত ইন্টেন্ট স্পেসিফিকেশনটিকে একটি intent: URI হিসেবে প্রিন্ট করুন। |
memory-limiter subcommand [ options ] | অ্যান্ড্রয়েড ১৭ এবং তার পরবর্তী সংস্করণ চালিত ডিভাইসগুলিতে আরোপিত মেমরি সীমা সামঞ্জস্য করুন বা নিষ্ক্রিয় করুন। অ্যান্ড্রয়েড ১৬ এবং তার পূর্ববর্তী সংস্করণ চালিত ডিভাইসগুলিতে এর কোনো প্রভাব নেই। উপ-কমান্ডগুলো হলো:
|
ইনটেন্ট আর্গুমেন্টের স্পেসিফিকেশন
অ্যাক্টিভিটি ম্যানেজার কমান্ডগুলোর ক্ষেত্রে, যেগুলো intent আর্গুমেন্ট গ্রহণ করে, আপনি নিম্নলিখিত অপশনগুলোর মাধ্যমে ইন্টেন্টটি নির্দিষ্ট করতে পারেন:
প্যাকেজ ম্যানেজারকে ( pm ) ফোন করুন
adb শেলের মধ্যে, আপনি ডিভাইসে ইনস্টল করা অ্যাপ প্যাকেজগুলির উপর বিভিন্ন কাজ ও কোয়েরি সম্পাদন করার জন্য প্যাকেজ ম্যানেজার ( pm ) টুলের সাহায্যে কমান্ড দিতে পারেন।
শেলের মধ্যে থাকাকালীন, pm সিনট্যাক্সটি হলো:
pm command
আপনি রিমোট শেল-এ প্রবেশ না করেও সরাসরি adb থেকে প্যাকেজ ম্যানেজার কমান্ড জারি করতে পারেন। উদাহরণস্বরূপ:
adb shell pm uninstall com.example.MyApp
সারণি ২. উপলব্ধ প্যাকেজ ম্যানেজার কমান্ডসমূহ
| আদেশ | বর্ণনা |
|---|---|
list packages [ options ] filter | সমস্ত প্যাকেজ প্রিন্ট করুন, এবং ঐচ্ছিকভাবে শুধুমাত্র সেই প্যাকেজগুলো প্রিন্ট করতে পারেন যাদের নামের মধ্যে filter থাকা লেখাটি রয়েছে।বিকল্পসমূহ:
|
list permission-groups | সকল জ্ঞাত অনুমতি গোষ্ঠী প্রিন্ট করুন। |
list permissions [ options ] group | জানা সমস্ত অনুমতি প্রিন্ট করুন, ঐচ্ছিকভাবে শুধুমাত্র group অন্তর্ভুক্ত অনুমতিগুলোও প্রিন্ট করতে পারেন।বিকল্পসমূহ:
|
list instrumentation [ options ] | সমস্ত টেস্ট প্যাকেজ তালিকাভুক্ত করুন। বিকল্পসমূহ:
|
list features | সিস্টেমের সমস্ত বৈশিষ্ট্য প্রিন্ট করুন। |
list libraries | বর্তমান ডিভাইস দ্বারা সমর্থিত সমস্ত লাইব্রেরি প্রিন্ট করুন। |
list users | সিস্টেমের সকল ব্যবহারকারীকে প্রিন্ট করুন। |
path package | প্রদত্ত package APK-এর পাথটি প্রিন্ট করুন। |
install [ options ] path | সিস্টেমে path দ্বারা নির্দিষ্ট প্যাকেজটি ইনস্টল করুন।বিকল্পসমূহ:
|
uninstall [ options ] package | Removes a package from the system. বিকল্পসমূহ:
|
clear package | Delete all data associated with a package. |
enable package_or_component | Enable the given package or component (written as "package/class"). |
disable package_or_component | Disable the given package or component (written as "package/class"). |
disable-user [ options ] package_or_component | বিকল্পসমূহ:
|
grant package_name permission | Grant a permission to an app. On devices running Android 6.0 (API level 23) and higher, the permission can be any permission declared in the app manifest. On devices running Android 5.1 (API level 22) and lower, must be an optional permission defined by the app. |
revoke package_name permission | Revoke a permission from an app. On devices running Android 6.0 (API level 23) and higher, the permission can be any permission declared in the app manifest. On devices running Android 5.1 (API level 22) and lower, must be an optional permission defined by the app. |
set-install-location location | Change the default install location. Location values:
Note: This is only intended for debugging. Using this can cause apps to break and other undesireable behavior. |
get-install-location | Returns the current install location. Return values:
|
set-permission-enforced permission [true | false] | Specify whether the given permission should be enforced. |
trim-caches desired_free_space | Trim cache files to reach the given free space. |
create-user user_name | Create a new user with the given user_name , printing the new user identifier of the user. |
remove-user user_id | Remove the user with the given user_id , deleting all data associated with that user |
get-max-users | Print the maximum number of users supported by the device. |
get-app-links [ options ] [ package ] | Print the domain verification state for the given package , or for all packages if none is specified. State codes are defined as follows:
Options are:
|
reset-app-links [ options ] [ package ] | Reset domain verification state for the given package, or for all packages if none is specified.
Options are:
|
verify-app-links [ --re-verify ] [ package ] | Broadcast a verification request for the given package , or for all packages if none is specified. Only sends if the package has previously not recorded a response.
|
set-app-links [--package package ] state domains | Manually set the state of a domain for a package. The domain must be declared by the package as autoVerify for this to work. This command will not report a failure for domains that could not be applied.
|
set-app-links-user-selection --user user_id [--package package ] enabled domains | Manually set the state of a host user selection for a package. The domain must be declared by the package for this to work. This command will not report a failure for domains that could not be applied.
|
set-app-links-allowed --user user_id [--package package ] allowed | Toggle the auto-verified link-handling setting for a package.
|
get-app-link-owners --user user_id [--package package ] domains | Print the owners for a specific domain for a given user in low- to high-priority order.
|
Call device policy manager ( dpm )
To help you develop and test your device management apps, issue commands to the device policy manager ( dpm ) tool. Use the tool to control the active admin app or change a policy's status data on the device.
While in a shell, the dpm syntax is:
dpm command
You can also issue a device policy manager command directly from adb without entering a remote shell:
adb shell dpm command
Table 3. Available device policy manager commands
| আদেশ | বর্ণনা |
|---|---|
set-active-admin [ options ] component | Sets component as active admin. Options are:
|
set-profile-owner [ options ] component | Set component as active admin and its package as profile owner for an existing user. Options are:
|
set-device-owner [ options ] component | Set component as active admin and its package as device owner. Options are:
|
remove-active-admin [ options ] component | Disable an active admin. The app must declare android:testOnly in the manifest. This command also removes device and profile owners.Options are:
|
clear-freeze-period-record | Clear the device's record of previously set freeze periods for system OTA updates. This is useful to avoid the device scheduling restrictions when developing apps that manage freeze periods. See Manage system updates . Supported on devices running Android 9.0 (API level 28) and higher. |
force-network-logs | Force the system to make any existing network logs ready for retrieval by a DPC. If there are connection or DNS logs available, the DPC receives the onNetworkLogsAvailable() callback. See Network activity logging .This command is rate-limited. Supported on devices running Android 9.0 (API level 28) and higher. |
force-security-logs | Force the system to make any existing security logs available to the DPC. If there are logs available, the DPC receives the onSecurityLogsAvailable() callback. See Log enterprise device activity .This command is rate-limited. Supported on devices running Android 9.0 (API level 28) and higher. |
Take a screenshot
The screencap command is a shell utility for taking a screenshot of a device display.
While in a shell, the screencap syntax is:
screencap filename
To use screencap from the command line, enter the following:
adb shell screencap /sdcard/screen.png
Here's an example screenshot session, using the adb shell to capture the screenshot and the pull command to download the file from the device:
$ adb shell
shell@ $ screencap /sdcard/screen.png
shell@ $ exit
$ adb pull /sdcard/screen.png
Alternatively, if you omit the filename, screencap writes the image to standard output. When combined with the -p option to specify PNG format, you can stream the device screenshot directly to a file on your local machine.
Here's an example of capturing a screenshot and saving it locally in a single command:
# use 'exec-out' instead of 'shell' to get raw data
$ adb exec-out screencap -p > screen.png
Record a video
The screenrecord command is a shell utility for recording the display of devices running Android 4.4 (API level 19) and higher. The utility records screen activity to an MPEG-4 file. You can use this file to create promotional or training videos or for debugging and testing.
In a shell, use the following syntax:
screenrecord [options] filename
To use screenrecord from the command line, enter the following:
adb shell screenrecord /sdcard/demo.mp4
Stop the screen recording by pressing Control+C. Otherwise, the recording stops automatically at three minutes or the time limit set by --time-limit .
To begin recording your device screen, run the screenrecord command to record the video. Then, run the pull command to download the video from the device to the host computer. Here's an example recording session:
$ adb shell
shell@ $ screenrecord --verbose /sdcard/demo.mp4
(press Control + C to stop)
shell@ $ exit
$ adb pull /sdcard/demo.mp4
The screenrecord utility can record at any supported resolution and bit rate you request, while retaining the aspect ratio of the device display. The utility records at the native display resolution and orientation by default, with a maximum length of three minutes.
Limitations of the screenrecord utility:
- Audio is not recorded with the video file.
- Video recording is not available for devices running Wear OS.
- Some devices might not be able to record at their native display resolution. If you encounter problems with screen recording, try using a lower screen resolution.
- Rotation of the screen during recording is not supported. If the screen does rotate during recording, some of the screen is cut off in the recording.
Table 4. screenrecord options
| বিকল্প | বর্ণনা |
|---|---|
--help | Display command syntax and options |
--size width x height | Set the video size: 1280x720 . The default value is the device's native display resolution (if supported), 1280x720 if not. For best results, use a size supported by your device's Advanced Video Coding (AVC) encoder. |
--bit-rate rate | Set the video bit rate for the video, in megabits per second. The default value is 20Mbps. You can increase the bit rate to improve video quality, but doing so results in larger movie files. The following example sets the recording bit rate to 6Mbps: screenrecord --bit-rate 6000000 /sdcard/demo.mp4 |
--time-limit time | Set the maximum recording time, in seconds. The default and maximum value is 180 (3 minutes). |
--rotate | Rotate the output 90 degrees. This feature is experimental. |
--verbose | Display log information on the command-line screen. If you do not set this option, the utility does not display any information while running. |
Read ART profiles for apps
Starting in Android 7.0 (API level 24), the Android Runtime (ART) collects execution profiles for installed apps, which are used to optimize app performance. Examine the collected profiles to understand which methods are executed frequently and which classes are used during app startup.
Note: It is only possible to retrieve the execution profile filename if you have root access to the file system, for example, on an emulator.
To produce a text form of the profile information, use the following command:
adb shell cmd package dump-profiles package
To retrieve the file produced, use:
adb pull /data/misc/profman/package.prof.txt
Reset test devices
If you test your app across multiple test devices, it may be useful to reset your device between tests, for example, to remove user data and reset the test environment. You can perform a factory reset of a test device running Android 10 (API level 29) or higher using the testharness adb shell command, as shown:
adb shell cmd testharness enable
When restoring the device using testharness , the device automatically backs up the RSA key that allows debugging through the current workstation in a persistent location. That is, after the device is reset, the workstation can continue to debug and issue adb commands to the device without manually registering a new key.
Additionally, to help make it easier and more secure to keep testing your app, using the testharness to restore a device also changes the following device settings:
- The device sets up certain system settings so that initial device setup wizards do not appear. That is, the device enters a state from which you can quickly install, debug, and test your app.
- সেটিংস:
- Disables lock screen.
- Disables emergency alerts.
- Disables auto-sync for accounts.
- Disables automatic system updates.
- Other:
- Disables preinstalled security apps.
If your app needs to detect and adapt to the default settings of the testharness command, use the ActivityManager.isRunningInUserTestHarness() .
sqlite
sqlite3 starts the sqlite command-line program for examining SQLite databases. It includes commands such as .dump to print the contents of a table and .schema to print the SQL CREATE statement for an existing table. You can also execute SQLite commands from the command line, as shown:
$ adb -s emulator-5554 shell
$ sqlite3 /data/data/com.example.app/databases/rssitems.db
SQLite version 3.3.12
Enter ".help" for instructions
Note: It is only possible to access a SQLite database if you have root access to the file system, for example, on an emulator.
For more information, see the sqlite3 command line documentation .
adb USB backends
The adb server can interact with the USB stack through two backends. It can either use the native backend of the OS (Windows, Linux, or macOS) or it can use the libusb backend. Some features, such as attach , detach , and USB speed detection, are only available when using libusb backend.
You can choose a backend by using the ADB_LIBUSB environment variable. If it isn't set, adb uses its default backend. The default behavior varies among OS. Starting with ADB v34 , the liubusb backend is used by default on all OS except Windows, where the native backend is used by default. If ADB_LIBUSB is set, it determines whether the native backend or libusb is used. See the adb manual page for more information about adb environment variables.
adb mDNS backends
ADB uses the mDNS (multicast DNS) protocol to automatically connect the server and devices for wireless debugging. As of ADB v37, The ADB server ships with two mDNS backends, libadbmdns and openscreen .
The default and recommended backend is libadbmdns . This behavior can be changed using the environment variable ADB_MDNS_OPENSCREEN (set to 1 or 0 ). Support for the Openscreen backend on macOS starts at ADB v35. Windows and Linux are supported as of ADB v34.
adb Burst Mode (starting with ADB 36.0.0)
Burst Mode is an experimental feature that lets ADB to keep on sending packets to a device even before the device has responded to the previous packet. This greatly increases the throughput of ADB when transferring large files and also reduces latency while debugging.
Burst Mode is disabled by default. To enable the feature, do one of the following:
- Set the environment variable
ADB_BURST_MODEto1. - In Android Studio, go to the debugger settings at File (or Android Studio on macOS) > Settings > Build, Execution, Deployment > Debugger and set ADB Server Burst Mode to Enabled .