TableLayout is a ViewGroup that
displays child View elements in rows and columns.
Note: For better performance and tooling support, you should instead build your layout with ConstraintLayout.

TableLayout positions its children into rows and
columns. TableLayout containers do not display border lines for their rows,
columns, or cells. The table will have as many columns as the row with the
most cells. A table can leave cells empty. Cells can span multiple columns,
as they can in HTML. You can span columns by using the span
field in the TableRow.LayoutParams class.
Note: Cells cannot span multiple rows.
TableRow objects are the child views of a TableLayout
(each TableRow defines a single row in the table). Each row has zero or more
cells, each of which is defined by any kind of other View. So, the cells of
a row may be composed of a variety of View objects, like ImageView or
TextView objects. A cell may also be a ViewGroup object (for example, you
can nest another TableLayout as a cell).
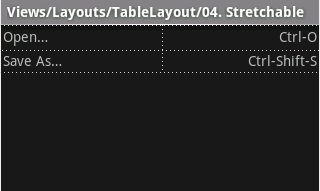
The following sample layout has two rows and two cells in each. The accompanying screenshot shows the result, with cell borders displayed as dotted lines (added for visual effect).
<?xml version="1.0" encoding="utf-8"?>
<TableLayout xmlns:android="http://schemas.android.com/apk/res/android"
    android:layout_width="match_parent"
    android:layout_height="match_parent"
    android:stretchColumns="1">
    <TableRow>
        <TextView
            android:text="@string/table_layout_4_open"
            android:padding="3dip" />
        <TextView
            android:text="@string/table_layout_4_open_shortcut"
            android:gravity="right"
            android:padding="3dip" />
    </TableRow>

    <TableRow>
        <TextView
            android:text="@string/table_layout_4_save"
            android:padding="3dip" />
        <TextView
            android:text="@string/table_layout_4_save_shortcut"
            android:gravity="right"
            android:padding="3dip" />
    </TableRow>
</TableLayout>
Columns can be hidden, marked to stretch and fill the available screen space,
or can be marked as shrinkable to force the column to shrink until the table
fits the screen. See the TableLayout reference
documentation for more details.
Example
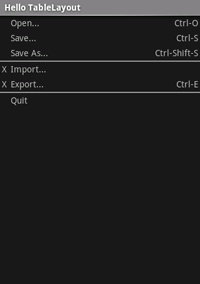
- Start a new project named HelloTableLayout.
- Open the
res/layout/main.xmlfile and insert the following:<?xml version="1.0" encoding="utf-8"?> <TableLayout xmlns:android="http://schemas.android.com/apk/res/android" android:layout_width="match_parent" android:layout_height="match_parent" android:stretchColumns="1"> <TableRow> <TextView android:layout_column="1" android:text="Open..." android:padding="3dip" /> <TextView android:text="Ctrl-O" android:gravity="right" android:padding="3dip" /> </TableRow> <TableRow> <TextView android:layout_column="1" android:text="Save..." android:padding="3dip" /> <TextView android:text="Ctrl-S" android:gravity="right" android:padding="3dip" /> </TableRow> <TableRow> <TextView android:layout_column="1" android:text="Save As..." android:padding="3dip" /> <TextView android:text="Ctrl-Shift-S" android:gravity="right" android:padding="3dip" /> </TableRow> <View android:layout_height="2dip" android:background="#FF909090" /> <TableRow> <TextView android:text="X" android:padding="3dip" /> <TextView android:text="Import..." android:padding="3dip" /> </TableRow> <TableRow> <TextView android:text="X" android:padding="3dip" /> <TextView android:text="Export..." android:padding="3dip" /> <TextView android:text="Ctrl-E" android:gravity="right" android:padding="3dip" /> </TableRow> <View android:layout_height="2dip" android:background="#FF909090" /> <TableRow> <TextView android:layout_column="1" android:text="Quit" android:padding="3dip" /> </TableRow> </TableLayout>
Notice how this resembles the structure of an HTML table. The
TableLayoutelement is like the HTML<table>element;TableRowis like a><tr>>element; but for the cells, you can use any kind ofViewelement. In this example, aTextViewis used for each cell. In between some of the rows, there is also a basicView, which is used to draw a horizontal line. - Make sure your HelloTableLayout Activity loads this layout in the
onCreate()method:Kotlin
override fun onCreate(savedInstanceState: Bundle?) {
    super.onCreate(savedInstanceState)
    setContentView(R.layout.main)
}
Java
public void onCreate(Bundle savedInstanceState) {
    super.onCreate(savedInstanceState);
    setContentView(R.layout.main);
}
The
setContentView(int)method loads the layout file for theActivity, specified by the resource ID —R.layout.mainrefers to theres/layout/main.xmllayout file. - Run the application.
You should see the following: