
คอมโพเนนต์การนำทางประกอบด้วยคลาส NavigationUI
คลาสนี้มีเมธอดแบบคงที่ซึ่งจัดการการนําทางด้วยแถบแอปด้านบน ลิ้นชักการนําทาง และการนําทางด้านล่าง
แถบแอปด้านบน
แถบแอปด้านบนเป็นตำแหน่งที่แสดงข้อมูลและการดําเนินการจากหน้าจอปัจจุบันอย่างสอดคล้องกันตลอดทั้งแอป

NavigationUI มีเมธอดที่จะอัปเดตเนื้อหาในแถบแอปด้านบนโดยอัตโนมัติเมื่อผู้ใช้ไปยังส่วนต่างๆ ของแอป เช่น NavigationUI ใช้ป้ายกํากับปลายทางจากกราฟการนําทางเพื่ออัปเดตชื่อแถบแอปด้านบนให้เป็นปัจจุบันอยู่เสมอ
<navigation>
    <fragment ...
              android:label="Page title">
      ...
    </fragment>
</navigation>
เมื่อใช้ NavigationUI กับการติดตั้งใช้งานแถบแอปด้านบนที่อธิบายไว้ด้านล่าง ระบบจะป้อนข้อมูลป้ายกำกับที่คุณแนบกับปลายทางโดยอัตโนมัติจากอาร์กิวเมนต์ที่ระบุให้กับปลายทางโดยใช้รูปแบบ {argName} ในป้ายกำกับ
NavigationUI รองรับแถบแอปด้านบนประเภทต่อไปนี้
ดูข้อมูลเพิ่มเติมเกี่ยวกับแถบแอปได้ที่ตั้งค่าแถบแอป
AppBarConfiguration
NavigationUI ใช้ออบเจ็กต์ AppBarConfiguration เพื่อจัดการลักษณะการทำงานของปุ่มการนำทางที่มุมซ้ายบนของพื้นที่แสดงผลของแอป ลักษณะการทํางานของปุ่มนําทางจะเปลี่ยนไปโดยขึ้นอยู่กับว่าผู้ใช้อยู่ที่ปลายทางระดับบนสุดหรือไม่
ปลายทางระดับบนสุดคือปลายทางระดับรูทหรือระดับสูงสุดในชุดปลายทางที่เกี่ยวข้องตามลําดับชั้น ปลายทางระดับบนสุดจะไม่แสดงปุ่ม "ขึ้น" ในแถบแอปด้านบนเนื่องจากไม่มีปลายทางในระดับที่สูงขึ้น โดยค่าเริ่มต้น ปลายทางเริ่มต้นของแอปจะเป็นปลายทางระดับบนสุดเพียงแห่งเดียว
เมื่อผู้ใช้อยู่ที่ปลายทางระดับบนสุด ปุ่มการนำทางจะเปลี่ยนเป็น
ไอคอนลิ้นชัก
![]() หากปลายทางใช้
หากปลายทางใช้ DrawerLayout หากปลายทางไม่ได้ใช้ DrawerLayout ระบบจะซ่อนปุ่มการนำทาง เมื่อผู้ใช้อยู่ที่ปลายทางอื่น ปุ่มการนําทางจะปรากฏเป็นปุ่มขึ้น
 หากต้องการกำหนดค่าปุ่มการนำทางโดยใช้เฉพาะปลายทางเริ่มต้นเป็นปลายทางระดับบนสุด ให้สร้างออบเจ็กต์
 AppBarConfiguration และส่งกราฟการนำทางที่เกี่ยวข้อง ดังที่แสดงด้านล่าง
Kotlin
val appBarConfiguration = AppBarConfiguration(navController.graph)
Java
AppBarConfiguration appBarConfiguration =
        new AppBarConfiguration.Builder(navController.getGraph()).build();
ในบางกรณี คุณอาจต้องกําหนดปลายทางระดับบนสุดหลายรายการแทนการใช้ปลายทางเริ่มต้น การใช้ BottomNavigationView เป็นกรณีการใช้งานที่พบบ่อยสำหรับกรณีนี้ ซึ่งคุณอาจมีหน้าจอพี่น้องที่ไม่ได้เชื่อมโยงกันตามลําดับชั้น และแต่ละหน้าจออาจมีปลายทางที่เกี่ยวข้องเป็นของตนเอง ในกรณีเช่นนี้ คุณสามารถส่งชุดรหัสปลายทางไปยังคอนสตรคเตอร์แทนได้ ดังที่แสดงด้านล่าง
Kotlin
val appBarConfiguration = AppBarConfiguration(setOf(R.id.main, R.id.profile))
Java
AppBarConfiguration appBarConfiguration =
        new AppBarConfiguration.Builder(R.id.main, R.id.profile).build();
สร้างแถบเครื่องมือ
หากต้องการสร้างแถบเครื่องมือด้วย NavigationUI ก่อนอื่นให้กำหนดแถบในกิจกรรมหลัก ดังที่แสดง
<LinearLayout>
    <androidx.appcompat.widget.Toolbar
        android:id="@+id/toolbar" />
    <androidx.fragment.app.FragmentContainerView
        android:id="@+id/nav_host_fragment"
        ... />
    ...
</LinearLayout>
จากนั้นเรียกใช้ setupWithNavController() จากเมธอด onCreate() ของกิจกรรมหลัก ดังที่แสดงในตัวอย่างต่อไปนี้
Kotlin
override fun onCreate(savedInstanceState: Bundle?) {
    setContentView(R.layout.activity_main)

    ...

    val navController = findNavController(R.id.nav_host_fragment)
    val appBarConfiguration = AppBarConfiguration(navController.graph)
    findViewById<Toolbar>(R.id.toolbar)
        .setupWithNavController(navController, appBarConfiguration)
}
Java
@Override
protected void onCreate(Bundle savedInstanceState) {
    setContentView(R.layout.activity_main);

    ...

    NavController navController = Navigation.findNavController(this, R.id.nav_host_fragment);
    AppBarConfiguration appBarConfiguration =
            new AppBarConfiguration.Builder(navController.getGraph()).build();
    Toolbar toolbar = findViewById(R.id.toolbar);
    NavigationUI.setupWithNavController(
            toolbar, navController, appBarConfiguration);
}
หากต้องการกำหนดค่าปุ่มการนําทางให้ปรากฏเป็นปุ่มขึ้นสําหรับปลายทางทั้งหมด ให้ส่งชุดรหัสปลายทางที่ว่างเปล่าสําหรับปลายทางระดับบนสุดเมื่อสร้าง AppBarConfiguration ซึ่งอาจมีประโยชน์ในกรณีที่คุณมีกิจกรรมที่ 2 ที่ควรแสดงปุ่มขึ้นใน Toolbar ของปลายทางทั้งหมด ซึ่งจะช่วยให้ผู้ใช้ไปยังกิจกรรมหลักได้เมื่อไม่มีปลายทางอื่นในกองซ้อนด้านหลัง คุณสามารถใช้ setFallbackOnNavigateUpListener() เพื่อควบคุมลักษณะการทํางานของเงื่อนไขที่ทำงานในกรณีที่ navigateUp() ไม่ทําการใดๆ ดังที่แสดงในตัวอย่างต่อไปนี้
Kotlin
override fun onCreate(savedInstanceState: Bundle?) {
    ...

    val navHostFragment =
        supportFragmentManager.findFragmentById(R.id.nav_host_fragment) as NavHostFragment
    val navController = navHostFragment.navController
    val appBarConfiguration = AppBarConfiguration(
        topLevelDestinationIds = setOf(),
        fallbackOnNavigateUpListener = ::onSupportNavigateUp
    )
    findViewById<Toolbar>(R.id.toolbar)
        .setupWithNavController(navController, appBarConfiguration)
}
Java
@Override
protected void onCreate(Bundle savedInstanceState) {
    ...

    NavHostFragment navHostFragment = (NavHostFragment) supportFragmentManager.findFragmentById(R.id.nav_host_fragment);
    NavController navController = navHostFragment.getNavController();
    AppBarConfiguration appBarConfiguration = new AppBarConfiguration.Builder()
        .setFallbackOnNavigateUpListener(::onSupportNavigateUp)
        .build();
    Toolbar toolbar = findViewById(R.id.toolbar);
    NavigationUI.setupWithNavController(
            toolbar, navController, appBarConfiguration);
}
รวม CollapsingToolbarLayout
หากต้องการใส่ CollapsingToolbarLayout ไว้ในแถบเครื่องมือ ให้กําหนดแถบเครื่องมือและเลย์เอาต์โดยรอบในกิจกรรมก่อน ดังที่แสดงด้านล่าง
<LinearLayout>
    <com.google.android.material.appbar.AppBarLayout
        android:layout_width="match_parent"
        android:layout_height="@dimen/tall_toolbar_height">

        <com.google.android.material.appbar.CollapsingToolbarLayout
            android:id="@+id/collapsing_toolbar_layout"
            android:layout_width="match_parent"
            android:layout_height="match_parent"
            app:contentScrim="?attr/colorPrimary"
            app:expandedTitleGravity="top"
            app:layout_scrollFlags="scroll|exitUntilCollapsed|snap">

            <androidx.appcompat.widget.Toolbar
                android:id="@+id/toolbar"
                android:layout_width="match_parent"
                android:layout_height="?attr/actionBarSize"
                app:layout_collapseMode="pin"/>
        </com.google.android.material.appbar.CollapsingToolbarLayout>
    </com.google.android.material.appbar.AppBarLayout>

    <androidx.fragment.app.FragmentContainerView
        android:id="@+id/nav_host_fragment"
        ... />
    ...
</LinearLayout>
ถัดไป ให้เรียกใช้ setupWithNavController()
จากเมธอด onCreate ของกิจกรรมหลัก ดังที่แสดงด้านล่าง
Kotlin
override fun onCreate(savedInstanceState: Bundle?) {
    setContentView(R.layout.activity_main)

    ...

    val layout = findViewById<CollapsingToolbarLayout>(R.id.collapsing_toolbar_layout)
    val toolbar = findViewById<Toolbar>(R.id.toolbar)
    val navHostFragment =
        supportFragmentManager.findFragmentById(R.id.nav_host_fragment) as NavHostFragment
    val navController = navHostFragment.navController
    val appBarConfiguration = AppBarConfiguration(navController.graph)
    layout.setupWithNavController(toolbar, navController, appBarConfiguration)
}
Java
@Override
protected void onCreate(Bundle savedInstanceState) {
    setContentView(R.layout.activity_main);

    ...

    CollapsingToolbarLayout layout = findViewById(R.id.collapsing_toolbar_layout);
    Toolbar toolbar = findViewById(R.id.toolbar);
    NavHostFragment navHostFragment = supportFragmentManager.findFragmentById(R.id.nav_host_fragment);
    NavController navController = navHostFragment.getNavController();
    AppBarConfiguration appBarConfiguration =
            new AppBarConfiguration.Builder(navController.getGraph()).build();
    NavigationUI.setupWithNavController(layout, toolbar, navController, appBarConfiguration);
}
แถบการดำเนินการ
หากต้องการเพิ่มการรองรับการนําทางไปยังแถบการดำเนินการเริ่มต้น ให้เรียกใช้ setupActionBarWithNavController() จากเมธอด onCreate() ของกิจกรรมหลัก ดังที่แสดงด้านล่าง โปรดทราบว่าคุณต้องประกาศ AppBarConfiguration ไว้นอก onCreate() เนื่องจากคุณต้องใช้ AppBarConfiguration เมื่อลบล้าง onSupportNavigateUp() ด้วย
Kotlin
private lateinit var appBarConfiguration: AppBarConfiguration

...

override fun onCreate(savedInstanceState: Bundle?) {
    ...

    val navHostFragment =
        supportFragmentManager.findFragmentById(R.id.nav_host_fragment) as NavHostFragment
    val navController = navHostFragment.navController
    appBarConfiguration = AppBarConfiguration(navController.graph)
    setupActionBarWithNavController(navController, appBarConfiguration)
}
Java
AppBarConfiguration appBarConfiguration;

...

@Override
protected void onCreate(Bundle savedInstanceState) {
    ...

    NavHostFragment navHostFragment = supportFragmentManager.findFragmentById(R.id.nav_host_fragment);
    NavController navController = navHostFragment.getNavController();
    appBarConfiguration = new AppBarConfiguration.Builder(navController.getGraph()).build();
    NavigationUI.setupActionBarWithNavController(this, navController, appBarConfiguration);
}
ถัดไป ให้ลบล้าง onSupportNavigateUp() เพื่อจัดการการไปยังด้านบน
Kotlin
override fun onSupportNavigateUp(): Boolean {
    val navController = findNavController(R.id.nav_host_fragment)
    return navController.navigateUp(appBarConfiguration)
            || super.onSupportNavigateUp()
}
Java
@Override
public boolean onSupportNavigateUp() {
    NavController navController = Navigation.findNavController(this, R.id.nav_host_fragment);
    return NavigationUI.navigateUp(navController, appBarConfiguration)
            || super.onSupportNavigateUp();
}
รองรับแถบแอปรูปแบบต่างๆ
การเพิ่มแถบแอปด้านบนลงในกิจกรรมจะทํางานได้ดีเมื่อเลย์เอาต์ของแถบแอปคล้ายกันสําหรับปลายทางแต่ละแห่งในแอป อย่างไรก็ตาม หากแถบแอปด้านบนมีการเปลี่ยนแปลงอย่างมากในปลายทางต่างๆ ให้พิจารณานําแถบแอปด้านบนออกจากกิจกรรมและกำหนดไว้ในแต่ละกลุ่มย่อยปลายทางแทน
ตัวอย่างเช่น ปลายทางหนึ่งอาจใช้ Toolbar มาตรฐาน ขณะที่ปลายทางอื่นใช้ AppBarLayout เพื่อสร้างแถบแอปที่ซับซ้อนมากขึ้นพร้อมแท็บ ดังที่แสดงในรูปที่ 2
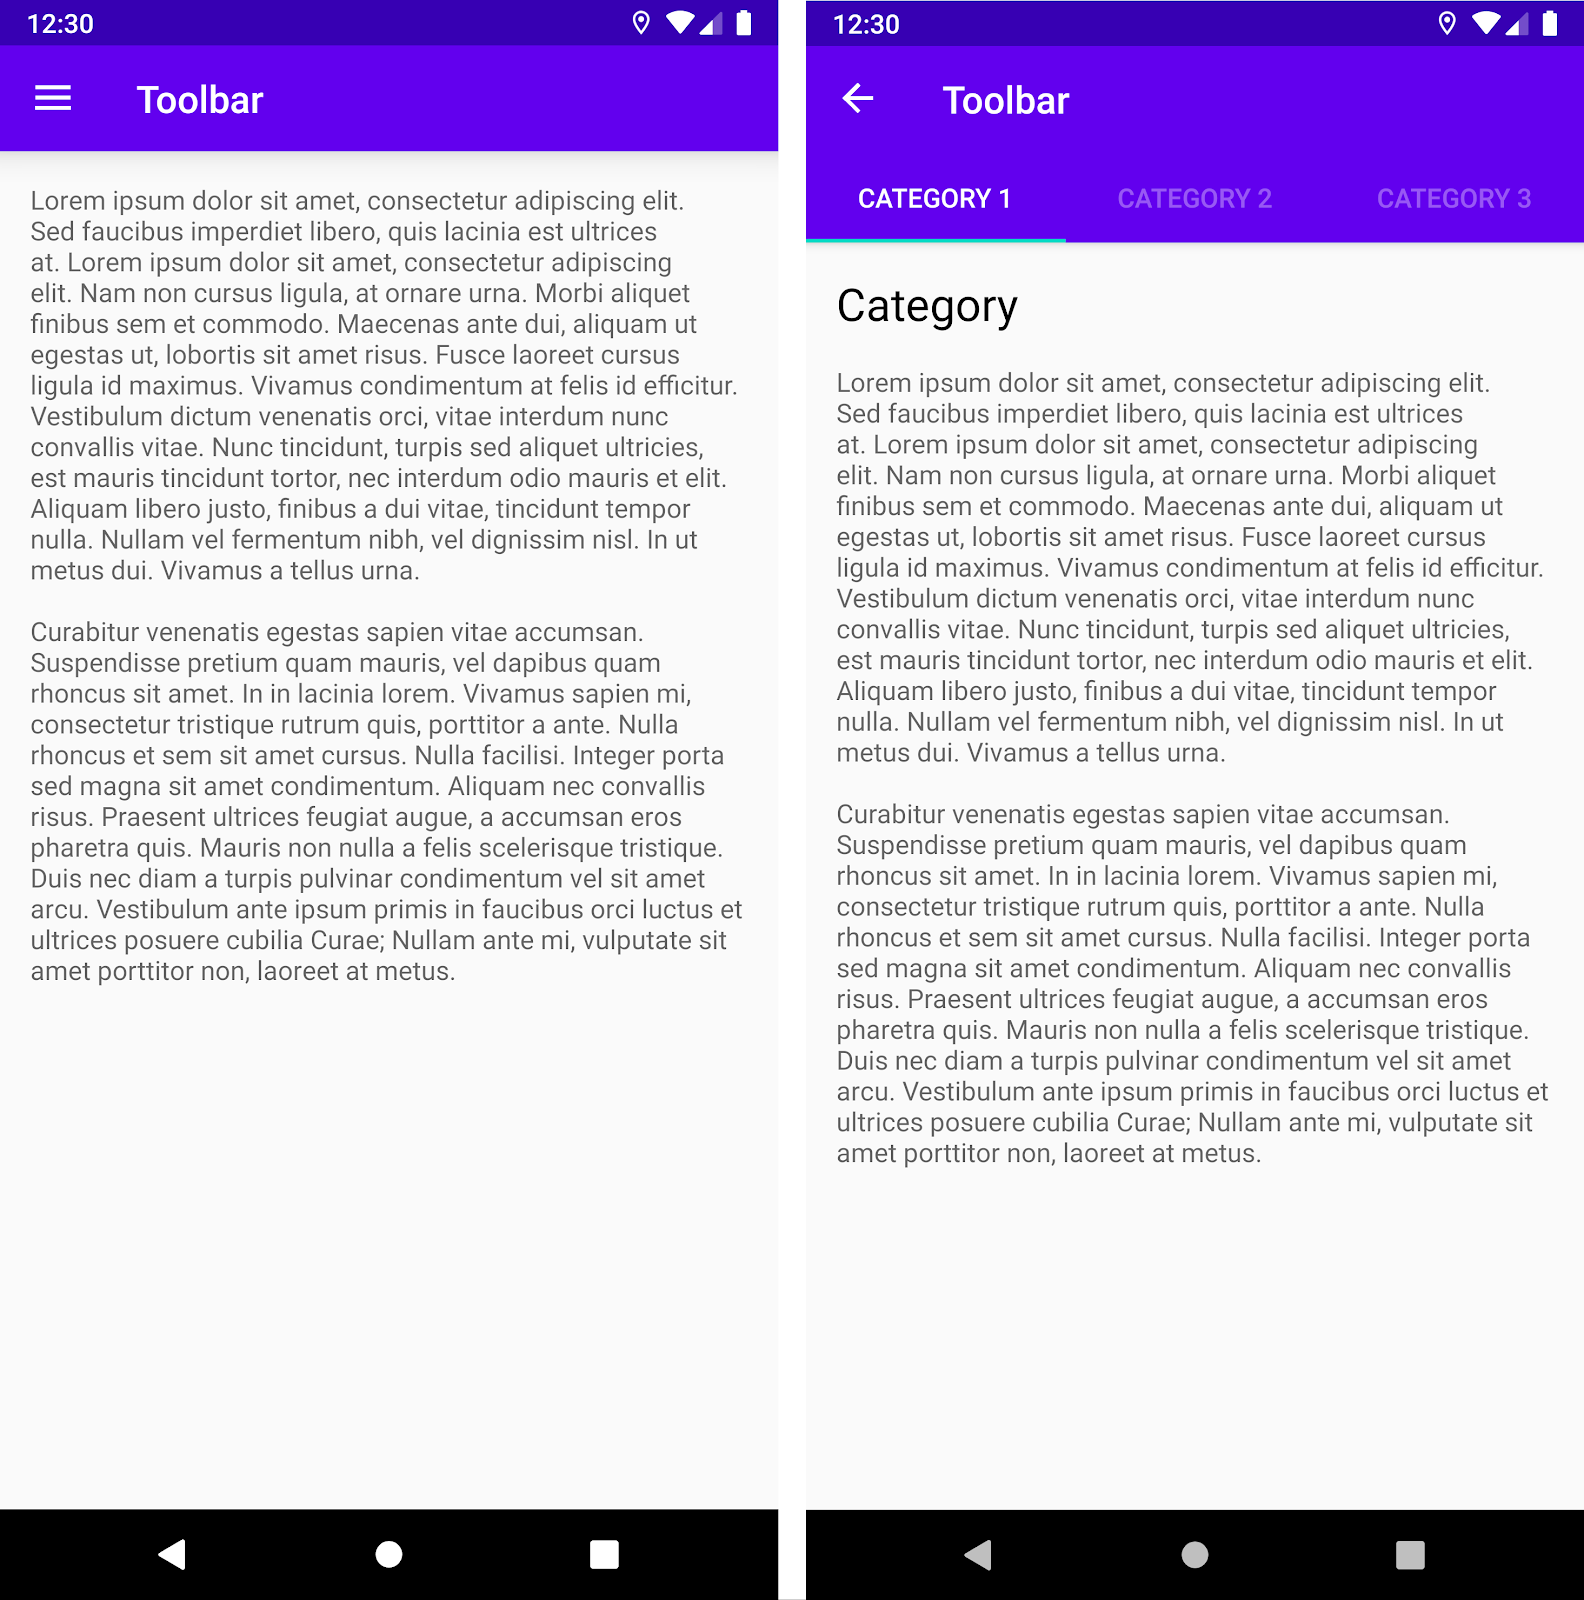
Toolbar AppBarLayout ที่มี Toolbar และแท็บหากต้องการใช้ตัวอย่างนี้ภายในข้อมูลโค้ดของปลายทางโดยใช้ NavigationUI ก่อนอื่นให้กําหนดแถบแอปในเลย์เอาต์ข้อมูลโค้ดแต่ละรายการ โดยเริ่มจากข้อมูลโค้ดปลายทางที่ใช้แถบเครื่องมือมาตรฐาน ดังนี้
<LinearLayout>
    <androidx.appcompat.widget.Toolbar
        android:id="@+id/toolbar"
        ... />
    ...
</LinearLayout>
ถัดไป ให้กําหนดข้อมูลโค้ดปลายทางที่ใช้แถบแอปที่มีแท็บ
<LinearLayout>
    <com.google.android.material.appbar.AppBarLayout
        ... />

        <androidx.appcompat.widget.Toolbar
            android:id="@+id/toolbar"
            ... />

        <com.google.android.material.tabs.TabLayout
            ... />

    </com.google.android.material.appbar.AppBarLayout>
    ...
</LinearLayout>
ตรรกะการกําหนดค่าการนําทางเหมือนกันสําหรับทั้ง 2 รายการนี้ ยกเว้นว่าคุณควรเรียกใช้ setupWithNavController() จากภายในเมธอด onViewCreated() ของแต่ละรายการแทนที่จะเริ่มต้นจากกิจกรรม
Kotlin
override fun onViewCreated(view: View, savedInstanceState: Bundle?) {
    val navController = findNavController()
    val appBarConfiguration = AppBarConfiguration(navController.graph)

    view.findViewById<Toolbar>(R.id.toolbar)
            .setupWithNavController(navController, appBarConfiguration)
}
Java
@Override
public void onViewCreated(@NonNull View view,
                          @Nullable Bundle savedInstanceState) {
    NavController navController = Navigation.findNavController(view);
    AppBarConfiguration appBarConfiguration =
            new AppBarConfiguration.Builder(navController.getGraph()).build();
    Toolbar toolbar = view.findViewById(R.id.toolbar);

    NavigationUI.setupWithNavController(
            toolbar, navController, appBarConfiguration);
}
เชื่อมโยงปลายทางกับรายการในเมนู
NavigationUI ยังมีตัวช่วยสำหรับเชื่อมโยงปลายทางกับคอมโพเนนต์ UI ที่ทำงานด้วยเมนูด้วย NavigationUI มีเมธอดตัวช่วย onNavDestinationSelected() ซึ่งใช้ MenuItem พร้อมกับ NavController ที่โฮสต์ปลายทางที่เกี่ยวข้อง หาก id ของ MenuItem ตรงกับ id ของปลายทาง NavController ก็จะไปยังปลายทางนั้นได้
ตัวอย่างเช่น ข้อมูลโค้ด XML ด้านล่างจะกำหนดรายการเมนูและปลายทางด้วย id ทั่วไป details_page_fragment
<?xml version="1.0" encoding="utf-8"?>
<navigation xmlns:app="http://schemas.android.com/apk/res-auto"
    xmlns:tools="http://schemas.android.com/tools"
    xmlns:android="http://schemas.android.com/apk/res/android"
    ... >

    ...

    <fragment android:id="@+id/details_page_fragment"
         android:label="@string/details"
         android:name="com.example.android.myapp.DetailsFragment" />
</navigation>
<menu xmlns:android="http://schemas.android.com/apk/res/android">

    ...

    <item
        android:id="@+id/details_page_fragment"
        android:icon="@drawable/ic_details"
        android:title="@string/details" />
</menu>
ตัวอย่างเช่น หากเพิ่มเมนูผ่าน onCreateOptionsMenu() ของกิจกรรม คุณสามารถเชื่อมโยงรายการเมนูกับปลายทางได้โดยลบล้าง onOptionsItemSelected() ของกิจกรรมเพื่อเรียก onNavDestinationSelected() ดังที่แสดงในตัวอย่างต่อไปนี้
Kotlin
override fun onOptionsItemSelected(item: MenuItem): Boolean {
    val navController = findNavController(R.id.nav_host_fragment)
    return item.onNavDestinationSelected(navController) || super.onOptionsItemSelected(item)
}
Java
@Override
public boolean onOptionsItemSelected(MenuItem item) {
    NavController navController = Navigation.findNavController(this, R.id.nav_host_fragment);
    return NavigationUI.onNavDestinationSelected(item, navController)
            || super.onOptionsItemSelected(item);
}
ตอนนี้เมื่อผู้ใช้คลิกรายการเมนู details_page_fragment แอปจะไปยังปลายทางที่เกี่ยวข้องโดยอัตโนมัติด้วย id เดียวกัน
เพิ่มลิ้นชักการนำทาง
ลิ้นชักการนำทางคือแผง UI ที่แสดงเมนูการนำทางหลักของแอป
ลิ้นชักจะปรากฏขึ้นเมื่อผู้ใช้แตะไอคอนลิ้นชัก
![]() ในแถบแอป หรือเมื่อผู้ใช้ปัดนิ้วจากขอบด้านซ้ายของหน้าจอ
ในแถบแอป หรือเมื่อผู้ใช้ปัดนิ้วจากขอบด้านซ้ายของหน้าจอ
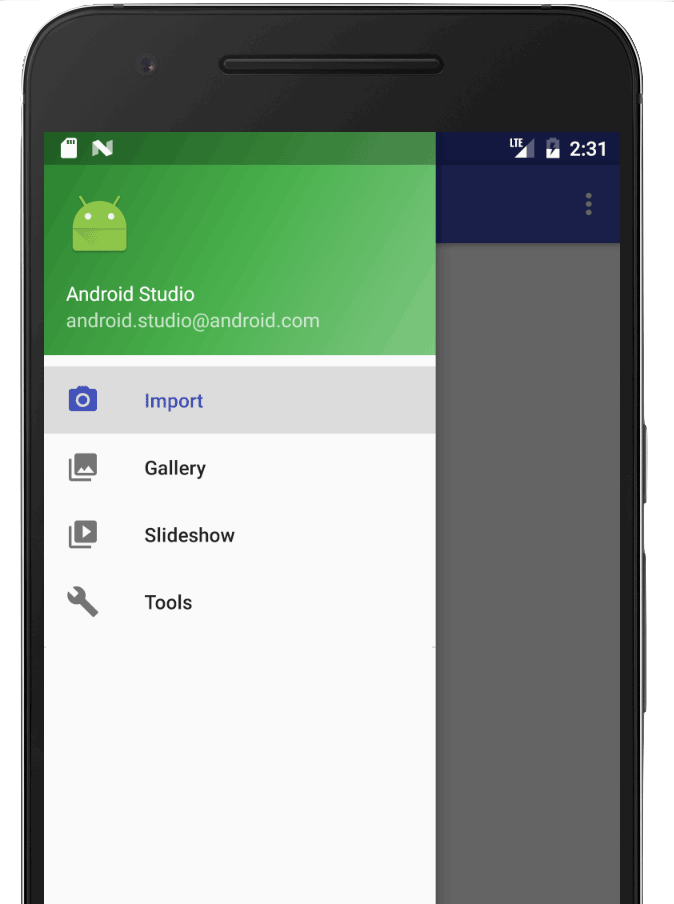
ไอคอนลิ้นชักจะแสดงในปลายทางระดับบนสุดทั้งหมดที่ใช้ DrawerLayout
หากต้องการเพิ่มลิ้นชักการนำทาง ให้ประกาศ DrawerLayout เป็นมุมมองรูทก่อน ภายใน DrawerLayout ให้เพิ่มเลย์เอาต์สำหรับเนื้อหา UI หลักและอีกมุมมองที่มีเนื้อหาของลิ้นชักการนำทาง
ตัวอย่างเช่น เลย์เอาต์ต่อไปนี้ใช้ DrawerLayout ที่มีมุมมองย่อย 2 รายการ ได้แก่ NavHostFragment สำหรับแสดงเนื้อหาหลัก และ NavigationView สำหรับแสดงเนื้อหาของลิ้นชักการนำทาง
<?xml version="1.0" encoding="utf-8"?>
<!-- Use DrawerLayout as root container for activity -->
<androidx.drawerlayout.widget.DrawerLayout xmlns:android="http://schemas.android.com/apk/res/android"
    xmlns:app="http://schemas.android.com/apk/res-auto"
    android:id="@+id/drawer_layout"
    android:layout_width="match_parent"
    android:layout_height="match_parent"
    android:fitsSystemWindows="true">

    <!-- Layout to contain contents of main body of screen (drawer will slide over this) -->
    <androidx.fragment.app.FragmentContainerView
        android:name="androidx.navigation.fragment.NavHostFragment"
        android:id="@+id/nav_host_fragment"
        android:layout_width="match_parent"
        android:layout_height="match_parent"
        app:defaultNavHost="true"
        app:navGraph="@navigation/nav_graph" />

    <!-- Container for contents of drawer - use NavigationView to make configuration easier -->
    <com.google.android.material.navigation.NavigationView
        android:id="@+id/nav_view"
        android:layout_width="wrap_content"
        android:layout_height="match_parent"
        android:layout_gravity="start"
        android:fitsSystemWindows="true" />

</androidx.drawerlayout.widget.DrawerLayout>
ถัดไป ให้เชื่อมต่อ DrawerLayout กับกราฟการนำทางโดยส่งไปยัง AppBarConfiguration ดังที่แสดงในตัวอย่างต่อไปนี้
Kotlin
val appBarConfiguration = AppBarConfiguration(navController.graph, drawerLayout)
Java
AppBarConfiguration appBarConfiguration =
        new AppBarConfiguration.Builder(navController.getGraph())
            .setDrawerLayout(drawerLayout)
            .build();
ถัดไป ในคลาสกิจกรรมหลัก ให้เรียกใช้ setupWithNavController() จากเมธอด onCreate() ของกิจกรรมหลัก ดังที่แสดงด้านล่าง
Kotlin
override fun onCreate(savedInstanceState: Bundle?) {
    setContentView(R.layout.activity_main)

    ...

    val navHostFragment =
        supportFragmentManager.findFragmentById(R.id.nav_host_fragment) as NavHostFragment
    val navController = navHostFragment.navController
    findViewById<NavigationView>(R.id.nav_view)
        .setupWithNavController(navController)
}
Java
@Override
protected void onCreate(Bundle savedInstanceState) {
    setContentView(R.layout.activity_main);

    ...

    NavHostFragment navHostFragment = supportFragmentManager.findFragmentById(R.id.nav_host_fragment);
    NavController navController = navHostFragment.getNavController();
    NavigationView navView = findViewById(R.id.nav_view);
    NavigationUI.setupWithNavController(navView, navController);
}
ตั้งแต่ Navigation 2.4.0-alpha01 เป็นต้นไป ระบบจะบันทึกและกู้คืนสถานะของรายการเมนูแต่ละรายการเมื่อคุณใช้setupWithNavController
การไปยังส่วนต่างๆ ด้านล่าง
NavigationUI ยังจัดการการนําทางด้านล่างได้ด้วย เมื่อผู้ใช้เลือกรายการในเมนู NavController จะเรียกonNavDestinationSelected()และอัปเดตรายการที่เลือกในแถบนำทางด้านล่างโดยอัตโนมัติ
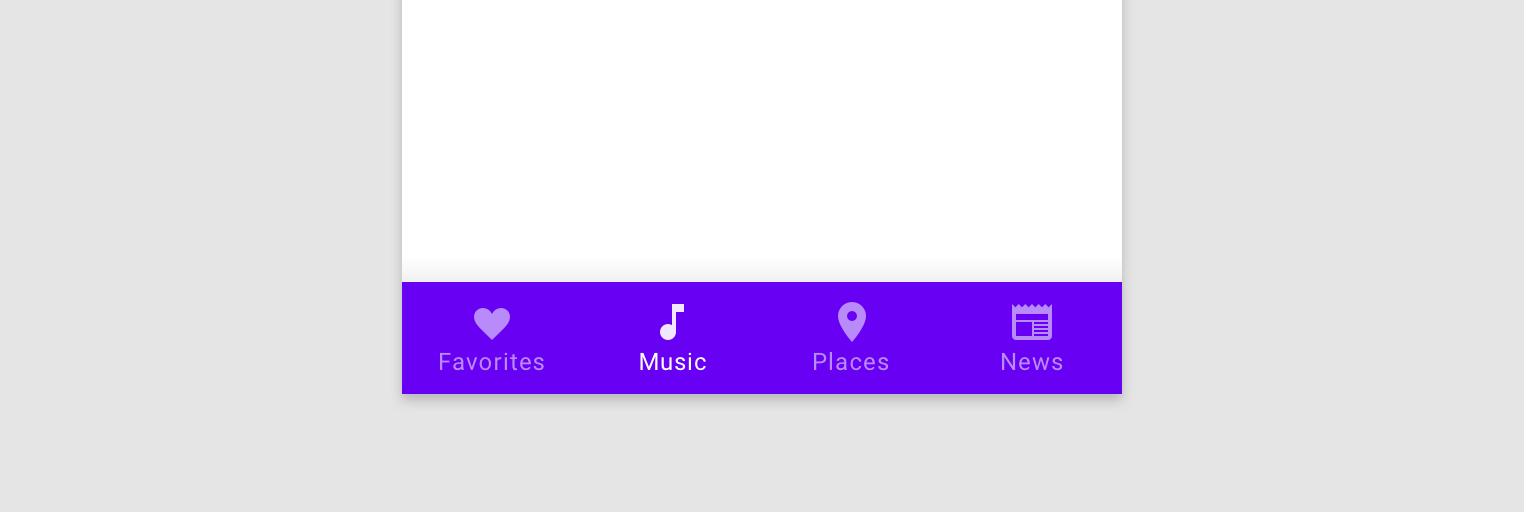
หากต้องการสร้างแถบนำทางด้านล่างในแอป ให้กำหนดแถบในกิจกรรมหลักก่อน ดังที่แสดงด้านล่าง
<LinearLayout>
    ...
    <androidx.fragment.app.FragmentContainerView
        android:id="@+id/nav_host_fragment"
        ... />
    <com.google.android.material.bottomnavigation.BottomNavigationView
        android:id="@+id/bottom_nav"
        app:menu="@menu/menu_bottom_nav" />
</LinearLayout>
ถัดไป ในคลาสกิจกรรมหลัก ให้เรียกใช้ setupWithNavController() จากเมธอด onCreate() ของกิจกรรมหลัก ดังที่แสดงด้านล่าง
Kotlin
override fun onCreate(savedInstanceState: Bundle?) {
    setContentView(R.layout.activity_main)

    ...

    val navHostFragment =
        supportFragmentManager.findFragmentById(R.id.nav_host_fragment) as NavHostFragment
    val navController = navHostFragment.navController
    findViewById<BottomNavigationView>(R.id.bottom_nav)
        .setupWithNavController(navController)
}
Java
@Override
protected void onCreate(Bundle savedInstanceState) {
    setContentView(R.layout.activity_main);

    ...

    NavHostFragment navHostFragment = supportFragmentManager.findFragmentById(R.id.nav_host_fragment);
    NavController navController = navHostFragment.getNavController();
    BottomNavigationView bottomNav = findViewById(R.id.bottom_nav);
    NavigationUI.setupWithNavController(bottomNav, navController);
}
ตั้งแต่ Navigation 2.4.0-alpha01 เป็นต้นไป ระบบจะบันทึกและกู้คืนสถานะของรายการเมนูแต่ละรายการเมื่อคุณใช้setupWithNavController
รอรับเหตุการณ์การนําทาง
การโต้ตอบกับ NavController
เป็นวิธีหลักในการไปยังปลายทางต่างๆ NavController
มีหน้าที่รับผิดชอบในการแทนที่เนื้อหาของ NavHost
ด้วยปลายทางใหม่ ในหลายกรณี องค์ประกอบ UI เช่น แถบแอปด้านบนหรือตัวควบคุมการนําทางอื่นๆ ถาวร เช่น BottomNavigationBar จะแสดงอยู่นอก NavHost และต้องได้รับการอัปเดตขณะที่คุณไปยังส่วนต่างๆ
NavController มีอินเทอร์เฟซ OnDestinationChangedListener ที่เรียกใช้เมื่อปลายทางปัจจุบันของ NavController หรืออาร์กิวเมนต์ของ NavController เปลี่ยนแปลง คุณสามารถลงทะเบียนผู้ฟังใหม่ได้ผ่านวิธีaddOnDestinationChangedListener()
โปรดทราบว่าเมื่อเรียกใช้ addOnDestinationChangedListener() ระบบจะส่งปลายทางปัจจุบันไปยังผู้ฟังทันทีหากปลายทางดังกล่าวมีอยู่
NavigationUI ใช้ OnDestinationChangedListener เพื่อทําให้คอมโพเนนต์ UI ทั่วไปเหล่านี้รับรู้การนําทาง อย่างไรก็ตาม โปรดทราบว่าคุณใช้ OnDestinationChangedListener เพียงอย่างเดียวเพื่อให้ UI หรือตรรกะทางธุรกิจที่กําหนดเองรับรู้เหตุการณ์การนําทางได้ด้วย
ตัวอย่างเช่น คุณอาจมีองค์ประกอบ UI ทั่วไปที่ต้องการแสดงในบางพื้นที่ของแอปขณะซ่อนองค์ประกอบเหล่านั้นไว้ในพื้นที่อื่นๆ เมื่อใช้OnDestinationChangedListenerของคุณเอง คุณจะเลือกแสดงหรือซ่อนองค์ประกอบ UI เหล่านี้ได้ตามปลายทางเป้าหมาย ดังที่แสดงในตัวอย่างต่อไปนี้
Kotlin
navController.addOnDestinationChangedListener { _, destination, _ ->
   if(destination.id == R.id.full_screen_destination) {
       toolbar.visibility = View.GONE
       bottomNavigationView.visibility = View.GONE
   } else {
       toolbar.visibility = View.VISIBLE
       bottomNavigationView.visibility = View.VISIBLE
   }
}
Java
navController.addOnDestinationChangedListener(new NavController.OnDestinationChangedListener() {
   @Override
   public void onDestinationChanged(@NonNull NavController controller,
           @NonNull NavDestination destination, @Nullable Bundle arguments) {
       if(destination.getId() == R.id.full_screen_destination) {
           toolbar.setVisibility(View.GONE);
           bottomNavigationView.setVisibility(View.GONE);
       } else {
           toolbar.setVisibility(View.VISIBLE);
           bottomNavigationView.setVisibility(View.VISIBLE);
       }
   }
});
Listener ที่อิงตามอาร์กิวเมนต์
หรือจะใช้อาร์กิวเมนต์ที่มีค่าเริ่มต้นภายในกราฟการนําทางก็ได้ ซึ่งตัวควบคุม UI ที่เหมาะสมจะใช้เพื่ออัปเดตสถานะได้ ตัวอย่างเช่น แทนที่จะอิงตรรกะใน OnDestinationChangedListener ตามรหัสปลายทางตามตัวอย่างก่อนหน้านี้ เราสามารถสร้างอาร์กิวเมนต์ใน NavGraph ดังนี้
<?xml version="1.0" encoding="utf-8"?>
<navigation xmlns:android="http://schemas.android.com/apk/res/android"
    xmlns:app="http://schemas.android.com/apk/res-auto"
    android:id="@+id/navigation\_graph"
    app:startDestination="@id/fragmentOne">
    <fragment
        android:id="@+id/fragmentOne"
        android:name="com.example.android.navigation.FragmentOne"
        android:label="FragmentOne">
        <action
            android:id="@+id/action\_fragmentOne\_to\_fragmentTwo"
            app:destination="@id/fragmentTwo" />
    </fragment>
    <fragment
        android:id="@+id/fragmentTwo"
        android:name="com.example.android.navigation.FragmentTwo"
        android:label="FragmentTwo">
        <argument
            android:name="ShowAppBar"
            android:defaultValue="true" />
    </fragment>
</navigation>
อาร์กิวเมนต์นี้ไม่ได้ใช้เมื่อไปยังปลายทาง แต่ใช้เป็นวิธีแนบข้อมูลเพิ่มเติมไปยังปลายทางโดยใช้ defaultValue ในกรณีนี้ ค่าจะระบุว่าควรแสดงแถบแอปหรือไม่เมื่ออยู่ในปลายทางนี้
ตอนนี้เราเพิ่ม OnDestinationChangedListener ใน Activity ได้แล้ว โดยทำดังนี้
Kotlin
navController.addOnDestinationChangedListener { _, _, arguments ->
    appBar.isVisible = arguments?.getBoolean("ShowAppBar", false) == true
}
Java
navController.addOnDestinationChangedListener(
        new NavController.OnDestinationChangedListener() {
            @Override
            public void onDestinationChanged(
                    @NonNull NavController controller,
                    @NonNull NavDestination destination,
                    @Nullable Bundle arguments
            ) {
                boolean showAppBar = false;
                if (arguments != null) {
                    showAppBar = arguments.getBoolean("ShowAppBar", false);
                }
                if(showAppBar) {
                    appBar.setVisibility(View.VISIBLE);
                } else {
                    appBar.setVisibility(View.GONE);
                }
            }
        }
);
NavController
จะเรียกใช้การเรียกกลับนี้ทุกครั้งที่มีการเปลี่ยนแปลงปลายทางการนำทาง ตอนนี้Activityจะอัปเดตสถานะหรือระดับการมองเห็นของคอมโพเนนต์ UI ที่ตนเป็นเจ้าของตามอาร์กิวเมนต์ที่ได้รับในคอลแบ็กได้แล้ว
ข้อดีอย่างหนึ่งของแนวทางนี้คือ Activity จะมองเห็นเฉพาะอาร์กิวเมนต์ในกราฟการนำทาง และไม่ทราบว่าFragmentแต่ละรายมีบทบาทและความรับผิดชอบอย่างไร ในทํานองเดียวกัน แต่ละส่วนจะไม่ทราบว่าActivity นั้นอยู่ที่ไหนและคอมโพเนนต์ UI ที่เป็นเจ้าของ
แหล่งข้อมูลเพิ่มเติม
ดูข้อมูลเพิ่มเติมเกี่ยวกับการนําทางได้ที่แหล่งข้อมูลต่อไปนี้
ตัวอย่าง
- ตัวอย่างการนําทางพื้นฐานของคอมโพเนนต์สถาปัตยกรรม Android
- ตัวอย่างการนำทางขั้นสูงของคอมโพเนนต์สถาปัตยกรรม Android
Codelabs
บล็อกโพสต์
วิดีโอ
- แนวทางปฏิบัติแนะนำ 10 ข้อสำหรับการเปลี่ยนไปใช้กิจกรรมเดียว
- กิจกรรมเดี่ยว: เหตุผล โอกาส และวิธี (Android Dev Summit ปี 2018)
- Android Jetpack: จัดการการนําทาง UI ด้วยตัวควบคุมการนําทาง (Google I/O ปี 2018)