
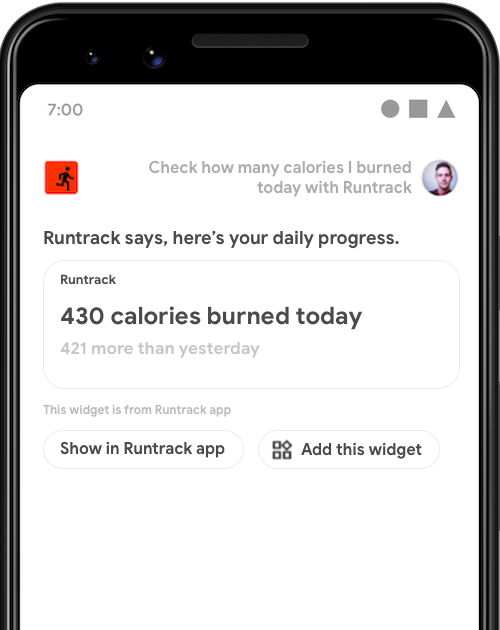
GET_EXERCISE_OBSERVATION のウィジェットを起動している。
多くのインテントでは、単純な回答や簡単な確認などの迅速な対話型のエクスペリエンスをユーザーに提供することをおすすめします。Google アシスタントに Android アプリ ウィジェットを表示することで、この種のインテントに対応できます。
このガイドでは、ウィジェットを使用して Google アシスタントのユーザーのクエリに対応する方法と、App Actions の Widgets Extension ライブラリでアシスタントのウィジェット エクスペリエンスを向上させる方法について説明します。
メリット
ウィジェットとは、ランチャーやロック画面などの Android サーフェスに埋め込むことができる小さなアプリビューです。App Actions を使用すると、ウィジェットをアシスタントで表示できるようにして、その効果を高めることができます。
- 発見: ユーザーの自然言語クエリに応じてウィジェットを積極的に表示します。
- エンゲージメント: アシスタントがロック画面のアカウントに基づく情報を表示するときや、Android Auto の場合などに、ハンズフリー コンテキストでウィジェットを表示します。
- リテンション: ユーザーがアシスタントに表示されたウィジェットをランチャーに固定できます。機能を固定するには、Widgets Extension ライブラリが必要です。
アシスタントがウィジェットを表示する方法
ユーザーがアシスタントでウィジェットを呼び出す方法は 2 つあります。
- 名前を指定してウィジェットを明示的にリクエストする。
- ウィジェット フルフィルメント用に構成された組み込みインテント(BII)またはカスタム インテントをトリガーするクエリをアシスタントに発話する。
明示的呼び出し
インストール済みのアプリのウィジェットを明示的に呼び出すには、次のようにアシスタントに話しかけます。
- 「OK Google, ExampleApp ウィジェットを表示して」
- 「ExampleApp のウィジェット」
アシスタントには、「ExampleApp says, here's a widget」という一般的な紹介とともにウィジェットが表示されます。アシスタントは、アプリ デベロッパーによる開発を必要とすることなく、この方法でリクエストされたウィジェットを返すようになっています。ただし、この呼び出し方法では、ユーザーがリクエストするウィジェットの明示的な知識を持っている必要があります。ウィジェットを簡単に発見できるようにするには、次のセクションで説明するインテント フルフィルメントの方法を使用します。
インテント フルフィルメント
ウィジェットを使用してユーザーがアシスタントで実行する自然言語クエリを処理することで、ウィジェットを見つけやすくします。たとえば、ユーザーが「OK Google, 今週は ExampleApp で何マイル歩いた?」と話しかけてフィットネス アプリの GET_EXERCISE_OBSERVATION BII をトリガーしたときにウィジェットを返すことができます。ウィジェットを App Actions と統合すると、発見が容易になるだけでなく、次のようなメリットも得られます。
- パラメータ アクセス: アシスタントがユーザークエリから抽出されたインテント パラメータをウィジェットに提供して、カスタム レスポンスを可能にします。
- 案内用のカスタム TTS: ウィジェットの表示時にアシスタントが読み上げる TTS(テキスト読み上げ)文字列を指定できます。
- ウィジェットの固定: アシスタントがウィジェットの近くに [このウィジェットを追加] ボタンを表示し、ウィジェットをランチャーに簡単に固定できるようにします。
ウィジェット フルフィルメントを実装する
インテントにウィジェット フルフィルメントを実装する手順は次のとおりです。
- シンプルなウィジェットを作成するの手順に沿って、Android ウィジェットを実装します。
- アプリの
shortcuts.xmlリソース ファイルで、フルフィルメントの詳細と BII<parameter>タグを含む<app-widget>要素をケーパビリティに追加します。パラメータを処理するようにウィジェットを更新します。 - 必要な Widgets Extension ライブラリを追加します。これで、アシスタントはウィジェットに BII 名とパラメータを渡せるようになります。また、カスタムの TTS の案内とウィジェットの固定機能も有効になります。
次のセクションでは、shortcuts.xml の <app-widget> スキーマについて説明します。
ウィジェット スキーマ
<app-widget> 要素は、shortcuts.xml の <capability> 要素内のフルフィルメントとして定義されます。任意と記載されていない限り、次の属性が必要です。
| shortcuts.xml タグ | 親要素 | 属性 |
|---|---|---|
<app-widget> |
<capability> |
|
<parameter> |
<app-widget> |
|
<extra> |
<app-widget> |
|
ウィジェット スキーマの説明
<app-widget>
最上位のウィジェット フルフィルメント要素。
属性:
android:identifier: このフルフィルメントの識別子。この値は、<capability>内で定義された<app-widget>と<intent>のフルフィルメント要素で一意である必要があります。android:targetClass: インテントを処理するAppWidgetProviderの完全なクラス名。
<parameter>
BII パラメータをインテントの <parameter> 値にマッピングします。<app-widget> 要素ごとに 0 個以上のパラメータを定義できます。アシスタントは、フルフィルメント中に、Key-Value ペアとしてウィジェット インスタンスのエクストラを次の形式で更新することで、パラメータを渡します。
- キー: パラメータに定義された
android:key。 - 値: BII がユーザーの音声入力から抽出する値。
トリガーする BII の名前とパラメータを含んだ Bundle を返す、関連付けられた AppWidgetManager オブジェクトの getAppWidgetOptions() を呼び出すことで、これらのエクストラにアクセスします。詳しくは、パラメータ値の抽出をご覧ください。
BII パラメータの照合の詳細については、パラメータのデータと照合をご覧ください。
<extra>
このウィジェットに案内用のカスタム TTS を使用することを宣言する省略可能なタグ。このタグには次の属性値が必要です。
android:name:"hasTts"android:value:"true"
サンプルコード
shortcuts.xml ファイルの次の例は、GET_EXERCISE_OBSERVATION BII ケーパビリティのウィジェット フルフィルメント構成を示しています。
<capability android:name="actions.intent.GET_EXERCISE_OBSERVATION">
  <app-widget
    android:identifier="GET_EXERCISE_OBSERVATION_1"
    android:targetClass="com.exampleapp.providers.exampleAppWidgetProvider"
    android:targetPackage="com.exampleapp">
    <parameter
      android:name="exerciseObservation.aboutExercise.name"
      android:key="exercisename">
    </parameter>
    <extra android:name="hasTts" android:value="true"/>
  </app-widget>
</capability>
ケーパビリティごとに複数の <app-widget> 要素を指定することも、<app-widget> 要素と <intent> 要素を組み合わせて使用することもできます。このアプローチにより、ユーザーが指定したパラメータのさまざまな組み合わせに基づいて、カスタマイズされたエクスペリエンスを実現できます。たとえば、ユーザーがクエリで降車場所を指定しなかった場合、乗車場所と降車場所を設定するオプションを表示するアプリ内アクティビティにユーザーを誘導できます。フォールバック インテントの定義について詳しくは、フォールバック インテントのセクションをご覧ください。
パラメータ値を抽出する
次のサンプル AppWidgetProvider クラスでは、プライベート関数 updateAppWidget() を使用して、ウィジェット オプション Bundle から BII 名とパラメータを抽出します。
Kotlin
package com.example.exampleapp

//... Other module imports
import com.google.assistant.appactions.widgets.AppActionsWidgetExtension

/**
 * Implementation of App Widget functionality.
 */
class MyAppWidget : AppWidgetProvider() {
    override fun onUpdate(
        context: Context,
        appWidgetManager: AppWidgetManager,
        appWidgetIds: IntArray
    ) {
        // There might be multiple widgets active, so update all of them
        for (appWidgetId in appWidgetIds) {
            updateAppWidget(context, appWidgetManager, appWidgetId)
        }
    }

    private fun updateAppWidget(
        context: Context,
        appWidgetManager: AppWidgetManager,
        appWidgetId: Int
    ) {
        val widgetText: CharSequence = context.getString(R.string.appwidget_text)

        // Construct the RemoteViews object
        val views = RemoteViews(context.packageName, R.layout.my_app_widget)
        views.setTextViewText(R.id.appwidget_text, widgetText)

        // Extract the name and parameters of the BII from the widget options
        val optionsBundle = appWidgetManager.getAppWidgetOptions(appWidgetId)
        val bii = optionsBundle.getString(AppActionsWidgetExtension.EXTRA_APP_ACTIONS_BII) // "actions.intent.CREATE_TAXI_RESERVATION"
        val params = optionsBundle.getBundle(AppActionsWidgetExtension.EXTRA_APP_ACTIONS_PARAMS)
        if (params != null && params.containsKey("dropoff")) {
            val dropoffLocation = params.getString("dropoff")
            // Build your RemoteViews with the extracted BII parameter
            // ...
        }
        appWidgetManager.updateAppWidget(appWidgetId, views)
    }
}
Java
package com.example.exampleapp;

//... Other module imports
import com.google.assistant.appactions.widgets.AppActionsWidgetExtension;

/**
 * Implementation of App Widget functionality.
 */
public class MyAppWidget extends AppWidgetProvider {

    @Override
    public void onUpdate(Context context, AppWidgetManager appWidgetManager, int[] appWidgetIds) {
        // There might be multiple widgets active, so update all of them
        for (int appWidgetId : appWidgetIds) {
            updateAppWidget(context, appWidgetManager, appWidgetId);
        }
    }

    private static void updateAppWidget(Context context, AppWidgetManager appWidgetManager, int appWidgetId) {

        CharSequence widgetText = context.getString(R.string.appwidget_text);

        // Construct the RemoteViews object
        RemoteViews views = new RemoteViews(context.getPackageName(), R.layout.my_app_widget);
        views.setTextViewText(R.id.appwidget_text, widgetText);

        // Extract the name and parameters of the BII from the widget options
        Bundle optionsBundle = appWidgetManager.getAppWidgetOptions(appWidgetId);
        String bii =
                optionsBundle.getString(AppActionsWidgetExtension.EXTRA_APP_ACTIONS_BII); // "actions.intent.CREATE_TAXI_RESERVATION"
        Bundle params =
                optionsBundle.getBundle(AppActionsWidgetExtension.EXTRA_APP_ACTIONS_PARAMS);

        if (params != null && params.containsKey(("dropoff"))){
            String dropoffLocation = params.getString("dropoff");
            // Build your RemoteViews with the extracted BII parameter
            // ...
        }

        appWidgetManager.updateAppWidget(appWidgetId, views);
    }
}
Widgets Extension ライブラリ
App Actions の Widgets Extension ライブラリを使用すると、音声を主体とするアシスタントに対応できるようウィジェットを拡張できます。このライブラリにより、ウィジェットはトリガーされる BII から、BII 名や、ユーザークエリから抽出されたインテント パラメータなどの重要なフルフィルメント情報を受け取ることができます。
この Maven ライブラリを使用すると、各ウィジェットに案内用のカスタム TTS(テキスト読み上げ)を提供できます。これにより、視覚的にレンダリングされるコンテンツの概要をアシスタントが読み上げることができます。また、ランチャーの固定も可能になり、ユーザーはアシスタントに表示されるウィジェットを簡単にランチャー画面に保存できるようになります。
まず、アプリ モジュールの build.gradle ファイルの依存関係セクションにライブラリを追加します。
dependencies {
    //...
    implementation "com.google.assistant.appactions:widgets:0.0.1"
}
カスタムの案内
Widgets Extension ライブラリをインポートした後、ウィジェットに案内用のカスタム TTS を提供できます。定義をウィジェットの AppWidgetProvider に追加するには、IDE でクラスを開き、Widgets Extension ライブラリをインポートします。
Kotlin
import com.google.assistant.appactions.widgets.AppActionsWidgetExtension
Java
import com.google.assistant.appactions.widgets.AppActionsWidgetExtension;
Kotlin
package com.example.exampleapp

//... Other module imports
import com.google.assistant.appactions.widgets.AppActionsWidgetExtension

/**
 * Implementation of App Widget functionality.
 */
object MyAppWidget : AppWidgetProvider() {
    fun updateAppWidget(
        context: Context?,
        appWidgetManager: AppWidgetManager,
        appWidgetId: Int
    ) {
        val appActionsWidgetExtension = AppActionsWidgetExtension.newBuilder(appWidgetManager)
            .setResponseSpeech("Hello world") // TTS to be played back to the user
            .setResponseText("Hello world!") // Response text to be displayed in Assistant
            .build()

        // Update widget with TTS
        appActionsWidgetExtension.updateWidget(appWidgetId)

        // Update widget UI
        appWidgetManager.updateAppWidget(appWidgetId, views)
    }
}
Java
package com.example.exampleapp;

//... Other module imports
import com.google.assistant.appactions.widgets.AppActionsWidgetExtension;

/**
 * Implementation of App Widget functionality.
 */
public class MyAppWidget extends AppWidgetProvider {

  static void updateAppWidget(Context context, AppWidgetManager appWidgetManager,
    int appWidgetId) {

    AppActionsWidgetExtension appActionsWidgetExtension = AppActionsWidgetExtension.newBuilder(appWidgetManager)
      .setResponseSpeech("Hello world")  // TTS to be played back to the user
      .setResponseText("Hello world!")  // Response text to be displayed in Assistant
      .build();

      // Update widget with TTS
      appActionsWidgetExtension.updateWidget(appWidgetId);

      // Update widget UI
      appWidgetManager.updateAppWidget(appWidgetId, views);
    }

}
TTS スタイルに関する推奨事項
TTS および表示されるプロンプトに最適なカスタム ウィジェットを導入するには、次のスタイルの推奨事項を適用します。
| 推奨事項 | 推奨 | 非推奨 |
|---|---|---|
短縮形(日本語は対象外)TTS プロンプトでは短縮形を使用します。短縮形を使用していないメッセージは、自然で会話的な表現ではなく、堅苦しいロボットのような印象になります。「cannot」や「do not」といった言葉は、罰しているような厳しい口調になる可能性があります。 |
ResponseSpeech(TTS)Sorry, I can’t find a reservation. ResponseTextSorry, I can't find a reservation. |
ResponseSpeech(TTS)Sorry, I cannot find a reservation. ResponseTextSorry, I cannot find a reservation. |
カンマ(日本語は対象外)3 つ以上の項目が含まれたリストでは、シリアルカンマを使用して区切りを明確にします。シリアルカンマをつけないと、リスト内の各項目が誤って聞こえたり、1 つのグループとして読み取られたりすることがあります。たとえば、「daffodils, daisies and sunflowers」とすると、「daisies and sunflowers」は 1 つのグループとして聞こえますが、「daffodils, daisies, and sunflowers」とすると、3 つすべてがはっきり分離されます。 |
ResponseSpeech(TTS)Our most popular ones include yellow roses, daffodils, daisies, and sunflowers. ResponseTextOur most popular ones include yellow roses, daffodils, daisies, and sunflowers. |
ResponseSpeech(TTS)Our most popular ones include yellow roses, daffodils, daisies and sunflowers. ResponseTextOur most popular ones include yellow roses, daffodils, daisies and sunflowers. |
数字(日本語は対象外)文字ではなく数字を使用し、コンテンツをひと目で視覚的に理解できるようにします。 |
ResponseSpeech(TTS)Your blood pressure is 100 over 80. ResponseTextYour blood pressure is 100/80. |
ResponseSpeech(TTS)Your blood pressure is 100/80. ResponseTextYour blood pressure is one hundred over eighty. |
記号(日本語は対象外)文字ではなく専用の記号を使用して、コンテンツをひと目で視覚的に理解できるようにします。 |
ResponseSpeech(TTS)Your last purchase was for $24.65. ResponseTextYour last purchase was for $24.65. |
ResponseSpeech(TTS)Your last purchase was for twenty-four dollars and sixty-five cents. ResponseTextYour last purchase was for twenty-four dollars and sixty-five cents. |
難しい表現は避ける難しい表現は、堅苦しくよそよそしい印象を与えます。形式ばらずに親しみやすい表現を心がけましょう。 |
ResponseSpeech(TTS)ご注文の商品は配送済みです。 ResponseTextご注文の商品は配送済みです。 |
ResponseSpeech(TTS)お問い合わせにお答えいたします。お客様がご注文された商品はすでに配送されています。 ResponseTextお問い合わせにお答えいたします。お客様がご注文された商品はすでに配送されています。 |
感嘆符を乱用しない感嘆符をつけると叫んでいるように受け取られる可能性があります。 |
ResponseSpeech(TTS)今日は 2.5 km 走りました。 ResponseText今日は 2.5 km 走りました。 |
ResponseSpeech(TTS)今日は 2.5 km 走りました! ResponseText今日は 2.5 km 走りました! |
時間「five-fifteen」や「quarter after five」ではなく、「5:15」の表記を使用します。12 時間制では、AM または PM を使用します。 |
ResponseSpeech(TTS)Your delivery should arrive by 8:15 AM. ResponseTextYour delivery should arrive by 8:15 AM. |
ResponseSpeech(TTS)Your delivery should arrive by 15 mins past 8 in the morning today. ResponseTextYour delivery should arrive by 15 mins past 8 in the morning today. |
簡潔な文にする返答は形式ばらずに簡潔な文にします。ユーザーに明らかなメリットのない、細かな説明をしないようにします。 |
ResponseSpeech(TTS)先月は 159 時間分のエネルギーを消費しました。 ResponseText先月は 159 時間分のエネルギーを消費しました。 |
ResponseSpeech(TTS)エネルギーを節約することは、地球や環境にとって非常に重要です。先月は 159 時間分のエネルギーを消費しました。今月は 58 時間分のエネルギーを消費しています。 ResponseTextエネルギーを節約することは、地球や環境にとって非常に重要です。先月は 159 時間分のエネルギーを消費しました。今月は 58 時間分のエネルギーを消費しています。 |
短く簡単な単語を使用するシンプルでわかりやすい言葉ほど、あらゆるバックグラウンドの人に最も幅広く届きます。 |
ResponseSpeech(TTS)前回の血糖値は 126 でした。 ResponseText前回の血糖値は 126 mg/dL でした。 |
ResponseSpeech(TTS)最後から 2 番目の血液中のブドウ糖レベルは 126 でした。 ResponseText最後から 2 番目の血液中のブドウ糖レベルは 126 でした。 |
ランチャーの固定
Widgets Extension ライブラリを使用すると、[このウィジェットを追加] ボタンをアシスタント内のウィジェットとともに表示できます。固定を有効にするには、次のレシーバー定義を AndroidManifest.xml に追加します。
<application>
  <receiver android:name="com.google.assistant.appactions.widgets.pinappwidget.PinAppWidgetBroadcastReceiver"
    android:exported="false">
    <intent-filter>
      <action android:name="com.google.assistant.appactions.widgets.COMPLETE_PIN_APP_WIDGET" />
    </intent-filter>
  </receiver>
  <service
    android:name=
    "com.google.assistant.appactions.widgets.pinappwidget.PinAppWidgetService"
    android:enabled="true"
    android:exported="true">
    <intent-filter>
      <action
        android:name="com.google.assistant.appactions.widgets.PIN_APP_WIDGET" />
    </intent-filter>
  </service>
</application>
インベントリの利用
インライン インベントリまたはウェブ インベントリをサポートする BII は、これらのインベントリをウィジェット フルフィルメントに拡張できます。
インライン インベントリ
サンプル shortcuts.xml ファイルの次のコードは、インライン インベントリとウィジェット フルフィルメントに対して構成された START_EXERCISE BII ケーパビリティを示しています。
<capability
  android:name="actions.intent.START_EXERCISE">
  <app-widget
    android:identifier="START_EXERCISE_1"
    android:targetClass="com.example.exampleapp.StartExerciseAppWidgetProvider">
    <parameter
      android:name="exercise.name"
      android:key="exerciseName"
      app:shortcutMatchRequired="true">
    </parameter>
  </app-widget>
</capability>

<shortcut android:shortcutId="RunningShortcut">
  <intent
    android:action="android.intent.action.VIEW"
    android:targetClass="com.example.exampleapp.StartExcerciseActivity" />
  <capability-binding
    android:capability="actions.intent.START_EXERCISE"
    android:parameter="exercise.name"
    android:value="running;runs" />
</shortcut>
前述のサンプルで、ユーザーがアシスタントに「ExampleApp でランニングを始めて」と話しかけてこのケーパビリティをトリガーすると、<app-widget> フルフィルメントのオプション バンドルには次の Key-Value ペアが含まれます。
- キー =
“exerciseName” - 値 =
“RunningShortcut”
ウェブ広告枠
サンプル shortcuts.xml ファイルの次のコードは、ウェブ インベントリとウィジェット フルフィルメントに対して有効になっているケーパビリティを示しています。
<shortcuts>
  <capability
    android:name="actions.intent.START_EXERCISE">
    <app-widget
      android:identifier="START_EXERCISE_1"
      android:targetClass="com.example.exampleapp.CreateTaxiAppWidgetProvider">
      <parameter
        android:name="exercise.name"
        android:key="exerciseName"
        android:mimeType="text/*">
        <data android:pathPattern="https://exampleapp.com/exercise/.*" />
      </parameter>
    </app-widget>
  </capability>
</shortcuts>
App Actions をテストする
Android Studio 用の Google アシスタント プラグインの機能である App Actions Test Tool を使用して、実機または仮想デバイスでウィジェットをテストします。このテストツールを使用する手順は次のとおりです。
- アプリを実行中のテストデバイスを接続します。
- Android Studio で、[Tools] > [App Actions] > [App Actions Test Tool] に移動します。
- [Create preview] をクリックします。
- Android Studio を使用して、テストデバイスでアプリを実行します。
- テストデバイスのアシスタント アプリを使用して、App Action をテストします。たとえば、「OK Google, 今週は ExampleApp で何マイル走った?」と尋ねます。
- アプリの動作を観察します。または、Android Studio デバッガを使用して、アクションの結果が想定どおりになることを確認します。
品質に関するガイドライン
このセクションでは、App Actions をウィジェットと統合する際の主な要件とおすすめの方法について説明します。
ウィジェットのコンテンツ
- (必須)ウィジェットに広告を表示しないでください。
- ウィジェットのコンテンツをインテントのフルフィルメントのみに集中させます。1 つのウィジェットで複数のインテントのフルフィルメントを行わないでください。また、無関係なコンテンツを追加しないでください。
認証を処理する
- (必須)ユーザーフローを完了するためにユーザー認証が必要な場合は、ユーザーが操作を続行する必要があることを説明するウィジェットをアプリ内で返してください。Google アシスタント内のインライン ユーザー認証は、App Actions ではサポートされていません。
- ユーザーがウィジェットを使用してデータを表示することをアプリに許可している場合は、権限のないユーザーに対して実行時にエラー ウィジェットを返すことができます。
フォールバック インテント
(必須)
shortcuts.xmlでは、常に、特定のケーパビリティのウィジェット フルフィルメントに加えて、フォールバック<intent>を指定します。フォールバック インテントは、必須の<parameter>値のない<intent>要素です。これがあることにより、ユーザークエリに、ケーパビリティで定義された他のフルフィルメント要素に必要なパラメータが含まれていない場合に、アシスタントがアクションを実行できるようになります。ただし、そのケーパビリティに必要なパラメータがない場合は例外です。この場合、ウィジェット フルフィルメントのみが必要になります。
フォールバック インテントを使用して、ホーム画面ではなく関連する画面にアプリを開きます。
サンプル shortcuts.xml ファイルの次のコードは、メインの <app-widget> フルフィルメントをサポートするフォールバック <intent> がある <capability> を示しています。
<shortcuts>
  <capability
    android:name="actions.intent.CREATE_TAXI_RESERVATION">
    <!-- Widget with required parameter, specified using the "android:required" attribute. -->
    <app-widget
      android:identifier="CREATE_TAXI_RESERVATION_1"
      android:targetClass="com.example.myapplication.CreateTaxiAppWidgetProvider">
      <parameter
        android:name="taxiReservation.dropoffLocation.name"
        android:key="dropoff"
        android:required="true">
      </parameter>
    </app-widget>
    <!-- Fallback intent with no parameters required to successfully execute. -->
    <intent
      android:identifier="CREATE_TAXI_RESERVATION_3"
      android:action="myapplication.intent.CREATE_TAXI_RESERVATION_1"
      android:targetClass="com.example.myapplication.TaxiReservationActivity">
    </intent>
  </capability>
</shortcuts>
Google Play のデータ開示
このセクションでは、最新バージョンの Widgets Extension ライブラリによって収集されるエンドユーザー データを記載しています。
この SDK では、アシスタントの音声機能を使用して Google アシスタントがユーザーに読み上げる、デベロッパー提供のテキスト読み上げ(TTS)応答が送信されます。この情報が Google に保存されることはありません。
App Actions は、次の目的でクライアント アプリのメタデータを収集する場合があります。
- 各 SDK バージョンの導入率をモニタリングするため。
- アプリ全体での SDK 機能の使用状況を数量化するため。