
1. 事前準備
必要條件
- 對 Kotlin Multiplatform 有基本瞭解。
- 具備 Kotlin 使用經驗。
- 對 Swift 語法有基本瞭解。
- 已安裝 Xcode 和 iOS 模擬器。
軟硬體需求
- 最新的 Android Studio 穩定版。
- 搭載 macOS 系統的 Mac 機器。
- Xcode 16.1 和 iPhone 模擬器 (搭載 iOS 16.0 以上版本)。
課程內容
- 如何在 Android 應用程式和 iOS 應用程式之間共用 Room 資料庫。
2. 做好準備
首先,請按照下列步驟操作:
- 使用下列終端機指令複製 GitHub 存放區:
$ git clone https://github.com/android/codelab-android-kmp.git
您也可以透過 ZIP 檔案下載存放區:
- 在 Android Studio 中開啟
migrate-room專案,該專案含有下列分支版本:
main:包含此專案的範例程式碼,您將修改這些程式碼來完成本程式碼研究室。end:含有本程式碼研究室的解決方案程式碼。
建議您先從 main 分支版本開始著手,依自己的步調逐步完成本程式碼實驗室。
- 如要查看解決方案程式碼,請執行以下指令:
$ git clone -b end https://github.com/android/codelab-android-kmp.git
或者,您也可以下載解決方案程式碼:
3. 瞭解範例應用程式
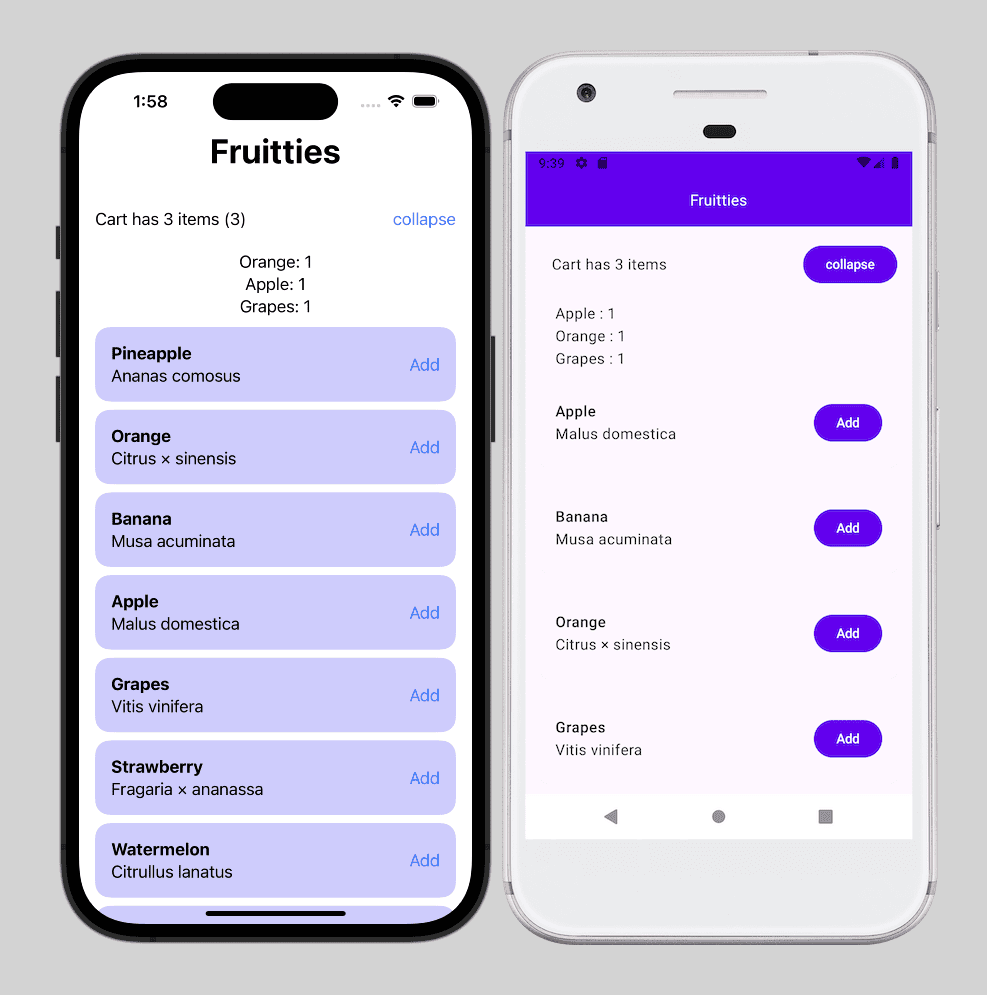
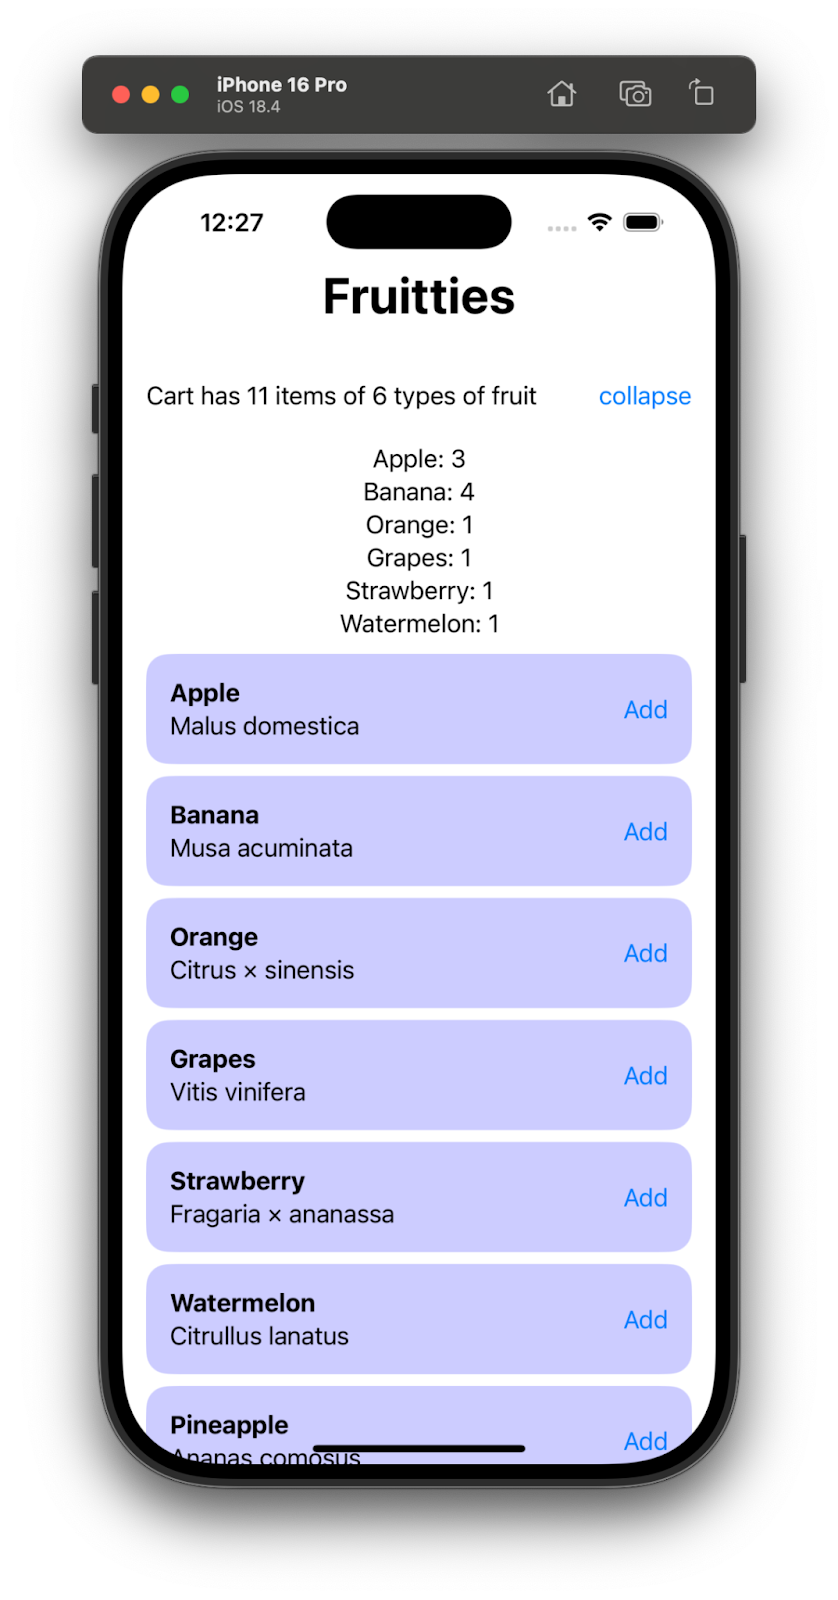
本教學課程包含以原生框架 (Android 上的 Jetpack Compose、iOS 上的 SwiftUI) 建構的 Fruitties 範例應用程式。
Fruitties 應用程式提供兩項主要功能:
- 「水果」項目清單,每個項目都有一個按鈕,可將該項目加入購物車。
- 頂端顯示「購物車」,顯示加入的水果數量。
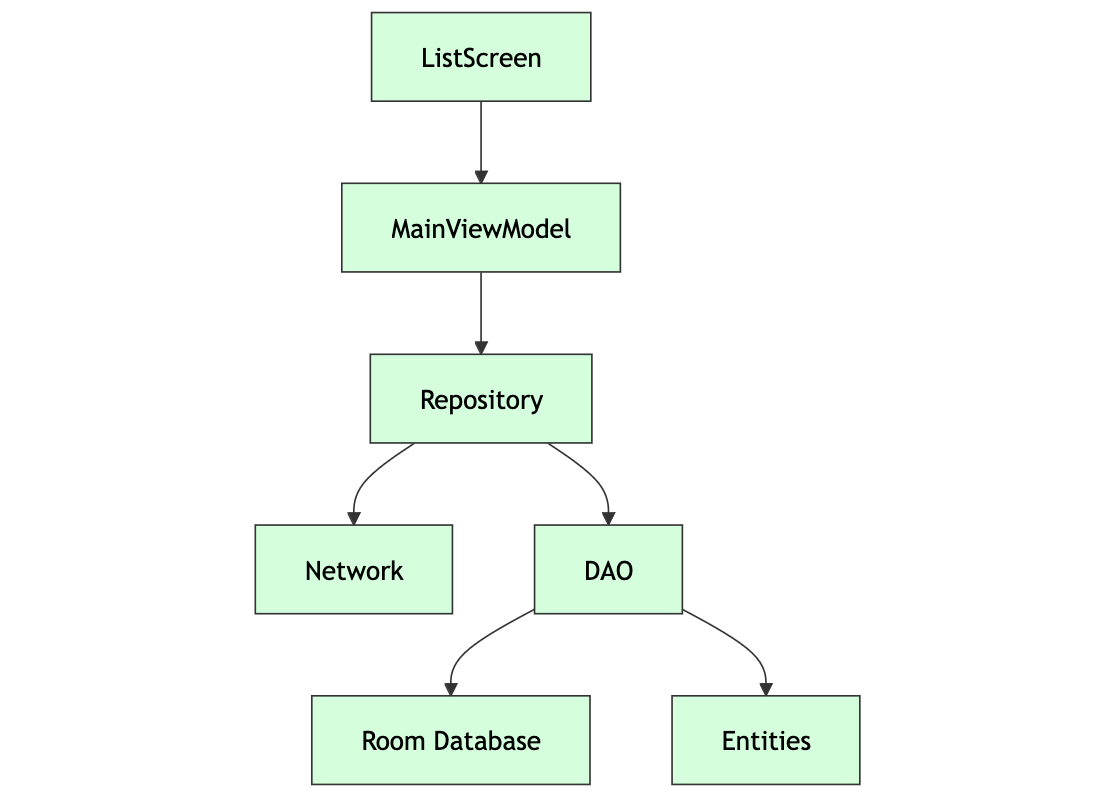
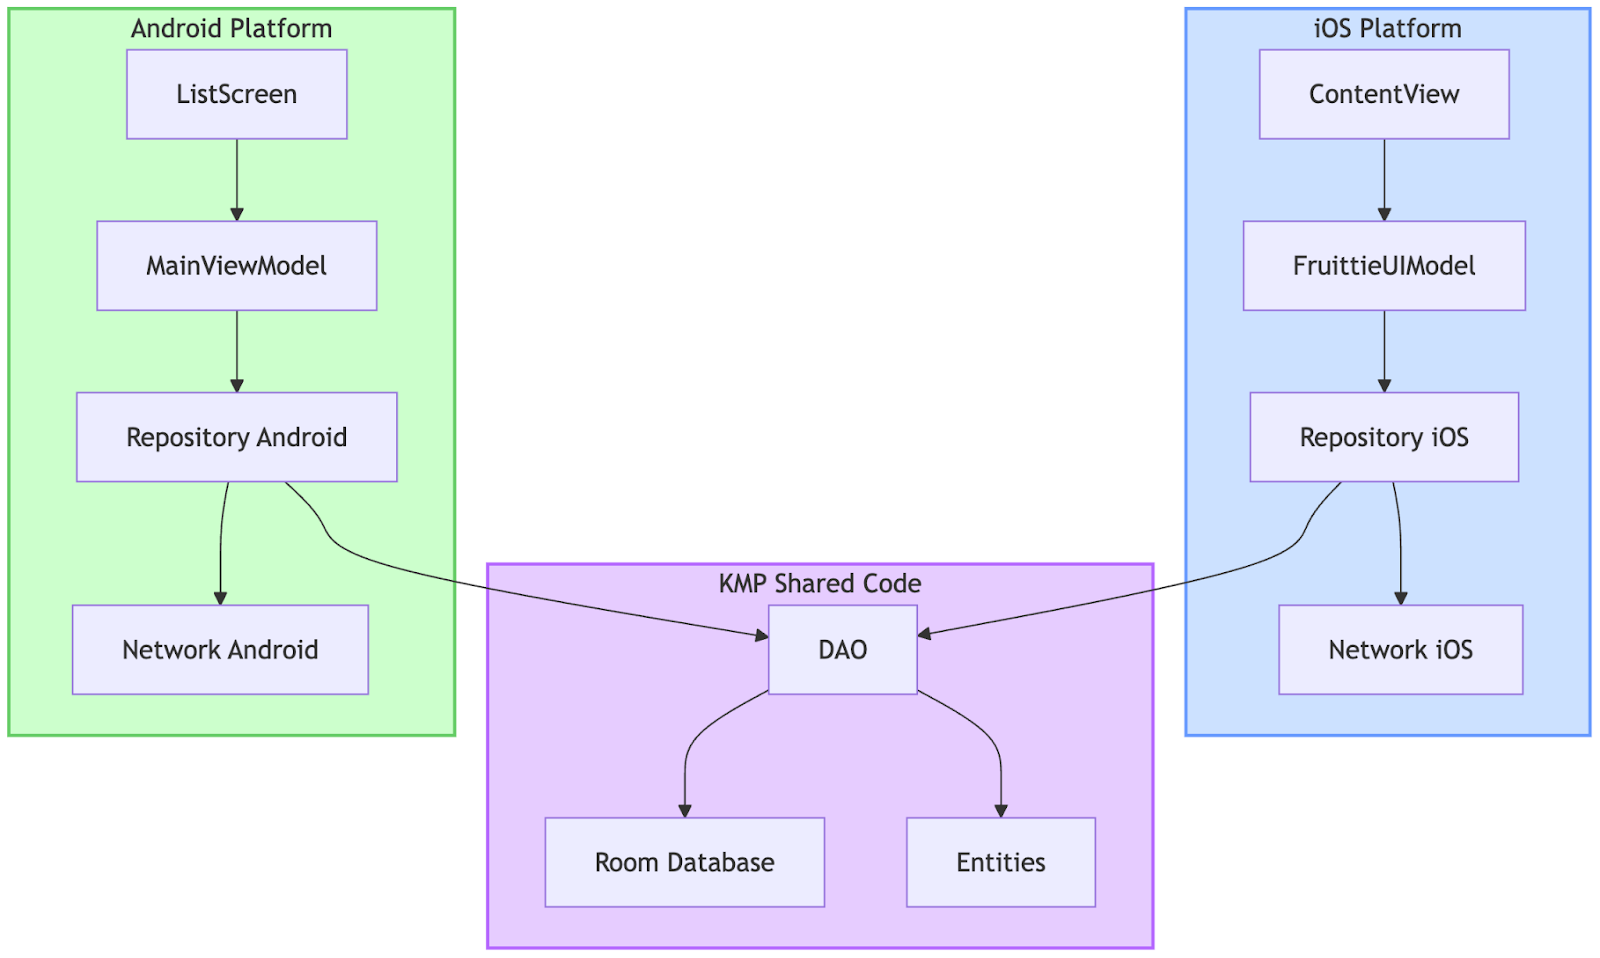
Android 應用程式架構
Android 應用程式遵守官方的 Android 架構指南,維持清楚的模組化結構。
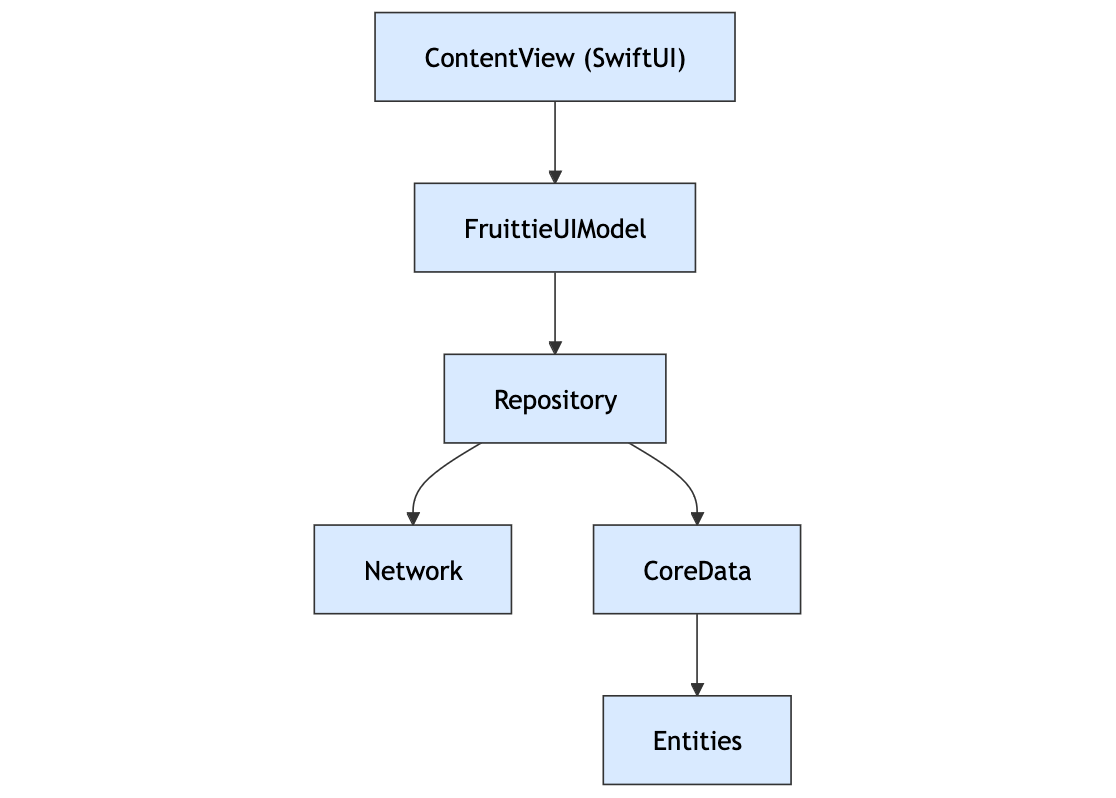
iOS 應用程式架構
KMP 共用模組
這個專案已設定 KMP 共用模組,但目前為空白。如果您的專案尚未設定共用模組,請先完成「開始使用 Kotlin Multiplatform」程式碼實驗室。
4. 準備 Room 資料庫用於 KMP 整合作業
將 Room 資料庫程式碼從 Fruitties Android 應用程式移至 shared 模組前,您必須確保應用程式與 Kotlin Multiplatform (KMP) Room API 相容。本節將逐步引導您完成這項程序。
其中一個重大更新是使用與 Android 和 iOS 相容的 SQLite 驅動程式。如要在多個平台上支援 Room 資料庫功能,您可以使用 BundledSQLiteDriver。這個驅動程式會將 SQLite 直接套用至應用程式,適合 Kotlin 多平台用途。如需詳細指南,請參閱 Room KMP 遷移指南。
更新依附元件
首先,請將 room-runtime 和 sqlite-bundled 依附元件新增至 libs.versions.toml 檔案:
# Add libraries
[libraries]
androidx-room-runtime = { module = "androidx.room:room-runtime", version.ref = "androidx-room" }

androidx-sqlite-bundled = { module = "androidx.sqlite:sqlite-bundled", version.ref = "androidx-sqlite" }
接著,請更新 :androidApp 模組的 build.gradle.kts,以便使用這些依附元件,並停止使用 libs.androidx.room.ktx:
// Add
implementation(libs.androidx.room.runtime)
implementation(libs.androidx.sqlite.bundled)
// Remove
implementation(libs.androidx.room.ktx)
接著,請同步處理 Android Studio 中的專案。
修改 BundledSQLiteDriver 資料庫模組
接著,請修改 Android 應用程式中的資料庫建立邏輯,以便使用 BundledSQLiteDriver,使其與 KMP 相容,同時保留 Android 上的功能。
- 開啟位於
androidApp/src/main/kotlin/com/example/fruitties/kmptutorial/android/di/DatabaseModule.kt的DatabaseModule.kt檔案。 - 更新
providesAppDatabase方法,如以下程式碼片段所示:
import androidx.sqlite.driver.bundled.BundledSQLiteDriver

@Module
@InstallIn(SingletonComponent::class)
internal object DatabaseModule {

...

@Provides
@Singleton
fun providesAppDatabase(@ApplicationContext context: Context): AppDatabase {
    val dbFile = context.getDatabasePath("sharedfruits.db")
    return Room.databaseBuilder<AppDatabase>(context, dbFile.absolutePath)
        .setDriver(BundledSQLiteDriver())
        .build()
}
建構並執行 Android 應用程式
現在您已將原生 SQLite 驅動程式切換成隨附驅動程式,請先驗證應用程式版本,確認一切運作正常,再將資料庫遷移至 :shared 模組。
5. 將資料庫程式碼移至 :shared 模組
在這個步驟中,我們會將 Room 資料庫設定從 Android 應用程式轉移至 :shared 模組,讓 Android 和 iOS 都能存取資料庫。
更新 :shared 模組的 build.gradle.kts 設定
首先,請更新 :shared 模組的 build.gradle.kts,以便使用 Room 多平台依附元件。
- 新增 KSP 和 Room 外掛程式:
plugins {
   ...
   // TODO add KSP + ROOM plugins
   alias(libs.plugins.ksp)
   alias(libs.plugins.room)
}
- 將
room-runtime和sqlite-bundled依附元件新增至commonMain區塊:
sourceSets {
    commonMain {
        // TODO Add KMP dependencies here
        implementation(libs.androidx.room.runtime)
        implementation(libs.androidx.sqlite.bundled)
    }
}
- 加入頂層
dependencies區塊,為每個平台目標新增 KSP 設定。為方便操作,您可以直接將其新增至檔案底部:
// Should be its own top level block. For convenience, add at the bottom of the file
dependencies {
   add("kspAndroid", libs.androidx.room.compiler)
   add("kspIosSimulatorArm64", libs.androidx.room.compiler)
   add("kspIosX64", libs.androidx.room.compiler)
   add("kspIosArm64", libs.androidx.room.compiler)
}
- 同樣在頂層新增區塊,設定
Room結構定義位置:
// Should be its own top level block. For convenience, add at the bottom of the file
room {
   schemaDirectory("$projectDir/schemas")
}
- Gradle 同步處理專案
將 Room 結構定義移至 :shared 模組
將 androidApp/schemas 目錄移至 src/ 資料夾旁的 :shared 模組根資料夾:
從: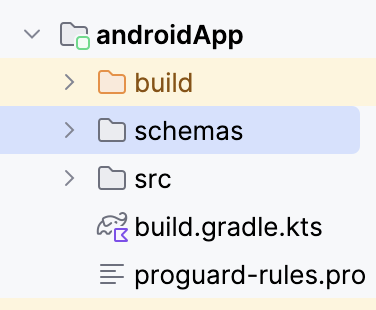
到: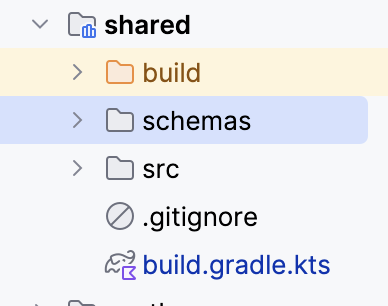
移動 DAO 和實體
現在您已將必要的 Gradle 依附元件加入 KMP 共用模組,需要將 DAO 和實體從 :androidApp 模組移至 :shared 模組。
這會將檔案移至 :shared 模組中 commonMain 來源集內的各自位置。
移動 Fruittie 模型
您可以依序點選「Refactor」>「Move」來切換模組,而不會中斷匯入作業:
- 找出
androidApp/src/main/kotlin/.../model/Fruittie.kt檔案,在檔案上按一下滑鼠右鍵,依序選取「Refactor」>「Move」 (或按 F6 鍵):
- 在「Move」對話方塊中,選取「Destination directory」欄位旁的
...圖示。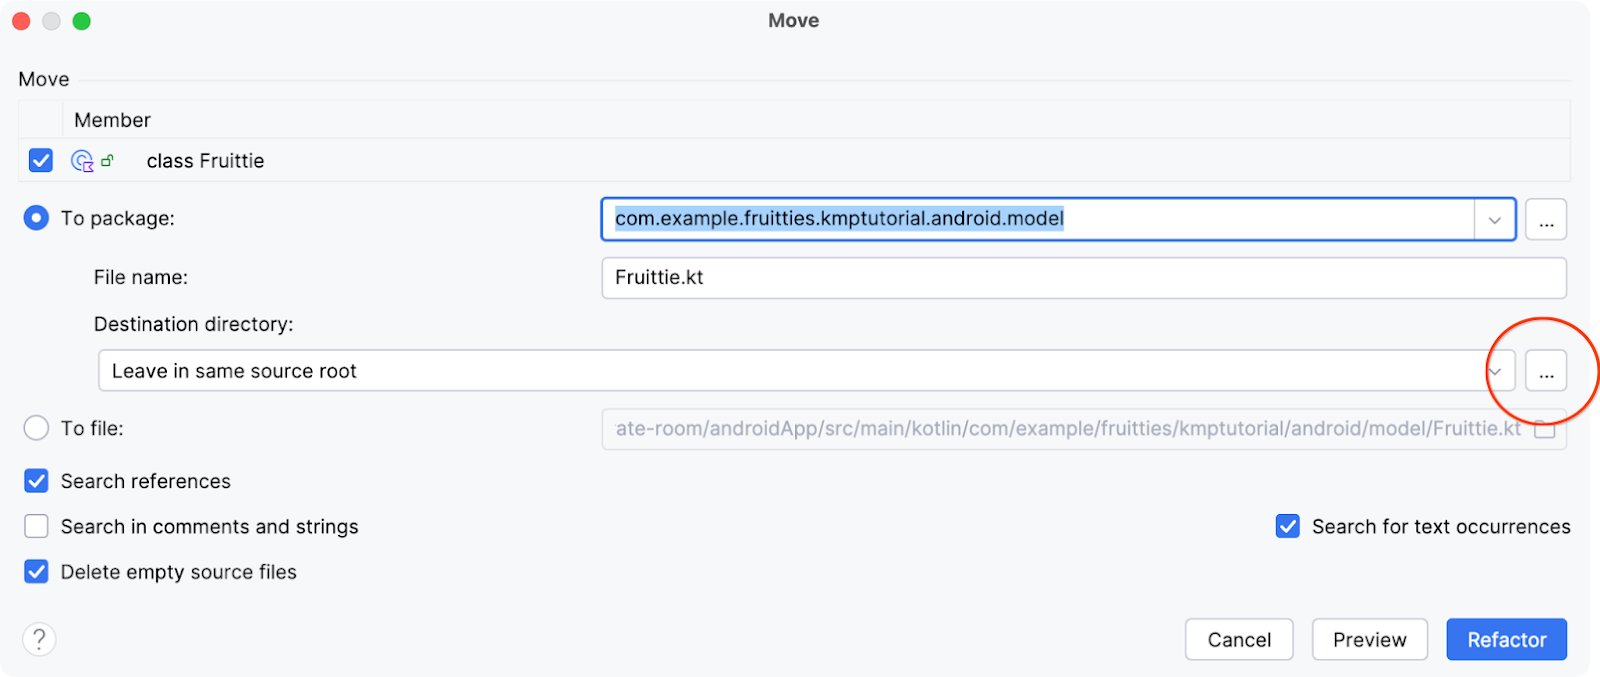
- 在「Choose Destination Directory」對話方塊中選取「commonMain」來源集,然後按一下「OK」。您可能需要停用「Show only existing source roots」核取方塊。
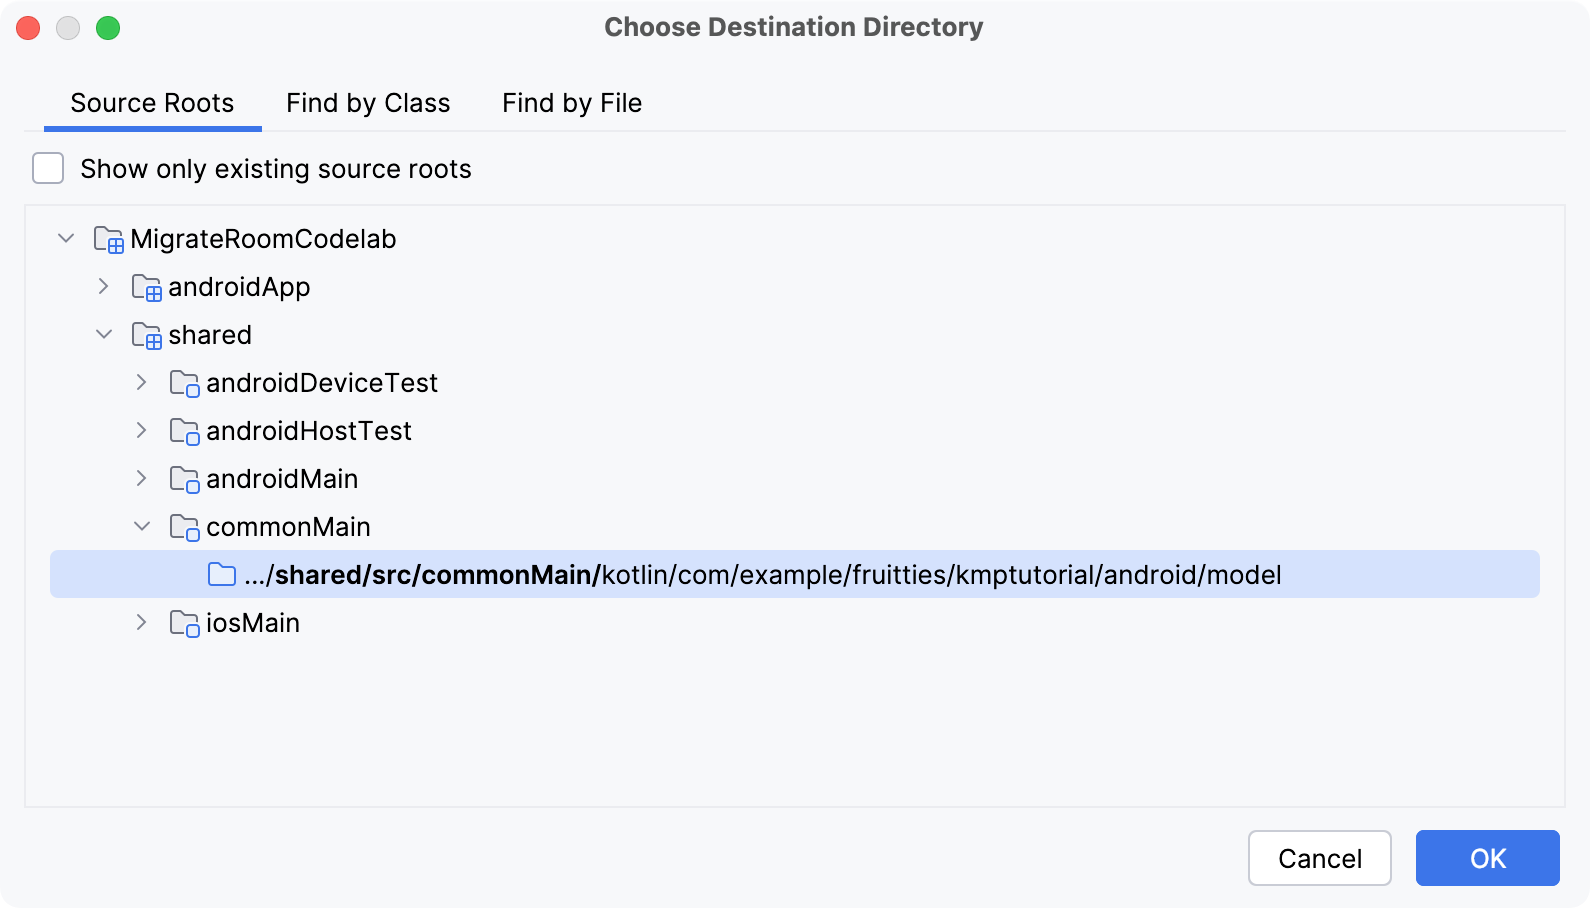
- 按一下「Refactor」按鈕即可移動檔案。
移動 CartItem 和 CartItemWithFruittie 模型
androidApp/.../model/CartItem.kt 檔案的處理步驟如下:
- 開啟檔案,在
CartItem類別上按一下滑鼠右鍵,依序選取「Refactor」>「Move」。 - 這會開啟相同的「Move」對話方塊,但在這種情況下,您也必須勾選
CartItemWithFruittie成員的核取方塊。  接著,依序選取
 ...圖示和commonMain來源集,就像處理Fruittie.kt檔案時一樣。
移動 DAO 和 AppDatabase
對下列檔案執行相同步驟 (您可以同時選取全部共三個檔案):
androidApp/.../database/FruittieDao.ktandroidApp/.../database/CartDao.ktandroidApp/.../database/AppDatabase.kt
更新共用 AppDatabase,以便在不同平台上運作
資料庫類別已移至 :shared 模組,因此您需要調整這些類別,以便在兩個平台上產生必要的實作項目。
- 開啟
/shared/src/commonMain/kotlin/com/example/fruitties/kmptutorial/android/database/AppDatabase.kt檔案。 - 新增下列
RoomDatabaseConstructor實作項目:
import androidx.room.RoomDatabaseConstructor

// The Room compiler generates the `actual` implementations.
@Suppress("NO_ACTUAL_FOR_EXPECT")
expect object AppDatabaseConstructor : RoomDatabaseConstructor<AppDatabase> {
    override fun initialize(): AppDatabase
}
- 為
AppDatabase類別加上@ConstructedBy(AppDatabaseConstructor::class)註解。
import androidx.room.ConstructedBy

@Database(
    entities = [Fruittie::class, CartItem::class],
    version = 1,
)
// TODO Add this line
@ConstructedBy(AppDatabaseConstructor::class)
abstract class AppDatabase : RoomDatabase() {
...

將資料庫建立作業移至 :shared 模組
接下來,將 Android 專用的 Room 設定從 :androidApp 模組移至 :shared 模組。這是必要步驟,因為您會在下一個步驟中從 :androidApp 模組移除 Room 依附元件。
- 找出
androidApp/.../di/DatabaseModule.kt檔案。 - 選取
providesAppDatabase函式的內容並按一下滑鼠右鍵,依序點選「Refactor」>「Extract Function to Scope」: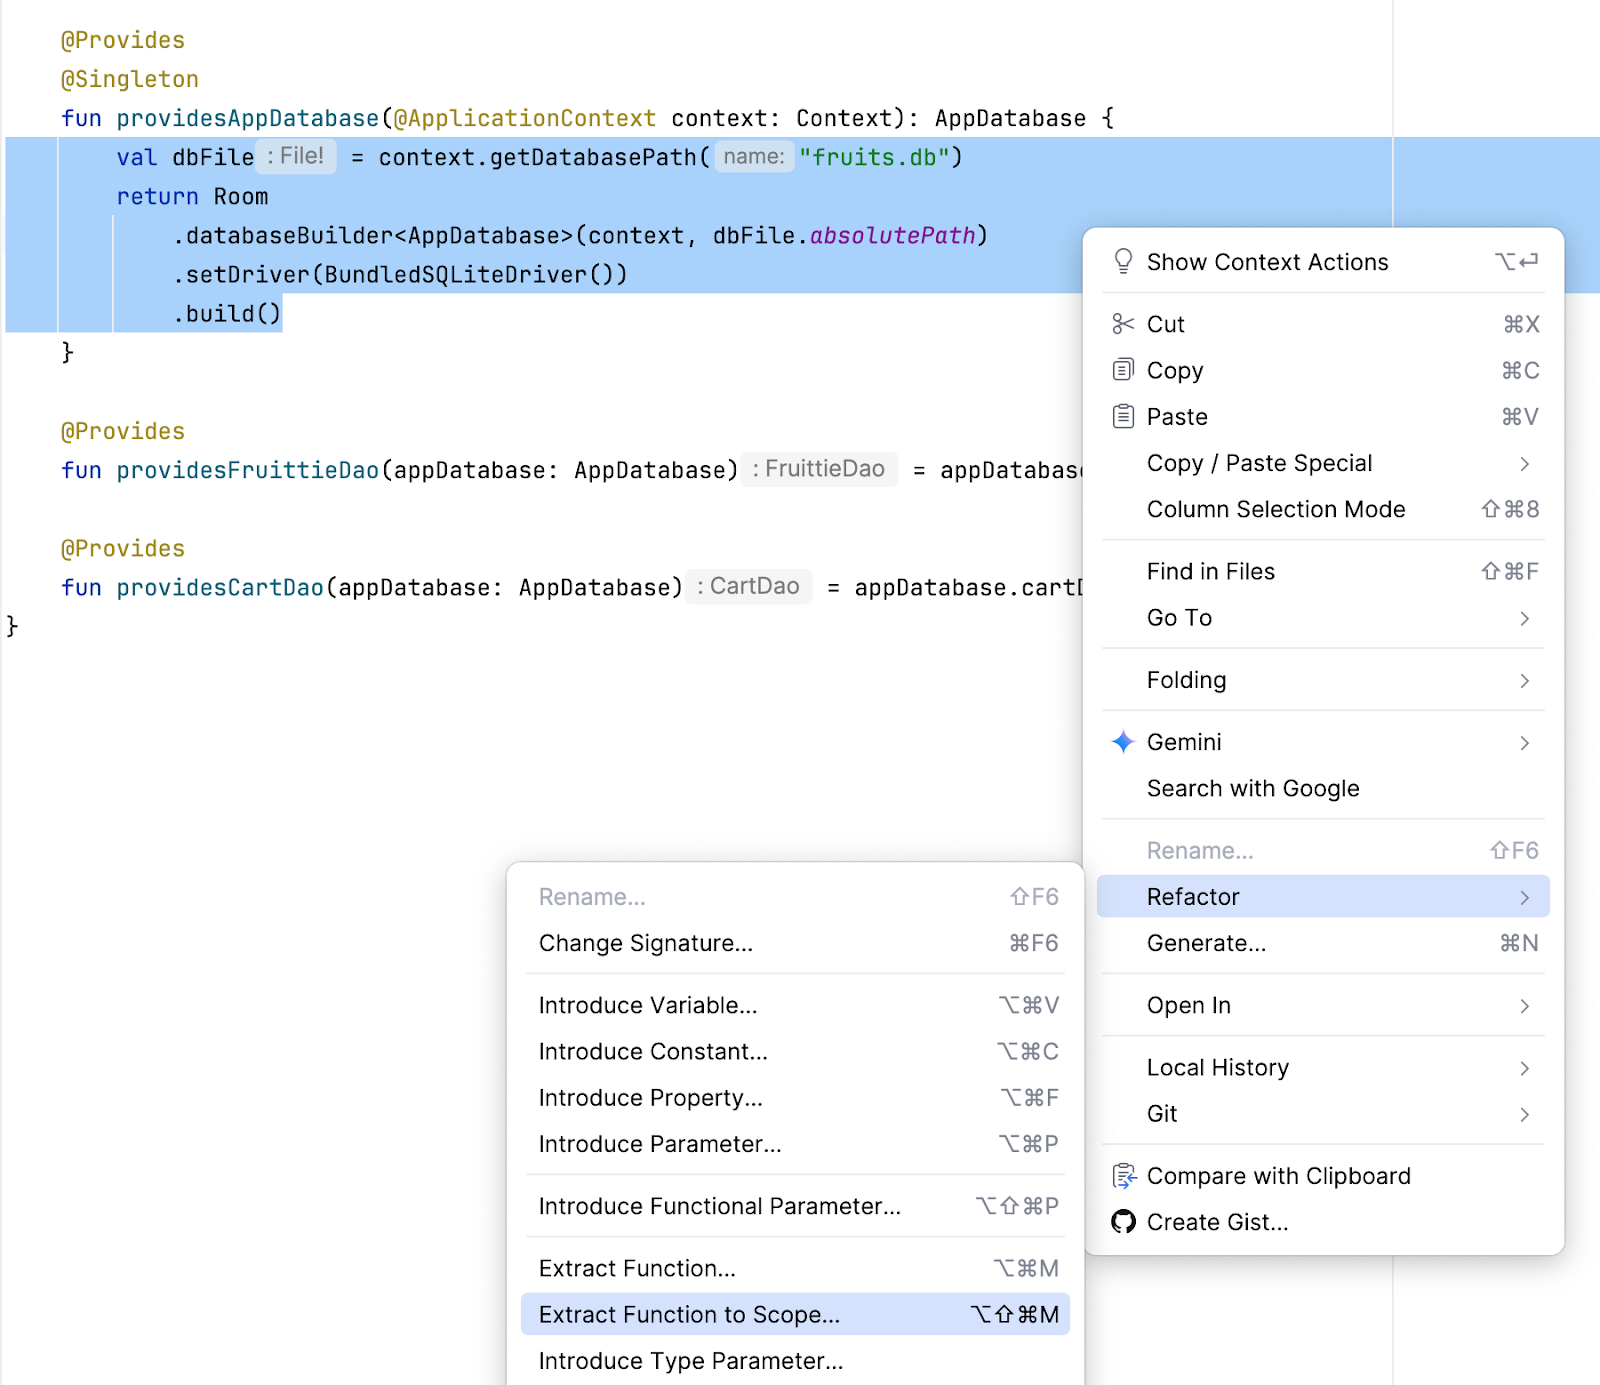
- 從選單中選取
DatabaseModule.kt,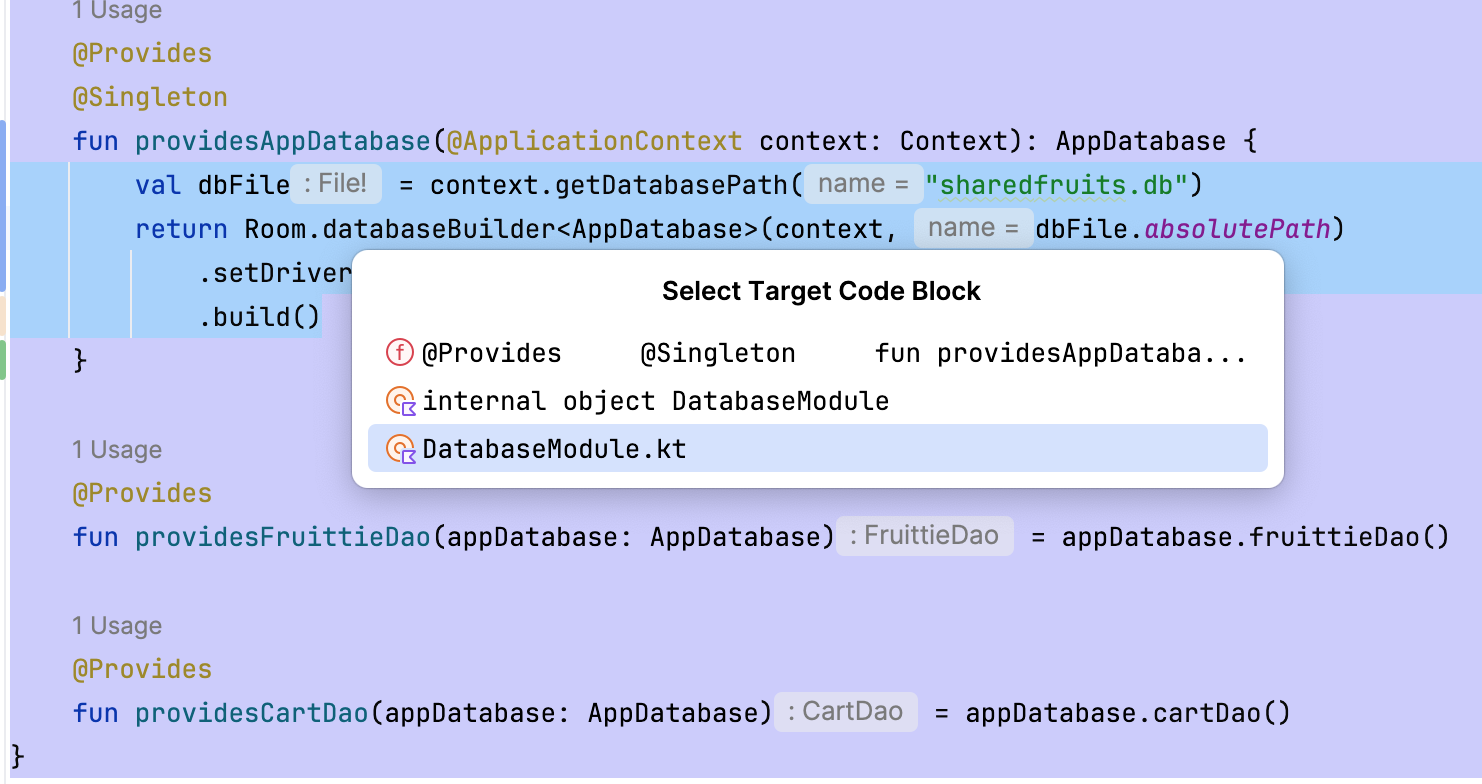 這會將內容移至全域
 appDatabase函式。按下「Enter」鍵確認函式名稱。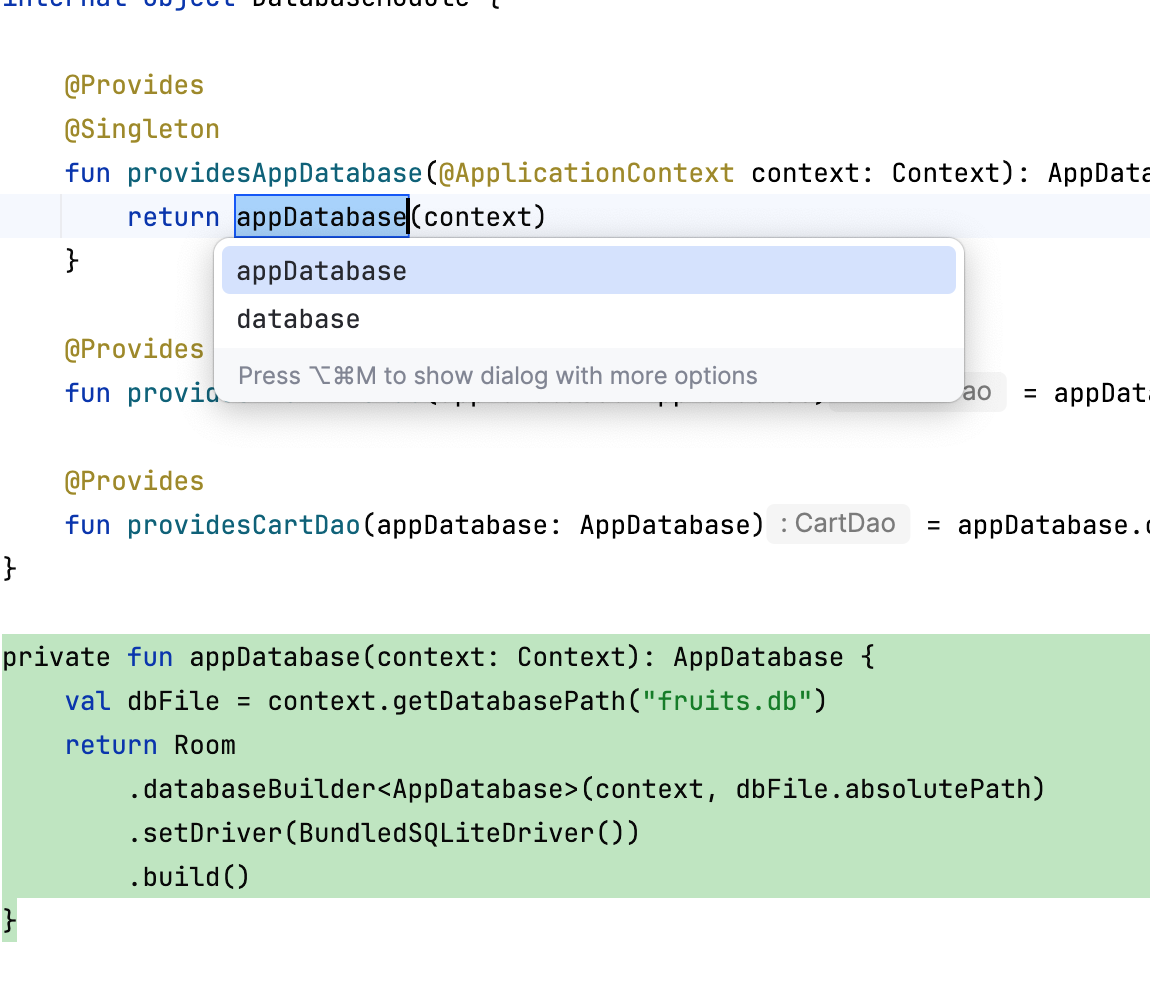
- 移除
private瀏覽權限修飾符,將函式設為公開。 - 按一下滑鼠右鍵,依序點選「Refactor」>「Move」,將函式移至
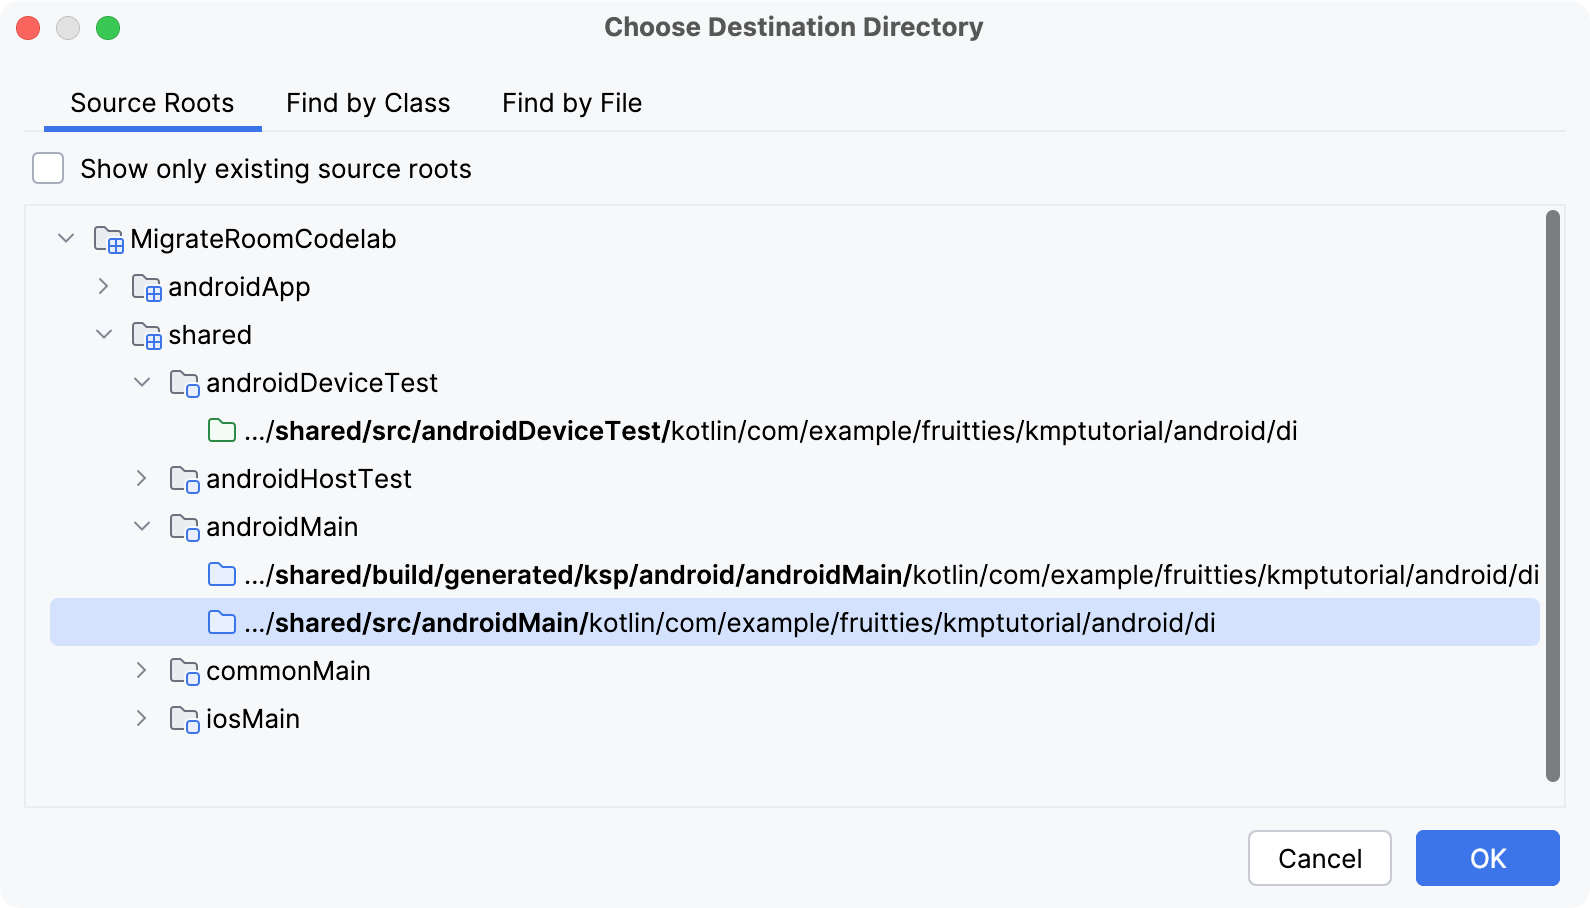
:shared模組。 - 在「Move」對話方塊中,選取「Destination directory」欄位旁的「...」圖示。
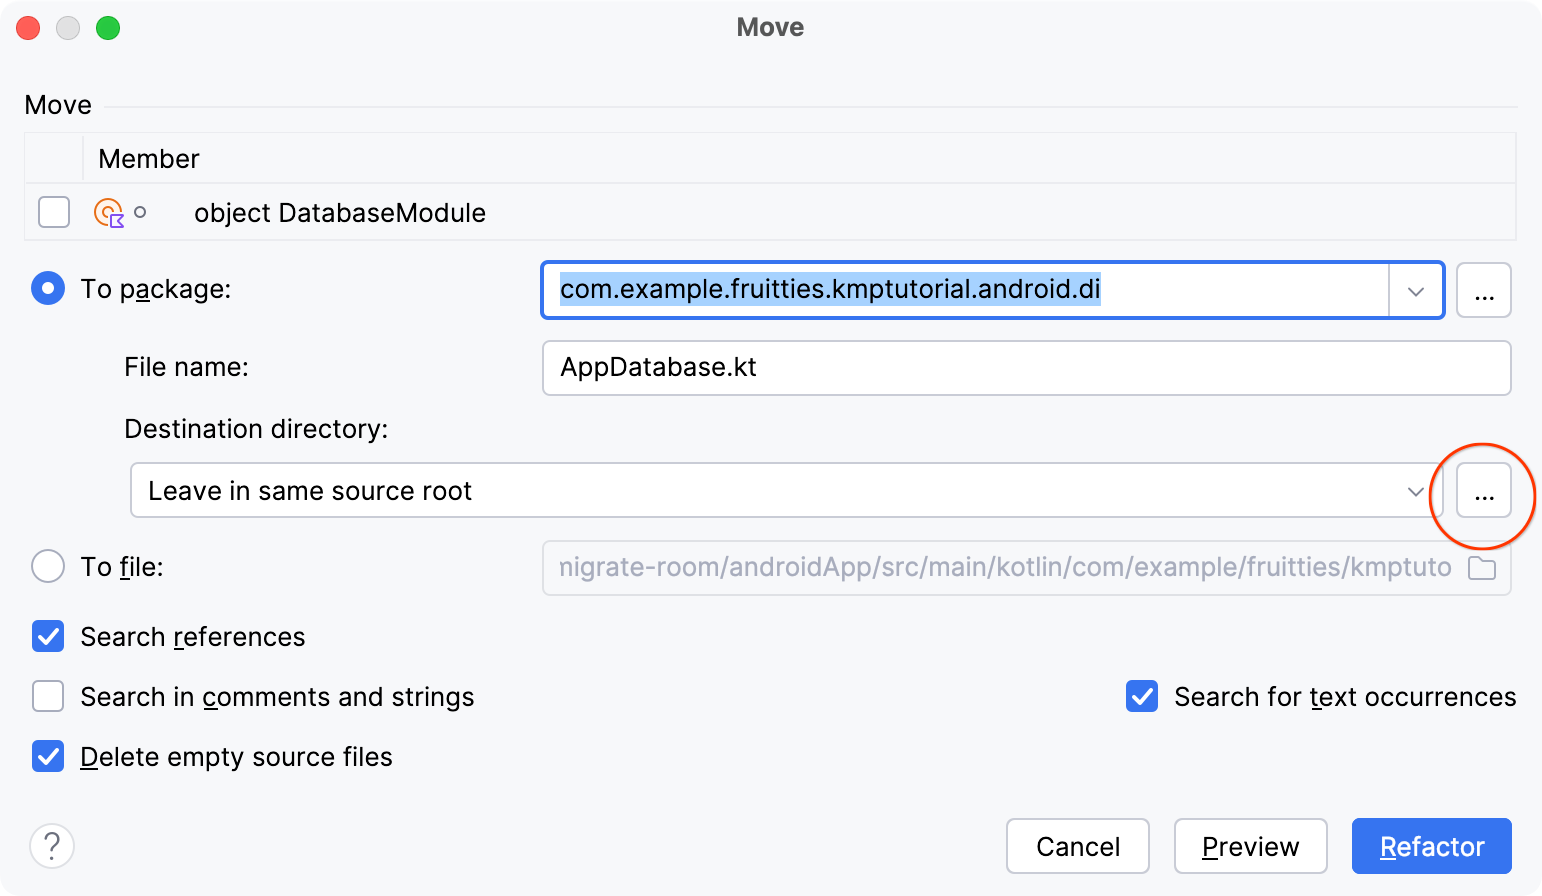
- 在「Choose Destination Directory」對話方塊中,依序選取「shared > androidMain」來源集 >「/shared/src/androidMain/」資料夾,按一下「OK」。
- 將「To package」欄位中的後置字串從
.di變更為.database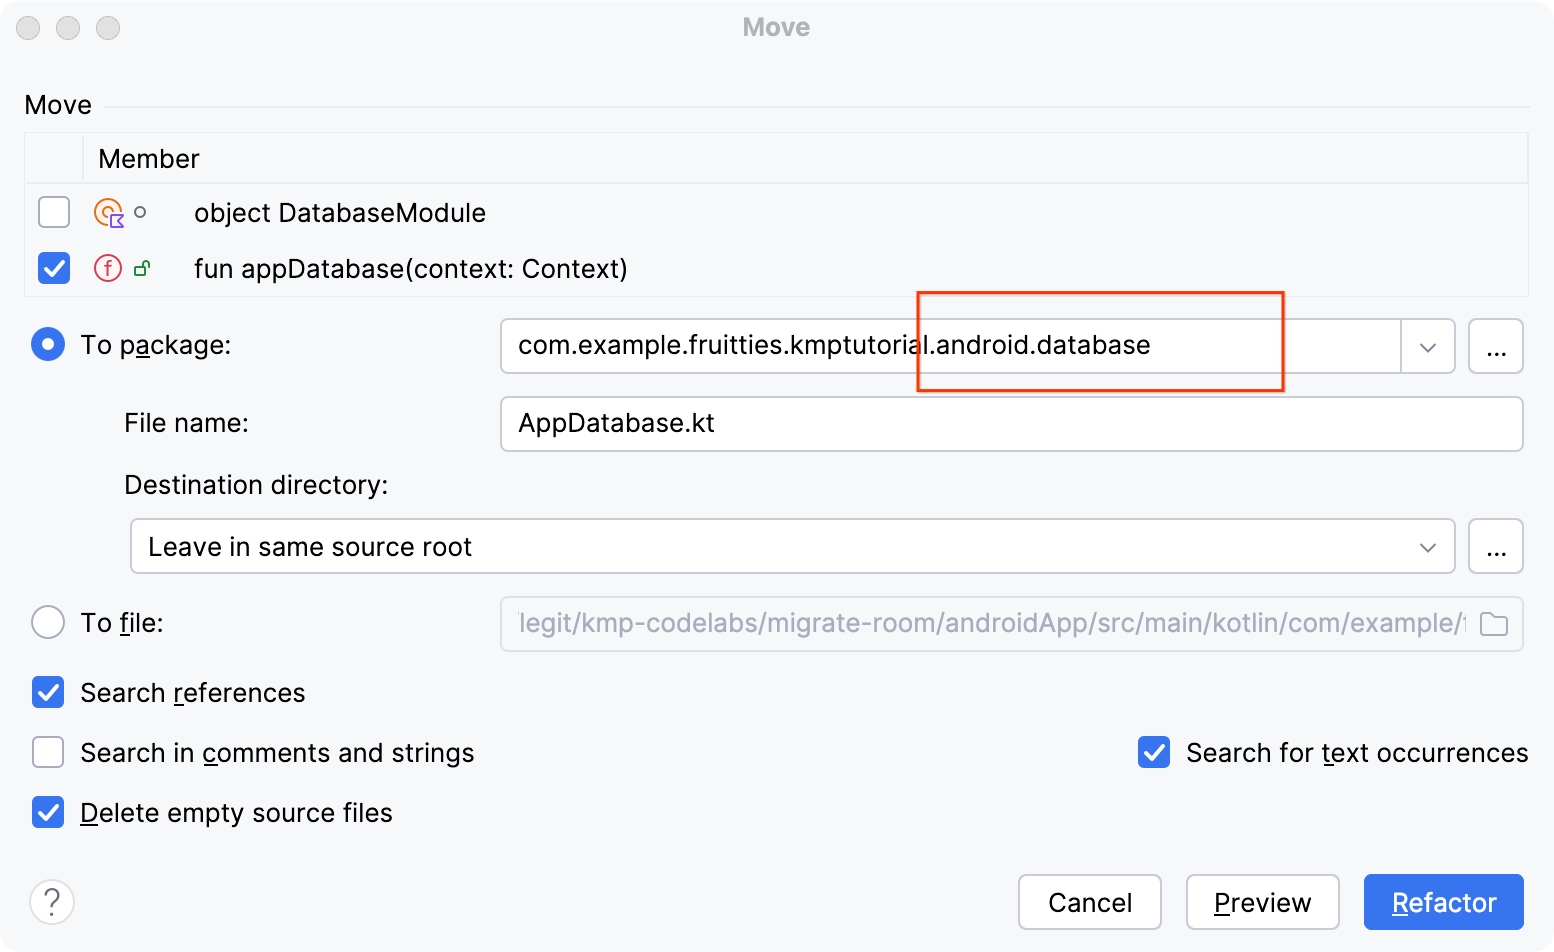
- 按一下「Refactor」。
清理 :androidApp 中不需要的程式碼
此時,您已將 Room 資料庫移至多平台模組,且 :androidApp 模組不需要使用任何 Room 依附元件,因此可以將這些元件移除。
- 開啟
:androidApp模組中的build.gradle.kts檔案。 - 移除依附元件和設定,如以下程式碼片段所示:
plugins {
  // TODO Remove
  alias(libs.plugins.room)
}

android {
  // TODO Remove
  ksp {
      arg("room.generateKotlin", "true")
  }

dependencies {
  // TODO Keep room-runtime
  implementation(libs.androidx.room.runtime)

  // TODO Remove
  implementation(libs.androidx.sqlite.bundled)
  ksp(libs.androidx.room.compiler)
}

// TODO Remove
room {
    schemaDirectory("$projectDir/schemas")
}
- Gradle 同步處理專案。
建構並執行 Android 應用程式
執行 Fruitties Android 應用程式,確保應用程式可正常執行,且已使用 :shared 模組中的資料庫。如果您先前曾加入購物車商品,即使 Room 資料庫現在位於 :shared 模組中,此時應仍可看到相同的商品。
6. 準備在 iOS 上使用 Room
如要進一步準備 iOS 平台適用的 Room 資料庫,您需要在 :shared 模組中設定一些支援程式碼,以便在下一個步驟中使用。
啟用 iOS 應用程式的資料庫建立功能
首先,新增 iOS 專用的資料庫建構工具。
- 在
iosMain來源集的:shared模組中,新增名為AppDatabase.ios.kt的檔案: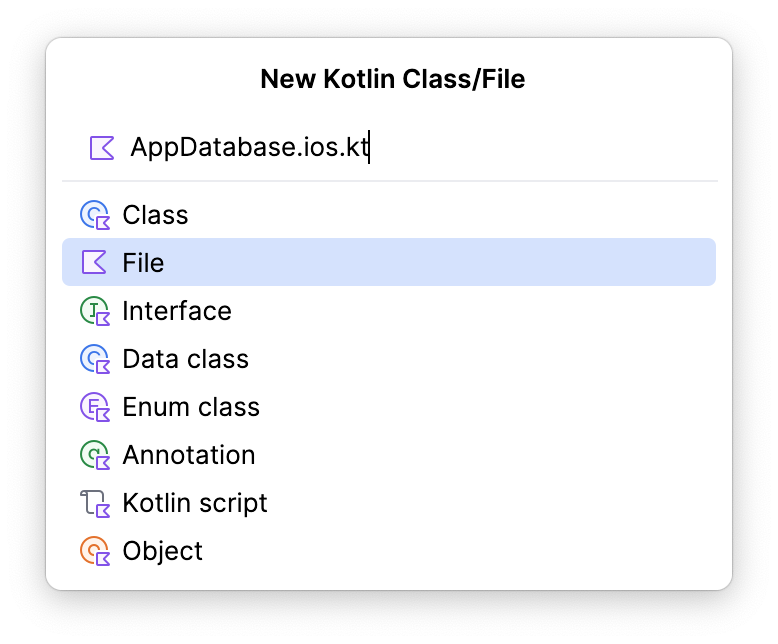
- 新增下列輔助函式。iOS 應用程式會使用這些函式取得 Room 資料庫的例項。
package com.example.fruitties.kmptutorial.shared

import androidx.room.Room
import androidx.sqlite.driver.bundled.BundledSQLiteDriver
import com.example.fruitties.kmptutorial.android.database.AppDatabase
import kotlinx.cinterop.BetaInteropApi
import kotlinx.cinterop.ExperimentalForeignApi
import kotlinx.cinterop.ObjCObjectVar
import kotlinx.cinterop.alloc
import kotlinx.cinterop.memScoped
import kotlinx.cinterop.ptr
import kotlinx.cinterop.value
import platform.Foundation.NSDocumentDirectory
import platform.Foundation.NSError
import platform.Foundation.NSFileManager
import platform.Foundation.NSUserDomainMask

fun getPersistentDatabase(): AppDatabase {
    val dbFilePath = documentDirectory() + "/" + "fruits.db"
    return Room.databaseBuilder<AppDatabase>(name = dbFilePath)
       .setDriver(BundledSQLiteDriver())
       .build()
}

@OptIn(ExperimentalForeignApi::class, BetaInteropApi::class)
private fun documentDirectory(): String {
    memScoped {
        val errorPtr = alloc<ObjCObjectVar<NSError?>>()
        val documentDirectory = NSFileManager.defaultManager.URLForDirectory(
            directory = NSDocumentDirectory,
            inDomain = NSUserDomainMask,
            appropriateForURL = null,
            create = false,
            error = errorPtr.ptr,
        )
        if (documentDirectory != null) {
            return requireNotNull(documentDirectory.path) {
                """Couldn't determine the document directory.
                  URL $documentDirectory does not conform to RFC 1808.
               """.trimIndent()
            }
        } else {
            val error = errorPtr.value
            val localizedDescription = error?.localizedDescription ?: "Unknown error occurred"
            error("Couldn't determine document directory. Error: $localizedDescription")
        }
    }
}
在 Room 實體中新增「Entity」後置字串
由於您會在 Swift 中為 Room 實體新增包裝函式,因此最好讓 Room 實體和包裝函式使用不同名稱。我們會使用 @ObjCName 註解,將 Room 實體加上「Entity」後置字串,確保兩者名稱不同。
開啟 :shared 模組中的 Fruittie.kt 檔案,將 @ObjCName 註解新增至 Fruittie 實體。由於這項註解屬於實驗性質,您可能需要在檔案中加入 @OptIn(ExperimentalObjC::class) 註解。
Fruittie.kt
import kotlin.experimental.ExperimentalObjCName
import kotlin.native.ObjCName

@OptIn(ExperimentalObjCName::class)
@Entity(indices = [Index(value = ["id"], unique = true)])
@ObjCName("FruittieEntity")
data class Fruittie(
   ...
)
接著,請對 CartItem.kt 檔案中的 CartItem 實體執行相同操作。
CartItem.kt
import kotlin.experimental.ExperimentalObjCName
import kotlin.native.ObjCName

@OptIn(ExperimentalObjCName::class)
@ObjCName("CartItemEntity")
@Entity(
   foreignKeys = [
       ForeignKey(
           entity = Fruittie::class,
           parentColumns = ["id"],
           childColumns = ["id"],
           onDelete = ForeignKey.CASCADE,
       ),
   ],
)
data class CartItem(@PrimaryKey val id: Long, val count: Int = 1)
7. 在 iOS 應用程式中使用 Room
iOS 應用程式是採用 Core Data 的現有應用程式。在本程式碼實驗室中,您不必擔心遷移資料庫中的任何現有資料,因為這只是原型應用程式。如果要將正式版應用程式遷移至 KMP,就必須編寫函式,讀取目前的 Core Data 資料庫,並在遷移後首次啟動時,將這些項目插入至 Room 資料庫。
開啟 Xcode 專案
在 Xcode 中開啟 iOS 專案,方法是前往 /iosApp/ 資料夾,在相關應用程式中開啟 Fruitties.xcodeproj。
移除 Core Data 實體類別
首先,您需要移除 Core Data 實體類別,為稍後要建立的實體包裝函式騰出空間。視應用程式在 Core Data 儲存的資料類型而定,您可以完全移除 Core Data 實體,或保留這些實體以利資料遷移。在本教學課程中,您不需要遷移任何現有資料,因此可以直接移除。
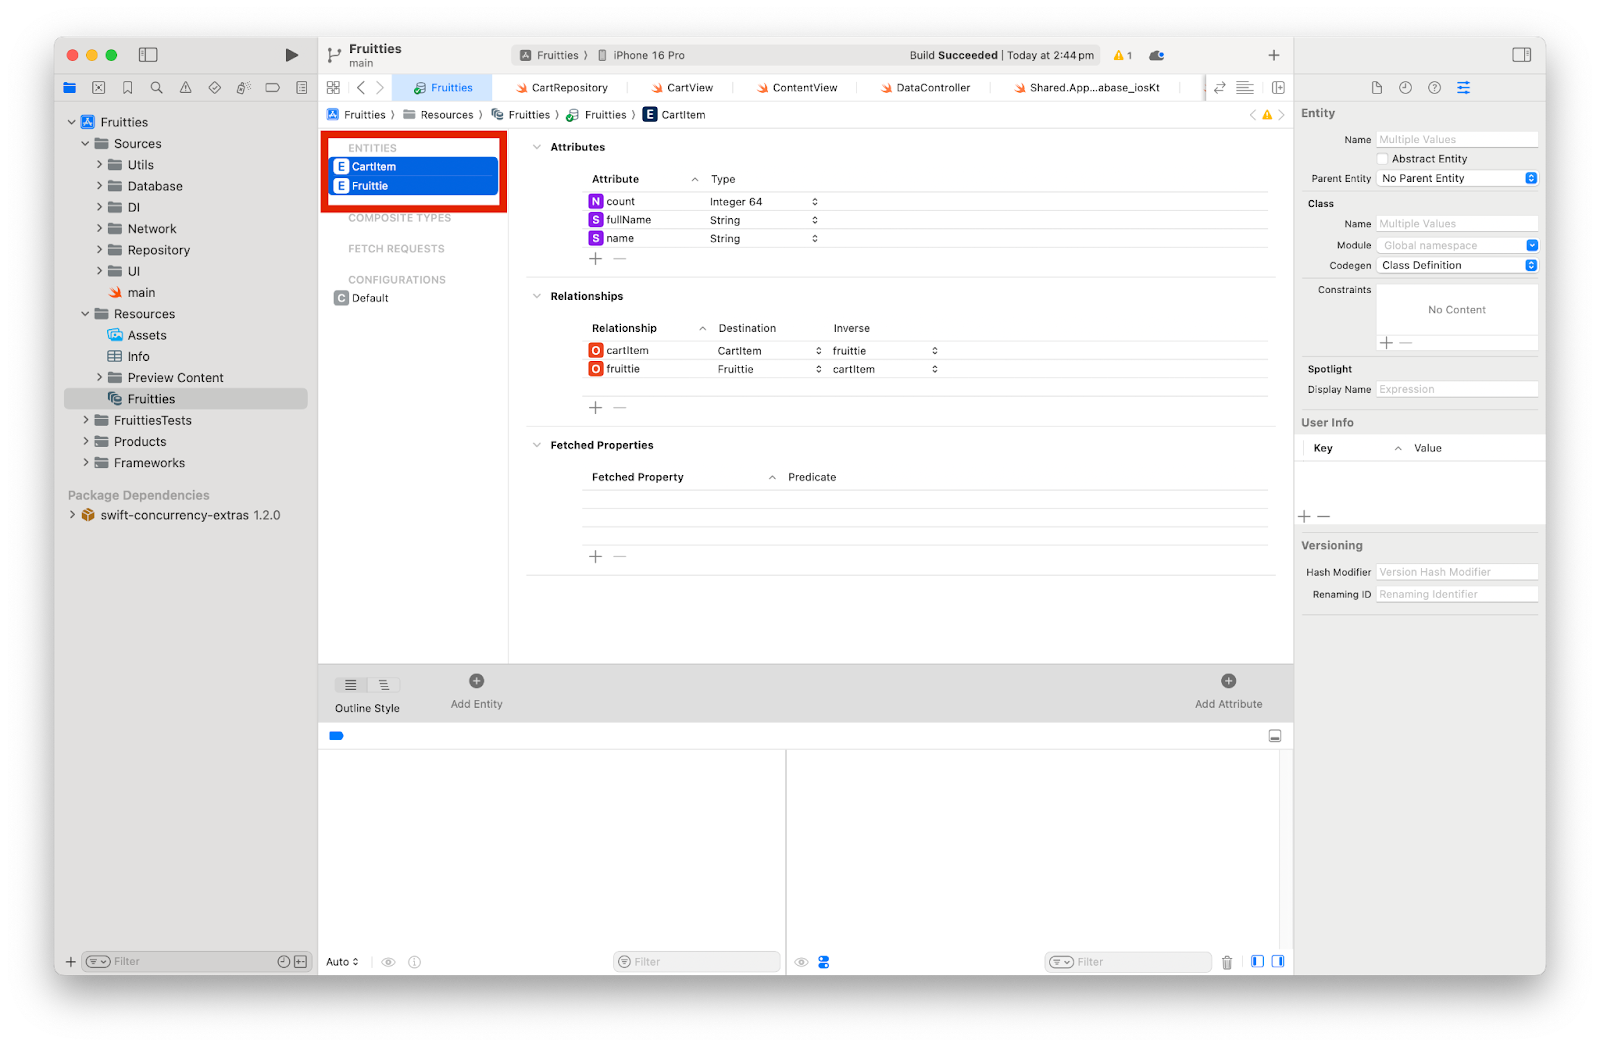
在 Xcode 中:
- 前往「Project Navigator」。
- 前往 Resources 資料夾。
- 開啟
Fruitties檔案。 - 逐一點選並刪除每個實體。
如要讓程式碼套用這些變更,請清除專案再重新建構。
這麼做應該會導致建構作業失敗,並顯示下列錯誤。
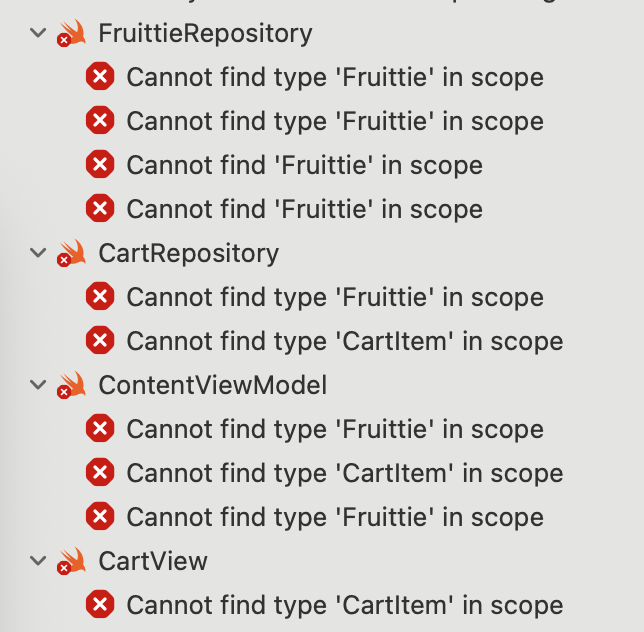
建立實體包裝函式
接下來為 Fruittie 和 CartItem 實體建立實體包裝函式,以便順利處理 Room 和 Core Data 實體之間的 API 差異。
這些包裝函式會盡量減少需要立即更新的程式碼數量,協助我們從 Core Data 轉換至 Room。建議您設法在日後以直接存取 Room 實體的方式,來取代這些包裝函式。
現在為 FruittieEntity 類別建立包裝函式,並提供選用屬性。
建立 FruittieEntity 包裝函式
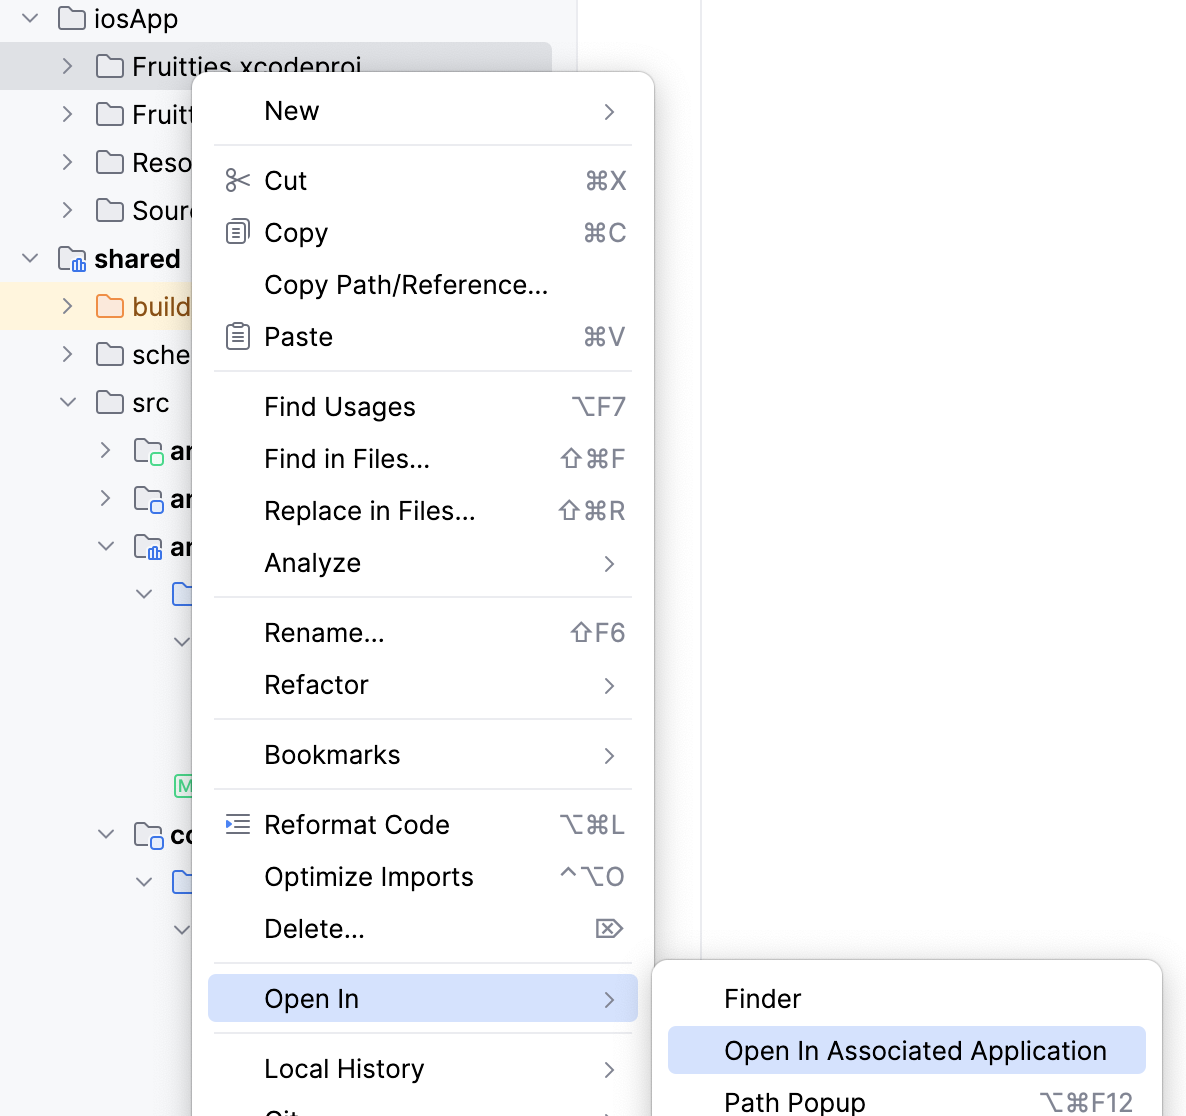
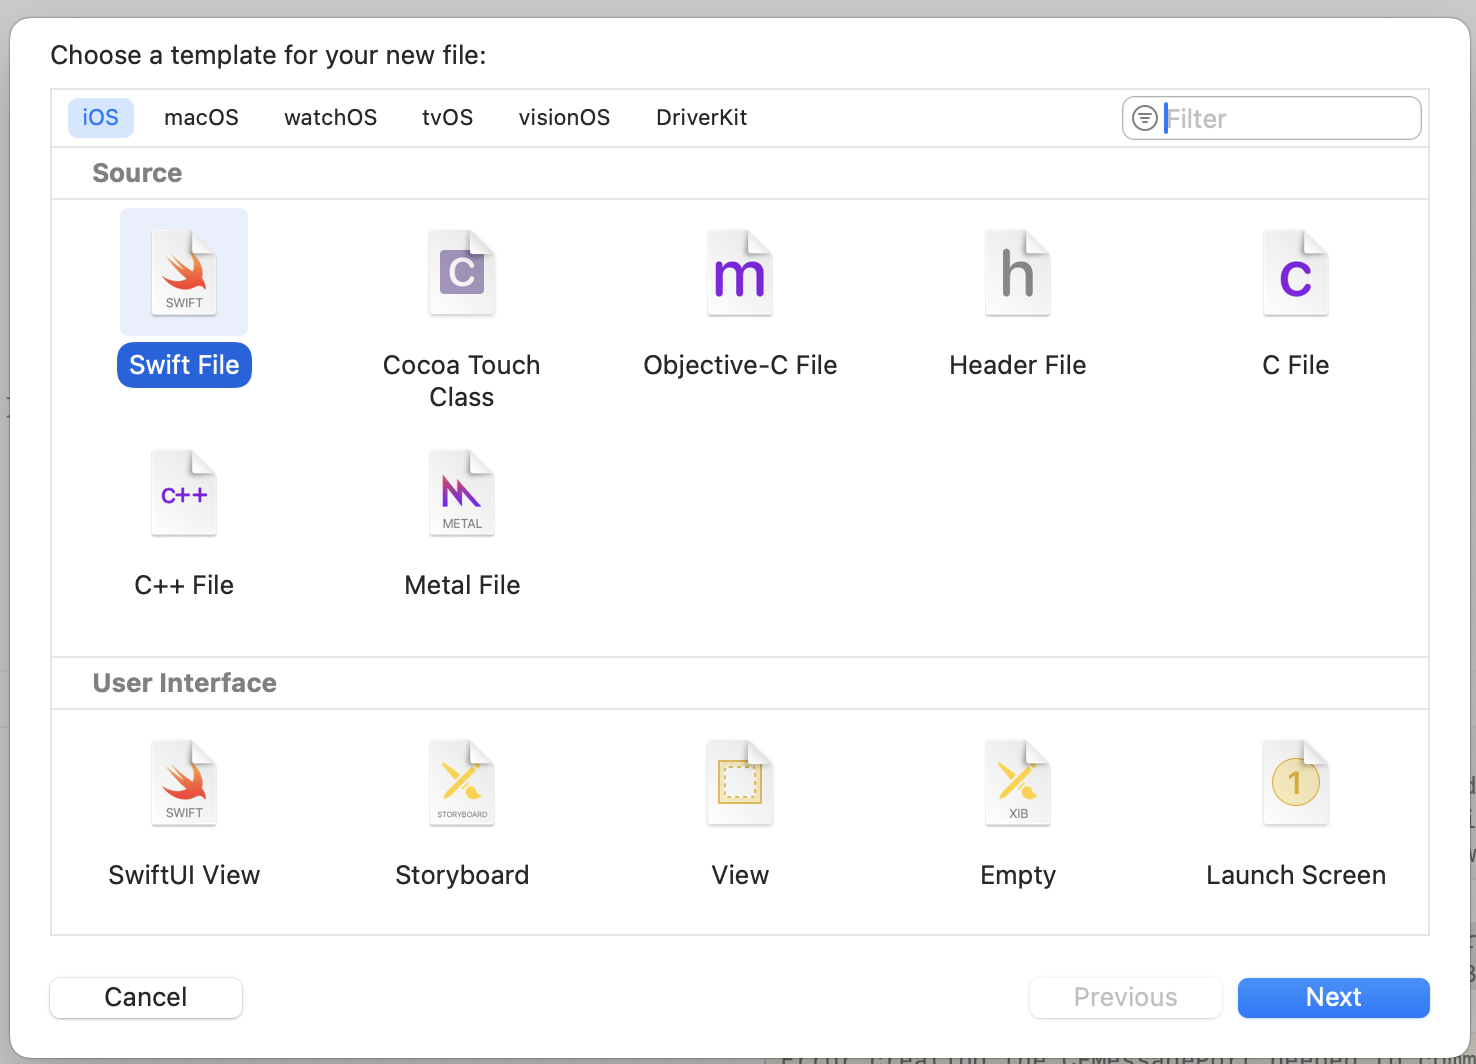
- 在
Sources/Repository目錄中建立新的 Swift 檔案,方法是在目錄名稱上按一下滑鼠右鍵,選取「New File from Template...」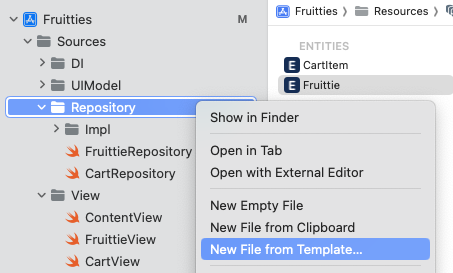
- 將檔案命名為
Fruittie,並確認只選取 Fruities 目標,而非測試目標。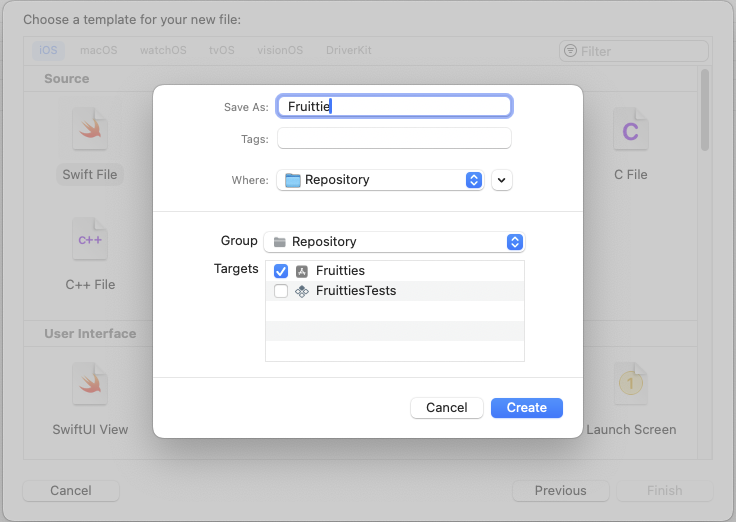
- 將下列程式碼加入新的 Fruittie 檔案:
import sharedKit

struct Fruittie: Hashable {
   let entity: FruittieEntity

   var id: Int64 {
       entity.id
   }

   var name: String? {
       entity.name
   }

   var fullName: String? {
       entity.fullName
   }
}
Fruittie 結構體會納入 FruittieEntity 類別,讓其屬性變成選用,並傳遞實體的屬性。此外,我們會讓 Fruittie 結構體符合 Hashable 通訊協定,以便在 SwiftUI 的 ForEach 檢視區塊中使用。
建立 CartItemEntity 包裝函式
接下來為 CartItemEntity 類別建立類似的包裝函式。
在 Sources/Repository 目錄中,建立名為 CartItem.swift 的新 Swift 檔案。
import sharedKit

struct CartItem: Hashable {
   let entity: CartItemWithFruittie

   let fruittie: Fruittie?

   var id: Int64 {
       entity.cartItem.id
   }

   var count: Int64 {
       Int64(entity.cartItem.count)
   }

   init(entity: CartItemWithFruittie) {
       self.entity = entity
       self.fruittie = Fruittie(entity: entity.fruittie)
   }
}
由於原始 Core Data CartItem 類別具有 Fruittie 屬性,在 CartItem 結構體中也納入了 Fruittie 屬性。雖然 CartItem 類別沒有任何選用屬性,但 count 屬性在 Room 實體中具有不同類型。
更新存放區
現在實體包裝函式已就位,您需要更新 DefaultCartRepository 和 DefaultFruittieRepository,以便使用 Room 而非 Core Data。
更新「DefaultCartRepository」
先從 DefaultCartRepository 類別開始,因為這是兩者中較簡單的類別。
開啟 Sources/Repository 目錄中的 CartRepository.swift 檔案。
- 首先,請將
CoreData匯入項目替換為sharedKit:
import sharedKit
- 接著,請移除
NSManagedObjectContext屬性,並以CartDao屬性取代:
// Remove
private let managedObjectContext: NSManagedObjectContext

// Replace with
private let cartDao: any CartDao
- 更新
init建構函式,初始化新的cartDao屬性:
init(cartDao: any CartDao) {
    self.cartDao = cartDao
}
- 接著,更新
addToCart方法。這個方法需要從 Core Data 提取現有的購物車商品,但 Room 實作項目不需要這麼做,而是插入新項目,或增加現有購物車項目的數量。
func addToCart(fruittie: Fruittie) async throws {
    try await cartDao.insertOrIncreaseCount(fruittie: fruittie.entity)
}
- 最後,更新
getCartItems()方法。這個方法會對CartDao呼叫getAll()方法,並將CartItemWithFruittie實體對應至CartItem包裝函式。
func getCartItems() -> AsyncStream<[CartItem]> {
    return cartDao.getAll().map { entities in
        entities.map(CartItem.init(entity:))
    }.eraseToStream()
}
更新「DefaultFruittieRepository」
如要遷移 DefaultFruittieRepository 類別,我們會套用對 DefaultCartRepository 所做的類似變更。
將 FruittieRepository 檔案更新成以下內容:
import ConcurrencyExtras
import sharedKit

protocol FruittieRepository {
    func getData() -> AsyncStream<[Fruittie]>
}

class DefaultFruittieRepository: FruittieRepository {
    private let fruittieDao: any FruittieDao
    private let api: FruittieApi

    init(fruittieDao: any FruittieDao, api: FruittieApi) {
        self.fruittieDao = fruittieDao
        self.api = api
    }

    func getData() -> AsyncStream<[Fruittie]> {
        let dao = fruittieDao
        Task {
            let isEmpty = try await dao.count() == 0
            if isEmpty {
                let response = try await api.getData(pageNumber: 0)
                let fruitties = response.feed.map {
                    FruittieEntity(
                        id: 0,
                        name: $0.name,
                        fullName: $0.fullName,
                        calories: ""
                    )
                }
                _ = try await dao.insert(fruitties: fruitties)
            }
        }
        return dao.getAll().map { entities in
            entities.map(Fruittie.init(entity:))
        }.eraseToStream()
    }
}
取代 @FetchRequest 屬性包裝函式
我們也需要取代 SwiftUI 檢視區塊中的 @FetchRequest 屬性包裝函式。@FetchRequest 屬性包裝函式的用途是從 Core Data 擷取資料及觀察變更,因此無法與 Room 實體搭配使用。請改用 UIModel 存取存放區的資料。
- 開啟
Sources/UI/CartView.swift檔案中的CartView。 - 將實作項目替換成以下內容:
import SwiftUI

struct CartView : View {
    @State
    private var expanded = false

    @ObservedObject
    private(set) var uiModel: ContentViewModel

    var body: some View {
        if (uiModel.cartItems.isEmpty) {
            Text("Cart is empty, add some items").padding()
        } else {
            HStack {
                Text("Cart has \(uiModel.cartItems.count) items (\(uiModel.cartItems.reduce(0) { $0 + $1.count }))")
                    .padding()

                Spacer()

                Button {
                    expanded.toggle()
                } label: {
                    if (expanded) {
                        Text("collapse")
                    } else {
                        Text("expand")
                    }
                }
                .padding()
            }
            if (expanded) {
                VStack {
                    ForEach(uiModel.cartItems, id: \.self) { item in
                        Text("\(item.fruittie!.name!): \(item.count)")
                    }
                }
            }
        }
    }
}
更新 ContentView
更新 Sources/View/ContentView.swift 檔案中的 ContentView,將 FruittieUIModel 傳遞至 CartView。
CartView(uiModel: uiModel)
更新 DataController
iOS 應用程式中的 DataController 類別負責設定 Core Data 堆疊。由於我們不再使用 Core Data,因此需要更新 DataController,才能初始化 Room 資料庫。
- 開啟
Sources/Database中的DataController.swift檔案。 - 新增
sharedKit匯入項目。 - 移除
CoreData匯入項目。 - 將
DataController類別中的 Room 資料庫例項化。 - 最後,從
DataControllerInitializer 中移除loadPersistentStores方法呼叫。
最終類別應如下所示:
import Combine
import sharedKit

class DataController: ObservableObject {
    let database = getPersistentDatabase()
    init() {}
}
更新依附元件插入功能
iOS 應用程式中的 AppContainer 類別負責初始化依附元件圖表。我們已更新存放區,改用 Room 而非 Core Data,因此需要更新 AppContainer,將 Room DAO 傳遞至存放區。
- 開啟
Sources/DI資料夾中的AppContainer.swift。 - 新增
sharedKit匯入項目。 - 從
AppContainer類別移除managedObjectContext屬性。 - 從
DataController提供的AppDatabase例項傳遞 Room DAO,以變更DefaultFruittieRepository和DefaultCartRepository初始化作業。
完成後,類別會如下所示:
import Combine
import Foundation
import sharedKit

class AppContainer: ObservableObject {
    let dataController: DataController
    let api: FruittieApi
    let fruittieRepository: FruittieRepository
    let cartRepository: CartRepository

    init() {
        dataController = DataController()
        api = FruittieNetworkApi(
            apiUrl: URL(
                string:
                    "https://android.github.io/kotlin-multiplatform-samples/fruitties-api"
            )!)
        fruittieRepository = DefaultFruittieRepository(
            fruittieDao: dataController.database.fruittieDao(),
            api: api
        )
        cartRepository = DefaultCartRepository(
                    cartDao: dataController.database.cartDao()
        )
    }
}
最後,請更新 main.swift 中的 FruittiesApp,移除 managedObjectContext:
struct FruittiesApp: App {
    @StateObject
    private var appContainer = AppContainer()

    var body: some Scene {
        WindowGroup {
            ContentView(appContainer: appContainer)
        }
    }
}
建構並執行 iOS 應用程式
最後,按下 ⌘R 建構並執行應用程式後,應用程式應會將資料庫從 Core Data 遷移至 Room 開始。
8. 恭喜
恭喜!您已使用 Room KMP,順利將獨立的 Android 和 iOS 應用程式遷移至共用資料層。
以下提供應用程式架構比較表,供您參考:
變更前
Android | iOS |
|
|
遷移後的架構
瞭解詳情
- 瞭解哪些 Jetpack 程式庫支援 KMP。
- 閱讀 Room KMP 說明文件。
- 閱讀 SQLite KMP 說明文件。
- 參閱官方的 Kotlin Multiplatform 說明文件。