
Android 15 में, डेवलपर के लिए कई बेहतरीन सुविधाएं और एपीआई उपलब्ध हैं. यहां दिए गए सेक्शन में, इन सुविधाओं के बारे में खास जानकारी दी गई है. इससे आपको इनसे जुड़े एपीआई का इस्तेमाल शुरू करने में मदद मिलेगी.
जोड़े गए, बदले गए, और हटाए गए एपीआई की पूरी सूची देखने के लिए, एपीआई में अंतर दिखाने वाली रिपोर्ट पढ़ें. जोड़े गए एपीआई के बारे में ज़्यादा जानने के लिए, Android API रेफ़रंस पर जाएं. Android 15 के लिए, एपीआई लेवल 35 में जोड़े गए एपीआई देखें. उन क्षेत्रों के बारे में जानने के लिए जहां प्लैटफ़ॉर्म में हुए बदलावों का असर आपके ऐप्लिकेशन पर पड़ सकता है, Android 15 के काम करने के तरीके में हुए बदलावों के बारे में ज़रूर जानें. ये बदलाव, Android 15 को टारगेट करने वाले ऐप्लिकेशन और सभी ऐप्लिकेशन के लिए किए गए हैं.
कैमरा और मीडिया
Android 15 में कई ऐसी सुविधाएं शामिल हैं जिनसे कैमरा और मीडिया का अनुभव बेहतर होता है. साथ ही, आपको ऐसे टूल और हार्डवेयर का ऐक्सेस मिलता है जिनकी मदद से, क्रिएटर्स Android पर अपनी कल्पना को साकार कर पाते हैं.
Android मीडिया और कैमरे के लिए, नई सुविधाओं और डेवलपर के लिए उपलब्ध समाधानों के बारे में ज़्यादा जानने के लिए, Google I/O में Android मीडिया और कैमरे के लिए आधुनिक अनुभव तैयार करना टॉक देखें.
कम रोशनी वाला मोड
Android 15 में कम रोशनी में बेहतर फ़ोटो क्वालिटी की सुविधा जोड़ी गई है. यह ऑटो-एक्सपोज़र मोड है, जो Camera 2 और नाइट मोड कैमरा एक्सटेंशन, दोनों के लिए उपलब्ध है. कम रोशनी वाला मोड, कम रोशनी वाली स्थितियों में झलक स्ट्रीम के एक्सपोज़र को अडजस्ट करता है. यह तरीका, नाइट मोड कैमरा एक्सटेंशन के स्टिल इमेज बनाने के तरीके से अलग है. ऐसा इसलिए है, क्योंकि नाइट मोड एक बेहतर इमेज बनाने के लिए, बर्स्ट फ़ोटो को जोड़ता है. नाइट मोड, स्टिल इमेज बनाने के लिए बहुत अच्छा काम करता है. हालांकि, यह फ़्रेम की लगातार स्ट्रीम नहीं बना सकता. हालांकि, लो लाइट बूस्ट की सुविधा से ऐसा किया जा सकता है. इसलिए, कम रोशनी में बेहतर फ़ोटो लेने की सुविधा, कैमरे की इन सुविधाओं को चालू करती है:
- इमेज की बेहतर झलक दिखाने की सुविधा, ताकि उपयोगकर्ता कम रोशनी में बेहतर तरीके से फ़ोटो खींच सकें
- कम रोशनी में क्यूआर कोड स्कैन करना
कम रोशनी वाला मोड चालू करने पर, यह कम रोशनी होने पर अपने-आप चालू हो जाता है और ज़्यादा रोशनी होने पर बंद हो जाता है.
ऐप्लिकेशन, कम रोशनी में झलक वाली स्ट्रीम को रिकॉर्ड कर सकते हैं, ताकि ज़्यादा रोशनी वाला वीडियो सेव किया जा सके.
ज़्यादा जानकारी के लिए, कम रोशनी में बेहतर फ़ोटो लेने की सुविधा देखें.
ऐप्लिकेशन में कैमरे के कंट्रोल
Android 15 में एक एक्सटेंशन जोड़ा गया है. इससे, जिन डिवाइसों पर यह वर्शन काम करता है उन पर कैमरे के हार्डवेयर और उसके एल्गोरिदम को ज़्यादा बेहतर तरीके से कंट्रोल किया जा सकता है:
- फ़्लैश की रोशनी में बदलाव करने की बेहतर सुविधा. इससे इमेज कैप्चर करते समय,
SINGLEऔरTORCH, दोनों मोड में फ़्लैश की रोशनी को सटीक तरीके से कंट्रोल किया जा सकता है.
एचडीआर हेडरूम कंट्रोल
Android 15, डिवाइस की क्षमताओं और पैनल की बिट-डेंसिटी के हिसाब से एचडीआर हेडरूम चुनता है. जिन पेजों पर ज़्यादा एसडीआर कॉन्टेंट होता है, जैसे कि एक एचडीआर थंबनेल दिखाने वाला मैसेजिंग ऐप्लिकेशन, उन पर इस व्यवहार का असर एसडीआर कॉन्टेंट की चमक पर पड़ सकता है. Android 15 में, setDesiredHdrHeadroom की मदद से एचडीआर हेडरूम को कंट्रोल किया जा सकता है. इससे एसडीआर और एचडीआर कॉन्टेंट के बीच संतुलन बना रहता है.
वॉल्यूम कंट्रोल करने की सुविधा

Android 15 में, आवाज़ के लिए CTA-2075 स्टैंडर्ड का इस्तेमाल करने की सुविधा जोड़ी गई है. इससे, ऑडियो की आवाज़ में होने वाले उतार-चढ़ावों से बचा जा सकता है. साथ ही, यह भी पक्का किया जा सकता है कि उपयोगकर्ताओं को कॉन्टेंट के बीच स्विच करते समय, वॉल्यूम को बार-बार अडजस्ट न करना पड़े. यह सिस्टम, आउटपुट डिवाइसों (हेडफ़ोन और स्पीकर) की जाने-पहचानी विशेषताओं के साथ-साथ, AAC ऑडियो कॉन्टेंट में उपलब्ध आवाज़ के मेटाडेटा का फ़ायदा उठाता है. इससे, ऑडियो की आवाज़ और डाइनैमिक रेंज कम्प्रेशन के लेवल को बेहतर तरीके से अडजस्ट किया जा सकता है.
इस सुविधा को चालू करने के लिए, आपको यह पक्का करना होगा कि आवाज़ की आवाज़ से जुड़ा मेटाडेटा
आपकी AAC सामग्री पर ध्यान दें और अपने ऐप्लिकेशन में प्लैटफ़ॉर्म सुविधा सक्षम करें. इसके लिए, आपको
LoudnessCodecController ऑब्जेक्ट को इसके हिसाब से इंस्टैंशिएट करें
ऑडियो के साथ बनाएँ बनाने का तरीका
संबंधित खाते का सेशन आईडी AudioTrack; यह
अपने-आप ऑडियो अपडेट लागू करना शुरू कर देता है. मदद के लिए
बदलाव करने या फ़िल्टर करने के लिए OnLoudnessCodecUpdateListener
तेज़ आवाज़ के पैरामीटर
MediaCodec.
// Media contains metadata of type MPEG_4 OR MPEG_D
val mediaCodec = …
val audioTrack = AudioTrack.Builder()
                                .setSessionId(sessionId)
                                .build()
...
// Create new loudness controller that applies the parameters to the MediaCodec
try {
   val lcController = LoudnessCodecController.create(mSessionId)
   // Starts applying audio updates for each added MediaCodec
}
AndroidX media3 ExoPlayer भी अपडेट किया जाएगा, ताकि
ऐप्लिकेशन के आसान इंटिग्रेशन के लिए, LoudnessCodecController API.
वर्चुअल एमआईडीआई 2.0 डिवाइस
Android 13 में, यूएसबी का इस्तेमाल करके एमआईडीआई 2.0 डिवाइसों से कनेक्ट करने की सुविधा जोड़ी गई है. ये डिवाइस, यूनिवर्सल एमआईडीआई पैकेट (यूएमपी) का इस्तेमाल करके कम्यूनिकेट करते हैं. Android 15 में, वर्चुअल एमआईडीआई ऐप्लिकेशन के लिए यूएमपी (यूनिवर्सल MIDI प्रोटोकॉल) की सुविधा जोड़ी गई है. इससे कंपोज़िशन ऐप्लिकेशन, वर्चुअल एमआईडीआई 2.0 डिवाइस के तौर पर सिंथेसाइज़र ऐप्लिकेशन को कंट्रोल कर सकते हैं. यह सुविधा, यूएसबी एमआईडीआई 2.0 डिवाइस के साथ काम करने जैसी ही है.
AV1 सॉफ़्टवेयर डिकोडिंग को ज़्यादा बेहतर तरीके से इस्तेमाल करना

VideoLAN का लोकप्रिय AV1 सॉफ़्टवेयर डीकोडर dav1d, उन Android डिवाइसों के लिए उपलब्ध है जिनमें हार्डवेयर में AV1 को डिकोड करने की सुविधा नहीं है. dav1d, लेगसी AV1 सॉफ़्टवेयर डीकोडर की तुलना में तीन गुना ज़्यादा बेहतर परफ़ॉर्म करता है. इससे ज़्यादा उपयोगकर्ताओं के लिए, एचडी AV1 प्लेबैक की सुविधा मिलती है. इनमें कुछ लो और मिड टीयर डिवाइस भी शामिल हैं.
आपके ऐप्लिकेशन को dav1d का इस्तेमाल करने के लिए, नाम "c2.android.av1-dav1d.decoder" डालकर उसे ऑप्ट-इन करना होगा. अगले अपडेट में, dav1d को डिफ़ॉल्ट AV1 सॉफ़्टवेयर डिकोडर बनाया जाएगा. यह सुविधा, Android 11 वाले उन डिवाइसों के लिए स्टैंडर्ड और बैकपोर्ट की गई है जिन्हें Google Play के सिस्टम अपडेट मिलते हैं.
डेवलपर की प्रॉडक्टिविटी और टूल
आपकी प्रॉडक्टिविटी को बेहतर बनाने के लिए, हम ज़्यादातर काम Android Studio, Jetpack Compose, और Android Jetpack लाइब्रेरी जैसे टूल पर करते हैं. हालांकि, हम हमेशा ऐसे तरीके ढूंढते रहते हैं जिनसे आपको अपने विज़न को आसानी से पूरा करने में मदद मिल सके.
OpenJDK 17 के अपडेट
Android 15 में, Android की मुख्य लाइब्रेरी को रीफ़्रेश करने का काम जारी है, ताकि इसे OpenJDK LTS के नए रिलीज़ की सुविधाओं के साथ अलाइन किया जा सके.
इसमें ये मुख्य सुविधाएं और सुधार शामिल हैं:
- NIO बफ़र से जुड़ी सुविधाओं को बेहतर बनाया गया है
- लाइव स्ट्रीम
mathऔरstrictmathके लिए अन्य तरीकेutilपैकेज के अपडेट, जिनमें क्रम से लगाए गएcollection,map, औरsetशामिल हैंDeflaterमेंByteBufferकी सहायता- सुरक्षा से जुड़े अपडेट, जैसे कि
X500PrivateCredentialऔर सुरक्षा कुंजी के अपडेट
ये एपीआई, Google Play के सिस्टम अपडेट की मदद से, Android 12 (एपीआई लेवल 31) और उसके बाद के वर्शन वाले एक अरब से ज़्यादा डिवाइसों पर अपडेट किए जाते हैं, ताकि आप प्रोग्रामिंग की नई सुविधाओं को टारगेट कर सकें.
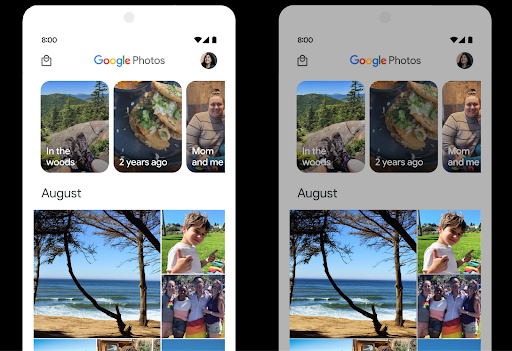
PDF से जुड़े सुधार
Android 15 में, PdfRenderer एपीआई में काफ़ी सुधार किए गए हैं. ऐप्लिकेशन में बेहतर सुविधाएं शामिल की जा सकती हैं. जैसे, पासवर्ड से सुरक्षित फ़ाइलों को रेंडर करना, एनोटेशन, फ़ॉर्म में बदलाव करना, खोजना, और कॉपी करने के साथ चुनें. लीनियर फ़ॉर्मैट में PDF
लोकल PDF देखने की रफ़्तार और संसाधन के इस्तेमाल को कम करने के लिए, ऑप्टिमाइज़ेशन का इस्तेमाल किया जा सकता है.
Jetpack PDF लाइब्रेरी में इन एपीआई का इस्तेमाल किया जाता है, ताकि PDF को आसानी से जोड़ा जा सके
देखने की क्षमता बढ़ाने के लिए.
PdfRenderer को ऐसे मॉड्यूल में ले जाया गया है जिसे Google का इस्तेमाल करके अपडेट किया जा सकता है
Play के सिस्टम से जुड़े अपडेट, प्लैटफ़ॉर्म के रिलीज़ होने के बाद भी उपलब्ध नहीं होते. हम
ये बदलाव, Android 11 (एपीआई लेवल 30) पर वापस आ जाएंगे. इसके लिए, यह एपीआई लेवल 30 के साथ काम करने वाला
Android 15 से पहले का एपीआई सरफ़ेस का वर्शन.
PdfRendererPreV.
अपने-आप भाषा बदलने की सुविधा में सुधार
Android 14 में, ऑडियो में कई भाषाओं की पहचान करने की सुविधा जोड़ी गई है. साथ ही, भाषाओं के बीच अपने-आप स्विच करने की सुविधा भी जोड़ी गई है. हालांकि, इससे शब्दों को छोड़ा जा सकता है. ऐसा खास तौर पर तब होता है, जब दो वाक्यांशों के बीच कम समय के लिए भाषा स्विच की जाती है. Android 15 में अतिरिक्त कंट्रोल जोड़े गए हैं, ताकि ऐप्लिकेशन अपने इस्तेमाल के हिसाब से, इस स्विचिंग को ट्यून कर सकें.
EXTRA_LANGUAGE_SWITCH_INITIAL_ACTIVE_DURATION_TIME_MILLIS, ऑडियो सेशन की शुरुआत में ही अपने-आप स्विच होने की सुविधा को सीमित करता है. वहीं, EXTRA_LANGUAGE_SWITCH_MATCH_SWITCHES, तय संख्या में स्विच करने के बाद, भाषा स्विच करने की सुविधा को बंद कर देता है. ये विकल्प तब खास तौर पर काम के होते हैं, जब आपको लगता है कि सेशन के दौरान एक ही भाषा बोली जाएगी और उसकी पहचान अपने-आप होनी चाहिए.
बेहतर OpenType Variable Font API
Android 15, OpenType वैरिएबल के फ़ॉन्ट की उपयोगिता को बेहतर बनाता है. आप बना सकते हैं
वेट ऐक्सिस के बारे में बताए बिना, वैरिएबल फ़ॉन्ट का FontFamily इंस्टेंस
buildVariableFamily API के साथ इस्तेमाल किया जा सकेगा. टेक्स्ट रेंडरर, दिखाए जा रहे टेक्स्ट से मैच करने के लिए, wght ऐक्सिस की वैल्यू को बदल देता है.
एपीआई का इस्तेमाल करने से, Typeface आसानी से बनाया जा सकता है:
Kotlin
val newTypeface = Typeface.CustomFallbackBuilder(
            FontFamily.Builder(
                Font.Builder(assets, "RobotoFlex.ttf").build())
                    .buildVariableFamily())
    .build()
Java
Typeface newTypeface = Typeface.CustomFallbackBuilder(
            new FontFamily.Builder(
                new Font.Builder(assets, "RobotoFlex.ttf").build())
                    .buildVariableFamily())
    .build();
पहले, इसी Typeface को बनाने के लिए, आपको ज़्यादा कोड की ज़रूरत होगी:
Kotlin
val oldTypeface = Typeface.CustomFallbackBuilder(
            FontFamily.Builder(
                Font.Builder(assets, "RobotoFlex.ttf")
                    .setFontVariationSettings("'wght' 400")
                    .setWeight(400)
                    .build())
                .addFont(
                    Font.Builder(assets, "RobotoFlex.ttf")
                        .setFontVariationSettings("'wght' 100")
                        .setWeight(100)
                        .build()
                )
                .addFont(
                    Font.Builder(assets, "RobotoFlex.ttf")
                        .setFontVariationSettings("'wght' 200")
                        .setWeight(200)
                        .build()
                )
                .addFont(
                    Font.Builder(assets, "RobotoFlex.ttf")
                        .setFontVariationSettings("'wght' 300")
                        .setWeight(300)
                        .build()
                )
                .addFont(
                    Font.Builder(assets, "RobotoFlex.ttf")
                        .setFontVariationSettings("'wght' 500")
                        .setWeight(500)
                        .build()
                )
                .addFont(
                    Font.Builder(assets, "RobotoFlex.ttf")
                        .setFontVariationSettings("'wght' 600")
                        .setWeight(600)
                        .build()
                )
                .addFont(
                    Font.Builder(assets, "RobotoFlex.ttf")
                        .setFontVariationSettings("'wght' 700")
                        .setWeight(700)
                        .build()
                )
                .addFont(
                    Font.Builder(assets, "RobotoFlex.ttf")
                        .setFontVariationSettings("'wght' 800")
                        .setWeight(800)
                        .build()
                )
                .addFont(
                    Font.Builder(assets, "RobotoFlex.ttf")
                        .setFontVariationSettings("'wght' 900")
                        .setWeight(900)
                        .build()
                ).build()
        ).build()
Java
Typeface oldTypeface = new Typeface.CustomFallbackBuilder(
    new FontFamily.Builder(
        new Font.Builder(assets, "RobotoFlex.ttf")
            .setFontVariationSettings("'wght' 400")
            .setWeight(400)
            .build()
    )
    .addFont(
        new Font.Builder(assets, "RobotoFlex.ttf")
            .setFontVariationSettings("'wght' 100")
            .setWeight(100)
            .build()
    )
    .addFont(
        new Font.Builder(assets, "RobotoFlex.ttf")
            .setFontVariationSettings("'wght' 200")
            .setWeight(200)
            .build()
    )
    .addFont(
        new Font.Builder(assets, "RobotoFlex.ttf")
            .setFontVariationSettings("'wght' 300")
            .setWeight(300)
            .build()
    )
    .addFont(
        new Font.Builder(assets, "RobotoFlex.ttf")
            .setFontVariationSettings("'wght' 500")
            .setWeight(500)
            .build()
    )
    .addFont(
        new Font.Builder(assets, "RobotoFlex.ttf")
            .setFontVariationSettings("'wght' 600")
            .setWeight(600)
            .build()
    )
    .addFont(
        new Font.Builder(assets, "RobotoFlex.ttf")
            .setFontVariationSettings("'wght' 700")
            .setWeight(700)
            .build()
    )
    .addFont(
        new Font.Builder(assets, "RobotoFlex.ttf")
            .setFontVariationSettings("'wght' 800")
            .setWeight(800)
            .build()
    )
    .addFont(
        new Font.Builder(assets, "RobotoFlex.ttf")
            .setFontVariationSettings("'wght' 900")
            .setWeight(900)
            .build()
    )
    .build()
).build();
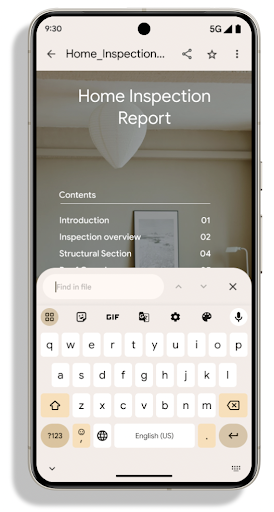
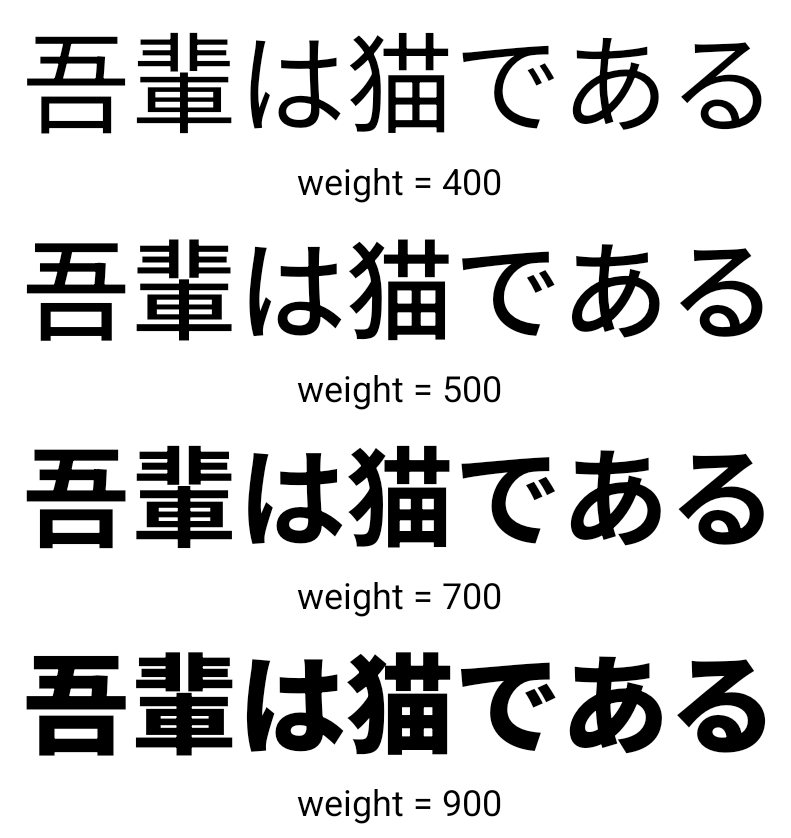
यहां एक उदाहरण दिया गया है कि पुराने और नए, दोनों एपीआई का इस्तेमाल करके Typeface कैसे बनाई गई
रेंडर करता है:
इस उदाहरण में, पुराने एपीआई की मदद से बनाए गए Typeface में
के लिए सही फ़ॉन्ट वेट बनाने की सुविधा 350, 450, 550 और 650
Font इंस्टेंस, इसलिए रेंडरर सबसे नज़दीकी वज़न पर वापस चला जाता है. इसलिए, इस मामले में 350 के बजाय 300, 450 के बजाय 400 वगैरह रेंडर किए जाते हैं. इसके उलट, नए एपीआई की मदद से बनाया गया Typeface डाइनैमिक तौर पर बनाता है
दिए गए वज़न के लिए एक Font इंस्टेंस, इसलिए 350 के लिए सटीक वेट रेंडर किए जाते हैं,
450, 550, और 650 भी हैं.
लाइन ब्रेक को कंट्रोल करने की बेहतर सुविधाएं
Android 15 से, TextView और लाइन ब्रेकर, टेक्स्ट के दिए गए हिस्से को एक ही लाइन में बनाए रख सकते हैं, ताकि उसे पढ़ने में आसानी हो. लाइन ब्रेक को पसंद के मुताबिक बनाने की सुविधा का फ़ायदा पाने के लिए, स्ट्रिंग रिसॉर्स में <nobreak> टैग या createNoBreakSpan का इस्तेमाल करें. इसी तरह, <nohyphen> टैग या
createNoHyphenationSpan का इस्तेमाल करके, शब्दों को हाइफ़न से बचाया जा सकता है.
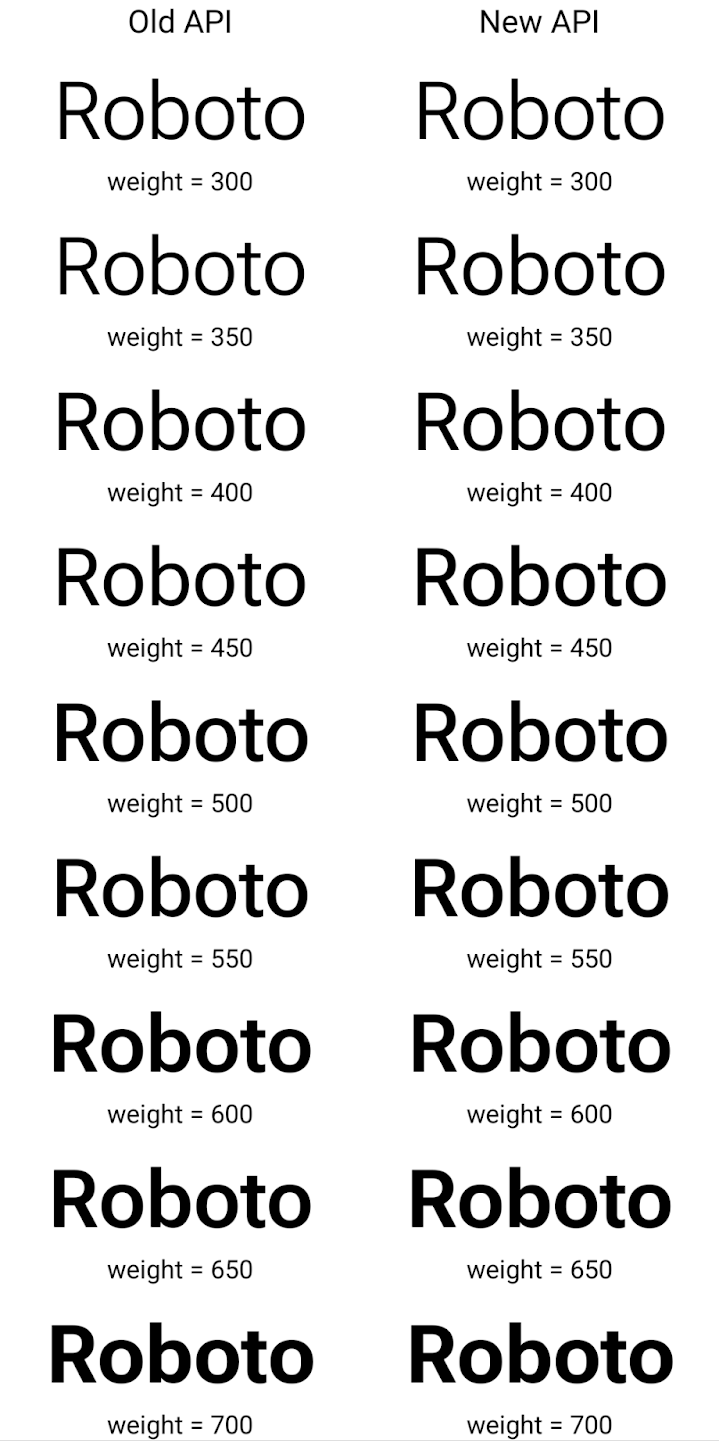
उदाहरण के लिए, यहां दी गई स्ट्रिंग रिसॉर्स में लाइन ब्रेक शामिल नहीं है. साथ ही, यह "Pixel 8 Pro" टेक्स्ट के साथ रेंडर होती है. यह टेक्स्ट, रेंडर होने के दौरान गलत जगह पर ब्रेक लेता है:
<resources>
    <string name="pixel8pro">The power and brains behind Pixel 8 Pro.</string>
</resources>
इसके उलट, इस स्ट्रिंग संसाधन में <nobreak> टैग शामिल है, जो "Pixel 8 Pro" वाक्यांश को रैप करता है और लाइन ब्रेक को रोकता है:
<resources>
    <string name="pixel8pro">The power and brains behind <nobreak>Pixel 8 Pro.</nobreak></string>
</resources>
इन स्ट्रिंग को रेंडर करने के तरीके में अंतर को यहां दी गई इमेज में दिखाया गया है:
<nobreak> टैग का इस्तेमाल करके रैप न किया गया हो.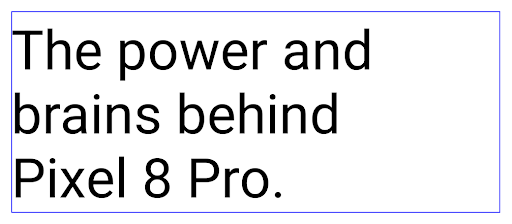
<nobreak> टैग का इस्तेमाल करके रैप किया गया है.ऐप्लिकेशन को संग्रहित करना
Android और Google Play ने पिछले साल, ऐप्लिकेशन को संग्रहित करने की सुविधा के बारे में एलान किया था. इसकी मदद से, उपयोगकर्ता अपने डिवाइस में कम इस्तेमाल किए जाने वाले उन ऐप्लिकेशन को हटाकर जगह खाली कर सकते हैं जिन्हें Google Play पर Android ऐप्लिकेशन बंडल का इस्तेमाल करके पब्लिश किया गया था. Android 15 में, ऐप्लिकेशन को संग्रहित करने और संग्रह से हटाने के लिए, ओएस लेवल पर सहायता शामिल है. इससे सभी ऐप स्टोर के लिए, इसे लागू करना आसान हो जाता है.
REQUEST_DELETE_PACKAGES अनुमति वाले ऐप्लिकेशन, PackageInstaller requestArchive तरीके का इस्तेमाल करके, इंस्टॉल किए गए ऐप्लिकेशन पैकेज को संग्रहित करने का अनुरोध कर सकते हैं. इससे APK और कैश मेमोरी में सेव की गई सभी फ़ाइलें हट जाती हैं, लेकिन उपयोगकर्ता का डेटा सेव रहता है. संग्रहित किए गए ऐप्लिकेशन, डिसप्ले करने लायक ऐप्लिकेशन के तौर पर वापस दिखेंगे. इसके लिए,
LauncherApps एपीआई; उपयोगकर्ताओं को एक यूज़र इंटरफ़ेस (यूआई) दिखेगा, ताकि यह हाइलाइट किया जा सके कि वे
ऐप्लिकेशन संग्रहित किए जाते हैं. अगर कोई उपयोगकर्ता संग्रहित किए गए किसी ऐप्लिकेशन पर टैप करता है, तो ऐप्लिकेशन इंस्टॉल करने वाले व्यक्ति को उसे अनअर्काइव करने का अनुरोध मिलेगा. साथ ही, ऐप्लिकेशन को वापस लाने की प्रोसेस को ACTION_PACKAGE_ADDED ब्रॉडकास्ट से मॉनिटर किया जा सकता है.
डेवलपर के लिए सेटिंग और टूल का इस्तेमाल करके, किसी डिवाइस पर 16 केबी मोड चालू करना
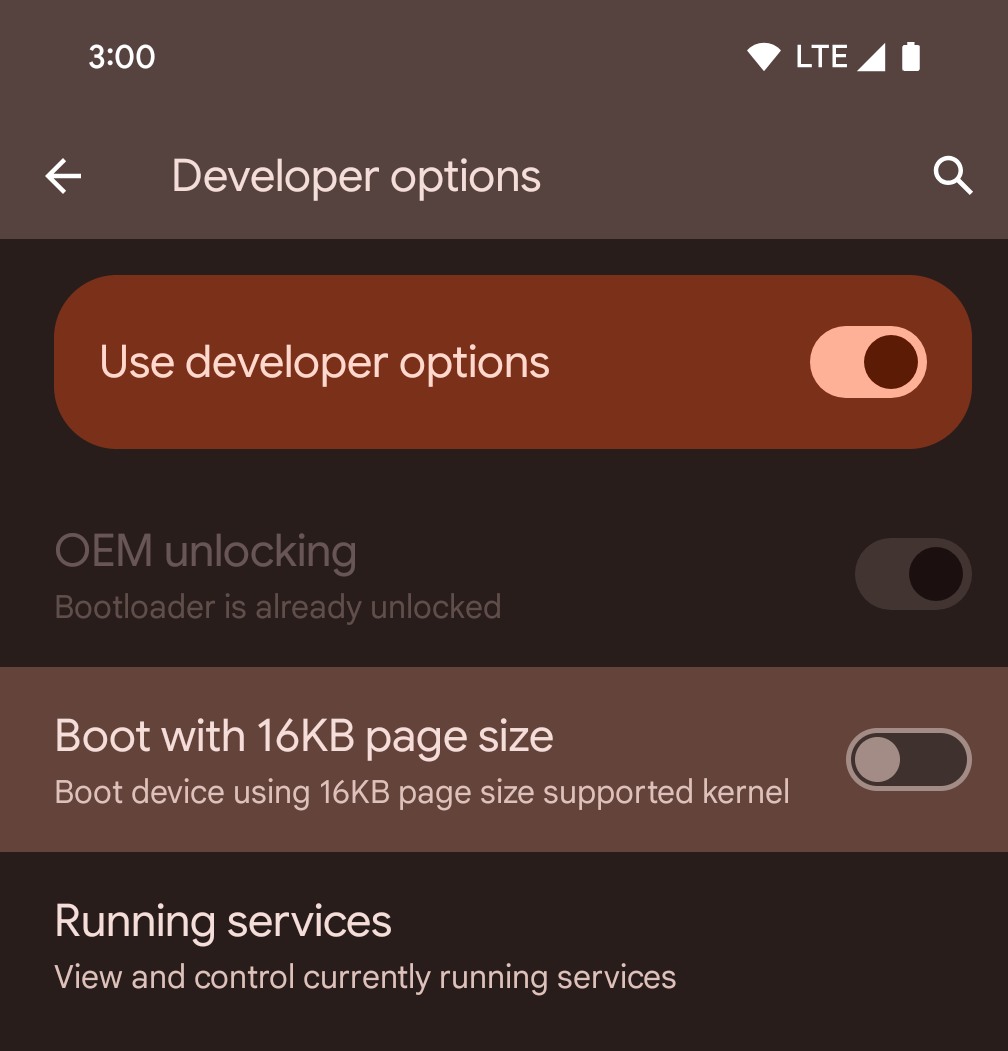
डिवाइस को 16 केबी मोड में बूट करने के लिए, डेवलपर विकल्प में जाकर 16 केबी पेज साइज़ के साथ बूट करें को टॉगल करें.
Android 15 के QPR वर्शन में, डेवलपर विकल्प का इस्तेमाल किया जा सकता है. यह विकल्प, कुछ डिवाइसों पर उपलब्ध होता है. इससे डिवाइस को 16 केबी मोड में बूट किया जा सकता है और डिवाइस पर टेस्टिंग की जा सकती है. डेवलपर के लिए सेटिंग और टूल का इस्तेमाल करने से पहले, सेटिंग > सिस्टम > सॉफ़्टवेयर अपडेट पर जाएं और उपलब्ध अपडेट लागू करें.
डेवलपर के लिए उपलब्ध यह विकल्प, इन डिवाइसों पर उपलब्ध है:
Pixel 8 और 8 Pro (Android 15 QPR1 या इसके बाद के वर्शन के साथ)
Pixel 8a (Android 15 QPR1 या इसके बाद के वर्शन के साथ)
Pixel 9, 9 Pro, और 9 Pro XL (Android 15 QPR2 Beta 2 या इसके बाद के वर्शन के साथ)
ग्राफ़िक्स
Android 15 में ग्राफ़िक को बेहतर बनाने से जुड़े नए अपडेट शामिल हैं. इनमें ANGLE और Canvas ग्राफ़िक सिस्टम में किए गए बदलाव शामिल हैं.
Android में जीपीयू ऐक्सेस करने की सुविधा को बेहतर बनाना

Android हार्डवेयर, शुरुआती दिनों के मुकाबले काफ़ी बदल गया है. शुरुआती दिनों में, मुख्य ओएस एक सीपीयू पर चलता था और जीपीयू को फ़िक्स्ड-फ़ंक्शन पाइपलाइन पर आधारित एपीआई का इस्तेमाल करके ऐक्सेस किया जाता था. Vulkan® ग्राफ़िक्स API, Android 7.0 (एपीआई लेवल 24) से NDK में उपलब्ध है. यह एपीआई, कम लेवल के एब्स्ट्रैक्शन के साथ काम करता है, जो आधुनिक जीपीयू हार्डवेयर को बेहतर तरीके से दिखाता है. साथ ही, यह कई सीपीयू कोर के साथ बेहतर तरीके से काम करता है और सीपीयू ड्राइवर के ओवरहेड को कम करता है. इससे ऐप्लिकेशन की परफ़ॉर्मेंस बेहतर होती है. Vulkan, सभी आधुनिक गेम इंजन के साथ काम करता है.
Android, जीपीयू के लिए Vulkan को प्राथमिकता देता है. इसलिए, Android 15 में ANGLE को वैकल्पिक लेयर के तौर पर शामिल किया गया है. इससे, Vulkan के साथ-साथ OpenGL® ES को भी चलाया जा सकता है. ANGLE पर स्विच करने से, Android OpenGL को बेहतर तरीके से लागू किया जा सकेगा. इससे, ऐप्लिकेशन के साथ बेहतर तरीके से काम करने के साथ-साथ, कुछ मामलों में बेहतर परफ़ॉर्मेंस भी मिलेगी. ANGLE की मदद से, अपने OpenGL ES ऐप्लिकेशन की परफ़ॉर्मेंस और स्थिरता की जांच की जा सकती है. इसके लिए, Android 15 पर सेटिंग -> सिस्टम -> डेवलपर के लिए सेटिंग और टूल -> एक्सपेरिमेंटल: ANGLE चालू करें में जाकर, डेवलपर के लिए सेटिंग चालू करें.
Vulkan के लिए Android ANGLE का रोडमैप
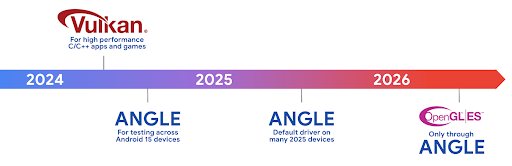
अपने जीपीयू स्टैक को बेहतर बनाने के लिए, हम आने वाले समय में ANGLE को ज़्यादा नए डिवाइसों पर, GL सिस्टम ड्राइवर के तौर पर शिप करेंगे. आने वाले समय में, OpenGL/ES सिर्फ़ ANGLE के ज़रिए उपलब्ध होगा. हालांकि, हमारा प्लान है कि हम सभी डिवाइसों पर OpenGL ES की सुविधा देना जारी रखें.
इसके बाद यह करें
OpenGL ES के लिए ANGLE ड्राइवर चुनने और अपने ऐप्लिकेशन की जांच करने के लिए, डेवलपर के विकल्पों का इस्तेमाल करें. नए प्रोजेक्ट के लिए, हमारा सुझाव है कि C/C++ के लिए Vulkan का इस्तेमाल करें.
Canvas में किए गए सुधार
Android 15 में, Android के कैनवस ग्राफ़िक सिस्टम को और बेहतर बनाया गया है. इसमें ये नई सुविधाएं भी जोड़ी गई हैं:
Matrix44, निर्देशांकों को बदलने के लिए 4x4 मैट्रिक उपलब्ध कराता है. इसका इस्तेमाल तब करना चाहिए, जब आपको कैनवस को 3D में बदलना हो.clipShader, मौजूदा क्लिप को तय किए गए शेडर के साथ इंटरसेक्शन करता है. वहीं,clipOutShader, क्लिप को मौजूदा क्लिप और शेडर के अंतर पर सेट करता है. दोनों ही शेडर को ऐल्फ़ा मास्क के तौर पर इस्तेमाल करते हैं. इससे जटिल आकार आसानी से बनाए जा सकते हैं.
परफ़ॉर्मेंस और बैटरी
Android, आपके ऐप्लिकेशन की परफ़ॉर्मेंस और क्वालिटी को बेहतर बनाने में आपकी मदद करता रहेगा. Android 15 में ऐसे एपीआई पेश किए गए हैं जो आपके ऐप्लिकेशन में टास्क को ज़्यादा असरदार तरीके से पूरा करने, ऐप्लिकेशन की परफ़ॉर्मेंस को ऑप्टिमाइज़ करने, और अपने ऐप्लिकेशन के बारे में अहम जानकारी इकट्ठा करने में मदद करते हैं.
बैटरी की खपत कम करने के सबसे सही तरीके, नेटवर्क और बैटरी की खपत से जुड़ी गड़बड़ियों को ठीक करने, और Android 15 और Android के हाल ही के वर्शन में बैकग्राउंड में होने वाले काम के लिए बैटरी की खपत को बेहतर बनाने के बारे में ज़्यादा जानकारी पाने के लिए, Google I/O में हुई Android पर बैकग्राउंड में होने वाले काम के लिए बैटरी की खपत को बेहतर बनाना टॉक देखें.
ApplicationStartInfo API
Android के पिछले वर्शन में, ऐप्लिकेशन के शुरू होने की प्रोसेस को समझना थोड़ा मुश्किल था. आपके ऐप्लिकेशन में यह तय करना मुश्किल था कि वह कोल्ड, वॉर्म या हॉट स्टैटस से शुरू हुआ था. यह जानना भी मुश्किल था कि ऐप्लिकेशन को लॉन्च करने के अलग-अलग चरणों में कितना समय लगा: प्रोसेस को फ़ॉर्क करना, onCreate को कॉल करना, पहला फ़्रेम बनाना वगैरह. जब आपकी Application क्लास को इंस्टैंशिएट किया गया था, तब आपके पास यह जानने का कोई तरीका नहीं था कि ऐप्लिकेशन किसी ब्रॉडकास्ट, कॉन्टेंट प्रोवाइडर, जॉब, बैकअप, बूट पूरा होने, अलार्म या Activity से शुरू हुआ है.
Android 15 पर ApplicationStartInfo एपीआई, ये सभी सुविधाएं और इससे ज़्यादा सुविधाएं देता है. आपके पास फ़्लो में अपने टाइमस्टैंप जोड़ने का विकल्प भी होता है, ताकि एक ही जगह पर टाइमिंग का डेटा इकट्ठा किया जा सके. मेट्रिक इकट्ठा करने के अलावा, ApplicationStartInfo का इस्तेमाल करके ऐप्लिकेशन के शुरू होने की प्रोसेस को सीधे ऑप्टिमाइज़ किया जा सकता है. उदाहरण के लिए, जब आपका ऐप्लिकेशन किसी ब्रॉडकास्ट की वजह से शुरू हो रहा हो, तो Application क्लास में यूज़र इंटरफ़ेस (यूआई) से जुड़ी लाइब्रेरी को इंस्टैंशिएट करने की ज़रूरत नहीं होती.
ऐप्लिकेशन के साइज़ के बारे में ज़्यादा जानकारी
Android 8.0 (एपीआई लेवल 26) से, Android में StorageStats.getAppBytes एपीआई शामिल है. यह एपीआई, किसी ऐप्लिकेशन के इंस्टॉल किए गए साइज़ की जानकारी, बाइट के तौर पर देता है. यह साइज़, APK के साइज़, APK से निकाली गई फ़ाइलों के साइज़, और डिवाइस पर जनरेट की गई फ़ाइलों के साइज़ का कुल योग होता है. जैसे, पहले से (एओटी) कंपाइल किया गया कोड. इस नंबर से यह पता नहीं चलता कि आपका ऐप्लिकेशन स्टोरेज का इस्तेमाल कैसे कर रहा है.
Android 15 में StorageStats.getAppBytesByDataType([type]) एपीआई जोड़ा गया है. इससे आपको यह जानकारी मिलती है कि आपका ऐप्लिकेशन, स्टोरेज का कितना हिस्सा इस्तेमाल कर रहा है. इसमें APK फ़ाइल के अलग-अलग हिस्से, AOT और तेज़ी से काम करने से जुड़ा कोड, dex मेटाडेटा, लाइब्रेरी, और गाइडेड प्रोफ़ाइलें शामिल हैं.
ऐप्लिकेशन के ज़रिए मैनेज की जाने वाली प्रोफ़ाइलिंग
Android 15 में ProfilingManager क्लास शामिल है. इसकी मदद से, अपने ऐप्लिकेशन में प्रोफ़ाइलिंग की जानकारी इकट्ठा की जा सकती है. जैसे, हेप डंप, हेप प्रोफ़ाइल, स्टैक सैंपलिंग वगैरह. यह आपके ऐप्लिकेशन को, दिए गए टैग के साथ कॉलबैक उपलब्ध कराता है. इससे, आउटपुट फ़ाइल की पहचान की जाती है. यह फ़ाइल, आपके ऐप्लिकेशन की फ़ाइल डायरेक्ट्री में डिलीवर की जाती है. एपीआई, परफ़ॉर्मेंस पर पड़ने वाले असर को कम करने के लिए, अनुरोध की दर को सीमित करता है.
अपने ऐप्लिकेशन में प्रोफ़ाइलिंग के अनुरोधों को आसानी से बनाने के लिए, हमारा सुझाव है कि आप Core 1.15.0-rc01 या इसके बाद के वर्शन में उपलब्ध, उससे जुड़े Profiling AndroidX API का इस्तेमाल करें.
SQLite डेटाबेस में सुधार
Android 15 में SQLite एपीआई उपलब्ध कराए गए हैं, जो इसमें मौजूद SQLite इंजन, जो परफ़ॉर्मेंस की उन समस्याओं को टारगेट करता है जो मेनिफ़ेस्ट करते हैं. ये एपीआई SQLite के अपडेट को वर्शन में शामिल करते हैं 3.44.3.
डेवलपर को अपने SQLite डेटाबेस का ज़्यादा से ज़्यादा फ़ायदा पाने के लिए, SQLite की परफ़ॉर्मेंस के लिए सबसे सही तरीकों के बारे में जानना चाहिए. ऐसा खास तौर पर, बड़े डेटाबेस के साथ काम करते समय या इंतज़ार का समय कम करने वाली क्वेरी चलाते समय ज़रूरी है.
- रीड-ओनली डेफ़र्ड ट्रांज़ैक्शन: रीड-ओनली ट्रांज़ैक्शन जारी करते समय (लिखने के स्टेटमेंट शामिल न करें), रीड-ओनली
DEFERREDट्रांज़ैक्शन जारी करने के लिए,beginTransactionReadOnly()औरbeginTransactionWithListenerReadOnly(SQLiteTransactionListener)का इस्तेमाल करें. ऐसे लेन-देन चलाए जा सकते हैं और डेटाबेस के WAL मोड में होने पर, ये दोनों काम कर सकते हैंIMMEDIATEयाEXCLUSIVEलेन-देन के साथ चलाए जाते हैं. - लाइन की संख्या और आईडी: एपीआई जोड़े गए हैं, ताकि बदली गई लाइनों की संख्या या डाली गई आखिरी लाइन का आईडी, अतिरिक्त क्वेरी जारी किए बिना वापस पाया जा सके.
getLastChangedRowCount(), मौजूदा ट्रांज़ैक्शन में सबसे हाल ही के एसक्यूएल स्टेटमेंट की मदद से डाली गई, अपडेट की गई या मिटाई गई पंक्तियों की संख्या दिखाता है. वहीं,getTotalChangedRowCount(), मौजूदा कनेक्शन की गिनती दिखाता है.getLastInsertRowId(), आखिरी पंक्ति काrowidदिखाता है को चालू करने के लिए किया जा सकता है. - रॉ स्टेटमेंट: रॉ SQlite स्टेटमेंट जारी करें. इससे, सुविधाजनक रैपर और प्रोसेसिंग के लिए होने वाले अतिरिक्त खर्च से बचा जा सकता है.
Android Dynamic Performance Framework के अपडेट
Android 15 में, हमने Android डाइनैमिक परफ़ॉर्मेंस फ़्रेमवर्क (ADPF) पर काम करना जारी रखा है. यह एपीआई का एक सेट है, जो गेम और बेहतर परफ़ॉर्मेंस वाले ऐप्लिकेशन को Android डिवाइसों के पावर और थर्मल सिस्टम के साथ सीधे तौर पर इंटरैक्ट करने की अनुमति देता है. Android 15, काम करने वाले डिवाइसों पर ADPF की सुविधाएं जोड़ता है:
- हिंट सेशन के लिए पावर-इफ़िशिएंस मोड, ताकि यह पता चल सके कि उनसे जुड़ी थ्रेड को परफ़ॉर्मेंस के बजाय, पावर सेव करने को प्राथमिकता देनी चाहिए. यह मोड, लंबे समय तक चलने वाले बैकग्राउंड वर्कलोड के लिए बेहतर है.
- जीपीयू और सीपीयू के काम करने की अवधि, दोनों को हिंट सेशन में रिपोर्ट किया जा सकता है. इससे सिस्टम, सीपीयू और जीपीयू की फ़्रीक्वेंसी को एक साथ अडजस्ट कर सकता है, ताकि वर्कलोड की ज़रूरतों को बेहतर तरीके से पूरा किया जा सके.
- थर्मल हेडरूम थ्रेशोल्ड, ताकि हेडरूम के अनुमान के आधार पर, थर्मल थ्रॉटलिंग की संभावित स्थिति का पता लगाया जा सके.
अपने ऐप्लिकेशन और गेम में ADPF का इस्तेमाल करने के तरीके के बारे में ज़्यादा जानने के लिए, दस्तावेज़ पर जाएं.
निजता
Android 15 में कई ऐसी सुविधाएं शामिल हैं जिनसे ऐप्लिकेशन डेवलपर को उपयोगकर्ता की निजता को सुरक्षित रखने में मदद मिलती है.
स्क्रीन रिकॉर्डिंग का पता लगाने की सुविधा
Android 15 में ऐप्लिकेशन के लिए सहायता जोड़ी गई है, ताकि यह पता लगाया जा सके कि उन्हें रिकॉर्ड किया जा रहा है. ऐप्लिकेशन के ट्रांज़िशन होने पर, कॉलबैक शुरू हो जाता है के बीच फ़र्क़ पड़ता है. अगर रजिस्टर करने की प्रोसेस के UID के मालिकाना हक वाली गतिविधियां रिकॉर्ड की जा रही हैं, तो ऐप्लिकेशन को दिखने वाला माना जाता है. इस तरह से, अगर आपका ऐप्लिकेशन संवेदनशील कार्रवाई करता है, तो उपयोगकर्ता को बता सकता है कि उन्हें रिकॉर्ड किया जा रहा है.
val mCallback = Consumer<Int> { state ->
  if (state == SCREEN_RECORDING_STATE_VISIBLE) {
    // We're being recorded
  } else {
    // We're not being recorded
  }
}

override fun onStart() {
   super.onStart()
   val initialState =
      windowManager.addScreenRecordingCallback(mainExecutor, mCallback)
   mCallback.accept(initialState)
}

override fun onStop() {
    super.onStop()
    windowManager.removeScreenRecordingCallback(mCallback)
}
IntentFilter की बेहतर सुविधाएं
Android 15 में, UriRelativeFilterGroup के ज़रिए Intent को ज़्यादा सटीक तरीके से हल करने की सुविधा पहले से मौजूद है. इसमें UriRelativeFilter ऑब्जेक्ट का एक सेट होता है, जो Intent मैच करने वाले नियमों का एक सेट बनाता है. इन नियमों को पूरा करना ज़रूरी है. इनमें यूआरएल क्वेरी पैरामीटर, यूआरएल फ़्रैगमेंट, और ब्लॉक करने या बाहर रखने के नियम शामिल हैं.
इन नियमों को AndroidManifest एक्सएमएल फ़ाइल में, <uri-relative-filter-group> टैग की मदद से तय किया जा सकता है. इसमें android:allow टैग भी शामिल किया जा सकता है. इन टैग में ऐसे <data> टैग शामिल हो सकते हैं जिनमें मौजूदा डेटा टैग एट्रिब्यूट के साथ-साथ, android:query और android:fragment एट्रिब्यूट का इस्तेमाल किया जाता है.
यहां AndroidManifest सिंटैक्स का एक उदाहरण दिया गया है:
<intent-filter android:autoVerify="true">
  <action android:name="android.intent.action.VIEW" />
  <category android:name="android.intent.category.BROWSABLE" />
  <category android:name="android.intent.category.DEFAULT" />
  <data android:scheme="http" />
  <data android:scheme="https" />
  <data android:host="astore.com" />
  <uri-relative-filter-group>
    <data android:pathPrefix="/auth" />
    <data android:query="region=na" />
  </uri-relative-filter-group>
  <uri-relative-filter-group android:allow="false">
    <data android:pathPrefix="/auth" />
    <data android:query="mobileoptout=true" />
  </uri-relative-filter-group>
  <uri-relative-filter-group android:allow="false">
    <data android:pathPrefix="/auth" />
    <data android:fragmentPrefix="faq" />
  </uri-relative-filter-group>
</intent-filter>
प्राइवेट स्पेस
प्राइवेट स्पेस की मदद से, उपयोगकर्ता अपने डिवाइस पर एक अलग स्पेस बना सकते हैं. इस स्पेस में, संवेदनशील ऐप्लिकेशन को छिपाकर रखा जा सकता है. इसके लिए, पुष्टि करने के एक और तरीके का इस्तेमाल किया जाता है. प्राइवेट स्पेस में, अलग उपयोगकर्ता प्रोफ़ाइल का इस्तेमाल किया जाता है. उपयोगकर्ता, डिवाइस के लॉक या प्राइवेट स्पेस के लिए किसी अलग लॉक फ़ैक्टर का इस्तेमाल करने का विकल्प चुन सकता है.
प्राइवेट स्पेस में मौजूद ऐप्लिकेशन, लॉन्चर में एक अलग कंटेनर में दिखते हैं. साथ ही, प्राइवेट स्पेस लॉक होने पर, ये ऐप्लिकेशन हाल ही में इस्तेमाल किए गए ऐप्लिकेशन, सूचनाओं, सेटिंग, और अन्य ऐप्लिकेशन से छिप जाते हैं. उपयोगकर्ता का जनरेट किया गया और डाउनलोड किया गया कॉन्टेंट (जैसे कि मीडिया या फ़ाइलें) और खाते, प्राइवेट स्पेस और मुख्य स्पेस में अलग-अलग होते हैं. सिस्टम शेयरशीट और फ़ोटो पिकर का इस्तेमाल करके, ऐप्लिकेशन को सभी स्पेस में मौजूद कॉन्टेंट का ऐक्सेस दिया जा सकता है. ऐसा तब किया जा सकता है, जब प्राइवेट स्पेस अनलॉक हो.
उपयोगकर्ता, मौजूदा ऐप्लिकेशन और उनके डेटा को प्राइवेट स्पेस में नहीं ले जा सकते. इसके बजाय, उपयोगकर्ता अपने पसंदीदा ऐप्लिकेशन स्टोर का इस्तेमाल करके, प्राइवेट स्पेस में ऐप्लिकेशन इंस्टॉल करने के लिए, इंस्टॉल करने का विकल्प चुनते हैं. प्राइवेट स्पेस में मौजूद ऐप्लिकेशन, मुख्य स्पेस में मौजूद ऐप्लिकेशन से अलग कॉपी के तौर पर इंस्टॉल किए जाते हैं. ये एक ही ऐप्लिकेशन की नई कॉपी होती हैं.
जब कोई उपयोगकर्ता प्राइवेट स्पेस को लॉक करता है, तो प्रोफ़ाइल काम करना बंद कर देती है. प्रोफ़ाइल के बंद होने पर, प्राइवेट स्पेस में मौजूद ऐप्लिकेशन काम नहीं करते. साथ ही, ये ऐप्लिकेशन फ़ोरग्राउंड या बैकग्राउंड में कोई गतिविधि नहीं कर सकते. जैसे, सूचनाएं दिखाना.
हमारा सुझाव है कि आप अपने ऐप्लिकेशन को प्राइवेट स्पेस में टेस्ट करें, ताकि यह पक्का किया जा सके कि आपका ऐप्लिकेशन उम्मीद के मुताबिक काम करता है. ऐसा खास तौर पर तब करें, जब आपका ऐप्लिकेशन इनमें से किसी कैटगरी में आता हो:
- वर्क प्रोफ़ाइल के लिए लॉजिक वाले ऐप्लिकेशन, जो यह मानते हैं कि उनके ऐप्लिकेशन की इंस्टॉल की गई ऐसी कॉपी जो मुख्य प्रोफ़ाइल में नहीं हैं वे वर्क प्रोफ़ाइल में हैं.
- मेडिकल ऐप्लिकेशन
- लॉन्चर ऐप्लिकेशन
- ऐप स्टोर पर मौजूद ऐप्लिकेशन
'चुनिंदा फ़ोटो का ऐक्सेस' के लिए, उपयोगकर्ता के सबसे हाल ही के चुने गए विकल्प के बारे में क्वेरी करना
मीडिया फ़ाइलों के लिए कुछ हिस्से का ऐक्सेस देने पर, ऐप्लिकेशन अब सिर्फ़ हाल ही में चुनी गई फ़ोटो और वीडियो को हाइलाइट कर सकते हैं. इस सुविधा को बेहतर बनाने के लिए,
उन ऐप्लिकेशन का उपयोगकर्ता अनुभव जो अक्सर फ़ोटो ऐक्सेस करने का अनुरोध करते हैं और
वीडियो. अपने ऐप्लिकेशन में इस सुविधा का इस्तेमाल करने के लिए, इसे चालू करें
MediaStore की क्वेरी करते समय QUERY_ARG_LATEST_SELECTION_ONLY तर्क
ContentResolver तक.
Kotlin
val externalContentUri = MediaStore.Files.getContentUri("external")

val mediaColumns = arrayOf(
   FileColumns._ID,
   FileColumns.DISPLAY_NAME,
   FileColumns.MIME_TYPE,
)

val queryArgs = bundleOf(
   // Return only items from the last selection (selected photos access)
   QUERY_ARG_LATEST_SELECTION_ONLY to true,
   // Sort returned items chronologically based on when they were added to the device's storage
   QUERY_ARG_SQL_SORT_ORDER to "${FileColumns.DATE_ADDED} DESC",
   QUERY_ARG_SQL_SELECTION to "${FileColumns.MEDIA_TYPE} = ? OR ${FileColumns.MEDIA_TYPE} = ?",
   QUERY_ARG_SQL_SELECTION_ARGS to arrayOf(
       FileColumns.MEDIA_TYPE_IMAGE.toString(),
       FileColumns.MEDIA_TYPE_VIDEO.toString()
   )
)
Java
Uri externalContentUri = MediaStore.Files.getContentUri("external");

String[] mediaColumns = {
    FileColumns._ID,
    FileColumns.DISPLAY_NAME,
    FileColumns.MIME_TYPE
};

Bundle queryArgs = new Bundle();
queryArgs.putBoolean(MediaStore.QUERY_ARG_LATEST_SELECTION_ONLY, true);
queryArgs.putString(MediaStore.QUERY_ARG_SQL_SORT_ORDER, FileColumns.DATE_ADDED + " DESC");
queryArgs.putString(MediaStore.QUERY_ARG_SQL_SELECTION, FileColumns.MEDIA_TYPE + " = ? OR " + FileColumns.MEDIA_TYPE + " = ?");
queryArgs.putStringArray(MediaStore.QUERY_ARG_SQL_SELECTION_ARGS, new String[] {
    String.valueOf(FileColumns.MEDIA_TYPE_IMAGE),
    String.valueOf(FileColumns.MEDIA_TYPE_VIDEO)
});
Android पर Privacy Sandbox
Android 15 में, Android Ad Services के नए एक्सटेंशन शामिल हैं. इनमें Android पर Privacy Sandbox का नया वर्शन भी शामिल है. यह बदलाव, उपयोगकर्ता की निजता को बेहतर बनाने और मोबाइल ऐप्लिकेशन के लिए दिलचस्पी के हिसाब से असरदार विज्ञापन दिखाने वाली टेक्नोलॉजी बनाने के हमारे काम का हिस्सा है. हमारे Privacy Sandbox पेज पर, Android के डेवलपर प्रीव्यू और बीटा प्रोग्राम में Privacy Sandbox के बारे में ज़्यादा जानकारी दी गई है. इससे आपको इस प्रोग्राम को शुरू करने में मदद मिलेगी.
Health Connect
Android 15 में, Health Connect by Android के नए एक्सटेंशन इंटिग्रेट किए गए हैं. यह एक सुरक्षित और एक ही जगह से कंट्रोल किया जा सकने वाला प्लैटफ़ॉर्म है. इसकी मदद से, सेहत और फ़िटनेस से जुड़ा वह डेटा मैनेज और शेयर किया जा सकता है जो ऐप्लिकेशन इकट्ठा करता है. इस अपडेट में, फ़िटनेस, पोषण, त्वचा के तापमान, ट्रेनिंग प्लान वगैरह के लिए, अन्य डेटा टाइप का इस्तेमाल करने की सुविधा जोड़ी गई है.
त्वचा के तापमान को ट्रैक करने की सुविधा की मदद से, उपयोगकर्ता किसी पहने जा सकने वाले डिवाइस या किसी अन्य ट्रैकिंग डिवाइस से, तापमान का ज़्यादा सटीक डेटा सेव और शेयर कर सकते हैं.
ट्रेनिंग के प्लान, कसरत के प्लान होते हैं. इनकी मदद से, उपयोगकर्ता अपने फ़िटनेस लक्ष्यों को हासिल कर सकता है. ट्रेनिंग के प्लान में, कसरत पूरी करने और परफ़ॉर्मेंस से जुड़े कई लक्ष्य शामिल होते हैं:
- बर्न की गई कैलोरी के हिसाब से लक्ष्य पूरा करने के लिए, दूरी, अवधि, दोहराव और कदम.
- ज़्यादा से ज़्यादा बार दोहराएं (AMRAP), गति, हृदय की दर, पावर, थकान की दर, और गति के आधार पर परफ़ॉर्मेंस के लक्ष्य.
Android में Health Connect में हुए नए अपडेट के बारे में यहां ज़्यादा जानें: Android के लिए, ज़रूरत के हिसाब से अनुभव तैयार करना Google I/O से स्वास्थ्य के बारे में जानकारी.
ऐप्लिकेशन की स्क्रीन शेयर करने की सुविधा
Android 15 में ऐप्लिकेशन की स्क्रीन शेयर करने की सुविधा उपलब्ध है. इसकी मदद से, उपयोगकर्ता अपने डिवाइस की पूरी स्क्रीन के बजाय, सिर्फ़ ऐप्लिकेशन की विंडो को शेयर या रिकॉर्ड कर सकते हैं. यह सुविधा, पहली बार Android 14 QPR2 में चालू की गई थी. इसमें MediaProjection कॉलबैक शामिल हैं. इनकी मदद से, आपके ऐप्लिकेशन को स्क्रीन शेयर करने के अनुभव को पसंद के मुताबिक बनाया जा सकता है. ध्यान दें कि Android 14 (एपीआई लेवल 34) या उसके बाद के वर्शन को टारगेट करने वाले ऐप्लिकेशन के लिए, हर MediaProjection कैप्चर सेशन के लिए उपयोगकर्ता की सहमति लेना ज़रूरी है.
उपयोगकर्ता अनुभव और सिस्टम यूज़र इंटरफ़ेस (यूआई)
Android 15 में, ऐप्लिकेशन डेवलपर और उपयोगकर्ताओं को अपने डिवाइस को अपनी ज़रूरतों के हिसाब से कॉन्फ़िगर करने के लिए, ज़्यादा कंट्रोल और सुविधा मिलती है.
Android 15 में किए गए नए सुधारों का इस्तेमाल करके, अपने ऐप्लिकेशन पर लोगों को बेहतर अनुभव देने के बारे में ज़्यादा जानने के लिए, Google I/O का अपने Android ऐप्लिकेशन पर लोगों को बेहतर अनुभव देना वीडियो देखें.
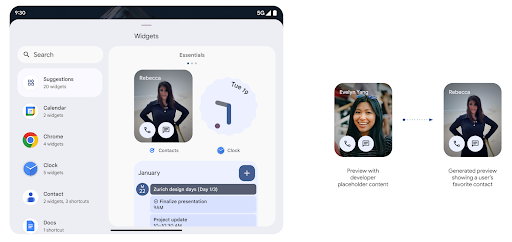
जनरेटेड प्रीव्यू एपीआई की मदद से, विजेट की बेहतर झलकें
Android 15 से पहले, विजेट पिकर की झलक दिखाने का सिर्फ़ एक ही तरीका था. इसके लिए, स्टैटिक इमेज या लेआउट रिसॉर्स तय करना होता था. होम स्क्रीन पर विजेट को जोड़ने पर, ये झलकें अक्सर असल विजेट से काफ़ी अलग दिखती हैं. साथ ही, Jetpack Glance की मदद से स्टैटिक रिसॉर्स नहीं बनाए जा सकते. इसलिए, Glance के डेवलपर को विजेट की झलक देखने के लिए, अपने विजेट का स्क्रीनशॉट लेना पड़ता था या एक्सएमएल लेआउट बनाना पड़ता था.
Android 15 में, जनरेट की गई झलक देखने की सुविधा जोड़ी गई. इसका मतलब है कि ऐप्लिकेशन विजेट की सेवा देने वाली कंपनियां, स्टैटिक संसाधन के बजाय, पिकर की झलक के तौर पर इस्तेमाल करने के लिए RemoteViews जनरेट कर सकती हैं.
Push API
ऐप्लिकेशन, पुश एपीआई की मदद से जनरेट की गई झलकियां दिखा सकते हैं. ऐप्लिकेशन, अपने लाइफ़साइकल के किसी भी समय झलक दिखा सकते हैं. इसके लिए, उन्हें होस्ट से झलक दिखाने का अनुरोध नहीं करना पड़ता. झलकें AppWidgetService में सेव रहती हैं. होस्ट, मांग पर इनका अनुरोध कर सकते हैं. इस उदाहरण में, एक्सएमएल विजेट लेआउट संसाधन लोड किया गया है और उसे झलक के तौर पर सेट किया गया है:
AppWidgetManager.getInstance(appContext).setWidgetPreview(
   ComponentName(
       appContext,
       SociaLiteAppWidgetReceiver::class.java
   ),
   AppWidgetProviderInfo.WIDGET_CATEGORY_HOME_SCREEN,
   RemoteViews("com.example", R.layout.widget_preview)
)
इसका अनुमानित फ़्लो यह होता है:
- विजेट की सेवा देने वाली कंपनी किसी भी समय
setWidgetPreviewको कॉल कर सकती है. दी गई झलकें,AppWidgetServiceमें सेवा देने वाली कंपनी की अन्य जानकारी के साथ सेव की जाती हैं. setWidgetPreview,AppWidgetHost.onProvidersChangedकॉलबैक की मदद से, होस्ट को अपडेट की गई झलक की सूचना देता है. इसके जवाब में, विजेट होस्ट, सेवा देने वाली कंपनी की सारी जानकारी को फिर से लोड करता है.- विजेट की झलक दिखाते समय, होस्ट
AppWidgetProviderInfo.generatedPreviewCategoriesकी जांच करता है. अगर चुनी गई कैटगरी उपलब्ध है, तो इस सेवा देने वाली कंपनी के लिए सेव की गई झलक दिखाने के लिए,AppWidgetManager.getWidgetPreviewको कॉल किया जाता है.
setWidgetPreview को कब कॉल करें
झलक दिखाने के लिए कोई कॉलबैक नहीं है. इसलिए, ऐप्लिकेशन किसी भी समय झलक भेज सकते हैं. झलक को कितनी बार अपडेट करना है, यह इस बात पर निर्भर करता है कि विजेट का इस्तेमाल किस तरह से किया जा रहा है.
यहां दी गई सूची में, झलक के इस्तेमाल के उदाहरणों की दो मुख्य कैटगरी के बारे में बताया गया है:
- सेवा देने वाली ऐसी कंपनियां जो अपने विजेट की झलक में असली डेटा दिखाती हैं, जैसे कि आपके हिसाब से बनाई गई या हाल की जानकारी. उपयोगकर्ता के साइन इन करने या अपने ऐप्लिकेशन में शुरुआती कॉन्फ़िगरेशन करने के बाद, ये सेवा देने वाली कंपनियां झलक सेट कर सकती हैं. इसके बाद, वे अपने चुने गए समय पर झलक को अपडेट करने के लिए, समय-समय पर होने वाला टास्क सेट अप कर सकती हैं. इस तरह के विजेट के उदाहरणों में फ़ोटो, कैलेंडर, मौसम या खबरों का विजेट शामिल हो सकता है.
- ऐसे प्रॉवाइडर जो झलक या क्विक ऐक्शन विजेट में स्टैटिक जानकारी दिखाते हैं और कोई डेटा नहीं दिखाते. ये कंपनियां, ऐप्लिकेशन के पहली बार लॉन्च होने पर, झलक को एक बार सेट कर सकती हैं. इस तरह के विजेट के उदाहरणों में, Drive की तुरंत कार्रवाइयों वाला विजेट या Chrome के शॉर्टकट विजेट शामिल हैं.
हो सकता है कि कुछ सेवा देने वाली कंपनियां, हब मोड पिकर पर स्टैटिक झलक दिखाएं, लेकिन होमस्क्रीन पिकर पर असल जानकारी दिखाएं. इन सेवा देने वाली कंपनियों को, झलक सेट करने के लिए, इस्तेमाल के इन दोनों उदाहरणों के लिए दिशा-निर्देशों का पालन करना चाहिए.
पिक्चर में पिक्चर
Android 15 में, पिक्चर में पिक्चर (पीआईपी) मोड में बदलाव किए गए हैं. इससे, पीआईपी मोड में जाने पर, स्क्रीन पर वीडियो का ट्रांज़िशन ज़्यादा आसानी से हो पाता है. यह इनके लिए फ़ायदेमंद होगा ऐसे ऐप्लिकेशन जिनके मुख्य यूज़र इंटरफ़ेस (यूआई) के ऊपर यूआई एलिमेंट दिखते हैं, जो पीआईपी (पिक्चर में पिक्चर) में जाते हैं.
लॉजिक तय करने के लिए डेवलपर, onPictureInPictureModeChanged कॉलबैक का इस्तेमाल करते हैं
जो ओवरले किए गए यूज़र इंटरफ़ेस (यूआई) एलिमेंट के दिखने को टॉगल करता है. यह कॉलबैक है
यह तब ट्रिगर होता है, जब पीआईपी में एंट्री या एग्ज़िट ऐनिमेशन पूरा हो जाता है. इतने समय में शुरू होगा
Android 15 के हिसाब से, PictureInPictureUiState क्लास में कोई दूसरा राज्य शामिल है.
यूज़र इंटरफ़ेस (यूआई) की इस स्थिति में, Android 15 (एपीआई लेवल 35) को टारगेट करने वाले ऐप्लिकेशन,
Activity#onPictureInPictureUiStateChanged कॉलबैक को इसके साथ शुरू किया जा रहा है
पीआईपी ऐनिमेशन के शुरू होते ही isTransitioningToPip(). यहां हैं
ऐसे कई यूज़र इंटरफ़ेस (यूआई) एलिमेंट जो ऐप्लिकेशन के पीआईपी मोड में होने पर, इनके लिए काम के नहीं होते
व्यू या लेआउट के उदाहरण, जिनमें सुझाव, आगे होने वाली, और ऐसी जानकारी शामिल है
कॉन्टेंट, रेटिंग, और टाइटल के बारे में जानकारी शामिल होती है. जब ऐप्लिकेशन पीआईपी मोड में जाए, तो
इन यूज़र इंटरफ़ेस (यूआई) एलिमेंट को छिपाने के लिए onPictureInPictureUiStateChanged कॉलबैक. जब
पीआईपी विंडो से, ऐप्लिकेशन फ़ुल स्क्रीन मोड में जाता है.
इन एलिमेंट को दिखाने के लिए onPictureInPictureModeChanged कॉलबैक, जैसा कि इसमें दिखाया गया है
ये उदाहरण:
override fun onPictureInPictureUiStateChanged(pipState: PictureInPictureUiState) {
        if (pipState.isTransitioningToPip()) {
          // Hide UI elements
        }
    }
override fun onPictureInPictureModeChanged(isInPictureInPictureMode: Boolean) {
        if (isInPictureInPictureMode) {
          // Unhide UI elements
        }
    }
बिना काम के यूज़र इंटरफ़ेस (यूआई) एलिमेंट के इस क्विक विज़िबिलिटी टॉगल से, पीआईपी विंडो में यह पक्का करें कि पीआईपी (पिक्चर में पिक्चर) में जाने का ऐनिमेशन आसान और झिलमिलाने वाला हो.
'परेशान न करें' सुविधा के बेहतर नियम
AutomaticZenRule की मदद से ऐप्लिकेशन, 'ध्यान दें' सुविधा को अपनी पसंद के मुताबिक बना सकते हैं
मैनेजमेंट (परेशान न करें) के नियम और तय करें कि इन्हें कब चालू या बंद करना है
उन्हें. Android 15, इन नियमों को बेहतर तरीके से दिखाता है. ऐसा करने का मकसद,
उपयोगकर्ता अनुभव मिलता है. इसमें ये बदलाव शामिल हैं:
AutomaticZenRuleमें टाइप जोड़े जा रहे हैं. इससे सिस्टम, खास वैल्यू लागू कर सकता है कुछ नियम-कानूनों के बारे में बताता है.AutomaticZenRuleमें आइकॉन जोड़ा जा रहा है. इससे मोड बेहतर तरीके से काम करेगा पहचानने लायक.AutomaticZenRuleमें ऐसीtriggerDescriptionस्ट्रिंग जोड़ी जा रही है जो यह बताए ऐसी शर्तें जिनके आधार पर, उपयोगकर्ता के लिए नियम चालू होना चाहिए.- जोड़े गए
ZenDeviceEffectsसेAutomaticZenRuleतक, जिससे नियम ग्रेस्केल जैसी चीज़ों को ट्रिगर कर सकेंगे वॉलपेपर की रोशनी कम करने के लिए भी किया जा सकता है.
सूचना चैनलों के लिए VibrationEffect सेट करना
Android 15 पर, आने वाली सूचनाओं के लिए शानदार वाइब्रेशन सेटिंग चालू की जा सकती है
NotificationChannel.setVibrationEffect का इस्तेमाल कर रहे हैं, इसलिए
आपके उपयोगकर्ता इसके बिना अलग-अलग तरह की सूचनाओं के बीच अंतर कर सकते हैं
उन्हें अपने डिवाइस में देखना पड़ता है.
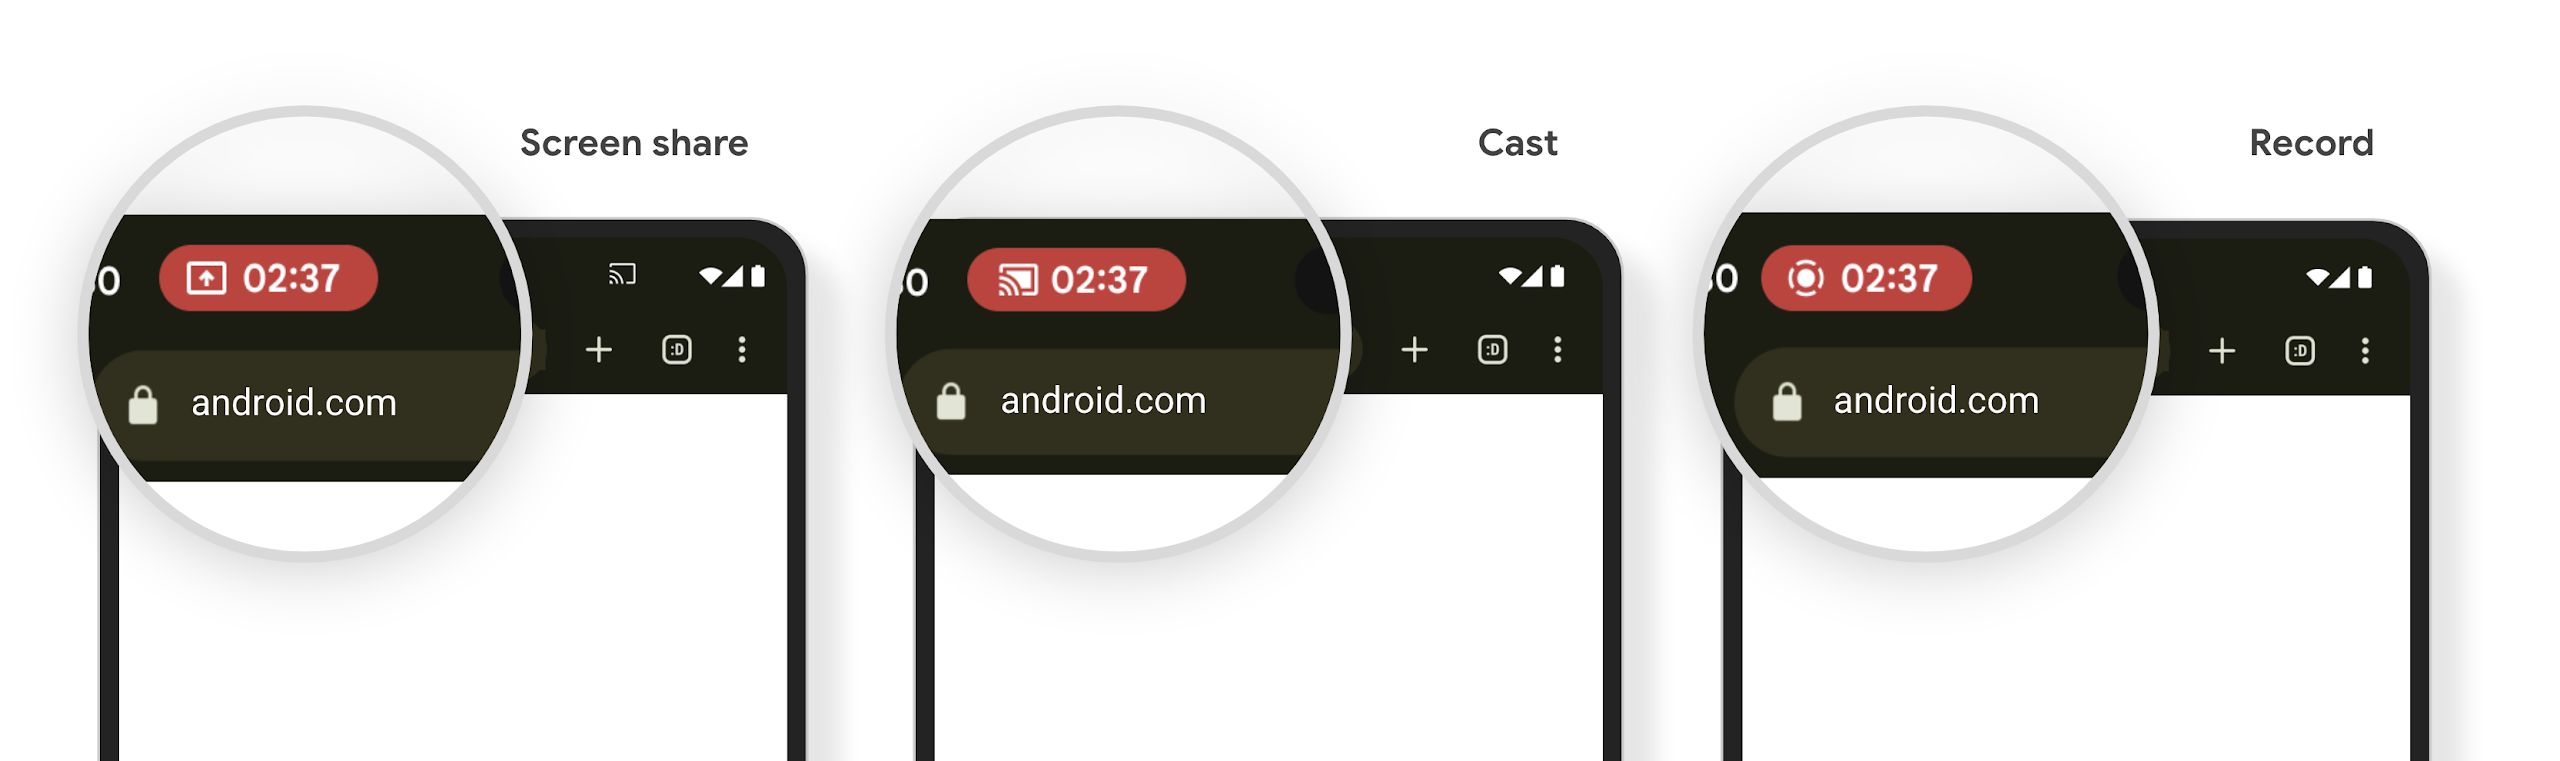
मीडिया प्रोजेक्शन की स्थिति दिखाने वाली स्टेटस बार चिप और अपने-आप बंद होने की सुविधा
मीडिया प्रोजेक्शन की सुविधा से, उपयोगकर्ता की निजी जानकारी सार्वजनिक हो सकती है. एक नया और प्रमुख स्टेटस बार चिप, उपयोगकर्ताओं को स्क्रीन पर चल रहे प्रोजेक्शन के बारे में बताता है. स्क्रीन को कास्ट करने, शेयर करने या रिकॉर्ड करने की सुविधा बंद करने के लिए, उपयोगकर्ता चिप पर टैप कर सकते हैं. साथ ही, बेहतर उपयोगकर्ता अनुभव के लिए, डिवाइस की स्क्रीन लॉक होने पर, स्क्रीन पर चल रहा प्रोजेक्शन अपने-आप बंद हो जाता है.
बड़ी स्क्रीन और फ़ॉर्म फ़ैक्टर
Android 15, आपके ऐप्लिकेशन को Android के फ़ॉर्म फ़ैक्टर का ज़्यादा से ज़्यादा फ़ायदा पाने में मदद करता है. इनमें बड़ी स्क्रीन, फ़्लिप किए जा सकने वाले डिवाइस, और फ़ोल्ड किए जा सकने वाले डिवाइस शामिल हैं.
बड़ी स्क्रीन पर मल्टीटास्किंग की बेहतर सुविधा
Android 15 की मदद से, उपयोगकर्ता बड़ी स्क्रीन वाले डिवाइसों पर एक साथ कई काम कर सकते हैं. इसके लिए उदाहरण के लिए, लोग अपने पसंदीदा स्प्लिट स्क्रीन ऐप्लिकेशन के कॉम्बिनेशन सेव कर सकते हैं, ताकि एक से दूसरे ऐप्लिकेशन पर फटाफट जाने के लिए, स्क्रीन पर टास्कबार को ऐक्सेस और पिन करें. इसका मतलब है कि यह पक्का करना कि आपका ऐप्लिकेशन, अलग-अलग डिवाइसों के हिसाब से ढल जाए, अब पहले से ज़्यादा ज़रूरी है.
Google I/O में अडैप्टिव Android बिल्डिंग बनाने पर सेशन होते हैं ऐप्लिकेशन और Material 3 के साथ यूज़र इंटरफ़ेस (यूआई) बनाना अडैप्टिव लाइब्रेरी से मदद मिल सकती है. साथ ही, हमारे दस्तावेज़ में आपकी मदद के लिए और भी बहुत कुछ है. आपकी साइट को बड़ी संख्या में स्क्रीन.
कवर स्क्रीन पर काम करने की सुविधा
आपका ऐप्लिकेशन, ऐसी प्रॉपर्टी का एलान कर सकता है जिसका इस्तेमाल Android 15, Application या Activity को फ़्लिप किए जा सकने वाले डिवाइसों की छोटी कवर स्क्रीन पर दिखाने के लिए करता है. ये स्क्रीन इतनी छोटी हैं कि इन्हें Android ऐप्लिकेशन के साथ काम करने वाले डिवाइसों के तौर पर नहीं माना जा सकता. हालांकि, आपका ऐप्लिकेशन इन डिवाइसों पर काम करने के लिए ऑप्ट-इन कर सकता है. इससे आपका ऐप्लिकेशन ज़्यादा जगहों पर उपलब्ध हो पाएगा.
कनेक्टिविटी
Android 15, प्लैटफ़ॉर्म को अपडेट करता है, ताकि आपके ऐप्लिकेशन को कम्यूनिकेशन और वायरलेस टेक्नोलॉजी के क्षेत्र में हुई नई तरक्की का ऐक्सेस मिल सके.
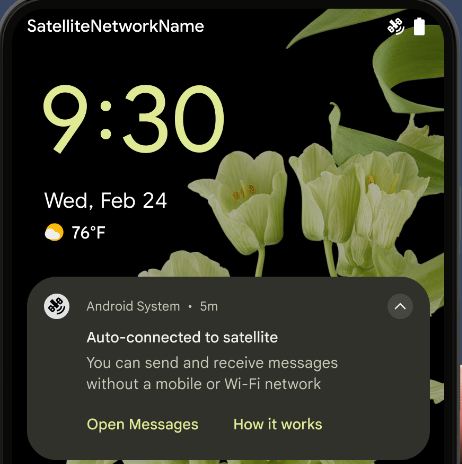
सैटलाइट की मदद से मैसेज भेजने की सुविधा
Android 15 का इस्तेमाल करने पर, सैटलाइट कनेक्टिविटी के लिए प्लैटफ़ॉर्म की सुविधा लगातार मिलती रहेगी. इसमें कुछ यूज़र इंटरफ़ेस (यूआई) एलिमेंट शामिल हैं, ताकि पूरे पेज पर एक जैसा उपयोगकर्ता अनुभव दिया जा सके सैटलाइट कनेक्टिविटी लैंडस्केप.
ऐप्लिकेशन, ServiceState.isUsingNonTerrestrialNetwork() का इस्तेमाल करके यह पता लगा सकते हैं कि कोई डिवाइस सैटलाइट से कब कनेक्ट है. इससे उन्हें यह जानकारी मिलती है कि नेटवर्क की सभी सेवाएं उपलब्ध न होने की वजह क्या हो सकती है. साथ ही, Android 15
एसएमएस और मल्टीमीडिया मैसेज (एमएमएस) ऐप्लिकेशन के साथ-साथ, पहले से लोड किए गए आरसीएस ऐप्लिकेशन को इस्तेमाल करने की सुविधा देता है
मैसेज भेजने और पाने के लिए सैटलाइट कनेक्टिविटी की सुविधा.
एनएफ़सी की सुविधा का बेहतर अनुभव
Android 15 में, टैप करके पैसे चुकाने की सुविधा को ज़्यादा आसान और भरोसेमंद बनाने पर काम किया जा रहा है. साथ ही, Android के एनएफ़सी ऐप्लिकेशन के बेहतर नेटवर्क को भी बेहतर बनाने पर काम किया जा रहा है. जिन डिवाइसों पर यह सुविधा काम करती है उन पर ऐप्लिकेशन, NfcAdapter से निगरानी मोड में जाने का अनुरोध कर सकते हैं. इस मोड में डिवाइस, एनएफ़सी रीडर को सुनता है, लेकिन उनका जवाब नहीं देता. साथ ही, ऐप्लिकेशन की एनएफ़सी सेवा PollingFrame को प्रोसेस करने के लिए ऑब्जेक्ट भेजता है. PollingFrame ऑब्जेक्ट का इस्तेमाल, एनएफ़सी रीडर से पहली बार संपर्क करने से पहले पुष्टि करने के लिए किया जा सकता है. इससे कई मामलों में एक टैप से लेन-देन किया जा सकता है.
इसके अलावा, ऐप्लिकेशन ऐसे डिवाइसों पर फ़िल्टर रजिस्टर कर सकते हैं जिन पर यह सुविधा काम करती है. इससे उन्हें पोलिंग लूप गतिविधि की सूचना मिल सकती है. इससे, एनएफ़सी की सुविधा वाले कई ऐप्लिकेशन को आसानी से चलाया जा सकता है.
Wallet की भूमिका
Android 15 में Wallet की भूमिका को शामिल किया गया है. इससे, उपयोगकर्ता के पसंदीदा Wallet ऐप्लिकेशन के साथ बेहतर तरीके से इंटिग्रेशन किया जा सकता है. यह भूमिका, एनएफ़सी की डिफ़ॉल्ट तौर पर सेट की गई, टच किए बिना पेमेंट करने की सेटिंग की जगह ले लेती है. उपयोगकर्ता, सेटिंग > ऐप्लिकेशन > डिफ़ॉल्ट ऐप्लिकेशन पर जाकर, Wallet में भूमिका रखने वाले व्यक्ति को मैनेज कर सकते हैं.
Wallet की भूमिका का इस्तेमाल, पेमेंट कैटगरी में रजिस्टर किए गए एआईडी के लिए एनएफ़सी टैप को रूट करते समय किया जाता है. टैप हमेशा Wallet की भूमिका वाले व्यक्ति को भेजे जाते हैं. ऐसा तब तक होता है, जब तक उसी AID के लिए रजिस्टर किया गया कोई दूसरा ऐप्लिकेशन फ़ोरग्राउंड में नहीं चल रहा होता.
इस भूमिका का इस्तेमाल यह तय करने के लिए भी किया जाता है कि चालू होने पर, Wallet की क्विक ऐक्सेस टाइल कहां दिखे. जब भूमिका "कोई नहीं" पर सेट होती है, तो क्विक ऐक्सेस टाइल उपलब्ध नहीं होती और पेमेंट कैटगरी के एनएफ़सी टैप सिर्फ़ फ़ोरग्राउंड ऐप्लिकेशन पर डिलीवर किए जाते हैं.
सुरक्षा
Android 15 की मदद से, अपने ऐप्लिकेशन की सुरक्षा को बेहतर बनाया जा सकता है. साथ ही, ऐप्लिकेशन के डेटा को सुरक्षित रखा जा सकता है. इसके अलावा, उपयोगकर्ताओं को उनके डेटा के बारे में ज़्यादा जानकारी दी जा सकती है और उन्हें डेटा पर ज़्यादा कंट्रोल दिया जा सकता है. उपयोगकर्ताओं की सुरक्षा को बेहतर बनाने और आपके ऐप्लिकेशन को नए खतरों से बचाने के लिए, हम क्या कर रहे हैं, इस बारे में ज़्यादा जानने के लिए, Google I/O में Android पर उपयोगकर्ताओं की सुरक्षा को बेहतर बनाना टॉक देखें.
ऑटोमैटिक भरने की सुविधा के साथ Credential Manager को इंटिग्रेट करना
Android 15 से, डेवलपर क्रेडेंशियल मैनेजर के अनुरोधों के साथ, उपयोगकर्ता नाम या पासवर्ड फ़ील्ड जैसे खास व्यू को लिंक कर सकते हैं. इससे, साइन-इन की प्रोसेस के दौरान उपयोगकर्ता को बेहतर अनुभव देना आसान हो जाता है. जब उपयोगकर्ता इनमें से किसी एक व्यू पर फ़ोकस करता है, तो उससे जुड़ा अनुरोध क्रेडेंशियल मैनेजर को भेजा जाता है. इस प्रोसेस से मिले क्रेडेंशियल, सभी सेवा देने वाली कंपनियों के साथ इकट्ठा किए जाते हैं और ऑटोमैटिक भरने की सुविधा के फ़ॉलबैक यूज़र इंटरफ़ेस (यूआई) में दिखाए जाते हैं. जैसे, इनलाइन सुझाव या ड्रॉप-डाउन सुझाव. डेवलपर के लिए, Jetpack androidx.credentials लाइब्रेरी का इस्तेमाल करना सबसे बेहतर है. यह लाइब्रेरी, Android 15 और इसके बाद के वर्शन में इस सुविधा को बेहतर बनाने के लिए जल्द ही उपलब्ध होगी.
बायोमेट्रिक प्रॉम्प्ट के साथ, एक टैप में साइन-अप और साइन-इन करने की सुविधा को इंटिग्रेट करना
क्रेडेंशियल मैनेजर बायोमेट्रिक प्रॉम्प्ट को क्रेडेंशियल बनाने की सुविधा में इंटिग्रेट करता है और साइन-इन करने की प्रोसेस को पूरा करता है. इससे, सेवा देने वाली कंपनियों को अपने बायोमेट्रिक प्रॉम्प्ट. इस वजह से, क्रेडेंशियल देने वालों को सिर्फ़ बनाने और पाने के नतीजे, बायोमेट्रिक फ़्लो के नतीजे के साथ बेहतर बनाए जाते हैं. यह आसान प्रोसेस, ज़्यादा बेहतर और आसान क्रेडेंशियल बनाती है बनाने और वापस पाने की प्रोसेस.
एंड-टू-एंड एन्क्रिप्शन के लिए कुंजी मैनेजमेंट
हम Android 15 में E2eeContactKeysManager को लॉन्च कर रहे हैं. इससे आपके Android ऐप्लिकेशन में एंड-टू-एंड एन्क्रिप्शन (E2EE) की सुविधा मिलती है. इसके लिए, क्रिप्टोग्राफ़िक सार्वजनिक कुंजियों को सेव करने के लिए, ओएस-लेवल का एपीआई उपलब्ध कराया जाता है.
E2eeContactKeysManager को प्लैटफ़ॉर्म के संपर्क ऐप्लिकेशन के साथ इंटिग्रेट करने के लिए डिज़ाइन किया गया है. इससे उपयोगकर्ताओं को अपने संपर्कों के सार्वजनिक कुंजियों को मैनेज करने और उनकी पुष्टि करने का एक ही तरीका मिलता है.
कॉन्टेंट यूआरआई पर अनुमतियों की जांच करना
Android 15 में ऐसे एपीआई का एक सेट शामिल किया गया है जो कॉन्टेंट के यूआरआई पर अनुमति की जांच करते हैं:
Context.checkContentUriPermissionFull: यह कॉन्टेंट यूआरआई पर अनुमति की पूरी जांच करता है.Activityमेनिफ़ेस्ट एट्रिब्यूटrequireContentUriPermissionFromCaller: यह गतिविधि शुरू होने पर, दिए गए कॉन्टेंट यूआरआई पर तय की गई अनुमतियां लागू करता है.Activityकॉलर के लिएComponentCallerक्लास: यह उस ऐप्लिकेशन को दिखाता है जिसने गतिविधि शुरू की.
सुलभता
Android 15 में ऐसी सुविधाएं जोड़ी गई हैं जिनसे लोगों को ऐक्सेसिबिलिटी से जुड़ी बेहतर सुविधाएं मिलती हैं.
बेहतर ब्रेल
हमने Android 15 में, TalkBack को यूएसबी और सुरक्षित ब्लूटूथ, दोनों के ज़रिए HID स्टैंडर्ड का इस्तेमाल करने वाले ब्रेल डिसप्ले के साथ काम करने की सुविधा दी है.
यह स्टैंडर्ड, माउस और कीबोर्ड के इस्तेमाल किए जाने वाले स्टैंडर्ड से काफ़ी मिलता-जुलता है. इससे Android को समय के साथ, ब्रेल डिसप्ले की ज़्यादा से ज़्यादा वैरायटी के साथ काम करने में मदद मिलेगी.
इंटरनैशनलाइज़ेशन
Android 15 में ऐसी सुविधाएं और क्षमताएं जोड़ी गई हैं जो अलग-अलग भाषाओं में डिवाइस इस्तेमाल करने पर, उपयोगकर्ता अनुभव को बेहतर बनाती हैं.
सीजेके वैरिएबल फ़ॉन्ट
Android 15 से, चाइनीज़, जैपनीज़, और कोरियन (CJK) भाषाओं के लिए फ़ॉन्ट फ़ाइल, NotoSansCJK अब वैरिएबल फ़ॉन्ट है. वैरिएबल फ़ॉन्ट की मदद से, CJK भाषाओं में क्रिएटिव टाइपोग्राफ़ी की संभावनाएं बढ़ जाती हैं. डिज़ाइनर, अलग-अलग तरह के स्टाइल आज़मा सकते हैं और ऐसे लेआउट बना सकते हैं जो पहले मुश्किल या असंभव थे.
अक्षर के बीच में स्पेस को सही ठहराना
Android 15 से, JUSTIFICATION_MODE_INTER_CHARACTER का इस्तेमाल करके, अक्षरों के बीच के स्पेस का इस्तेमाल करके टेक्स्ट को अलाइन किया जा सकता है. एक ही शब्द में दो बार सही ठहराने की वजह यह थी
पहली बार Android 8.0 (एपीआई लेवल 26) और इंटर-कैरेक्टर में पेश किया गया था
वजह बताने की सुविधा, उन भाषाओं के लिए समान सुविधाएं देती है जो
चाइनीज़, जैपनीज़ वगैरह जैसे सेगमेंटेशन के लिए खाली सफ़ेद जगह.
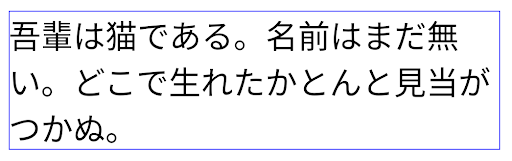
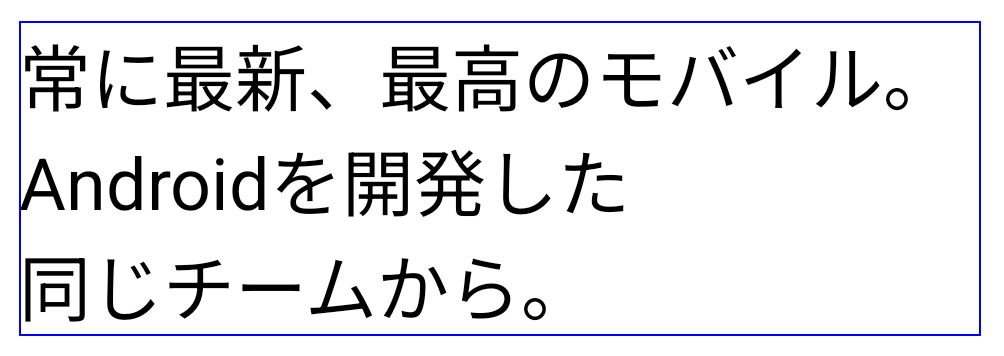
JUSTIFICATION_MODE_NONE का इस्तेमाल करने वाले जैपनीज़ टेक्स्ट के लिए लेआउट.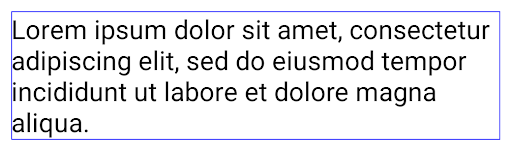
JUSTIFICATION_MODE_NONE का इस्तेमाल करके अंग्रेज़ी टेक्स्ट के लिए लेआउट.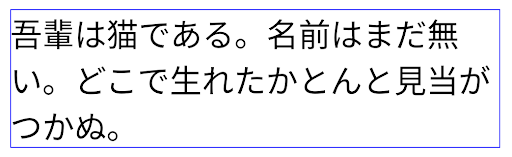
JUSTIFICATION_MODE_INTER_WORD का इस्तेमाल करके, जैपनीज़ टेक्स्ट के लिए लेआउट.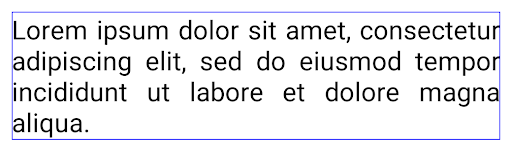
JUSTIFICATION_MODE_INTER_WORD का इस्तेमाल करके अंग्रेज़ी टेक्स्ट के लिए लेआउट.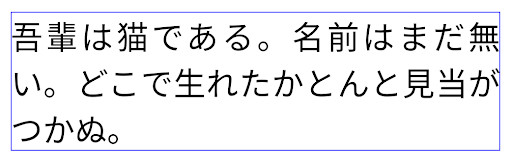
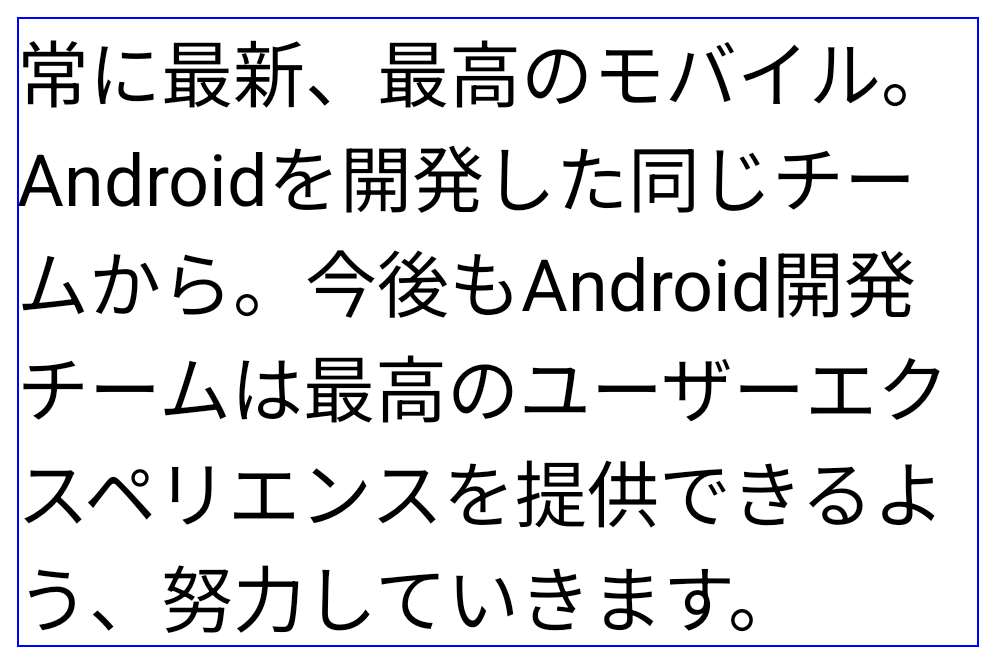
JUSTIFICATION_MODE_INTER_CHARACTER का इस्तेमाल करके, जैपनीज़ टेक्स्ट के लिए लेआउट.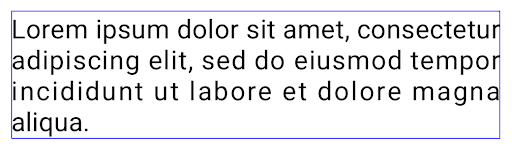
JUSTIFICATION_MODE_INTER_CHARACTER का इस्तेमाल करके अंग्रेज़ी टेक्स्ट का लेआउट.लाइन अपने-आप टूटने की सुविधा को कॉन्फ़िगर करना
Android ने जैपनीज़ और कोरियन भाषा के लिए, फ़्रेज़ के आधार पर लाइन ब्रेक की सुविधा शुरू की
Android 13 (एपीआई लेवल 33). हालांकि, वाक्यांश के आधार पर लाइन ब्रेक से,
टेक्स्ट की छोटी पंक्तियों को पढ़ना आता है, इसलिए ये टेक्स्ट की लंबी लाइनों के लिए ठीक से काम नहीं करते.
Android 15 में, ऐप्लिकेशन सिर्फ़ छोटी लाइनों के लिए, फ़्रेज़ के आधार पर लाइन ब्रेक का इस्तेमाल कर सकते हैं
LINE_BREAK_WORD_STYLE_AUTO का इस्तेमाल करके, टेक्स्ट का इस्तेमाल किया गया है
का विकल्प शामिल है. यह विकल्प, टेक्स्ट के लिए सबसे सही वर्ड स्टाइल विकल्प चुनता है.
टेक्स्ट की छोटी लाइनों के लिए, फ़्रेज़-आधारित लाइन ब्रेक का इस्तेमाल किया जाता है, जो एक जैसी होती हैं
LINE_BREAK_WORD_STYLE_PHRASE के तौर पर, जैसा कि
निम्न चित्र:
LINE_BREAK_WORD_STYLE_AUTO
टेक्स्ट पढ़ने में आसान बनाने के लिए, फ़्रेज़ के आधार पर लाइन ब्रेक लागू करता है.
यह वैसा ही है जैसे
LINE_BREAK_WORD_STYLE_PHRASE लागू करना.टेक्स्ट की लंबी लाइनों के लिए, LINE_BREAK_WORD_STYLE_AUTO "नहीं" का इस्तेमाल करता है
पंक्ति ब्रेक शब्द शैली, जो इसके समान है
LINE_BREAK_WORD_STYLE_NONE, जैसा कि
निम्न चित्र:
LINE_BREAK_WORD_STYLE_AUTO, टेक्स्ट की लंबी लाइनों के लिए, टेक्स्ट को आसानी से पढ़ने लायक बनाने के लिए, लाइन-ब्रेक वर्ड स्टाइल लागू नहीं करता.
यह आवेदन करने के जैसा ही है
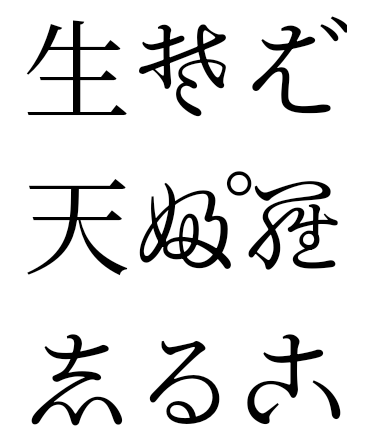
LINE_BREAK_WORD_STYLE_NONE.जापानी हेंटाइगाना फ़ॉन्ट
Android 15 में, पुराने जैपनीज़ हीरागाना (जिसे हेंटाइगाना कहा जाता है) के लिए एक फ़ॉन्ट फ़ाइल डिफ़ॉल्ट रूप से शामिल होता है. हेंटाइगाना के किरदारों के खास आकार से कला या डिज़ाइन में अपनी विशेषज्ञता के साथ-साथ सटीक जानकारी को सुरक्षित रखने में भी मदद मिलती है प्राचीन जापानी दस्तावेज़ों का ट्रांसमिशन और समझ.
VideoLAN cone कॉपीराइट (c) 1996-2010 VideoLAN. इस लोगो या इसके बदले गए वर्शन का इस्तेमाल, कोई भी व्यक्ति VideoLAN प्रोजेक्ट या VideoLAN टीम के बनाए गए किसी भी प्रॉडक्ट के बारे में बताने के लिए कर सकता है. हालांकि, इसका मतलब यह नहीं है कि प्रोजेक्ट ने इस प्रॉडक्ट का प्रमोशन किया है.
Vulkan और Vulkan का लोगो, Khronos Group Inc. के रजिस्टर किए हुए ट्रेडमार्क हैं.
OpenGL एक रजिस्टर किया गया ट्रेडमार्क है और OpenGL ES लोगो, हेवलेट पैकार्ड एंटरप्राइज़ का ट्रेडमार्क है. इसका इस्तेमाल, Khronos की अनुमति से किया जाता है.