
এই দস্তাবেজটি বর্ণনা করে যে কীভাবে বিভিন্ন সাধারণ এসপ্রেসো পরীক্ষা সেট আপ করতে হয়।
অন্য ভিউয়ের পাশে একটি ভিউ মিলান
একটি বিন্যাসে এমন কিছু দৃশ্য থাকতে পারে যেগুলি নিজের দ্বারা অনন্য নয়৷ উদাহরণস্বরূপ, পরিচিতির সারণীতে একটি পুনরাবৃত্তি কল বোতামে একই R.id থাকতে পারে, একই টেক্সট থাকতে পারে এবং ভিউ হায়ারার্কির মধ্যে অন্যান্য কল বোতামের মতো একই বৈশিষ্ট্য থাকতে পারে।
উদাহরণস্বরূপ, এই কার্যকলাপে, "7" পাঠ্য সহ ভিউ একাধিক সারি জুড়ে পুনরাবৃত্তি হয়:
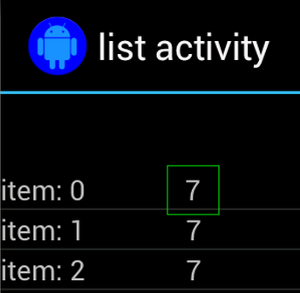
প্রায়শই, নন-ইউনিক ভিউকে কিছু অনন্য লেবেলের সাথে যুক্ত করা হবে যা এটির পাশে অবস্থিত, যেমন কল বোতামের পাশে পরিচিতির নাম। এই ক্ষেত্রে, আপনি আপনার নির্বাচনকে সংকীর্ণ করতে hasSibling() matcher ব্যবহার করতে পারেন:
কোটলিন
onView(allOf(withText("7"), hasSibling(withText("item: 0"))))
    .perform(click())
জাভা
onView(allOf(withText("7"), hasSibling(withText("item: 0"))))
    .perform(click());
একটি অ্যাকশন বারের ভিতরে থাকা একটি দৃশ্যের সাথে মিল করুন
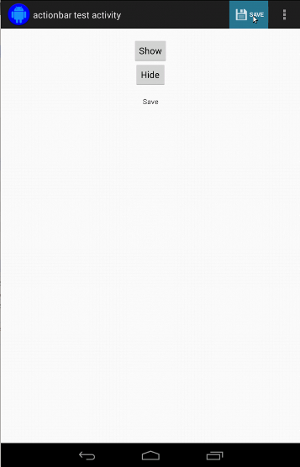
ActionBarTestActivity এ দুটি ভিন্ন অ্যাকশন বার রয়েছে: একটি সাধারণ অ্যাকশন বার এবং একটি প্রাসঙ্গিক অ্যাকশন বার যা একটি বিকল্প মেনু থেকে তৈরি করা হয়। উভয় অ্যাকশন বারেই একটি আইটেম রয়েছে যা সর্বদা দৃশ্যমান এবং দুটি আইটেম যা শুধুমাত্র ওভারফ্লো মেনুতে দৃশ্যমান। যখন একটি আইটেম ক্লিক করা হয়, এটি ক্লিক করা আইটেমের বিষয়বস্তুতে একটি TextView পরিবর্তন করে।
উভয় অ্যাকশন বারে দৃশ্যমান আইকন মিলানো সহজ, যেমনটি নিম্নলিখিত কোড স্নিপেটে দেখানো হয়েছে:
কোটলিন
fun testClickActionBarItem() {
    // We make sure the contextual action bar is hidden.
    onView(withId(R.id.hide_contextual_action_bar))
        .perform(click())

    // Click on the icon - we can find it by the r.Id.
    onView(withId(R.id.action_save))
        .perform(click())

    // Verify that we have really clicked on the icon
    // by checking the TextView content.
    onView(withId(R.id.text_action_bar_result))
        .check(matches(withText("Save")))
}
জাভা
public void testClickActionBarItem() {
    // We make sure the contextual action bar is hidden.
    onView(withId(R.id.hide_contextual_action_bar))
        .perform(click());

    // Click on the icon - we can find it by the r.Id.
    onView(withId(R.id.action_save))
        .perform(click());

    // Verify that we have really clicked on the icon
    // by checking the TextView content.
    onView(withId(R.id.text_action_bar_result))
        .check(matches(withText("Save")));
}
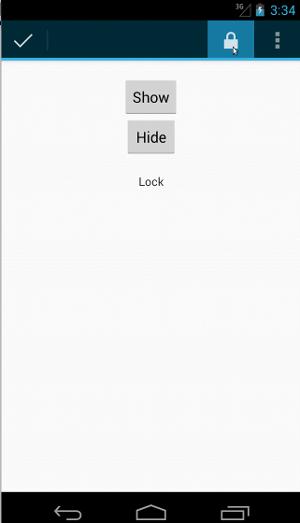
কোডটি প্রাসঙ্গিক অ্যাকশন বারের জন্য অভিন্ন দেখায়:
কোটলিন
fun testClickActionModeItem() {
    // Make sure we show the contextual action bar.
    onView(withId(R.id.show_contextual_action_bar))
        .perform(click())

    // Click on the icon.
    onView((withId(R.id.action_lock)))
        .perform(click())

    // Verify that we have really clicked on the icon
    // by checking the TextView content.
    onView(withId(R.id.text_action_bar_result))
        .check(matches(withText("Lock")))
}
জাভা
public void testClickActionModeItem() {
    // Make sure we show the contextual action bar.
    onView(withId(R.id.show_contextual_action_bar))
        .perform(click());

    // Click on the icon.
    onView((withId(R.id.action_lock)))
        .perform(click());

    // Verify that we have really clicked on the icon
    // by checking the TextView content.
    onView(withId(R.id.text_action_bar_result))
        .check(matches(withText("Lock")));
}
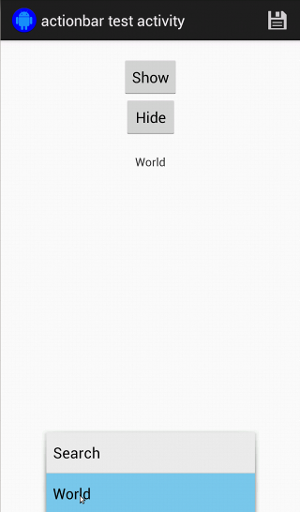
ওভারফ্লো মেনুতে আইটেমগুলিতে ক্লিক করা সাধারণ অ্যাকশন বারের জন্য কিছুটা জটিল কারণ কিছু ডিভাইসে একটি হার্ডওয়্যার ওভারফ্লো মেনু বোতাম থাকে, যা একটি বিকল্প মেনুতে ওভারফ্লো হওয়া আইটেমগুলিকে খোলে এবং কিছু ডিভাইসে একটি সফ্টওয়্যার ওভারফ্লো মেনু বোতাম থাকে, যা একটি সাধারণ ক্রিয়াকলাপ খোলে। ওভারফ্লো মেনু। ভাগ্যক্রমে, এসপ্রেসো আমাদের জন্য এটি পরিচালনা করে।
সাধারণ অ্যাকশন বারের জন্য:
কোটলিন
fun testActionBarOverflow() {
    // Make sure we hide the contextual action bar.
    onView(withId(R.id.hide_contextual_action_bar))
        .perform(click())

    // Open the options menu OR open the overflow menu, depending on whether
    // the device has a hardware or software overflow menu button.
    openActionBarOverflowOrOptionsMenu(
            ApplicationProvider.getApplicationContext<Context>())

    // Click the item.
    onView(withText("World"))
        .perform(click())

    // Verify that we have really clicked on the icon by checking
    // the TextView content.
    onView(withId(R.id.text_action_bar_result))
        .check(matches(withText("World")))
}
জাভা
public void testActionBarOverflow() {
    // Make sure we hide the contextual action bar.
    onView(withId(R.id.hide_contextual_action_bar))
        .perform(click());

    // Open the options menu OR open the overflow menu, depending on whether
    // the device has a hardware or software overflow menu button.
    openActionBarOverflowOrOptionsMenu(
            ApplicationProvider.getApplicationContext());

    // Click the item.
    onView(withText("World"))
        .perform(click());

    // Verify that we have really clicked on the icon by checking
    // the TextView content.
    onView(withId(R.id.text_action_bar_result))
        .check(matches(withText("World")));
}

হার্ডওয়্যার ওভারফ্লো মেনু বোতাম সহ ডিভাইসগুলিতে এটি এইভাবে দেখায়:
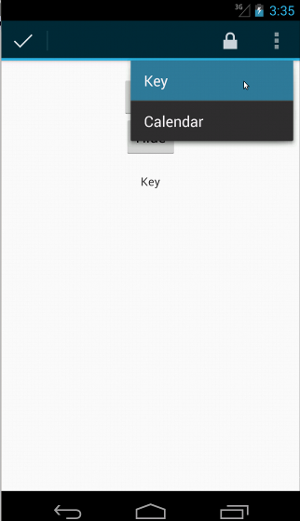
প্রাসঙ্গিক কর্ম বারের জন্য এটি আবার সত্যিই সহজ:
কোটলিন
fun testActionModeOverflow() {
    // Show the contextual action bar.
    onView(withId(R.id.show_contextual_action_bar))
        .perform(click())

    // Open the overflow menu from contextual action mode.
    openContextualActionModeOverflowMenu()

    // Click on the item.
    onView(withText("Key"))
        .perform(click())

    // Verify that we have really clicked on the icon by
    // checking the TextView content.
    onView(withId(R.id.text_action_bar_result))
        .check(matches(withText("Key")))
    }
}
জাভা
public void testActionModeOverflow() {
    // Show the contextual action bar.
    onView(withId(R.id.show_contextual_action_bar))
        .perform(click());

    // Open the overflow menu from contextual action mode.
    openContextualActionModeOverflowMenu();

    // Click on the item.
    onView(withText("Key"))
        .perform(click());

    // Verify that we have really clicked on the icon by
    // checking the TextView content.
    onView(withId(R.id.text_action_bar_result))
        .check(matches(withText("Key")));
    }
}
এই নমুনার সম্পূর্ণ কোড দেখতে, GitHub-এ ActionBarTest.java নমুনা দেখুন।
দাবী করুন যে একটি দৃশ্য প্রদর্শিত হয় না
একাধিক ক্রিয়া সম্পাদন করার পরে, আপনি অবশ্যই পরীক্ষার অধীনে UI এর অবস্থা জাহির করতে চাইবেন। কখনও কখনও, এটি একটি নেতিবাচক ক্ষেত্রে হতে পারে, যেমন যখন কিছু ঘটছে না। মনে রাখবেন যে আপনি ViewAssertions.matches() ব্যবহার করে যেকোন হ্যামক্রেস্ট ভিউ ম্যাচারকে একটি ViewAssertion এ পরিণত করতে পারেন।
নীচের উদাহরণে, আমরা isDisplayed() matcher নিই এবং স্ট্যান্ডার্ড not() matcher ব্যবহার করে এটিকে বিপরীত করি:
কোটলিন
import androidx.test.espresso.Espresso.onView
import androidx.test.espresso.assertion.ViewAssertions.matches
import androidx.test.espresso.matcher.ViewMatchers.isDisplayed
import androidx.test.espresso.matcher.ViewMatchers.withId
import org.hamcrest.Matchers.not

onView(withId(R.id.bottom_left))
    .check(matches(not(isDisplayed())))
জাভা
import static androidx.test.espresso.Espresso.onView;
import static androidx.test.espresso.assertion.ViewAssertions.matches;
import static androidx.test.espresso.matcher.ViewMatchers.isDisplayed;
import static androidx.test.espresso.matcher.ViewMatchers.withId;
import static org.hamcrest.Matchers.not;

onView(withId(R.id.bottom_left))
    .check(matches(not(isDisplayed())));
উপরের পদ্ধতিটি কাজ করে যদি দৃশ্যটি এখনও শ্রেণীবিন্যাসের অংশ হয়। যদি এটি না হয়, আপনি একটি NoMatchingViewException পাবেন এবং আপনাকে ViewAssertions.doesNotExist() ব্যবহার করতে হবে।
দাবি করুন যে একটি দৃশ্য উপস্থিত নেই
যদি ভিউটি ভিউ হায়ারার্কি থেকে চলে যায়—যা ঘটতে পারে যখন কোনো অ্যাকশন অন্য অ্যাক্টিভিটিতে পরিবর্তন ঘটায়—আপনার ব্যবহার করা উচিত ViewAssertions.doesNotExist() :
কোটলিন
import androidx.test.espresso.Espresso.onView
import androidx.test.espresso.assertion.ViewAssertions.doesNotExist
import androidx.test.espresso.matcher.ViewMatchers.withId

onView(withId(R.id.bottom_left))
    .check(doesNotExist())
জাভা
import static androidx.test.espresso.Espresso.onView;
import static androidx.test.espresso.assertion.ViewAssertions.doesNotExist;
import static androidx.test.espresso.matcher.ViewMatchers.withId;

onView(withId(R.id.bottom_left))
    .check(doesNotExist());
নিশ্চিত করুন যে একটি ডেটা আইটেম একটি অ্যাডাপ্টারে নেই
একটি নির্দিষ্ট ডেটা আইটেম AdapterView এর মধ্যে নেই তা প্রমাণ করার জন্য আপনাকে জিনিসগুলি একটু ভিন্নভাবে করতে হবে। আমরা যে AdapterView আগ্রহী তা খুঁজে বের করতে হবে এবং এর ধারণকৃত ডেটাকে জিজ্ঞাসাবাদ করতে হবে। আমাদের onData() ব্যবহার করার দরকার নেই। পরিবর্তে, আমরা AdapterView খুঁজে পেতে onView() ব্যবহার করি এবং তারপর ভিউয়ের ভিতরে ডেটাতে কাজ করতে অন্য ম্যাচার ব্যবহার করি।
প্রথমে ম্যাচার:
কোটলিন
private fun withAdaptedData(dataMatcher: Matcher<Any>): Matcher<View> {
    return object : TypeSafeMatcher<View>() {

        override fun describeTo(description: Description) {
            description.appendText("with class name: ")
            dataMatcher.describeTo(description)
        }

        public override fun matchesSafely(view: View) : Boolean {
            if (view !is AdapterView<*>) {
                return false
            }

            val adapter = view.adapter
            for (i in 0 until adapter.count) {
                if (dataMatcher.matches(adapter.getItem(i))) {
                    return true
                }
            }

            return false
        }
    }
}
জাভা
private static Matcher<View> withAdaptedData(final Matcher<Object> dataMatcher) {
    return new TypeSafeMatcher<View>() {

        @Override
        public void describeTo(Description description) {
            description.appendText("with class name: ");
            dataMatcher.describeTo(description);
        }

        @Override
        public boolean matchesSafely(View view) {
            if (!(view instanceof AdapterView)) {
                return false;
            }

            @SuppressWarnings("rawtypes")
            Adapter adapter = ((AdapterView) view).getAdapter();
            for (int i = 0; i < adapter.getCount(); i++) {
                if (dataMatcher.matches(adapter.getItem(i))) {
                    return true;
                }
            }

            return false;
        }
    };
}
তারপরে AdapterView খুঁজে পেতে আমাদের যা দরকার তা হল onView() :
কোটলিন
fun testDataItemNotInAdapter() {
    onView(withId(R.id.list))
          .check(matches(not(withAdaptedData(withItemContent("item: 168")))))
    }
}
জাভা
@SuppressWarnings("unchecked")
public void testDataItemNotInAdapter() {
    onView(withId(R.id.list))
          .check(matches(not(withAdaptedData(withItemContent("item: 168")))));
    }
}
এবং আমাদের কাছে একটি দাবী আছে যা ব্যর্থ হবে যদি "আইটেম: 168" এর সমান আইটেম আইডি তালিকা সহ অ্যাডাপ্টার ভিউতে উপস্থিত থাকে।
সম্পূর্ণ নমুনার জন্য, GitHub-এ AdapterViewTest.java ক্লাসের মধ্যে testDataItemNotInAdapter() পদ্ধতিটি দেখুন।
একটি কাস্টম ব্যর্থ হ্যান্ডলার ব্যবহার করুন
Espresso-এ ডিফল্ট FailureHandler একটি কাস্টম দিয়ে প্রতিস্থাপন করলে অতিরিক্ত বা ভিন্ন ত্রুটি হ্যান্ডলিং করা যায়, যেমন একটি স্ক্রিনশট নেওয়া বা অতিরিক্ত ডিবাগ তথ্য দিয়ে পাস করা।
CustomFailureHandlerTest উদাহরণ দেখায় কিভাবে একটি কাস্টম ব্যর্থ হ্যান্ডলার বাস্তবায়ন করতে হয়:
কোটলিন
private class CustomFailureHandler(targetContext: Context) : FailureHandler {
    private val delegate: FailureHandler

    init {
        delegate = DefaultFailureHandler(targetContext)
    }

    override fun handle(error: Throwable, viewMatcher: Matcher<View>) {
        try {
            delegate.handle(error, viewMatcher)
        } catch (e: NoMatchingViewException) {
            throw MySpecialException(e)
        }

    }
}
জাভা
private static class CustomFailureHandler implements FailureHandler {
    private final FailureHandler delegate;

    public CustomFailureHandler(Context targetContext) {
        delegate = new DefaultFailureHandler(targetContext);
    }

    @Override
    public void handle(Throwable error, Matcher<View> viewMatcher) {
        try {
            delegate.handle(error, viewMatcher);
        } catch (NoMatchingViewException e) {
            throw new MySpecialException(e);
        }
    }
}
এই ব্যর্থতা হ্যান্ডলার একটি NoMatchingViewException এর পরিবর্তে একটি MySpecialException নিক্ষেপ করে এবং অন্যান্য সমস্ত ব্যর্থতা DefaultFailureHandler কে অর্পণ করে। CustomFailureHandler পরীক্ষার setUp() পদ্ধতিতে Espresso-এর সাথে নিবন্ধিত হতে পারে:
কোটলিন
@Throws(Exception::class)
override fun setUp() {
    super.setUp()
    getActivity()
    setFailureHandler(CustomFailureHandler(
            ApplicationProvider.getApplicationContext<Context>()))
}
জাভা
@Override
public void setUp() throws Exception {
    super.setUp();
    getActivity();
    setFailureHandler(new CustomFailureHandler(
            ApplicationProvider.getApplicationContext()));
}
আরও তথ্যের জন্য, FailureHandler ইন্টারফেস এবং Espresso.setFailureHandler() দেখুন।
অ-ডিফল্ট উইন্ডোগুলি লক্ষ্য করুন
অ্যান্ড্রয়েড একাধিক উইন্ডো সমর্থন করে। সাধারণত, এটি ব্যবহারকারী এবং অ্যাপ বিকাশকারীর কাছে স্বচ্ছ, তবুও কিছু ক্ষেত্রে একাধিক উইন্ডো দৃশ্যমান হয়, যেমন যখন অনুসন্ধান উইজেটের প্রধান অ্যাপ্লিকেশন উইন্ডোতে একটি স্বয়ংক্রিয়-সম্পূর্ণ উইন্ডো আঁকা হয়। জিনিসগুলিকে সহজ করার জন্য, ডিফল্টরূপে Espresso একটি হিউরিস্টিক ব্যবহার করে অনুমান করার জন্য যে আপনি কোন Window সাথে ইন্টারঅ্যাক্ট করতে চান৷ এই হিউরিস্টিক প্রায় সবসময় যথেষ্ট ভাল; যাইহোক, বিরল ক্ষেত্রে, আপনাকে নির্দিষ্ট করতে হবে কোন উইন্ডোতে ইন্টারঅ্যাকশন টার্গেট করা উচিত। আপনি আপনার নিজস্ব রুট উইন্ডো ম্যাচার, বা Root ম্যাচার প্রদান করে এটি করতে পারেন:
কোটলিন
onView(withText("South China Sea"))
    .inRoot(withDecorView(not(`is`(getActivity().getWindow().getDecorView()))))
    .perform(click())
জাভা
onView(withText("South China Sea"))
    .inRoot(withDecorView(not(is(getActivity().getWindow().getDecorView()))))
    .perform(click());
ViewMatchers এর ক্ষেত্রে যেমন, আমরা আগে থেকে দেওয়া RootMatchers এর একটি সেট প্রদান করি। অবশ্যই, আপনি সর্বদা আপনার নিজস্ব Matcher অবজেক্ট বাস্তবায়ন করতে পারেন।
GitHub-এ একাধিক উইন্ডো টেস্ট নমুনা দেখুন।
একটি তালিকা দৃশ্যে একটি শিরোনাম বা পাদচরণ মেলান
addHeaderView() এবং addFooterView() পদ্ধতি ব্যবহার করে ListViews এ হেডার এবং ফুটার যোগ করা হয়। নিশ্চিত করতে Espresso.onData() জানে যে কোন ডেটা অবজেক্টের সাথে মেলে, addHeaderView() এবং addFooterView() এ দ্বিতীয় প্যারামিটার হিসাবে একটি প্রিসেট ডেটা অবজেক্ট মান পাস করতে ভুলবেন না। যেমন:
কোটলিন
const val FOOTER = "FOOTER"
...
val footerView = layoutInflater.inflate(R.layout.list_item, listView, false)
footerView.findViewById<TextView>(R.id.item_content).text = "count:"
footerView.findViewById<TextView>(R.id.item_size).text
        = data.size.toString
listView.addFooterView(footerView, FOOTER, true)
জাভা
public static final String FOOTER = "FOOTER";
...
View footerView = layoutInflater.inflate(R.layout.list_item, listView, false);
footerView.findViewById<TextView>(R.id.item_content).setText("count:");
footerView.findViewById<TextView>(R.id.item_size).setText(String.valueOf(data.size()));
listView.addFooterView(footerView, FOOTER, true);
তারপর, আপনি ফুটারের জন্য একটি ম্যাচার লিখতে পারেন:
কোটলিন
import org.hamcrest.Matchers.allOf
import org.hamcrest.Matchers.instanceOf
import org.hamcrest.Matchers.`is`

fun isFooter(): Matcher<Any> {
    return allOf(`is`(instanceOf(String::class.java)),
            `is`(LongListActivity.FOOTER))
}
জাভা
import static org.hamcrest.Matchers.allOf;
import static org.hamcrest.Matchers.instanceOf;
import static org.hamcrest.Matchers.is;

@SuppressWarnings("unchecked")
public static Matcher<Object> isFooter() {
    return allOf(is(instanceOf(String.class)), is(LongListActivity.FOOTER));
}
এবং একটি পরীক্ষায় ভিউ লোড করা তুচ্ছ:
কোটলিন
import androidx.test.espresso.Espresso.onData
import androidx.test.espresso.action.ViewActions.click
import androidx.test.espresso.sample.LongListMatchers.isFooter

fun testClickFooter() {
    onData(isFooter())
        .perform(click())

    // ...
}
জাভা
import static androidx.test.espresso.Espresso.onData;
import static androidx.test.espresso.action.ViewActions.click;
import static androidx.test.espresso.sample.LongListMatchers.isFooter;

public void testClickFooter() {
    onData(isFooter())
        .perform(click());

    // ...
}
GitHub-এ AdapterViewTest.java এর testClickFooter() পদ্ধতিতে পাওয়া সম্পূর্ণ কোড নমুনাটি দেখুন।