

אחת מהשיטות להגן על מידע רגיש או על תוכן פרימיום באפליקציה היא לבקש אימות ביומטרי, כמו זיהוי פנים או זיהוי טביעת אצבע. במדריך הזה מוסבר איך לתמוך בתהליכי התחברות ביומטריים באפליקציה.
ככלל, מומלץ להשתמש ב-Credential Manager לכניסה ראשונית במכשיר. אפשר לבצע הרשאות מחדש באמצעות הנחיה ביומטרית או Credential Manager. היתרון של שימוש ב-Biometric Prompt הוא שהוא מציע יותר אפשרויות להתאמה אישית, ואילו Credential Manager מציע הטמעה אחת בשני התהליכים.
הצהרה על סוגי האימות שהאפליקציה תומכת בהם
כדי להגדיר את סוגי האימות שהאפליקציה תומכת בהם, משתמשים בממשק BiometricManager.Authenticators. המערכת מאפשרת לכם להצהיר על סוגי האימות הבאים:
BIOMETRIC_STRONG- אימות באמצעות נתונים ביומטריים ברמה 3, כפי שמוגדר בדף הגדרת התאימות של Android.
BIOMETRIC_WEAK- אימות באמצעות נתונים ביומטריים מסוג Class 2, כפי שמוגדר בדף הגדרת התאימות של Android.
DEVICE_CREDENTIAL- אימות באמצעות פרטי כניסה לנעילת המסך – קוד האימות, קו ביטול הנעילה או הסיסמה של המשתמש.
כדי להתחיל להשתמש באמצעי אימות, המשתמש צריך ליצור קוד אימות, קו ביטול נעילה או סיסמה. אם למשתמש עדיין אין קוד גישה, תהליך ההרשמה הביומטרי יבקש ממנו ליצור קוד גישה.
כדי להגדיר את סוגי האימות הביומטרי שהאפליקציה מקבלת, מעבירים סוג אימות או שילוב של סוגים ב-bitwise ל-method setAllowedAuthenticators(). בקטע הקוד הבא אפשר לראות איך לתמוך באימות באמצעות נתונים ביומטריים מסוג Class 3 או פרטי כניסה לנעילת המסך.
Kotlin
// Lets the user authenticate using either a Class 3 biometric or
// their lock screen credential (PIN, pattern, or password).
promptInfo = BiometricPrompt.PromptInfo.Builder()
        .setTitle("Biometric login for my app")
        .setSubtitle("Log in using your biometric credential")
        .setAllowedAuthenticators(BIOMETRIC_STRONG or DEVICE_CREDENTIAL)
        .build()
Java
// Lets user authenticate using either a Class 3 biometric or
// their lock screen credential (PIN, pattern, or password).
promptInfo = new BiometricPrompt.PromptInfo.Builder()
        .setTitle("Biometric login for my app")
        .setSubtitle("Log in using your biometric credential")
        .setAllowedAuthenticators(BIOMETRIC_STRONG | DEVICE_CREDENTIAL)
        .build();
השילובים הבאים של סוגי מאמתים לא נתמכים ב-Android מגרסה 10 (רמת API 29) ומטה: DEVICE_CREDENTIAL ו-BIOMETRIC_STRONG | DEVICE_CREDENTIAL. כדי לבדוק אם יש קוד אימות, קו ביטול נעילה או סיסמה ב-Android מגרסה 10 ומטה, משתמשים ב-method KeyguardManager.isDeviceSecure().
בדיקה אם יש אימות ביומטרי
אחרי שמחליטים אילו רכיבי אימות האפליקציה תומכת בהם, בודקים אם הרכיבים האלה זמינים. כדי לעשות את זה, מעבירים את אותו שילוב של סוגים ברמת הביט שהצהרתם עליהם באמצעות השיטה setAllowedAuthenticators() לשיטה canAuthenticate().
אם צריך, מפעילים את פעולת ה-intent ACTION_BIOMETRIC_ENROLL. ב-intent extra, מספקים את קבוצת אמצעי האימות שהאפליקציה מקבלת. ה-Intent הזה מבקש מהמשתמש לרשום פרטי כניסה למאמת שהאפליקציה שלכם מקבלת.
Kotlin
val biometricManager = BiometricManager.from(this)
when (biometricManager.canAuthenticate(BIOMETRIC_STRONG or DEVICE_CREDENTIAL)) {
    BiometricManager.BIOMETRIC_SUCCESS ->
        Log.d("MY_APP_TAG", "App can authenticate using biometrics.")
    BiometricManager.BIOMETRIC_ERROR_NO_HARDWARE ->
        Log.e("MY_APP_TAG", "No biometric features available on this device.")
    BiometricManager.BIOMETRIC_ERROR_HW_UNAVAILABLE ->
        Log.e("MY_APP_TAG", "Biometric features are currently unavailable.")
    BiometricManager.BIOMETRIC_ERROR_NONE_ENROLLED -> {
        // Prompts the user to create credentials that your app accepts.
        val enrollIntent = Intent(Settings.ACTION_BIOMETRIC_ENROLL).apply {
            putExtra(Settings.EXTRA_BIOMETRIC_AUTHENTICATORS_ALLOWED,
                BIOMETRIC_STRONG or DEVICE_CREDENTIAL)
        }
        startActivityForResult(enrollIntent, REQUEST_CODE)
    }
}
Java
BiometricManager biometricManager = BiometricManager.from(this);
switch (biometricManager.canAuthenticate(BIOMETRIC_STRONG | DEVICE_CREDENTIAL)) {
    case BiometricManager.BIOMETRIC_SUCCESS:
        Log.d("MY_APP_TAG", "App can authenticate using biometrics.");
        break;
    case BiometricManager.BIOMETRIC_ERROR_NO_HARDWARE:
        Log.e("MY_APP_TAG", "No biometric features available on this device.");
        break;
    case BiometricManager.BIOMETRIC_ERROR_HW_UNAVAILABLE:
        Log.e("MY_APP_TAG", "Biometric features are currently unavailable.");
        break;
    case BiometricManager.BIOMETRIC_ERROR_NONE_ENROLLED:
        // Prompts the user to create credentials that your app accepts.
        final Intent enrollIntent = new Intent(Settings.ACTION_BIOMETRIC_ENROLL);
        enrollIntent.putExtra(Settings.EXTRA_BIOMETRIC_AUTHENTICATORS_ALLOWED,
                BIOMETRIC_STRONG | DEVICE_CREDENTIAL);
        startActivityForResult(enrollIntent, REQUEST_CODE);
        break;
}
קובעים איך המשתמש עבר אימות
אחרי שהמשתמש מאמת את הזהות, אפשר לבדוק אם הוא השתמש בפרטי כניסה של המכשיר או בפרטי כניסה ביומטריים באמצעות הפעלת getAuthenticationType().
הצגת בקשת הכניסה
כדי להציג בקשה של המערכת לאימות באמצעות פרטי כניסה ביומטריים, משתמשים בספרייה הביומטרית. תיבת הדו-שיח הזו, שמסופקת על ידי המערכת, עקבית בכל האפליקציות שמשתמשות בה, וכך יוצרת חוויית משתמש אמינה יותר. דוגמה לתיבת דו-שיח מופיעה באיור 1.
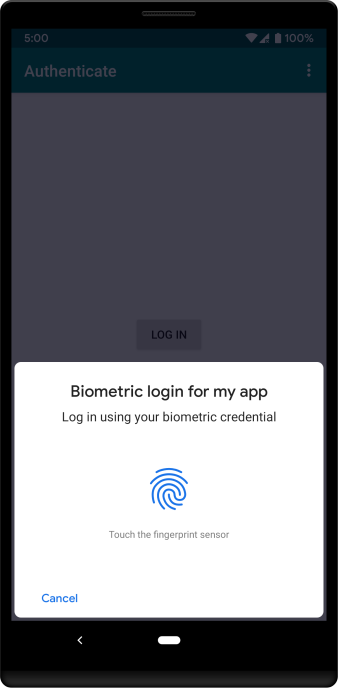
כדי להוסיף לאפליקציה אימות ביומטרי באמצעות הספרייה הביומטרית:
בקובץ
build.gradleשל מודול האפליקציה, מוסיפים תלות בandroidx.biometric.בפעילות או בקטע שמארחים את תיבת הדו-שיח של ההתחברות באמצעות נתונים ביומטריים, מציגים את תיבת הדו-שיח באמצעות הלוגיקה שמוצגת בקטע הקוד הבא:
Kotlin
private lateinit var executor: Executor
private lateinit var biometricPrompt: BiometricPrompt
private lateinit var promptInfo: BiometricPrompt.PromptInfo

override fun onCreate(savedInstanceState: Bundle?) {
    super.onCreate(savedInstanceState)
    setContentView(R.layout.activity_login)
    executor = ContextCompat.getMainExecutor(this)
    biometricPrompt = BiometricPrompt(this, executor,
            object : BiometricPrompt.AuthenticationCallback() {
        override fun onAuthenticationError(errorCode: Int,
                errString: CharSequence) {
            super.onAuthenticationError(errorCode, errString)
            Toast.makeText(applicationContext,
                "Authentication error: $errString", Toast.LENGTH_SHORT)
                .show()
        }

        override fun onAuthenticationSucceeded(
                result: BiometricPrompt.AuthenticationResult) {
            super.onAuthenticationSucceeded(result)
            Toast.makeText(applicationContext,
                "Authentication succeeded!", Toast.LENGTH_SHORT)
                .show()
        }

        override fun onAuthenticationFailed() {
            super.onAuthenticationFailed()
            Toast.makeText(applicationContext, "Authentication failed",
                Toast.LENGTH_SHORT)
                .show()
        }
    })

    promptInfo = BiometricPrompt.PromptInfo.Builder()
            .setTitle("Biometric login for my app")
            .setSubtitle("Log in using your biometric credential")
            .setNegativeButtonText("Use account password")
            .build()

    // Prompt appears when user clicks "Log in".
    // Consider integrating with the keystore to unlock cryptographic operations,
    // if needed by your app.
    val biometricLoginButton =
            findViewById<Button>(R.id.biometric_login)
    biometricLoginButton.setOnClickListener {
        biometricPrompt.authenticate(promptInfo)
    }
}
Java
private Executor executor;
private BiometricPrompt biometricPrompt;
private BiometricPrompt.PromptInfo promptInfo;

@Override
protected void onCreate(Bundle savedInstanceState) {
    super.onCreate(savedInstanceState);
    setContentView(R.layout.activity_login);
    executor = ContextCompat.getMainExecutor(this);
    biometricPrompt = new BiometricPrompt(MainActivity.this,
            executor, new BiometricPrompt.AuthenticationCallback() {
        @Override
        public void onAuthenticationError(int errorCode,
                @NonNull CharSequence errString) {
            super.onAuthenticationError(errorCode, errString);
            Toast.makeText(getApplicationContext(),
                "Authentication error: " + errString, Toast.LENGTH_SHORT)
                .show();
        }

        @Override
        public void onAuthenticationSucceeded(
                @NonNull BiometricPrompt.AuthenticationResult result) {
            super.onAuthenticationSucceeded(result);
            Toast.makeText(getApplicationContext(),
                "Authentication succeeded!", Toast.LENGTH_SHORT).show();
        }

        @Override
        public void onAuthenticationFailed() {
            super.onAuthenticationFailed();
            Toast.makeText(getApplicationContext(), "Authentication failed",
                Toast.LENGTH_SHORT)
                .show();
        }
    });

    promptInfo = new BiometricPrompt.PromptInfo.Builder()
            .setTitle("Biometric login for my app")
            .setSubtitle("Log in using your biometric credential")
            .setNegativeButtonText("Use account password")
            .build();

    // Prompt appears when user clicks "Log in".
    // Consider integrating with the keystore to unlock cryptographic operations,
    // if needed by your app.
    Button biometricLoginButton = findViewById(R.id.biometric_login);
    biometricLoginButton.setOnClickListener(view -> {
            biometricPrompt.authenticate(promptInfo);
    });
}
שימוש בפתרון קריפטוגרפי שתלוי באימות
כדי להגן עוד יותר על מידע רגיש באפליקציה, אתם יכולים לשלב קריפטוגרפיה בתהליך העבודה של האימות הביומטרי באמצעות מופע של CryptoObject.
המסגרת תומכת באובייקטים הקריפטוגרפיים הבאים:
Signature,
Cipher,
Mac ו-
KeyAgreement.
אחרי שהמשתמש מאמת את הזהות שלו באמצעות הנחיה ביומטרית, האפליקציה יכולה לבצע פעולה קריפטוגרפית. לדוגמה, אם אתם מבצעים אימות באמצעות אובייקט Cipher, האפליקציה יכולה לבצע הצפנה ופענוח באמצעות אובייקט SecretKey.
בקטעים הבאים מפורטות דוגמאות לשימוש באובייקט Cipher ובאובייקט SecretKey כדי להצפין נתונים. בכל אחת מהדוגמאות נעשה שימוש בשיטות הבאות:
Kotlin
private fun generateSecretKey(keyGenParameterSpec: KeyGenParameterSpec) {
    val keyGenerator = KeyGenerator.getInstance(
            KeyProperties.KEY_ALGORITHM_AES, "AndroidKeyStore")
    keyGenerator.init(keyGenParameterSpec)
    keyGenerator.generateKey()
}

private fun getSecretKey(): SecretKey {
    val keyStore = KeyStore.getInstance("AndroidKeyStore")

    // Before the keystore can be accessed, it must be loaded.
    keyStore.load(null)
    return keyStore.getKey(KEY_NAME, null) as SecretKey
}

private fun getCipher(): Cipher {
    return Cipher.getInstance(KeyProperties.KEY_ALGORITHM_AES + "/"
            + KeyProperties.BLOCK_MODE_CBC + "/"
            + KeyProperties.ENCRYPTION_PADDING_PKCS7)
}
Java
private void generateSecretKey(KeyGenParameterSpec keyGenParameterSpec) {
    KeyGenerator keyGenerator = KeyGenerator.getInstance(
            KeyProperties.KEY_ALGORITHM_AES, "AndroidKeyStore");
    keyGenerator.init(keyGenParameterSpec);
    keyGenerator.generateKey();
}

private SecretKey getSecretKey() {
    KeyStore keyStore = KeyStore.getInstance("AndroidKeyStore");

    // Before the keystore can be accessed, it must be loaded.
    keyStore.load(null);
    return ((SecretKey)keyStore.getKey(KEY_NAME, null));
}

private Cipher getCipher() {
    return Cipher.getInstance(KeyProperties.KEY_ALGORITHM_AES + "/"
            + KeyProperties.BLOCK_MODE_CBC + "/"
            + KeyProperties.ENCRYPTION_PADDING_PKCS7);
}
אימות באמצעות פרטי כניסה ביומטריים בלבד
אם האפליקציה משתמשת במפתח סודי שדורש פרטי כניסה ביומטריים כדי לבטל את הנעילה, המשתמש חייב לאמת את פרטי הכניסה הביומטריים בכל פעם לפני שהאפליקציה ניגשת למפתח.
כדי להצפין מידע רגיש רק אחרי שהמשתמש מאמת את עצמו באמצעות פרטי כניסה ביומטריים, צריך לבצע את הפעולות הבאות:
יוצרים מפתח שמשתמש בהגדרות הבאות של
KeyGenParameterSpec:Kotlin
generateSecretKey(KeyGenParameterSpec.Builder(
        KEY_NAME,
        KeyProperties.PURPOSE_ENCRYPT or KeyProperties.PURPOSE_DECRYPT)
        .setBlockModes(KeyProperties.BLOCK_MODE_CBC)
        .setEncryptionPaddings(KeyProperties.ENCRYPTION_PADDING_PKCS7)
        .setUserAuthenticationRequired(true)
        // Invalidate the keys if the user has registered a new biometric
        // credential, such as a new fingerprint. Can call this method only
        // on Android 7.0 (API level 24) or higher. The variable
        // "invalidatedByBiometricEnrollment" is true by default.
        .setInvalidatedByBiometricEnrollment(true)
        .build())
Java
generateSecretKey(new KeyGenParameterSpec.Builder(
        KEY_NAME,
        KeyProperties.PURPOSE_ENCRYPT | KeyProperties.PURPOSE_DECRYPT)
        .setBlockModes(KeyProperties.BLOCK_MODE_CBC)
        .setEncryptionPaddings(KeyProperties.ENCRYPTION_PADDING_PKCS7)
        .setUserAuthenticationRequired(true)
        // Invalidate the keys if the user has registered a new biometric
        // credential, such as a new fingerprint. Can call this method only
        // on Android 7.0 (API level 24) or higher. The variable
        // "invalidatedByBiometricEnrollment" is true by default.
        .setInvalidatedByBiometricEnrollment(true)
        .build());
מתחילים תהליך עבודה של אימות ביומטרי שמשלב צופן:
Kotlin
biometricLoginButton.setOnClickListener {
    // Exceptions are unhandled within this snippet.
    val cipher = getCipher()
    val secretKey = getSecretKey()
    cipher.init(Cipher.ENCRYPT_MODE, secretKey)
    biometricPrompt.authenticate(promptInfo,
            BiometricPrompt.CryptoObject(cipher))
}
Java
biometricLoginButton.setOnClickListener(view -> {
    // Exceptions are unhandled within this snippet.
    Cipher cipher = getCipher();
    SecretKey secretKey = getSecretKey();
    cipher.init(Cipher.ENCRYPT_MODE, secretKey);
    biometricPrompt.authenticate(promptInfo,
            new BiometricPrompt.CryptoObject(cipher));
});
בתוך הקריאות החוזרות (callback) של האימות הביומטרי, משתמשים במפתח הסודי כדי להצפין את המידע הרגיש:
Kotlin
override fun onAuthenticationSucceeded(
        result: BiometricPrompt.AuthenticationResult) {
    val encryptedInfo: ByteArray = result.cryptoObject.cipher?.doFinal(
        // plaintext-string text is whatever data the developer would like
        // to encrypt. It happens to be plain-text in this example, but it
        // can be anything
            plaintext-string.toByteArray(Charset.defaultCharset())
    )
    Log.d("MY_APP_TAG", "Encrypted information: " +
            Arrays.toString(encryptedInfo))
}
Java
@Override
public void onAuthenticationSucceeded(
        @NonNull BiometricPrompt.AuthenticationResult result) {
    // NullPointerException is unhandled; use Objects.requireNonNull().
    byte[] encryptedInfo = result.getCryptoObject().getCipher().doFinal(
        // plaintext-string text is whatever data the developer would like
        // to encrypt. It happens to be plain-text in this example, but it
        // can be anything
            plaintext-string.getBytes(Charset.defaultCharset()));
    Log.d("MY_APP_TAG", "Encrypted information: " +
            Arrays.toString(encryptedInfo));
}
אימות באמצעות נתונים ביומטריים או פרטי הכניסה של מסך הנעילה
אתם יכולים להשתמש במפתח סודי שמאפשר אימות באמצעות פרטי כניסה ביומטריים או פרטי כניסה של מסך הנעילה (קוד אימות, קו פתיחת נעילה או סיסמה). כשמגדירים את המפתח הזה, צריך לציין תקופת תוקף. במהלך פרק הזמן הזה, האפליקציה יכולה לבצע כמה פעולות הצפנה בלי שהמשתמש יצטרך לבצע אימות מחדש.
כדי להצפין מידע רגיש אחרי שהמשתמש מאמת את הזהות שלו באמצעות פרטי כניסה ביומטריים או פרטי כניסה של מסך הנעילה, פועלים לפי השלבים הבאים:
יוצרים מפתח עם ההגדרות הבאות של
KeyGenParameterSpec:Kotlin
generateSecretKey(KeyGenParameterSpec.Builder(
        KEY_NAME,
        KeyProperties.PURPOSE_ENCRYPT or KeyProperties.PURPOSE_DECRYPT)
        .setBlockModes(KeyProperties.BLOCK_MODE_CBC)
        .setEncryptionPaddings(KeyProperties.ENCRYPTION_PADDING_PKCS7)
        .setUserAuthenticationRequired(true)
        .setUserAuthenticationParameters(VALIDITY_DURATION_SECONDS,
                ALLOWED_AUTHENTICATORS)
        .build())
Java
generateSecretKey(new KeyGenParameterSpec.Builder(
        KEY_NAME,
        KeyProperties.PURPOSE_ENCRYPT | KeyProperties.PURPOSE_DECRYPT)
        .setBlockModes(KeyProperties.BLOCK_MODE_CBC)
        .setEncryptionPaddings(KeyProperties.ENCRYPTION_PADDING_PKCS7)
        .setUserAuthenticationRequired(true)
        .setUserAuthenticationParameters(VALIDITY_DURATION_SECONDS,
                ALLOWED_AUTHENTICATORS)
        .build());
במהלך תקופה של
VALIDITY_DURATION_SECONDSאחרי שהמשתמש מאמת את עצמו, מצפינים את המידע הרגיש:Kotlin
private fun encryptSecretInformation() {
    // Exceptions are unhandled for getCipher() and getSecretKey().
    val cipher = getCipher()
    val secretKey = getSecretKey()
    try {
        cipher.init(Cipher.ENCRYPT_MODE, secretKey)
        val encryptedInfo: ByteArray = cipher.doFinal(
            // plaintext-string text is whatever data the developer would
            // like to encrypt. It happens to be plain-text in this example,
            // but it can be anything
                plaintext-string.toByteArray(Charset.defaultCharset()))
        Log.d("MY_APP_TAG", "Encrypted information: " +
                Arrays.toString(encryptedInfo))
    } catch (e: InvalidKeyException) {
        Log.e("MY_APP_TAG", "Key is invalid.")
    } catch (e: UserNotAuthenticatedException) {
        Log.d("MY_APP_TAG", "The key's validity timed out.")
        biometricPrompt.authenticate(promptInfo)
    }
Java
private void encryptSecretInformation() {
    // Exceptions are unhandled for getCipher() and getSecretKey().
    Cipher cipher = getCipher();
    SecretKey secretKey = getSecretKey();
    try {
        // NullPointerException is unhandled; use Objects.requireNonNull().
        ciper.init(Cipher.ENCRYPT_MODE, secretKey);
        byte[] encryptedInfo = cipher.doFinal(
            // plaintext-string text is whatever data the developer would
            // like to encrypt. It happens to be plain-text in this example,
            // but it can be anything
                plaintext-string.getBytes(Charset.defaultCharset()));
    } catch (InvalidKeyException e) {
        Log.e("MY_APP_TAG", "Key is invalid.");
    } catch (UserNotAuthenticatedException e) {
        Log.d("MY_APP_TAG", "The key's validity timed out.");
        biometricPrompt.authenticate(promptInfo);
    }
}
אימות באמצעות מפתחות auth-per-use
אתם יכולים לספק תמיכה במפתחות אימות לכל שימוש במופע של BiometricPrompt. כדי להשתמש במפתח כזה, המשתמש צריך להציג פרטי כניסה ביומטריים או פרטי כניסה של המכשיר בכל פעם שהאפליקציה צריכה לגשת לנתונים שמוגנים על ידי המפתח הזה. מפתחות Auth-per-use יכולים להיות שימושיים לעסקאות בעלות ערך גבוה, כמו ביצוע תשלום גדול או עדכון של סיכום מצב בריאותי של אדם מסוים.
כדי לשייך אובייקט BiometricPrompt למפתח אימות לכל שימוש, מוסיפים קוד שדומה לקוד הבא:
Kotlin
val authPerOpKeyGenParameterSpec =
        KeyGenParameterSpec.Builder("myKeystoreAlias", key-purpose)
    // Accept either a biometric credential or a device credential.
    // To accept only one type of credential, include only that type as the
    // second argument.
    .setUserAuthenticationParameters(0 /* duration */,
            KeyProperties.AUTH_BIOMETRIC_STRONG or
            KeyProperties.AUTH_DEVICE_CREDENTIAL)
    .build()
Java
KeyGenParameterSpec authPerOpKeyGenParameterSpec =
        new KeyGenParameterSpec.Builder("myKeystoreAlias", key-purpose)
    // Accept either a biometric credential or a device credential.
    // To accept only one type of credential, include only that type as the
    // second argument.
    .setUserAuthenticationParameters(0 /* duration */,
            KeyProperties.AUTH_BIOMETRIC_STRONG |
            KeyProperties.AUTH_DEVICE_CREDENTIAL)
    .build();
אימות ללא פעולה מפורשת מצד המשתמש
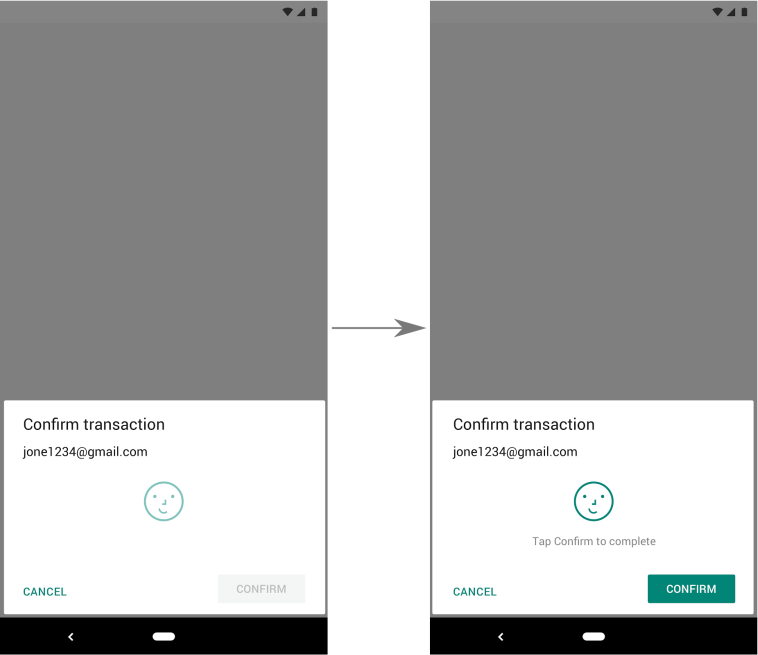
כברירת מחדל, המערכת דורשת מהמשתמשים לבצע פעולה ספציפית, כמו לחיצה על לחצן, אחרי שהיא מקבלת את האישורים הביומטריים שלהם. ההגדרה הזו עדיפה אם האפליקציה מציגה את תיבת הדו-שיח כדי לאשר פעולה רגישה או בסיכון גבוה, כמו ביצוע רכישה.
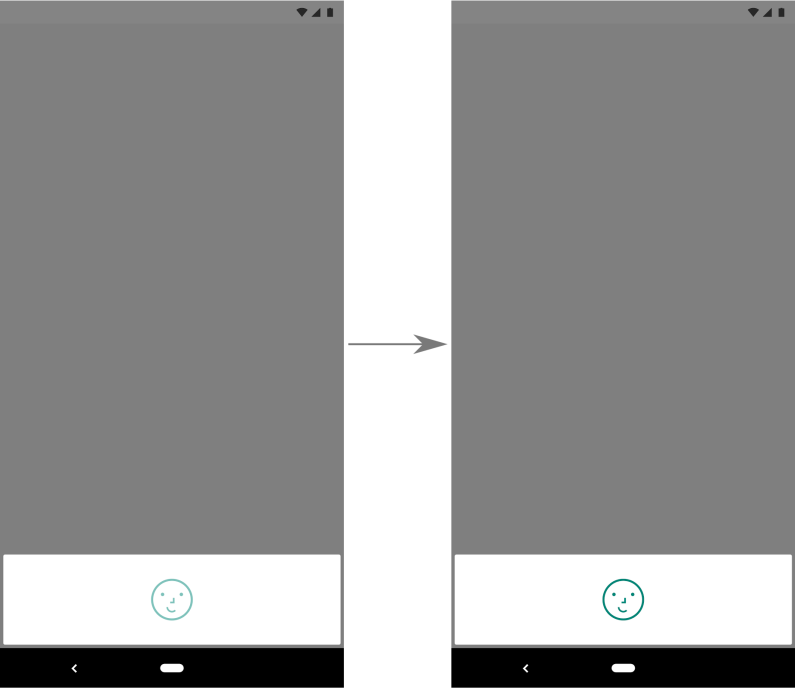
עם זאת, אם האפליקציה מציגה תיבת דו-שיח של אימות ביומטרי לפעולה בסיכון נמוך יותר, אתם יכולים לספק רמז למערכת שהמשתמש לא צריך לאשר את האימות. הרמז הזה יכול לאפשר למשתמש לראות תוכן באפליקציה מהר יותר אחרי אימות מחדש באמצעות שיטה פסיבית, כמו זיהוי פנים או קשתית העין. כדי לספק את הרמז הזה, מעבירים את false ל-method setConfirmationRequired().
באיור 2 מוצגות שתי גרסאות של אותה תיבת דו-שיח. גרסה אחת דורשת פעולה מפורשת של המשתמש, והגרסה השנייה לא.
בקטע הקוד הבא אפשר לראות איך להציג תיבת דו-שיח שלא דורשת פעולה מפורשת של המשתמש כדי להשלים את תהליך האימות:
Kotlin
// Lets the user authenticate without performing an action, such as pressing a
// button, after their biometric credential is accepted.
promptInfo = BiometricPrompt.PromptInfo.Builder()
        .setTitle("Biometric login for my app")
        .setSubtitle("Log in using your biometric credential")
        .setNegativeButtonText("Use account password")
        .setConfirmationRequired(false)
        .build()
Java
// Lets the user authenticate without performing an action, such as pressing a
// button, after their biometric credential is accepted.
promptInfo = new BiometricPrompt.PromptInfo.Builder()
        .setTitle("Biometric login for my app")
        .setSubtitle("Log in using your biometric credential")
        .setNegativeButtonText("Use account password")
        .setConfirmationRequired(false)
        .build();
אפשרות לחזור לפרטי כניסה לא ביומטריים
אם אתם רוצים שהאפליקציה תאפשר אימות באמצעות נתונים ביומטריים או פרטי כניסה למכשיר, אתם יכולים להצהיר שהאפליקציה תומכת בפרטי כניסה למכשיר על ידי הכללת DEVICE_CREDENTIAL בקבוצת הערכים שאתם מעבירים אל setAllowedAuthenticators().
אם האפליקציה שלכם משתמשת כרגע ב-createConfirmDeviceCredentialIntent() או ב-setDeviceCredentialAllowed() כדי לספק את היכולת הזו, אתם צריכים לעבור לשימוש ב-setAllowedAuthenticators().
מקורות מידע נוספים
במקורות המידע הבאים אפשר לקרוא מידע נוסף על אימות ביומטרי ב-Android.