

บริการป้อนข้อความอัตโนมัติคือแอปที่ช่วยให้ผู้ใช้กรอกแบบฟอร์มได้ง่ายขึ้นโดยการแทรกข้อมูลลงในมุมมองของแอปอื่นๆ นอกจากนี้ บริการป้อนข้อความอัตโนมัติยังดึงข้อมูลผู้ใช้จากมุมมองในแอปและจัดเก็บไว้เพื่อใช้ในภายหลังได้ด้วย บริการป้อนข้อความอัตโนมัติมักให้บริการโดยแอปที่จัดการข้อมูลผู้ใช้ เช่น เครื่องมือจัดการรหัสผ่าน
Android ช่วยให้กรอกแบบฟอร์มได้ง่ายขึ้นด้วยเฟรมเวิร์กการป้อนข้อความอัตโนมัติที่พร้อมใช้งานใน Android 8.0 (ระดับ API 26) ขึ้นไป ผู้ใช้จะใช้ประโยชน์จากฟีเจอร์ป้อนข้อความอัตโนมัติได้ก็ต่อเมื่อมีแอปที่ให้บริการป้อนข้อความอัตโนมัติในอุปกรณ์
หน้านี้แสดงวิธีติดตั้งใช้งานบริการป้อนข้อความอัตโนมัติในแอป หากต้องการดูตัวอย่างโค้ดที่แสดงวิธีติดตั้งใช้งานบริการ โปรดดูตัวอย่าง AutofillFramework ใน Java หรือ Kotlin ดูรายละเอียดเพิ่มเติมเกี่ยวกับวิธีการทำงานของบริการป้อนข้อความอัตโนมัติได้ที่หน้าข้อมูลอ้างอิงสำหรับคลาส AutofillService และ AutofillManager
การประกาศและสิทธิ์ในไฟล์ Manifest
แอปที่ให้บริการป้อนข้อความอัตโนมัติต้องมีการประกาศที่อธิบายการใช้งานบริการดังกล่าว หากต้องการระบุการประกาศ ให้รวมองค์ประกอบ <service> ไว้ในไฟล์ Manifest ของแอป องค์ประกอบ <service> ต้องมีแอตทริบิวต์และองค์ประกอบต่อไปนี้
- แอตทริบิวต์
android:nameที่ชี้ไปยังคลาสย่อยของAutofillServiceในแอปที่ใช้บริการ - แอตทริบิวต์
android:permissionที่ประกาศสิทธิ์BIND_AUTOFILL_SERVICE - องค์ประกอบ
<intent-filter>ที่มีองค์ประกอบย่อย<action>ที่จำเป็นซึ่งระบุการดำเนินการandroid.service.autofill.AutofillService - องค์ประกอบ
<meta-data>ที่ไม่บังคับซึ่งคุณสามารถใช้เพื่อระบุพารามิเตอร์การกำหนดค่าเพิ่มเติมสำหรับบริการ
ตัวอย่างต่อไปนี้แสดงการประกาศบริการป้อนข้อความอัตโนมัติ
<service
    android:name=".MyAutofillService"
    android:label="My Autofill Service"
    android:permission="android.permissi>on.BI<ND_AUTOFILL_S>ERVICE&qu<ot;
    intent-filter
        action android:name="android.>servi<ce.autofill.Au>tofil<lService" /
    /intent-filter
    meta-data
        android:name="android.autofill"
     > <  android:resource="@xml/service_configuration" /
/service
องค์ประกอบ <meta-data> มีแอตทริบิวต์ android:resource ที่ชี้ไปยังทรัพยากร XML พร้อมรายละเอียดเพิ่มเติมเกี่ยวกับบริการ ทรัพยากร service_configuration ในตัวอย่างก่อนหน้าระบุกิจกรรมที่อนุญาตให้ผู้ใช้กำหนดค่าบริการ ตัวอย่างต่อไปนี้แสดงทรัพยากร XML ของ service_configuration
<autofill-service
  xmlns:android="http://schemas.android.com/apk/res/android"
  android:settingsActivity="com.example.android.Sett>ingsActivity" /
ดูข้อมูลเพิ่มเติมเกี่ยวกับทรัพยากร XML ได้ที่ภาพรวมทรัพยากรของแอป
ข้อความแจ้งให้เปิดใช้บริการ
แอปจะใช้เป็นบริการป้อนข้อความอัตโนมัติหลังจากประกาศสิทธิ์ BIND_AUTOFILL_SERVICE และผู้ใช้เปิดใช้ในการตั้งค่าอุปกรณ์ แอปสามารถยืนยันได้ว่าเป็นบริการที่เปิดใช้หรือไม่โดยเรียกใช้เมธอด hasEnabledAutofillServices() ของคลาส AutofillManager
หากแอปไม่ใช่บริการป้อนข้อความอัตโนมัติปัจจุบัน แอปจะขอให้ผู้ใช้เปลี่ยนการตั้งค่าการป้อนข้อความอัตโนมัติได้โดยใช้ Intent ACTION_REQUEST_SET_AUTOFILL_SERVICE Intent จะแสดงผลค่าเป็น RESULT_OK หากผู้ใช้เลือกบริการป้อนข้อความอัตโนมัติที่ตรงกับแพ็กเกจของผู้โทร
กรอกข้อมูลในมุมมองของลูกค้า
บริการป้อนข้อความอัตโนมัติจะได้รับคำขอให้กรอกข้อมูลมุมมองไคลเอ็นต์เมื่อผู้ใช้โต้ตอบกับแอปอื่นๆ หากบริการป้อนข้อความอัตโนมัติมีข้อมูลผู้ใช้ที่ตรงกับคำขอ ระบบจะส่งข้อมูลในการตอบกลับ ระบบ Android จะแสดง UI การป้อนข้อความอัตโนมัติพร้อมข้อมูลที่ใช้ได้ ดังที่แสดงในรูปที่ 1

เฟรมเวิร์กการป้อนข้อความอัตโนมัติจะกำหนดเวิร์กโฟลว์เพื่อกรอกข้อมูลในมุมมองที่ออกแบบมาเพื่อลดเวลาที่ระบบ Android เชื่อมโยงกับบริการป้อนข้อความอัตโนมัติ ในคำขอแต่ละรายการ ระบบ Android จะส่งออบเจ็กต์ AssistStructure ไปยังบริการโดยเรียกใช้เมธอด onFillRequest()
บริการป้อนข้อความอัตโนมัติจะตรวจสอบว่าสามารถตอบสนองคำขอด้วยข้อมูลผู้ใช้ที่จัดเก็บไว้ก่อนหน้านี้ได้หรือไม่ หากตอบสนองคำขอได้ บริการจะจัดแพ็กเกจข้อมูลในออบเจ็กต์ Dataset บริการจะเรียกใช้เมธอด onSuccess() โดยส่งออบเจ็กต์ FillResponse ที่มีออบเจ็กต์ Dataset หากบริการไม่มีข้อมูลที่ตรงกับคำขอ บริการจะส่ง null ไปยังเมธอด onSuccess() บริการจะเรียกใช้เมธอด onFailure() แทนหากเกิดข้อผิดพลาดในการประมวลผลคำขอ
ดูคำอธิบายโดยละเอียดเกี่ยวกับเวิร์กโฟลว์ได้ที่คำอธิบายในหน้าอ้างอิง AutofillService
โค้ดต่อไปนี้แสดงตัวอย่างของเมธอด onFillRequest()
Kotlin
override fun onFillRequest(
    request: FillRequest,
    cancellationSignal: CancellationSignal,
    callback: FillCallback
) {
    // Get the structure from the request
    val context: List<FillContext> = request.fillContexts
    val structure: AssistStructure = context[context.size - 1].structure

    // Traverse the structure looking for nodes to fill out
    val parsedStructure: ParsedStructure = parseStructure(structure)

    // Fetch user data that matches the fields
    val (username: String, password: String) = fetchUserData(parsedStructure)

    // Build the presentation of the datasets
    val usernamePresentation = RemoteViews(packageName, android.R.layout.simple_list_item_1)
    usernamePresentation.setTextViewText(android.R.id.text1, "my_username")
    val passwordPresentation = RemoteViews(packageName, android.R.layout.simple_list_item_1)
    passwordPresentation.setTextViewText(android.R.id.text1, "Password for my_username")

    // Add a dataset to the response
    val fillResponse: FillResponse = FillResponse.Builder()
            .addDataset(Dataset.Builder()
                    .setValue(
                            parsedStructure.usernameId,
                            AutofillValue.forText(username),
                            usernamePresentation
                    )
                    .setValue(
                            parsedStructure.passwordId,
                            AutofillValue.forText(password),
                            passwordPresentation
                    )
                    .build())
            .build()

    // If there are no errors, call onSuccess() and pass the response
    callback.onSuccess(fillResponse)
}

data class ParsedStructure(var usernameId: AutofillId, var passwordId: AutofillId)

data class UserData(var username: String, var password: String)
Java
@Override
public void onFillRequest(FillRequest request, CancellationSignal cancellationSignal, FillCallback callback) {
    // Get the structure from the request
    List<FillContext> context = request.getFillContexts();
    AssistStructure structure = context.get(context.size() - 1).getStructure();

    // Traverse the structure looking for nodes to fill out
    ParsedStructure parsedStructure = parseStructure(structure);

    // Fetch user data that matches the fields
    UserData userData = fetchUserData(parsedStructure);

    // Build the presentation of the datasets
    RemoteViews usernamePresentation = new RemoteViews(getPackageName(), android.R.layout.simple_list_item_1);
    usernamePresentation.setTextViewText(android.R.id.text1, "my_username");
    RemoteViews passwordPresentation = new RemoteViews(getPackageName(), android.R.layout.simple_list_item_1);
    passwordPresentation.setTextViewText(android.R.id.text1, "Password for my_username");

    // Add a dataset to the response
    FillResponse fillResponse = new FillResponse.Builder()
            .addDataset(new Dataset.Builder()
                    .setValue(parsedStructure.usernameId,
                            AutofillValue.forText(userData.username), usernamePresentation)
                    .setValue(parsedStructure.passwordId,
                            AutofillValue.forText(userData.password), passwordPresentation)
                    .build())
            .build();

    // If there are no errors, call onSuccess() and pass the response
    callback.onSuccess(fillResponse);
}

class ParsedStructure {
    AutofillId usernameId;
    AutofillId passwordId;
}

class UserData {
    String username;
    String password;
}
บริการหนึ่งๆ อาจมีชุดข้อมูลมากกว่า 1 ชุดที่ตรงตามคำขอ ในกรณีนี้ ระบบ Android จะแสดงตัวเลือกหลายรายการ (1 รายการสำหรับชุดข้อมูลแต่ละชุด) ใน UI การป้อนข้อความอัตโนมัติ ตัวอย่างโค้ดต่อไปนี้แสดงวิธีระบุชุดข้อมูลหลายชุดในการตอบกลับ
Kotlin
// Add multiple datasets to the response
val fillResponse: FillResponse = FillResponse.Builder()
        .addDataset(Dataset.Builder()
                .setValue(parsedStructure.usernameId,
                        AutofillValue.forText(user1Data.username), username1Presentation)
                .setValue(parsedStructure.passwordId,
                        AutofillValue.forText(user1Data.password), password1Presentation)
                .build())
        .addDataset(Dataset.Builder()
                .setValue(parsedStructure.usernameId,
                        AutofillValue.forText(user2Data.username), username2Presentation)
                .setValue(parsedStructure.passwordId,
                        AutofillValue.forText(user2Data.password), password2Presentation)
                .build())
        .build()
Java
// Add multiple datasets to the response
FillResponse fillResponse = new FillResponse.Builder()
        .addDataset(new Dataset.Builder()
                .setValue(parsedStructure.usernameId,
                        AutofillValue.forText(user1Data.username), username1Presentation)
                .setValue(parsedStructure.passwordId,
                        AutofillValue.forText(user1Data.password), password1Presentation)
                .build())
        .addDataset(new Dataset.Builder()
                .setValue(parsedStructure.usernameId,
                        AutofillValue.forText(user2Data.username), username2Presentation)
                .setValue(parsedStructure.passwordId,
                        AutofillValue.forText(user2Data.password), password2Presentation)
                .build())
        .build();
บริการป้อนข้อความอัตโนมัติสามารถไปยังออบเจ็กต์ ViewNode ใน AssistStructure เพื่อดึงข้อมูลการป้อนข้อความอัตโนมัติที่จำเป็นต่อการดำเนินการตามคำขอ
บริการสามารถดึงข้อมูลการป้อนข้อความอัตโนมัติได้โดยใช้เมธอดของคลาส ViewNode เช่น getAutofillId()
บริการต้องสามารถอธิบายเนื้อหาของมุมมองเพื่อตรวจสอบว่าสามารถตอบสนองคำขอได้หรือไม่ การใช้แอตทริบิวต์ autofillHints เป็นวิธีแรกที่บริการต้องใช้เพื่ออธิบายเนื้อหาของมุมมอง อย่างไรก็ตาม แอปไคลเอ็นต์ต้องระบุแอตทริบิวต์ในมุมมองอย่างชัดเจนก่อนที่บริการจะพร้อมใช้งาน
หากแอปไคลเอ็นต์ไม่ได้ระบุแอตทริบิวต์ autofillHints บริการจะต้องใช้การวิเคราะห์พฤติกรรมของตนเองเพื่ออธิบายเนื้อหา บริการสามารถใช้วิธีการจากคลาสอื่นๆ เช่น getText() หรือ getHint() เพื่อรับข้อมูลเกี่ยวกับเนื้อหาของมุมมอง ดูข้อมูลเพิ่มเติมได้ที่ระบุคำแนะนำสำหรับการป้อนข้อความอัตโนมัติ
ตัวอย่างต่อไปนี้แสดงวิธีข้าม AssistStructure และดึงข้อมูลการป้อนข้อความอัตโนมัติจากออบเจ็กต์ ViewNode
Kotlin
fun traverseStructure(structure: AssistStructure) {
    val windowNodes: List<AssistStructure.WindowNode> =
            structure.run {
                (0 until windowNodeCount).map { getWindowNodeAt(it) }
            }

    windowNodes.forEach { windowNode: AssistStructure.WindowNode ->
        val viewNode: ViewNode? = windowNode.rootViewNode
        traverseNode(viewNode)
    }
}

fun traverseNode(viewNode: ViewNode?) {
    if (viewNode?.autofillHints?.isNotEmpty() == true) {
        // If the client app provides autofill hints, you can obtain them using
        // viewNode.getAutofillHints();
    } else {
        // Or use your own heuristics to describe the contents of a view
        // using methods such as getText() or getHint()
    }

    val children: List<ViewNode>? =
            viewNode?.run {
                (0 until childCount).map { getChildAt(it) }
            }

    children?.forEach { childNode: ViewNode ->
        traverseNode(childNode)
    }
}
Java
public void traverseStructure(AssistStructure structure) {
    int nodes = structure.getWindowNodeCount();

    for (int i = 0; i < nodes; i++) {
        WindowNode windowNode = structure.getWindowNodeAt(i);
        ViewNode viewNode = windowNode.getRootViewNode();
        traverseNode(viewNode);
    }
}

public void traverseNode(ViewNode viewNode) {
    if(viewNode.getAutofillHints() != null && viewNode.getAutofillHints().length > 0) {
        // If the client app provides autofill hints, you can obtain them using
        // viewNode.getAutofillHints();
    } else {
        // Or use your own heuristics to describe the contents of a view
        // using methods such as getText() or getHint()
    }

    for(int i = 0; i < viewNode.getChildCount(); i++) {
        ViewNode childNode = viewNode.getChildAt(i);
        traverseNode(childNode);
    }
}
บันทึกข้อมูลผู้ใช้
บริการป้อนข้อความอัตโนมัติต้องการข้อมูลผู้ใช้เพื่อกรอกข้อมูลในมุมมองต่างๆ ในแอป เมื่อผู้ใช้กรอกข้อมูลในมุมมองด้วยตนเอง ระบบจะแจ้งให้บันทึกข้อมูลลงในบริการป้อนข้อความอัตโนมัติปัจจุบัน ดังที่แสดงในรูปที่ 2
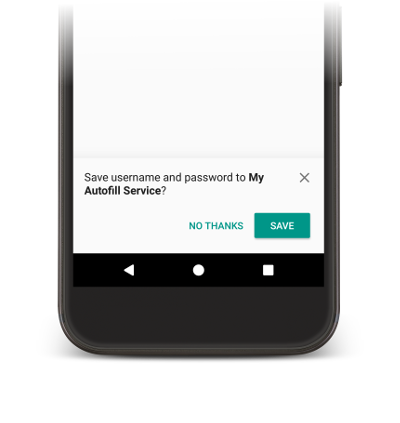
หากต้องการบันทึกข้อมูล บริการต้องระบุว่าต้องการจัดเก็บข้อมูลเพื่อใช้ในอนาคต ก่อนที่ระบบ Android จะส่งคำขอให้บันทึกข้อมูล จะมีคำขอให้กรอกข้อมูลซึ่งบริการมีโอกาสกรอกข้อมูลในมุมมองต่างๆ บริการจะรวมออบเจ็กต์ SaveInfo ไว้ในการตอบกลับคำขอป้อนข้อความเพื่อระบุว่าต้องการบันทึกข้อมูล ออบเจ็กต์ SaveInfo มีข้อมูลต่อไปนี้เป็นอย่างน้อย
- ประเภทข้อมูลผู้ใช้ที่บันทึกไว้ ดูรายการค่า
SAVE_DATAที่ใช้ได้ที่SaveInfo - ชุดมุมมองขั้นต่ำที่ต้องเปลี่ยนแปลงเพื่อทริกเกอร์คำขอบันทึก
ตัวอย่างเช่น โดยปกติแล้วแบบฟอร์มการเข้าสู่ระบบจะกำหนดให้ผู้ใช้ต้องอัปเดตมุมมอง
usernameและpasswordเพื่อเรียกใช้คำขอบันทึก
ออบเจ็กต์ SaveInfo เชื่อมโยงกับออบเจ็กต์ FillResponse ดังที่แสดงในตัวอย่างโค้ดต่อไปนี้
Kotlin
override fun onFillRequest(
    request: FillRequest,
    cancellationSignal: CancellationSignal,
    callback: FillCallback
) {
    // ...
    // Builder object requires a non-null presentation
    val notUsed = RemoteViews(packageName, android.R.layout.simple_list_item_1)

    val fillResponse: FillResponse = FillResponse.Builder()
            .addDataset(
                    Dataset.Builder()
                            .setValue(parsedStructure.usernameId, null, notUsed)
                            .setValue(parsedStructure.passwordId, null, notUsed)
                            .build()
            )
            .setSaveInfo(
                    SaveInfo.Builder(
                            SaveInfo.SAVE_DATA_TYPE_USERNAME or SaveInfo.SAVE_DATA_TYPE_PASSWORD,
                            arrayOf(parsedStructure.usernameId, parsedStructure.passwordId)
                    ).build()
            )
            .build()
    // ...
}
Java
@Override
public void onFillRequest(FillRequest request, CancellationSignal cancellationSignal, FillCallback callback) {
    // ...
    // Builder object requires a non-null presentation
    RemoteViews notUsed = new RemoteViews(getPackageName(), android.R.layout.simple_list_item_1);

    FillResponse fillResponse = new FillResponse.Builder()
            .addDataset(new Dataset.Builder()
                    .setValue(parsedStructure.usernameId, null, notUsed)
                    .setValue(parsedStructure.passwordId, null, notUsed)
                    .build())
            .setSaveInfo(new SaveInfo.Builder(
                    SaveInfo.SAVE_DATA_TYPE_USERNAME | SaveInfo.SAVE_DATA_TYPE_PASSWORD,
                    new AutofillId[] {parsedStructure.usernameId, parsedStructure.passwordId})
                    .build())
            .build();
    // ...
}
บริการป้อนข้อความอัตโนมัติสามารถใช้ตรรกะเพื่อเก็บข้อมูลผู้ใช้ไว้ในเมธอด onSaveRequest() ซึ่งมักจะเรียกใช้หลังจากกิจกรรมของไคลเอ็นต์เสร็จสิ้นหรือเมื่อแอปไคลเอ็นต์เรียกใช้ commit() โค้ดต่อไปนี้แสดงตัวอย่างของเมธอด onSaveRequest()
Kotlin
override fun onSaveRequest(request: SaveRequest, callback: SaveCallback) {
    // Get the structure from the request
    val context: List<FillContext> = request.fillContexts
    val structure: AssistStructure = context[context.size - 1].structure

    // Traverse the structure looking for data to save
    traverseStructure(structure)

    // Persist the data - if there are no errors, call onSuccess()
    callback.onSuccess()
}
Java
@Override
public void onSaveRequest(SaveRequest request, SaveCallback callback) {
    // Get the structure from the request
    List<FillContext> context = request.getFillContexts();
    AssistStructure structure = context.get(context.size() - 1).getStructure();

    // Traverse the structure looking for data to save
    traverseStructure(structure);

    // Persist the data - if there are no errors, call onSuccess()
    callback.onSuccess();
}
บริการป้อนข้อความอัตโนมัติต้องเข้ารหัสข้อมูลที่ละเอียดอ่อนก่อนที่จะเก็บรักษาไว้ อย่างไรก็ตาม ข้อมูลผู้ใช้อาจรวมถึงป้ายกำกับหรือข้อมูลที่ไม่ละเอียดอ่อน ตัวอย่างเช่น บัญชีผู้ใช้สามารถมีป้ายกำกับที่ทำเครื่องหมายข้อมูลเป็นบัญชีงานหรือบัญชีส่วนตัวได้ บริการต้องไม่เข้ารหัสป้ายกำกับ การไม่เข้ารหัสป้ายกำกับจะช่วยให้บริการต่างๆ สามารถใช้ป้ายกำกับในมุมมองของผู้นำเสนอได้หากผู้ใช้ยังไม่ได้ตรวจสอบสิทธิ์ จากนั้นบริการจะแทนที่ป้ายกำกับด้วยข้อมูลจริงหลังจากที่ผู้ใช้ตรวจสอบสิทธิ์
เลื่อน UI การบันทึกการป้อนข้อความอัตโนมัติออกไป
ตั้งแต่ Android 10 เป็นต้นไป หากคุณใช้หลายหน้าจอเพื่อใช้เวิร์กโฟลว์การป้อนข้อความอัตโนมัติ เช่น หน้าจอหนึ่งสำหรับช่องชื่อผู้ใช้และอีกหน้าจอหนึ่งสำหรับรหัสผ่าน คุณสามารถเลื่อน UI การบันทึกการป้อนข้อความอัตโนมัติได้โดยใช้แฟล็ก SaveInfo.FLAG_DELAY_SAVE
หากตั้งค่าแฟล็กนี้ ระบบจะไม่เรียกใช้ UI การบันทึกการป้อนข้อความอัตโนมัติเมื่อมีการคอมมิตบริบทการป้อนข้อความอัตโนมัติที่เชื่อมโยงกับการตอบกลับ SaveInfo แต่คุณสามารถใช้กิจกรรมแยกต่างหากภายในงานเดียวกันเพื่อส่งคำขอป้อนข้อมูลในอนาคต แล้วแสดง UI โดยใช้คำขอบันทึกแทน ดูข้อมูลเพิ่มเติมได้ที่ SaveInfo.FLAG_DELAY_SAVE
ต้องมีการตรวจสอบสิทธิ์ผู้ใช้
บริการป้อนข้อความอัตโนมัติสามารถเพิ่มระดับความปลอดภัยได้อีกขั้นโดยกำหนดให้ผู้ใช้ต้องตรวจสอบสิทธิ์ก่อนจึงจะกรอกข้อมูลในมุมมองได้ สถานการณ์ต่อไปนี้เหมาะสำหรับการใช้การตรวจสอบสิทธิ์ผู้ใช้
- ข้อมูลผู้ใช้ในแอปต้องปลดล็อกโดยใช้รหัสผ่านหลักหรือการสแกนลายนิ้วมือ
- ต้องปลดล็อกชุดข้อมูลที่เฉพาะเจาะจง เช่น รายละเอียดบัตรเครดิตโดยใช้รหัสยืนยันบัตร (CVC)
ในสถานการณ์ที่บริการต้องการการตรวจสอบสิทธิ์ผู้ใช้ก่อนปลดล็อกข้อมูล บริการสามารถแสดงข้อมูลสำเร็จรูปหรือป้ายกำกับ และระบุ Intent ที่จัดการการตรวจสอบสิทธิ์ หากต้องการข้อมูลเพิ่มเติมเพื่อประมวลผลคำขอหลังจากขั้นตอนการตรวจสอบสิทธิ์เสร็จสิ้น คุณสามารถเพิ่มข้อมูลดังกล่าวลงใน Intent ได้ จากนั้นกิจกรรมการตรวจสอบสิทธิ์จะแสดงข้อมูลไปยังคลาส AutofillService ในแอปของคุณได้
ตัวอย่างโค้ดต่อไปนี้แสดงวิธีระบุว่าคำขอต้องมีการตรวจสอบสิทธิ์
Kotlin
val authPresentation = RemoteViews(packageName, android.R.layout.simple_list_item_1).apply {
    setTextViewText(android.R.id.text1, "requires authentication")
}
val authIntent = Intent(this, AuthActivity::class.java).apply {
    // Send any additional data required to complete the request
    putExtra(MY_EXTRA_DATASET_NAME, "my_dataset")
}

val intentSender: IntentSender = PendingIntent.getActivity(
        this,
        1001,
        authIntent,
        PendingIntent.FLAG_CANCEL_CURRENT
).intentSender

// Build a FillResponse object that requires authentication
val fillResponse: FillResponse = FillResponse.Builder()
        .setAuthentication(autofillIds, intentSender, authPresentation)
        .build()
Java
RemoteViews authPresentation = new RemoteViews(getPackageName(), android.R.layout.simple_list_item_1);
authPresentation.setTextViewText(android.R.id.text1, "requires authentication");
Intent authIntent = new Intent(this, AuthActivity.class);

// Send any additional data required to complete the request
authIntent.putExtra(MY_EXTRA_DATASET_NAME, "my_dataset");
IntentSender intentSender = PendingIntent.getActivity(
                this,
                1001,
                authIntent,
                PendingIntent.FLAG_CANCEL_CURRENT
        ).getIntentSender();

// Build a FillResponse object that requires authentication
FillResponse fillResponse = new FillResponse.Builder()
        .setAuthentication(autofillIds, intentSender, authPresentation)
        .build();
เมื่อกิจกรรมเสร็จสิ้นขั้นตอนการตรวจสอบสิทธิ์แล้ว กิจกรรมจะต้องเรียกใช้เมธอด setResult() โดยส่งค่า RESULT_OK และตั้งค่า EXTRA_AUTHENTICATION_RESULT เพิ่มเติมเป็นออบเจ็กต์ FillResponse ที่มีชุดข้อมูลที่ป้อน โค้ดต่อไปนี้แสดงตัวอย่างวิธีแสดงผลลัพธ์เมื่อขั้นตอนการตรวจสอบสิทธิ์เสร็จสมบูรณ์
Kotlin
// The data sent by the service and the structure are included in the intent
val datasetName: String? = intent.getStringExtra(MY_EXTRA_DATASET_NAME)
val structure: AssistStructure = intent.getParcelableExtra(EXTRA_ASSIST_STRUCTURE)
val parsedStructure: ParsedStructure = parseStructure(structure)
val (username, password) = fetchUserData(parsedStructure)

// Build the presentation of the datasets
val usernamePresentation =
        RemoteViews(packageName, android.R.layout.simple_list_item_1).apply {
            setTextViewText(android.R.id.text1, "my_username")
        }
val passwordPresentation =
        RemoteViews(packageName, android.R.layout.simple_list_item_1).apply {
            setTextViewText(android.R.id.text1, "Password for my_username")
        }

// Add the dataset to the response
val fillResponse: FillResponse = FillResponse.Builder()
        .addDataset(Dataset.Builder()
                .setValue(
                        parsedStructure.usernameId,
                        AutofillValue.forText(username),
                        usernamePresentation
                )
                .setValue(
                        parsedStructure.passwordId,
                        AutofillValue.forText(password),
                        passwordPresentation
                )
                .build()
        ).build()

val replyIntent = Intent().apply {
    // Send the data back to the service
    putExtra(MY_EXTRA_DATASET_NAME, datasetName)
    putExtra(EXTRA_AUTHENTICATION_RESULT, fillResponse)
}

setResult(Activity.RESULT_OK, replyIntent)
Java
Intent intent = getIntent();

// The data sent by the service and the structure are included in the intent
String datasetName = intent.getStringExtra(MY_EXTRA_DATASET_NAME);
AssistStructure structure = intent.getParcelableExtra(EXTRA_ASSIST_STRUCTURE);
ParsedStructure parsedStructure = parseStructure(structure);
UserData userData = fetchUserData(parsedStructure);

// Build the presentation of the datasets
RemoteViews usernamePresentation = new RemoteViews(getPackageName(), android.R.layout.simple_list_item_1);
usernamePresentation.setTextViewText(android.R.id.text1, "my_username");
RemoteViews passwordPresentation = new RemoteViews(getPackageName(), android.R.layout.simple_list_item_1);
passwordPresentation.setTextViewText(android.R.id.text1, "Password for my_username");

// Add the dataset to the response
FillResponse fillResponse = new FillResponse.Builder()
        .addDataset(new Dataset.Builder()
                .setValue(parsedStructure.usernameId,
                        AutofillValue.forText(userData.username), usernamePresentation)
                .setValue(parsedStructure.passwordId,
                        AutofillValue.forText(userData.password), passwordPresentation)
                .build())
        .build();

Intent replyIntent = new Intent();

// Send the data back to the service
replyIntent.putExtra(MY_EXTRA_DATASET_NAME, datasetName);
replyIntent.putExtra(EXTRA_AUTHENTICATION_RESULT, fillResponse);

setResult(RESULT_OK, replyIntent);
ในกรณีที่ต้องปลดล็อกชุดข้อมูลบัตรเครดิต บริการจะแสดง UI ที่ขอ CVC ได้ คุณสามารถซ่อนข้อมูลจนกว่าจะมีการปลดล็อกชุดข้อมูลโดยแสดงข้อมูลสำเร็จรูป เช่น ชื่อธนาคารและหมายเลขบัตรเครดิต 4 หลักสุดท้าย ตัวอย่างต่อไปนี้แสดงวิธีกำหนดให้ต้องมีการตรวจสอบสิทธิ์สำหรับชุดข้อมูลและซ่อนข้อมูลจนกว่าผู้ใช้จะระบุ CVC
Kotlin
// Parse the structure and fetch payment data
val parsedStructure: ParsedStructure = parseStructure(structure)
val paymentData: Payment = fetchPaymentData(parsedStructure)

// Build the presentation that shows the bank and the last four digits of the
// credit card number, such as 'Bank-1234'
val maskedPresentation: String = "${paymentData.bank}-" +
        paymentData.creditCardNumber.substring(paymentData.creditCardNumber.length - 4)
val authPresentation = RemoteViews(packageName, android.R.layout.simple_list_item_1).apply {
    setTextViewText(android.R.id.text1, maskedPresentation)
}

// Prepare an intent that displays the UI that asks for the CVC
val cvcIntent = Intent(this, CvcActivity::class.java)
val cvcIntentSender: IntentSender = PendingIntent.getActivity(
        this,
        1001,
        cvcIntent,
        PendingIntent.FLAG_CANCEL_CURRENT
).intentSender

// Build a FillResponse object that includes a Dataset that requires authentication
val fillResponse: FillResponse = FillResponse.Builder()
        .addDataset(
                Dataset.Builder()
                        // The values in the dataset are replaced by the actual
                        // data once the user provides the CVC
                        .setValue(parsedStructure.creditCardId, null, authPresentation)
                        .setValue(parsedStructure.expDateId, null, authPresentation)
                        .setAuthentication(cvcIntentSender)
                        .build()
        ).build()
Java
// Parse the structure and fetch payment data
ParsedStructure parsedStructure = parseStructure(structure);
Payment paymentData = fetchPaymentData(parsedStructure);

// Build the presentation that shows the bank and the last four digits of the
// credit card number, such as 'Bank-1234'
String maskedPresentation = paymentData.bank + "-" +
    paymentData.creditCardNumber.subString(paymentData.creditCardNumber.length - 4);
RemoteViews authPresentation = new RemoteViews(getPackageName(), android.R.layout.simple_list_item_1);
authPresentation.setTextViewText(android.R.id.text1, maskedPresentation);

// Prepare an intent that displays the UI that asks for the CVC
Intent cvcIntent = new Intent(this, CvcActivity.class);
IntentSender cvcIntentSender = PendingIntent.getActivity(
        this,
        1001,
        cvcIntent,
        PendingIntent.FLAG_CANCEL_CURRENT
).getIntentSender();

// Build a FillResponse object that includes a Dataset that requires authentication
FillResponse fillResponse = new FillResponse.Builder()
        .addDataset(new Dataset.Builder()
                // The values in the dataset are replaced by the actual
                // data once the user provides the CVC
                .setValue(parsedStructure.creditCardId, null, authPresentation)
                .setValue(parsedStructure.expDateId, null, authPresentation)
                .setAuthentication(cvcIntentSender)
                .build())
        .build();
เมื่อกิจกรรมตรวจสอบ CVC แล้ว ระบบควรเรียกใช้เมธอด setResult() โดยส่งค่า RESULT_OK และตั้งค่า EXTRA_AUTHENTICATION_RESULT เพิ่มเติมเป็นออบเจ็กต์ Dataset ที่มีหมายเลขบัตรเครดิตและวันที่หมดอายุ ชุดข้อมูลใหม่จะแทนที่ชุดข้อมูลที่ต้องมีการตรวจสอบสิทธิ์ และระบบจะกรอกข้อมูลในมุมมองทันที โค้ดต่อไปนี้แสดงตัวอย่างวิธีแสดงชุดข้อมูลเมื่อผู้ใช้ระบุ CVC
Kotlin
// Parse the structure and fetch payment data.
val parsedStructure: ParsedStructure = parseStructure(structure)
val paymentData: Payment = fetchPaymentData(parsedStructure)

// Build a non-null RemoteViews object to use as the presentation when
// creating the Dataset object. This presentation isn't actually used, but the
// Builder object requires a non-null presentation.
val notUsed = RemoteViews(packageName, android.R.layout.simple_list_item_1)

// Create a dataset with the credit card number and expiration date.
val responseDataset: Dataset = Dataset.Builder()
        .setValue(
                parsedStructure.creditCardId,
                AutofillValue.forText(paymentData.creditCardNumber),
                notUsed
        )
        .setValue(
                parsedStructure.expDateId,
                AutofillValue.forText(paymentData.expirationDate),
                notUsed
        )
        .build()

val replyIntent = Intent().apply {
    putExtra(EXTRA_AUTHENTICATION_RESULT, responseDataset)
}
Java
// Parse the structure and fetch payment data.
ParsedStructure parsedStructure = parseStructure(structure);
Payment paymentData = fetchPaymentData(parsedStructure);

// Build a non-null RemoteViews object to use as the presentation when
// creating the Dataset object. This presentation isn't actually used, but the
// Builder object requires a non-null presentation.
RemoteViews notUsed = new RemoteViews(getPackageName(), android.R.layout.simple_list_item_1);

// Create a dataset with the credit card number and expiration date.
Dataset responseDataset = new Dataset.Builder()
        .setValue(parsedStructure.creditCardId,
                AutofillValue.forText(paymentData.creditCardNumber), notUsed)
        .setValue(parsedStructure.expDateId,
                AutofillValue.forText(paymentData.expirationDate), notUsed)
        .build();

Intent replyIntent = new Intent();
replyIntent.putExtra(EXTRA_AUTHENTICATION_RESULT, responseDataset);
จัดระเบียบข้อมูลเป็นกลุ่มที่สมเหตุสมผล
บริการป้อนข้อความอัตโนมัติต้องจัดระเบียบข้อมูลเป็นกลุ่มเชิงตรรกะที่แยกแนวคิดจากโดเมนต่างๆ ในหน้านี้ เราจะเรียกกลุ่มเชิงตรรกะเหล่านี้ว่าพาร์ติชัน รายการต่อไปนี้แสดงตัวอย่างทั่วไปของพาร์ติชันและฟิลด์
- ข้อมูลเข้าสู่ระบบ ซึ่งรวมถึงช่องชื่อผู้ใช้และรหัสผ่าน
- ที่อยู่ ซึ่งรวมถึงช่องถนน เมือง รัฐ และรหัสไปรษณีย์
- ข้อมูลการชำระเงิน ซึ่งรวมถึงช่องหมายเลขบัตรเครดิต วันที่หมดอายุ และรหัสยืนยัน
บริการป้อนข้อความอัตโนมัติที่แบ่งพาร์ติชันข้อมูลอย่างถูกต้องจะช่วยปกป้องข้อมูลของผู้ใช้ได้ดียิ่งขึ้นโดยไม่เปิดเผยข้อมูลจากพาร์ติชันมากกว่า 1 รายการในชุดข้อมูล ตัวอย่างเช่น ชุดข้อมูลที่มีข้อมูลเข้าสู่ระบบไม่จำเป็นต้องมีข้อมูลการชำระเงิน การจัดระเบียบข้อมูลในพาร์ติชันช่วยให้บริการของคุณแสดงข้อมูลที่เกี่ยวข้องในปริมาณขั้นต่ำที่จำเป็นต่อการตอบสนองคำขอได้
การจัดระเบียบข้อมูลในพาร์ติชันช่วยให้บริการสามารถกรอกกิจกรรมที่มีมุมมองจากหลายพาร์ติชันได้ ขณะเดียวกันก็ส่งข้อมูลที่เกี่ยวข้องในปริมาณน้อยที่สุดไปยังแอปไคลเอ็นต์ ตัวอย่างเช่น ลองพิจารณากิจกรรมที่มีมุมมองสำหรับชื่อผู้ใช้ รหัสผ่าน ถนน และเมือง และบริการป้อนข้อความอัตโนมัติที่มีข้อมูลต่อไปนี้
| พาร์ติชัน | ช่อง 1 | ช่อง 2 |
|---|---|---|
| ข้อมูลเข้าสู่ระบบ | work_username | work_password |
| personal_username | personal_password | |
| ที่อยู่ | work_street | work_city |
| personal_street | personal_city |
บริการสามารถเตรียมชุดข้อมูลที่มีพาร์ติชันข้อมูลเข้าสู่ระบบสำหรับทั้งบัญชีงานและบัญชีส่วนตัว เมื่อผู้ใช้เลือกชุดข้อมูล การตอบกลับการป้อนข้อความอัตโนมัติที่ตามมาจะระบุที่อยู่ที่ทำงานหรือที่อยู่ส่วนตัวก็ได้ โดยขึ้นอยู่กับตัวเลือกแรกของผู้ใช้
บริการสามารถระบุฟิลด์ที่สร้างคำขอได้โดยเรียกใช้เมธอด isFocused() ขณะข้ามออบเจ็กต์ AssistStructure
ซึ่งจะช่วยให้บริการเตรียม FillResponse ที่มีข้อมูลพาร์ติชันที่เหมาะสมได้
การป้อนรหัสแบบใช้ครั้งเดียวทาง SMS โดยอัตโนมัติ
บริการป้อนข้อความอัตโนมัติสามารถช่วยผู้ใช้กรอกรหัสแบบใช้ครั้งเดียวที่ส่งโดยใช้ SMS Retriever API ได้
คุณต้องมีคุณสมบัติตรงตามข้อกำหนดต่อไปนี้จึงจะใช้ฟีเจอร์นี้ได้
- บริการป้อนข้อความอัตโนมัติทำงานใน Android 9 (ระดับ API 28) ขึ้นไป
- ผู้ใช้ให้ความยินยอมแก่บริการป้อนข้อความอัตโนมัติเพื่ออ่านรหัสแบบครั้งเดียวจาก SMS
- แอปพลิเคชันที่คุณกำลังให้บริการป้อนข้อความอัตโนมัติไม่ได้ใช้ SMS Retriever API เพื่ออ่านรหัสแบบใช้ครั้งเดียวอยู่แล้ว
บริการป้อนข้อความอัตโนมัติสามารถใช้ SmsCodeAutofillClient ซึ่งพร้อมใช้งานโดยการเรียกใช้ SmsCodeRetriever.getAutofillClient() จากบริการ Google Play 19.0.56 ขึ้นไป
ขั้นตอนหลักในการใช้ API นี้ในบริการป้อนข้อความอัตโนมัติมีดังนี้
- ในบริการป้อนข้อความอัตโนมัติ ให้ใช้
hasOngoingSmsRequestจากSmsCodeAutofillClientเพื่อระบุว่ามีคำขอที่ใช้งานอยู่สำหรับชื่อแพ็กเกจของแอปพลิเคชันที่คุณกำลังป้อนข้อความอัตโนมัติหรือไม่ บริการป้อนข้อความอัตโนมัติของคุณต้องแสดงข้อความแจ้งคำแนะนำก็ต่อเมื่อเมธอดนี้แสดงผลเป็นfalse - ในบริการป้อนข้อความอัตโนมัติ ให้ใช้
checkPermissionStateจากSmsCodeAutofillClientเพื่อตรวจสอบว่าบริการป้อนข้อความอัตโนมัติมีสิทธิ์ป้อนรหัสแบบครั้งเดียวโดยอัตโนมัติหรือไม่ สถานะสิทธิ์นี้อาจเป็นNONE,GRANTEDหรือDENIEDบริการป้อนข้อความอัตโนมัติต้องแสดงข้อความแจ้งคำแนะนำสำหรับสถานะNONEและGRANTED - ในกิจกรรมการตรวจสอบสิทธิ์การป้อนข้อความอัตโนมัติ ให้ใช้สิทธิ์
SmsRetriever.SEND_PERMISSIONเพื่อลงทะเบียนBroadcastReceiverที่รอฟังSmsCodeRetriever.SMS_CODE_RETRIEVED_ACTIONเพื่อรับผลลัพธ์รหัส SMS เมื่อพร้อมใช้งาน เรียกใช้
startSmsCodeRetrieverในSmsCodeAutofillClientเพื่อเริ่มฟังรหัสแบบใช้ครั้งเดียวที่ส่งโดยใช้ SMS หากผู้ใช้ให้สิทธิ์บริการป้อนข้อความอัตโนมัติในการดึงรหัสแบบครั้งเดียวจาก SMS ระบบจะค้นหาข้อความ SMS ที่ได้รับในช่วง 1-5 นาทีที่ผ่านมานับจากตอนนี้หากบริการป้อนข้อความอัตโนมัติต้องขอการให้สิทธิ์จากผู้ใช้เพื่ออ่านรหัสแบบใช้ครั้งเดียว
Taskที่startSmsCodeRetrieverแสดงผลอาจดำเนินการไม่สำเร็จโดยมีResolvableApiExceptionแสดงผล หากเกิดกรณีนี้ขึ้น คุณต้องเรียกใช้เมธอดResolvableApiException.startResolutionForResult()เพื่อแสดงกล่องโต้ตอบความยินยอมสำหรับคำขอสิทธิ์รับผลลัพธ์รหัส SMS จาก Intent แล้วแสดงรหัส SMS เป็นการตอบกลับการป้อนข้อความอัตโนมัติ
เปิดใช้การป้อนข้อความอัตโนมัติใน Chrome
Chrome อนุญาตให้บริการป้อนข้อความอัตโนมัติของบุคคลที่สามป้อนข้อความอัตโนมัติในแบบฟอร์มได้โดยตรง ซึ่งช่วยให้ผู้ใช้ได้รับประสบการณ์การใช้งานที่ราบรื่นและง่ายขึ้น หากต้องการใช้บริการป้อนข้อความอัตโนมัติของบุคคลที่สามเพื่อป้อนรหัสผ่าน พาสคีย์ และข้อมูลอื่นๆ เช่น ที่อยู่และข้อมูลการชำระเงินโดยอัตโนมัติ ผู้ใช้ต้องเลือกป้อนข้อความอัตโนมัติโดยใช้บริการอื่นในการตั้งค่า Chrome

ผู้ให้บริการป้อนข้อความอัตโนมัติควรแนะนำให้ผู้ใช้ระบุผู้ให้บริการที่ต้องการในการตั้งค่า Chrome เพื่อช่วยให้ผู้ใช้ได้รับประสบการณ์การป้อนข้อความอัตโนมัติที่ดีที่สุดจากบริการของคุณและ Chrome ใน Android
นักพัฒนาแอปสามารถดำเนินการต่อไปนี้เพื่อช่วยให้ผู้ใช้เปิดปุ่มเปิด/ปิดได้
- ค้นหาการตั้งค่า Chrome และดูว่าผู้ใช้ต้องการใช้บริการป้อนข้อความอัตโนมัติของบุคคลที่สามหรือไม่
- Deep Link ไปยังหน้าการตั้งค่า Chrome ที่ผู้ใช้สามารถเปิดใช้บริการป้อนข้อความอัตโนมัติของบุคคลที่สามได้
ระบุเวอร์ชัน Chrome สูงสุดสำหรับโหมดความเข้ากันได้
Chrome หยุดรองรับโหมดความเข้ากันได้ตั้งแต่เวอร์ชัน 137 เพื่อเปลี่ยนไปใช้การป้อนข้อความอัตโนมัติของ Android การคงโหมดความเข้ากันได้ไว้อาจทำให้เกิดปัญหาด้านความเสถียร ระบุเวอร์ชันสูงสุดของแพ็กเกจ Chrome ที่รองรับโหมดความเข้ากันได้เพื่อความเสถียรดังนี้
<autofill-service>
  ...
  <compatibility-package android:name="com.android.chrome" android:maxLongVersionCode=&qu>ot;<711900039" /
  compatibility-package android:name="com.chrome.beta" android:ma>xLo<ngVersionCode="711900039" /
  compatibility-package android:name="com.chrome.>dev<" android:maxLongVersionCode="711900039" /
  compatibility-package android:name=>"c<om.chrome.canary&>quot; android:maxLongVersionCode="711900039" /
  ...
/autofill-service
อ่านการตั้งค่า Chrome
แอปใดก็ตามสามารถอ่านได้ว่า Chrome ใช้โหมดป้อนข้อความอัตโนมัติของบุคคลที่สามซึ่งอนุญาตให้ใช้การป้อนข้อความอัตโนมัติของ Android หรือไม่ Chrome ใช้ ContentProvider ของ Android เพื่อสื่อสารข้อมูลดังกล่าว ประกาศในไฟล์ Manifest ของ Android ว่าคุณต้องการอ่านการตั้งค่าจากช่องทางใด
<uses-permission android:name="android.permission.READ_USER_DICTION>A<RY">;/<
queries
 !-- To Query Chrom>e <Beta: --
 package android:name="com>.ch<rome.beta" /

 !-- To Que>ry< Chrome Stable: --
 package android:name=&q>u<ot;com.a>ndroid.chrome" /
/queries
จากนั้นใช้ ContentResolver ของ Android เพื่อขอข้อมูลดังกล่าวโดยสร้าง URI เนื้อหาดังนี้
Kotlin
val CHROME_CHANNEL_PACKAGE = "com.android.chrome" // Chrome Stable.
val CONTENT_PROVIDER_NAME = ".AutofillThirdPartyModeContentProvider"
val THIRD_PARTY_MODE_COLUMN = "autofill_third_party_state"
val THIRD_PARTY_MODE_ACTIONS_URI_PATH = "autofill_third_party_mode"

val uri = Uri.Builder()
    .scheme(ContentResolver.SCHEME_CONTENT)
    .authority(CHROME_CHANNEL_PACKAGE + CONTENT_PROVIDER_NAME)
    .path(THIRD_PARTY_MODE_ACTIONS_URI_PATH)
    .build()

val cursor = contentResolver.query(
    uri,
    arrayOf(THIRD_PARTY_MODE_COLUMN), // projection
    null, // selection
    null, // selectionArgs
    null  // sortOrder
)

if (cursor == null) {
  // Terminate now! Chromium versions older than this don't provide this information.
}

cursor?.use { // Use the safe call operator and the use function for auto-closing
    if (it.moveToFirst()) { // Check if the cursor has any rows
        val index = it.getColumnIndex(THIRD_PARTY_MODE_COLUMN)
        if (index != -1) { // Check if the column exists
          val value = it.getInt(index)
          if (0 == value) {
              // 0 means that the third party mode is turned off. Chrome uses its built-in
              // password manager. This is the default for new users.
          } else {
              // 1 means that the third party mode is turned on. Chrome forwards all
              // autofill requests to Android Autofill. Users have to opt-in for this.
          }
        } else {
          // Handle the case where the column doesn't exist.  Log a warning, perhaps.
          Log.w("Autofill", "Column $THIRD_PARTY_MODE_COLUMN not found in cursor")
        }
    }
} // The cursor is automatically closed here
Java
final String CHROME_CHANNEL_PACKAGE = "com.android.chrome";  // Chrome Stable.
final String CONTENT_PROVIDER_NAME = ".AutofillThirdPartyModeContentProvider";
final String THIRD_PARTY_MODE_COLUMN = "autofill_third_party_state";
final String THIRD_PARTY_MODE_ACTIONS_URI_PATH = "autofill_third_party_mode";

final Uri uri = new Uri.Builder()
                  .scheme(ContentResolver.SCHEME_CONTENT)
                  .authority(CHROME_CHANNEL_PACKAGE + CONTENT_PROVIDER_NAME)
                  .path(THIRD_PARTY_MODE_ACTIONS_URI_PATH)
                  .build();

final Cursor cursor = getContentResolver().query(
                  uri,
                  /*projection=*/new String[] {THIRD_PARTY_MODE_COLUMN},
                  /*selection=*/ null,
                  /*selectionArgs=*/ null,
                  /*sortOrder=*/ null);

if (cursor == null) {
  // Terminate now! Chromium versions older than this don't provide this information.
}

cursor.moveToFirst(); // Retrieve the result;

int index = cursor.getColumnIndex(THIRD_PARTY_MODE_COLUMN);

if (0 == cursor.getInt(index)) {
  // 0 means that the third party mode is turned off. Chrome uses its built-in
  // password manager. This is the default for new users.
} else {
  // 1 means that the third party mode is turned on. Chrome forwards all
  // autofill requests to Android Autofill. Users have to opt-in for this.
}
Deep Link ไปยังการตั้งค่า Chrome
หากต้องการทำ Deep Link ไปยังหน้าการตั้งค่า Chrome ที่ผู้ใช้สามารถเปิดใช้บริการป้อนข้อความอัตโนมัติของบุคคลที่สามได้ ให้ใช้ Intent ของ Android อย่าลืมกำหนดค่าการกระทำและหมวดหมู่ดังที่แสดงในตัวอย่างนี้
Kotlin
val autofillSettingsIntent = Intent(Intent.ACTION_APPLICATION_PREFERENCES)
autofillSettingsIntent.addCategory(Intent.CATEGORY_DEFAULT)
autofillSettingsIntent.addCategory(Intent.CATEGORY_APP_BROWSER)
autofillSettingsIntent.addCategory(Intent.CATEGORY_PREFERENCE)

// Invoking the intent with a chooser allows users to select the channel they
// want to configure. If only one browser reacts to the intent, the chooser is
// skipped.
val chooser = Intent.createChooser(autofillSettingsIntent, "Pick Chrome Channel")
startActivity(chooser)

// If the caller knows which Chrome channel they want to configure,
// they can instead add a package hint to the intent, e.g.
val specificChromeIntent = Intent(Intent.ACTION_APPLICATION_PREFERENCES) // Create a *new* intent
specificChromeIntent.addCategory(Intent.CATEGORY_DEFAULT)
specificChromeIntent.addCategory(Intent.CATEGORY_APP_BROWSER)
specificChromeIntent.addCategory(Intent.CATEGORY_PREFERENCE)
specificChromeIntent.setPackage("com.android.chrome") // Set the package on the *new* intent
startActivity(specificChromeIntent) // Start the *new* intent
Java
Intent autofillSettingsIntent = new Intent(Intent.ACTION_APPLICATION_PREFERENCES);
autofillSettingsIntent.addCategory(Intent.CATEGORY_DEFAULT);
autofillSettingsIntent.addCategory(Intent.CATEGORY_APP_BROWSER);
autofillSettingsIntent.addCategory(Intent.CATEGORY_PREFERENCE);

// Invoking the intent with a chooser allows users to select the channel they
// want to configure. If only one browser reacts to the intent, the chooser is
// skipped.
Intent chooser = Intent.createChooser(autofillSettingsIntent, "Pick Chrome Channel");
startActivity(chooser);

// If the caller knows which Chrome channel they want to configure,
// they can instead add a package hint to the intent, e.g.
autofillSettingsIntent.setPackage("com.android.chrome");
startActivity(autofillSettingsIntent);
สถานการณ์การป้อนข้อความอัตโนมัติขั้นสูง
ใช้การป้อนข้อความอัตโนมัติในสถานการณ์ต่อไปนี้
ผสานรวมกับแป้นพิมพ์
ตั้งแต่ Android 11 เป็นต้นไป แพลตฟอร์มจะอนุญาตให้แป้นพิมพ์และเครื่องมือแก้ไขวิธีการป้อนข้อมูล (IME) อื่นๆ แสดงคำแนะนำการป้อนข้อความอัตโนมัติในบรรทัดแทนการใช้เมนูแบบพุลดาวน์ ดูข้อมูลเพิ่มเติมเกี่ยวกับวิธีที่บริการป้อนข้อความอัตโนมัติสามารถรองรับฟังก์ชันนี้ได้ที่หัวข้อผสานรวมการป้อนข้อความอัตโนมัติกับแป้นพิมพ์
แบ่งหน้าชุดข้อมูล
การตอบกลับการป้อนข้อความอัตโนมัติขนาดใหญ่อาจเกินขนาดธุรกรรมที่อนุญาตของออบเจ็กต์ Binder ซึ่งแสดงถึงออบเจ็กต์ระยะไกลที่จำเป็นในการประมวลผลคำขอ เพื่อป้องกันไม่ให้ระบบ Android แสดงข้อยกเว้นในสถานการณ์เหล่านี้ คุณสามารถทำให้ FillResponse มีขนาดเล็กได้โดยเพิ่มออบเจ็กต์ Dataset ไม่เกิน 20 รายการต่อครั้ง หากคำตอบของคุณต้องการชุดข้อมูลเพิ่มเติม คุณสามารถเพิ่มชุดข้อมูลที่ช่วยให้ผู้ใช้ทราบว่ามีข้อมูลเพิ่มเติมและดึงข้อมูลชุดข้อมูลกลุ่มถัดไปเมื่อเลือกได้ ดูข้อมูลเพิ่มเติมได้ที่ addDataset(Dataset)
บันทึกข้อมูลที่แยกออกเป็นหลายหน้าจอ
แอปมักจะแยกข้อมูลผู้ใช้ออกเป็นหลายหน้าจอภายในกิจกรรมเดียวกัน เช่น สำหรับการสร้างบัญชีผู้ใช้ใหม่ เช่น หน้าจอแรกอาจขอชื่อผู้ใช้ และหน้าจอที่ 2 ขอรหัสผ่าน ในสถานการณ์เหล่านี้ บริการป้อนข้อความอัตโนมัติของคุณต้องรอจนกว่าผู้ใช้จะป้อนข้อมูลลงในช่องที่เกี่ยวข้องทั้งหมดก่อนที่จะแสดง UI การบันทึกการป้อนข้อความอัตโนมัติ ทำตามขั้นตอนต่อไปนี้เพื่อจัดการกับสถานการณ์ดังกล่าว
- ในคำขอเติมข้อมูลครั้งแรก ให้เพิ่ม client state bundle ในการตอบกลับที่มีรหัสการป้อนข้อความอัตโนมัติของช่องบางส่วนที่แสดงในหน้าจอ
- ในคำขอการกรอกครั้งที่ 2 ให้ดึงข้อมูลแพ็กเกจสถานะไคลเอ็นต์ รับรหัสการป้อนข้อความอัตโนมัติที่ตั้งค่าไว้ในคำขอก่อนหน้าจากสถานะไคลเอ็นต์ และเพิ่มรหัสเหล่านี้และแฟล็ก
FLAG_SAVE_ON_ALL_VIEWS_INVISIBLEลงในออบเจ็กต์SaveInfoที่ใช้ในการตอบกลับครั้งที่ 2 ในคำขอบันทึก ให้ใช้ออบเจ็กต์
FillContextที่เหมาะสมเพื่อรับค่าของแต่ละช่อง โดยจะมีบริบทการเติม 1 รายการต่อคำขอเติม 1 รายการดูข้อมูลเพิ่มเติมได้ที่บันทึกเมื่อข้อมูลแยกออกเป็นหลายหน้าจอ
ระบุตรรกะการเริ่มต้นและการแยกส่วนสำหรับคำขอแต่ละรายการ
ทุกครั้งที่มีคำขอป้อนข้อความอัตโนมัติ ระบบ Android จะเชื่อมโยงกับบริการและเรียกใช้เมธอด onConnected() เมื่อบริการประมวลผลคำขอแล้ว ระบบ Android จะเรียกใช้เมธอด onDisconnected() และยกเลิกการเชื่อมโยงจากบริการ คุณสามารถใช้ onConnected() เพื่อระบุโค้ดที่ทำงานก่อนประมวลผลคำขอ และใช้ onDisconnected() เพื่อระบุโค้ดที่ทำงานหลังประมวลผลคำขอ
ปรับแต่ง UI การบันทึกการป้อนข้อความอัตโนมัติ
บริการป้อนข้อความอัตโนมัติสามารถปรับแต่ง UI การบันทึกการป้อนข้อความอัตโนมัติเพื่อช่วยให้ผู้ใช้ตัดสินใจได้ว่าต้องการอนุญาตให้บริการบันทึกข้อมูลของตนหรือไม่ บริการต่างๆ สามารถให้ข้อมูลเพิ่มเติมเกี่ยวกับสิ่งที่บันทึกไว้ผ่านข้อความหรือผ่านมุมมองที่กำหนดเอง นอกจากนี้ บริการยังเปลี่ยนลักษณะที่ปรากฏของปุ่มที่ยกเลิกคำขอบันทึกและรับการแจ้งเตือนเมื่อผู้ใช้แตะปุ่มนั้นได้ด้วย
ดูข้อมูลเพิ่มเติมได้ที่หน้าข้อมูลอ้างอิง SaveInfo
โหมดความเข้ากันได้
โหมดความเข้ากันได้ช่วยให้บริการป้อนข้อความอัตโนมัติใช้โครงสร้างเสมือนจริงสำหรับการช่วยเหลือพิเศษเพื่อวัตถุประสงค์ในการป้อนข้อความอัตโนมัติได้ ซึ่งมีประโยชน์อย่างยิ่งสำหรับการให้บริการฟังก์ชันการป้อนข้อความอัตโนมัติในเบราว์เซอร์ที่ไม่ได้ใช้ API การป้อนข้อความอัตโนมัติอย่างชัดเจน
หากต้องการทดสอบบริการป้อนข้อความอัตโนมัติโดยใช้โหมดความเข้ากันได้ ให้เพิ่มเบราว์เซอร์หรือแอปที่ต้องใช้โหมดความเข้ากันได้ลงในรายการที่อนุญาตอย่างชัดแจ้ง คุณสามารถตรวจสอบว่าแพ็กเกจใดอยู่ในรายการที่อนุญาตแล้วโดยเรียกใช้คำสั่งต่อไปนี้
$ adb shell settings get global autofill_compat_mode_allowed_packages
หากแพ็กเกจที่คุณกำลังทดสอบไม่อยู่ในรายการ ให้เพิ่มแพ็กเกจโดยเรียกใช้คำสั่งต่อไปนี้ โดยที่ pkgX คือแพ็กเกจของแอป
$ adb shell settings put global autofill_compat_mode_allowed_packages pkg1[resId1]:pkg2[resId1,resId2]
หากแอปเป็นเบราว์เซอร์ ให้ใช้ resIdx เพื่อระบุรหัสทรัพยากรของช่องป้อนข้อมูลที่มี URL ของหน้าที่แสดงผล
โหมดความเข้ากันได้มีข้อจำกัดต่อไปนี้
- คำขอบันทึกจะเริ่มทำงานเมื่อบริการใช้แฟล็ก
FLAG_SAVE_ON_ALL_VIEWS_INVISIBLEหรือมีการเรียกใช้เมธอดsetTrigger()ระบบจะตั้งค่าFLAG_SAVE_ON_ALL_VIEWS_INVISIBLEโดยค่าเริ่มต้นเมื่อใช้โหมดความเข้ากันได้ - ค่าข้อความของโหนดอาจไม่พร้อมใช้งานในเมธอด
onSaveRequest(SaveRequest, SaveCallback)
ดูข้อมูลเพิ่มเติมเกี่ยวกับโหมดความเข้ากันได้ รวมถึงข้อจำกัดที่เกี่ยวข้องได้ที่ข้อมูลอ้างอิงคลาส AutofillService