
Project Treble (which includes Android (9)Pie and above devices) creates a clear interface between the Android OS and the Vendor portion. The Vendor portion includes a Board Support Package (BSP). The OS part is called Android Generic System Image (GSI):
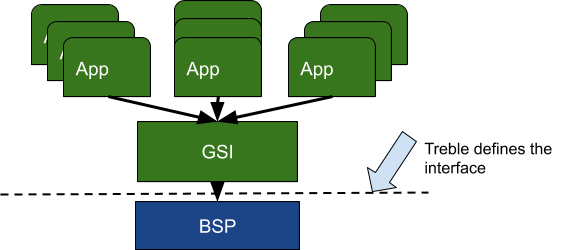
Android OS builds that conform with the Treble interface can run on any Treble-compliant Android device. Naturally these OS builds could not include any OEM customizations or extensions.
What is Generic System Image (GSI)?
Android GSI is a full OS image that matches the AOSP source code. Some of GSI values, to application developers, are:
- At Android early release time such as Developer Preview and Beta phases, developers can install those OSes to a device for which the latest OSes are not available from its manufacturer yet.
If an application works well on GSI, then it should execute smoothly on future certified OEM platforms with the same Android API level. In this respect, GSI enables developers to test applications earlier for future Android OS generations; early testing gains more time for developers to fix potential compatibility issues with the new OS, also enables developers to report OS issues earlier so the Android team could fix them before the final OS gets released! GSI helps developers and Android team to create a better Android ecosystem and to achieve the best user experience for your applications.
This codelab teaches you how to install Android GSI 11 to a device that runs Android 9 (API level 28) device, from there we could start our normal testing or development on the new Android 11!
Device Requirement for Android GSI
In general, 3 things are needed to use Android GSI:
- a device is fully Treble compliant (Treble support is mandatory for devices launched with Android 9 or later).
- the device's bootloader could be unlocked.
- the tools and procedures to update OS for the device.
You could find the above information from your device's manufacturer. For this codelab, we'll use a Pixel 3 phone as an example.
What you will build
In this codelab, you're going to:
From here, you can perform application development and validation: the GSI is your device's new OS. |
|
What you'll learn
- How to identify the right GSI type
- Where to download the GSI
- How to install the GSI onto a device
What you'll need
- A computer with Debian/Ubuntu Linux, Mac OS, or Windows, preinstalled with the most recent stable version of Android Studio and Android SDK.
- The
platform-toolsdirectory added to yourPATHenvironment variable: - On Linux or Mac OS:
export PATH=$your-android-sdk-path/platform-tools:$PATH - On Windows:
setx path "%path%;%your-android-sdk%\platform-tools" - An Android device launched with Android 9 or better, the bootloader unlocked, and USB debugging enabled.
If you run into any issues (code bugs, grammatical errors, unclear wording, etc.) as you work through this codelab, please report the issue via the Report a mistake link in the lower left corner of the codelab.
Enable USB Debug
After following the instructions to enable USB debugging, type the following command in a terminal:
adb devices
You should see your test device's serial number listed in the terminal.
Confirm device launching OS version
To confirm that Android 9 is the launching OS on your test device, type the following command:
adb shell getprop ro.product.first_api_levelIf the result of this command is 28(or better), which means Android 9+, we are ready to go: devices launched with Android 9 and later are required to be fully Treble compliant.
Note that older generation GSI could not be installed on a device running newer generation Android OS(es): for example, installing Android 10 GSI on an Android 11 launched device may not work.
Unlocking Bootloader
Unlocking bootloader steps are solely dependent on device's manufacturers. For Pixel 3+ phones, we could follow instructions documented on AOSP website if not unlocked yet:
- Enable OEM unlocking with "Settings" app: Developer options > OEM unlocking
- Reboot to bootloader by holding down Power + Volume Down button, or with adb:
adb reboot bootloader- Unlock the bootloader with:
fastboot flashing unlockFollow the prompt on Pixel 3 to allow unlocking; and this Pixel 3 is ready to install GSI.
The available GSI types are listed on the Android Generic System Images (GSIs) website. To check the CPU architecture for your device, run the following command in a terminal window:
adb shell getprop ro.product.cpu.abiIt should return one of the following:
arm64-v8aarmeabi-v7aarmeabix86x86_64
Pixel 3 supports the arm64-v8a architecture, so we could use either arm64 or arm64 + GMS GSI:
arm64GSI type: AOSP Androidgms_arm64type: arm64 GSI with Google GMS
arm64+GMS allows you to use Google Play Services on the device, you normally would install this type of GSI to test your applications. For download file size considerations, in this codelab we'll use the arm64 GSI; the steps are exactly the same for the gms_arm64 GSIs.
Download Android 11 GSI
GSIs are a part of Android releases cycles including developer preview, beta, up to and including the formal release. At the formal release time, GSI source code would be released to AOSP. Generally speaking:
- Before formal release, only pre-built GSIs are available;
- At the final release, GSI source code would be released to AOSP; then
- GSIs without GMS are available from AOSP CI page; you could also build GSIs from source code yourself;
- GSIs with GMS are only available from the GSI release page.
At current time, GSI availability could be summarized in the following:
release phase | location | GSI format |
before final | pre-built binary:
| |
final version | pre-built binary:
| |
Source code, i.e.:
aosp GSI on CI page, i.e., | ||
quarterly update | Source code, i.e.:
aosp GSI on CI page, i.e., |
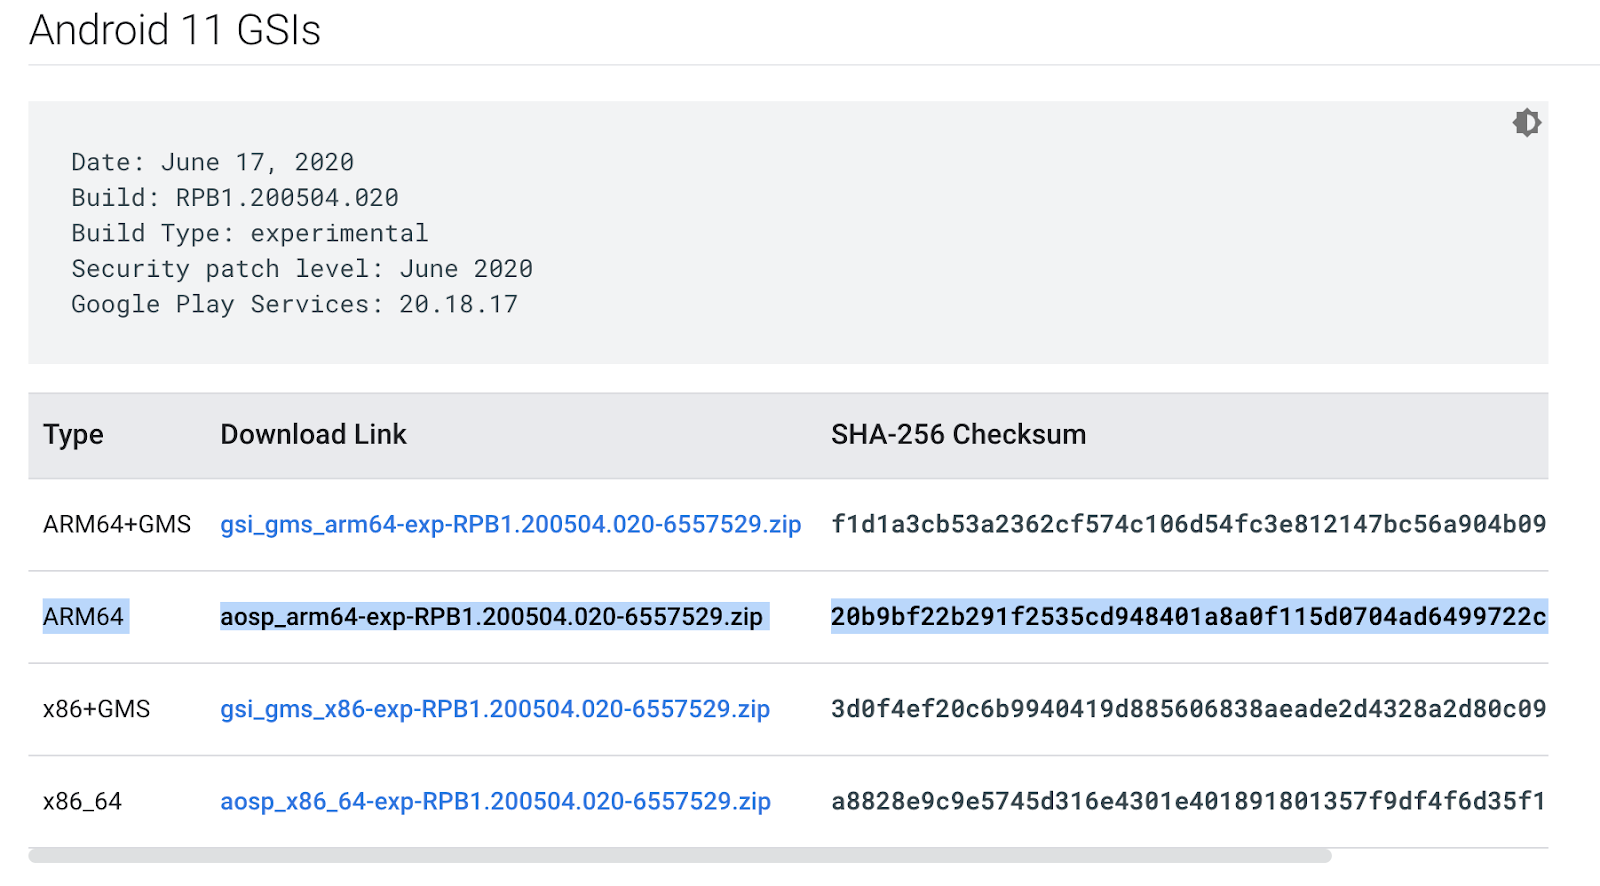
This codelab is for Android 11 GSIs, currently at beta phase, they are only available from GSI release website, let's download arm64 GSI from there:
- Navigate to the image download table on the page.
- Select the link next to ARM64:
- Agree to the GSI terms and conditions, download the file and unzip:
  mkdir  ~/gsi
  cd ~/gsi
  mv ~/Downloads/aosp_arm64-exp*.zip .
  unzip aosp_arm64-exp*.zip
You should see 2 image files after unzipping:
- vbmeta.img: just to disable AVB (Android Verified Boot), needed if your device adopted Android Verified Boot Implementation.
- system.img: Generic System Image that will be installed onto your device.
(Optional) Check the version of your SDK's flashing tool.
To flash GSI onto your test device, you need the adb and fastboot tools. It is recommended to use the version that matches the current running Android version on your Android device.
To determine the version of your SDK's platform tools, run the following command:
adb --versionThis part is heavily device dependent: different Android device manufacturers have their own flashing tools and instructions, make sure to visit your device's manufacturer site for the exact tools and processes for your device!
For Pixel 3+ devices, "dynamic partition" feature introduced in Android 10 affects the GSI installation in the follow aspects:
- flashing mode
When dynamic partition feature is enabled, Pixel devices needs to be put into the fastbootd (dynamic fastboot) mode; otherwise, devices needs to be in the fastboot mode:
adb reboot fastboot// when dynamic partition is enabled
adb reboot bootloader// dynamic partition is not used or disabled
You could check thedynamic_partitionboot property setting for the dynamic partition status:
adb shell getprop ro.boot.dynamic_partitions
the command will only returntrueif it is enabled. - Partition resizing
When the dynamic partition is enabled, the system partition is one of dynamic partitions; GSI will be installed into this dynamic system partition. The GSI size might be bigger than the existingsystempartition size; in this case, you just need to delete some other dynamic partitions such asproduct partitionto make more space for GSI when system re-sizes the system partition:fastboot delete-logical-partition product_a/product_b
check for the official documentation page forproduct_aorproduct_bselection in the above command.
In this example, you will use a Pixel 3 running Android 9 to install GSI: Android 9 launched phones are more accessible than Android 10 launched devices.
The tools needed to install GSI on the Pixel 3 are adb and fastboot, let's get started:
- Navigate to the local GSI image directory:
cd ~/gsi- Enter flashing mode on the device:
Please note that if dynamic partition feature is enabled, Pixel 3 needs to be put into thefastbootdmode; for this codelab purpose, Android 9 is running on this Pixel 3 phone,fastboot modeis necessary:
adb reboot bootloader- Flash GSI onto the device
fastboot flash system system.imgNote that If you see some error message such as the following:Resizing 'system_a' FAILED (remote: 'Not enough space to resize partition')
It means that the dynamic partition is enabled on your device; as mentioned before, fix it with the following command as documented at Flashing GSIs page
fastboot delete-logical-partition product_a/_b
- Disable AVB (Android Verify Boot) to enable GSI to boot after installation
fastboot flash --disable-verification vbmeta vbmeta.img- Erase user data, cache and reboot:
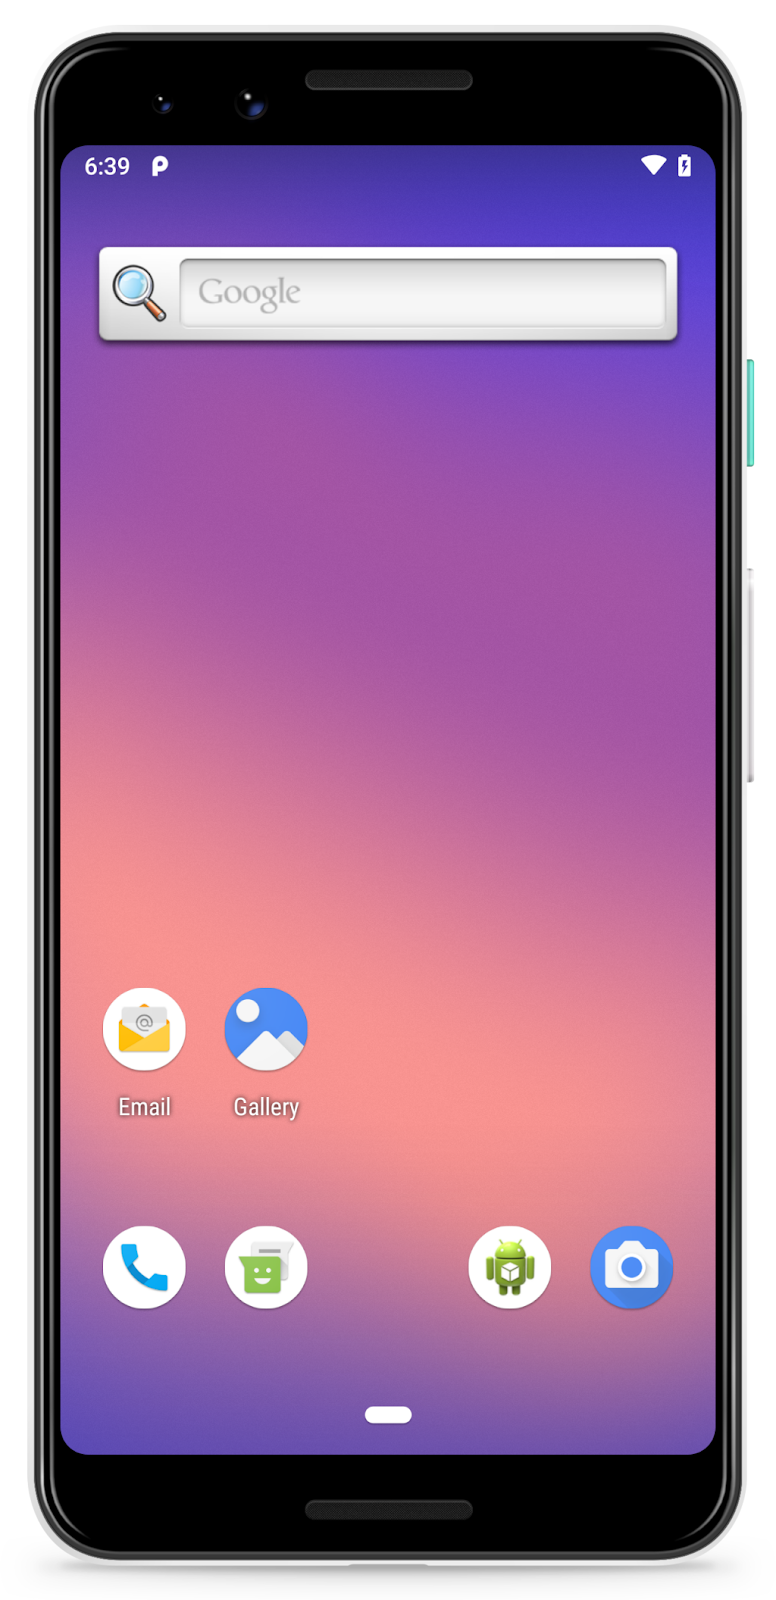
fastboot -w rebootAfter a minute or so, your device should boot into the newly-installed Android 11 GSI:
There it is: you have a fresh GSI image running on your Android phone! Now you can start testing and developing applications with the latest and greatest versions of Android.
And remember to use the Android GSI issue tracker to report GSI related issues.
Manually installing GSI could be demanding for some devices. From Android 10, GSI team implemented a feature called Dynamic System Update (DSU) to automate the GSI installation process! DSU makes GSI installation much easier by:
- fetching GSI from GSI release page ( available from Android 11 )
- creating a dynamic partition
- install GSI into the new partition
Furthermore, DSU preserves the existing OS and userdata on the device, switches freely between the original Android OS on the devices and GSI! DSU is available in Android 10 on Pixel 3+ devices, ready to be adopted by other OEMs! Check out the DSU page for detailed documentations!
Summary
In this codelab, we have covered:
- GSI types and flavors.
- The download location for Android GSIs.
- GSI flashing steps for Pixel 3+.
As a testing platform, Android GSI enables you to
- test your app with any milestone release during the full new Android OS release cycle on devices you do not have formal OS yet (from your device manufacturer)
- fix application compatibility issues
- report potential OS issues to the Android team so they could get fixed before the final OS release
Fully use GSI to do your test early and create the best Android ecosystem, with the best quality applications and Android OSes!
Further reading
- Dynamic System Update (DSU): Automatic GSI Installation
- Project Treble Update
- Generic System Image(GSI) documentation
- GSI on AOSP
- Android OTA for Pixel system images
We love your feedback for GSI and Android! Please share your thoughts and report GSI issues by filing GSI bugs, discussing topics on StackOverflow, and contributing to GSI Reddit page!