
1. 始める前に
タッチペンはペンの形をしたツールで、正確なタスクを実行するのに役立ちます。この Codelab では、android.os ライブラリと androidx ライブラリを使用してオーガニックなタッチペン エクスペリエンスを実装する方法を学びます。また、MotionEvent クラスを使用して、圧力、傾斜、向き、パーム リジェクションをサポートし、不要なタップを防ぐ方法も学びます。さらに、モーション予測でタッチペンのレイテンシを低減し、OpenGL と SurfaceView クラスで低レイテンシのグラフィックスを取得する方法についても学びます。
前提条件
- Kotlin とラムダの使用経験。
- Android Studio の使用方法についての基礎知識があること。
- Jetpack Compose に関する基本的な知識。
- 低レイテンシ グラフィックのための OpenGL に関する基礎知識。
学習内容
- タッチペンに
MotionEventクラスを使用する方法。 - タッチペン機能(圧力、傾斜、向きのサポートなど)を実装する方法。
Canvasクラスを描画する方法。- モーション予測を実装する方法
- OpenGL と
SurfaceViewクラスを使用して低レイテンシのグラフィックをレンダリングする方法。
必要なもの
- 最新バージョンの Android Studio
- ラムダを含む Kotlin 構文の使用経験。
- Compose に関する基本的な経験。Compose に慣れていない場合は、Jetpack Compose の基本の Codelab を修了してください。
- タッチペン対応のデバイス。
- アクティブなタッチペン。
- Git。
2. スターター コードを取得する
スターター アプリのテーマ設定と基本設定を含むコードを取得する手順は次のとおりです。
- この GitHub リポジトリのクローンを作成します。
git clone https://github.com/android/large-screen-codelabs
advanced-stylusフォルダを開きます。startフォルダにはスターター コードが含まれ、endフォルダには解答コードが含まれています。
3. 基本的な描画アプリを実装する
まず、ユーザーが描画を行える基本的な描画アプリ用の必要なレイアウトを作成し、Canvas Composable 関数を使用して画面にタッチペン属性を表示します。次の画像のように表示されます。
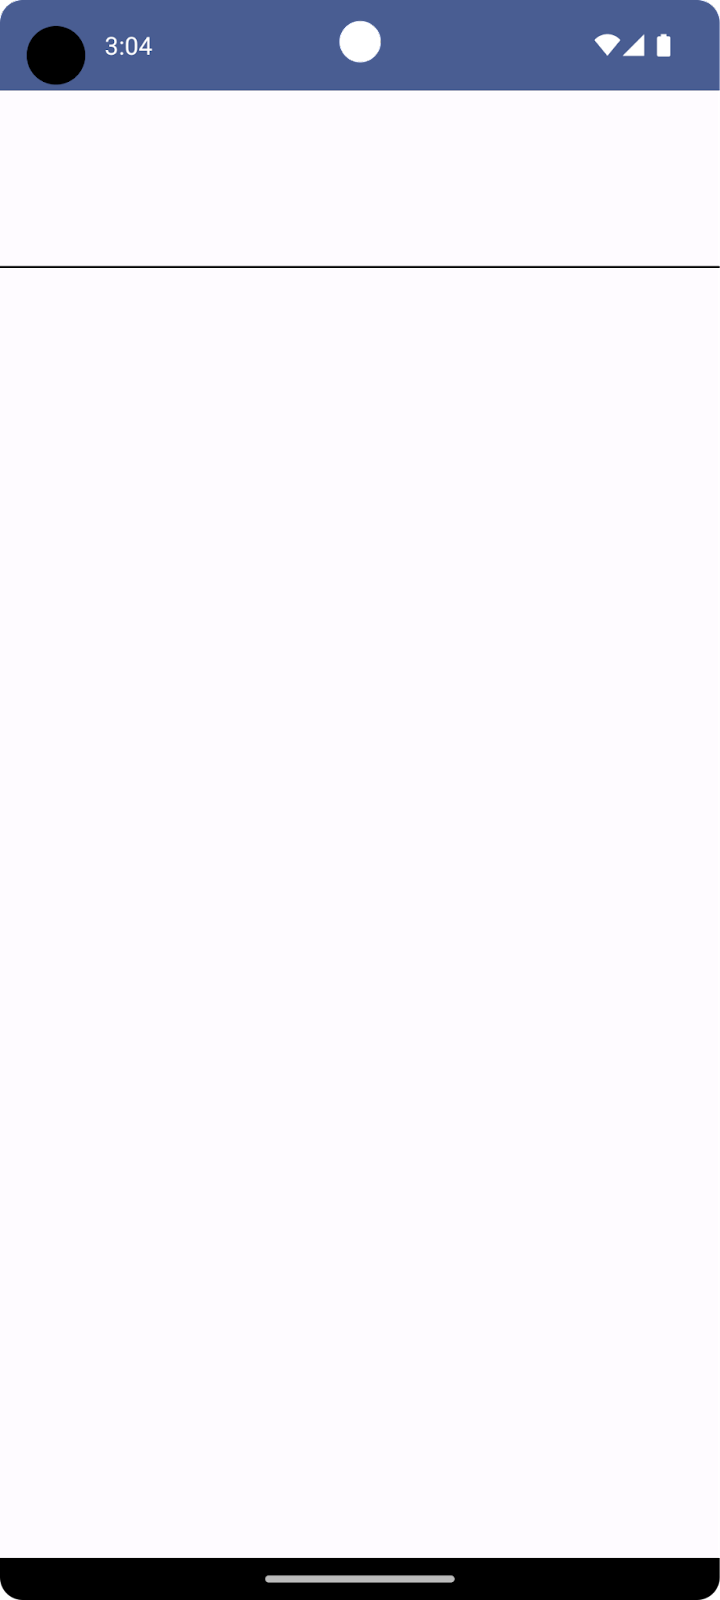
上段は Canvas Composable 関数で、タッチペンのビジュアリゼーションを描画し、向き、傾斜、圧力など、タッチペンのさまざまな属性を表示します。下端は、タッチペン入力を受け取って単純なストロークを描画する Canvas Composable 関数です。
描画アプリの基本レイアウトを実装する手順は次のとおりです。
- Android Studio で、クローンを作成したリポジトリを開きます。
app>java>com.example.stylusをクリックします。次に、MainActivityをダブルクリックします。MainActivity.ktファイルが開きます。MainActivityクラスで、StylusVisualizationおよびDrawAreaComposable関数に注目してください。このセクションでは、DrawAreaComposable関数に焦点を当てます。
StylusState クラス を作成します。
- 同じ
uiディレクトリで、[File] > [New] > [Kotlin/Class file] をクリックします。 - テキスト ボックスで、Name プレースホルダを
StylusState.ktに置き換え、Enter(macOS ではreturn)を押します。 StylusState.ktファイルでStylusStateデータクラスを作成し、次の表の変数を追加します。
変数 | タイプ | デフォルト値 | 説明 |
|
| 0~1.0 の範囲の値。 | |
|
| -pi から pi の範囲のラジアン値。 | |
|
| 0 から pi/2 の範囲のラジアン値。 | |
|
|
|
StylusState.kt
package com.example.stylus.ui
import androidx.compose.ui.graphics.Path

data class StylusState(
   var pressure: Float = 0F,
   var orientation: Float = 0F,
   var tilt: Float = 0F,
   var path: Path = Path(),
)
MainActivity.ktファイルでMainActivityクラスを探し、mutableStateOf()関数でタッチペンの状態を追加します。
MainActivity.kt
import androidx.compose.runtime.setValue
import androidx.compose.runtime.getValue
import androidx.compose.runtime.mutableStateOf
import com.example.stylus.ui.StylusState

class MainActivity : ComponentActivity() {
    private var stylusState: StylusState by mutableStateOf(StylusState())
DrawPoint クラス
DrawPoint クラスは、画面に描画されたそれぞれの点に関するデータを保存します。これらの点をリンクすると、線が作成されます。これは、Path オブジェクトの動作を模倣しています。
DrawPoint クラスは PointF クラスを拡張します。これには、次のデータが含まれます。
パラメータ | タイプ | 説明 |
|
| Coordinate |
|
| Coordinate |
|
| ポイントの種類 |
DrawPointType 列挙型で記述される DrawPoint オブジェクトには、次の 2 種類があります。
タイプ | 説明 |
| 線の始点を所定の位置に移動します。 |
| 前の点から線をトレースします。 |
DrawPoint.kt
import android.graphics.PointF
class DrawPoint(x: Float, y: Float, val type: DrawPointType): PointF(x, y)
データポイントをパスにレンダリングする
このアプリの場合、StylusViewModel クラスは、線のデータを保持し、レンダリング用のデータを用意して、パーム リジェクションのために Path オブジェクトに対してなんらかのオペレーションを実行します。
- 線のデータを保持するには、
StylusViewModelクラスでDrawPointオブジェクトの可変リストを作成します。
StylusViewModel.kt
import androidx.lifecycle.ViewModel
import com.example.stylus.data.DrawPoint

class StylusViewModel : ViewModel() {private var currentPath = mutableListOf<DrawPoint>()
データポイントをパスにレンダリングする手順は次のとおりです。
StylusViewModel.ktファイルのStylusViewModelクラスにcreatePath関数を追加します。Path()コンストラクタを使用して、Path型のpath変数を作成します。currentPath変数内の各データポイントを反復処理するforループを作成します。- データポイントの種類が
STARTの場合は、moveToメソッドを呼び出して、指定したx座標とy座標で線を開始します。 - それ以外の場合は、データポイントの
x座標とy座標を指定してlineToメソッドを呼び出して、前の点にリンクします。 pathオブジェクトを返します。
StylusViewModel.kt
import androidx.compose.ui.graphics.Path
import com.example.stylus.data.DrawPoint
import com.example.stylus.data.DrawPointType


class StylusViewModel : ViewModel() {
   private var currentPath = mutableListOf<DrawPoint>()

   private fun createPath(): Path {
      val path = Path()

      for (point in currentPath) {
          if (point.type == DrawPointType.START) {
              path.moveTo(point.x, point.y)
          } else {
              path.lineTo(point.x, point.y)
          }
      }
      return path
   }

private fun cancelLastStroke() {
}
MotionEvent オブジェクトを処理する
タッチペン イベントは MotionEvent オブジェクトを介して渡されます。このオブジェクトは、実行されたアクションとそれに関連するデータ(ポインタの位置や圧力など)に関する情報を提供します。次の表に、MotionEvent オブジェクトの定数とそのデータの一部を示します。これらを使用して、画面上でのユーザー操作を特定できます。
定数 | データ |
| ポインタで画面をタップします。これは、 |
| ポインタが画面上を移動します。これが描画される線です。 |
| ポインタでの画面のタップを停止します。線の終わりです。 |
| 不要なタップが検出されました。最後のストロークをキャンセルします。 |
アプリが新しい MotionEvent オブジェクトを受け取ると、新しいユーザー入力を反映するように画面がレンダリングされます。
StylusViewModelクラスのMotionEventオブジェクトを処理するには、線の座標を収集する関数を作成します。
StylusViewModel.kt
import android.view.MotionEvent

class StylusViewModel : ViewModel() {
   private var currentPath = mutableListOf<DrawPoint>()

   ...

   fun processMotionEvent(motionEvent: MotionEvent): Boolean {
      when (motionEvent.actionMasked) {
          MotionEvent.ACTION_DOWN -> {
              currentPath.add(
                  DrawPoint(motionEvent.x, motionEvent.y, DrawPointType.START)
              )
          }
          MotionEvent.ACTION_MOVE -> {
              currentPath.add(DrawPoint(motionEvent.x, motionEvent.y, DrawPointType.LINE))
          }
          MotionEvent.ACTION_UP -> {
              currentPath.add(DrawPoint(motionEvent.x, motionEvent.y, DrawPointType.LINE))
          }
          MotionEvent.ACTION_CANCEL -> {
              // Unwanted touch detected.
              cancelLastStroke()
          }
          else -> return false
      }

      return true
   }
UI にデータを送信する
UI が StylusState データクラスの変更を収集できるように StylusViewModel クラスを更新する手順は次のとおりです。
StylusViewModelクラスで、StylusStateクラスのMutableStateFlow型の_stylusState変数と、StylusStateクラスのStateFlow型のstylusState変数を作成します。_stylusState変数は、StylusViewModelクラスでタッチペンの状態が変更されるたびに変更され、stylusState変数はMainActivityクラスの UI によって使用されます。
StylusViewModel.kt
import com.example.stylus.ui.StylusState
import kotlinx.coroutines.flow.MutableStateFlow
import kotlinx.coroutines.flow.StateFlow

class StylusViewModel : ViewModel() {

   private var _stylusState = MutableStateFlow(StylusState())
   val stylusState: StateFlow<StylusState> = _stylusState
StylusStateオブジェクト パラメータを受け入れるrequestRendering関数を作成します。
StylusViewModel.kt
import kotlinx.coroutines.flow.update

...

class StylusViewModel : ViewModel() {
   private var _stylusState = MutableStateFlow(StylusState())
   val stylusState: StateFlow<StylusState> = _stylusState

   ...

    private fun requestRendering(stylusState: StylusState) {
      // Updates the stylusState, which triggers a flow.
      _stylusState.update {
          return@update stylusState
      }
   }
processMotionEvent関数の最後に、StylusStateパラメータを使用してrequestRendering関数の呼び出しを追加します。StylusStateパラメータで、motionEvent変数から傾斜、圧力、方向の値を取得し、createPath()関数を使用してパスを作成します。この操作でフローイベントがトリガーされ、後で UI で接続できます。
StylusViewModel.kt
...

class StylusViewModel : ViewModel() {

   ...

   fun processMotionEvent(motionEvent: MotionEvent): Boolean {

      ...
         else -> return false
      }


      requestRendering(
         StylusState(
             tilt = motionEvent.getAxisValue(MotionEvent.AXIS_TILT),
             pressure = motionEvent.pressure,
             orientation = motionEvent.orientation,
             path = createPath()
         )
      )
UI を StylusViewModel クラスにリンクする
MainActivityクラスで、onCreate関数のsuper.onCreate関数を見つけて、状態コレクションを追加します。状態収集の詳細については、ライフサイクルを意識した方法でのフローの収集をご覧ください。
MainActivity.kt
import androidx.lifecycle.lifecycleScope
import kotlinx.coroutines.launch
import androidx.lifecycle.repeatOnLifecycle
import kotlinx.coroutines.flow.onEach
import androidx.lifecycle.Lifecycle
import kotlinx.coroutines.flow.collect

...
class MainActivity : ComponentActivity() {
   override fun onCreate(savedInstanceState: Bundle?) {
      super.onCreate(savedInstanceState)

      lifecycleScope.launch {
          lifecycle.repeatOnLifecycle(Lifecycle.State.STARTED) {
              viewModel.stylusState
                  .onEach {
                      stylusState = it
                  }
                  .collect()
          }
      }
これで、StylusViewModel クラスが新しい StylusState 状態を送信すると、アクティビティはその状態を受け取り、新しい StylusState オブジェクトはローカルの MainActivity クラスの stylusState 変数を更新します。
DrawAreaComposable関数の本体で、CanvasComposable関数にpointerInteropFilter修飾子を追加してMotionEventオブジェクトを指定します。
- 次のように、
MotionEventオブジェクトを StylusViewModel のprocessMotionEvent関数に送信して処理します。
MainActivity.kt
import androidx.compose.ui.ExperimentalComposeUiApi
import androidx.compose.ui.input.pointer.pointerInteropFilter

...
class MainActivity : ComponentActivity() {

   ...

@Composable
@OptIn(ExperimentalComposeUiApi::class)
fun DrawArea(modifier: Modifier = Modifier) {
   Canvas(modifier = modifier
       .clipToBounds()

 .pointerInteropFilter {
              viewModel.processMotionEvent(it)
          }

   ) {

   }
}
stylusStatepath属性を指定してdrawPath関数を呼び出し、色とストローク スタイルを指定します。
MainActivity.kt
class MainActivity : ComponentActivity() {

...

   @Composable
   @OptIn(ExperimentalComposeUiApi::class)
   fun DrawArea(modifier: Modifier = Modifier) {
      Canvas(modifier = modifier
          .clipToBounds()
          .pointerInteropFilter {
              viewModel.processMotionEvent(it)
          }
      ) {
          with(stylusState) {
              drawPath(
                  path = this.path,
                  color = Color.Gray,
                  style = strokeStyle
              )
          }
      }
   }
- アプリを実行すると、画面に描画できることがわかります。
4. 圧力、向き、傾斜のサポートを実装する
前のセクションでは、圧力、向き、傾斜などのタッチペン情報を MotionEvent オブジェクトから取得する方法を確認しました。
StylusViewModel.kt
tilt = motionEvent.getAxisValue(MotionEvent.AXIS_TILT),
pressure = motionEvent.pressure,
orientation = motionEvent.orientation,
ただし、このショートカットは、最初のポインタに対してのみ機能します。マルチタッチが検出されると、複数のポインタが検出され、このショートカットは最初のポインタの値、または画面上の最初のポインタの値のみを返します。特定のポインタに関するデータをリクエストするには、pointerIndex パラメータを使用します。
StylusViewModel.kt
tilt = motionEvent.getAxisValue(MotionEvent.AXIS_TILT, pointerIndex),
pressure = motionEvent.getPressure(pointerIndex),
orientation = motionEvent.getOrientation(pointerIndex)
ポインタとマルチタッチについて詳しくは、マルチタッチ ジェスチャーを処理するをご覧ください。
圧力、向き、傾斜の可視化を追加する
MainActivity.ktファイルでStylusVisualizationComposable関数を見つけ、StylusStateフロー オブジェクトの情報を使用して可視化をレンダリングします。
MainActivity.kt
import StylusVisualization.drawOrientation
import StylusVisualization.drawPressure
import StylusVisualization.drawTilt
...
class MainActivity : ComponentActivity() {

   ...

   @Composable
   fun StylusVisualization(modifier: Modifier = Modifier) {
      Canvas(
          modifier = modifier
      ) {
          with(stylusState) {
              drawOrientation(this.orientation)
              drawTilt(this.tilt)
              drawPressure(this.pressure)
          }
      }
   }
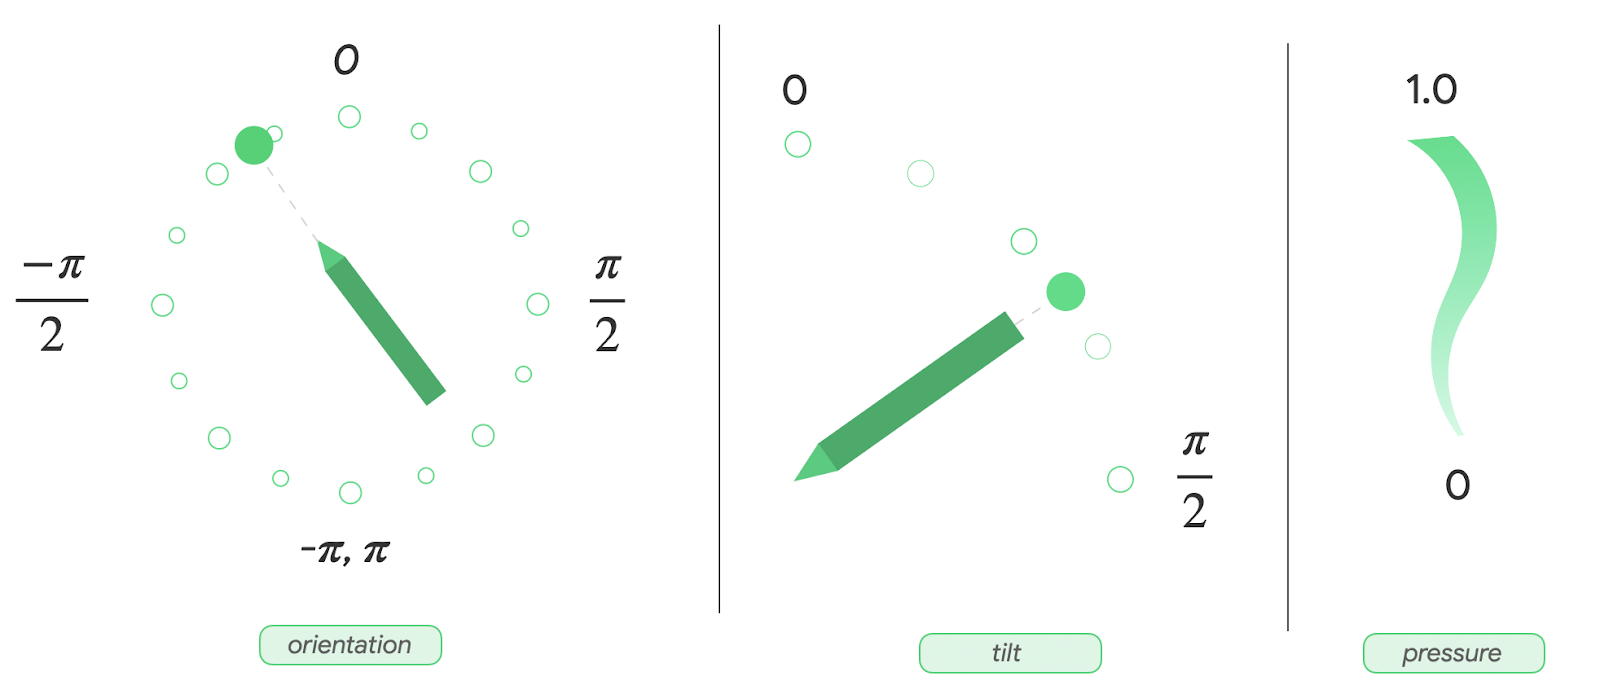
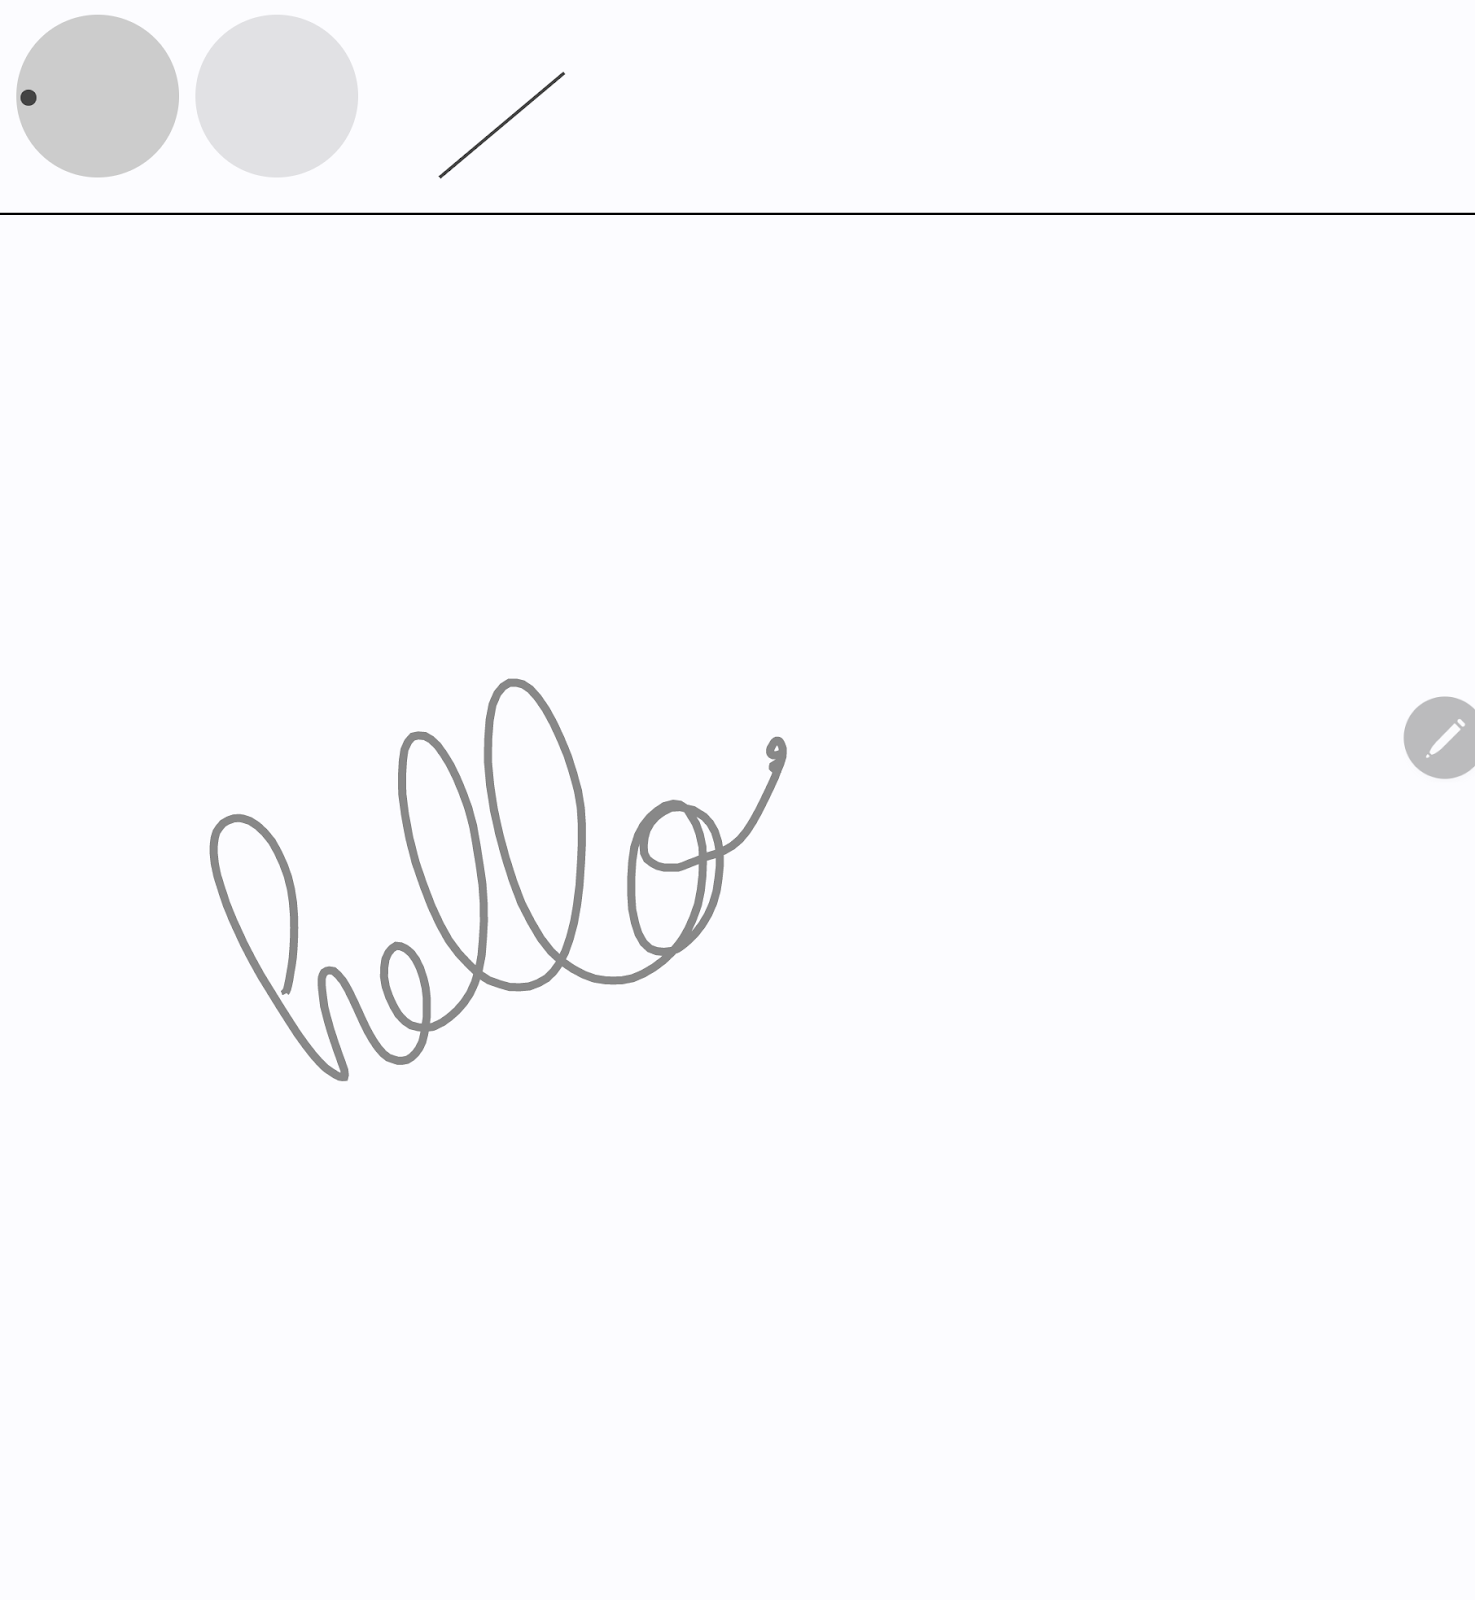
- アプリを実行します。画面上部に、向き、圧力、傾斜を示す 3 つのインジケーターが表示されます。
- 画面をタッチペンでスクリブルし、各ビジュアリゼーションが入力にどのように反応するかを確認します。
StylusVisualization.ktファイルを調べて、各可視化がどのように構成されているかを理解します。
5. パーム リジェクションを実装する
画面で不要なタップを登録できる。たとえば、これはユーザーが手書き入力のサポート時に自然に画面に手に置いた場合に発生します。
パーム リジェクションは、この動作を検出するためのメカニズムであり、最後の MotionEvent オブジェクト セットをキャンセルするようデベロッパーに通知します。MotionEvent オブジェクトのセットは ACTION_DOWN 定数で始まります。
つまり、画面から不要なタップを取り除き、正当なユーザー入力を再レンダリングできるように、入力の履歴を維持する必要があります。幸い、履歴はすでに currentPath 変数の StylusViewModel クラスに保存されています。
Android には MotionEvent オブジェクトからの ACTION_CANCEL 定数が用意されており、不要なタップについてデベロッパーに通知できるようになっています。Android 13 以降では、MotionEvent オブジェクトは FLAG_CANCELED 定数を提供しており、ACTION_POINTER_UP 定数を確認する必要があります。
cancelLastStroke 関数を実装します。
- 最後の
STARTデータポイントからデータポイントを削除するには、StylusViewModelクラスに戻り、最後のSTARTデータポイントのインデックスを見つけて、インデックスから 1 を引いた値になるまで最初のデータポイントからそのデータのみを保持するcancelLastStroke関数を作成します。
StylusViewModel.kt
...
class StylusViewModel : ViewModel() {
    ...

   private fun cancelLastStroke() {
      // Find the last START event.
      val lastIndex = currentPath.findLastIndex {
          it.type == DrawPointType.START
      }

      // If found, keep the element from 0 until the very last event before the last MOVE event.
      if (lastIndex > 0) {
          currentPath = currentPath.subList(0, lastIndex - 1)
      }
   }
ACTION_CANCEL と FLAG_CANCELED の定数を追加する
StylusViewModel.ktファイルで、processMotionEvent関数を見つけます。ACTION_UP定数で、現在の SDK バージョンが Android 13 以降かどうか、およびFLAG_CANCELED定数がアクティブになっているかどうかを確認するcanceled変数を作成します。- 次の線で、
canceled変数が true であるかどうかを確認する条件を作成します。その場合は、cancelLastStroke関数を呼び出して、MotionEventオブジェクトの最後のセットを削除します。それ以外の場合は、currentPath.addメソッドを呼び出して、MotionEventオブジェクトの最後のセットを追加します。
StylusViewModel.kt
import android.os.Build
...
class StylusViewModel : ViewModel() {
    ...
    fun processMotionEvent(motionEvent: MotionEvent): Boolean {
    ...
        MotionEvent.ACTION_POINTER_UP,
        MotionEvent.ACTION_UP -> {
           val canceled = Build.VERSION.SDK_INT >= Build.VERSION_CODES.TIRAMISU &&
           (motionEvent.flags and MotionEvent.FLAG_CANCELED) == MotionEvent.FLAG_CANCELED

           if(canceled) {
               cancelLastStroke()
           } else {
               currentPath.add(DrawPoint(motionEvent.x, motionEvent.y, DrawPointType.LINE))
           }
        }
ACTION_CANCEL定数内のcancelLastStroke関数に注目してください。
StylusViewModel.kt
...
class StylusViewModel : ViewModel() {
    ...
    fun processMotionEvent(motionEvent: MotionEvent): Boolean {
        ...
        MotionEvent.ACTION_CANCEL -> {
           // unwanted touch detected
           cancelLastStroke()
        }
パーム リジェクションが実装されました。作業コードは palm-rejection フォルダにあります。
6. 低レイテンシを実装する
このセクションでは、パフォーマンスを高めるために、ユーザー入力と画面レンダリングの間のレイテンシを短縮します。レイテンシには複数の原因があり、その一つは長いグラフィック パイプラインです。フロント バッファ レンダリングを使用して、グラフィック パイプラインを削減します。フロント バッファ レンダリングにより、デベロッパーは画面バッファに直接アクセスできるため、手書きやスケッチから優れた結果を得ることができます。
androidx.graphics ライブラリが提供する GLFrontBufferedRenderer クラスは、フロントおよびダブル バッファ レンダリングを処理します。また、onDrawFrontBufferedLayer コールバック関数による高速レンダリングと onDrawDoubleBufferedLayer コールバック関数による通常のレンダリングのために SurfaceView オブジェクトを最適化します。GLFrontBufferedRenderer クラスと GLFrontBufferedRenderer.Callback インターフェースは、ユーザー提供データ型とやり取りします。この Codelab では、Segment クラスを使用します。
使用を開始するには、以下のステップを実行してください。
- Android Studio で
low-latencyフォルダを開き、必要なファイルをすべて取得します。 - プロジェクトの新しいファイルは次のとおりです。
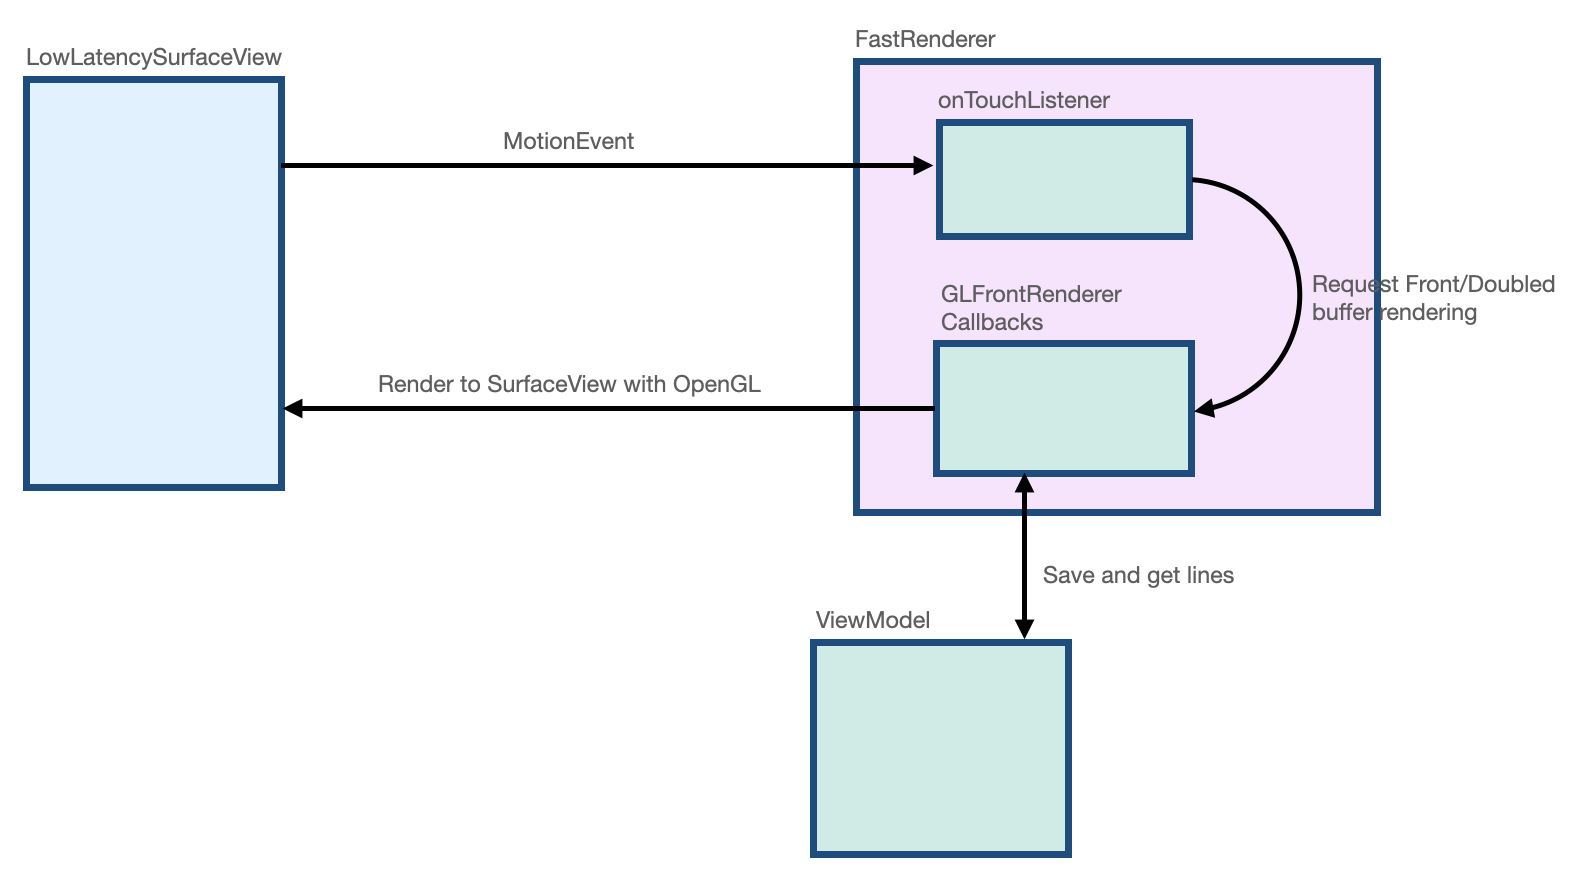
build.gradleファイルで、implementation "androidx.graphics:graphics-core:1.0.0-alpha03"宣言とともに、androidx.graphicsライブラリがインポートされています。LowLatencySurfaceViewクラスはSurfaceViewクラスを拡張して、画面に OpenGL コードをレンダリングします。LineRendererクラスは、画面上に線をレンダリングするために OpenGL コードを保持します。FastRendererクラスを使用すると、レンダリングを高速化し、GLFrontBufferedRenderer.Callbackインターフェースを実装できます。また、MotionEventオブジェクトをインターセプトします。StylusViewModelクラスは、LineManagerインターフェースを持つデータポイントを保持します。Segmentクラスは、次のようにセグメントを定義します。x1、y1: 第 1 点の座標x2、y2: 第 2 点の座標
次の図は、各クラス間でデータがどのように移動するかを示しています。
低レイテンシのサーフェスとレイアウトを作成する
MainActivity.ktファイルで、MainActivityクラスのonCreate関数を見つけます。onCreate関数の本体で、FastRendererオブジェクトを作成し、viewModelオブジェクトで渡します。
MainActivity.kt
class MainActivity : ComponentActivity() {
   ...
   override fun onCreate(savedInstanceState: Bundle?) {
      super.onCreate(savedInstanceState)

      fastRendering = FastRenderer(viewModel)

      lifecycleScope.launch {
      ...
- 同じファイルで、
DrawAreaLowLatencyComposable関数を作成します。 - 関数の本文で、
AndroidViewAPI を使用してLowLatencySurfaceViewビューをラップし、fastRenderingオブジェクトを指定します。
MainActivity.kt
import androidx.compose.ui.viewinterop.AndroidView
import com.example.stylus.gl.LowLatencySurfaceView
class MainActivity : ComponentActivity() {
...
@Composable
fun DrawAreaLowLatency(modifier: Modifier = Modifier) {
AndroidView(factory = { context ->
LowLatencySurfaceView(context, fastRenderer = fastRendering)
}, modifier = modifier)
}
onCreate関数で、DividerComposable関数の後に、DrawAreaLowLatencyComposable関数をレイアウトに対して追加します。
MainActivity.kt
class MainActivity : ComponentActivity() {
   ...
   override fun onCreate(savedInstanceState: Bundle?) {
   ...
   Surface(
      modifier = Modifier
          .fillMaxSize(),
      color = MaterialTheme.colorScheme.background
   ) {
      Column {
          StylusVisualization(
              modifier = Modifier
                  .fillMaxWidth()
                  .height(100.dp)
          )
          Divider(
              thickness = 1.dp,
              color = Color.Black,
          )
          DrawAreaLowLatency()
      }
   }
glディレクトリでLowLatencySurfaceView.ktファイルを開き、LowLatencySurfaceViewクラスで次のことを確認します。
LowLatencySurfaceViewクラスはSurfaceViewクラスを拡張します。fastRendererオブジェクトのonTouchListenerメソッドを使用します。- コールバックで
SurfaceViewビューにレンダリングできるよう、onAttachedToWindow関数が呼び出されたときに、fastRendererクラスを介したGLFrontBufferedRenderer.CallbackインターフェースをSurfaceViewオブジェクトに接続する必要があります。 onDetachedFromWindow関数が呼び出されたら、fastRendererクラスを介したGLFrontBufferedRenderer.Callbackインターフェースを解放する必要があります。
LowLatencySurfaceView.kt
class LowLatencySurfaceView(context: Context, private val fastRenderer: FastRenderer) :
   SurfaceView(context) {

   init {
       setOnTouchListener(fastRenderer.onTouchListener)
   }

   override fun onAttachedToWindow() {
       super.onAttachedToWindow()
       fastRenderer.attachSurfaceView(this)
   }

   override fun onDetachedFromWindow() {
       fastRenderer.release()
       super.onDetachedFromWindow()
   }
}
onTouchListener インターフェースを使用して MotionEvent オブジェクトを処理する
ACTION_DOWN 定数が検出されたときに MotionEvent オブジェクトを処理する手順は次のとおりです。
glディレクトリで、FastRenderer.ktファイルを開きます。ACTION_DOWN定数の本体で、MotionEventオブジェクトのx座標を格納するcurrentX変数と、y座標を格納するcurrentY変数を作成します。currentXパラメータの 2 つのインスタンスとcurrentYパラメータの 2 つのインスタンスを受け入れるSegmentオブジェクトを格納するSegment変数を作成します。これは線の先頭であるためです。segmentパラメータを指定してrenderFrontBufferedLayerメソッドを呼び出し、onDrawFrontBufferedLayer関数でコールバックをトリガーします。
FastRenderer.kt
class FastRenderer ( ... ) {
   ...
   val onTouchListener = View.OnTouchListener { view, event ->
   ...
   MotionEvent.ACTION_DOWN -> {
      // Ask that the input system not batch MotionEvent objects,
      // but instead deliver them as soon as they're available.
      view.requestUnbufferedDispatch(event)

      currentX = event.x
      currentY = event.y

      // Create a single point.
      val segment = Segment(currentX, currentY, currentX, currentY)

      frontBufferRenderer?.renderFrontBufferedLayer(segment)
   }
ACTION_MOVE 定数が検出されたときに MotionEvent オブジェクトを処理する手順は次のとおりです。
ACTION_MOVE定数の本体で、currentX変数を格納するpreviousX変数と、currentY変数を格納するpreviousY変数を作成します。MotionEventオブジェクトの現在のx座標を保存するcurrentX変数と、現在のy座標を保存するcurrentY変数を作成します。previousX、previousY、currentX、currentYの各パラメータを受け入れるSegmentオブジェクトを格納するSegment変数を作成します。segmentパラメータを指定してrenderFrontBufferedLayerメソッドを呼び出し、onDrawFrontBufferedLayer関数でコールバックをトリガーして OpenGL コードを実行します。
FastRenderer.kt
class FastRenderer ( ... ) {
   ...
   val onTouchListener = View.OnTouchListener { view, event ->
   ...
   MotionEvent.ACTION_MOVE -> {
      previousX = currentX
      previousY = currentY
      currentX = event.x
      currentY = event.y

      val segment = Segment(previousX, previousY, currentX, currentY)

      // Send the short line to front buffered layer: fast rendering
      frontBufferRenderer?.renderFrontBufferedLayer(segment)
   }
ACTION_UP定数が検出されたときにMotionEventオブジェクトを処理するには、commitメソッドを呼び出してonDrawDoubleBufferedLayer関数の呼び出しをトリガーし、OpenGL コードを実行します。
FastRenderer.kt
class FastRenderer ( ... ) {
   ...
   val onTouchListener = View.OnTouchListener { view, event ->
   ...
   MotionEvent.ACTION_UP -> {
      frontBufferRenderer?.commit()
   }
GLFrontBufferedRenderer コールバック関数を実装する
FastRenderer.ktファイルで、onDrawFrontBufferedLayer および onDrawDoubleBufferedLayer コールバック関数は OpenGL コードを実行します。それぞれのコールバック関数の開始時に、次の OpenGL 関数は Android データを OpenGL ワークスペースにマッピングします。
GLES20.glViewport関数は、シーンをレンダリングする長方形のサイズを定義します。Matrix.orthoM関数は、ModelViewProjectionマトリックスを計算します。Matrix.multiplyMM関数はマトリックス乗算を実行して Android データを OpenGL 参照に変換し、projectionマトリックスのセットアップを提供します。
FastRenderer.kt
class FastRenderer( ... ) {
    ...
    override fun onDraw[Front/Double]BufferedLayer(
       eglManager: EGLManager,
       bufferInfo: BufferInfo,
       transform: FloatArray,
       params: Collection<Segment>
    ) {
        val bufferWidth = bufferInfo.width
        val bufferHeight = bufferInfo.height

        GLES20.glViewport(0, 0, bufferWidth, bufferHeight)
        // Map Android coordinates to OpenGL coordinates.
        Matrix.orthoM(
           mvpMatrix,
           0,
           0f,
           bufferWidth.toFloat(),
           0f,
           bufferHeight.toFloat(),
           -1f,
           1f
        )

        Matrix.multiplyMM(projection, 0, mvpMatrix, 0, transform, 0)
コードのその部分を設定すると、実際のレンダリングを行うコードに集中できます。onDrawFrontBufferedLayer コールバック関数は、画面の小さな領域をレンダリングします。Segment 型の param 値を提供するため、単一のセグメントをすばやくレンダリングできます。LineRenderer クラスは、線の色とサイズを適用するブラシ用の OpenGL レンダラです。
onDrawFrontBufferedLayer コールバック関数を実装する手順は次のとおりです。
FastRenderer.ktファイルで、onDrawFrontBufferedLayerコールバック関数を見つけます。onDrawFrontBufferedLayerコールバック関数の本体で、obtainRenderer関数を呼び出してLineRendererインスタンスを取得します。- 次のパラメータを指定して、
LineRenderer関数のdrawLineメソッドを呼び出します。
- 以前に計算された
projectionマトリックス。 Segmentオブジェクトのリスト。この場合は 1 つのセグメントです。- 行の
color。
FastRenderer.kt
import android.graphics.Color
import androidx.core.graphics.toColor

class FastRenderer( ... ) {
...
override fun onDrawFrontBufferedLayer(
   eglManager: EGLManager,
   bufferInfo: BufferInfo,
   transform: FloatArray,
   params: Collection<Segment>
) {
   ...

   Matrix.multiplyMM(projection, 0, mvpMatrix, 0, transform, 0)

   obtainRenderer().drawLine(projection, listOf(param), Color.GRAY.toColor())
}
- アプリを実行すると、最小限のレイテンシで画面に描画できるようになります。ただし、
onDrawDoubleBufferedLayerコールバック関数を引き続き実装する必要があるため、アプリで線が維持されません。
onDrawDoubleBufferedLayer コールバック関数は、commit 関数の後に呼び出され、線の永続化を可能にします。このコールバックは、Segment オブジェクトのコレクションを含む params 値を提供します。永続化のために、フロント バッファのすべてのセグメントがダブルバッファでリプレイされます。
onDrawDoubleBufferedLayer コールバック関数を実装する手順は次のとおりです。
StylusViewModel.ktファイルでStylusViewModelクラスを探し、Segmentオブジェクトの変更可能なリストを格納するopenGlLines変数を作成します。
StylusViewModel.kt
import com.example.stylus.data.Segment

class StylusViewModel : ViewModel() {
    private var _stylusState = MutableStateFlow(StylusState())
    val stylusState: StateFlow<StylusState> = _stylusState

    val openGlLines = mutableListOf<List<Segment>>()

    private fun requestRendering(stylusState: StylusState) {
FastRenderer.ktファイルで、FastRendererクラスのonDrawDoubleBufferedLayerコールバック関数を見つけます。- シーンをゼロからレンダリングできるように、
onDrawDoubleBufferedLayerコールバック関数の本体でGLES20.glClearColorメソッドとGLES20.glClearメソッドで画面を消去し、viewModelオブジェクトに線を追加して永続化します。
FastRenderer.kt
class FastRenderer( ... ) {
   ...
   override fun onDrawDoubleBufferedLayer(
      eglManager: EGLManager,
      bufferInfo: BufferInfo,
      transform: FloatArray,
      params: Collection<Segment>
   ) {
      ...
      // Clear the screen with black.
      GLES20.glClearColor(0.0f, 0.0f, 0.0f, 1.0f)
      GLES20.glClear(GLES20.GL_COLOR_BUFFER_BIT)

      viewModel.openGlLines.add(params.toList())
viewModelオブジェクトのそれぞれの線を反復してレンダリングするforループを作成します。
FastRenderer.kt
class FastRenderer( ... ) {
   ...
   override fun onDrawDoubleBufferedLayer(
      eglManager: EGLManager,
      bufferInfo: BufferInfo,
      transform: FloatArray,
      params: Collection<Segment>
   ) {
      ...
      // Clear the screen with black.
      GLES20.glClearColor(0.0f, 0.0f, 0.0f, 1.0f)
      GLES20.glClear(GLES20.GL_COLOR_BUFFER_BIT)

      viewModel.openGlLines.add(params.toList())

      // Render the entire scene (all lines).
      for (line in viewModel.openGlLines) {
         obtainRenderer().drawLine(projection, line, Color.GRAY.toColor())
      }
   }
- アプリを実行します。画面上に描画できるようになり、
ACTION_UP定数がトリガーされた後も線が保持されます。
7. モーション予測を実装する
タッチペンのコースを分析し、次のポイントの位置を予測してレンダリングするために挿入する androidx.input ライブラリによって、レイテンシをさらに改善できます。
モーション予測を設定する手順は次のとおりです。
app/build.gradleファイルで、dependencies セクションのライブラリをインポートします。
app/build.gradle
...
dependencies {
    ...
    implementation"androidx.input:input-motionprediction:1.0.0-beta01"
- [File] > [Sync Project with Gradle Files] をクリックします。
FastRendering.ktファイルのFastRenderingクラスで、motionEventPredictorオブジェクトを属性として宣言します。
FastRenderer.kt
import androidx.input.motionprediction.MotionEventPredictor

class FastRenderer( ... ) {
   ...
   private var frontBufferRenderer: GLFrontBufferedRenderer<Segment>? = null
   private var motionEventPredictor: MotionEventPredictor? = null
attachSurfaceView関数で、motionEventPredictor変数を初期化します。
FastRenderer.kt
class FastRenderer( ... ) {
   ...
   fun attachSurfaceView(surfaceView: SurfaceView) {
      frontBufferRenderer = GLFrontBufferedRenderer(surfaceView, this)
      motionEventPredictor = MotionEventPredictor.newInstance(surfaceView)
   }
onTouchListener変数でmotionEventPredictor?.recordメソッドを呼び出して、motionEventPredictorオブジェクトがモーション データを取得できるようにします。
FastRendering.kt
class FastRenderer( ... ) {
   ...
   val onTouchListener = View.OnTouchListener { view, event ->
      motionEventPredictor?.record(event)
      ...
      when (event?.action) {
次のステップでは、predict 関数を使用して MotionEvent オブジェクトを予測します。ACTION_MOVE 定数を受信したときと MotionEvent オブジェクトを記録した後に予測することをおすすめします。つまり、ストロークがいつ始まるかを予測する必要があります。
predictメソッドを使用して、人工のMotionEventオブジェクトを予測します。- 現在および予測される x 座標と y 座標を使用する
Segmentオブジェクトを作成します。 frontBufferRenderer?.renderFrontBufferedLayer(predictedSegment)メソッドを使用して、予測されたセグメントの高速レンダリングをリクエストします。
FastRendering.kt
class FastRenderer( ... ) {
   ...
   val onTouchListener = View.OnTouchListener { view, event ->
       motionEventPredictor?.record(event)
       ...
       when (event?.action) {
          ...
          MotionEvent.ACTION_MOVE -> {
              ...
              frontBufferRenderer?.renderFrontBufferedLayer(segment)

              val motionEventPredicted = motionEventPredictor?.predict()
              if(motionEventPredicted != null) {
                 val predictedSegment = Segment(currentX, currentY,
       motionEventPredicted.x, motionEventPredicted.y)
                 frontBufferRenderer?.renderFrontBufferedLayer(predictedSegment)
              }

          }
          ...
       }
予測されたイベントがレンダリング用に挿入され、レイテンシが改善されます。
- アプリを実行すると、レイテンシが改善されたことがわかります。
レイテンシを改善することで、タッチペンのユーザー エクスペリエンスがより自然になります。
8. 完了
お疲れさまでした。プロのようにタッチペンを扱う方法を把握しました。
また、MotionEvent オブジェクトを処理して圧力、向き、傾斜に関する情報を抽出する方法を学習しました。また、androidx.graphics ライブラリと androidx.input ライブラリの両方を実装して、レイテンシを改善する方法についても学習しました。これらの機能強化は、よりオーガニックなタッチペン体験を実現します。