
1. Introduction
Last Updated: 2022-04-14
Build variants are useful for creating different versions of your app. For example, you might want to build one version of your app that's free, with a limited set of content, and another paid version that includes more. You can also build different versions of your app that target different devices, based on API level or other device variations.
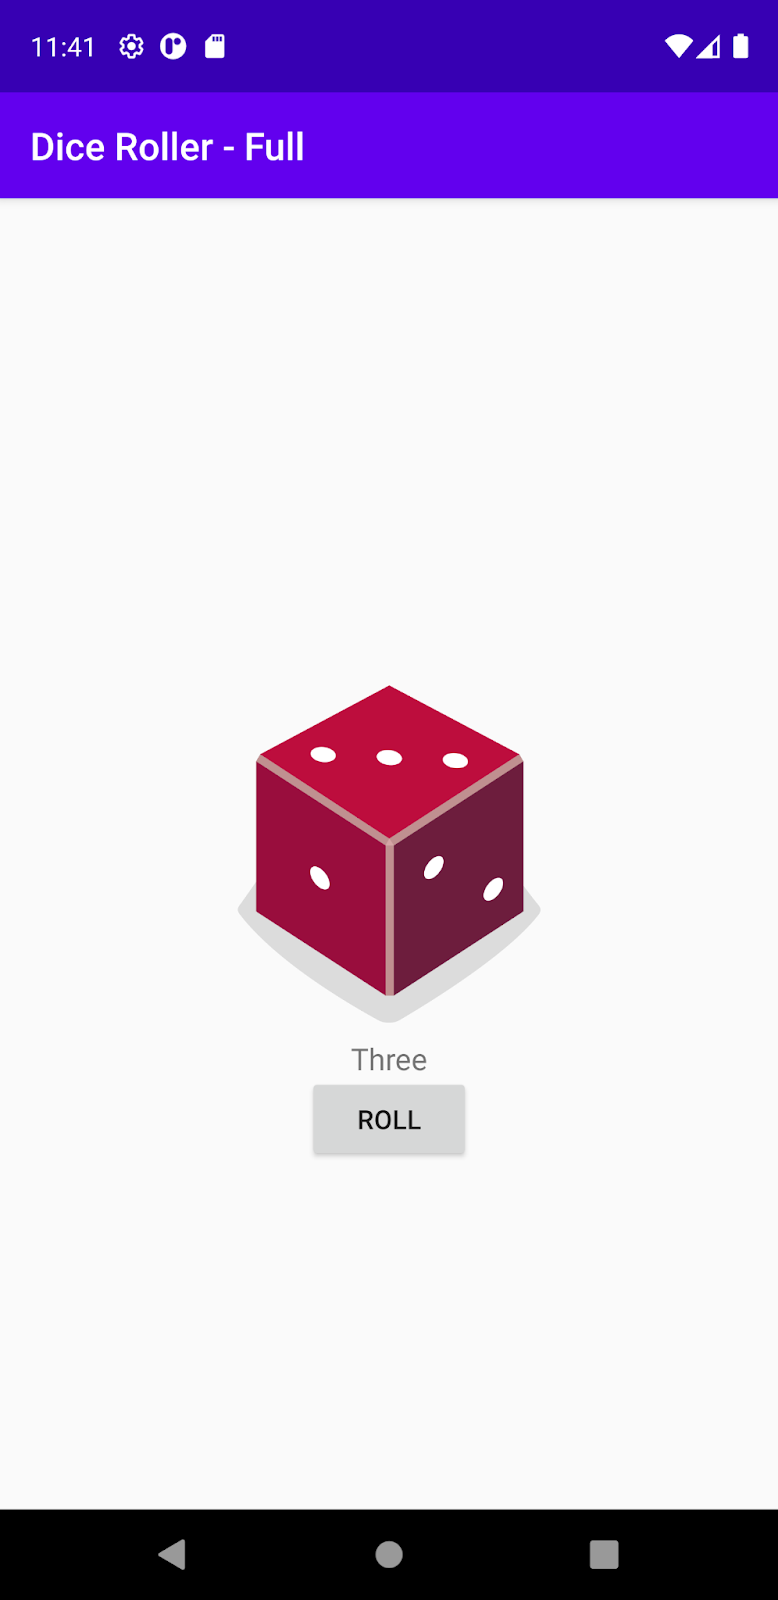
In this codelab, you modify the Dice Roller app you built in Unit 1: Kotlin Basics, so that you have two versions: "demo" and "full." The "full" version has an additional text box that displays the result of the die roll in words, so the user doesn't have to rely on just the die image for the roll result.
What you should already know
You should have:
- Completed Android Basics learning pathways 1-4. To do the prerequisite codelabs, see the Unit 1: Kotlin Basics pathways.
- A general understanding of the Android build system. To familiarize yourself with its main components, review the build overview.
What you'll learn
- What build variants are.
- What source sets are.
- How to build different versions of your app using build variants and source sets.
- How to give your app variants unique application IDs.
What you'll build
In this codelab, you start with the DiceRoller app that you built in the learning pathways of Unit 1: Kotlin Basics. The DiceRoller app has a picture of a die and a ROLL button below it. When the user clicks ROLL, the die is rolled and the picture changes depending on the roll outcome.
You create additional project files and add code to:
- Create "demo" and "full" product flavors of your app.
- Create "demo" and "full" source sets corresponding to the product flavors.
- Add a box to the layout of the "full" version of your app.
- Program the "full" version box to display the roll result when the user clicks ROLL.
- Customize the app titles for the "demo" and "full" app versions.
- Give the "demo" and "full" app versions unique application IDs.
Here's what the full version of your app will look like:
What you'll need
2. Set up your environment
Get the code
If you don't have the completed DiceRoller app from Unit 1: Kotlin Basics readily available, download the app code from GitHub.
To download and open the app code in Android Studio, follow these steps:
- On the
android-basics-kotlin-dice-roller-with-images-app-solutionGitHub repo home page, click Code > Download ZIP. - Once the ZIP file is downloaded, open the project in Android Studio and then click File > Open. You can start an Empty Activity or open a previous project if prompted. It doesn't really matter since we will be opening the downloaded project.
- Navigate to where your ZIP file is downloaded (probably your
Downloadsfolder), select it, and then click Open.
Use Project view
When you work with build variants, you need to work with your project files in Project view to see all the directories for the different variants. To do this, open the Project pane in Android Studio, click the view type menu (it's set to Android view by default), and select Project view.
3. Understand build variants
Build variants are the result of different combinations of product flavors and build types. You can think of product flavors as more user-facing attributes, and build types as more developer-facing attributes. You don't actually configure the build variants directly; rather, you configure a set of product flavors and a set of build types, which in turn determine the build variants.
Specifically, the build variants represent every combination of product flavor and build type, and are named <product-flavor><build-type> accordingly. For example, if you had the build types debug and release and the product flavors demo and full, the resulting build variants are:
demoDebugdemoReleasefullDebugfullRelease
Let's configure our product flavors and build types for the DiceRoller app.
4. Configure product flavors
Product flavors are the more user-facing attributes of your app in the sense that they usually represent the app versions available to the user. To create the demo and full versions of our app, you have to add the two product flavors and assign them to a flavor dimension. To add the product flavors, open the app-level build.gradle file (app > build.gradle in Project view) and paste this code in the android {} block.
flavorDimensions "app_type"
productFlavors {
   demo {
       dimension "app_type"
         }
   full {
       dimension "app_type"
   }
}
This code does these things:
- Creates a flavor dimension called
app_type. - Creates two product flavors, represented by the
demo {}andfull {}blocks. - Assigns the two product flavors to the
app_typedimension (this is optional if there is only one flavor dimension).
This is the basic code needed to define product flavors. You'll use some additional options later in this codelab.
5. Configure build types
Build types are more developer-facing attributes of your app in the sense that they usually represent stages of development (for example, debug, beta, and release). Android Studio automatically configures two build types for you: debug and release. The debug build type is for debugging purposes, whereas the release build type is for distribution purposes.
You can create build types and modify their configurations by editing the buildTypes {} block in the app-level build.gradle file. The default buildTypes {} block looks like:
buildTypes {
   release {
       minifyEnabled false
       proguardFiles getDefaultProguardFile('proguard-android-optimize.txt'), 'proguard-rules.pro'
   }
}
You can see the default configuration for the release build type (we won't cover the minifyEnabled or proguardFiles properties in this codelab). The debug build type doesn't appear in the build configuration file by default, but you can add a debug {} block to add or change certain settings. The default configuration works for our purposes, so you can leave it as is.
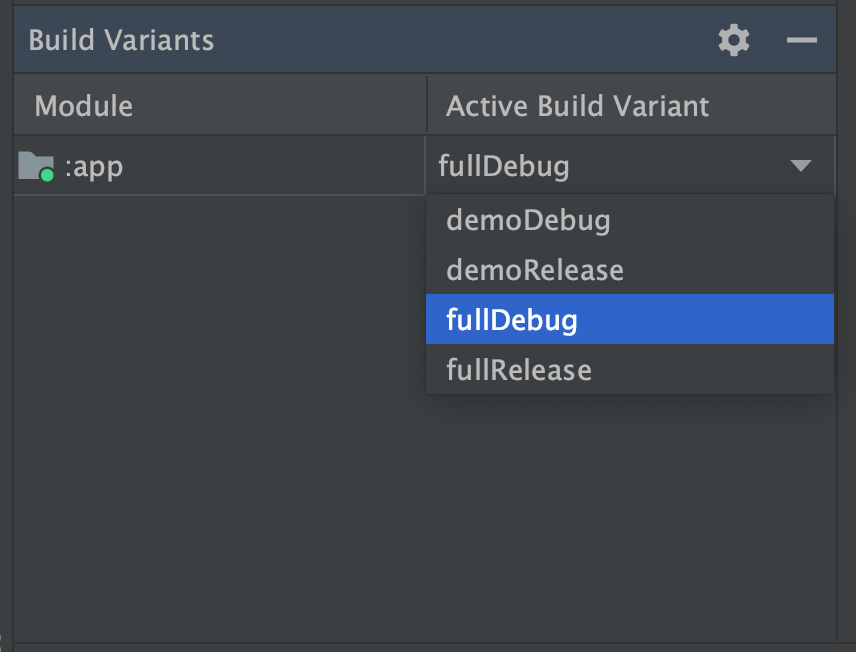
6. Use the Build Variants tool window
Now that you have two product flavors and two build types, let's see what build variants they create. To view your new build variants in Android Studio:
- In the toolbar, click Sync Project with Gradle Files
 . Whenever you make changes to build configuration files, Studio prompts you to sync your files so that it can save the new build configuration and check for build errors.
 - Click Build > Select Build Variant (or View > Tool Windows > Build Variants) to display the Build Variants window.
- Click demoDebug in the Active Build Variant column to open a menu that contains all your build variants: demoDebug, demoRelease, fullDebug, and fullRelease. Use this menu to select different build variants to run and test.
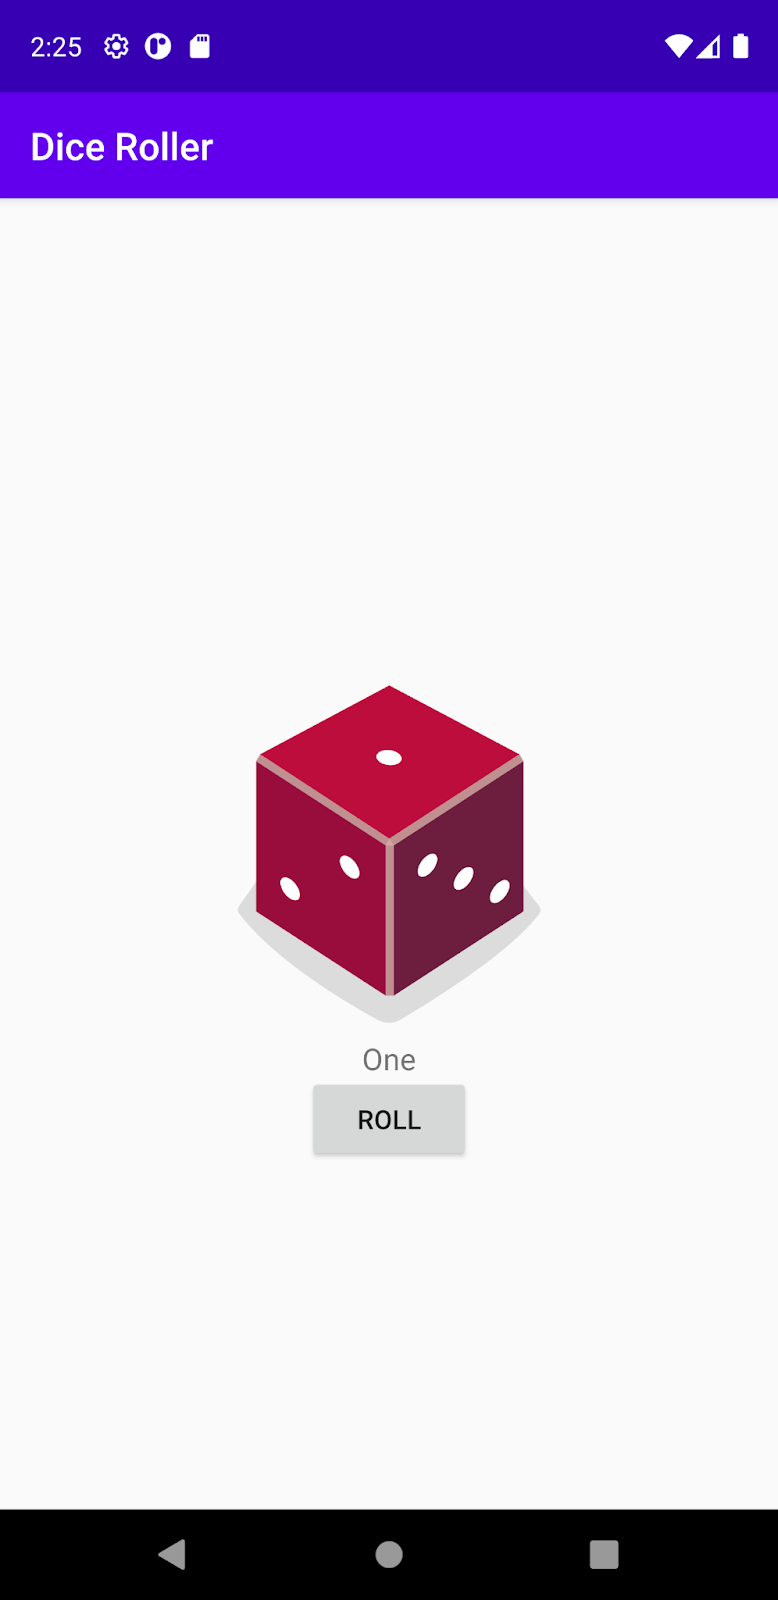
Run the demoDebug and fullDebug variants (the variants based on the release build type require more setup to run, so we won't deal with them in this codelab). The demoDebug and fullDebug variants are indistinguishable from a user perspective so far.
7. Create different features for different variants
Now that you have your demo and full app versions, let's add some features to the full version.
Add a premium feature using source sets
For the full product flavor, let's add a box that shows the result of the roll, so users don't have to rely on just the die image to know what they rolled. To add this premium feature, you use source sets. A source set is a directory that contains content for specific build types, product flavors, and build variants. The default main source set (app > src > main) contains content to share among all build variants. This default content can be overridden by content in other source sets.
The way you override what's in the main source set and determine which source sets you need to add differs depending on what you want to change.
To change a resource, such as a layout or image (something in main > res), follow these general steps:
- Create a source set, or directory, for the product flavor you want to change (we'll cover where and how to create this source set in the next section).
- Paste the resource file you want to change into this new source set and then update it. When the Android Gradle plugin (AGP) builds a build variant that depends on the new source set, it overrides the resource code in
mainwith the resource code in the new source set.
To override a behavior in a Java or Kotlin class (something in main > java), follow these general steps:
- Create source sets, or directories, for the product flavor you want to change and all the other product flavors in the same flavor dimension.
- Paste the file you want to change into all the product flavor source sets, and then modify the copy (or copies) you want to change.
- Delete the original file from the
mainsource set.
To add a dynamic box to the full version of your app, it's helpful to think of the premium feature as two main edits:
- Customize the layout: Add a box by modifying the
activity_main.xmlfile. - Customize the behavior of the app: Change what shows in the box based on the die roll by modifying the
MainActivity.ktfile.
In the next section, you learn where and how to create source sets.
Determine where to create new source sets
The Android Gradle plugin (AGP) shows you how to organize your files for each of your build types, product flavors, and build variants. To add a premium feature to the full product flavor that includes a change to the MainActivity.kt file, you create source sets for both the full and demo flavors. To find out where to create these source sets, follow these steps in Android Studio:
- Click Gradle in the IDE window.
- Navigate to MyApplication > Tasks > android and double-click sourceSets. If you don't see the Tasks folder, let Gradle build the task list during sync by clicking File > Settings > Experimental and unchecking Do not build Gradle task list during Gradle sync (Android Studio > Preferences > Experimental on macOS). After Gradle executes the task, the Run window should then display the output.
- If the display is not in text mode as shown here, click Toggle view
 in the Run window.
In the Run window, you should see this output:
------------------------------------------------------------
Project ':app'
------------------------------------------------------------

...

debug
-----
Compile configuration: debugCompile
build.gradle name: android.sourceSets.debug
Java sources: [app/src/debug/java]
Kotlin sources: [app/src/debug/kotlin, app/src/debug/java]
Manifest file: app/src/debug/AndroidManifest.xml
Android resources: [app/src/debug/res]
Assets: [app/src/debug/assets]
AIDL sources: [app/src/debug/aidl]
RenderScript sources: [app/src/debug/rs]
JNI sources: [app/src/debug/jni]
JNI libraries: [app/src/debug/jniLibs]
Java-style resources: [app/src/debug/resources]

...

full
----
Compile configuration: fullCompile
build.gradle name: android.sourceSets.full
Java sources: [app/src/full/java]
Kotlin sources: [app/src/full/kotlin, app/src/full/java]
Manifest file: app/src/full/AndroidManifest.xml
Android resources: [app/src/full/res]
Assets: [app/src/full/assets]
AIDL sources: [app/src/full/aidl]
RenderScript sources: [app/src/full/rs]
JNI sources: [app/src/full/jni]
JNI libraries: [app/src/full/jniLibs]
Java-style resources: [app/src/full/resources]
The list of file paths under "debug" describes where AGP looks for app code and resources for the "debug" product flavor by default. Similarly, the list of file paths under "full" describes where AGP looks for content for the "full" product flavor by default.
Take note of the "Java sources" (for files such as Java and Kotlin classes) and "Android resources" (for files such as layouts and images) file paths. Now that you know where to create new source sets, create them and add code for the premium feature.
Customize the layout of the full version
To add a box to the full version of your app, follow these steps:
First, create the full source set and Java resources directory:
- Open the Project pane and select the Project view.
- Navigate to the
DiceRoller/app/src/directory. - Right-click the
srcdirectory and then select New > Directory. - From the menu under Gradle Source Sets, select full/resources and then Press
Enter.
Second, paste the activity_main.xml file from the main source set to the full source set.
- Navigate to
DiceRoller/app/src/main/res/. - Right-click on the
activity_main.xmlfile and then click Copy. - Navigate to
DiceRoller/app/src/full/res/. - Right-click on the
resdirectory and then click Paste.
Third, to add a box to the full flavor of your app, add this code to the activity_main.xml file in the full source set:
<TextView
    android:id="@+id/resultTextView"
    android:layout_width="wrap_content"
    android:layout_height="wrap_content"
    android:textSize="16sp"
    android:text="Result"
    app:layout_constraintBottom_toTopOf="@+id/button"
    app:layout_constraintEnd_toEndOf="parent"
    app:layout_constraintStart_toStartOf="parent"
    app:layout_constraintTop_toBottomOf="@id/imageView" />
Run the fullDebug and demoDebug build variants of your app (select the build variant you want to run using the Build Variants tool window and then click Run). You should see the new box for the fullDebug variant only. The box doesn't do anything yet though, so let's program it to change depending on the die roll.

Customize the behavior of the full version
For the full version of the app, the box should display the result of the die roll, in words. To program this behavior, follow these steps:
First, create the full source set Java sources directory.
- With the Project pane in Project view, navigate to the
DiceRoller/app/src/fulldirectory. - Right-click the
fulldirectory and then select New > Directory. - From the Gradle Source Sets menu, select java and then press
Enter.
Second, create the debug source set and Java sources directory.
- With the Project pane in Project view, navigate to the
DiceRoller/app/srcdirectory. - Right-click the
srcdirectory and then select New > Directory. - From the Gradle Source Sets menu, select debug/java and then press
Enter.
Third, navigate to the DiceRoller/app/src/main/java directory.
- Paste the
MainActivity.ktfile into both thefull/javaanddebug/javadirectories. - Delete the
javadirectory, including theMainActivity.ktfile, from the main source set. (Right-click on thejavadirectory and click Delete.) - In the full source set
MainActivity.ktfile, add this code to therollDice()method:
// Update the result text view
val resultTextView: TextView = findViewById(R.id.resultTextView)
resultTextView.text = when (diceRoll) {
    1 -> "One"
    2 -> "Two"
    3 -> "Three"
    4 -> "Four"
    5 -> "Five"
    else -> "Six"
}
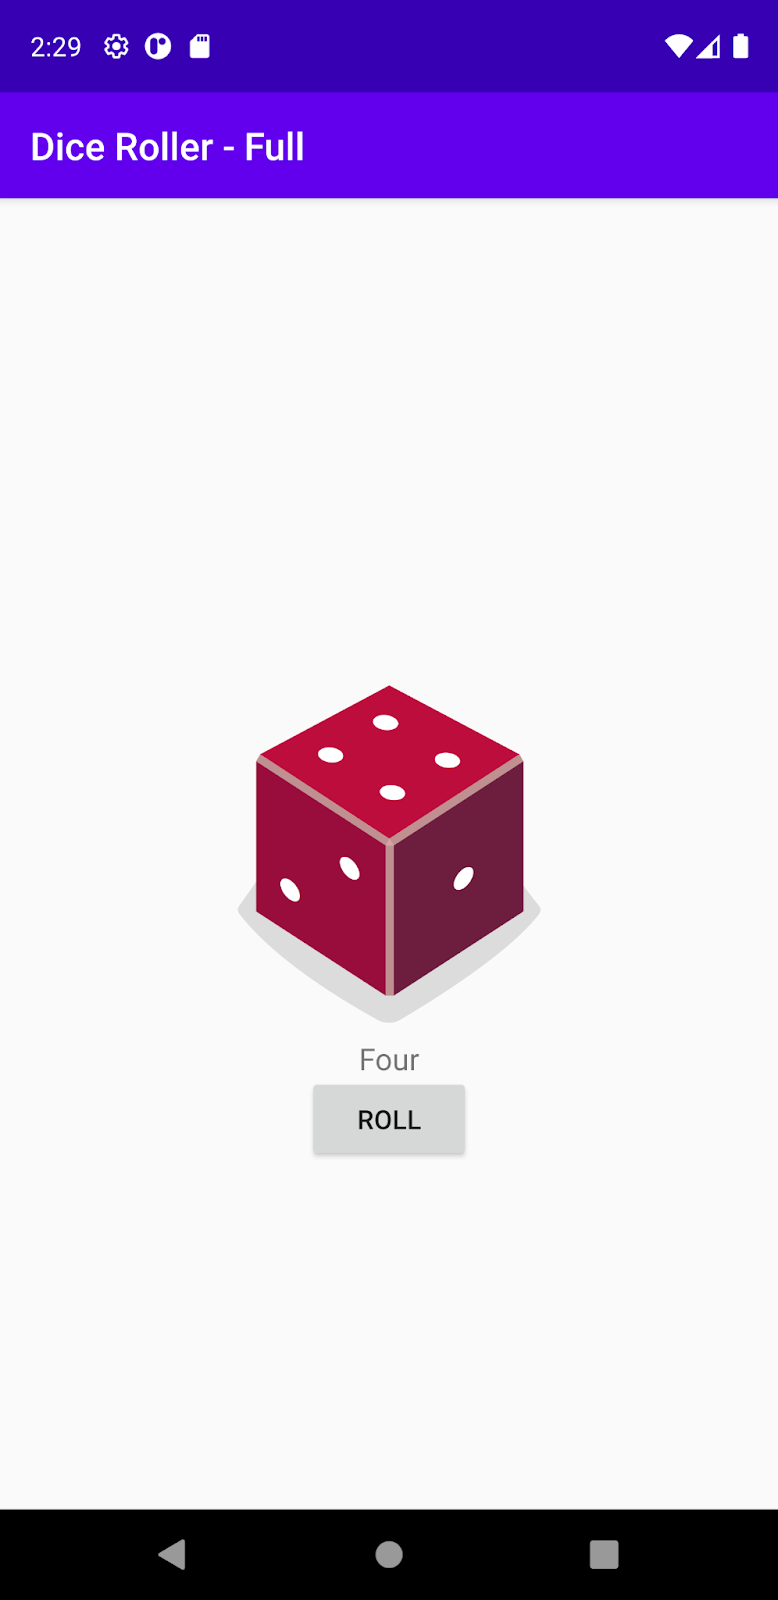
Run the fullDebug and demoDebug build variants again. The box in the full version should include the die roll result.
Change the app titles
For clarity, let's specify which version of the app you are using in the app title. This type of change can actually be done without source sets. The app title is defined by the label property in the AndroidManifest.xml file (app > manifests > AndroidManifest.xml) . To get the label value to change depending on the variant being run, open the AndroidManifest.xml file and change the label line to be:
android:label="${appLabel}"
This assigns a variable, appLabel, as the app title.
Next, to set the value of appLabel or change the title for the demo version of the app, add the manifestPlaceholders line to the demo {} block you created earlier:
demo {
   dimension "version"
   manifestPlaceholders = [appLabel: "Dice Roller - Demo"]
   applicationIdSuffix ".demo"
}
Similarly, to change the title of the full flavor of the app, add another manifestPlaceholders line to the full {} block:
full {
   dimension "version"
   manifestPlaceholders = [appLabel: "Dice Roller - Full"]
   applicationIdSuffix ".full"
}
Now run the demoDebug and fullDebug variants again. You should see the different titles now for the different build variants.
8. Give unique application IDs to your build variants
When you build an APK or AAB for your app, the build tools tag the app with the application ID defined in the defaultConfig {} block from the app-level build.gradle file (as shown below). However, if you want to create different versions of your app to appear as separate listings on Google Play Store, such as a "demo" or "full" version, you need to give each version a different application ID. For each flavor inside the productFlavors {} block, you can redefine the applicationId property, or you can instead append a segment to the default application ID using applicationIdSuffix, as shown here:
defaultConfig {
   applicationId "com.example.diceroller"
   ...
}

flavorDimensions "version"
productFlavors {
   demo {
 dimension "version"
       manifestPlaceholders = [appLabel: "Dice Roller - Demo"]
         applicationIdSuffix ".demo"
   }
   full {
       dimension "version"
       manifestPlaceholders = [appLabel: "Dice Roller - Full"]
         applicationIdSuffix ".full"
   }
}
9. Congratulations
Congratulations, you've successfully built two versions of the DiceRoller app using build variants!
You configured product flavors and build types to create build variants. You added a premium feature to the "full" app version using source sets. You learned how to give each build variant a unique application ID so that they are considered separate apps in the Play Store.
You now know the foundational steps required to create multiple versions of an app to better serve different user groups.